Review: 10283 NASA Space Shuttle Discovery
Posted by CapnRex101,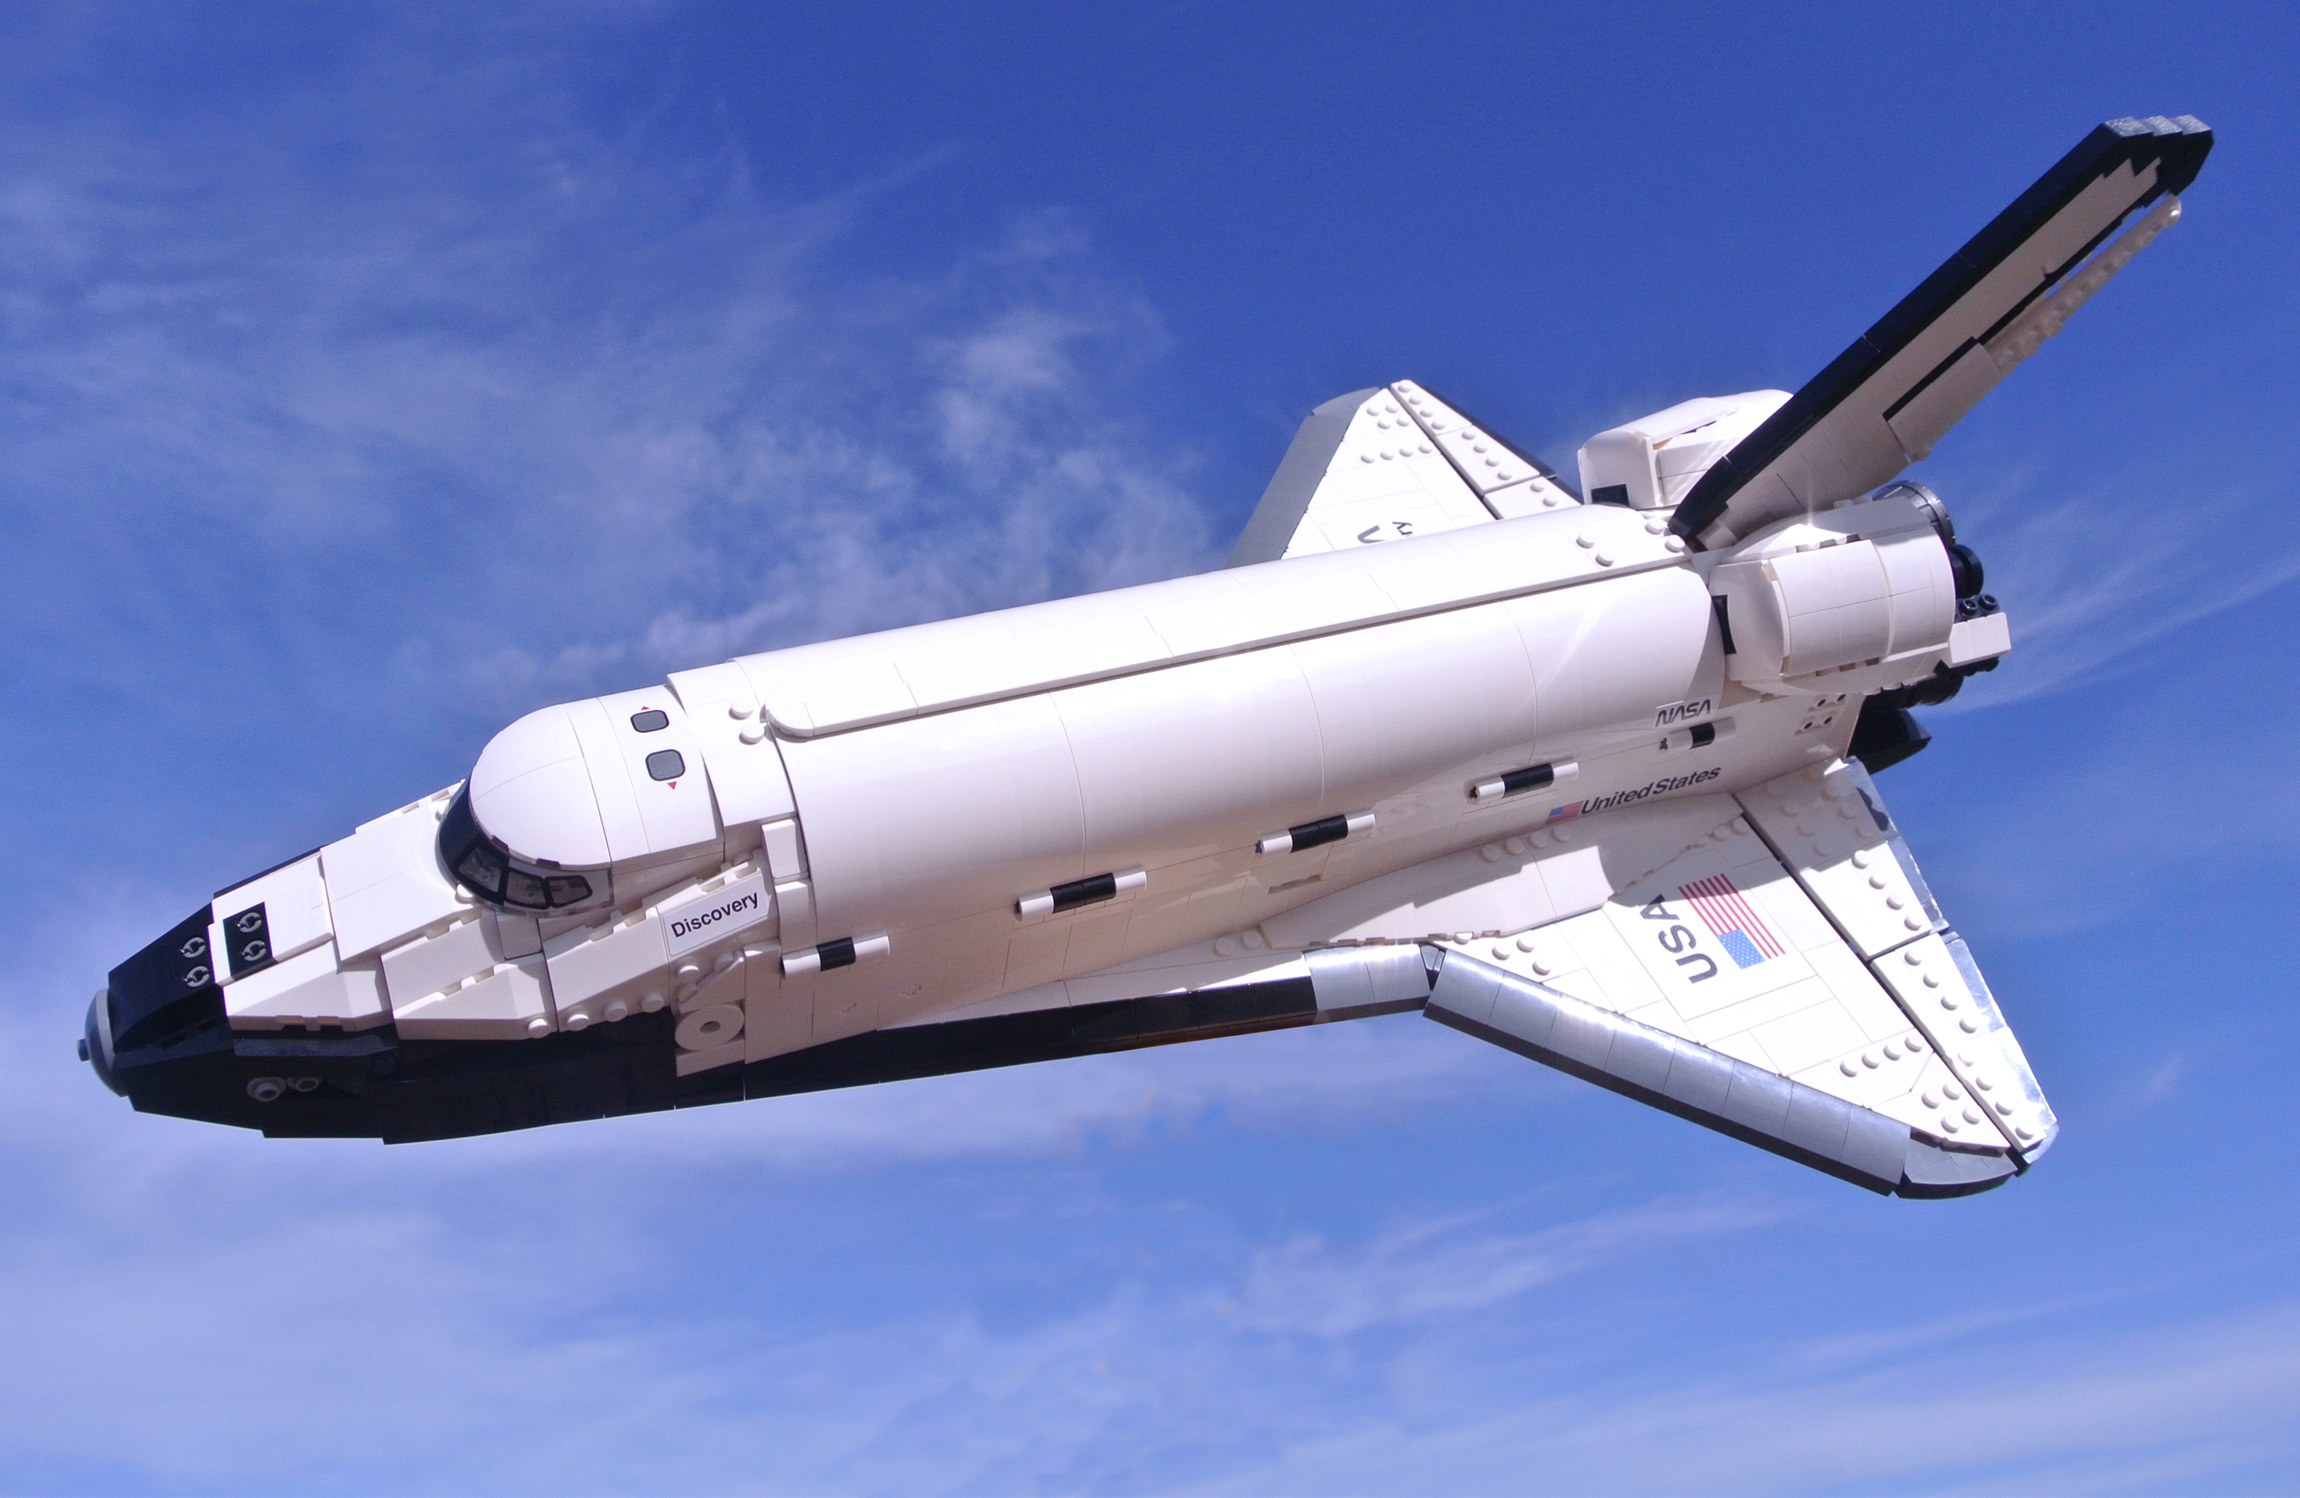
NASA spacecraft have inspired numerous LEGO models, including several interesting renditions of the famous Space Shuttle. They have differed significantly in size and appearance, prioritising accuracy and detail on multiple occasions while other examples prize functionality.
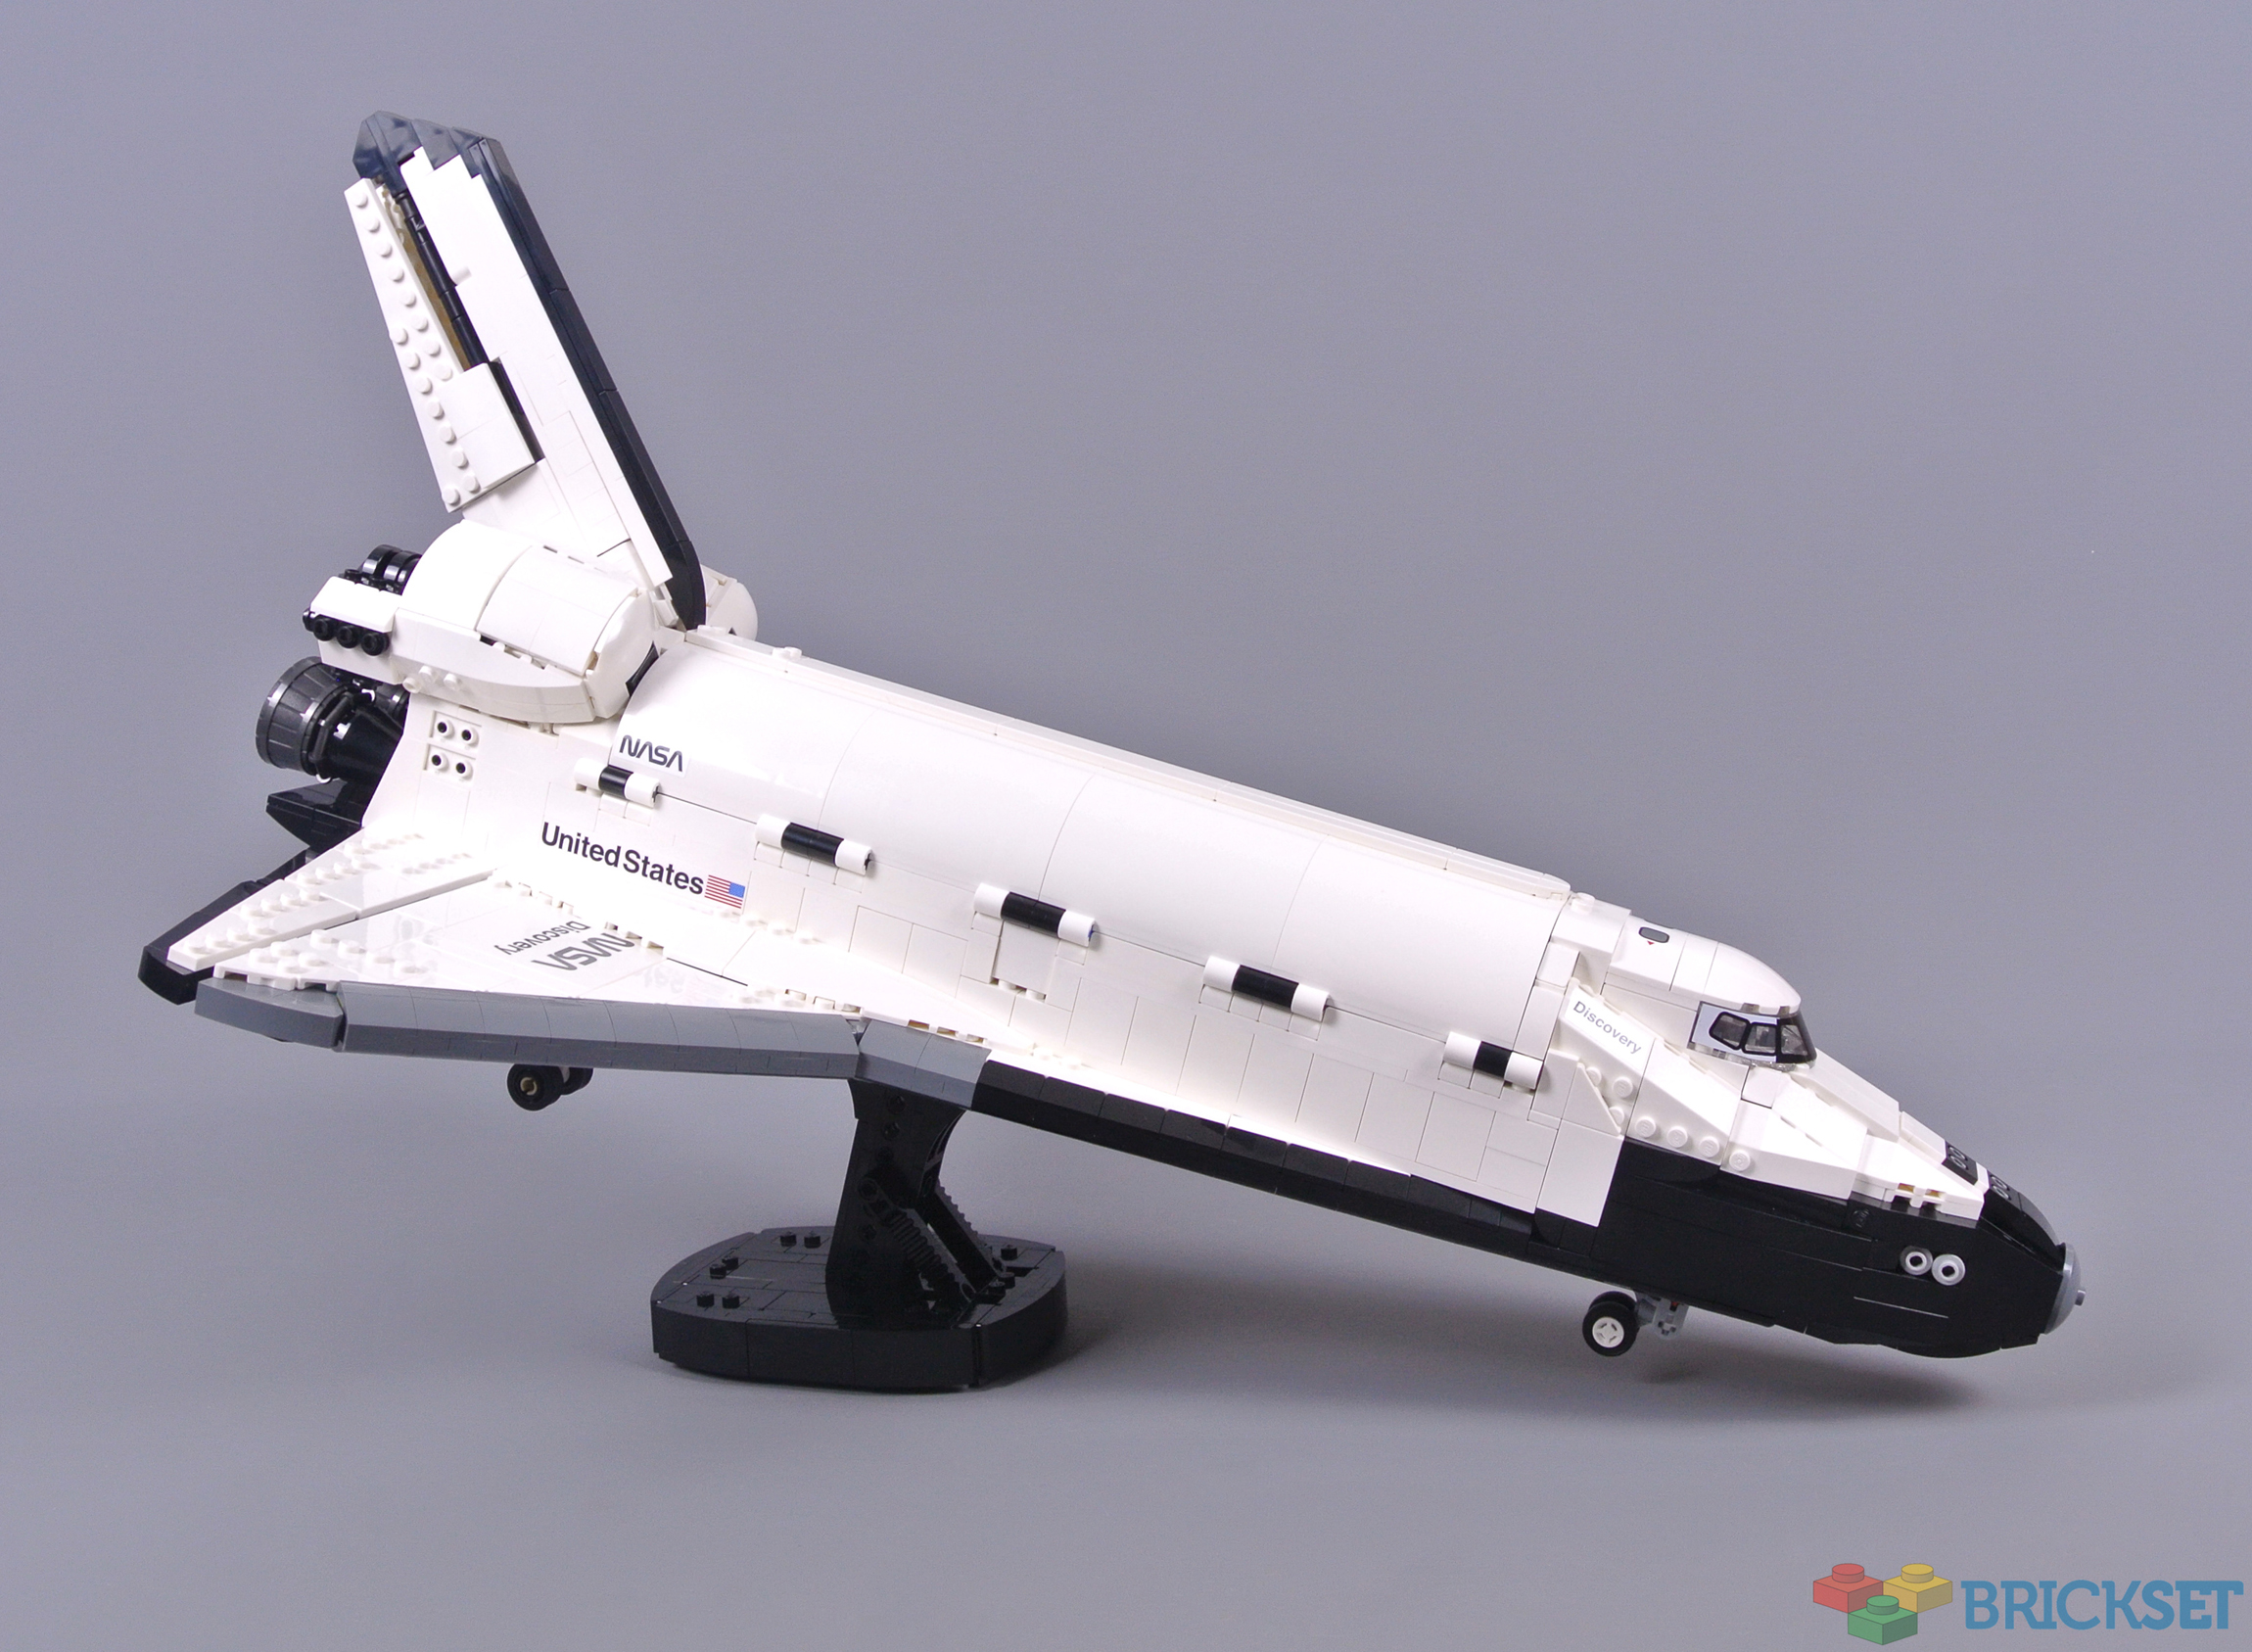
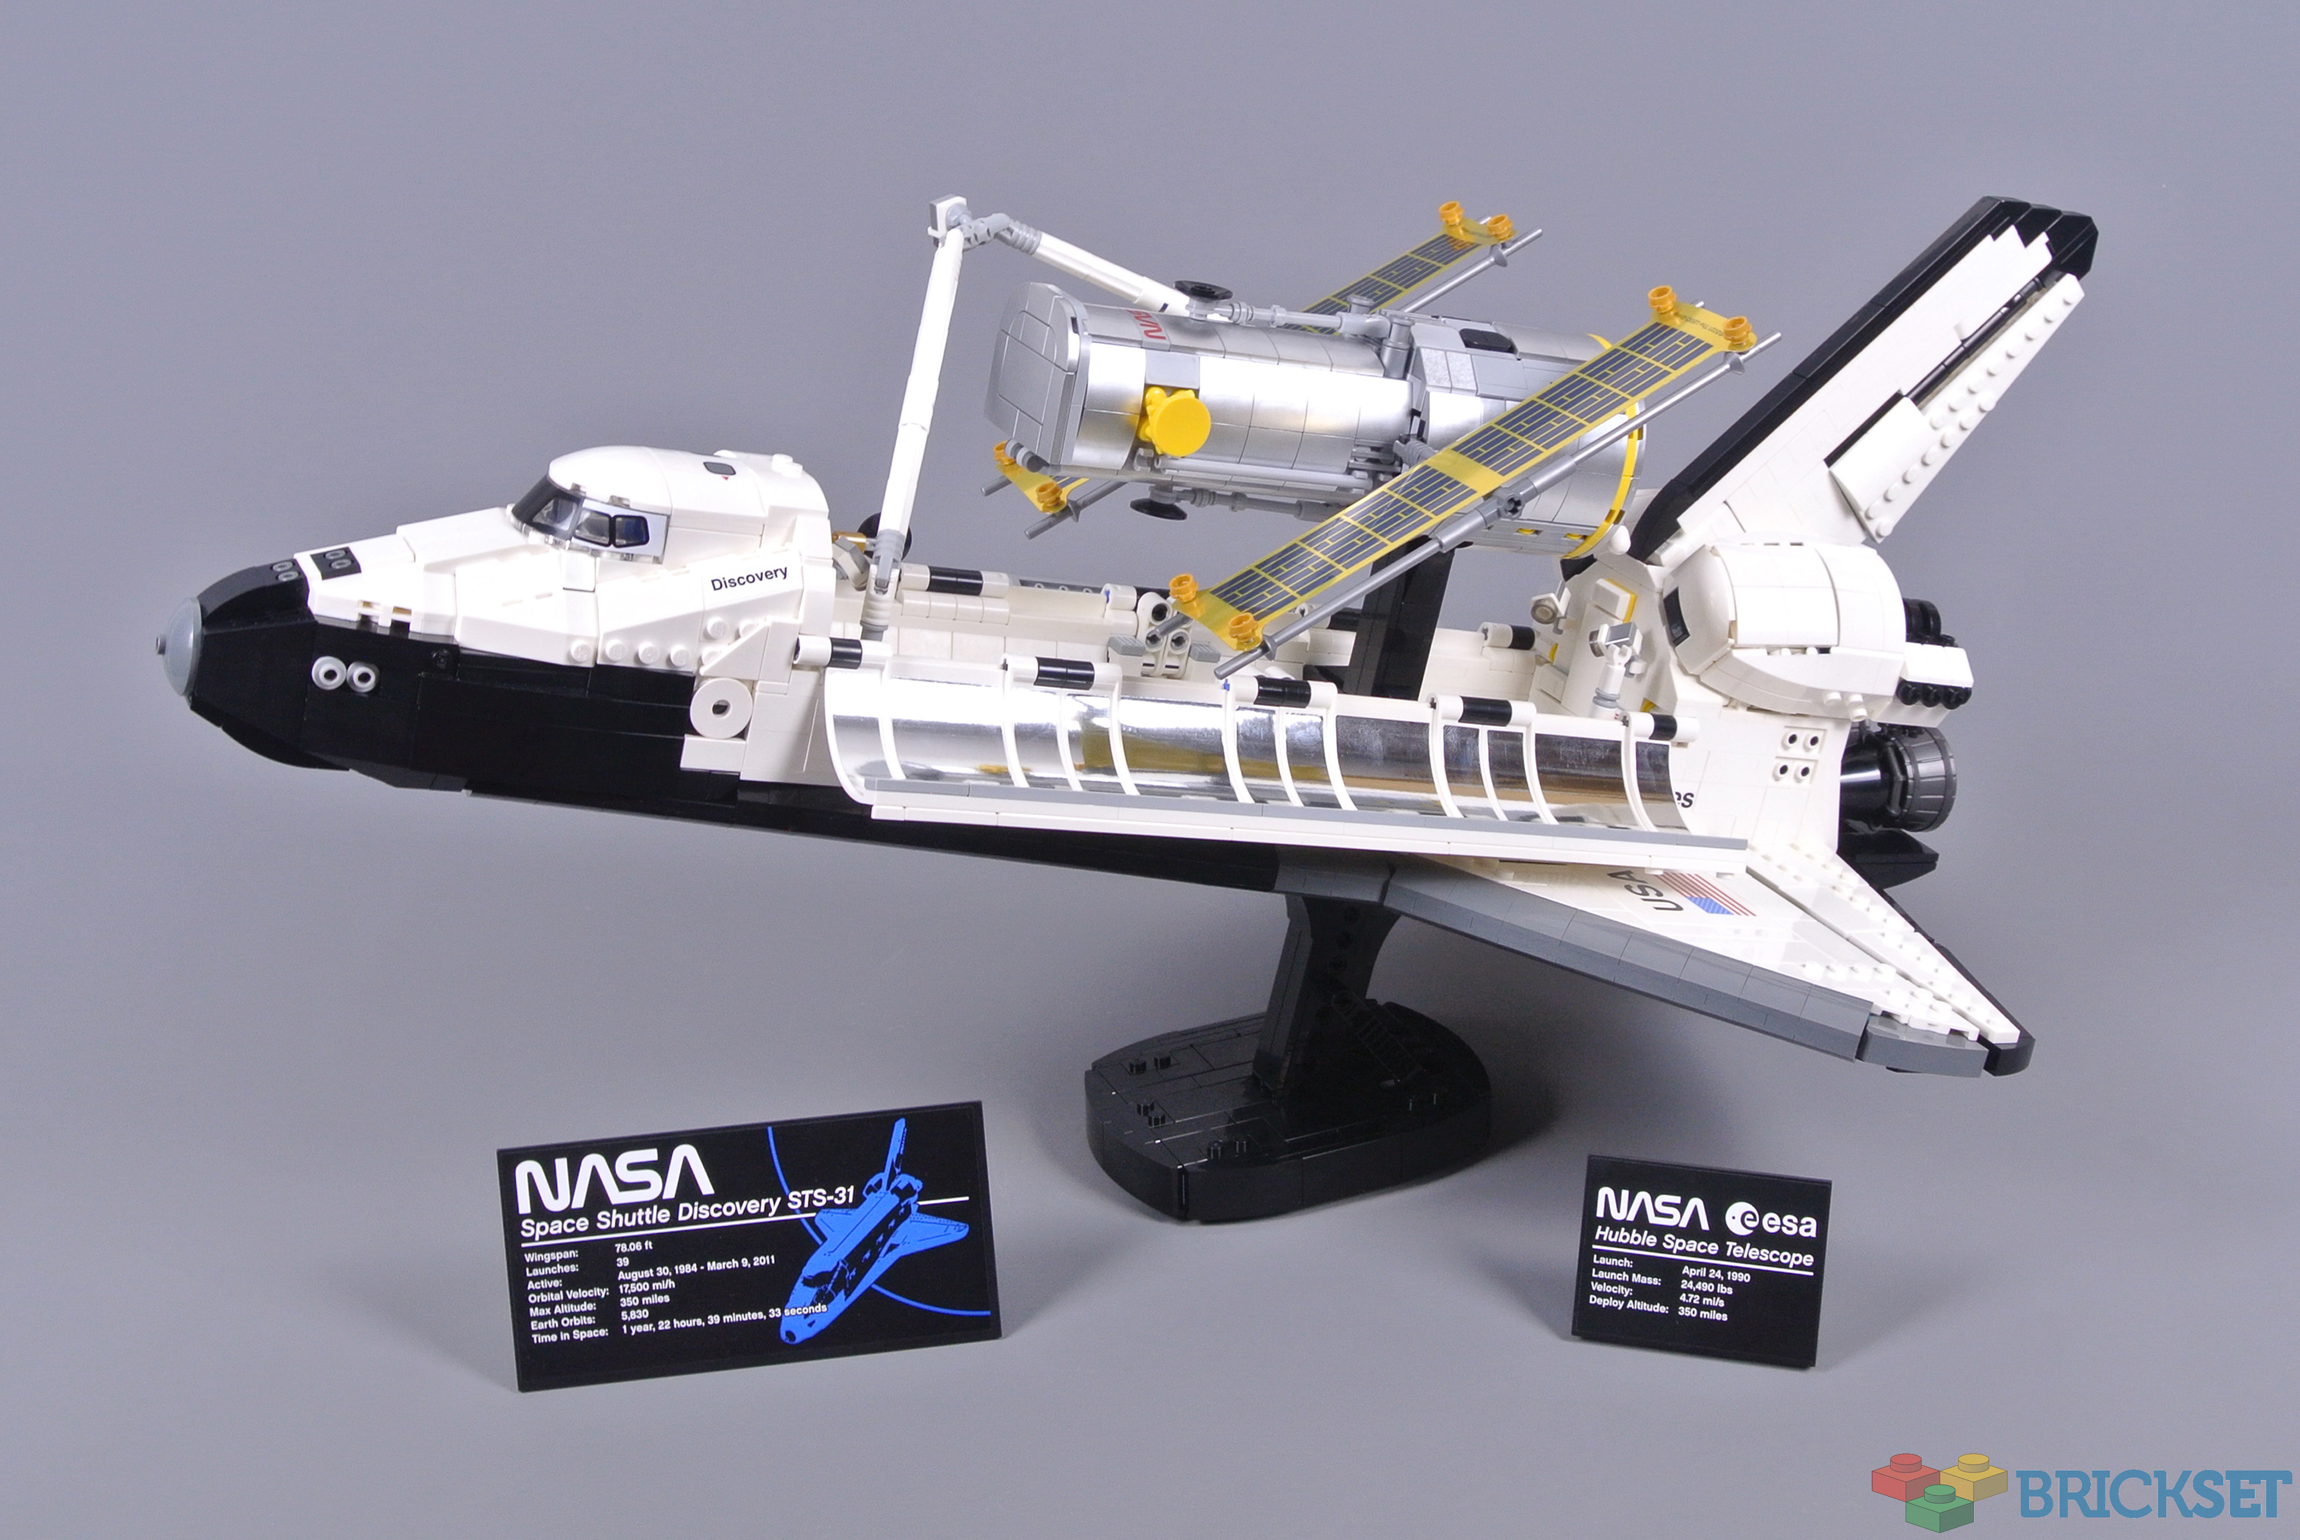
10283 NASA Space Shuttle Discovery combines these important aspects of LEGO design, achieving impressive authenticity and incorporating various functions. Additionally, the scale has increased considerably following previous Space Shuttle designs, reaching 54cm in length and therefore integrating greater detail than before.
Box and Contents
As expected, 10283 NASA Space Shuttle Discovery belongs to the 18+ range and accordingly features predominantly black packaging. This design looks reasonable, although I still think the overwhelming focus upon complete consistency between varied 18+ sets limits how impressive these models can appear. The previous NASA products have displayed far more appealing and creative artwork.
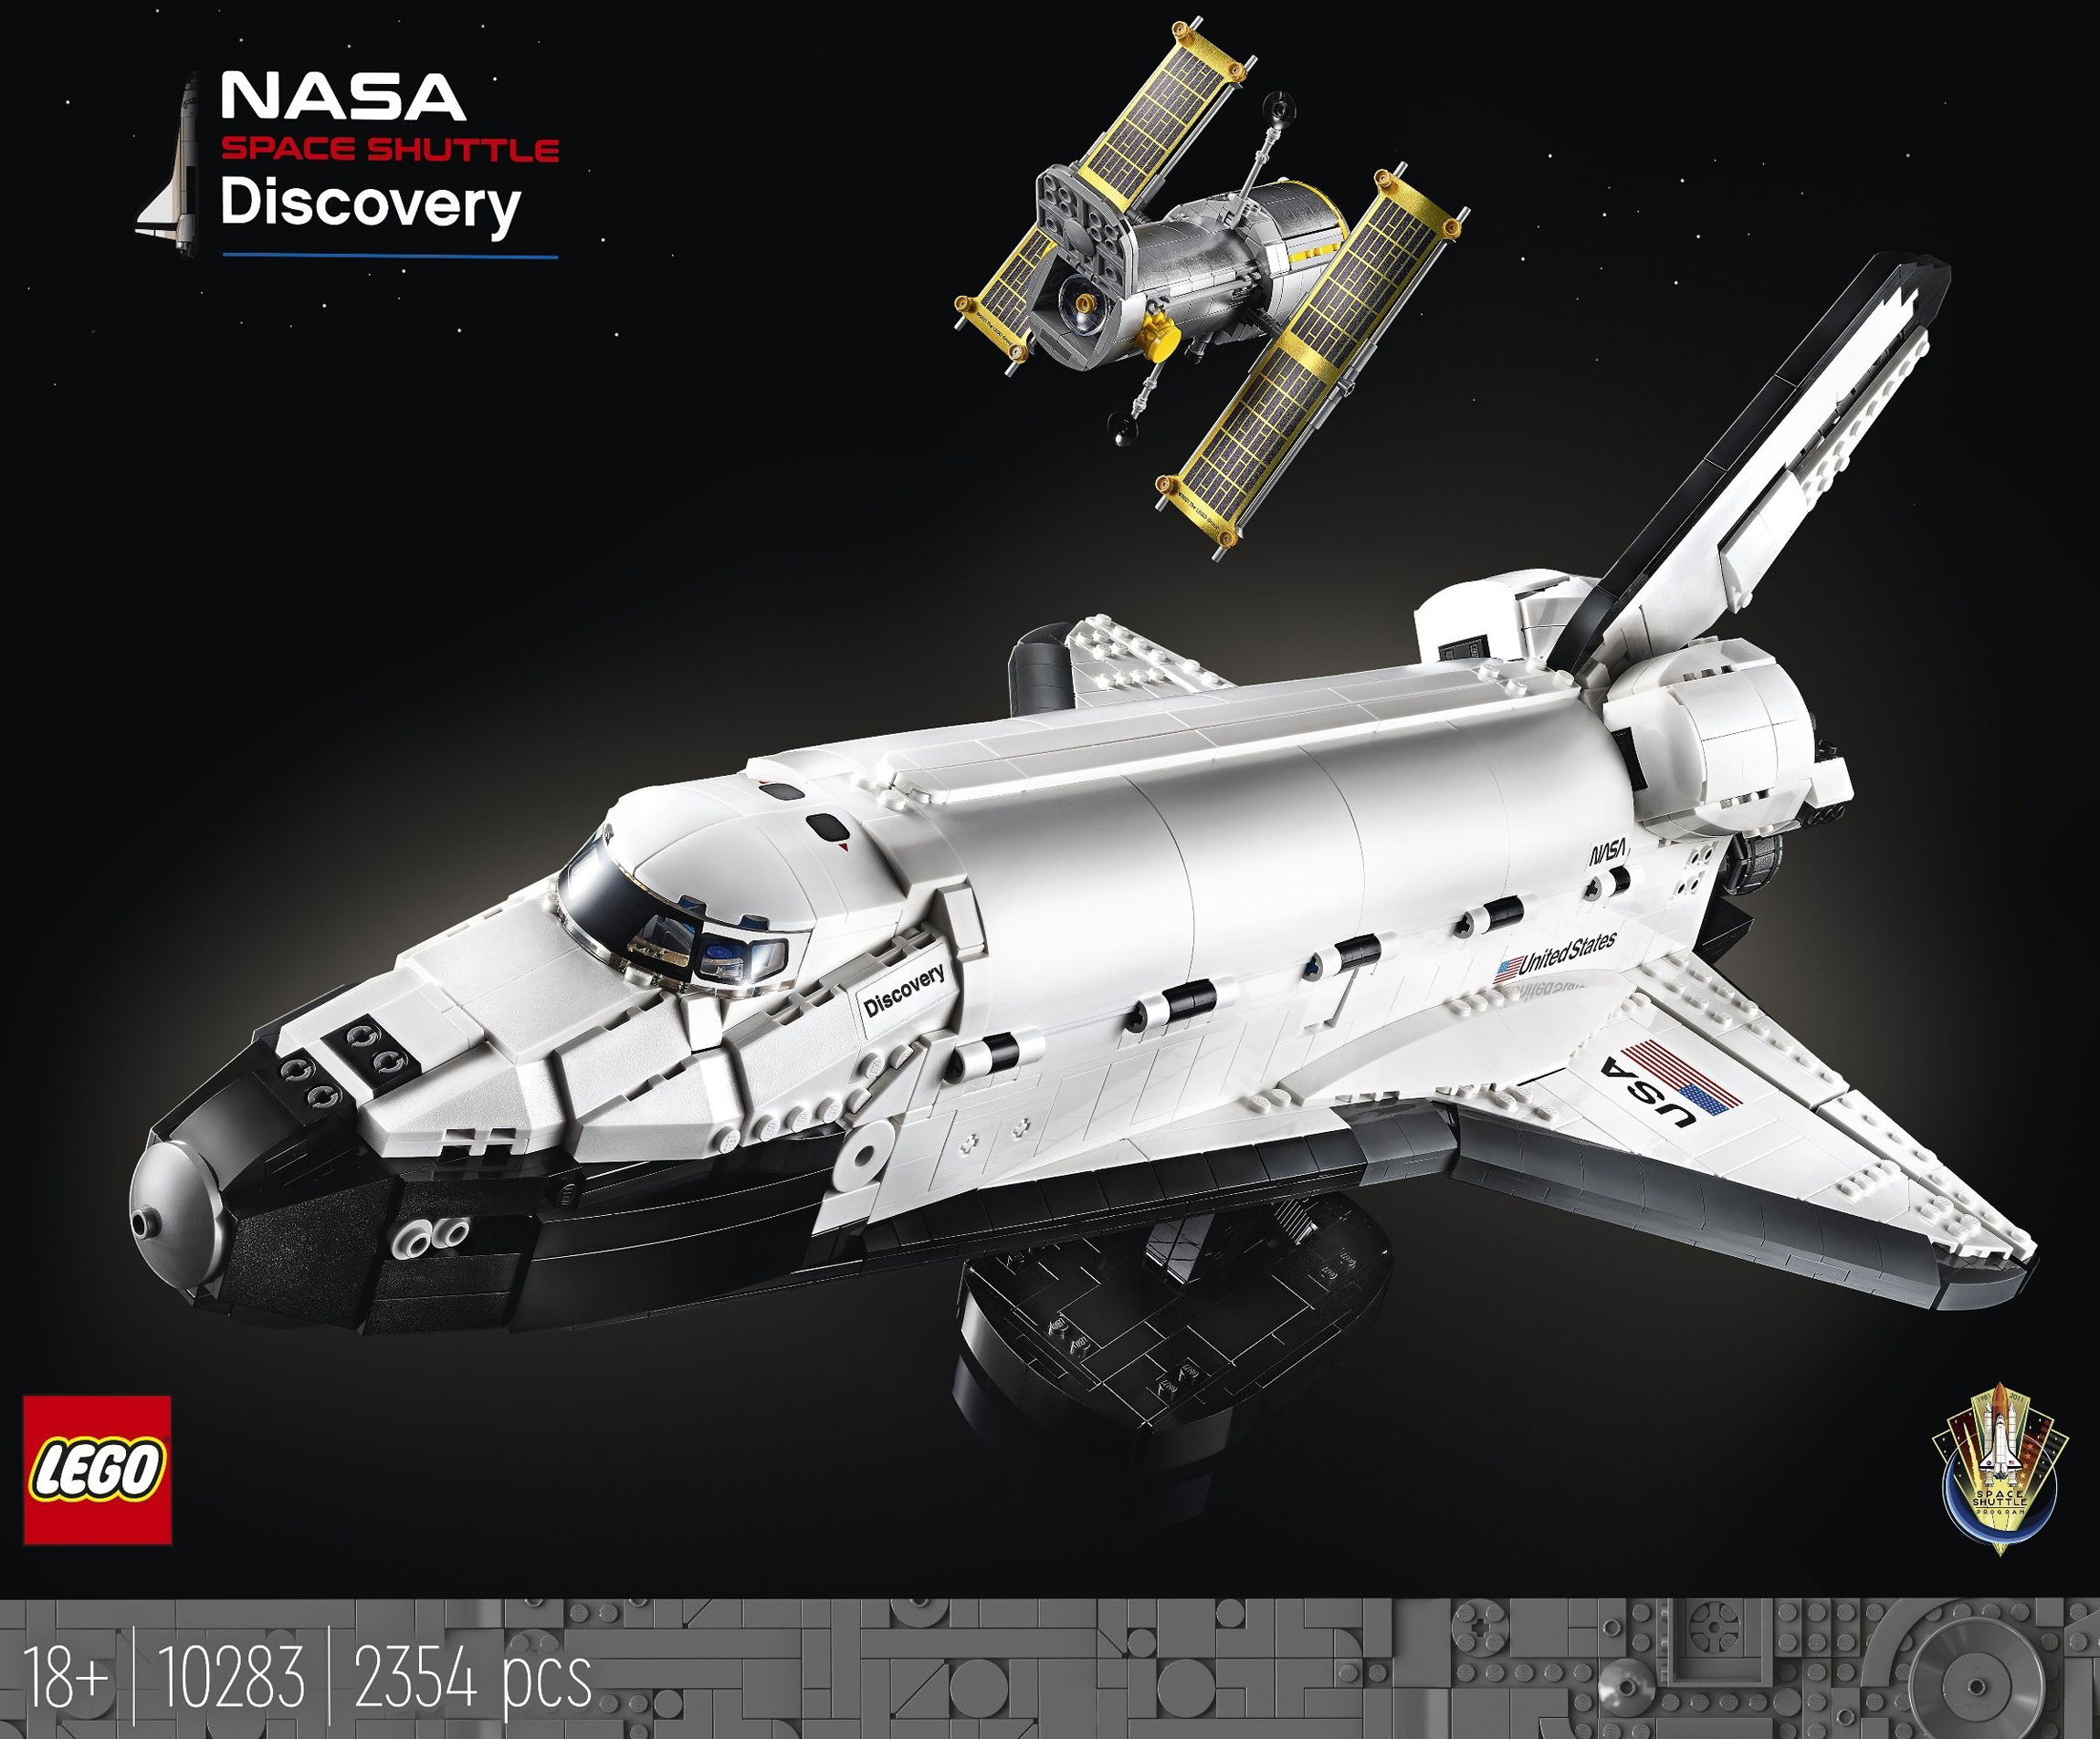
The box contains eighteen bags, numbered between one and seventeen, while another bag stores the larger elements separately. This instruction manual comprises 320 pages, the first several of which are dedicated to both the Space Shuttle program and mission STS-31 which deployed the Hubble Space Telescope. 7470 Space Shuttle Discovery - STS-31 depicted the same mission, released during 2003.
Milan Madge, the set designer, also provides some commentary about the difficulty in finding space to accommodate the interesting landing gear mechanism. Some additional information about the Space Shuttle and the Hubble Space Telescope is available throughout the manual too, tracing the construction of each section which is enjoyable.

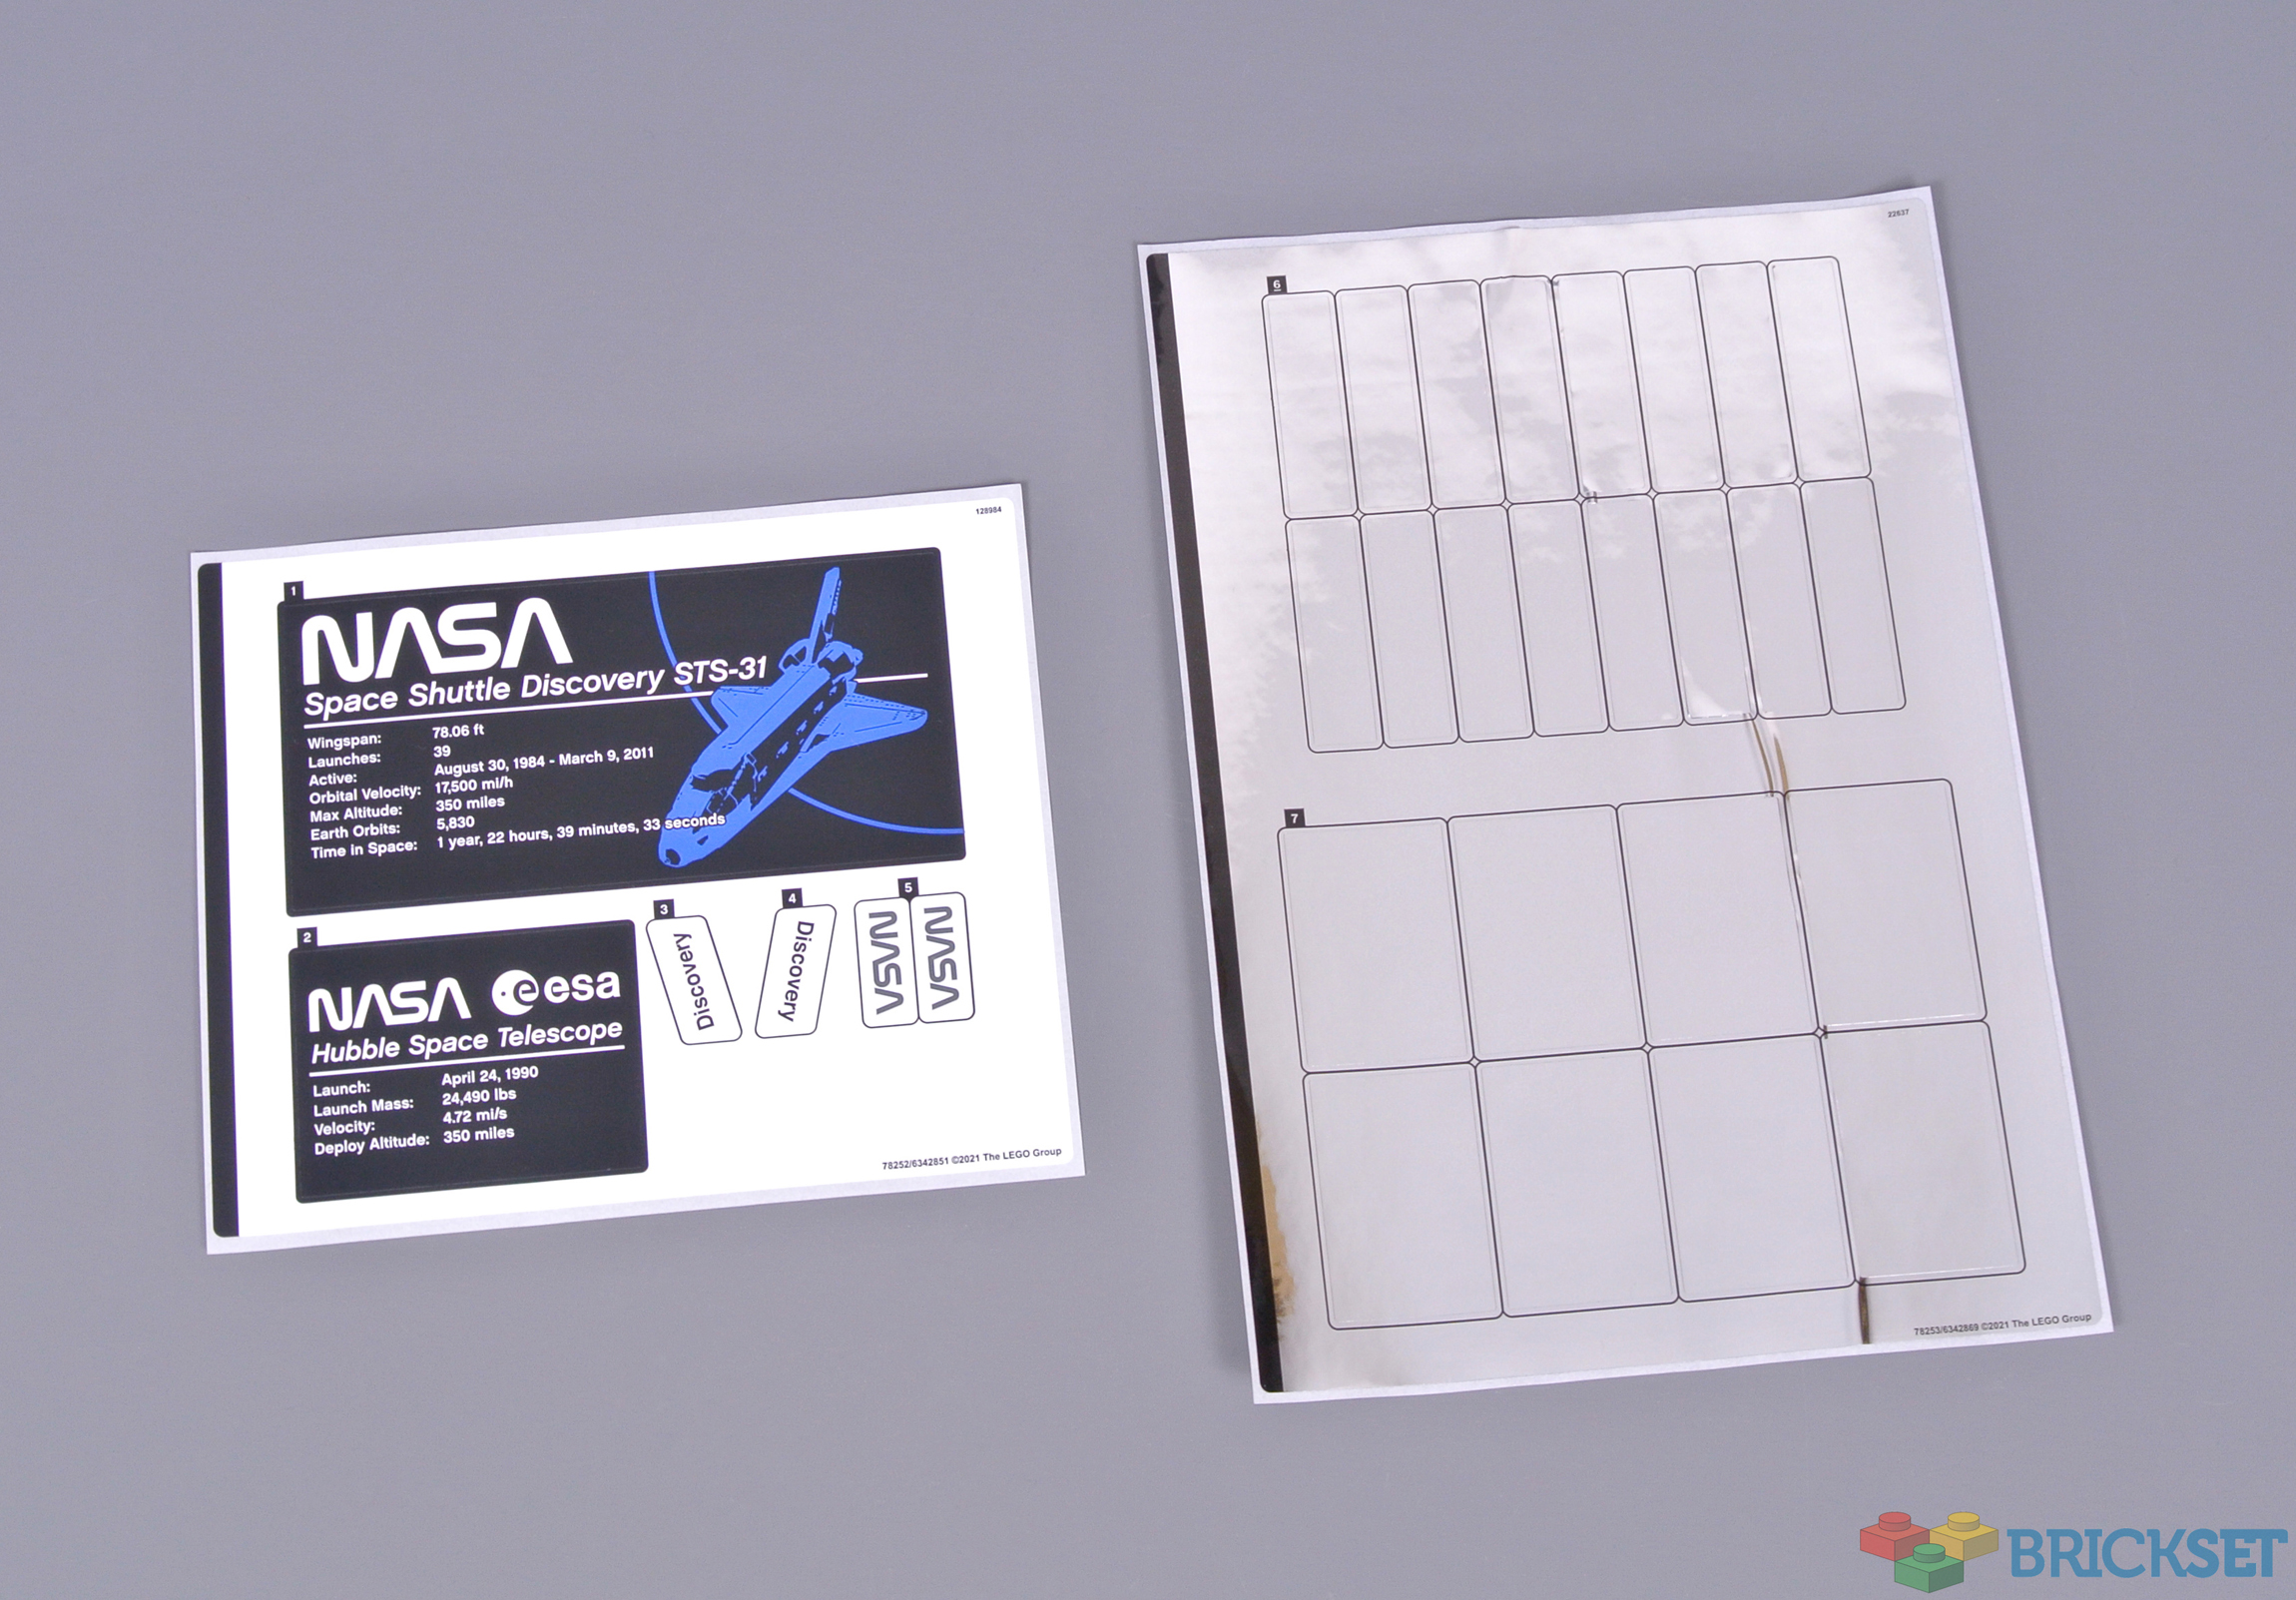
Two sticker sheets are also provided, including thirty stickers. While those for the plaque and minor details were inevitable, the reflective stickers decorating the payload bay were certainly an unpleasant surprise! They adorn concave surfaces which does create challenges, although the door components feature strengthening ridges which are useful when lining up the stickers.
Construction
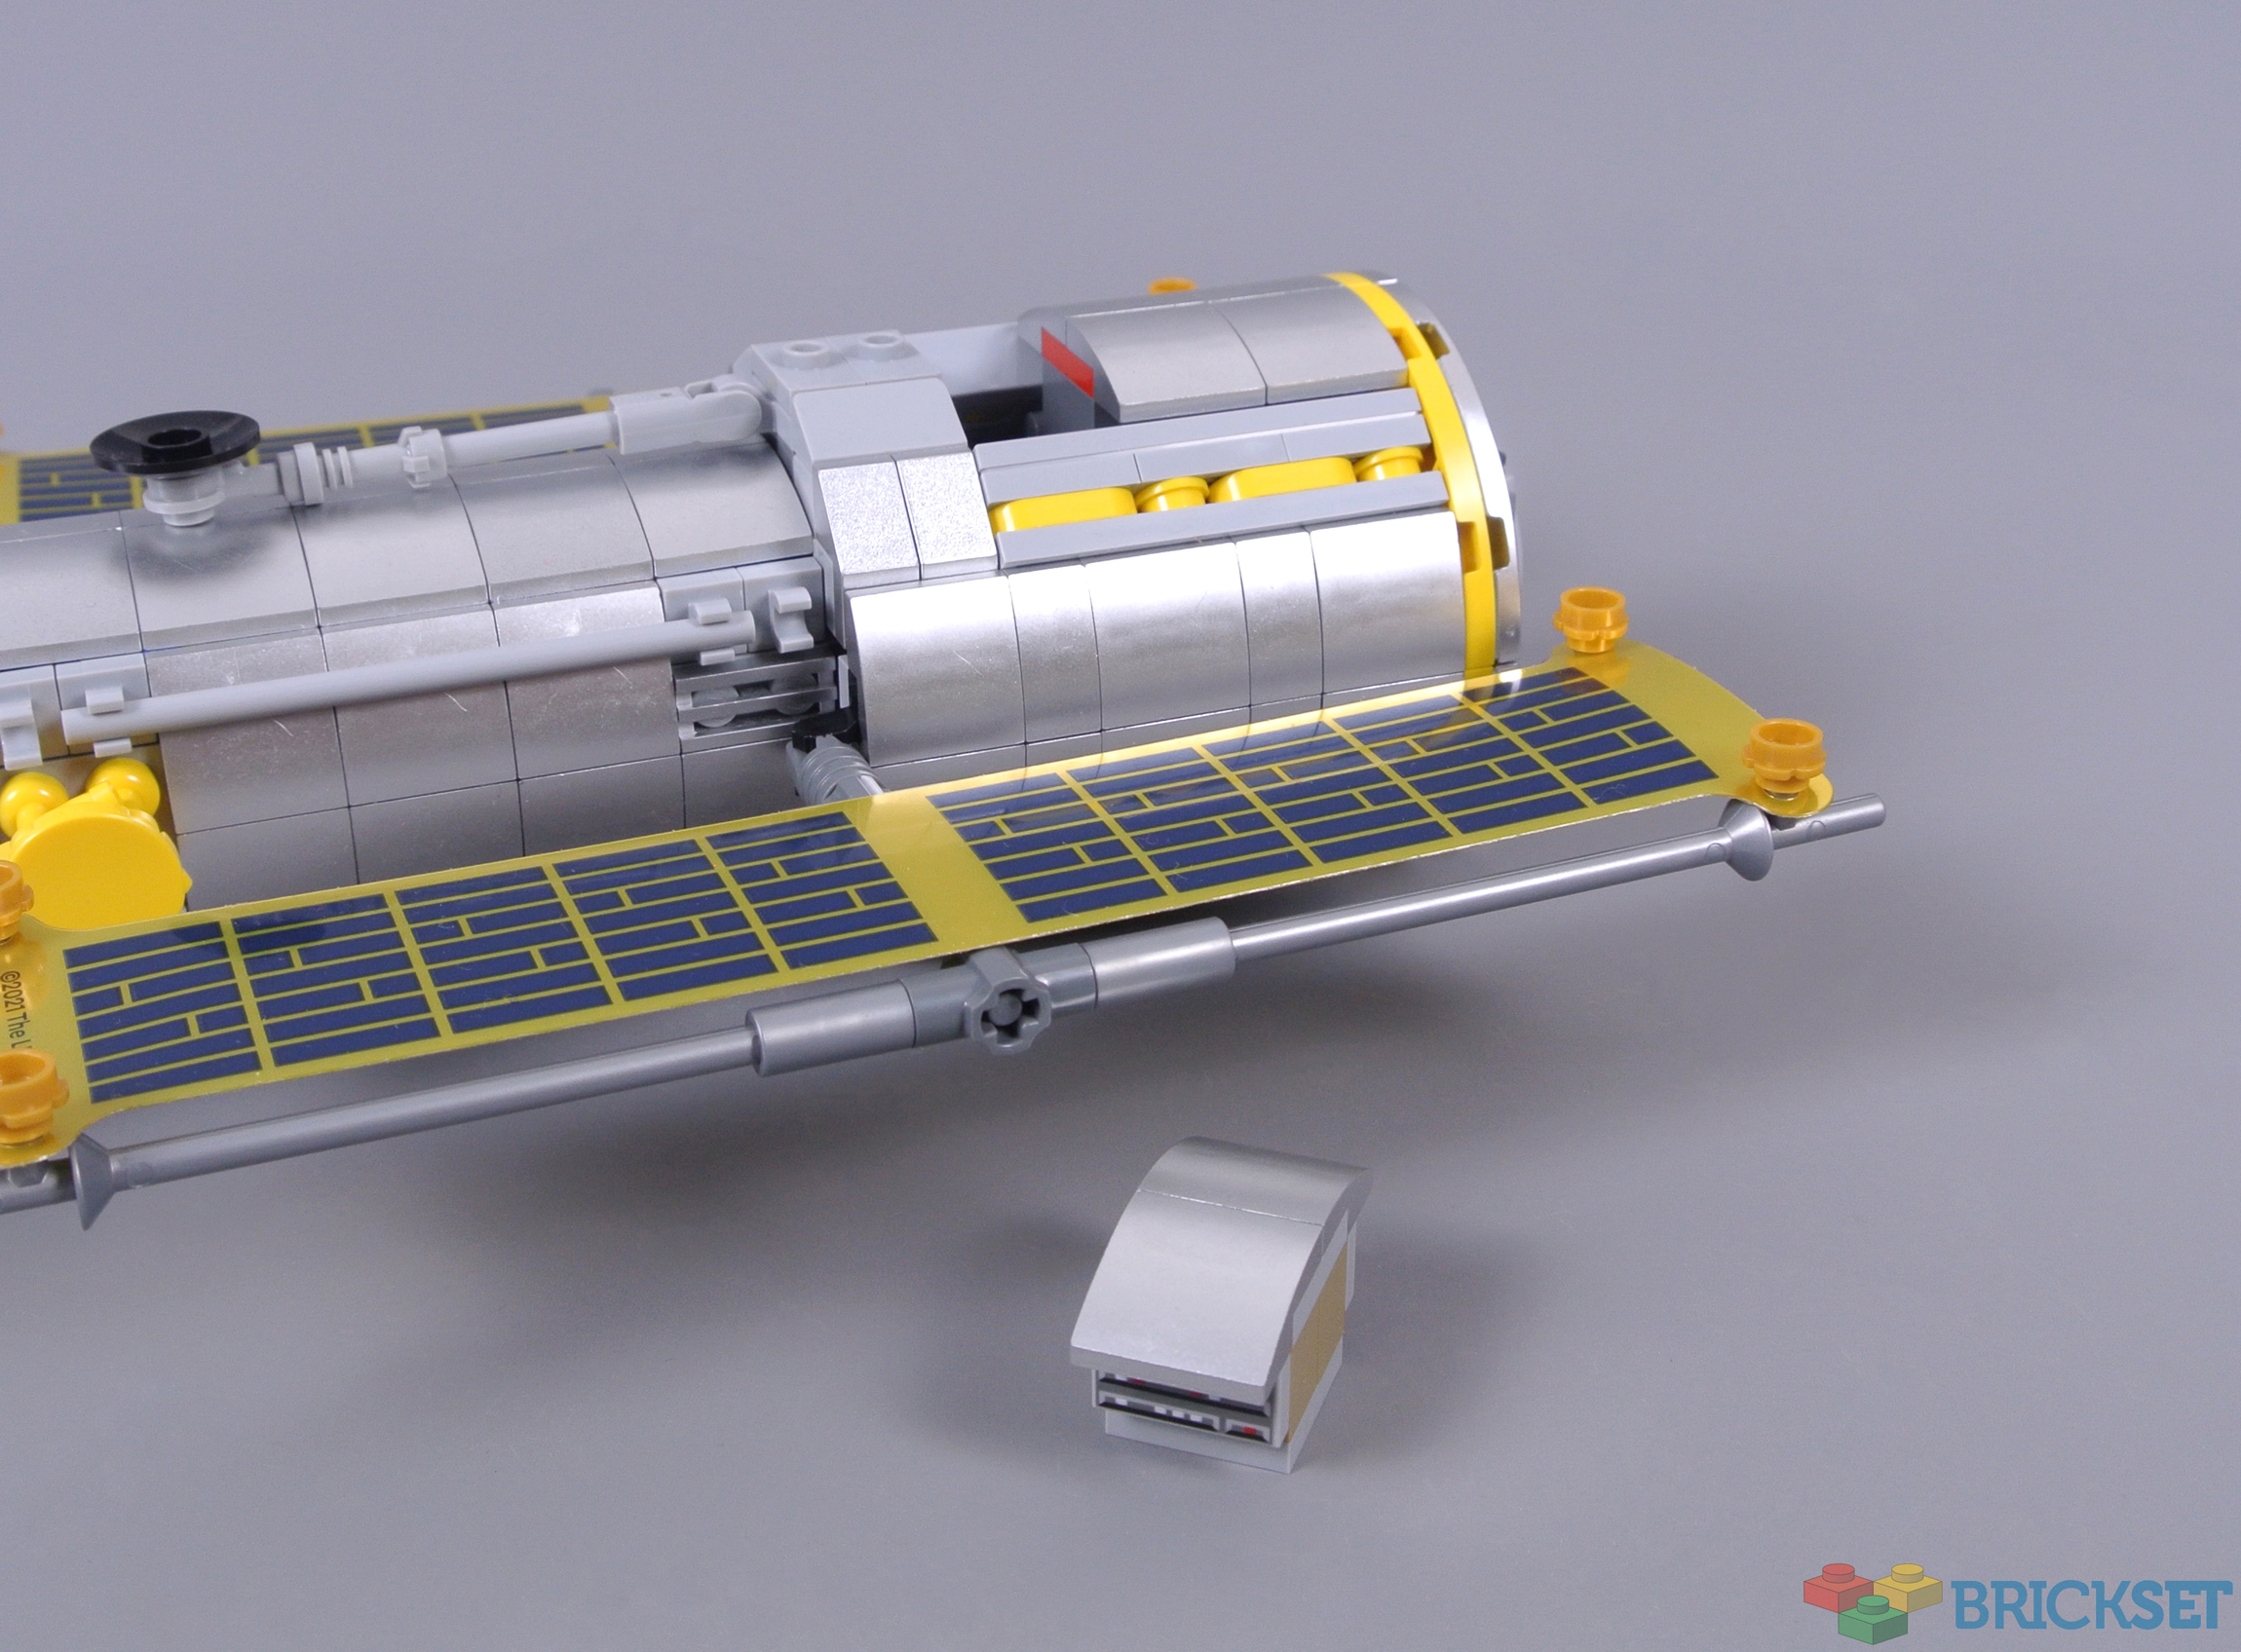
The construction process commences with the Hubble Space Telescope, which comprises an extraordinary number of drum-lacquered metallic silver elements! The structure feels relatively familiar, featuring various brackets with curved slopes covering the exterior. The interior is fairly colourful, as demonstrated below, but these red and blue pieces are gradually concealed.
While the aperture assembly is constructed using curved slopes, the broader camera housing integrates angled segments between the curves. Appropriately, this building technique returns from 21309 NASA Apollo Saturn V and this entire cylindrical structure feels remarkably secure, especially because the interior contains few hollow spaces.
The vital solar panels are unusually assembled using plastic sheets, rather than printed tiles which appeared prominently on 21321 International Space Station. However, this design has proven effective and captures the delicacy of these panels in reality. The supports underneath look excellent as well and these are surprisingly robust, despite their fragile appearance.
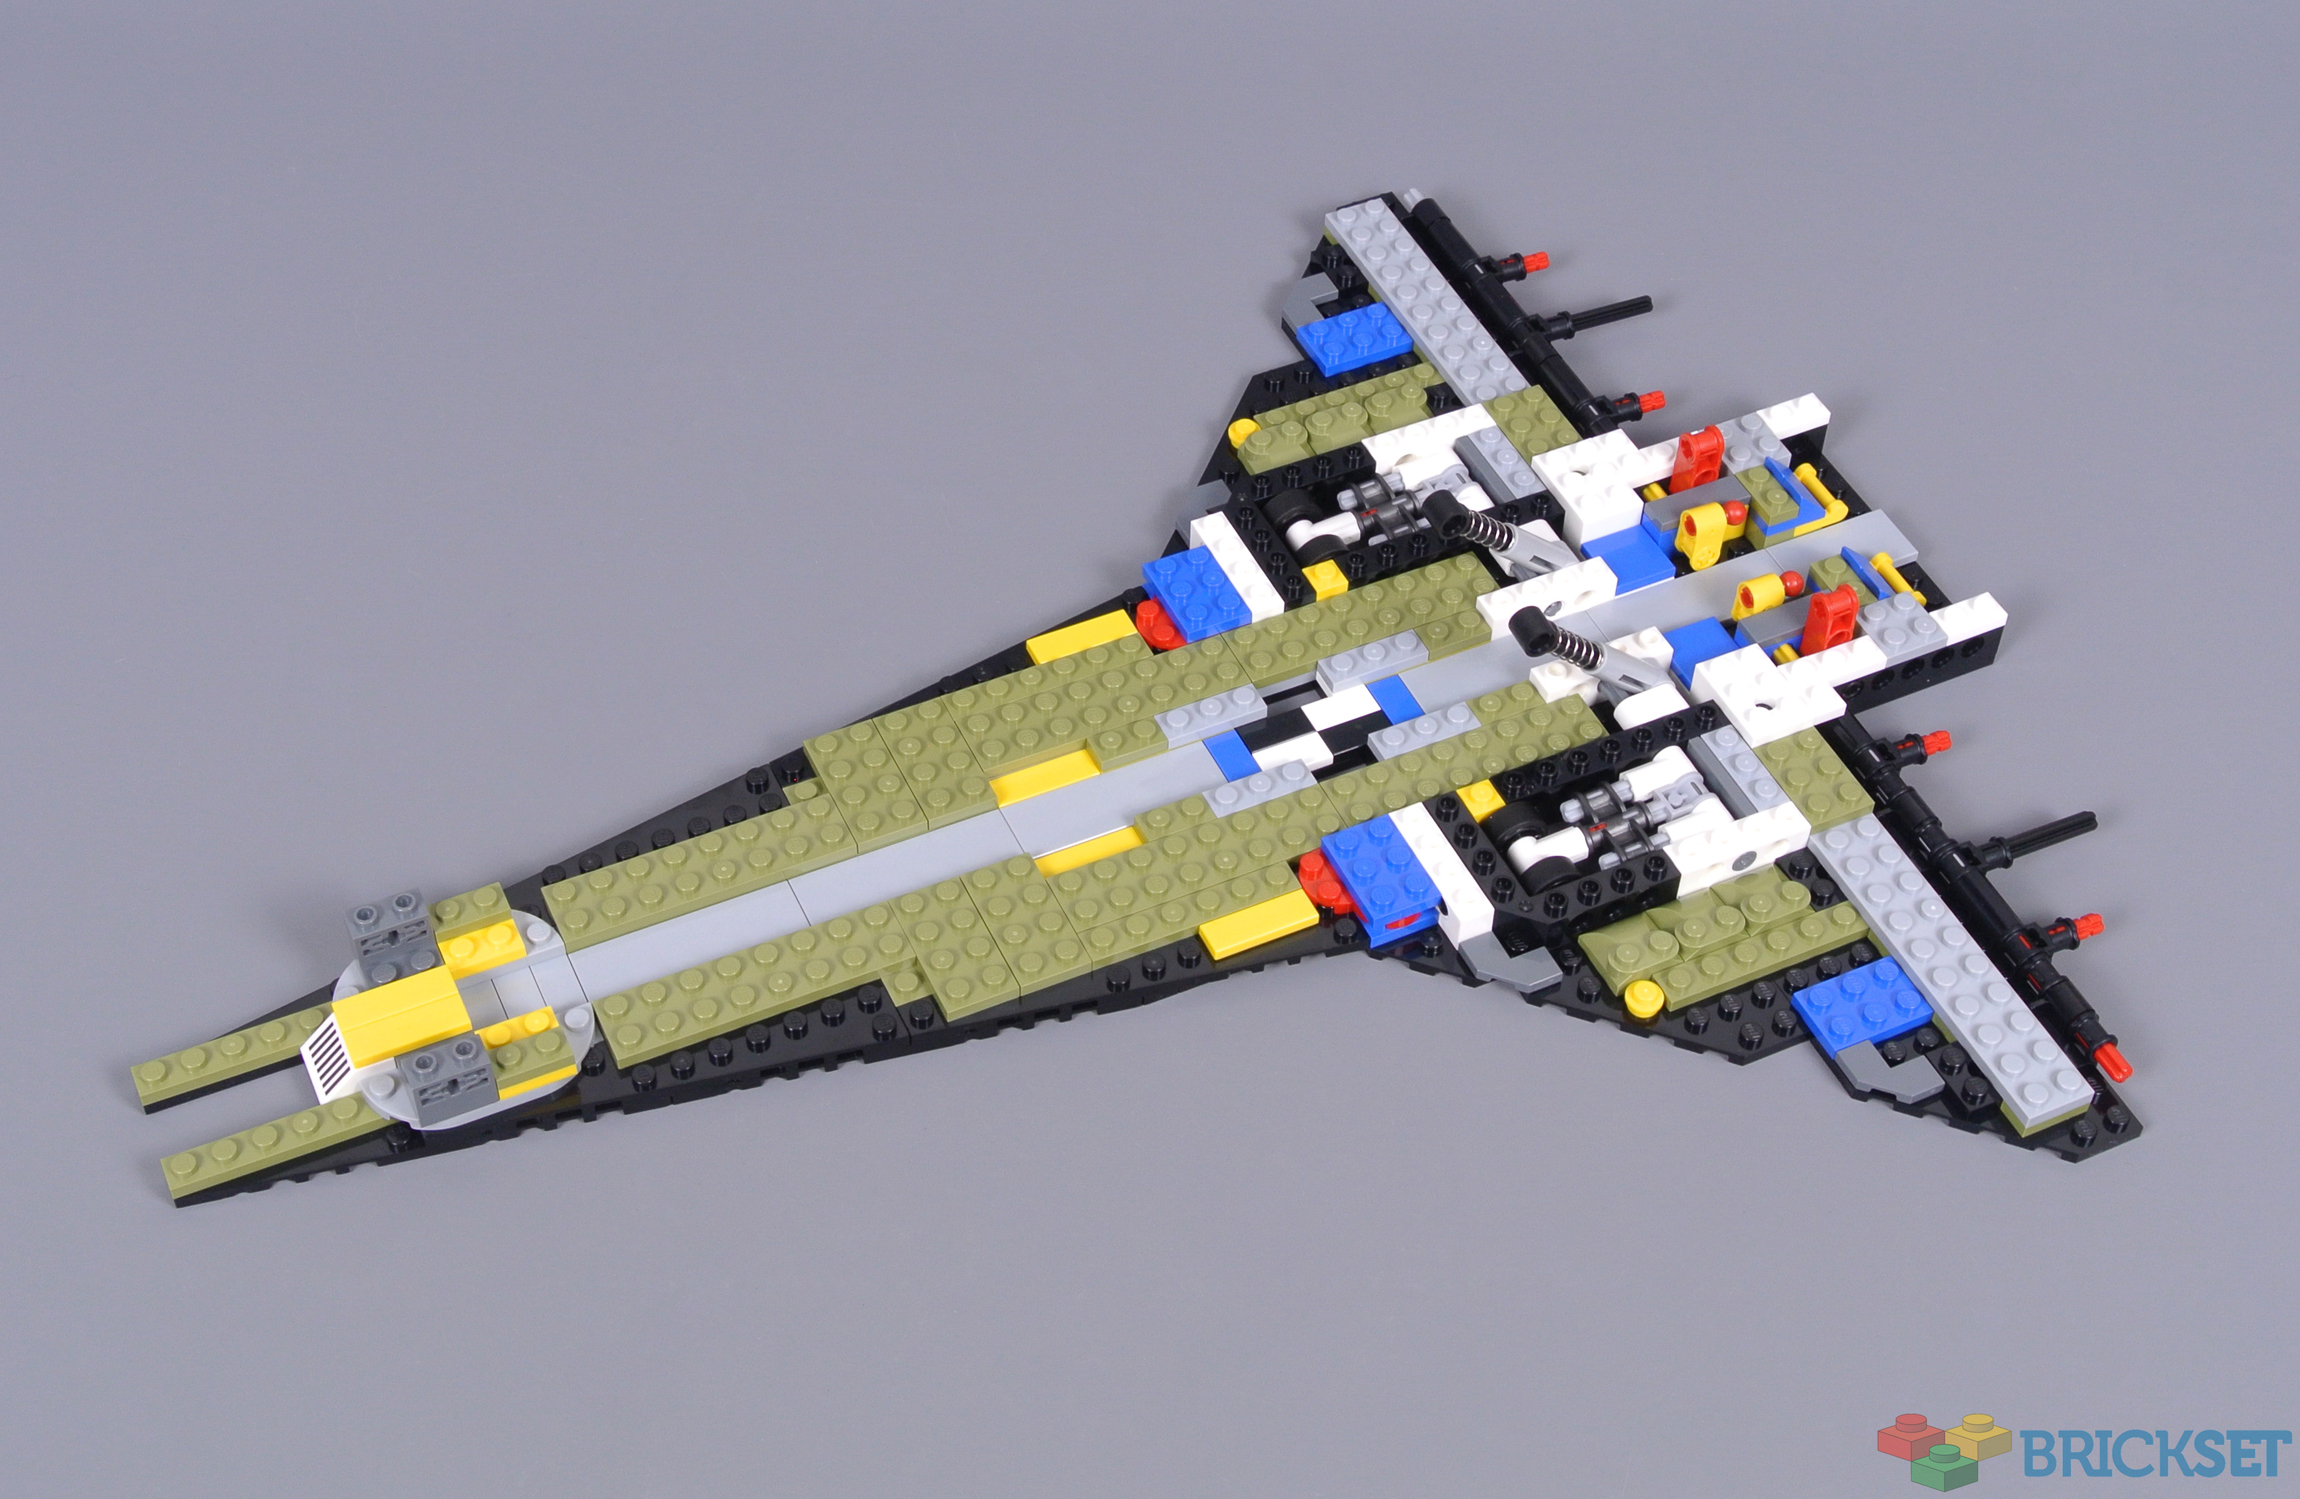
Attention next moves to the Space Shuttle, commencing with the fuselage where the distinctive shape associated with these spacecraft emerges quickly. The layered plate design seems fairly simple, although that is pleasantly punctuated with Technic construction towards the rear as the landing gear and elevon mechanisms are integrated.
Trims comprising tiles, slopes and curved slopes are then attached along the leading edge of each wing. These are reminiscent of 76161 1989 Batwing, cleverly demonstrating how LEGO hinges and wedge plates can interact. Four separate structures are attached to the wings and they feel absolutely rigid, especially after positioning large 10x10 corner plates on top.
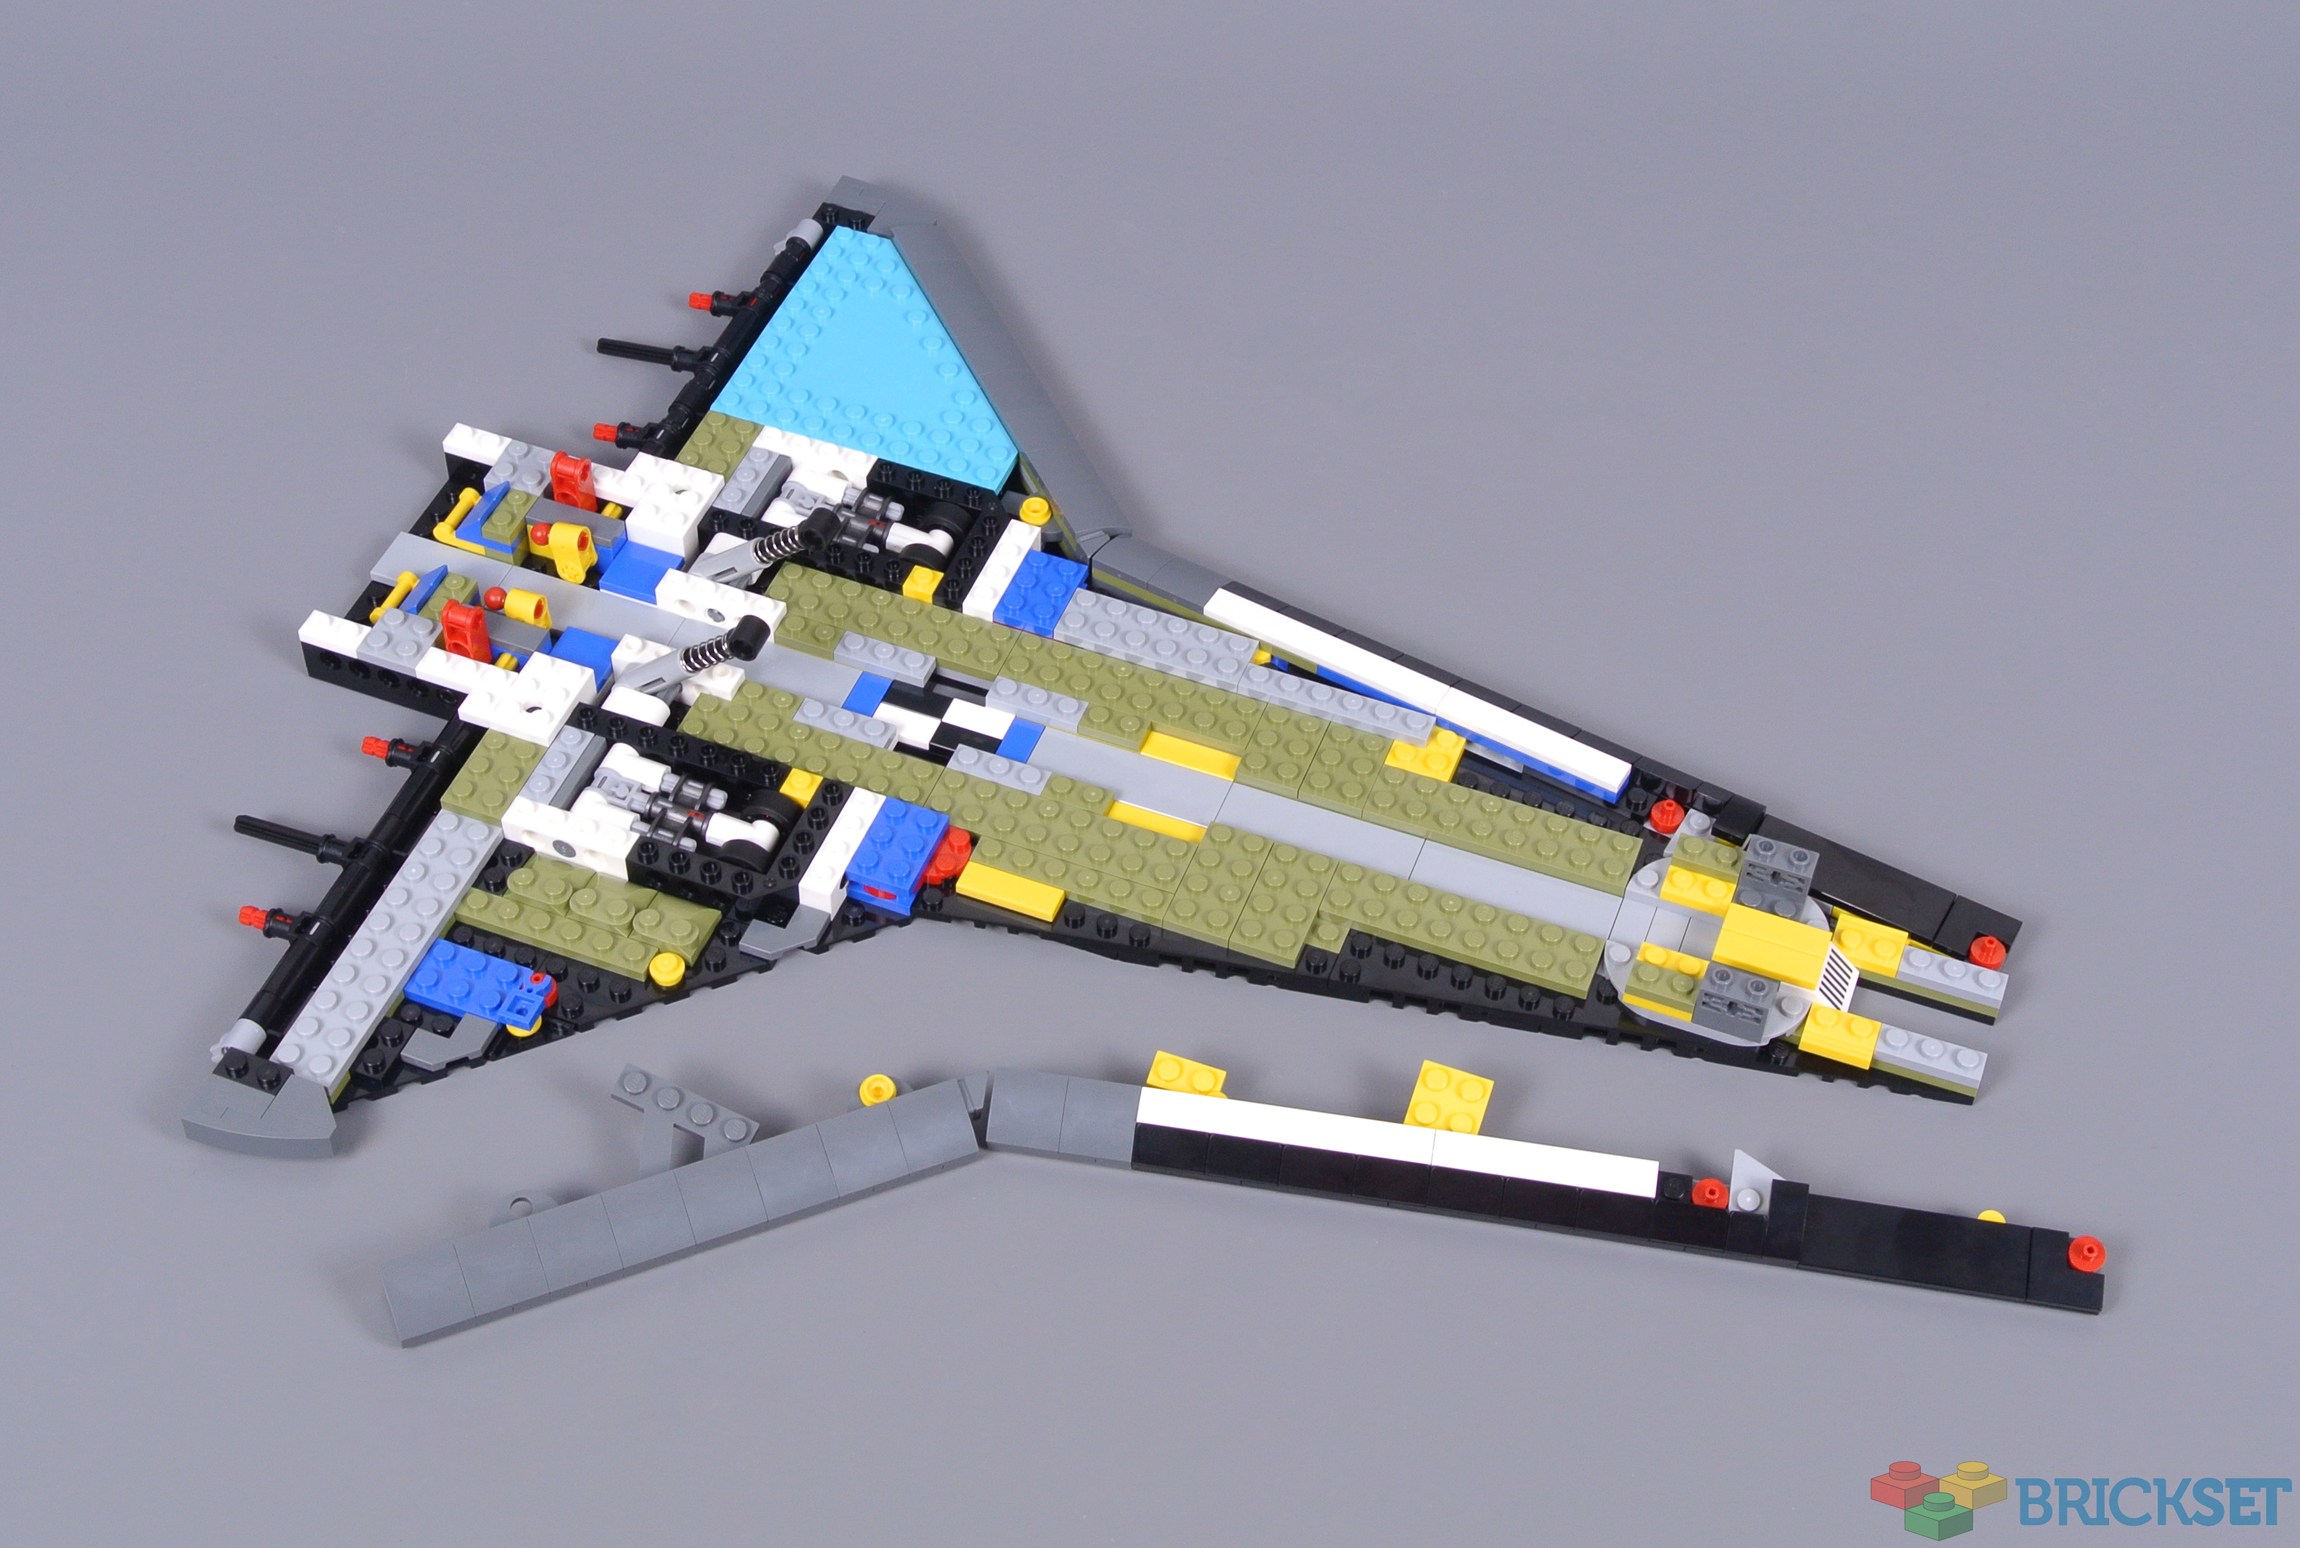
The outermost layer of white bodywork then covers the internal structure, creating beautifully smooth shapes which appear realistic. Additionally, the connected landing gear mechanism is ingeniously disguised inside the payload bay. This space is quite substantial but necessary for the telescope, hence the forward and rear landing gear are inconspicuously linked through the floor.
Another discreet mechanism is situated between the engines and the payload bay, controlling the elevons. While the aforementioned landing gear linkage is hidden in plain sight, these dark bluish grey linkages will be completely hidden when construction is complete. The engine base is interesting as well, featuring several connected sections which create an authentic shape.
Following these intricate Technic assemblies, the fuselage seems comparatively simple. The walls consist primarily of standard bricks and slopes, although Technic pin holes are required around the centre, eventually supporting the cargo bar doors. Moreover, the vertical stabiliser construction begins at this stage, revealing the purpose of the conspicuous yellow clips which are visible above.

The payload bar doors are constructed using new curved components, somewhat resembling the 3x4x3 curved panels that were introduced for the same purpose during 2015. Applying the reflective stickers is both difficult and time-consuming, although the elaborate cockpit design is certainly a welcome reward afterwards! Many bricks with studs on the side and differing slopes are employed here, yielding an accurate shape without requiring new pieces!
Despite their outwardly simple appearance, the elevons are surprisingly interesting. They are assembled using bricks with a layer of tiles and wedge plates on top, accurately matching the depth of each wing. Technic axles then slide through the elevons, securing them while leaving adequate space for movement. The vertical stabiliser makes similar use of bricks and Technic axles to maintain strength.
The remaining colourful parts are finally covered by fuel tanks and thrusters towards the rear, which are appropriately angled using hinges. Once again, the exterior looks relatively smooth but the internal structures are extremely complex, requiring additional bricks with studs on the side. Construction is fittingly concluded with the crew compartment and the telescope support.
The Completed Model
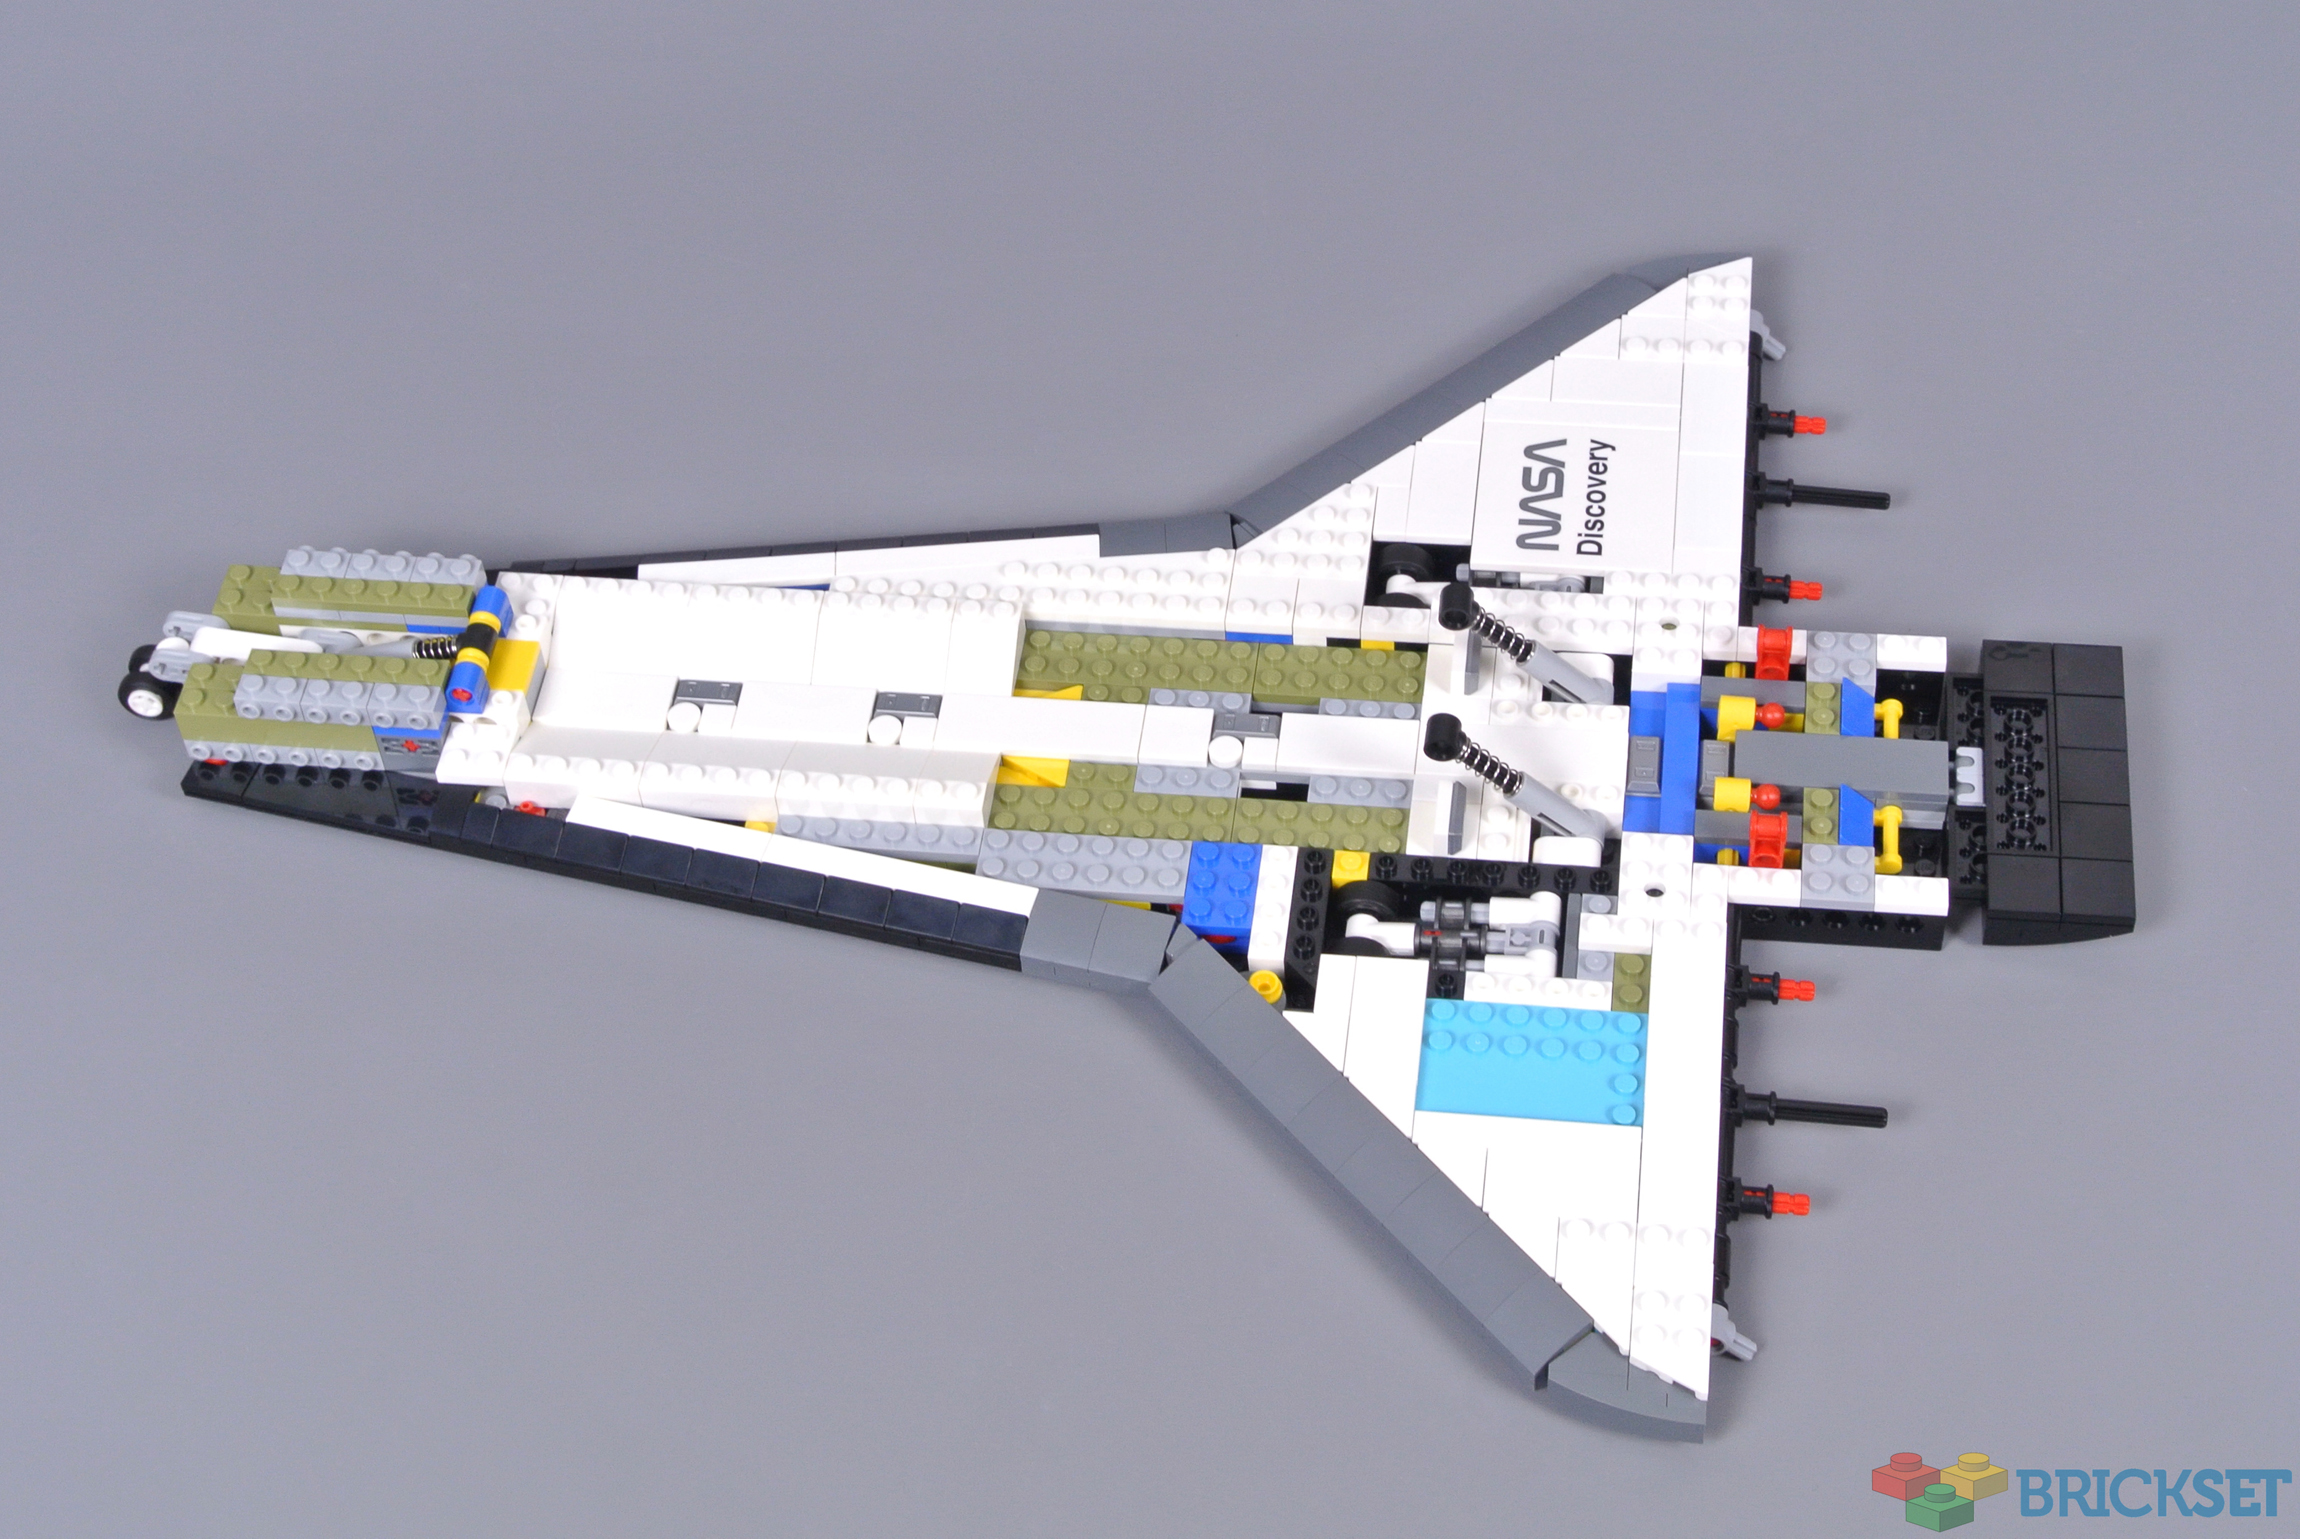
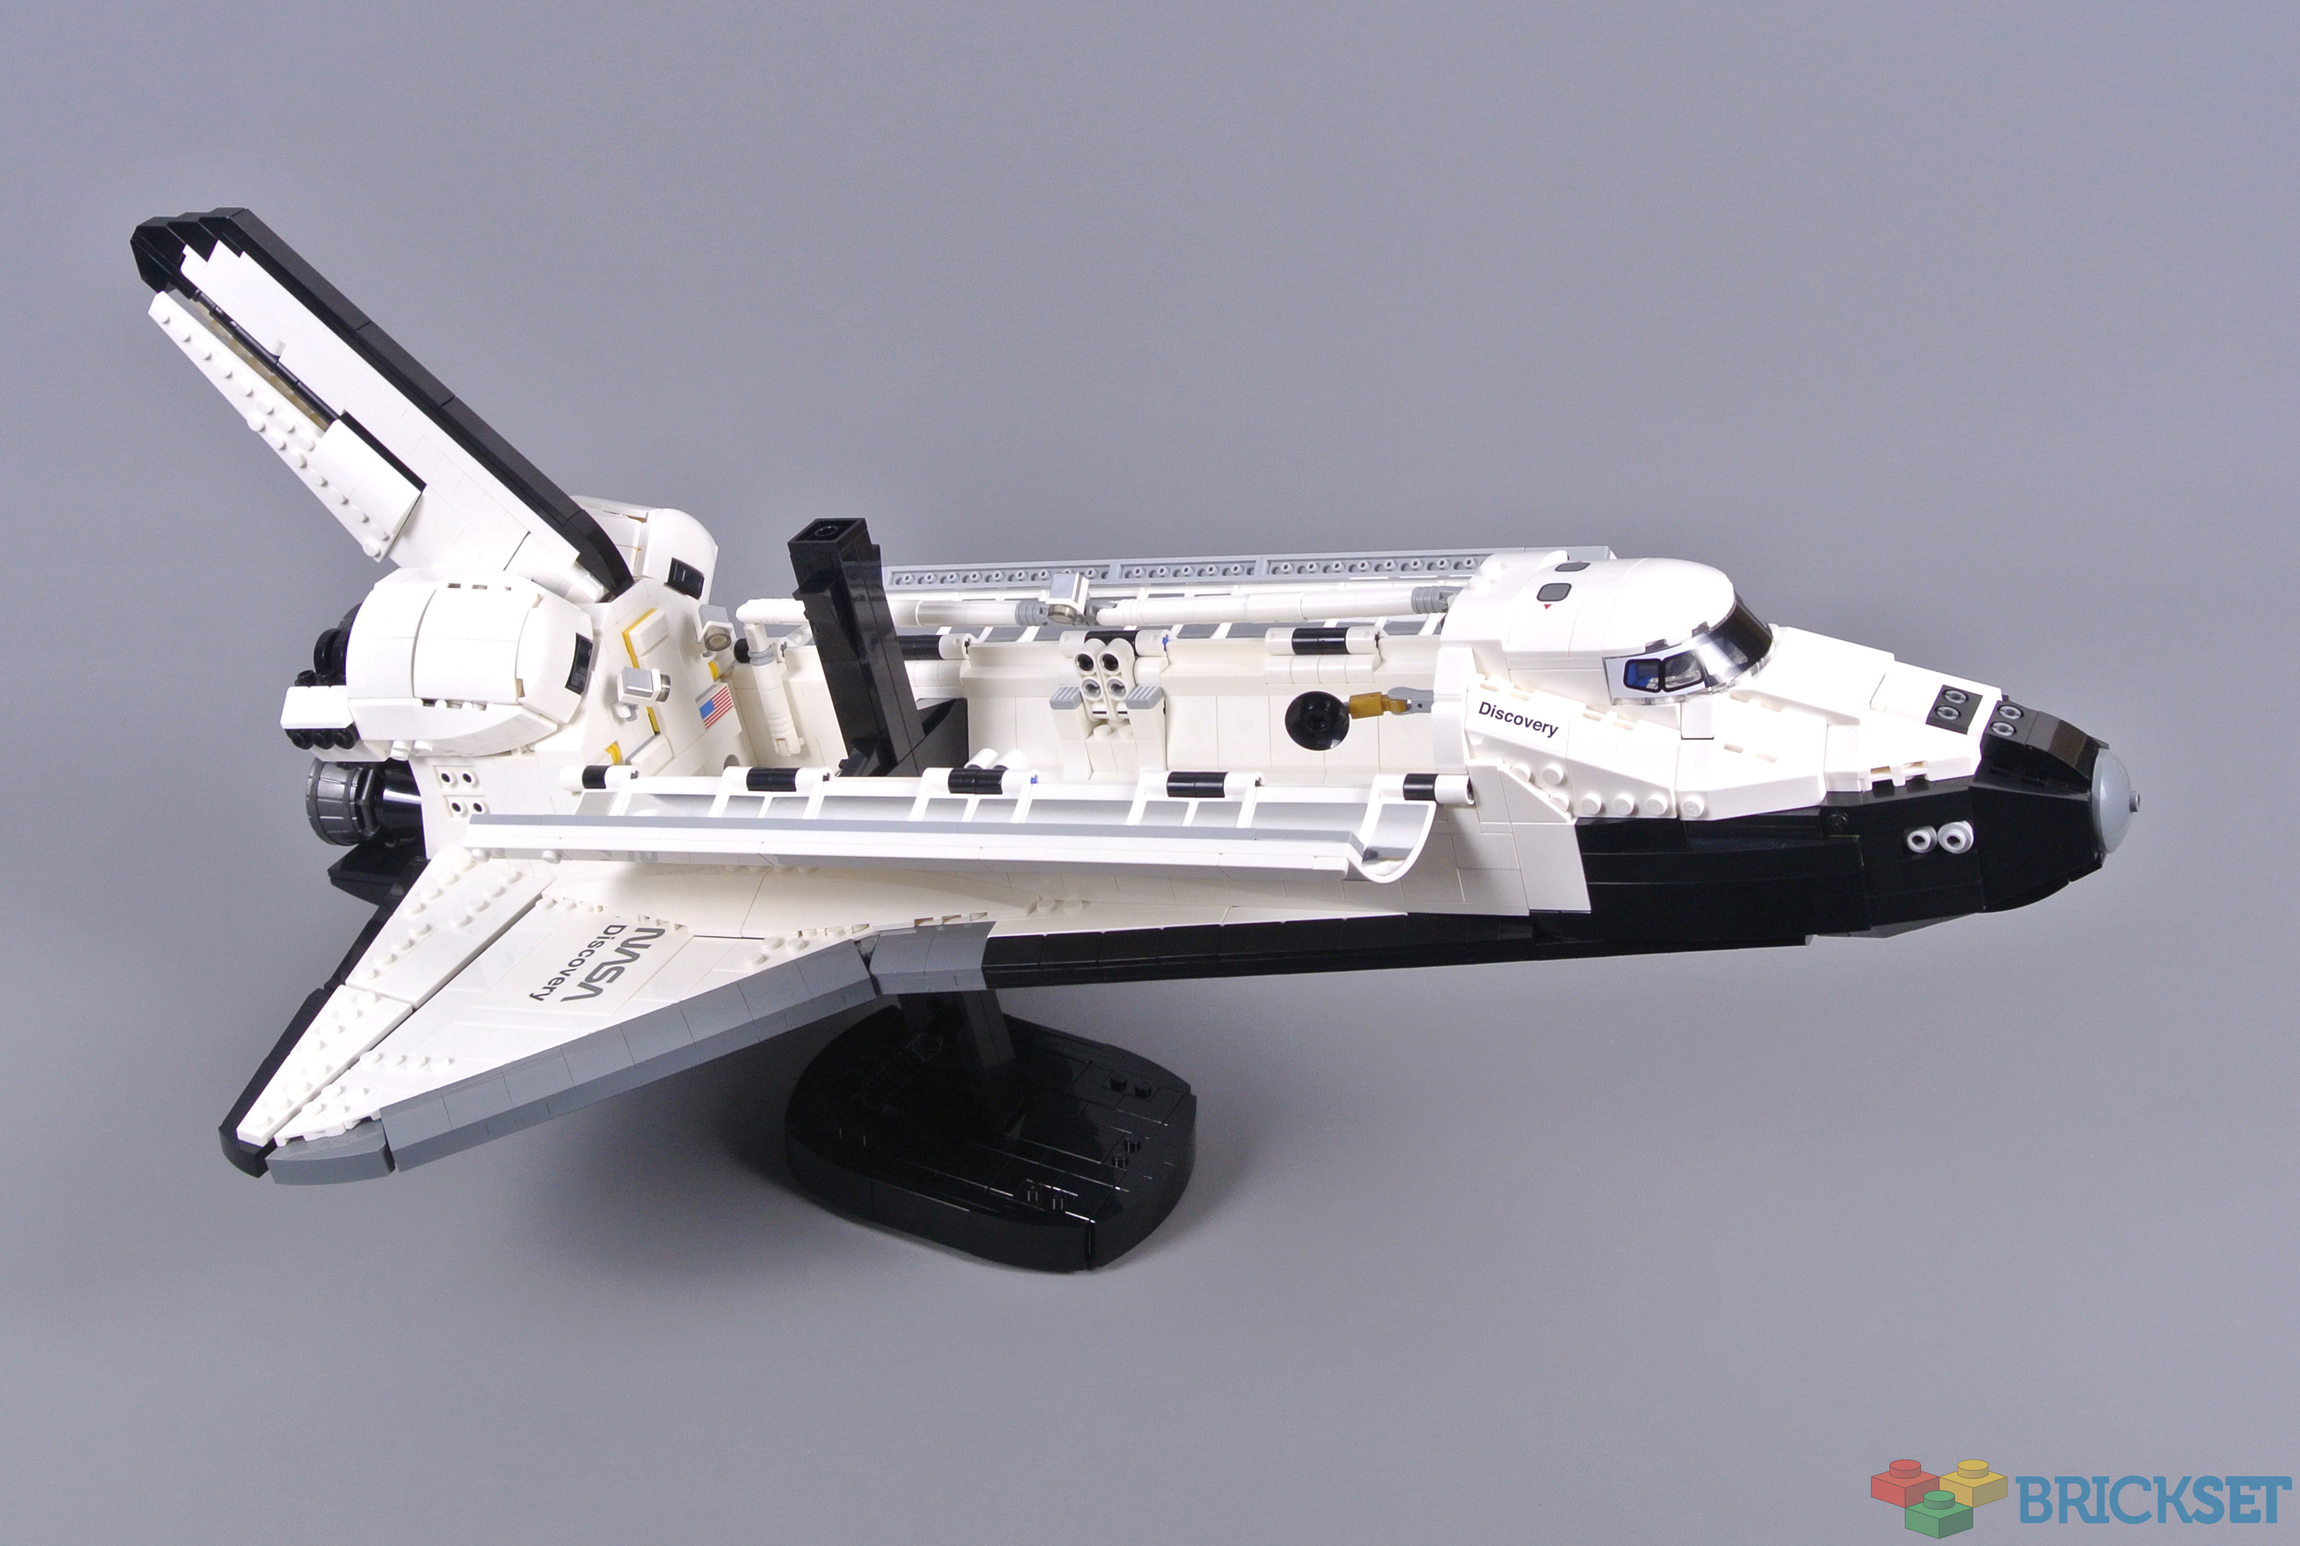
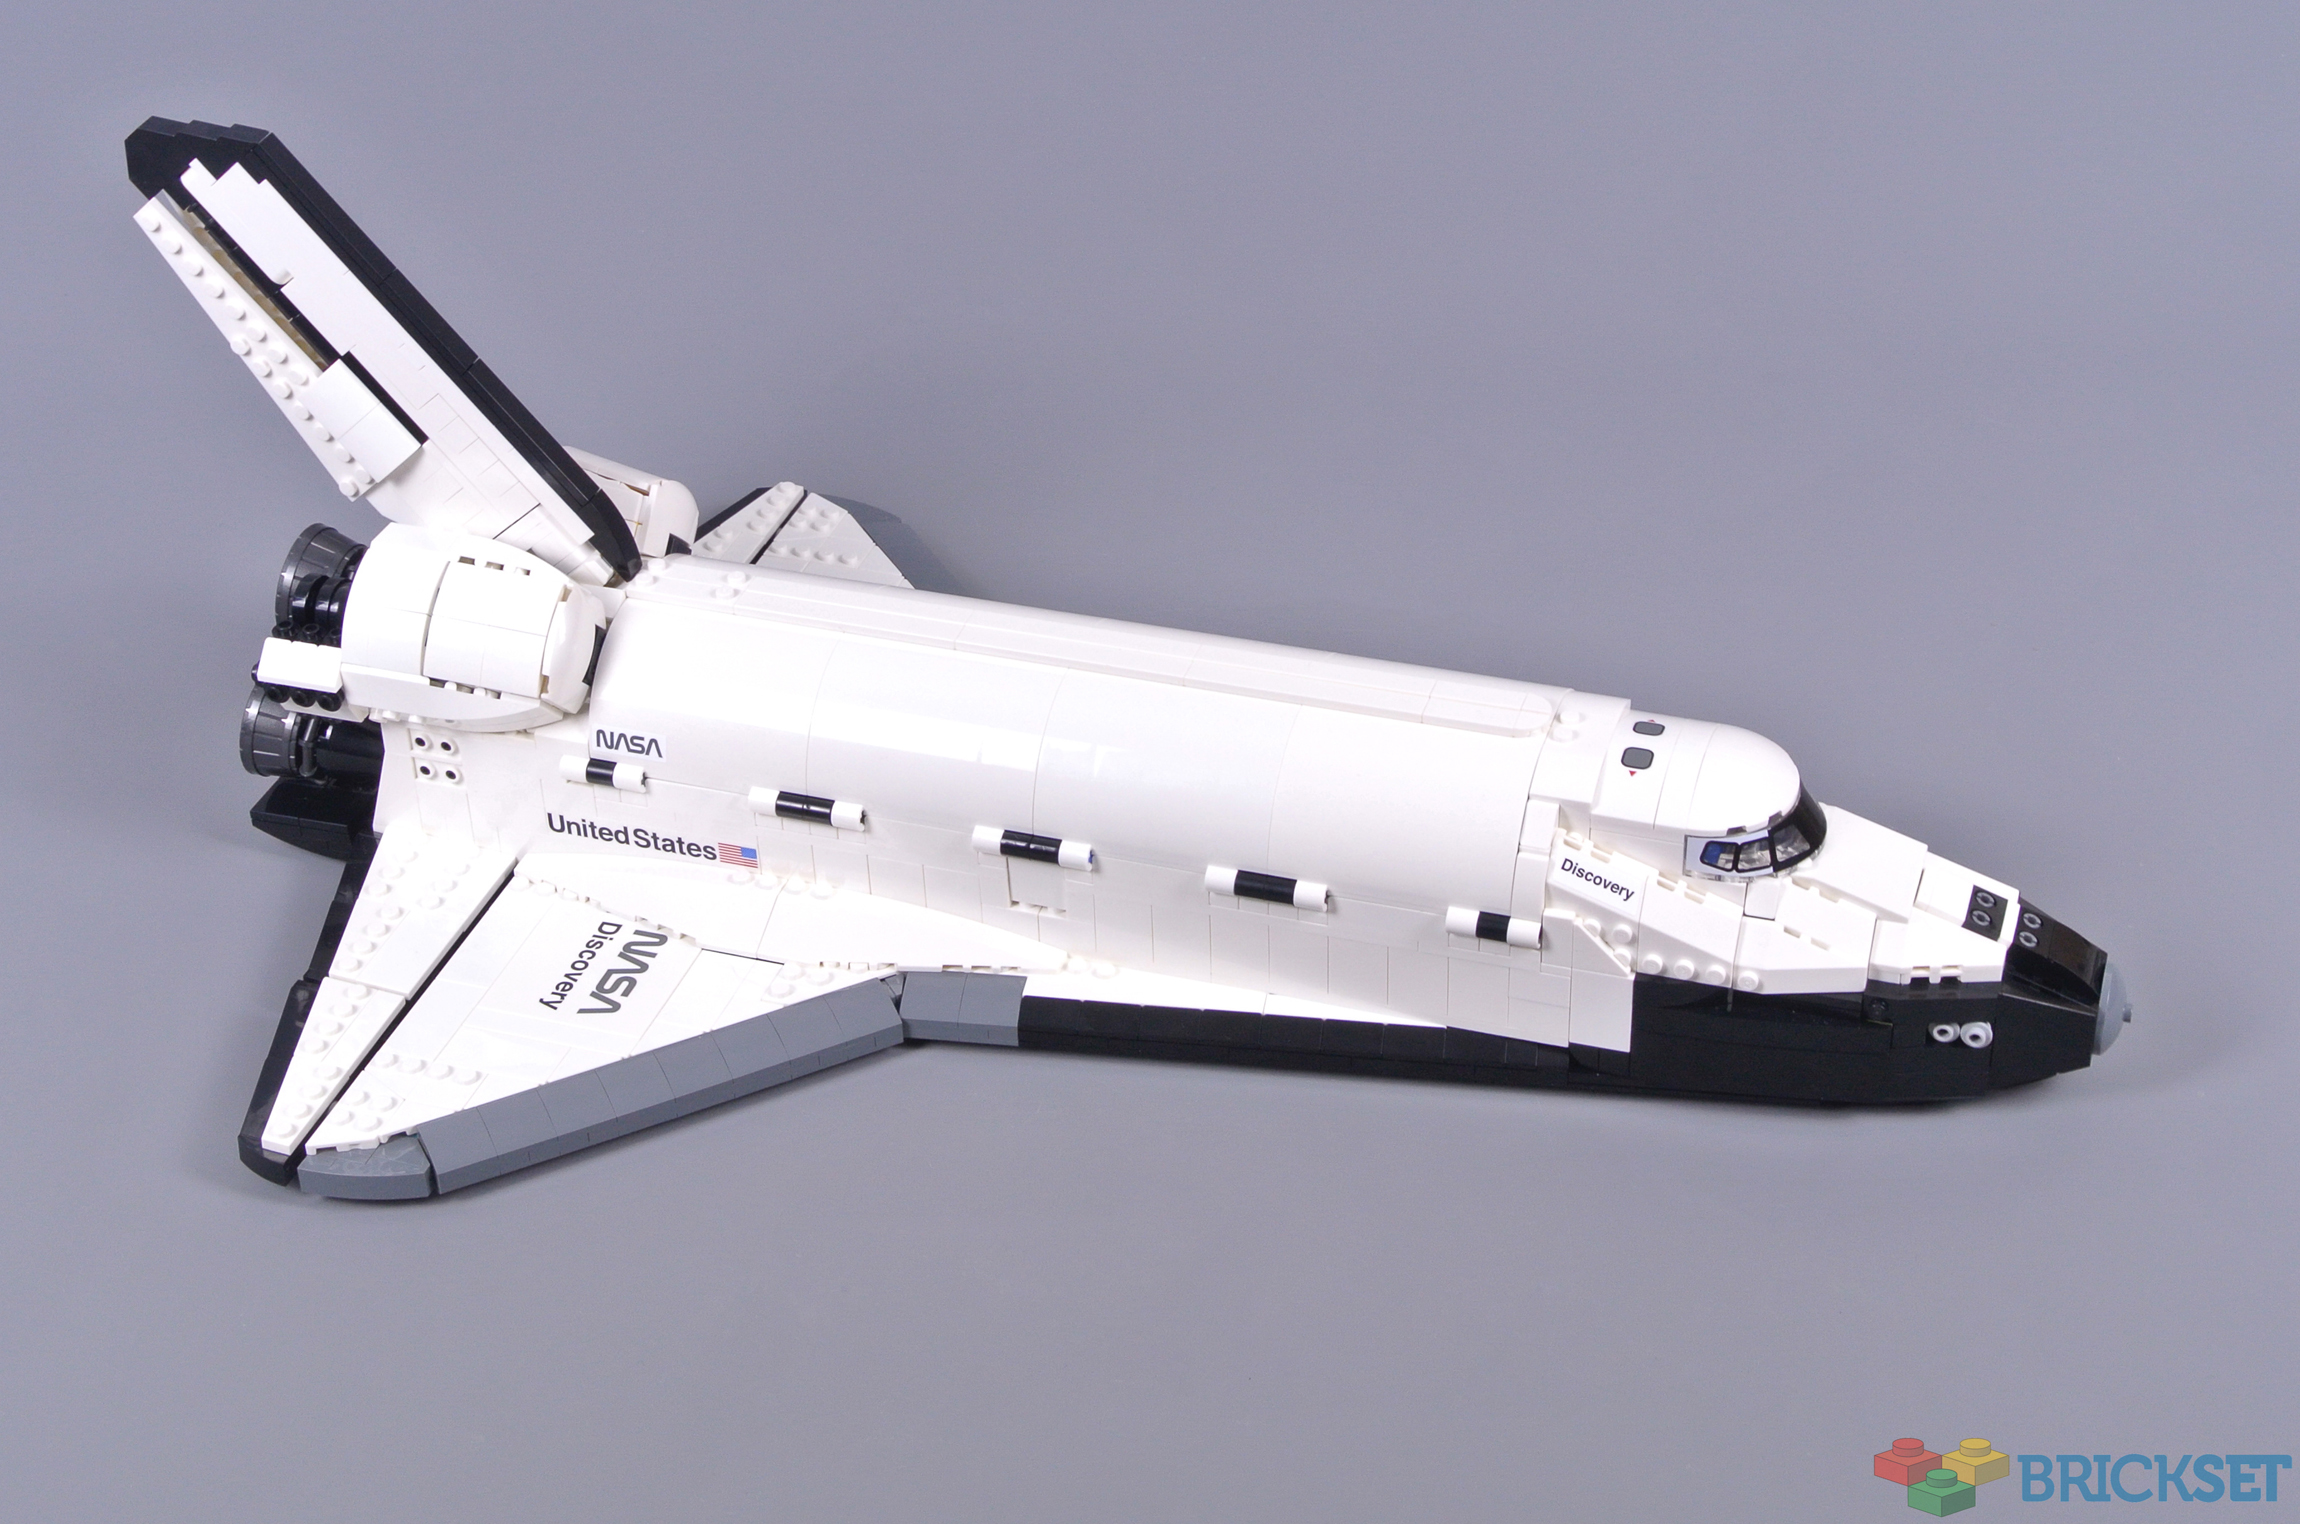
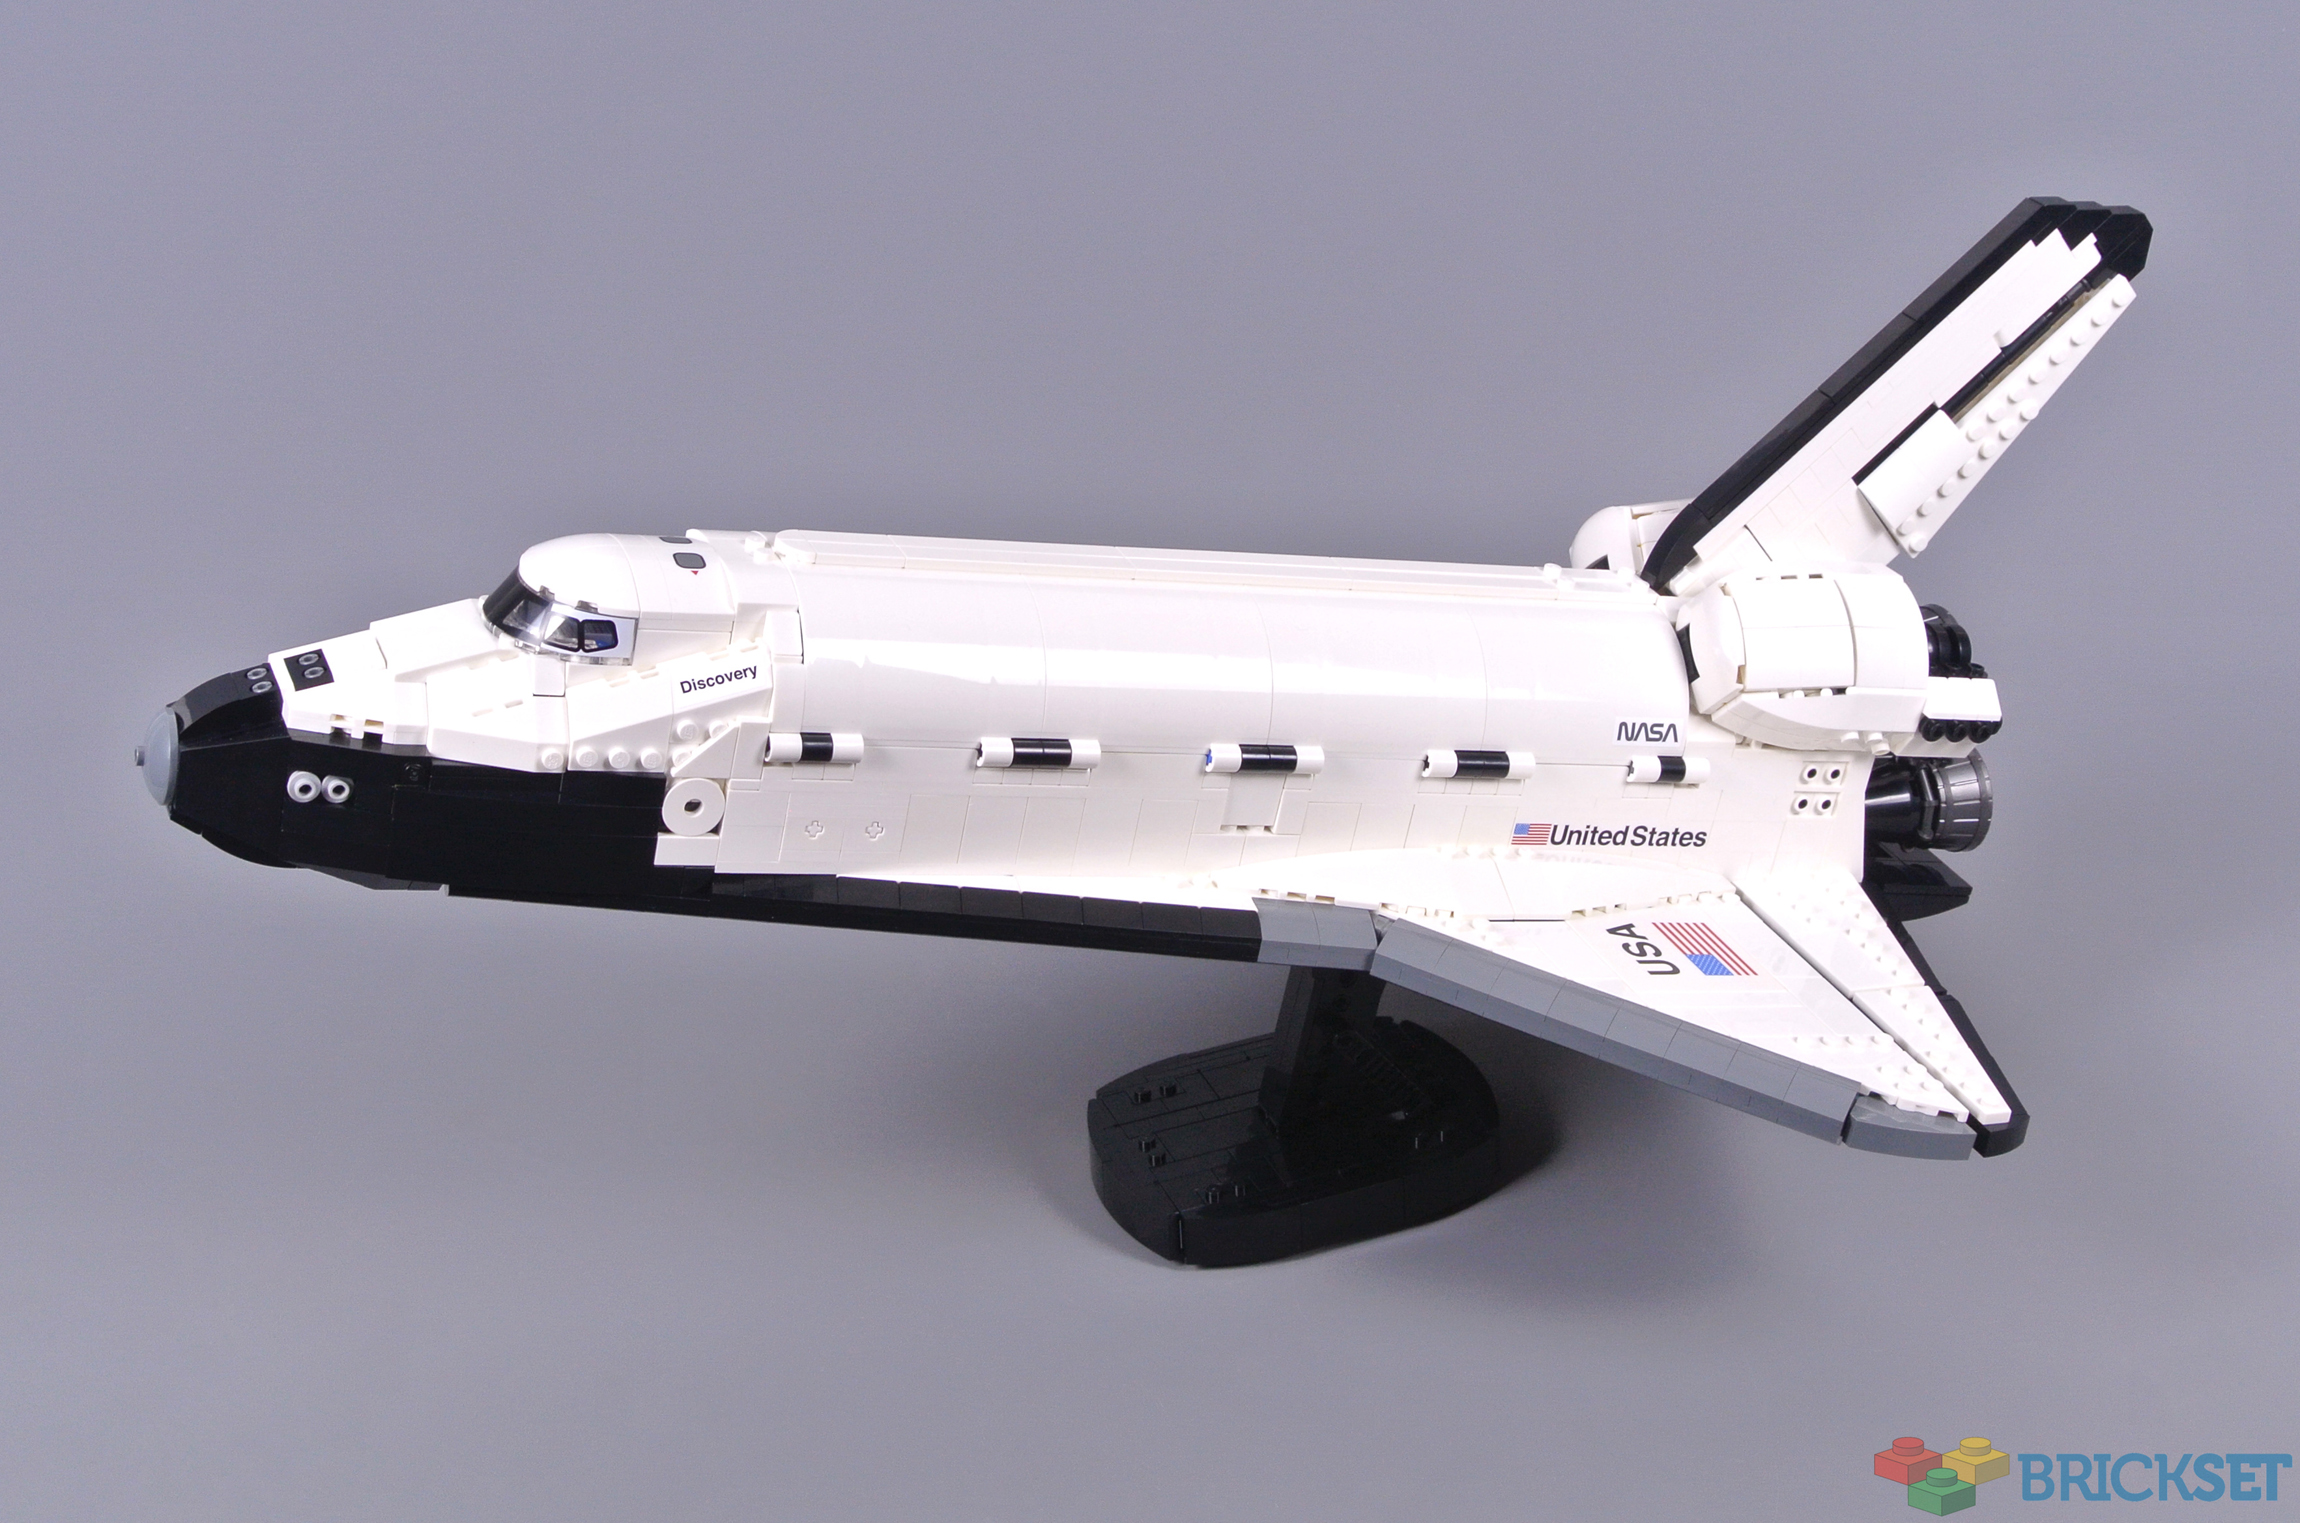
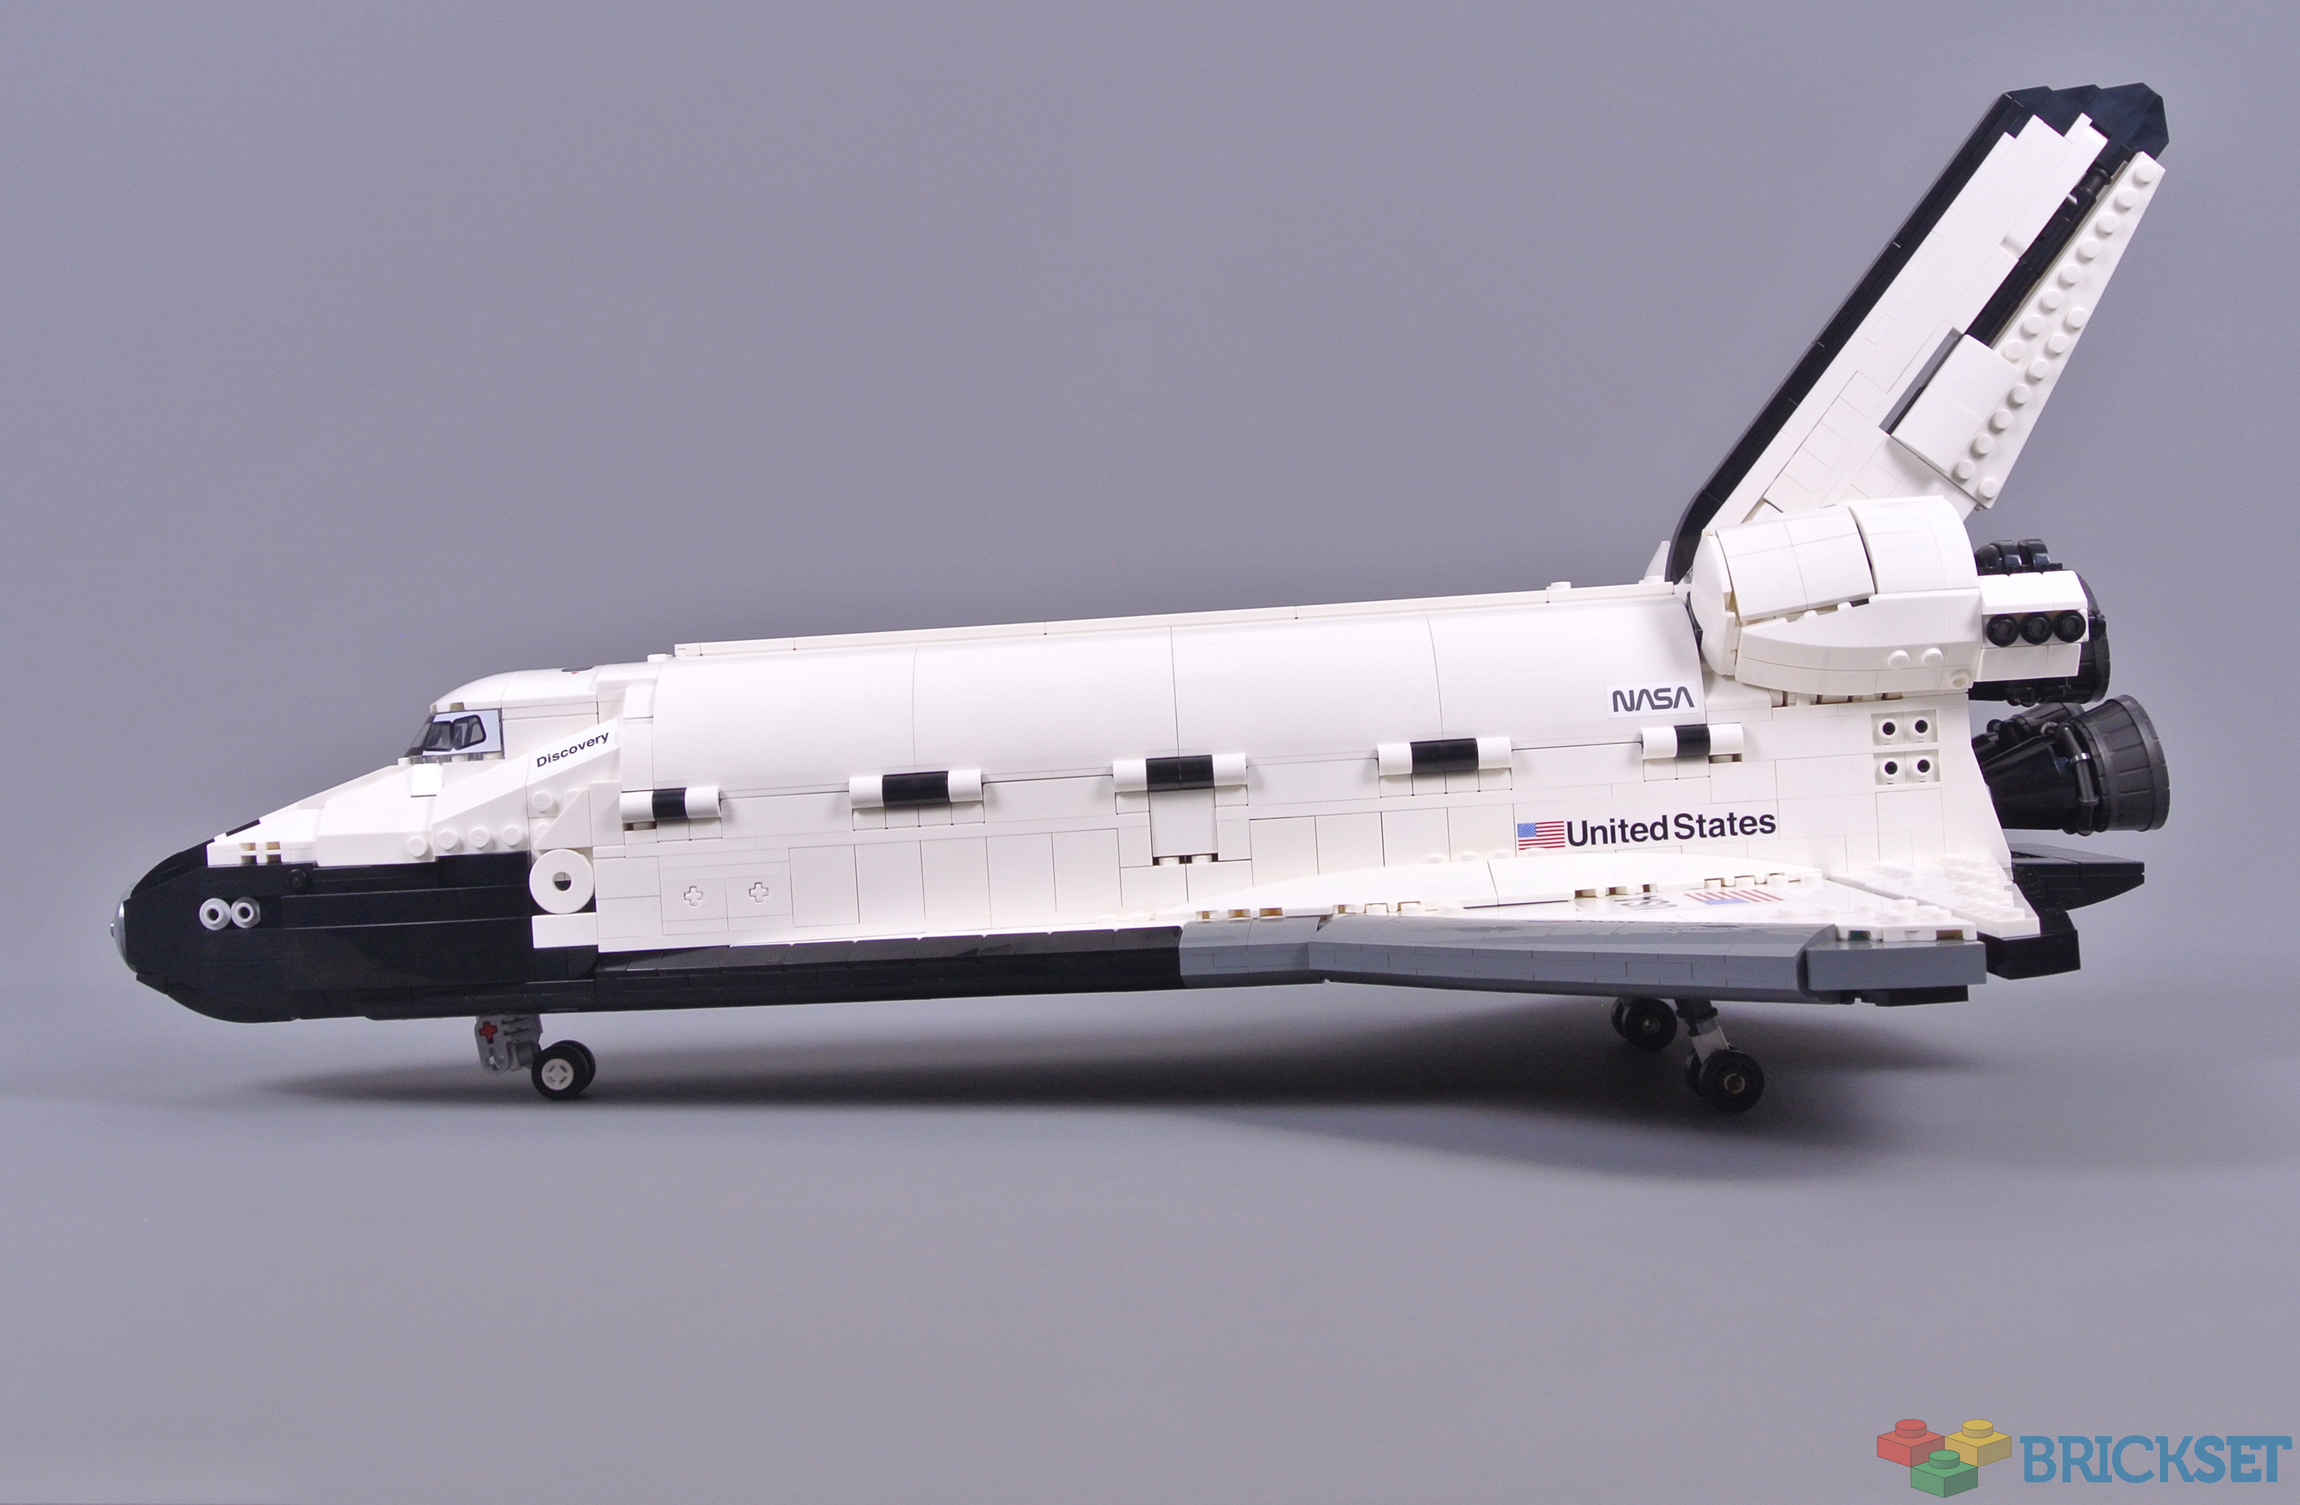
LEGO has produced various renditions of the Space Shuttle and 10283 NASA Space Shuttle Discovery appears exceedingly accurate. The model measures 54cm in length which is larger than previous designs and has enabled the designer to create shapes which have proven very challenging in the past, notably including the distinctive nose. Furthermore, the intricate details demonstrate outstanding fidelity to the original spacecraft.
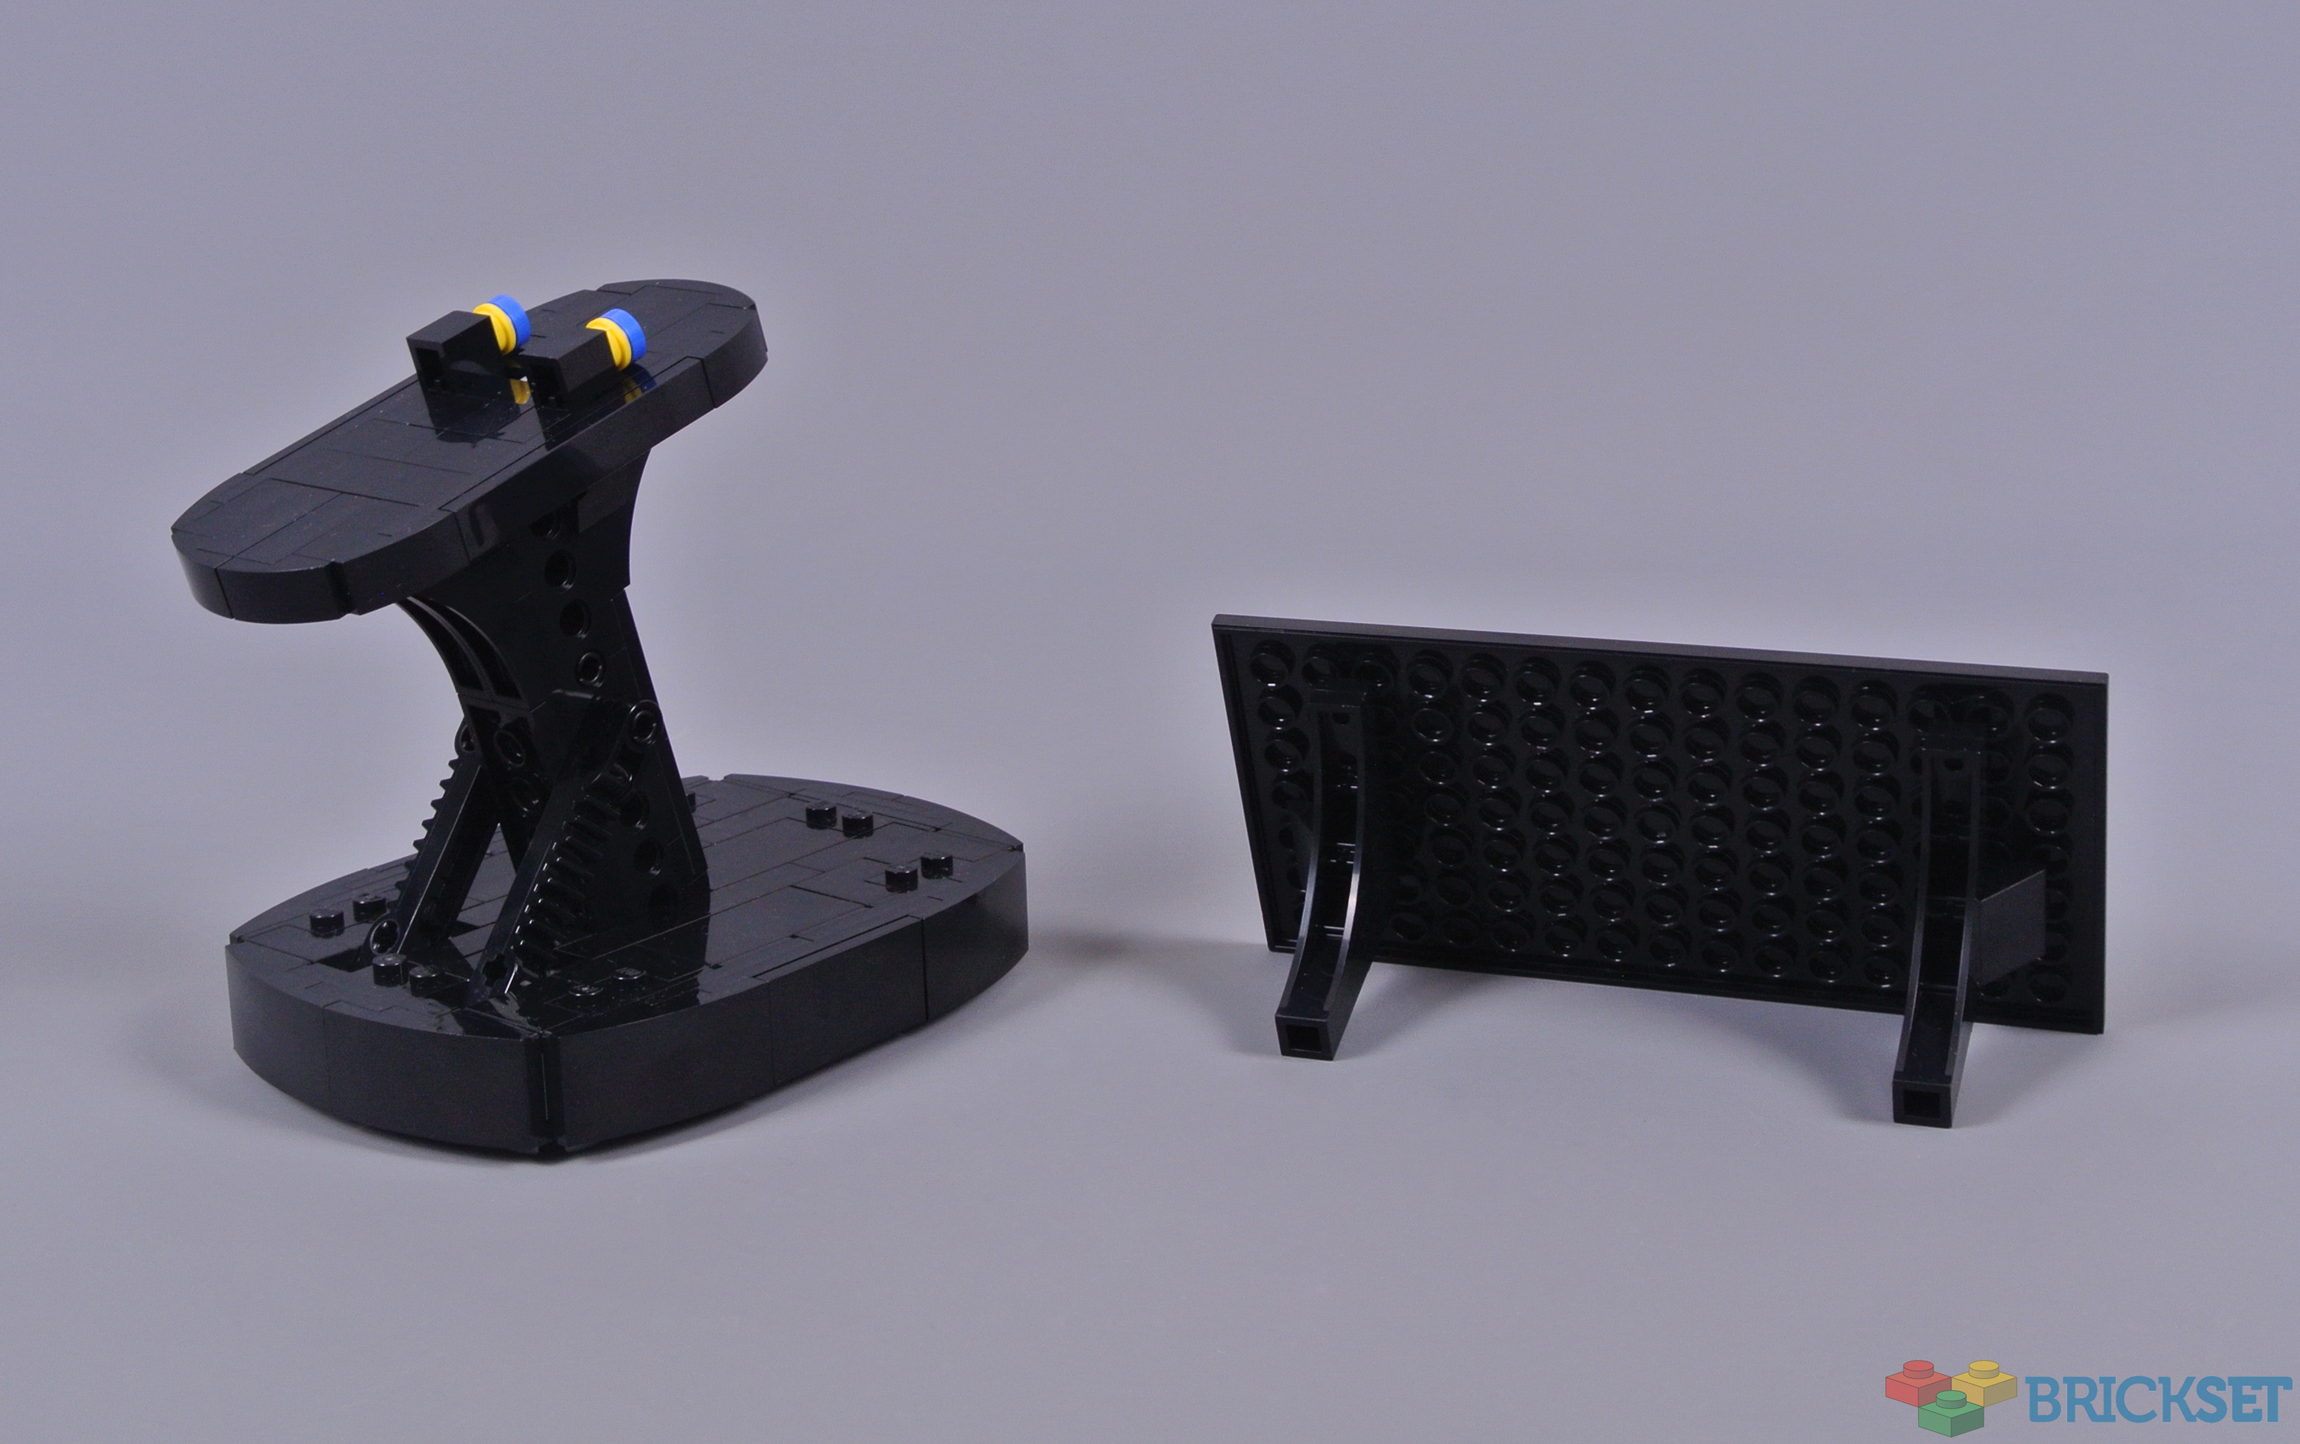
Numerous options for display are available here, facilitated by the versatile stand which slots underneath the Space Shuttle. Despite its comparatively small footprint, this is ideally located beneath the centre of gravity and feels completely stable. Moreover, I think this angled design looks beautiful, conveying an appealing impression of movement which is welcome.
Alternatively, you can rotate the stand and display the model with its nose pitched downwards because the stand remains sufficiently tall. This configuration seems awkward on flat surfaces but could prove effective when displaying the orbiter on higher shelves, showing the bodywork more clearly. However, this vehicle cannot be displayed sideways, as though banking.
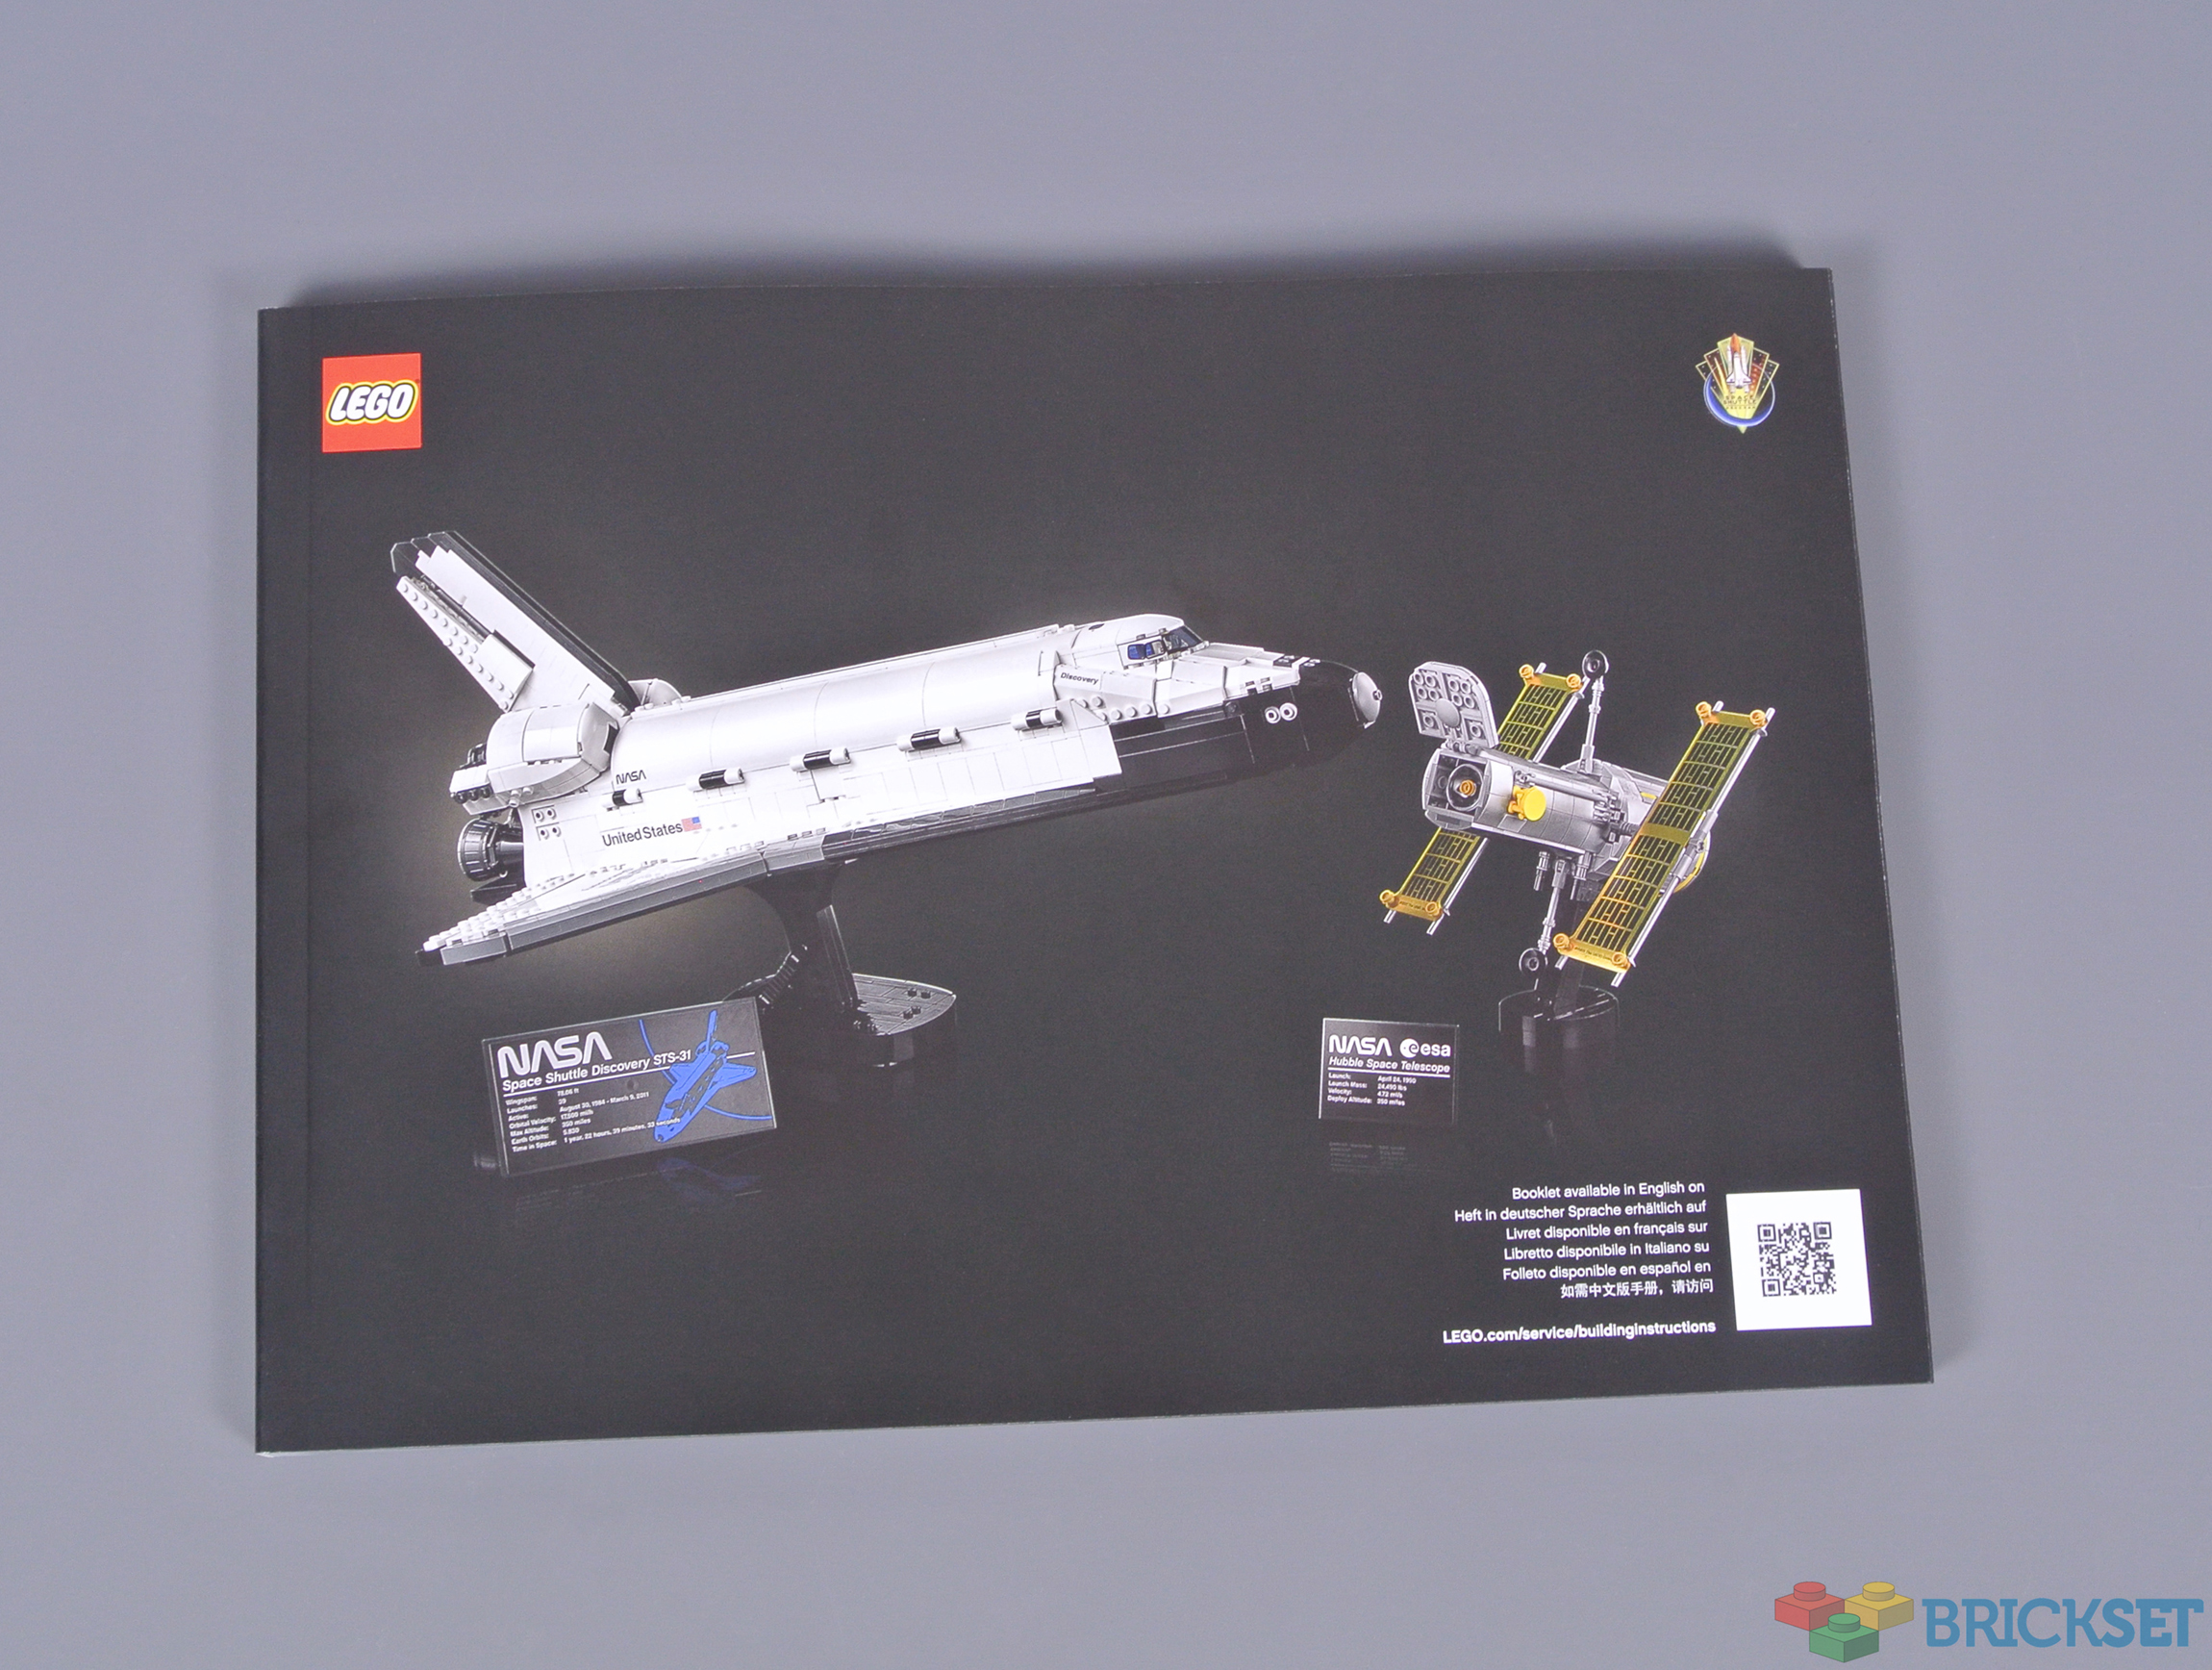
The display stand appears remarkably simple, comprising smooth shapes and contrasting with the predominant white colour across the shuttle. The rounded edges look marvellous and I like how scattered studs remain exposed where brackets are found. However, I was surprised that the display stand and accompanying information plaque are constructed independently.
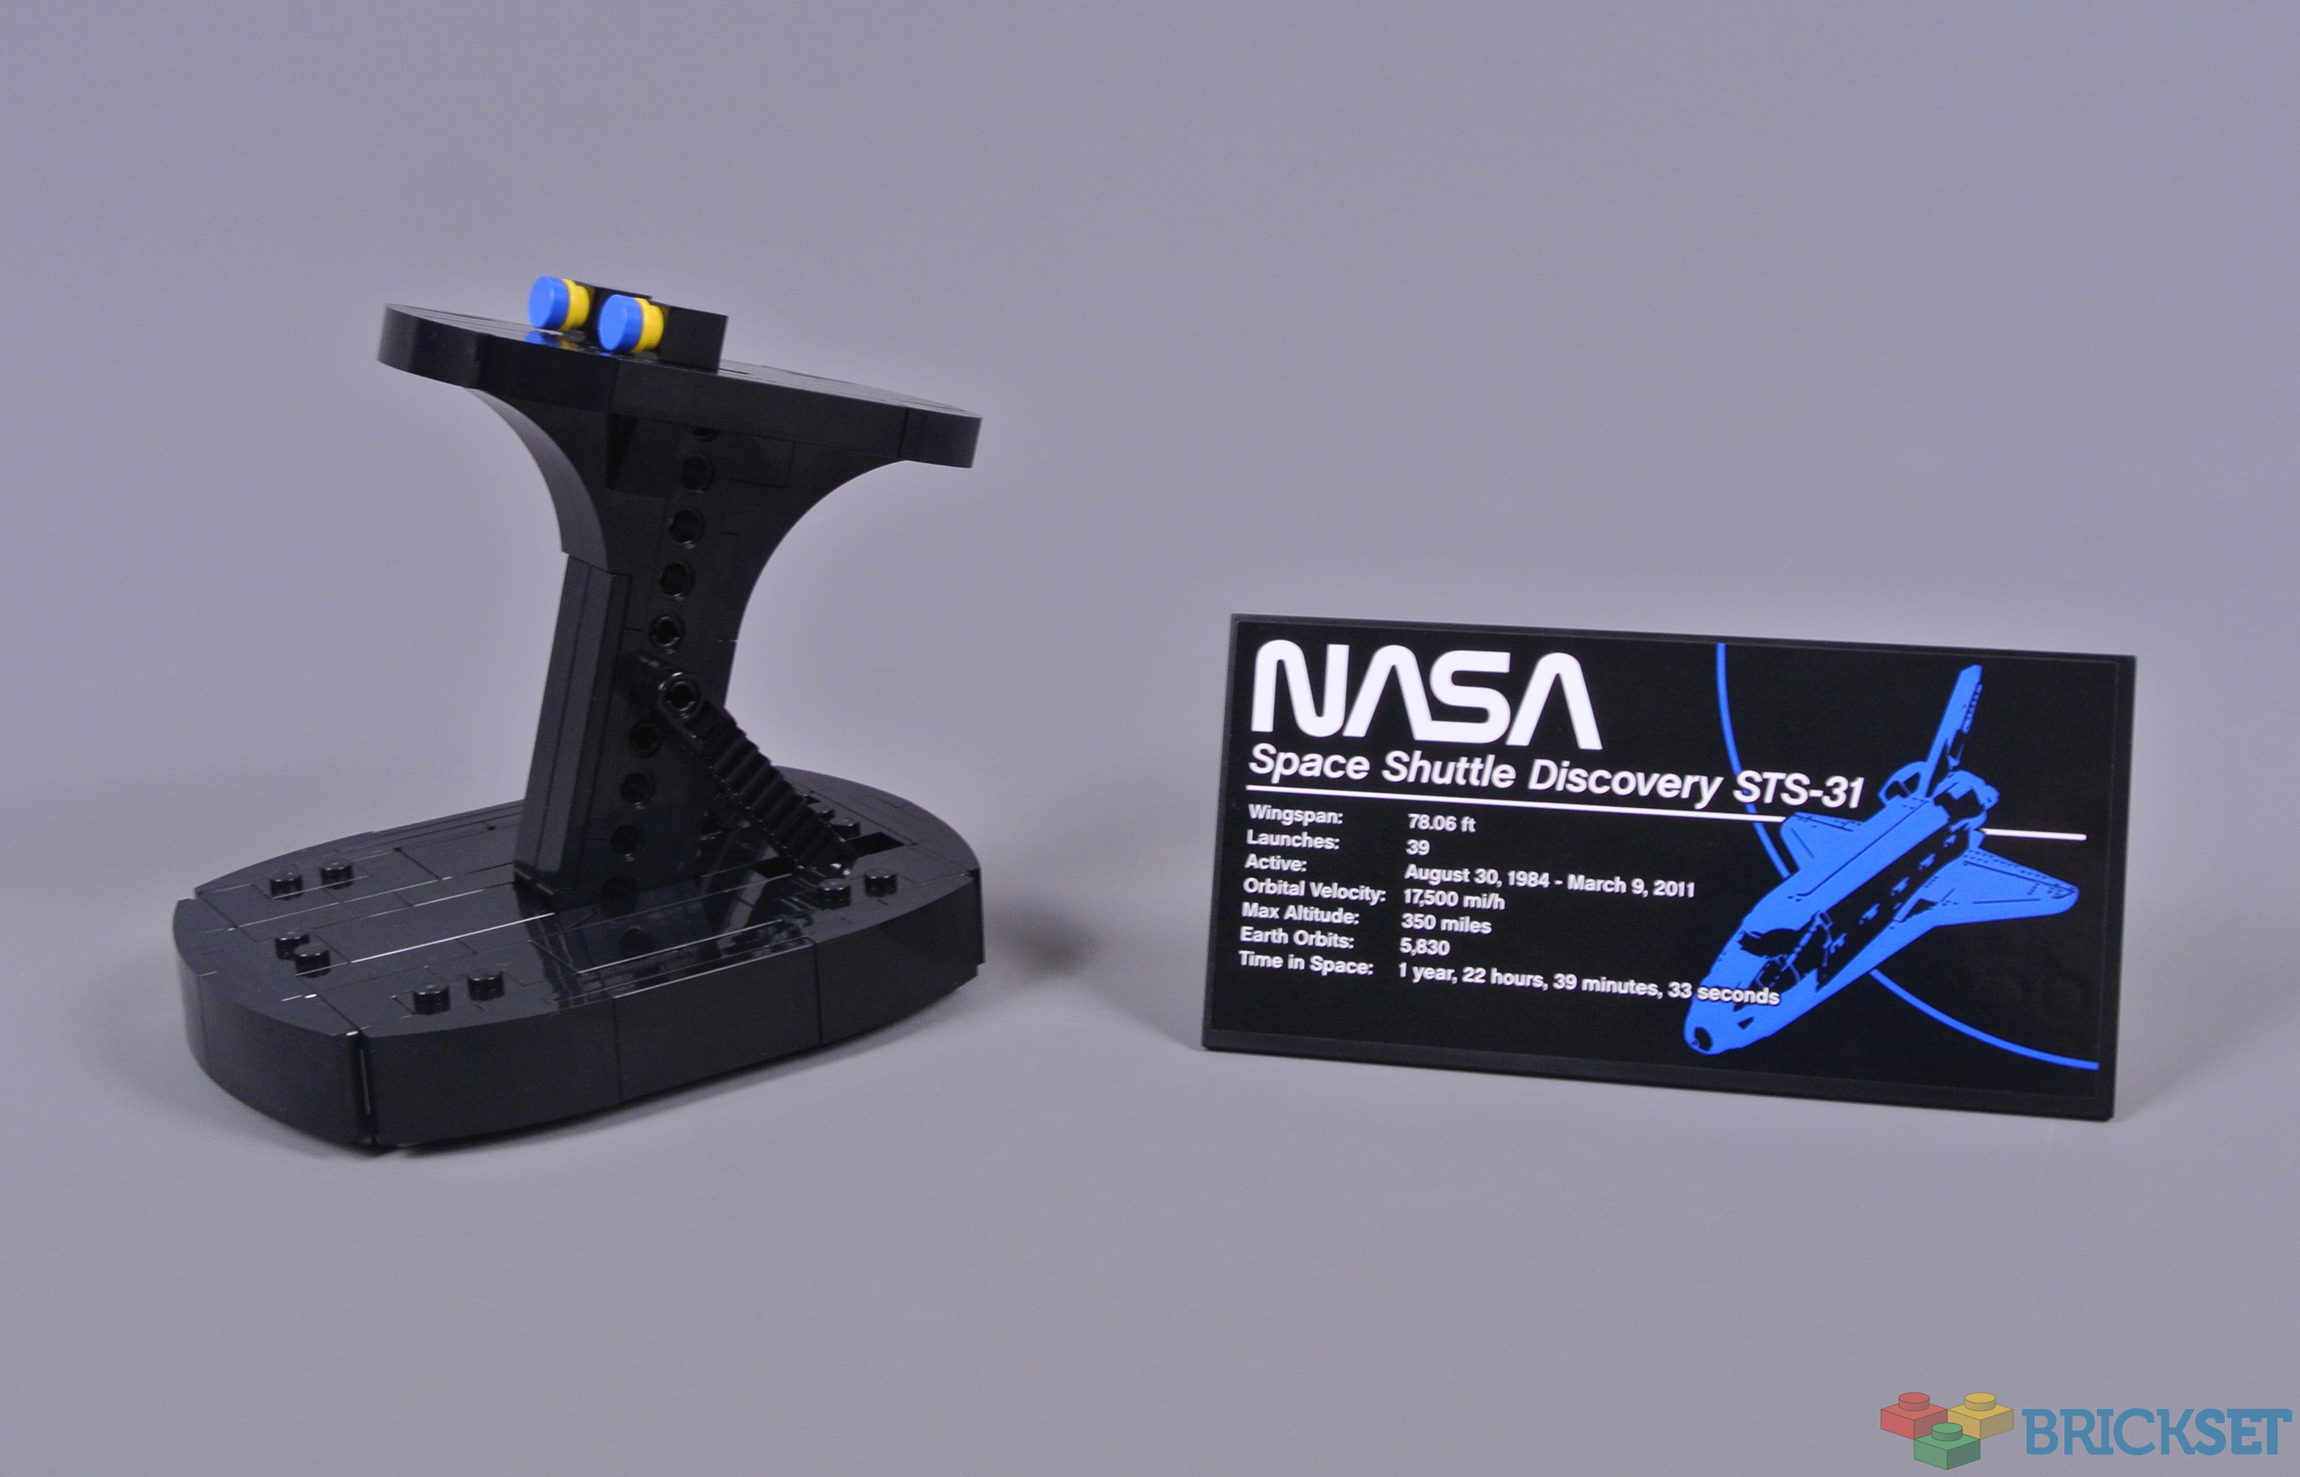
Separating the plaque from the display stand is certainly unusual, although this stand is rather short so limited space is available beneath the Space Shuttle. Of course, modifying the display stand to accommodate the plaque would be easy, if you prefer to keep them together. Accurate information about the Space Shuttle Discovery is provided on the plaque, fortunately, but I think showing the mission specification was unnecessary.
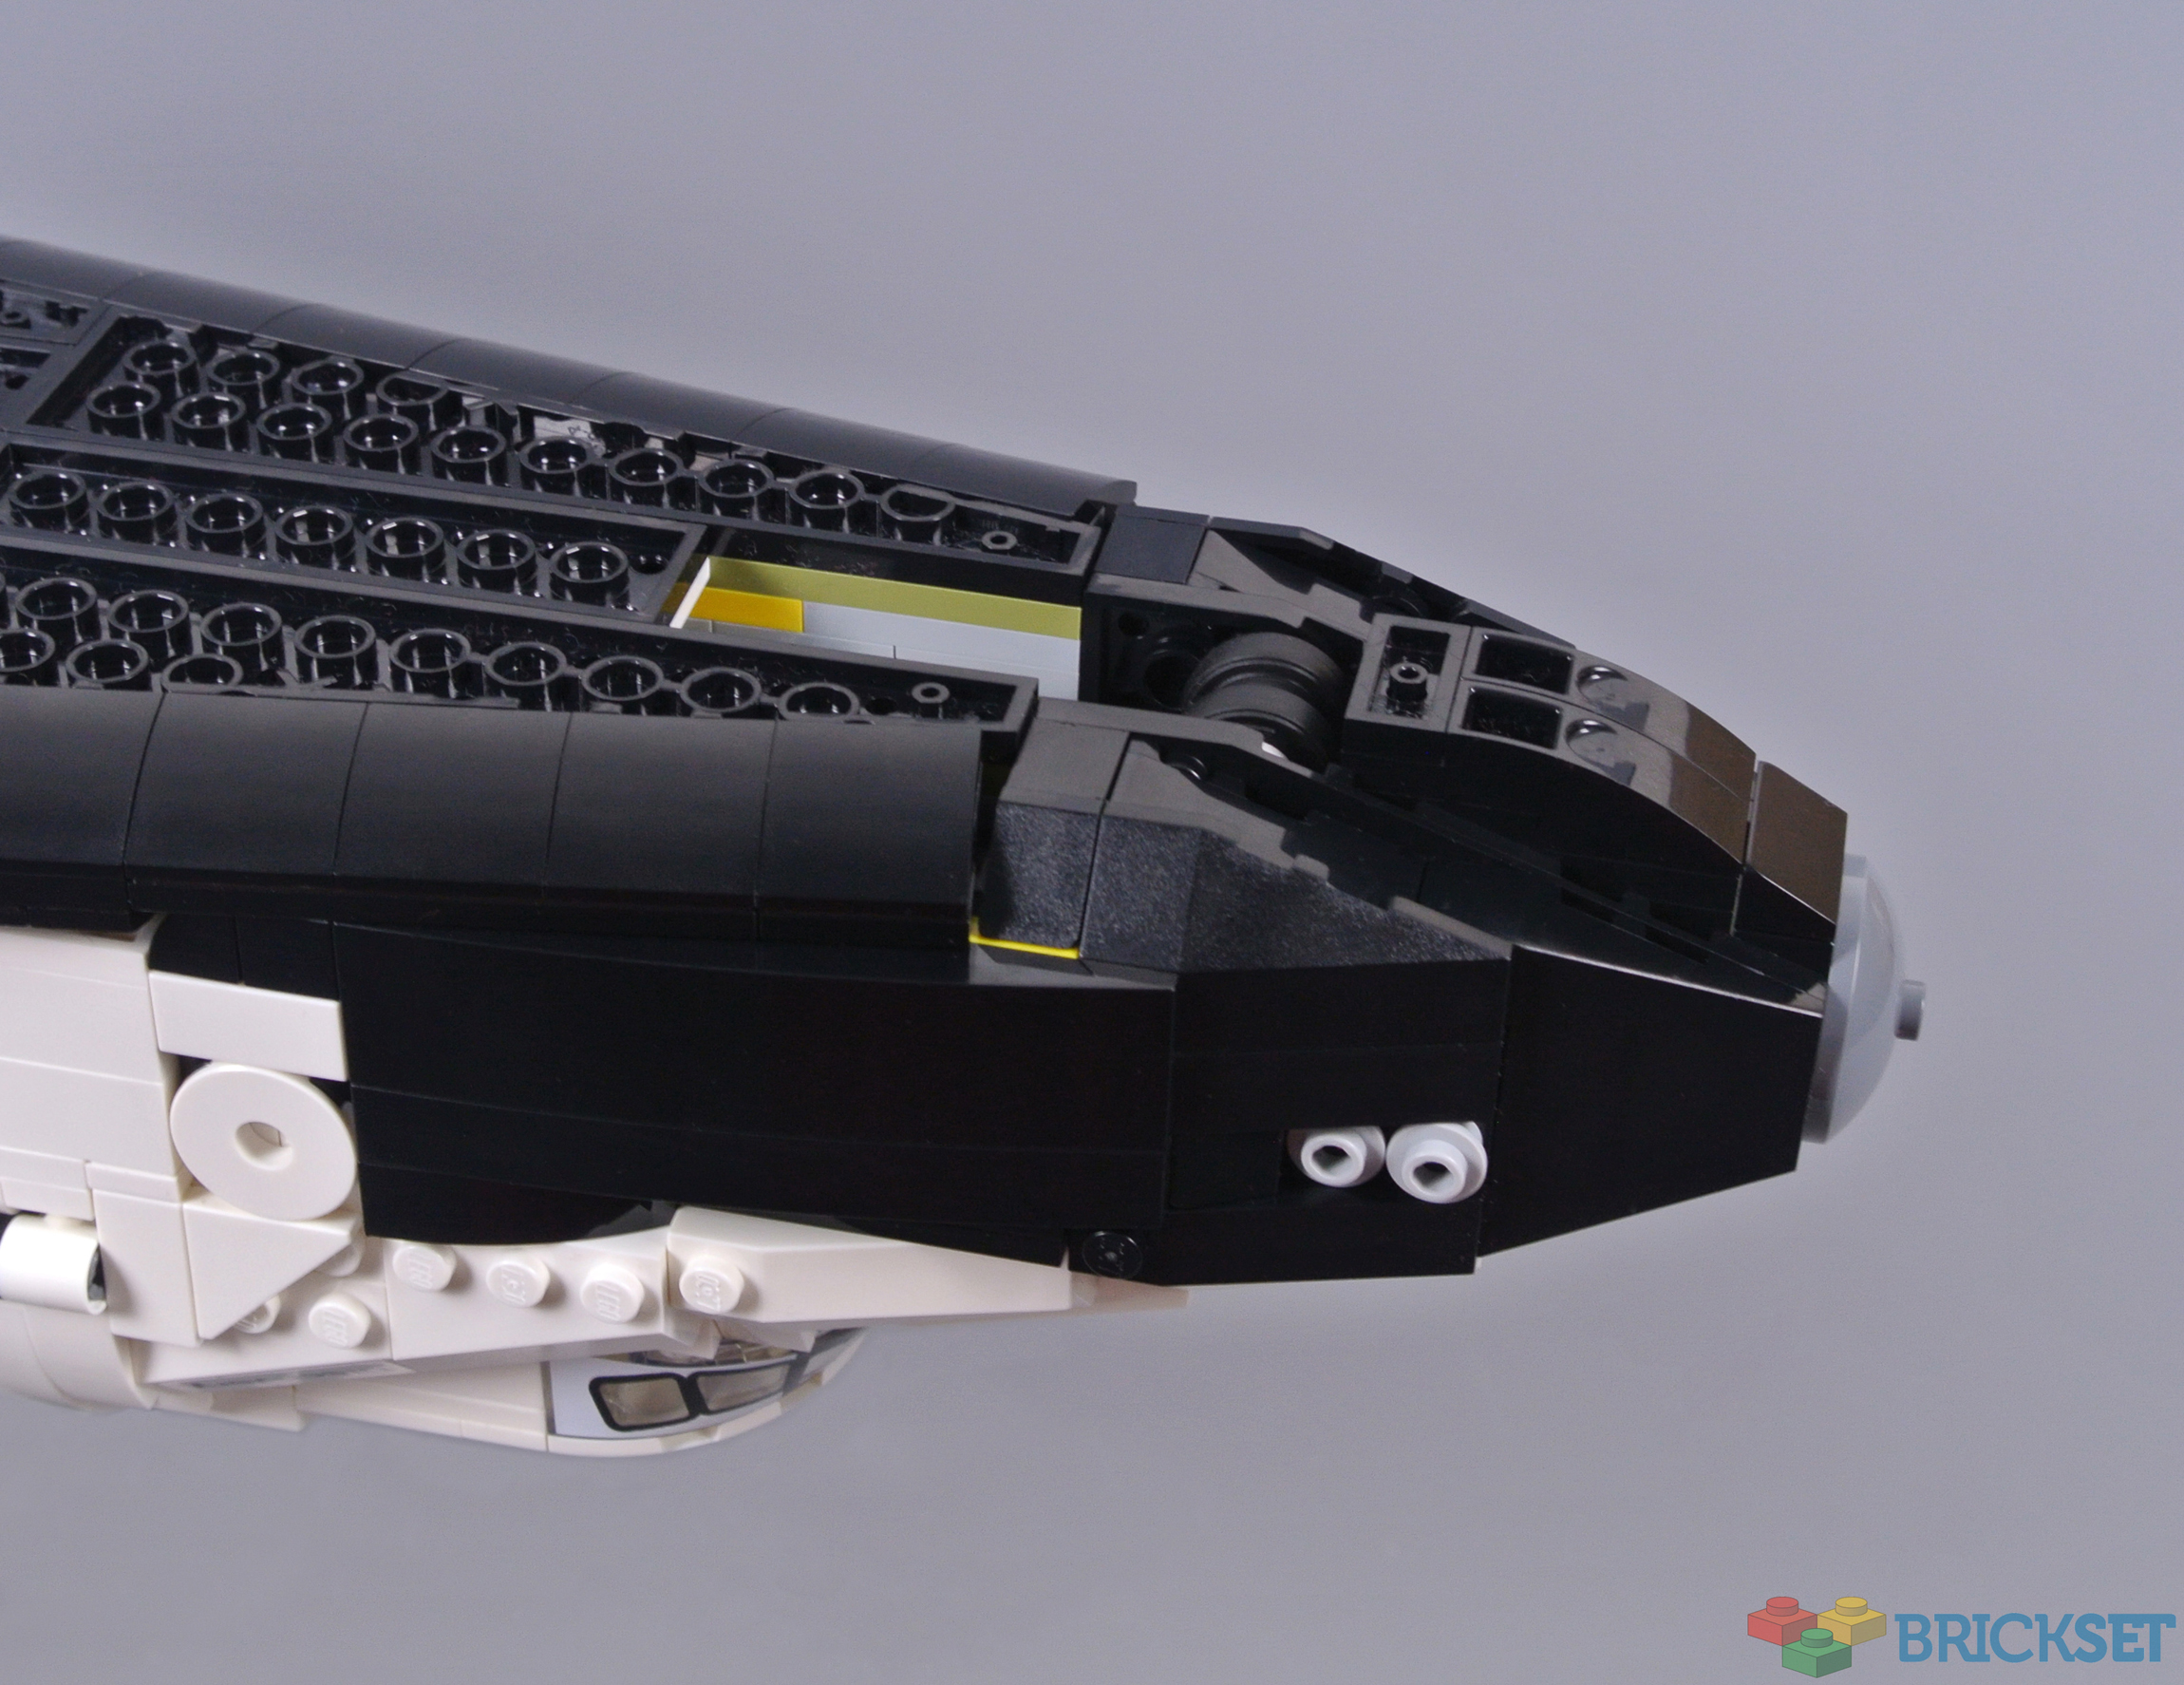
The nose and cockpit section have commonly presented difficulties when constructing LEGO Space Shuttles. The shape appears relatively simple but combines curves of varying gradient and unique components have therefore been employed sometimes. However, the selection of slopes and curved slopes has expanded considerably during recent years, permitting splendid accuracy here.
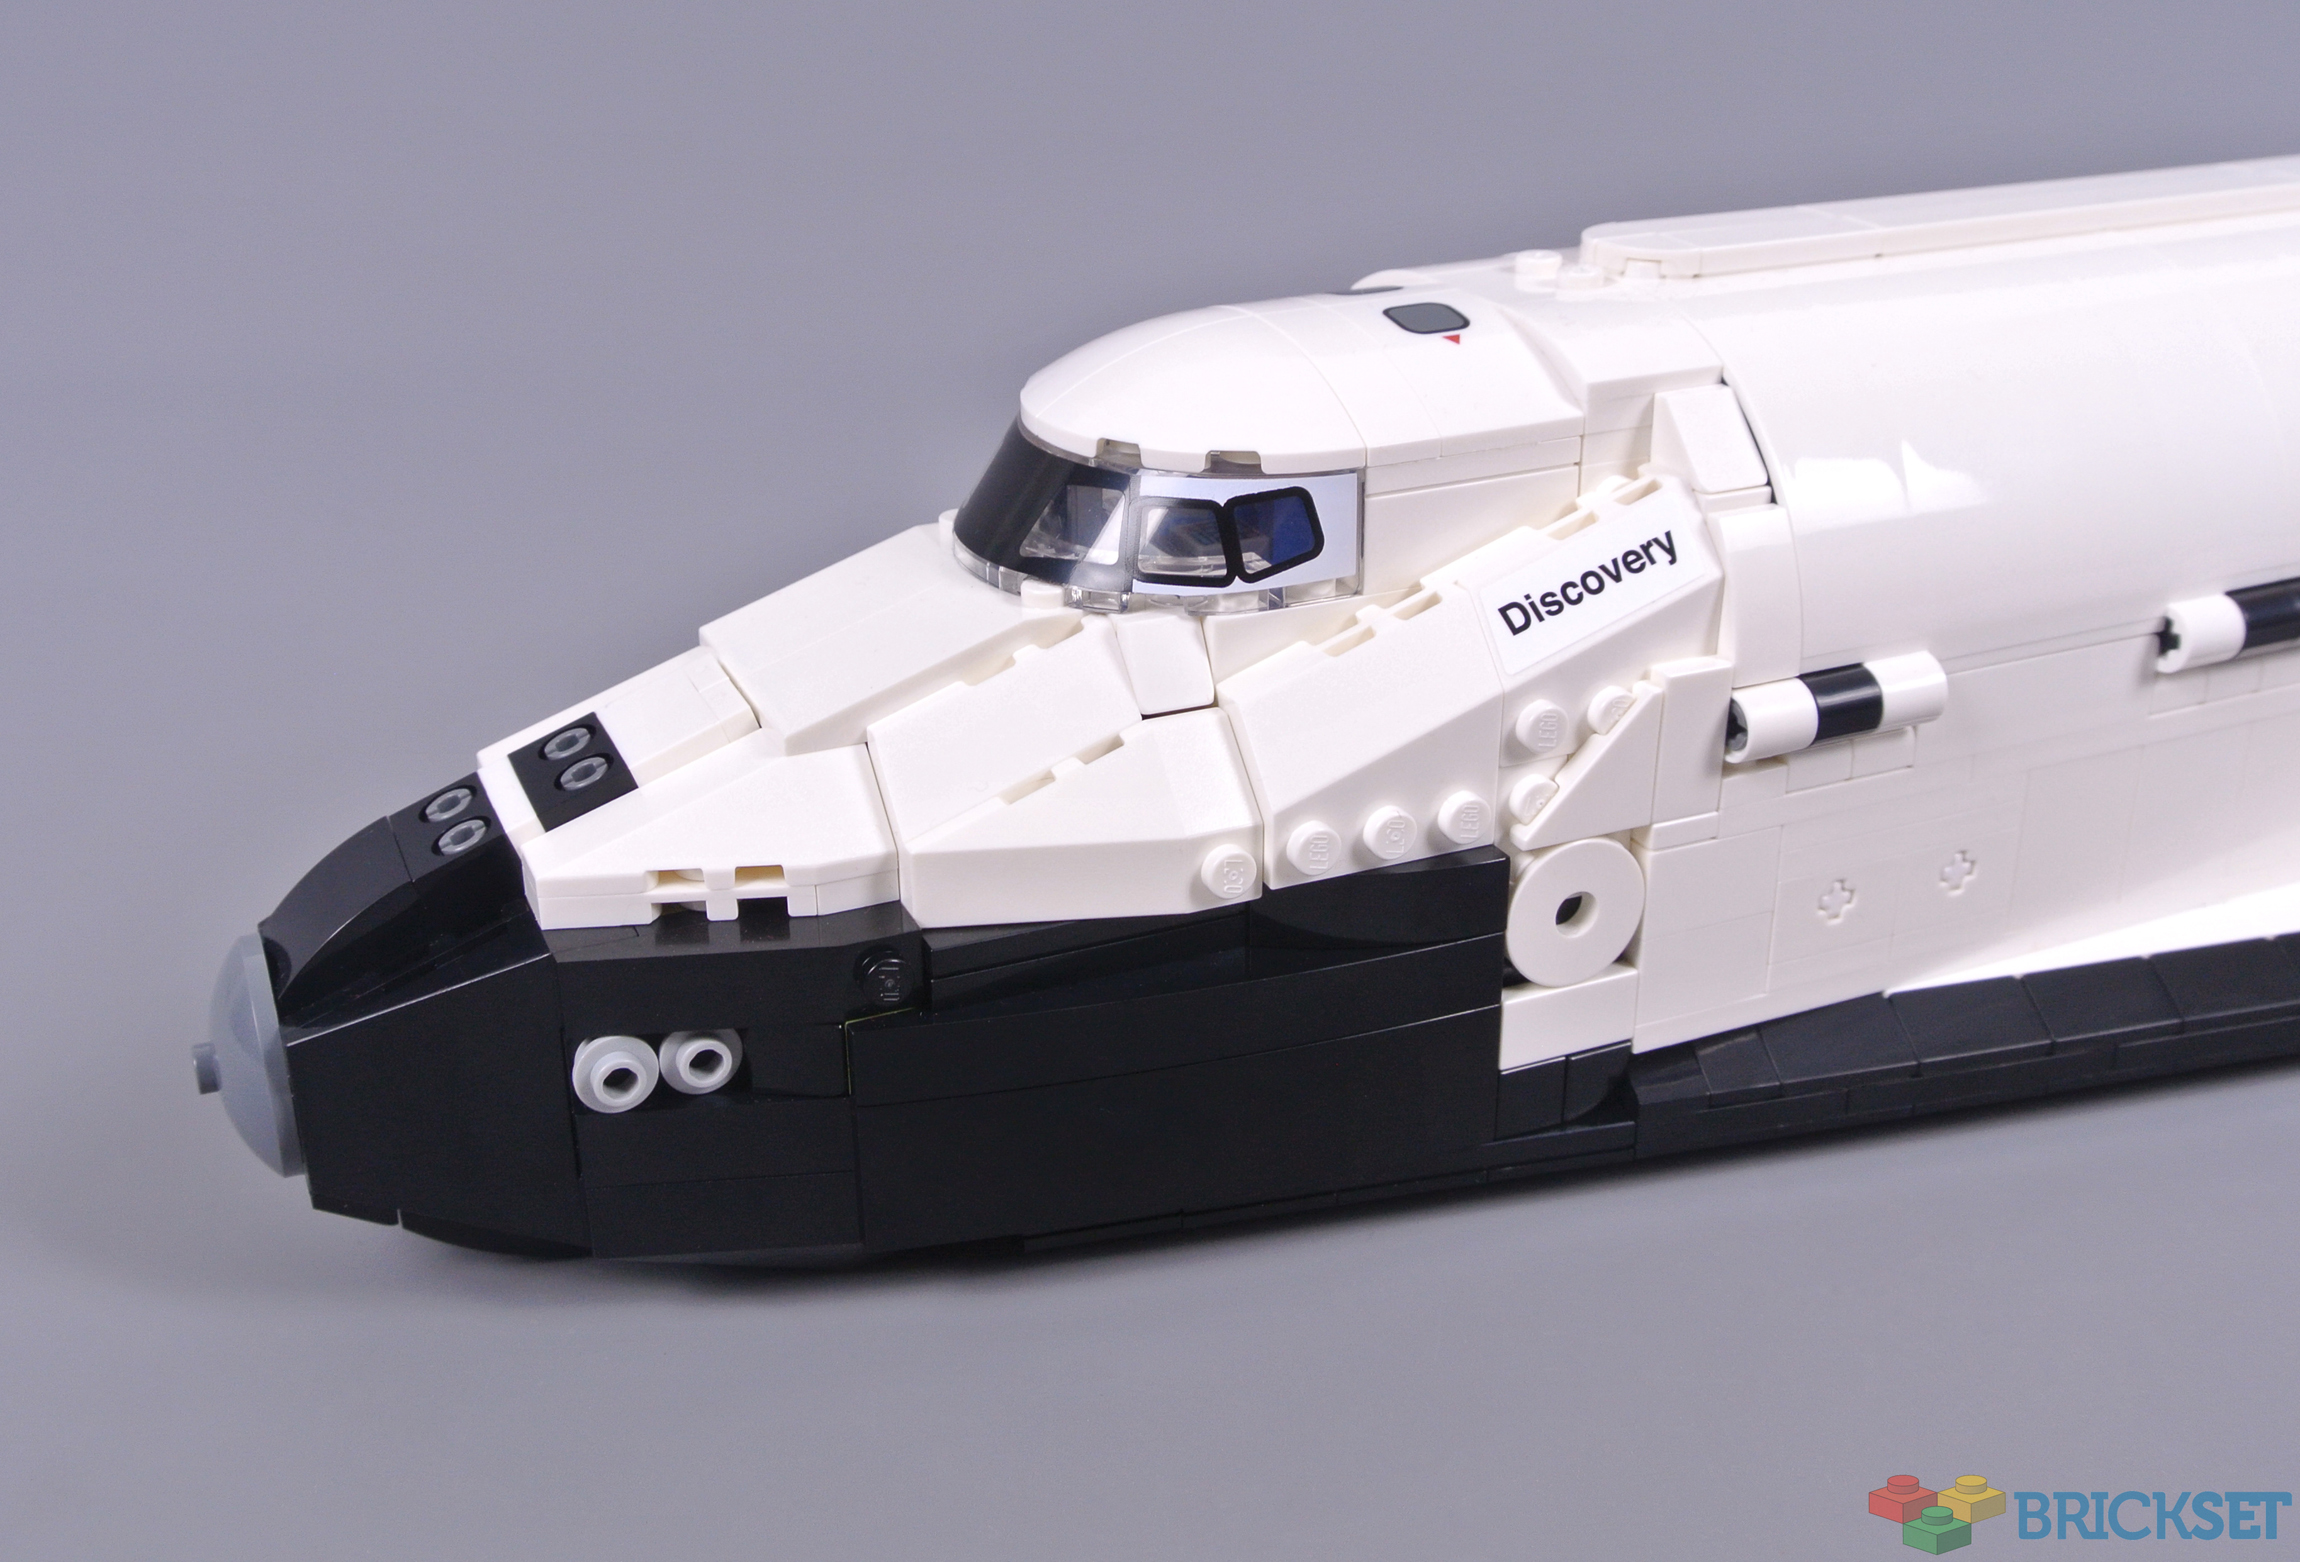
Admittedly, the combination of smooth and studded surfaces does appear odd, although I am impressed with how different elements are combined. Additionally, this design ensures correct colours around the nose, including at the tip where the dark bluish grey section looks fantastic. The reaction control thrusters seem relatively realistic too, although two more thrusters should be fixed on top.
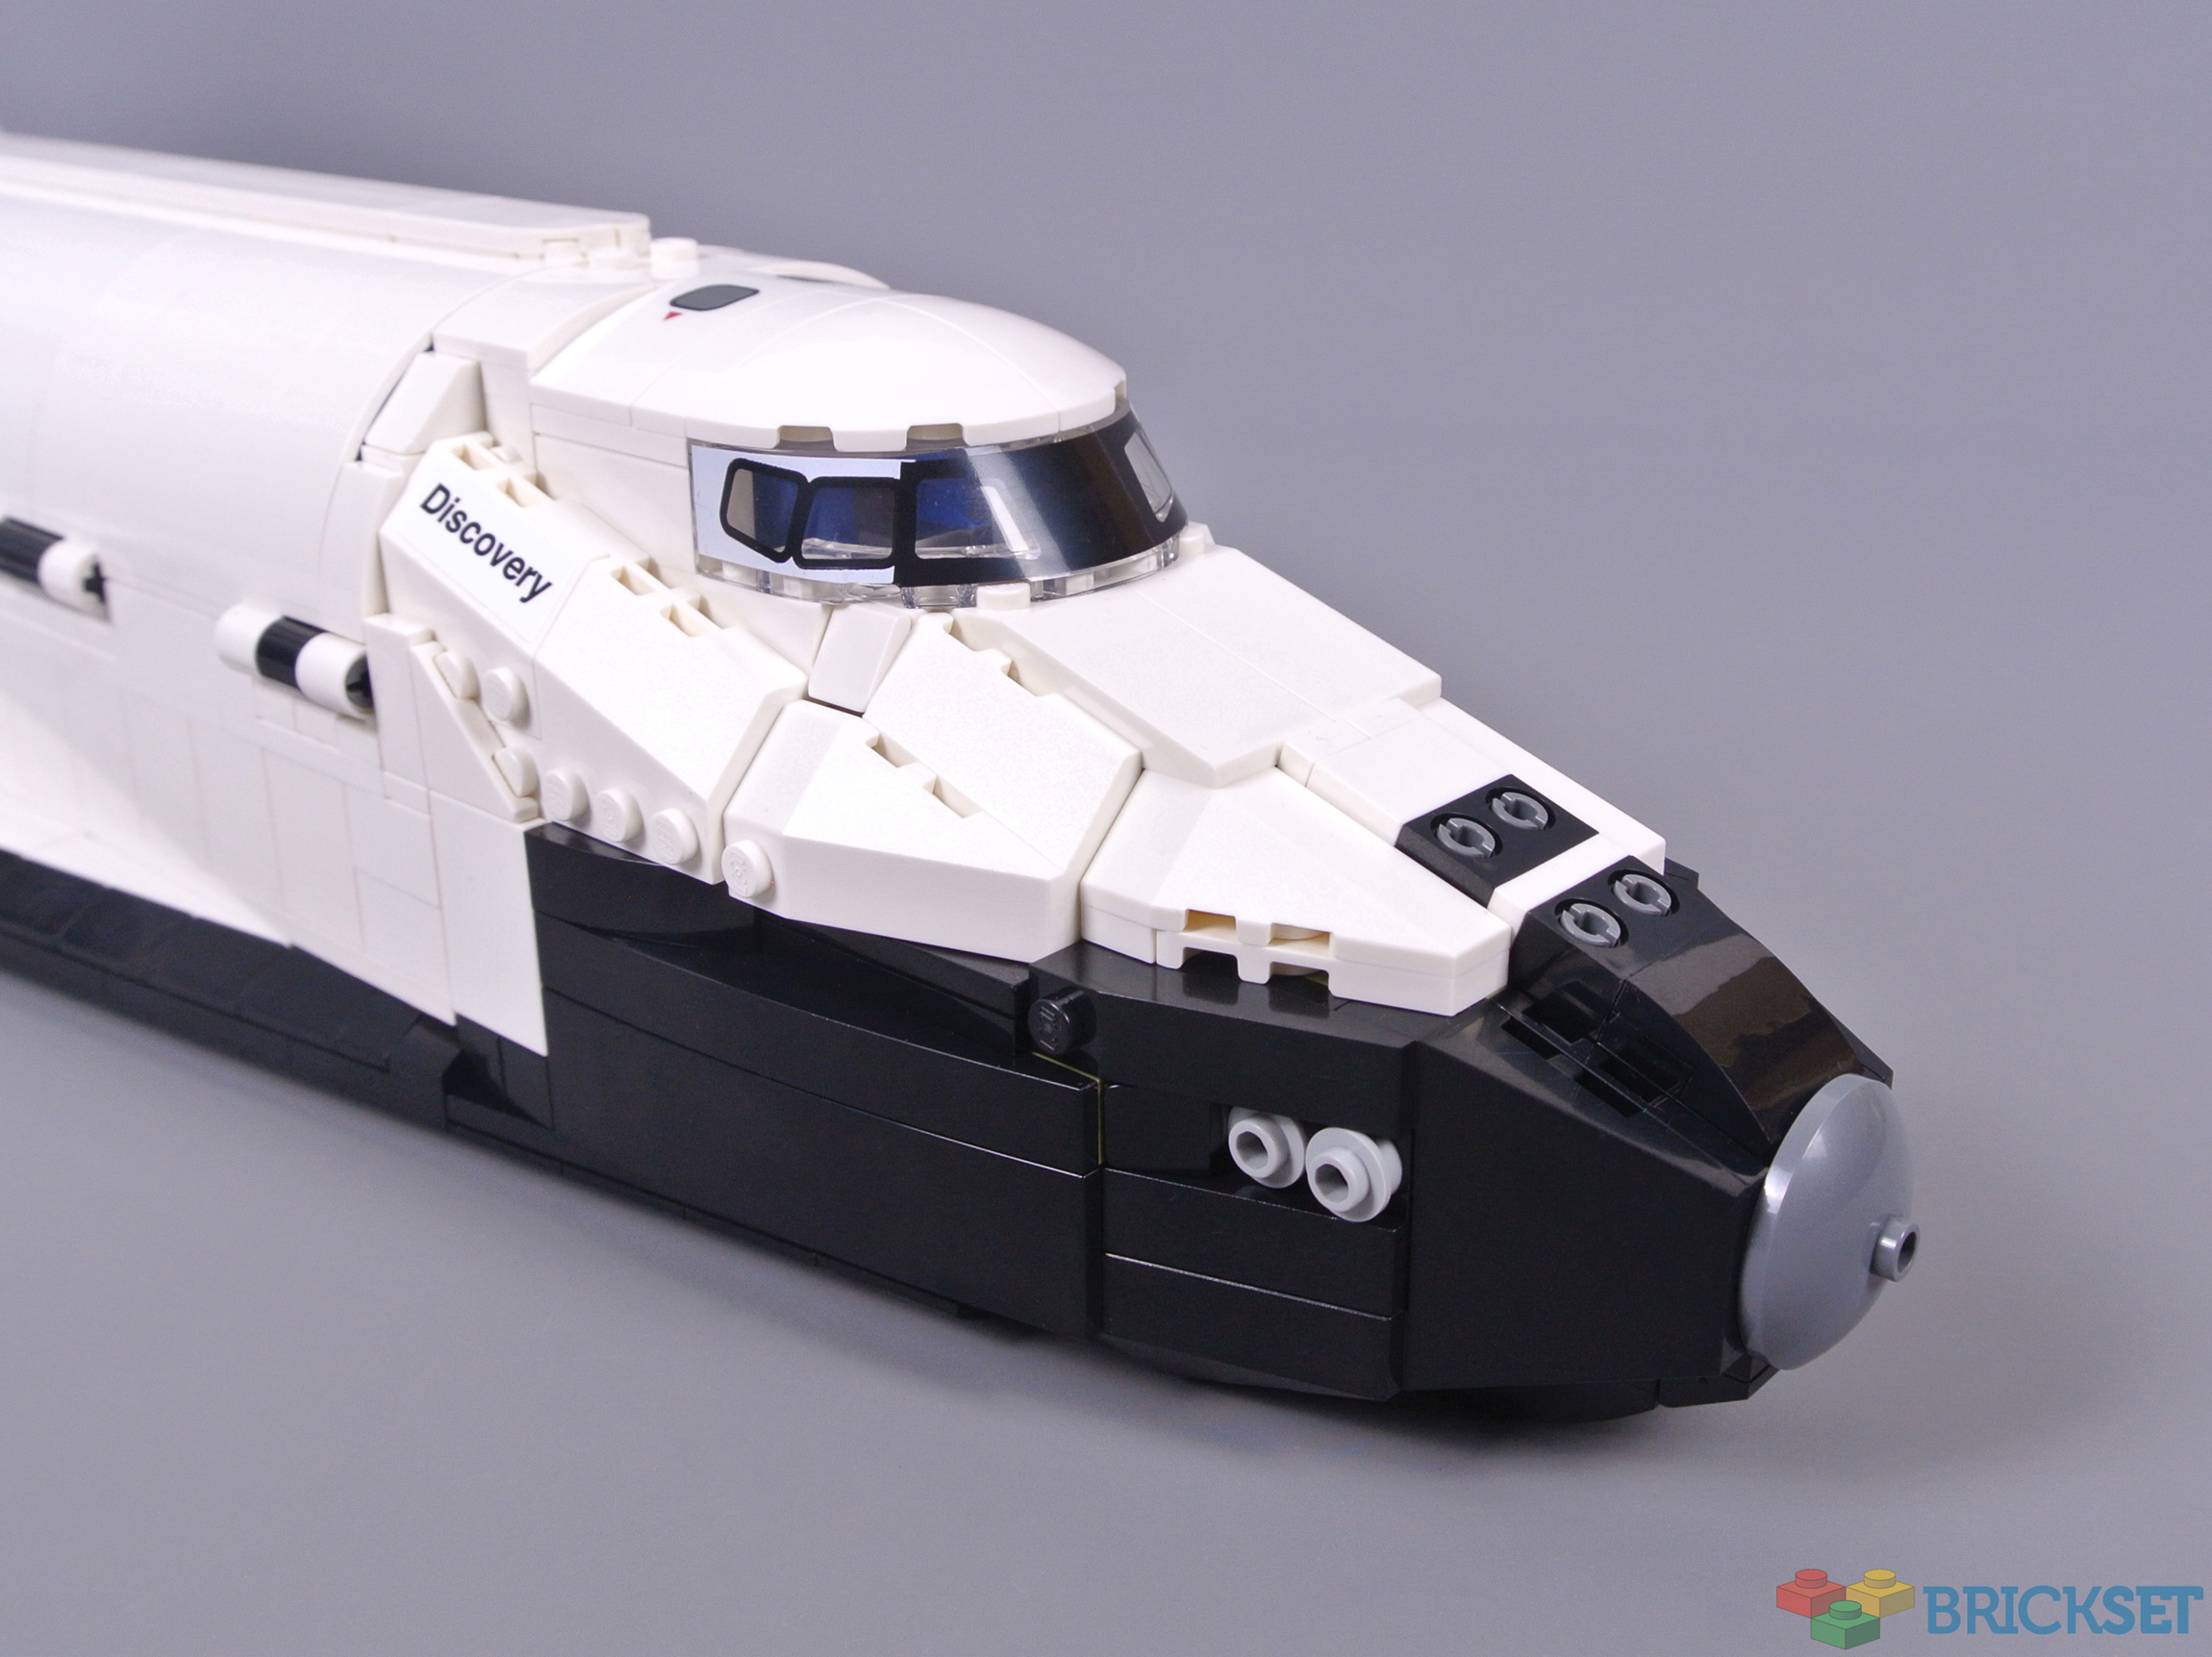
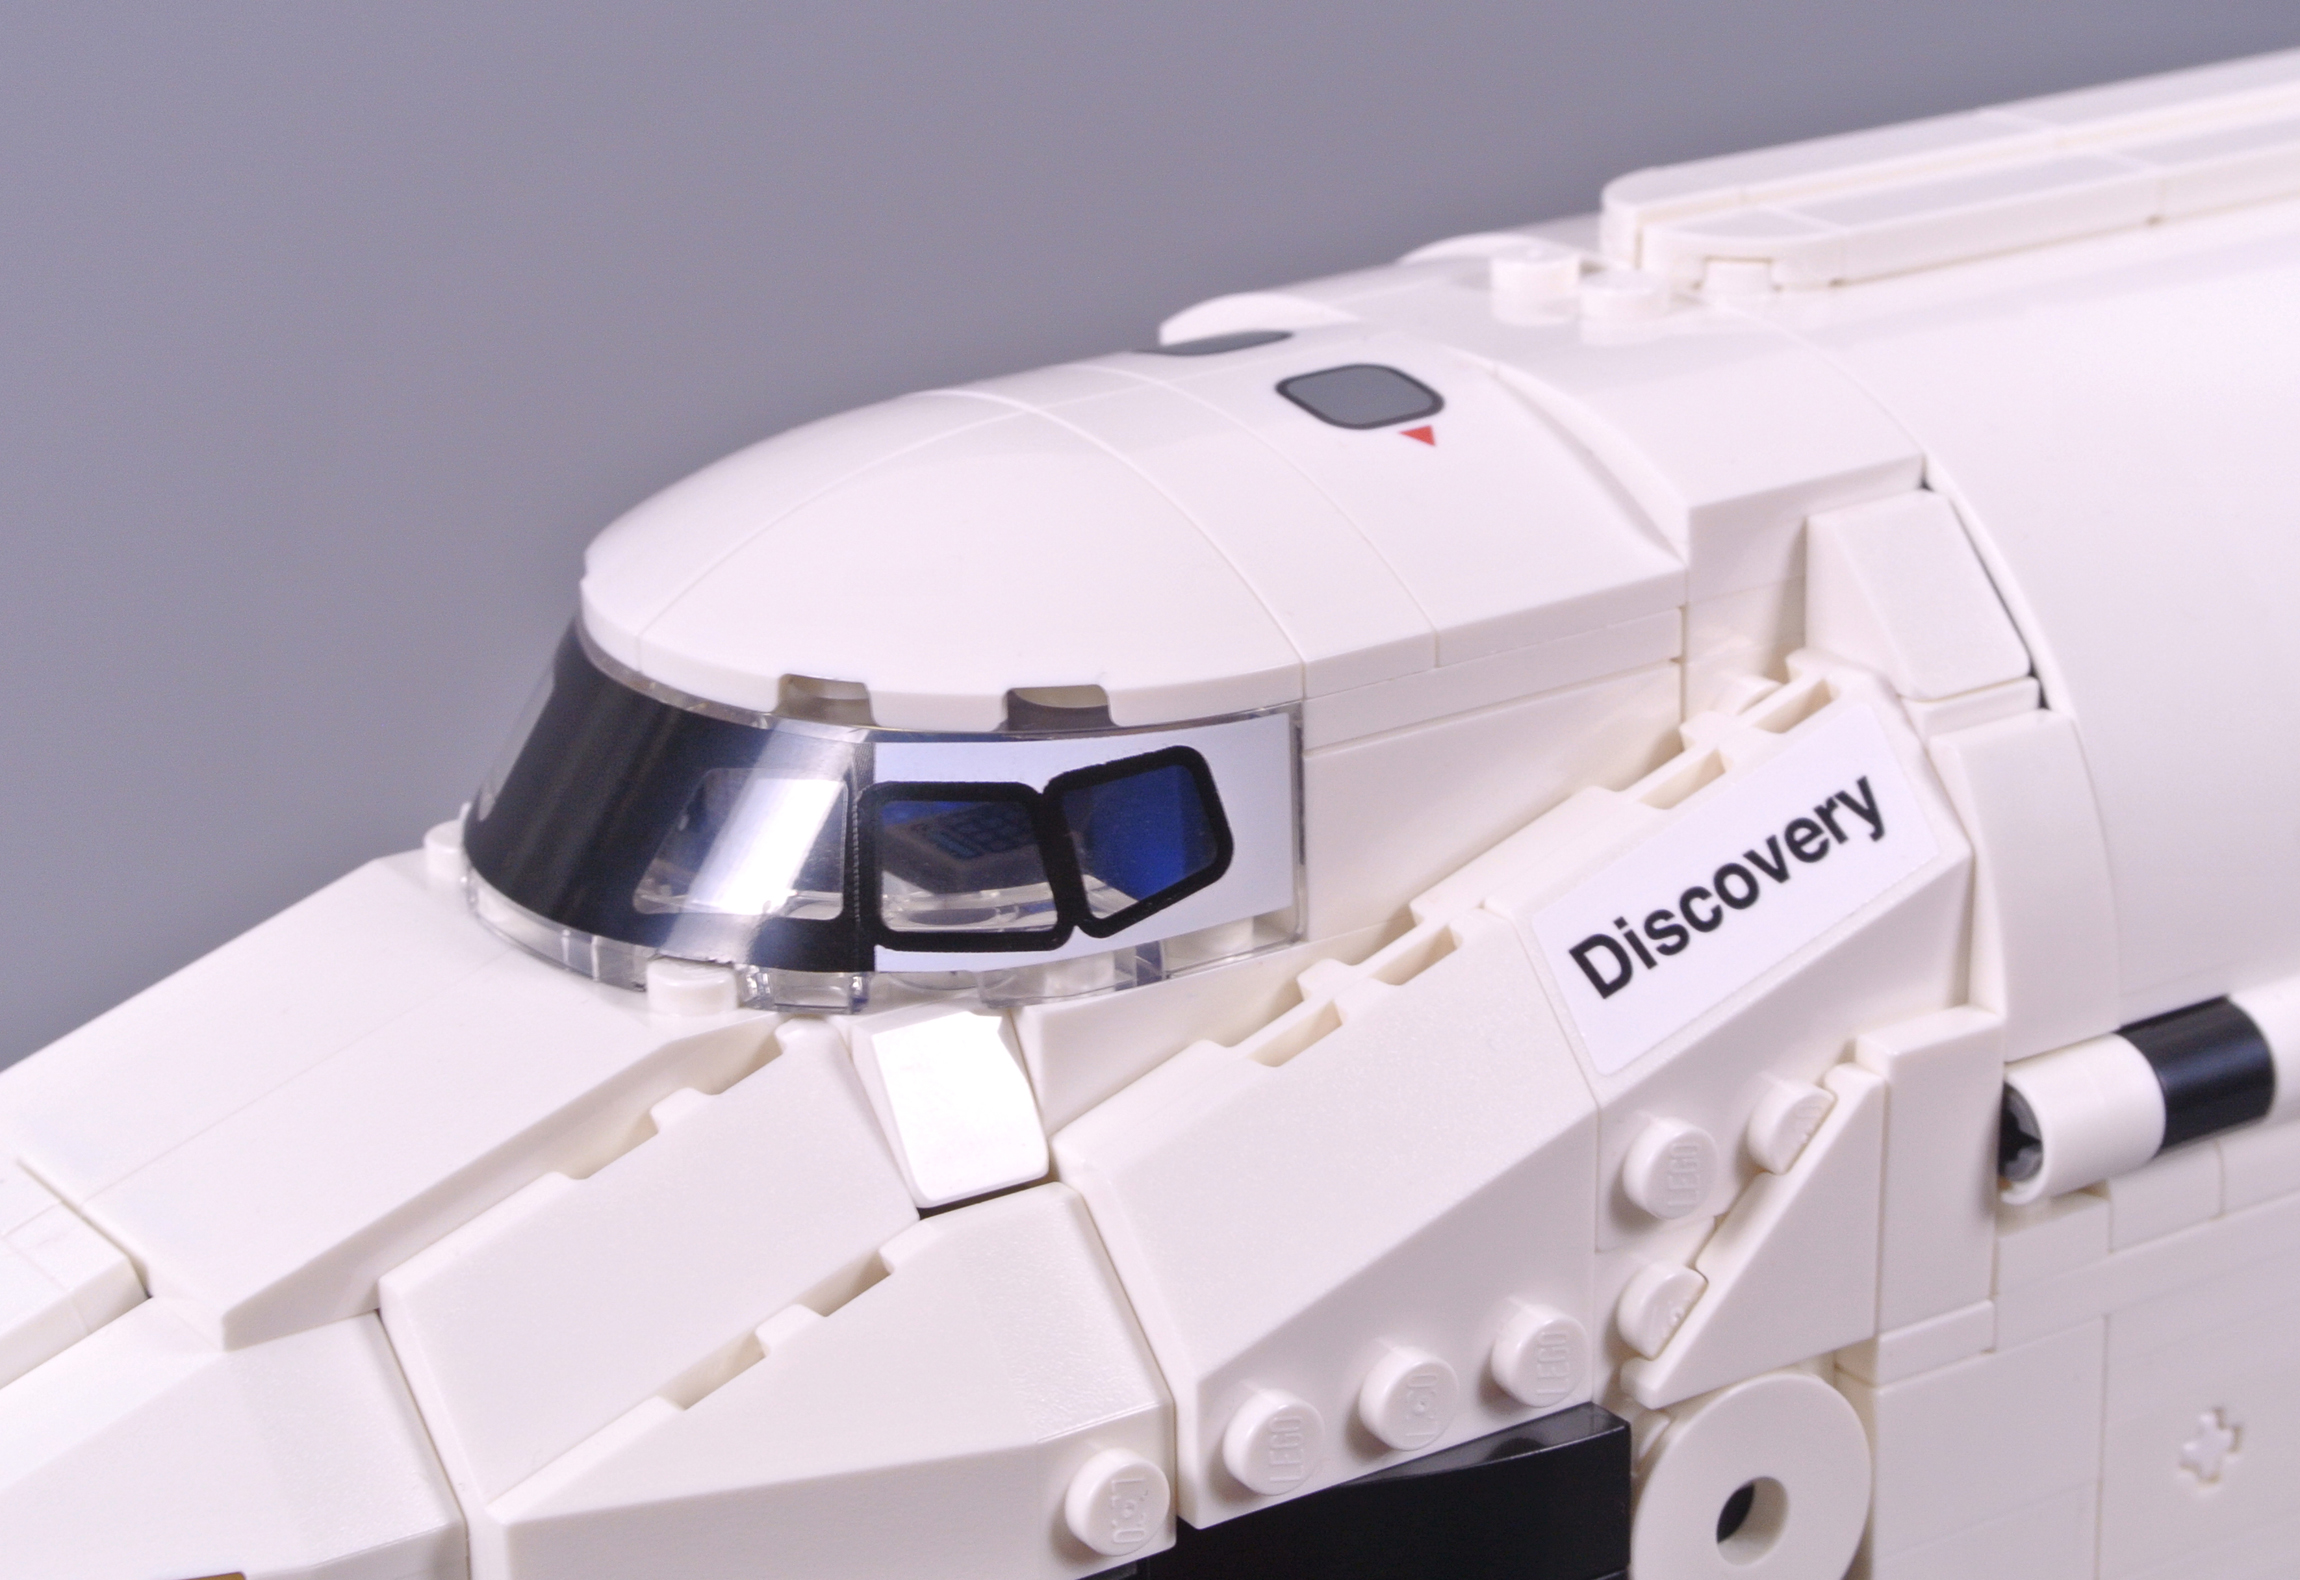
While the nose structure features no new elements, two are provided around the cockpit. The printed windscreen resembles the existing 3x6x1 element but is now elongated. In addition, the roof features two new 3x3 curved corner slopes, matching the existing 1x3 and 2x3 curved slopes. The resulting shape looks superb and the printing is accurate, although its white colour matching leaves something to be desired.
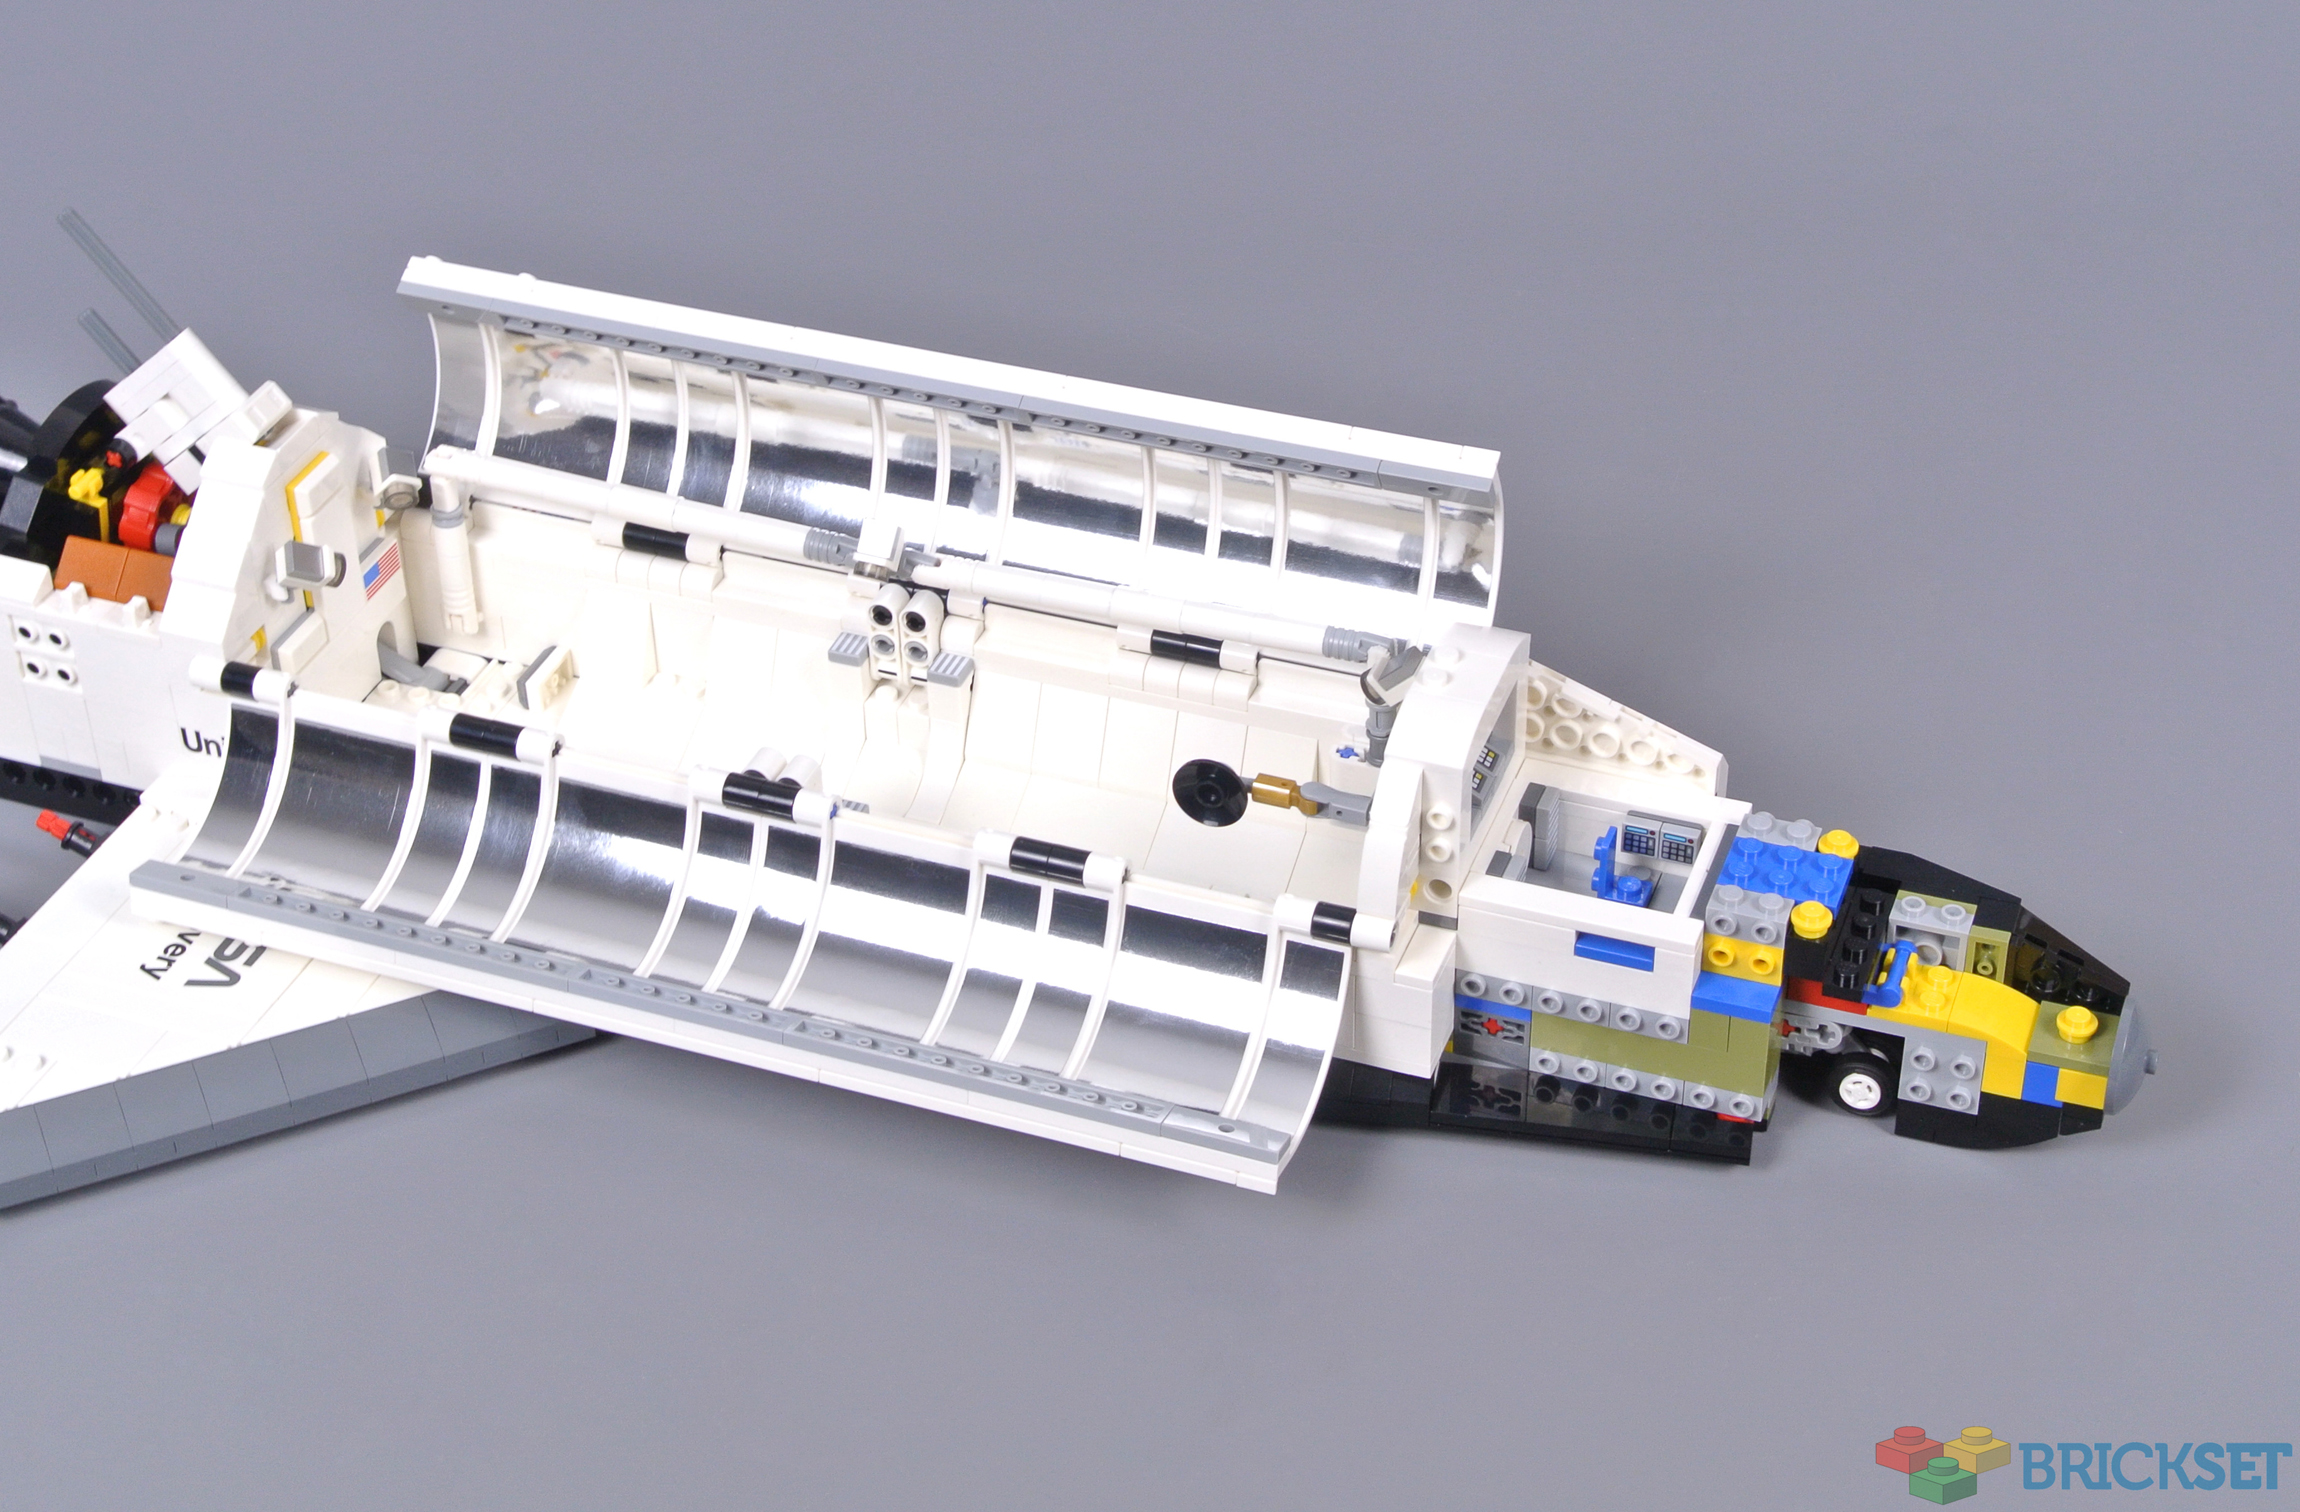
Removing the windscreen and roof reveals the crew compartment which contains extensive detail. Four blue seats occupy the flight deck, correctly organised for launch and re-entry. An impressive selection of printed control consoles are also provided, further corresponding with the source material and displaying appropriately intricate buttons.
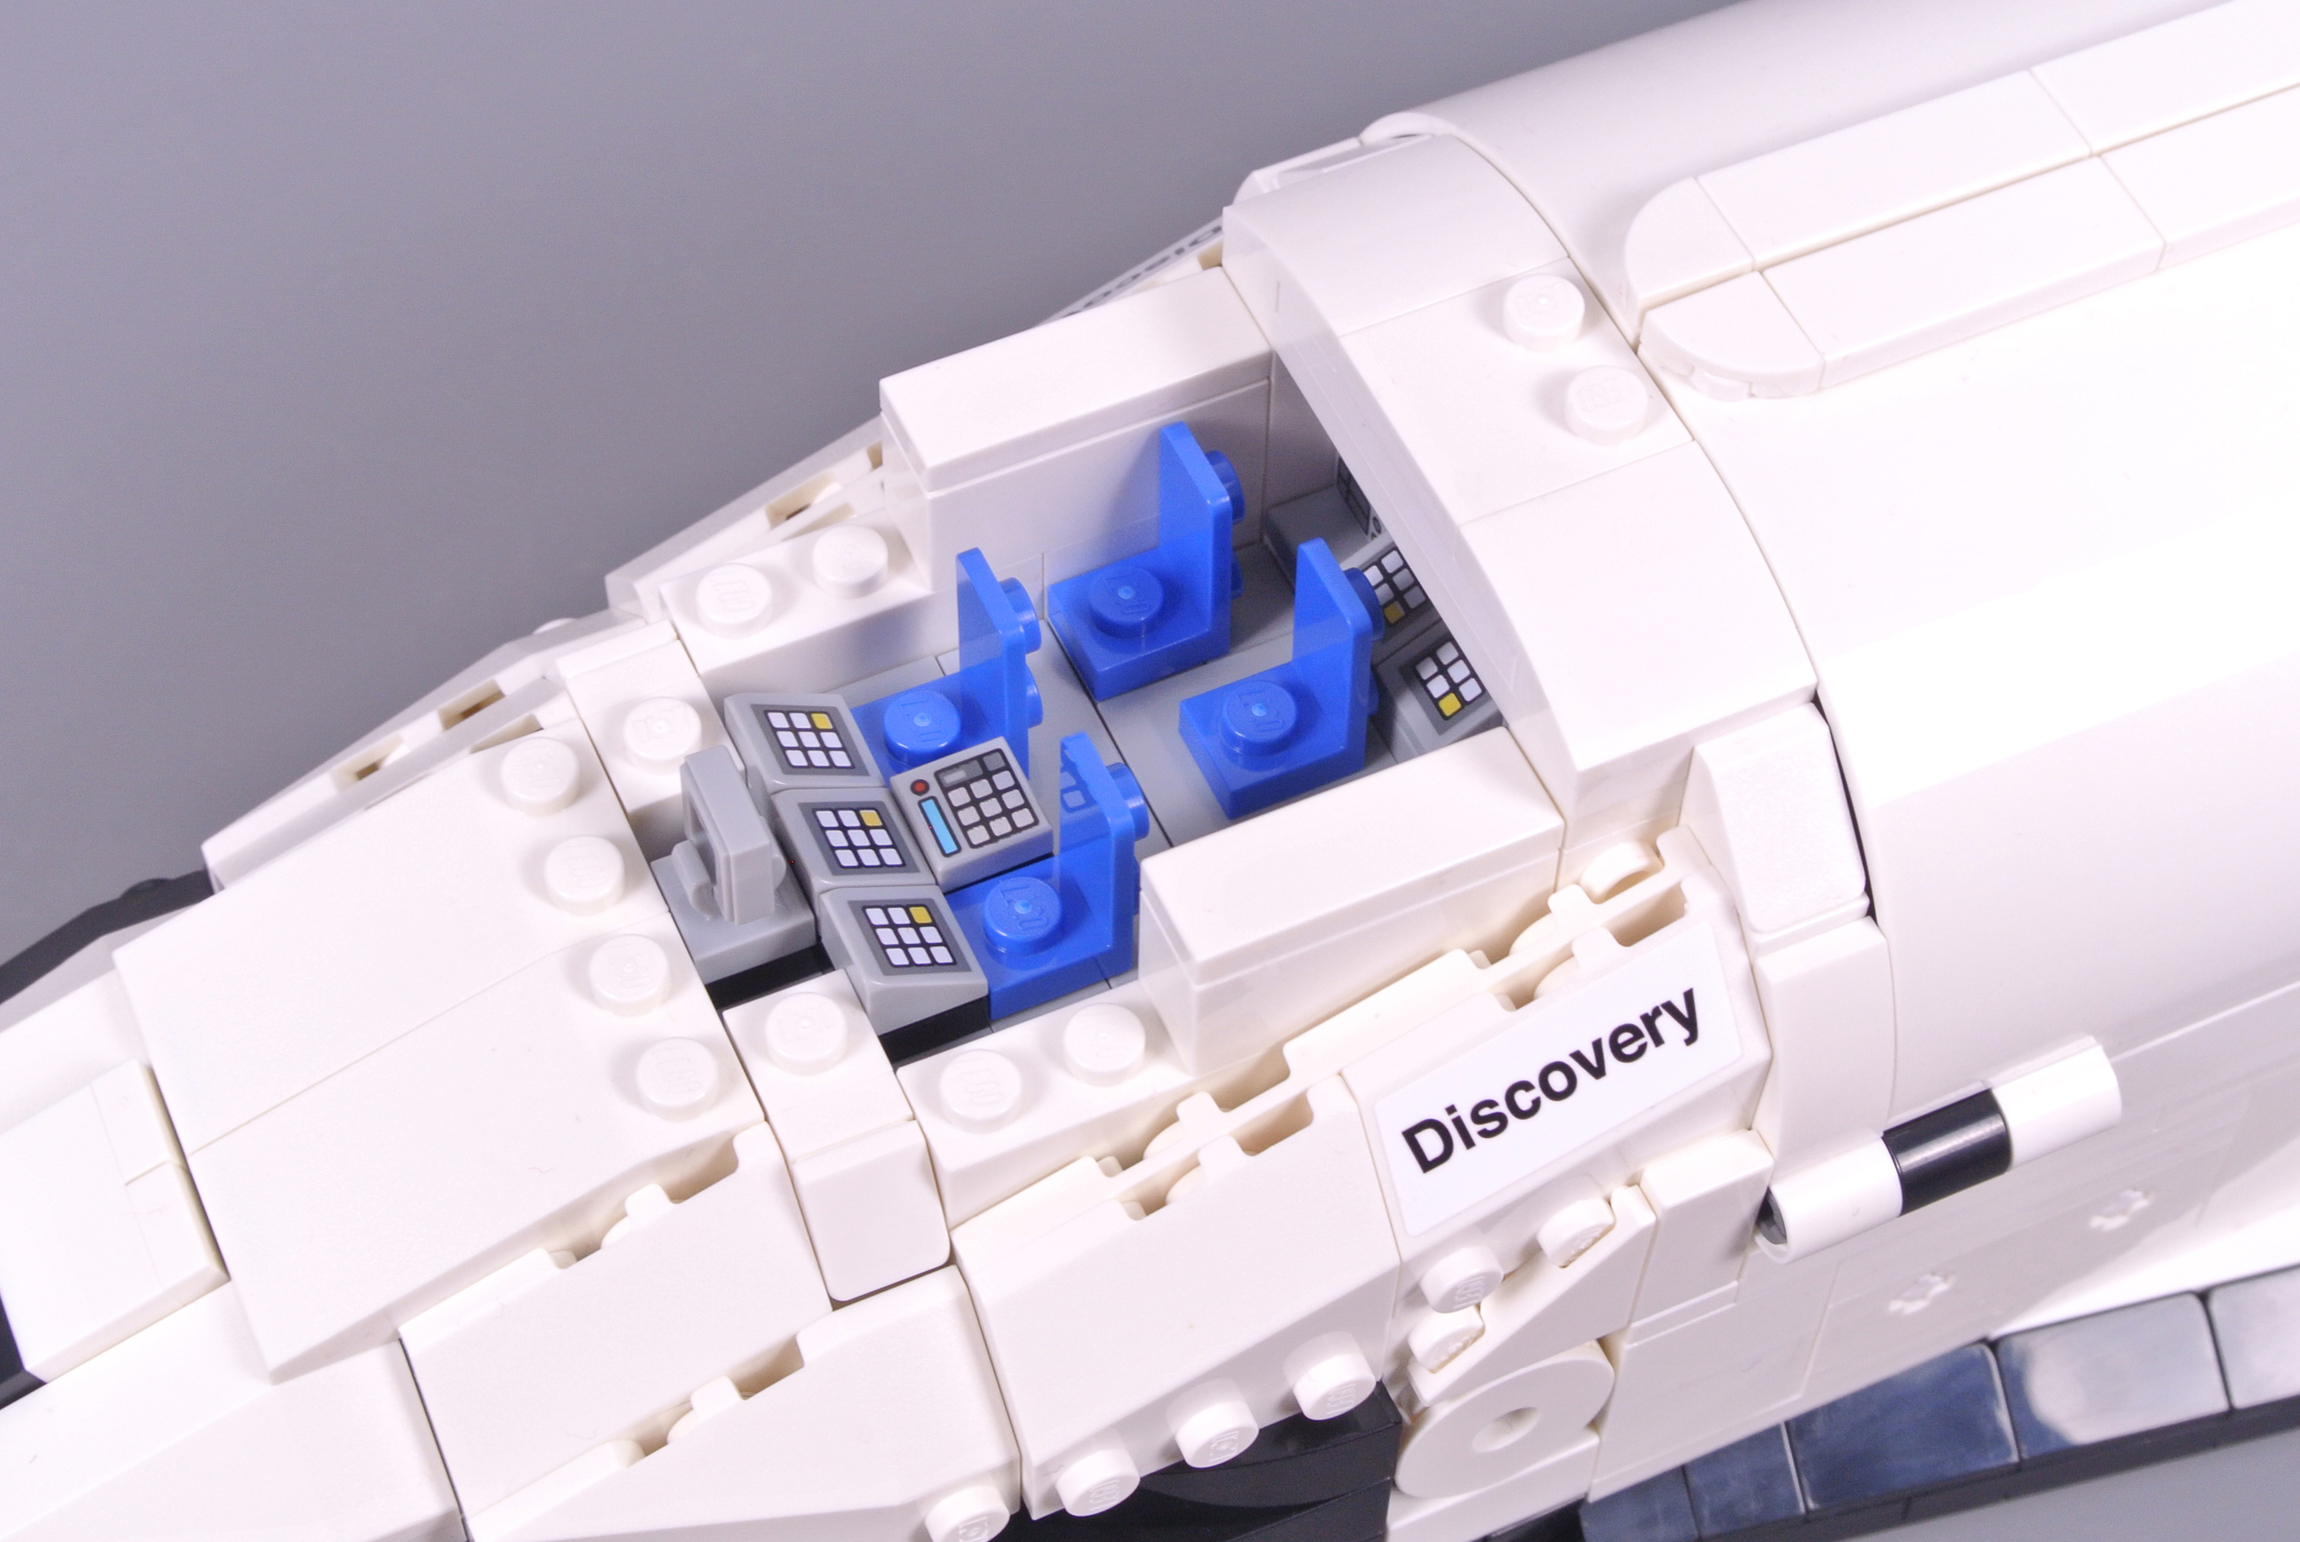
The flight deck can be removed to show the middeck underneath, featuring another blue seat which is perfectly positioned. Several additional control panels are located here, alongside the avionics bay. Moreover, a 2x2 round tile with hole depicts the airlock, through which astronauts could reach the cargo section. The airlock cannot open here but it looks splendid.

Another 2x2 round tile with hole is positioned on the port side, depicting the access hatch, while identifying stickers are applied on both sides of the cockpit. Displaying the name Discovery is absolutely appropriate for mission STS-31, although I am surprised that alternative names were not supplied for all five Space Shuttle orbiters.

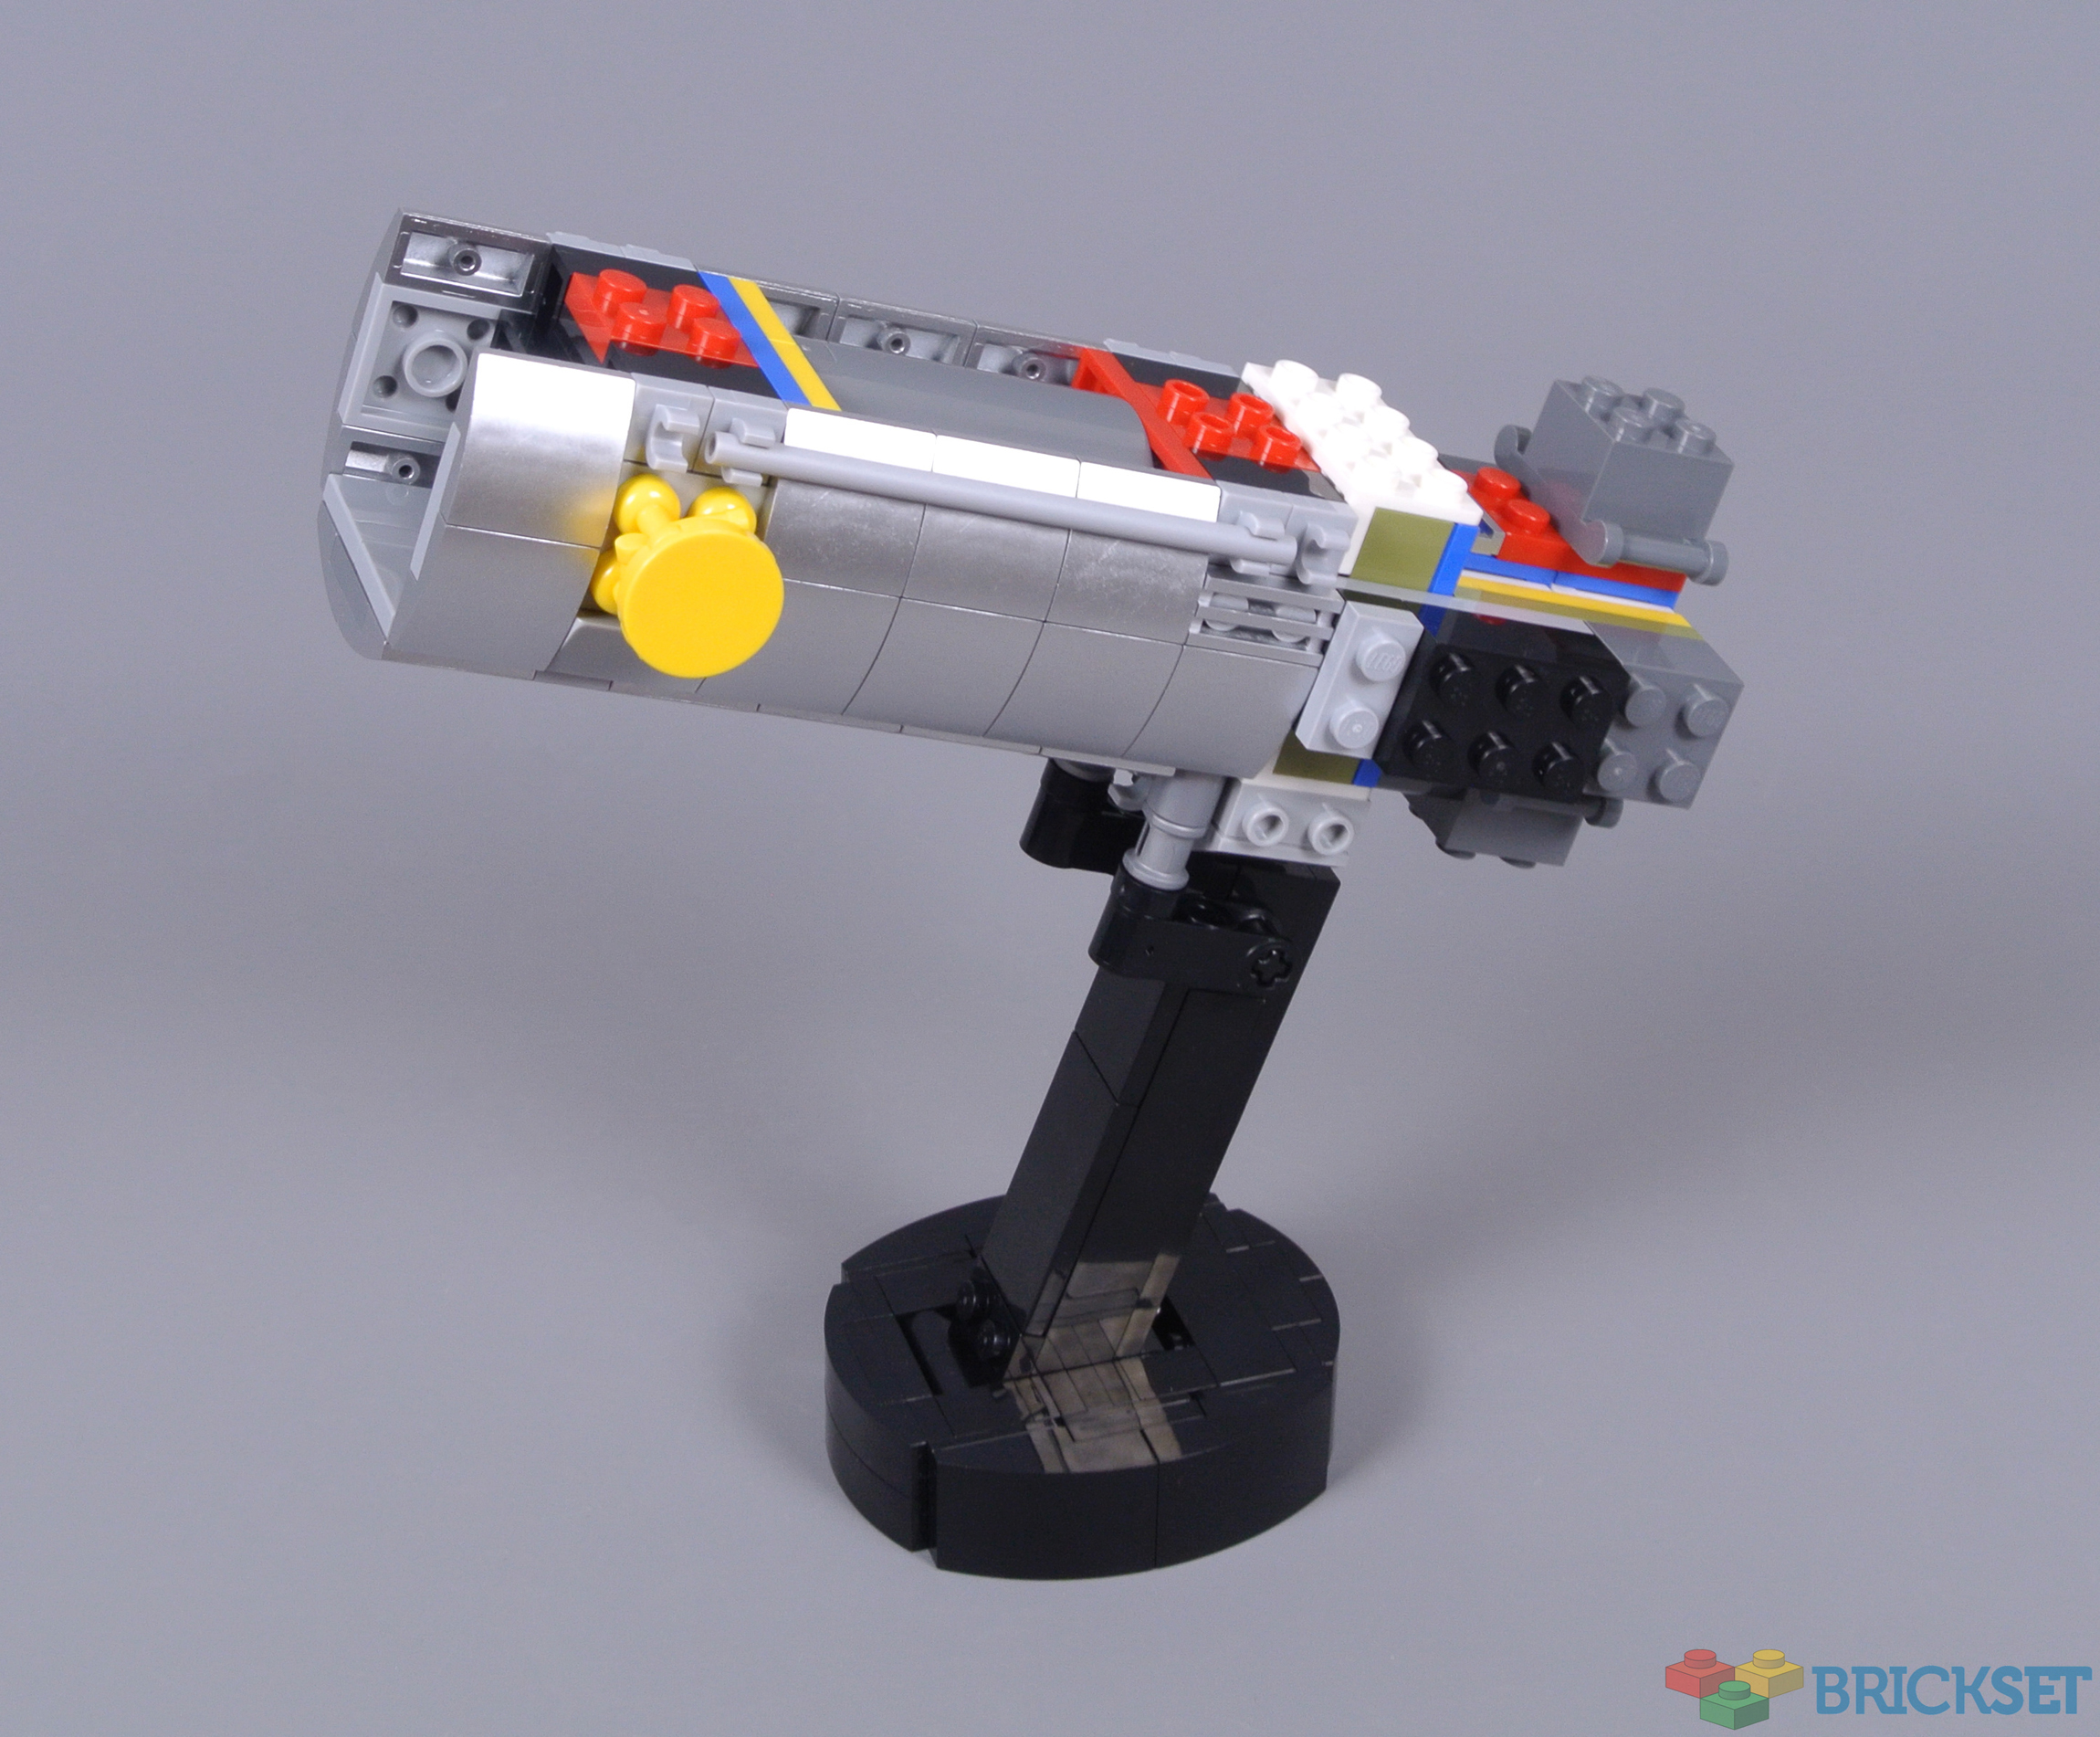
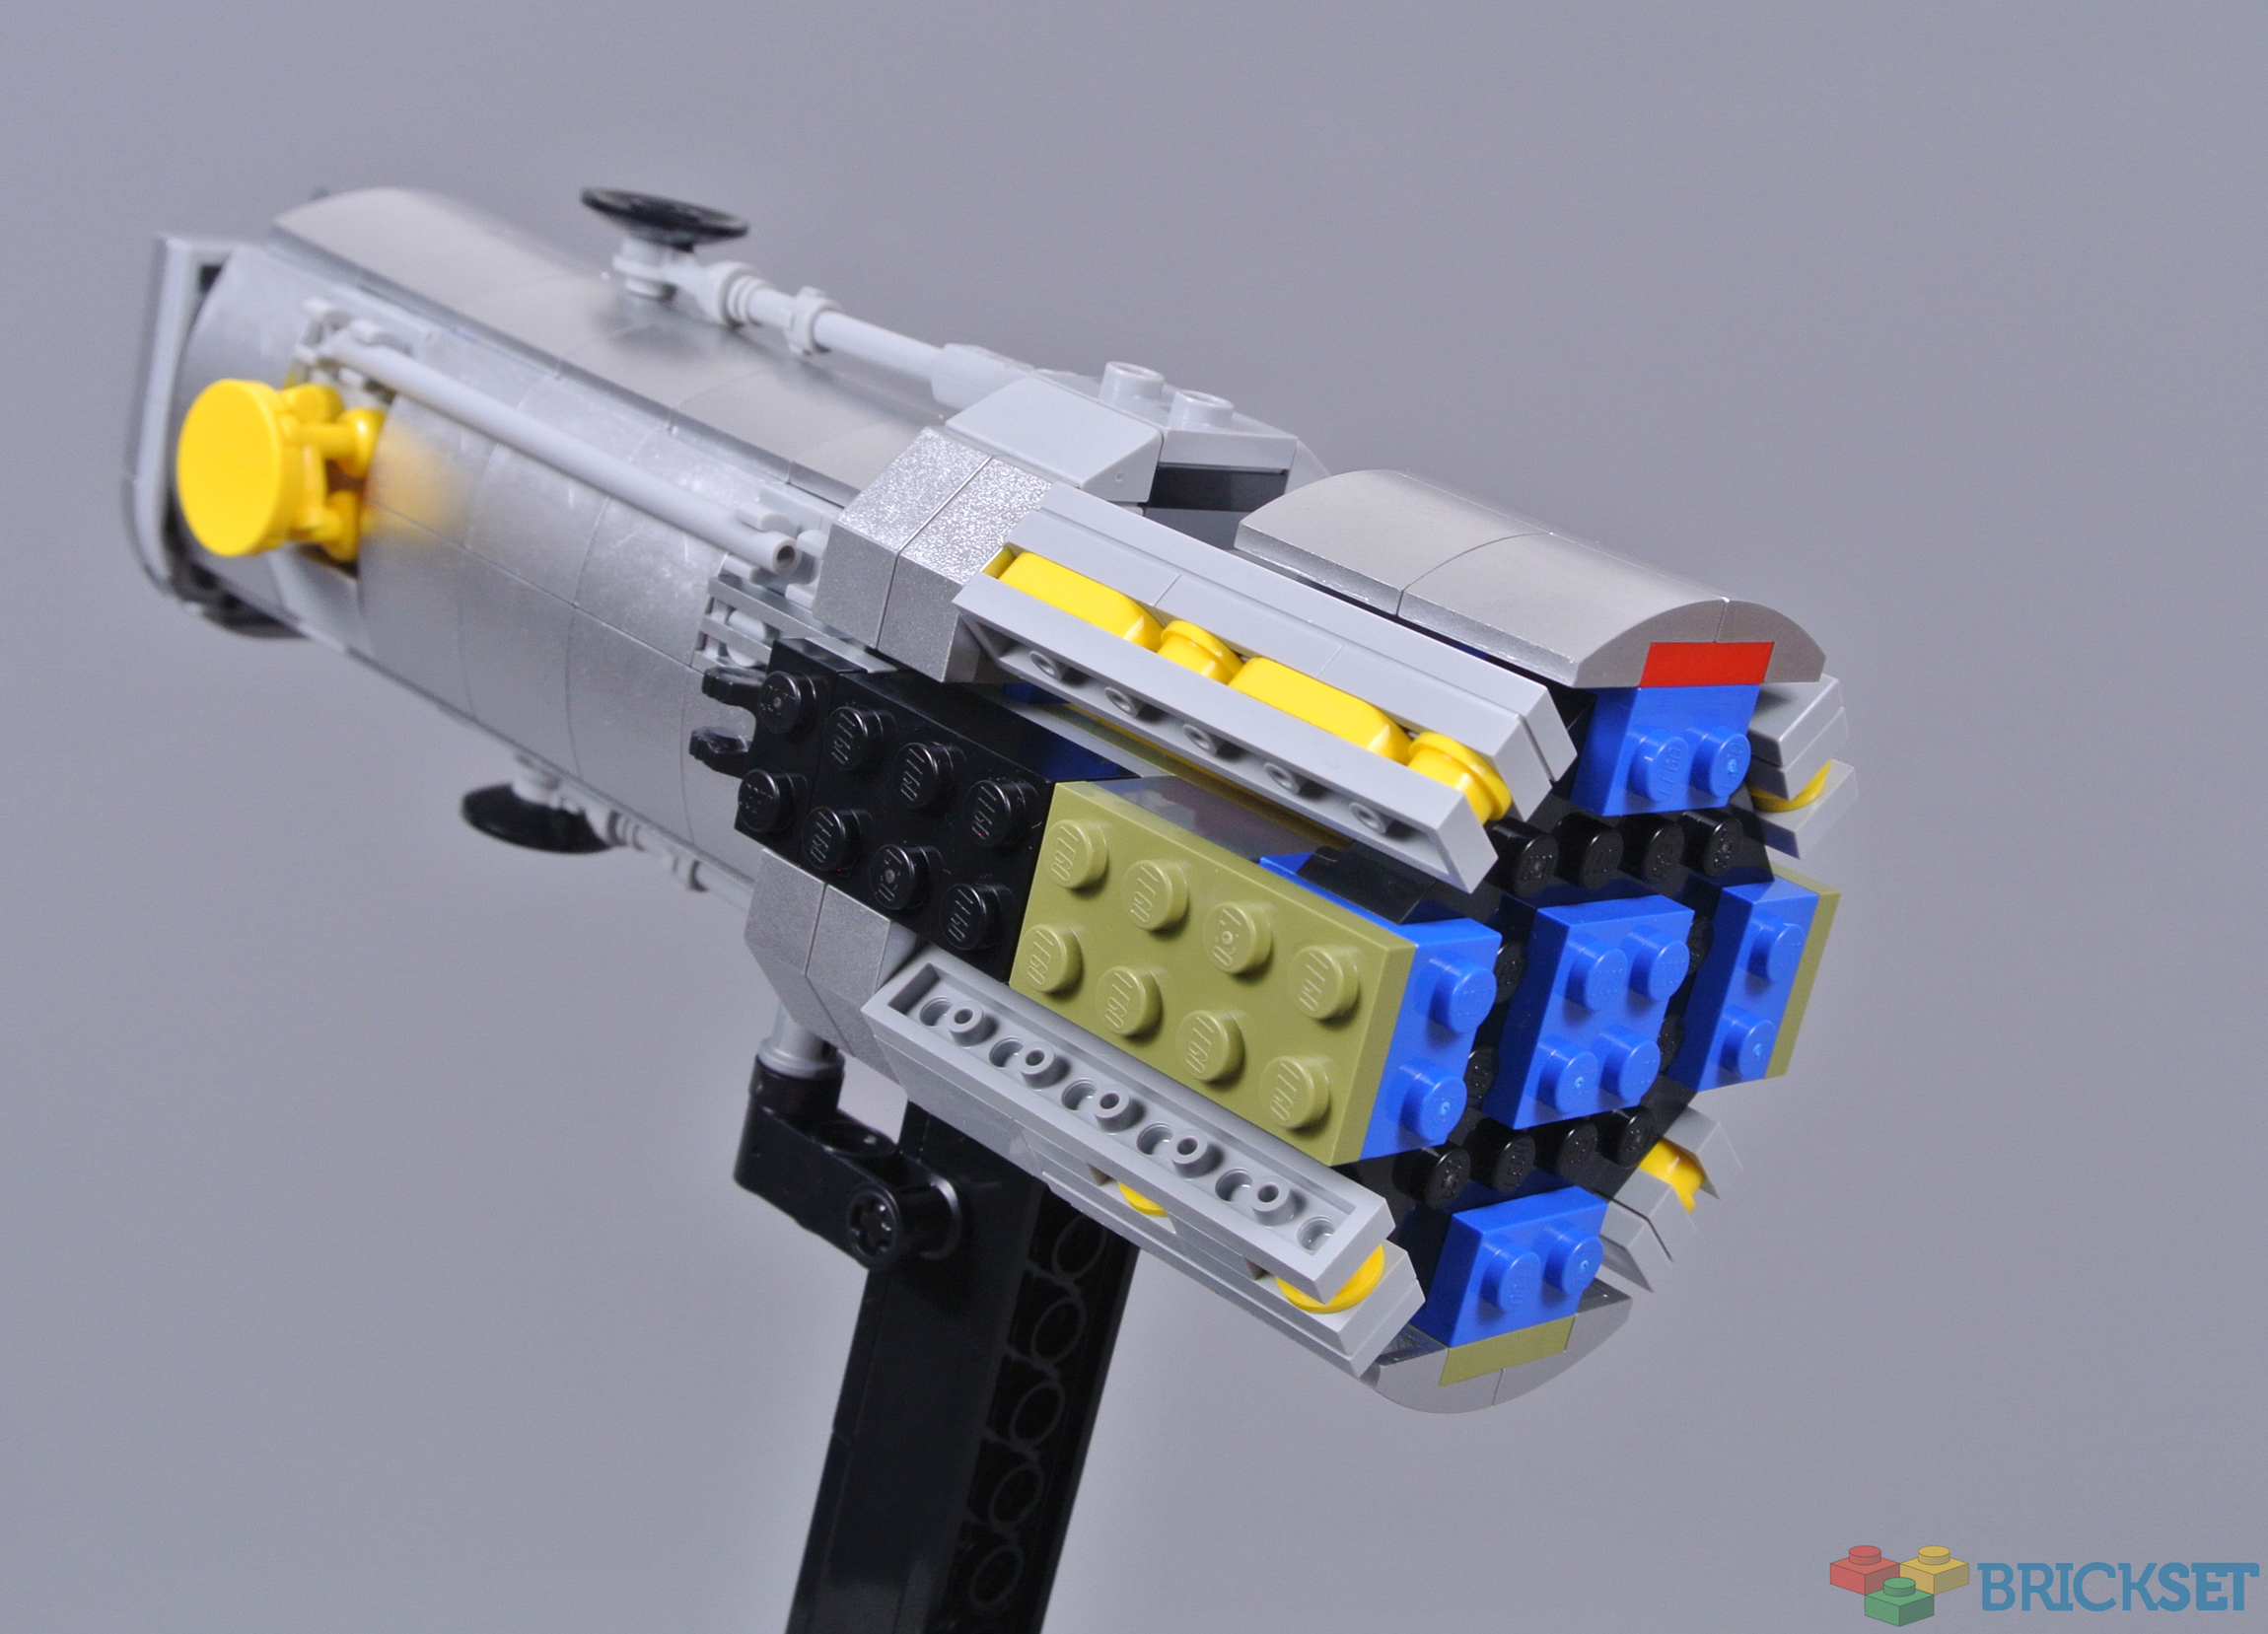
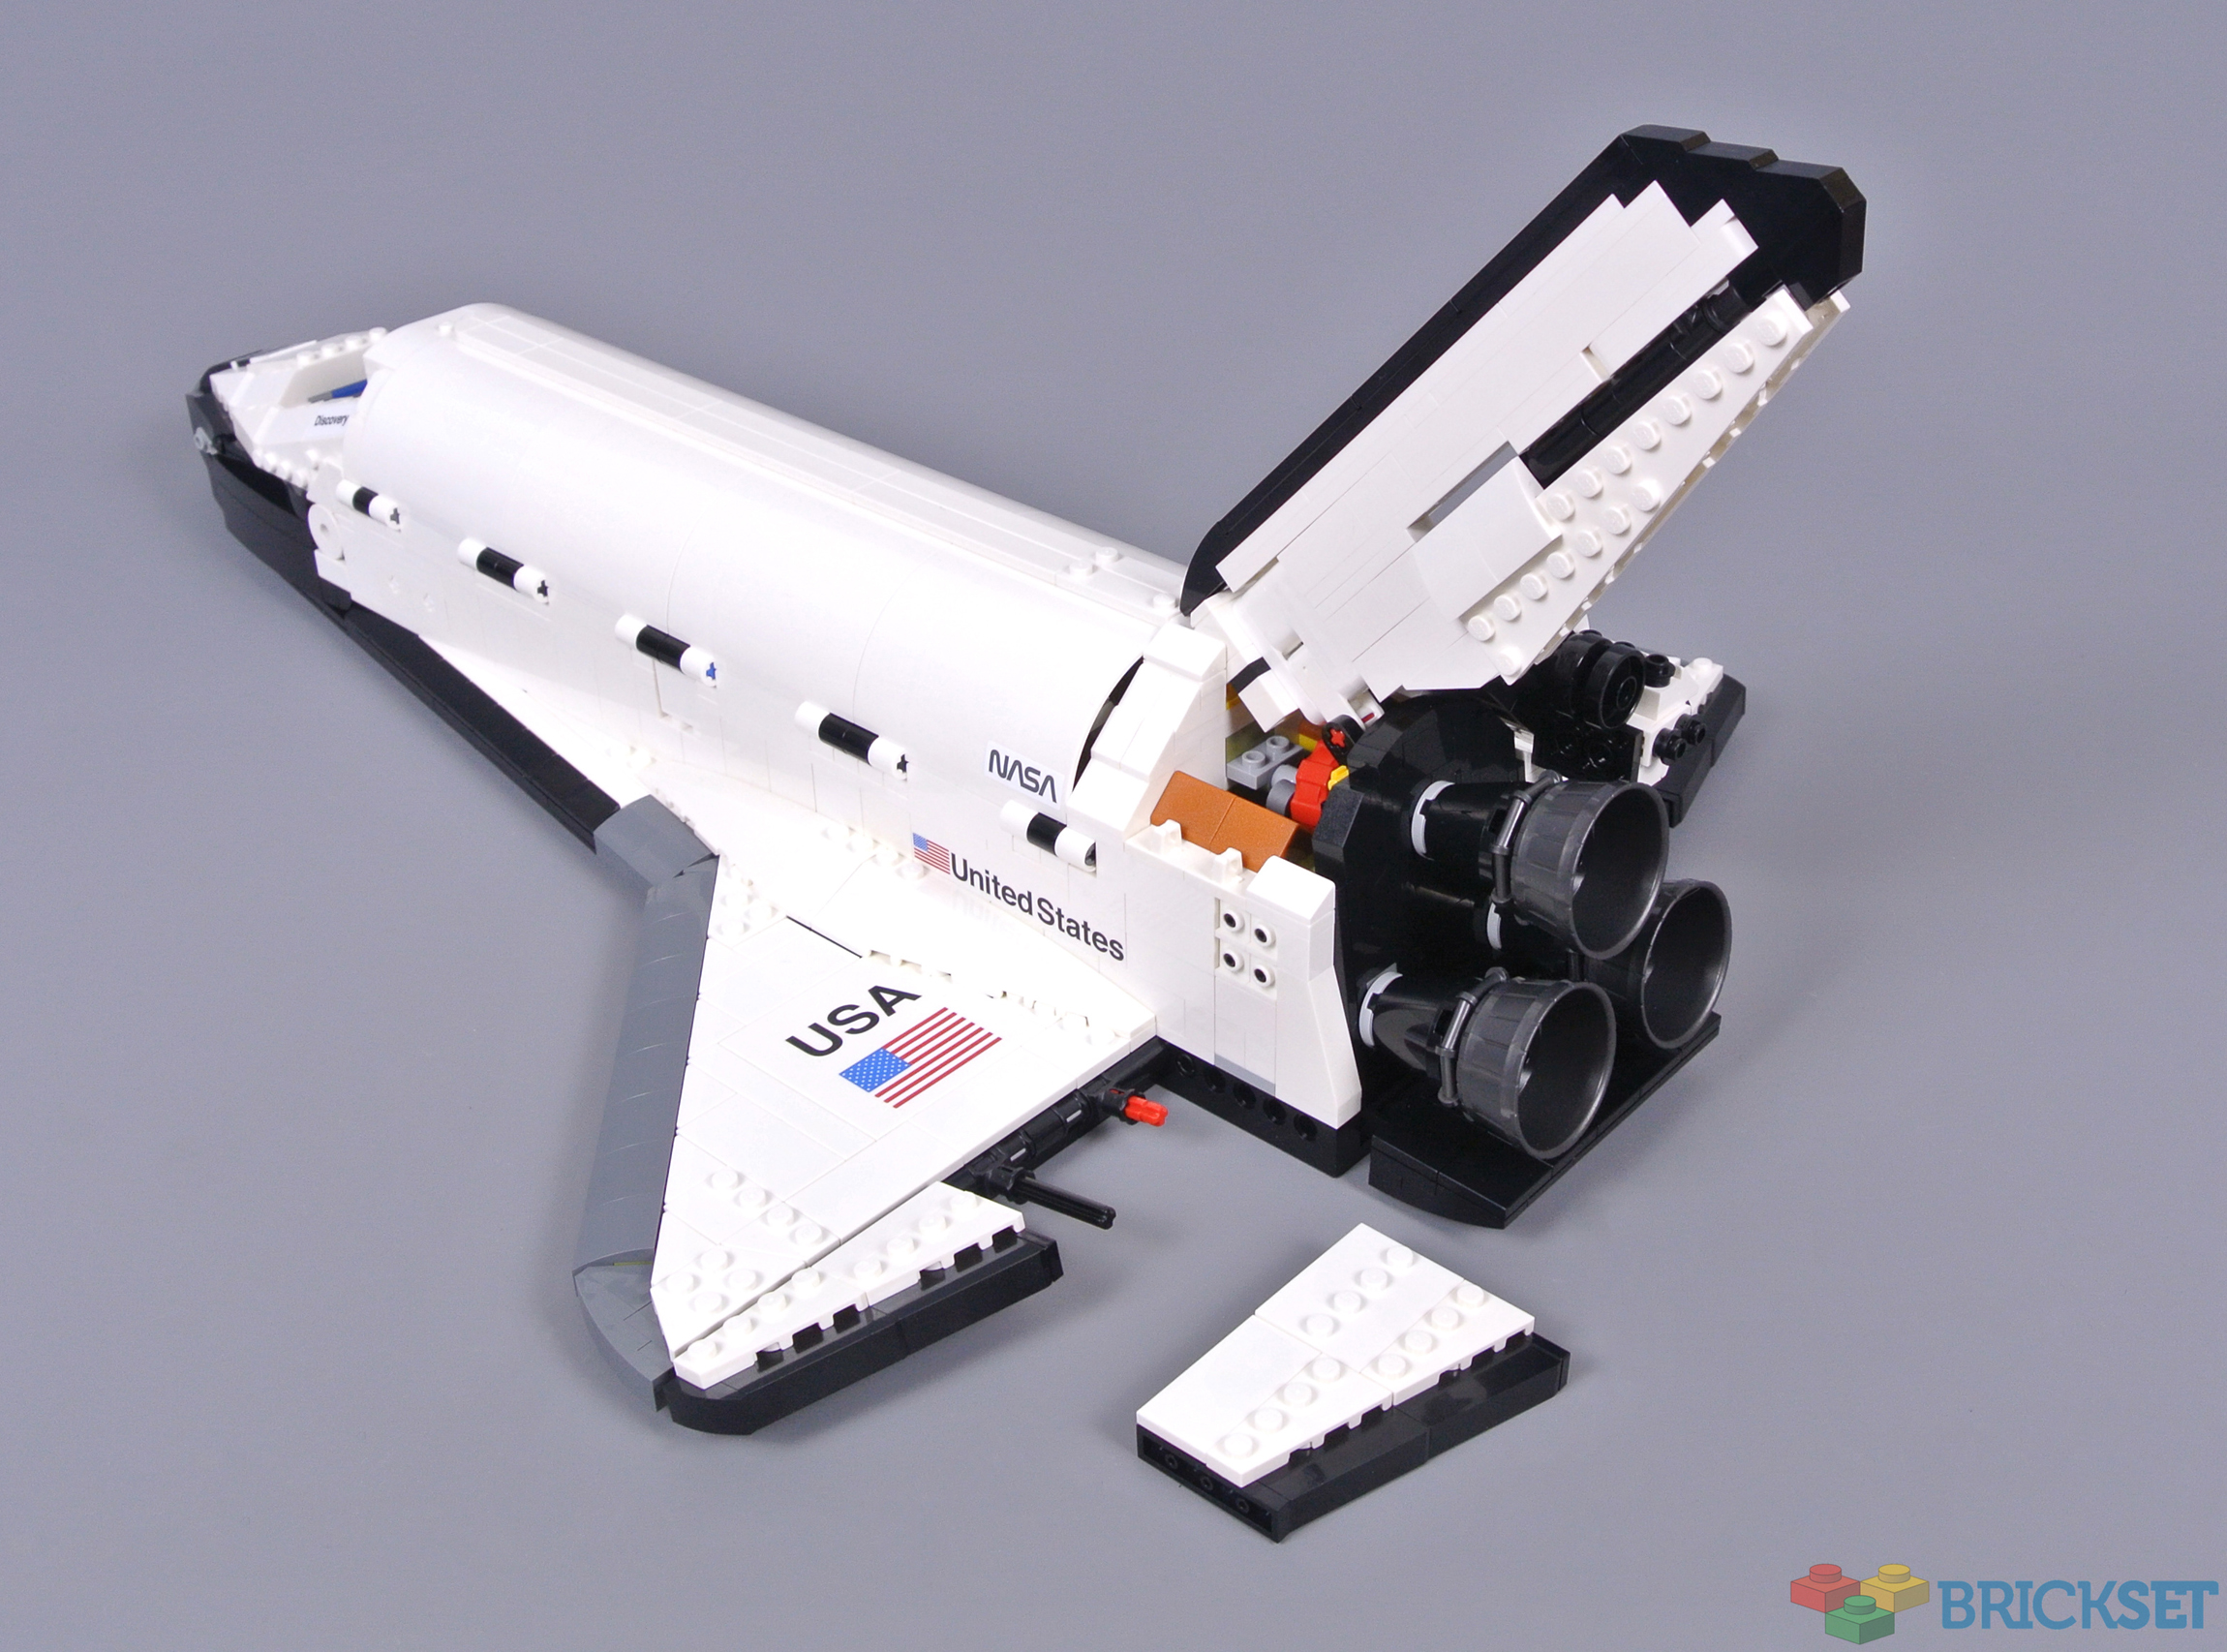
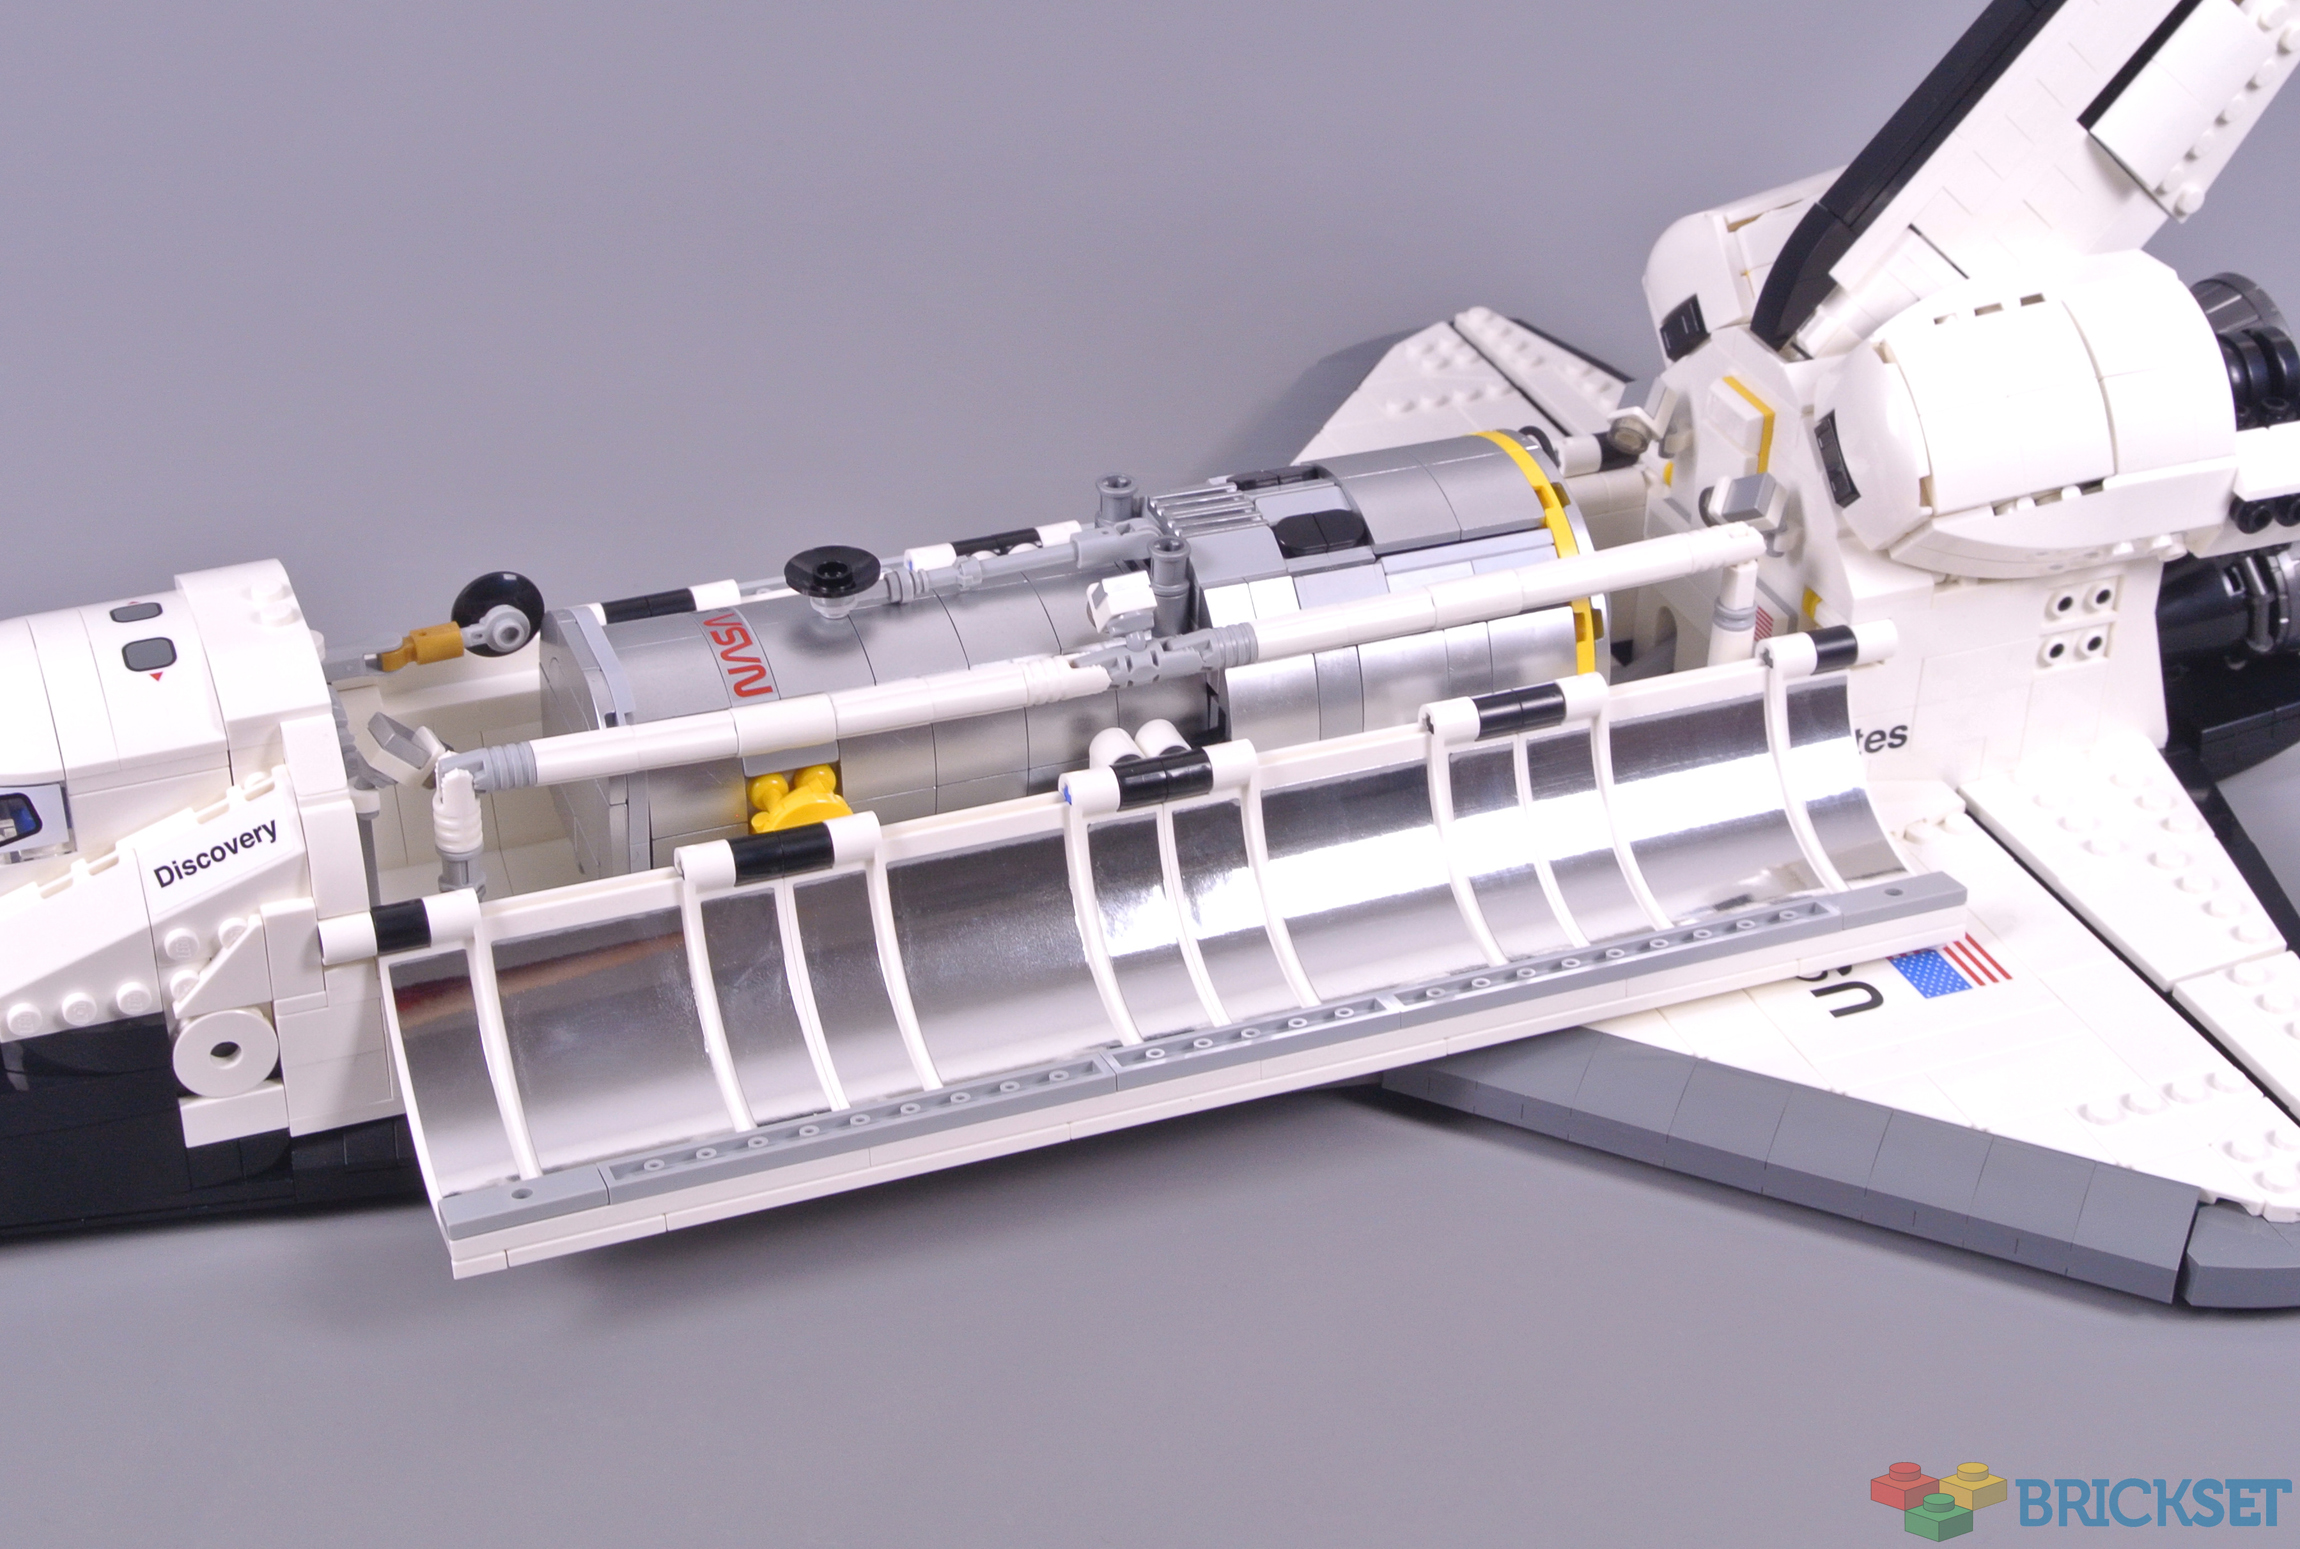
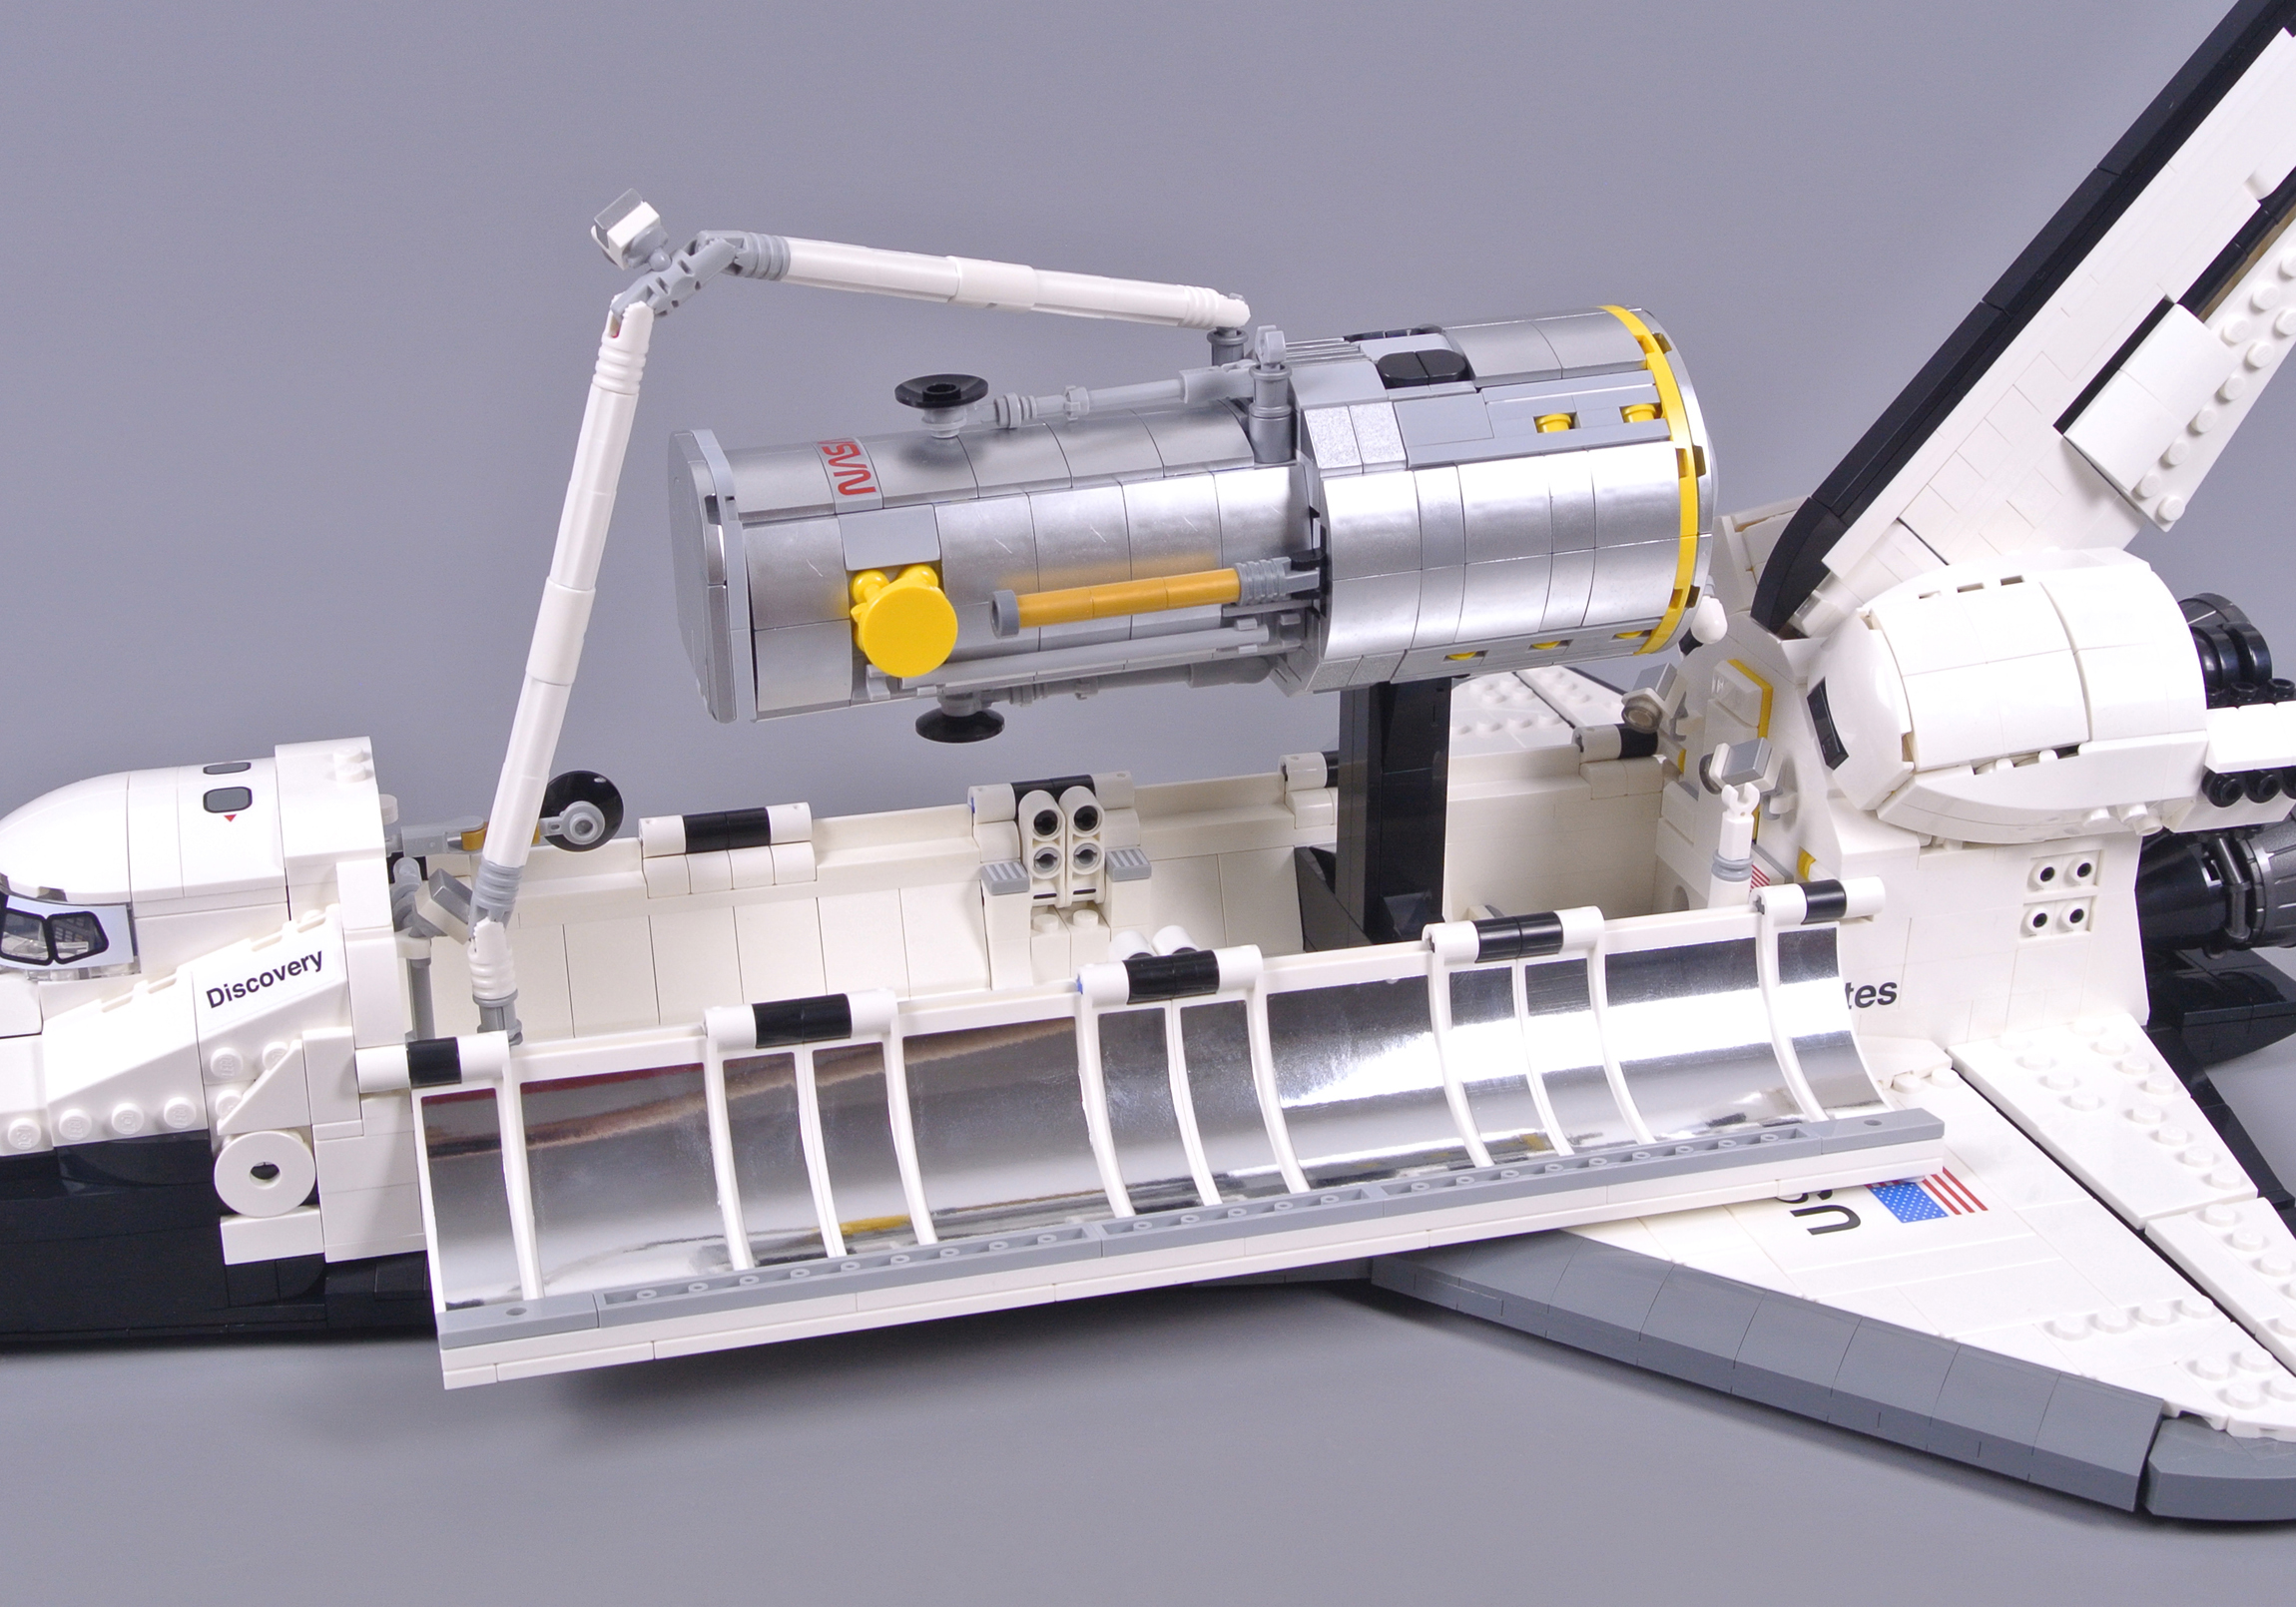
New elements have been developed around the payload bay, faithfully recreating the original shape from the Space Shuttle. Five black hinges are positioned along both flanks and appear somewhat strange. However, similar highlights are located on the actual orbiter, albeit in much greater quantities and less prominently than these versatile Technic hinges.

While capturing the external shape was undoubtedly important, the most significant reason for developing these unique elements becomes apparent inside. These doors are remarkably thin which maximises the internal area, thereby allowing the Hubble Space Telescope to slot inside the payload bay! This satellite nestles inside perfectly, slotting between tabs which project from the walls and the floor.
The robotic arm positioned beside the telescope, known as the SRMS or Canadarm, features several joints and looks marvellous when compared with its original counterpart. However, the Canadarm cannot actually support the weight of the Hubble Space Telescope, hence a second black support is provided to display the telescope during deployment. This support looks rather conspicuous but I appreciate the consistency between different display stands.
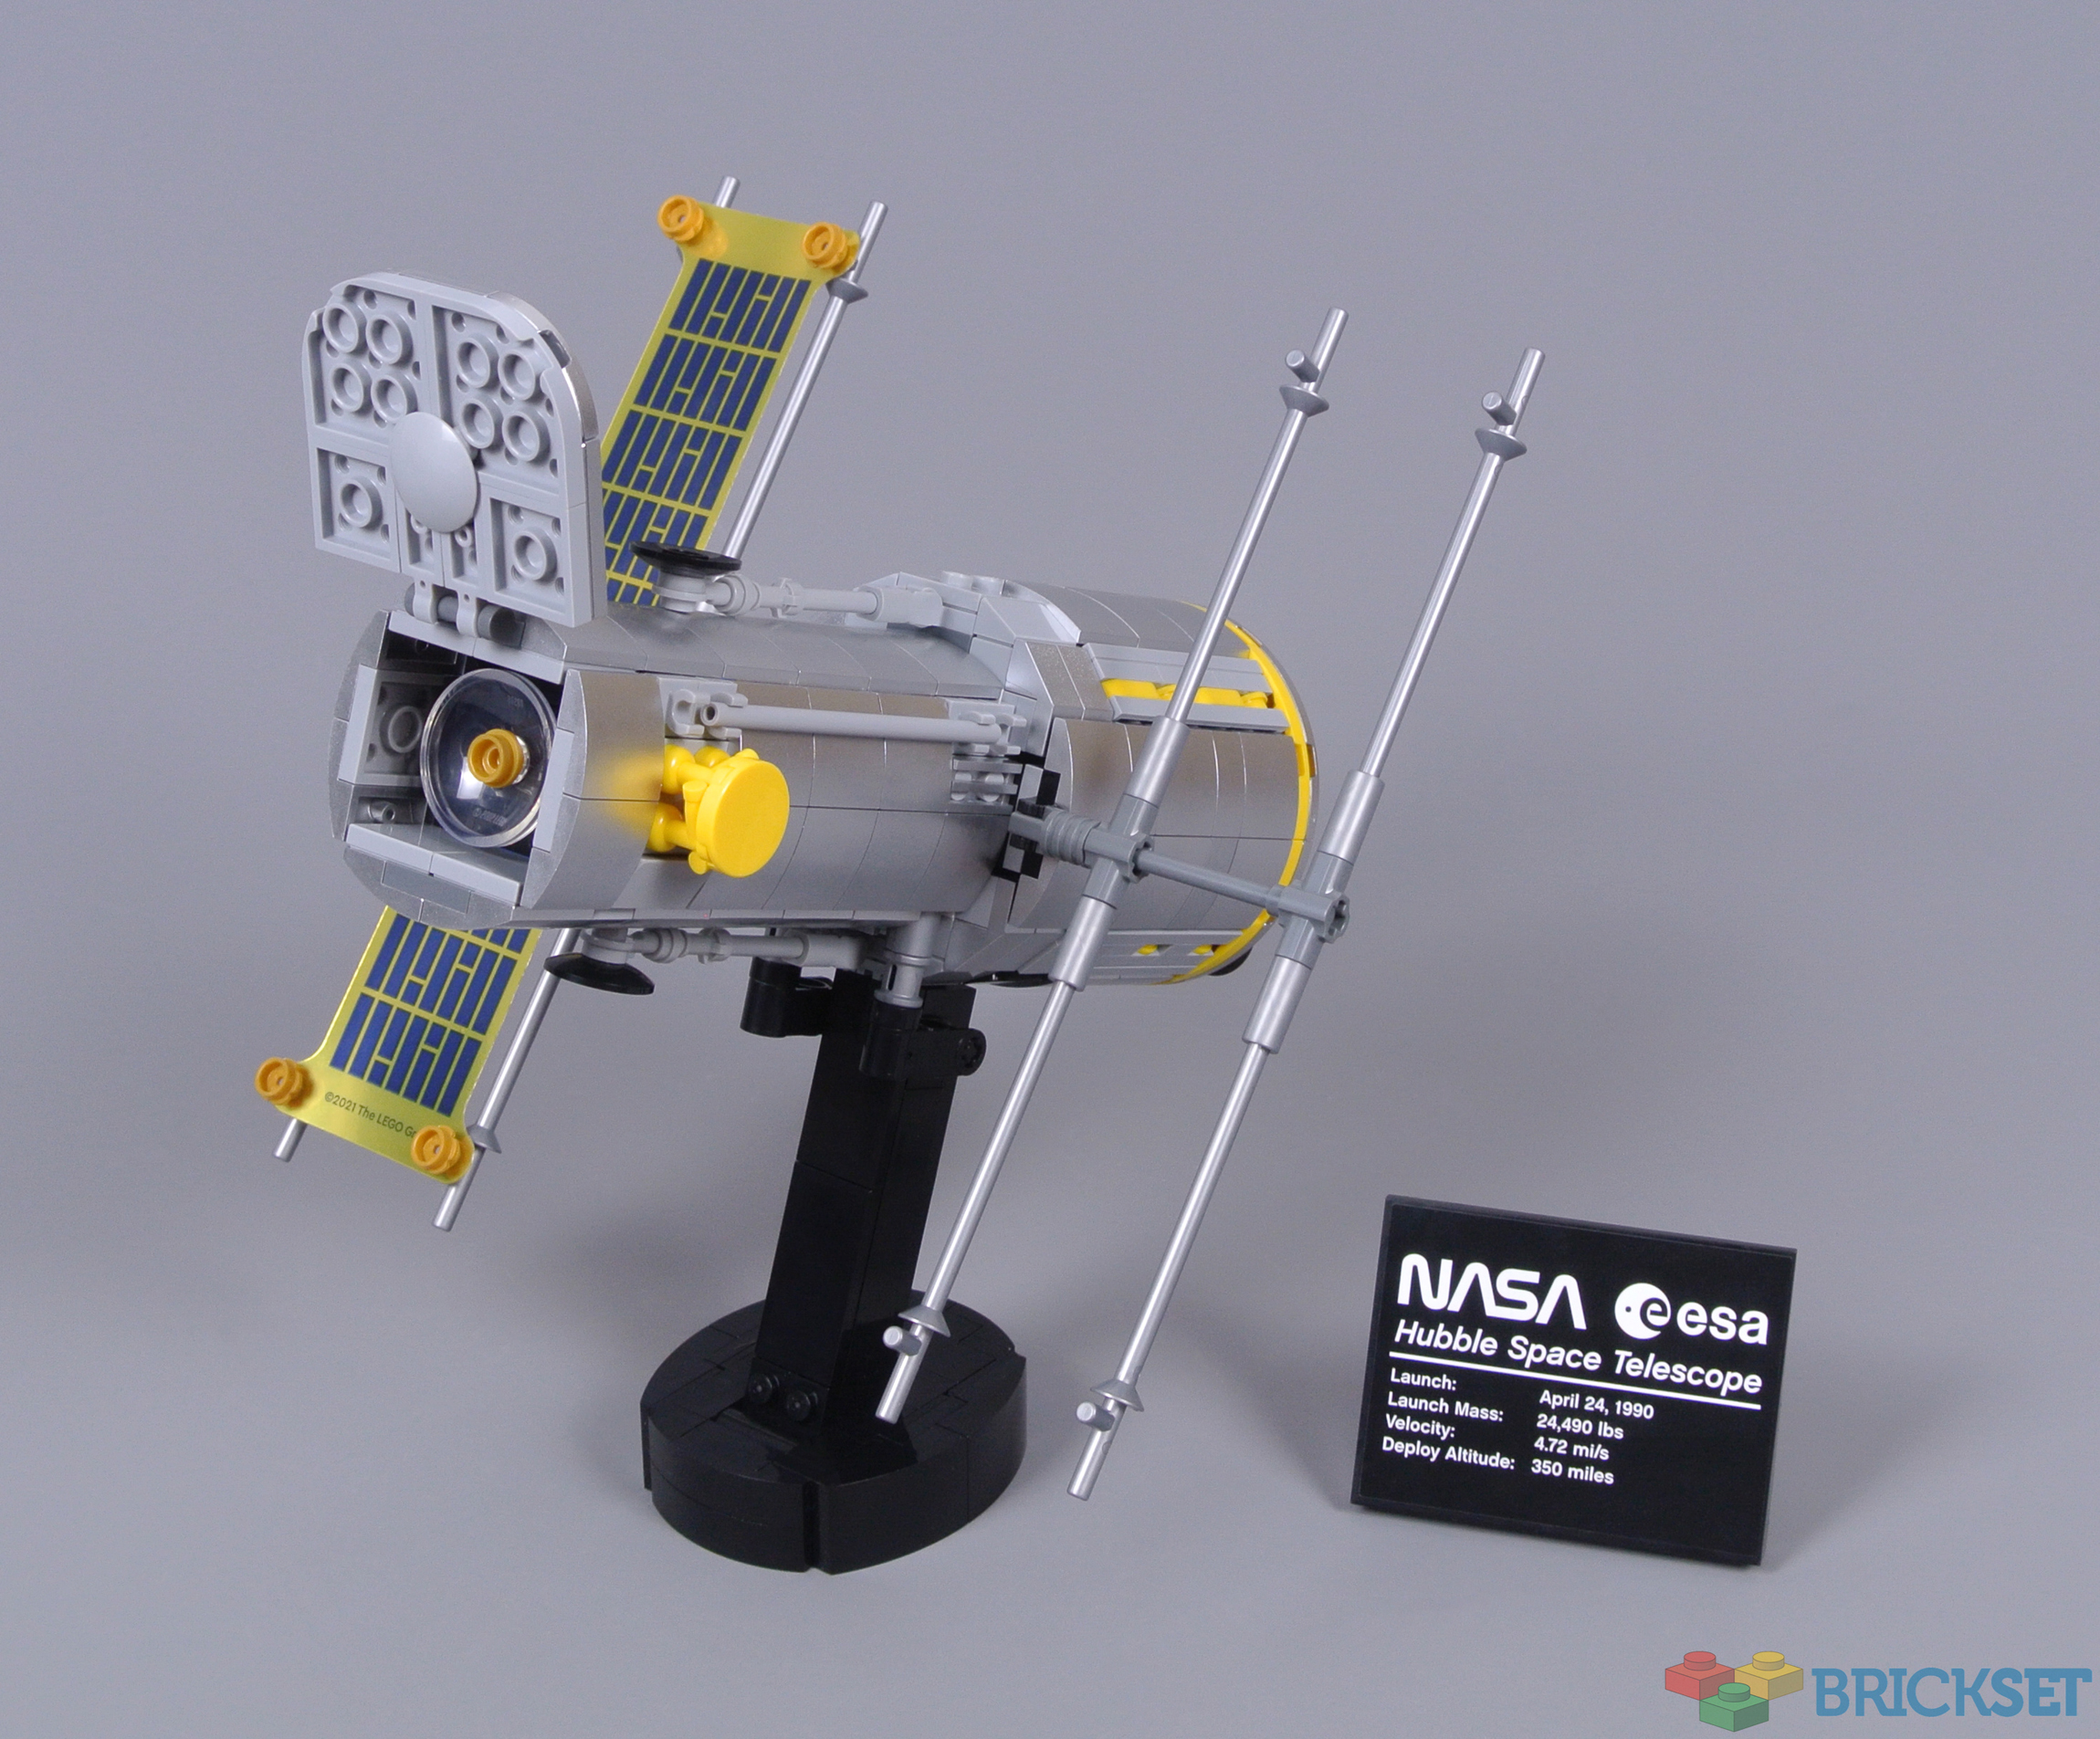
Another elegant display stand supports the Hubble Space Telescope separately! The curved base matches the larger orbiter stand and the angle is also consistent, ensuring both models look appealing together. This stand certainly feels stable on completely flat surfaces but does sometimes tip backwards if the surface underneath is uneven or soft, unfortunately.
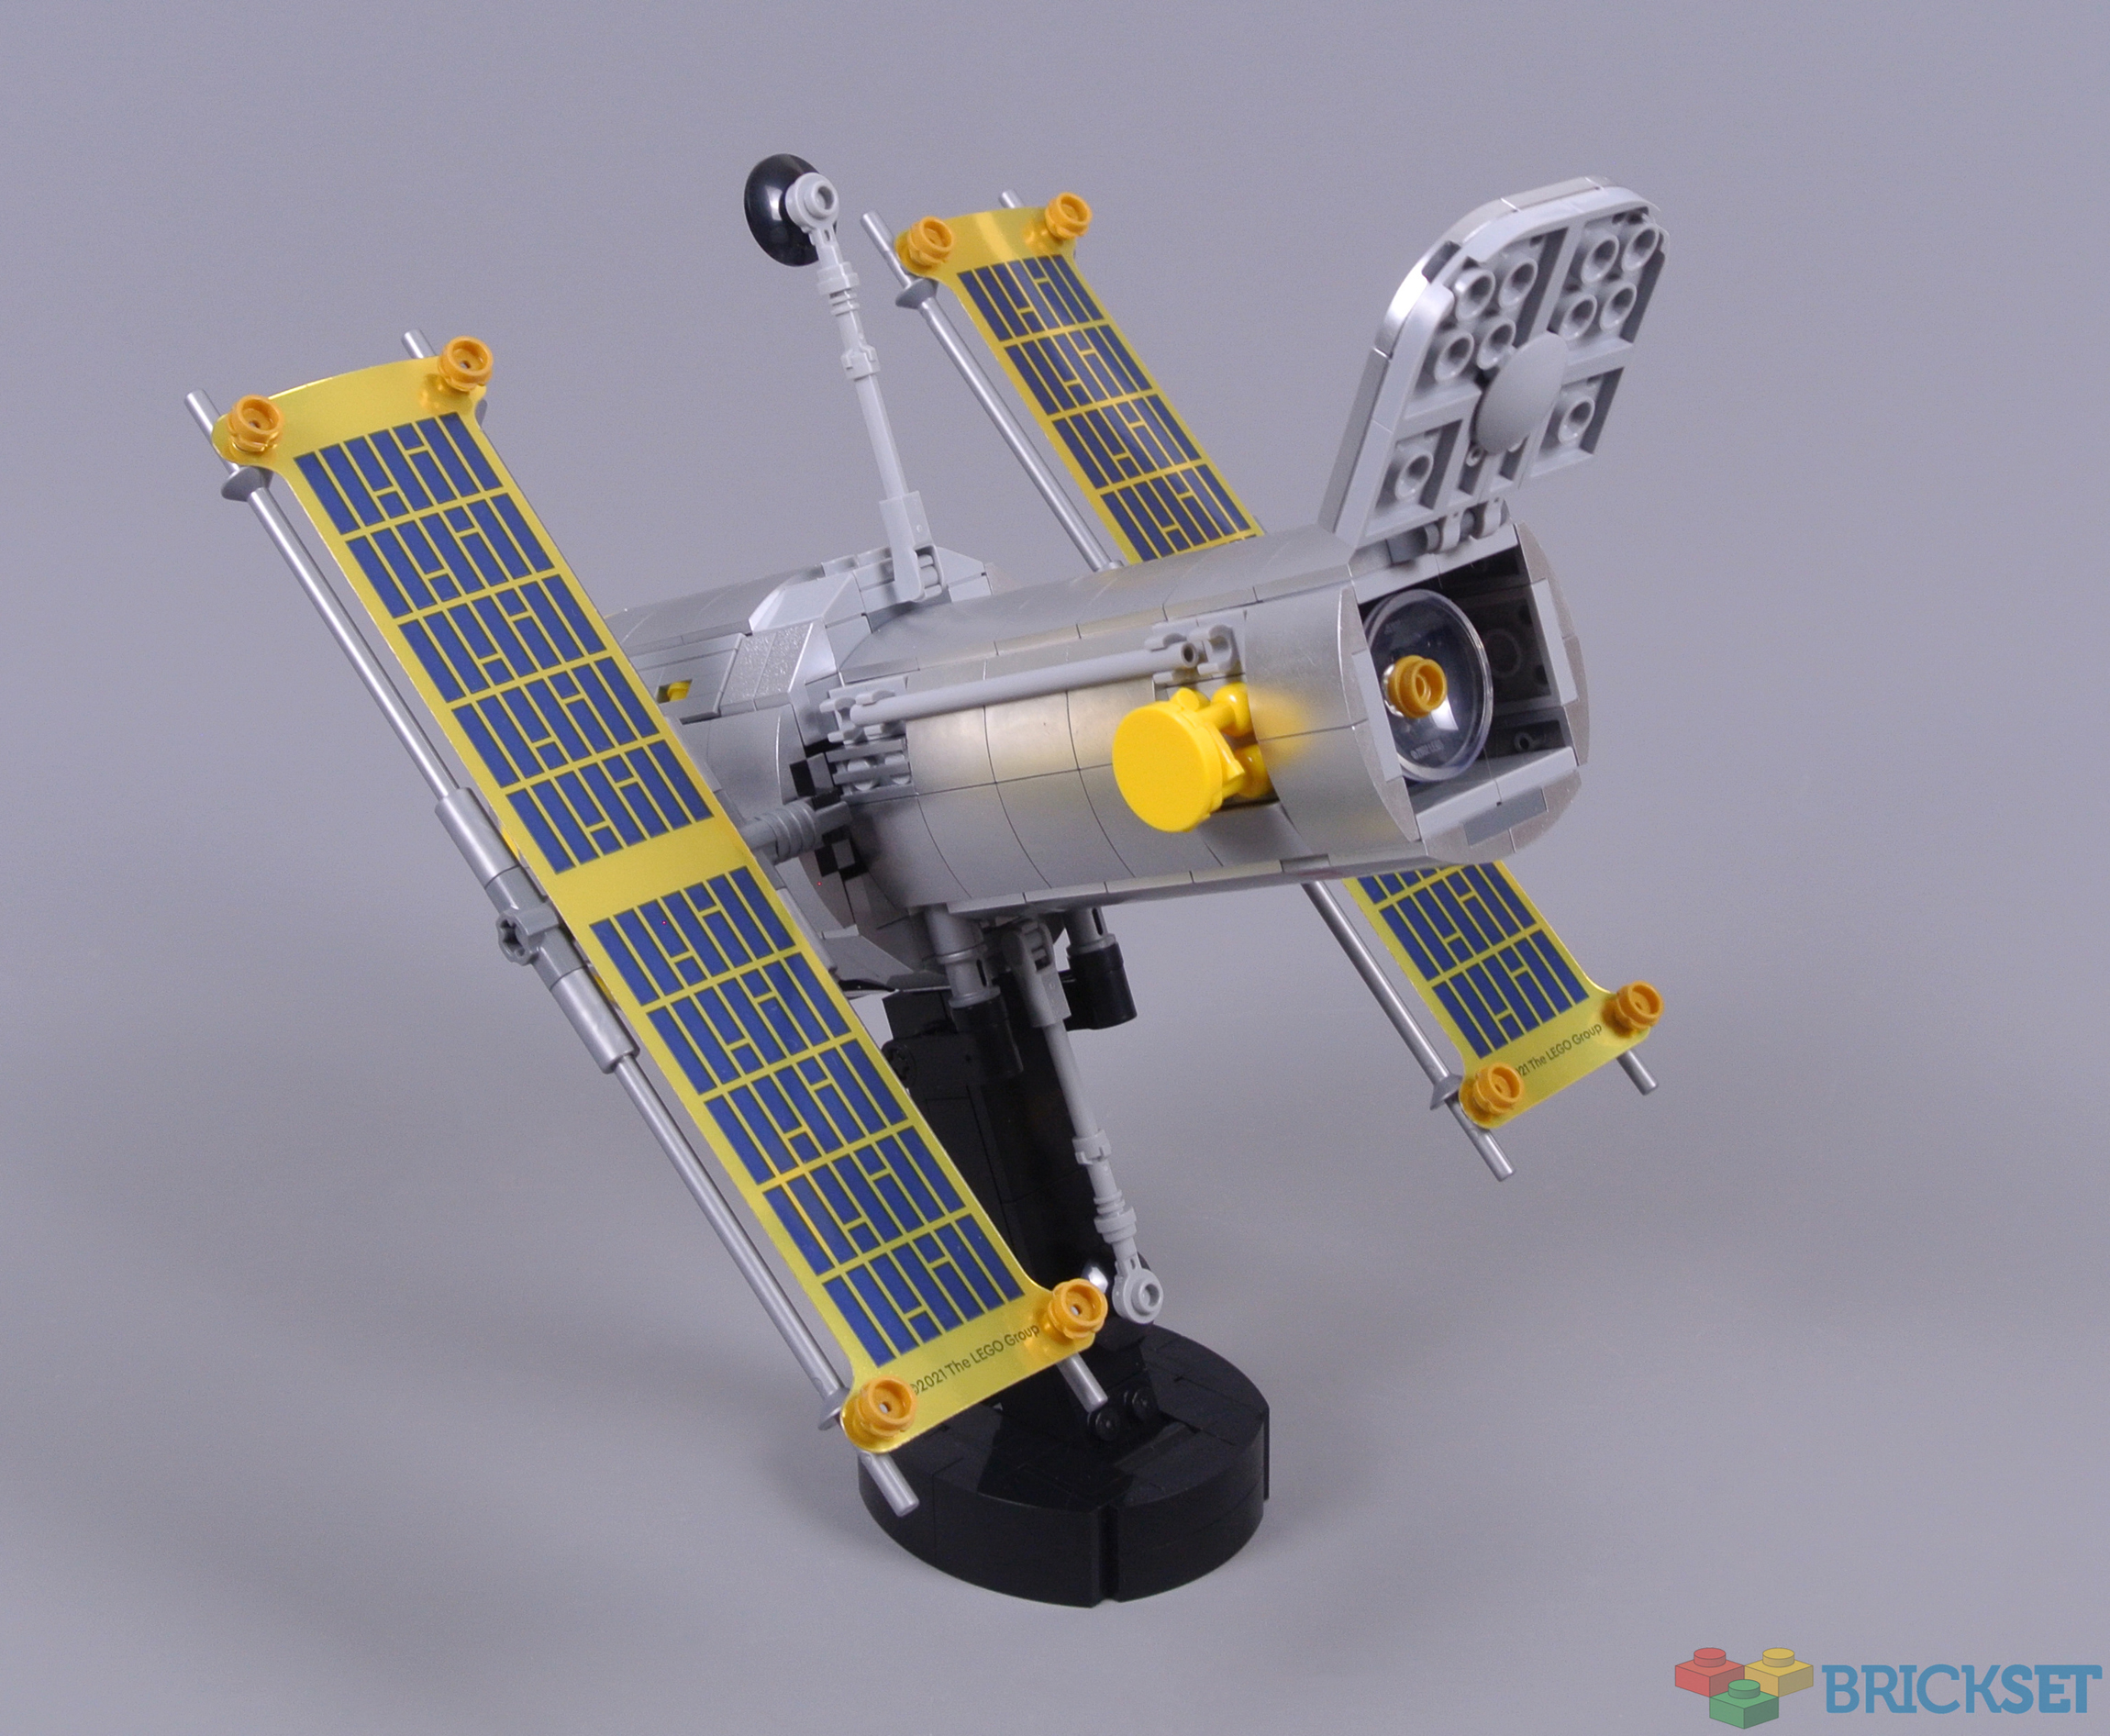
Nevertheless, this stand looks nice and another information plaque is supplied too, displaying specifications for the Hubble Space Telescope beneath NASA and ESA branding. The relative size of this plaque cannot accommodate the traditional blue image of the subject which seems awkward when displaying both models together, although enlarging its plaque may overwhelm the actual telescope.

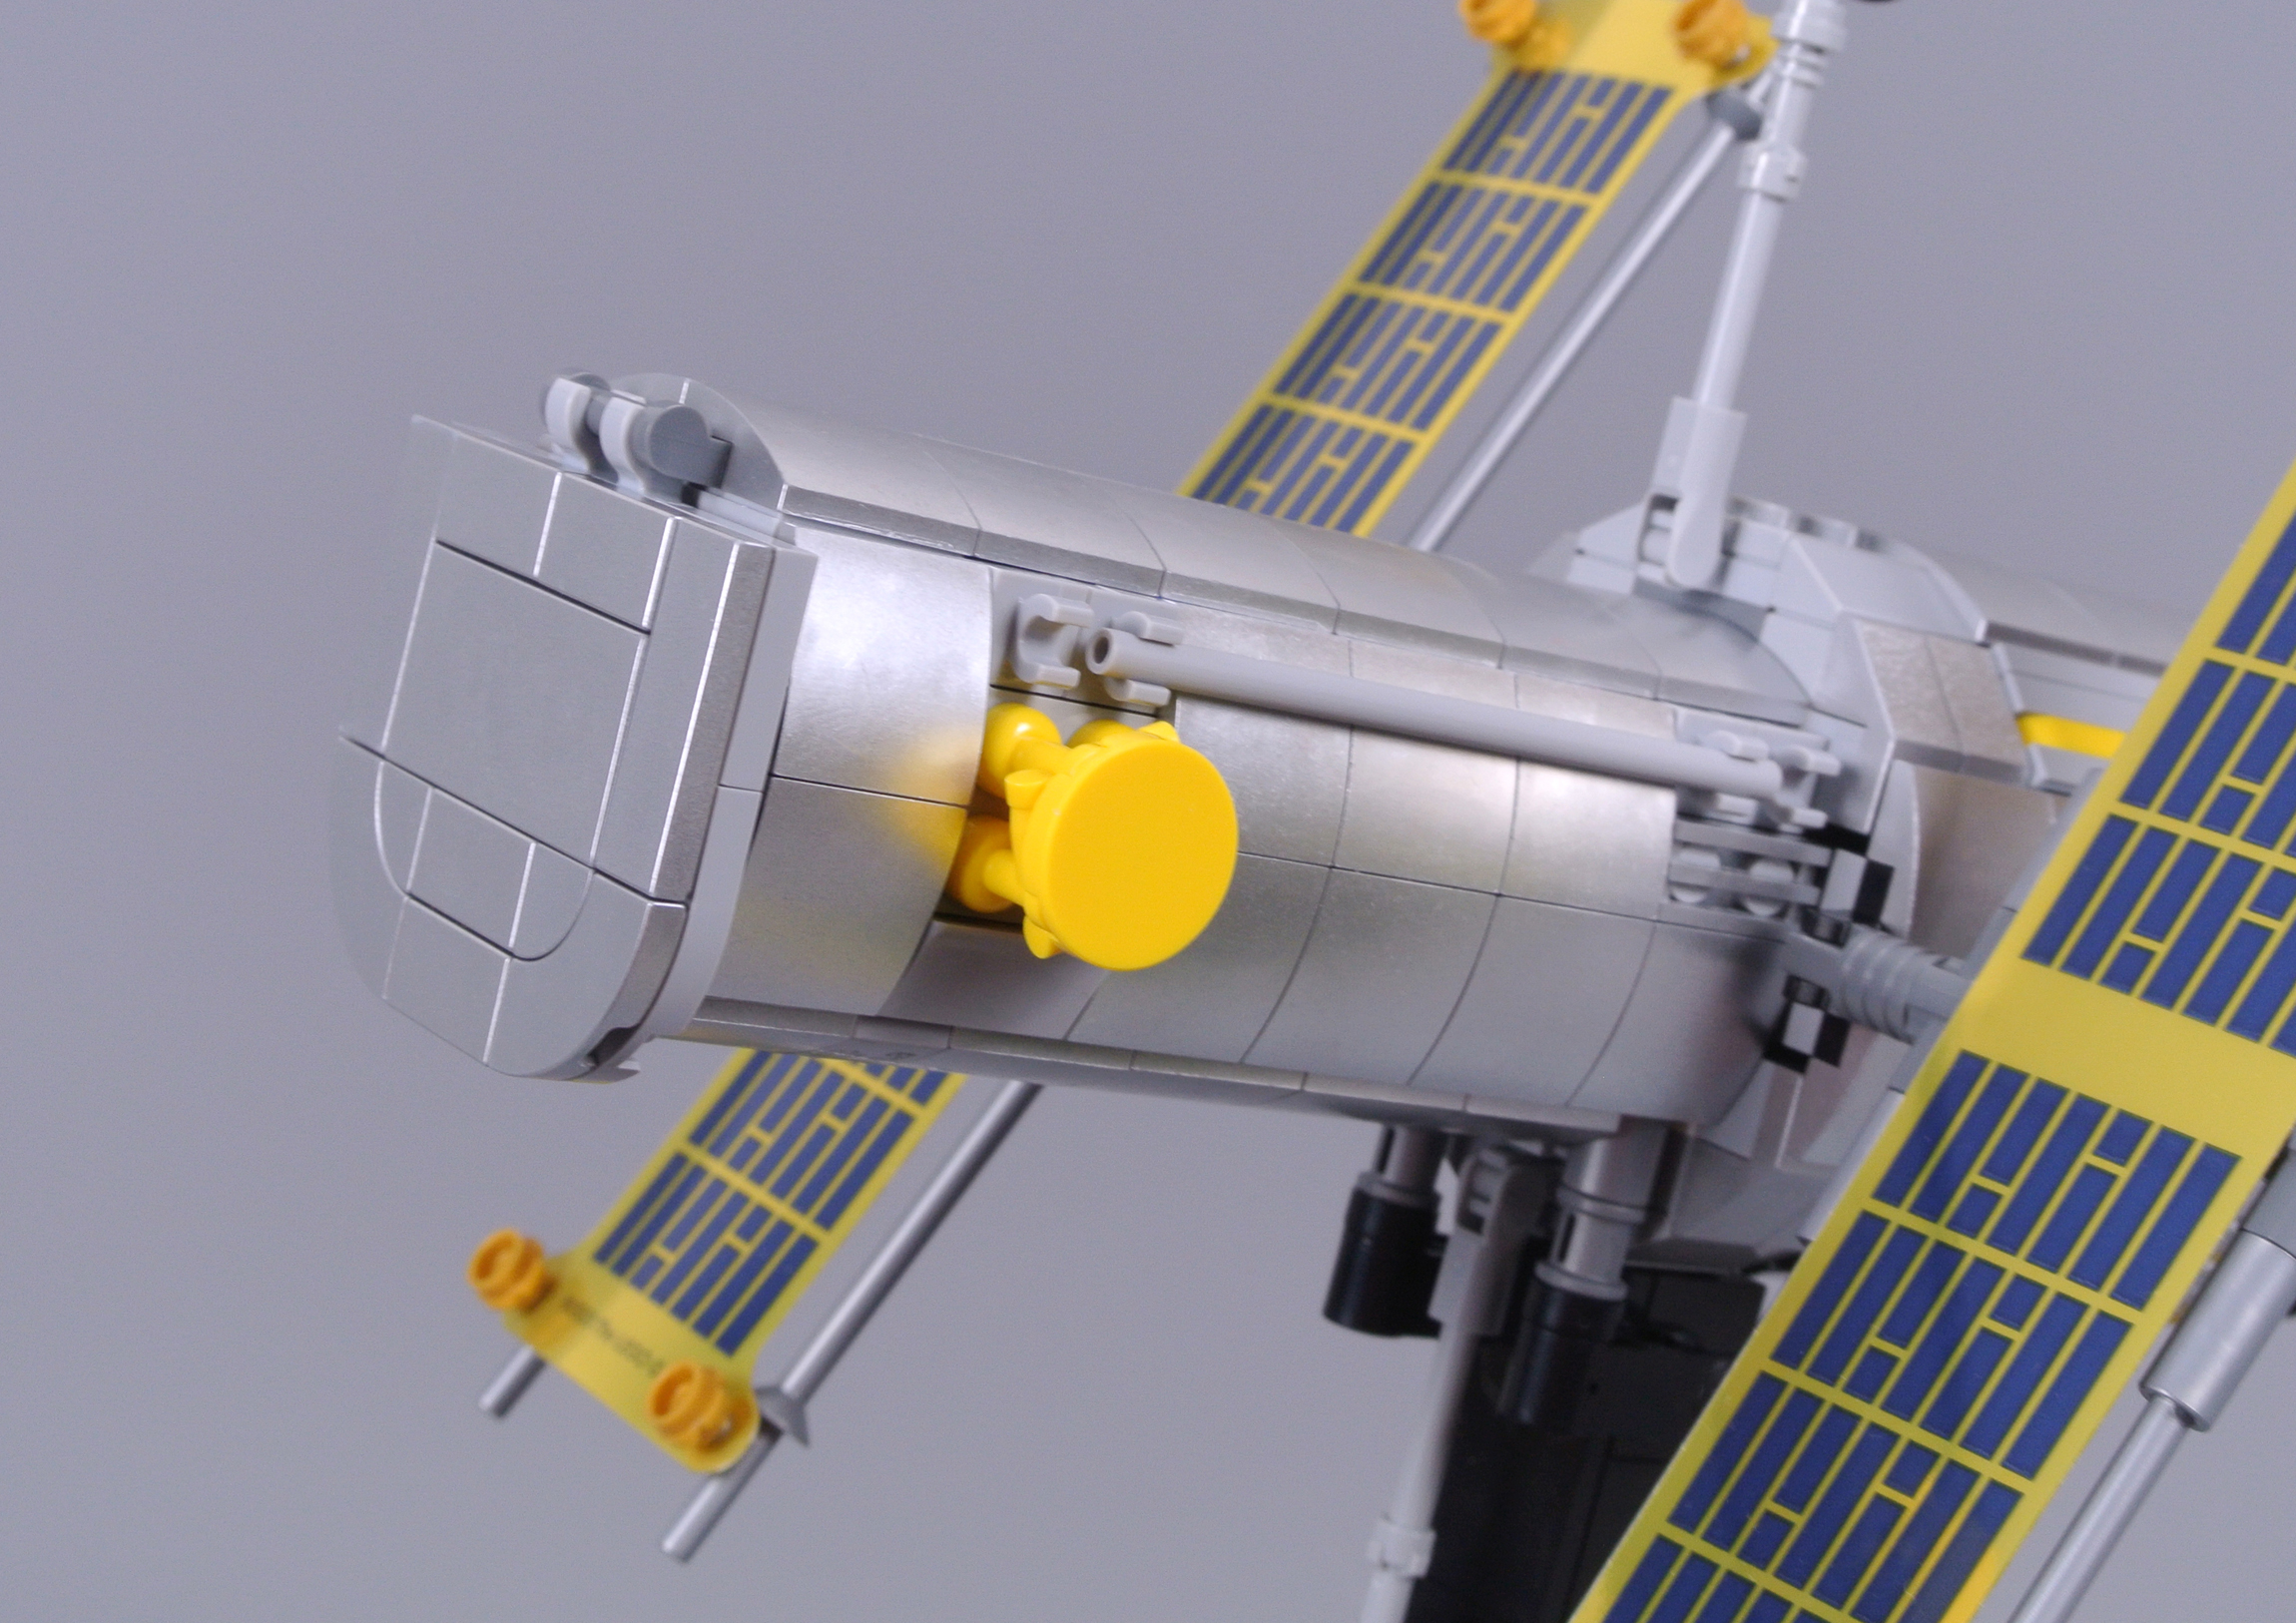
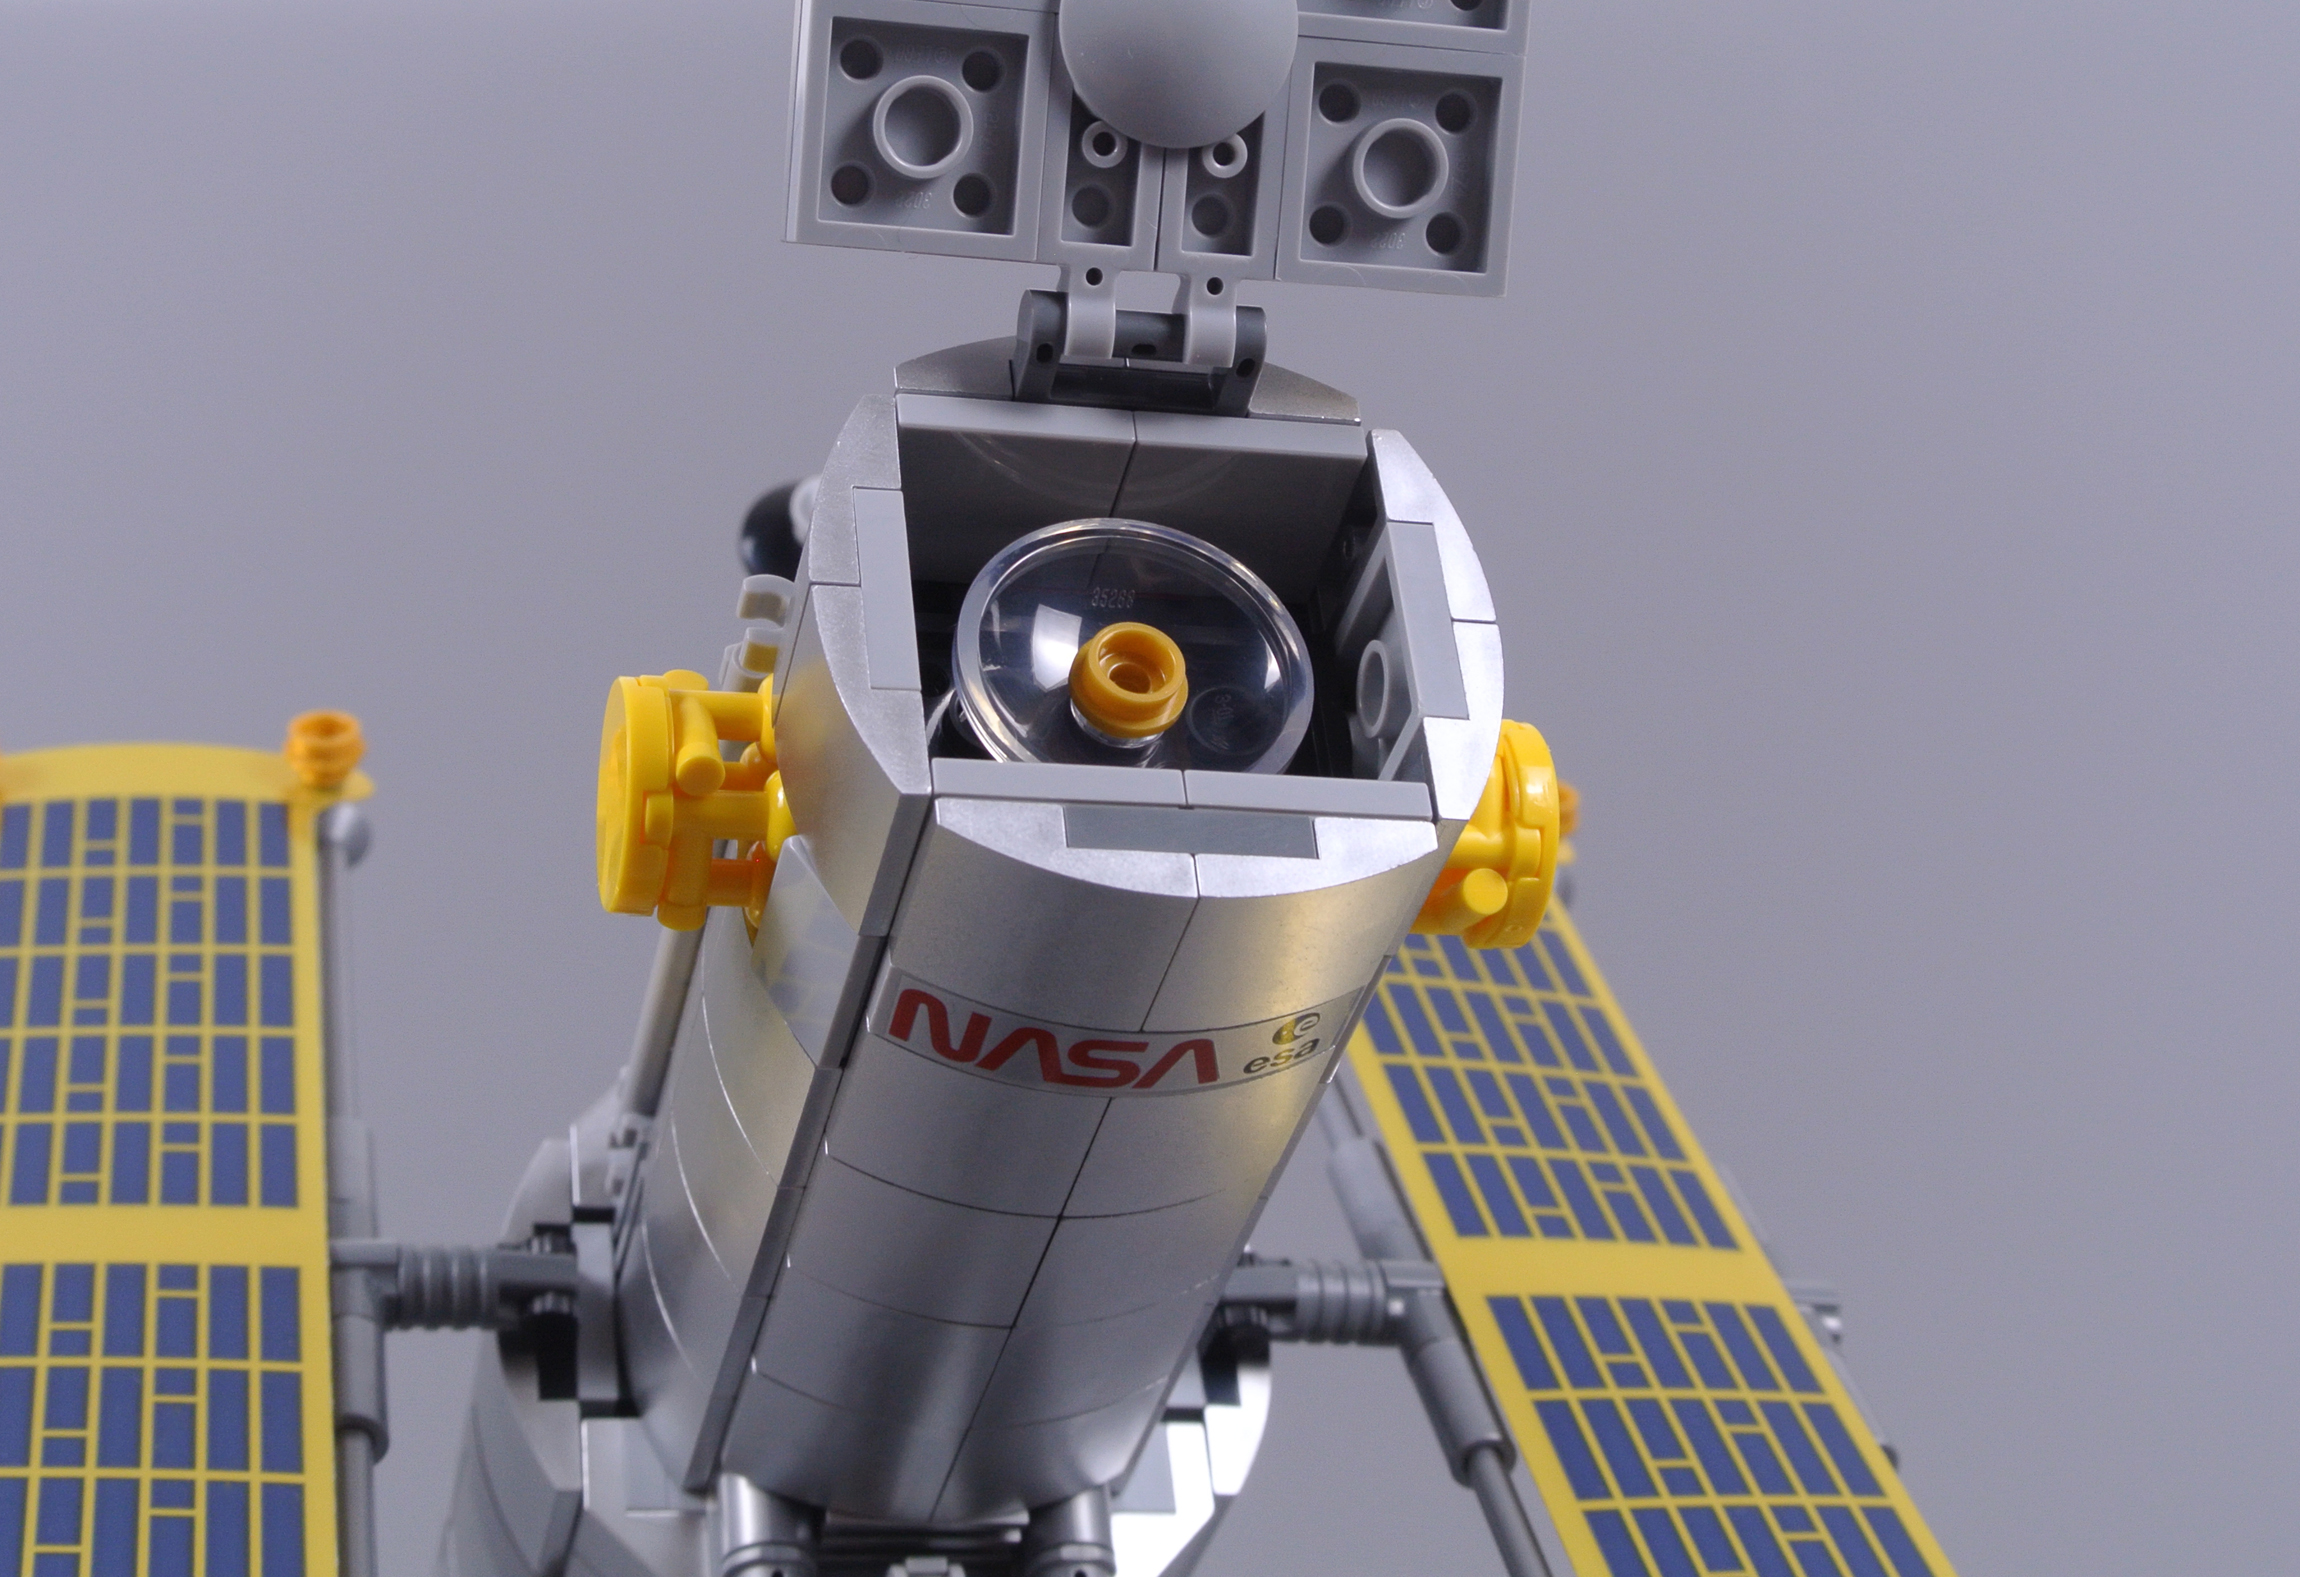
The satellite is protected by reflective thermal blankets that are represented by metallic silver drum-lacquered elements here. The entire set includes 108 such pieces and they look superb, effectively recreating the actual colour. Moreover, the cylindrical shape of the aperture housing and seems realistic and I appreciate the inclusion of yellow braces on either side, even though these are perhaps too prominent.
Opening the aperture door uncovers the secondary mirror inside. This mirror should be fixed substantially deeper within the housing, although that space is instead required to strengthen the internal structure. The decorated curved slope on the exterior is perfectly accurate though, featuring both NASA and ESA branding to reflect the international development of this famous scientific instrument.
Golden solar arrays are connected to the telescope, taking inspiration from the flexible panels which originally provided power. Recreating the solar panels using plastic sheets has certainly proven effective and the slender stanchions around the edges appear relatively inconspicuous. The deployable communication antennas appear similarly authentic, in either their retracted or active positions.

The solar arrays can also be displayed before deployment, replacing the standard structures with their furled equivalents. That demonstrates wonderful attention to detail as the telescope was deployed with its solar panels retracted. However, the payload bay cannot accommodate even these stowed panels which is disappointing. I think providing the modern solar panels to replace the original versions would have been appreciated too.

Shortly after launch, it was discovered that the Hubble Space Telescope's primary mirror had been polished to the wrong shape. Thankfully, this mistake was corrected using the COSTAR system which was installed during 1993. This rendition of the telescope includes a removable section to represent that famous repair and the resultant void cleverly connects the telescope with its aforementioned deployment display stand.
Excellent detail continues across the wider camera, spectrometer and spectrograph housing, where different instruments detect and record data. The yellow highlights around the exterior accurately recreate handgrips on the Hubble Space Telescope but the associated light bluish grey sections look awkward. Unfortunately, these pieces are unavailable in metallic silver.

After removing the telescope, the payload bay appears inevitably empty. Nevertheless, some interesting details remain, including the Ku-band antenna which is located behind the cockpit. Several angled cameras are also positioned inside, enabling astronauts to observe the cargo during deployment, while the remote manipulator arm connects neatly inside the payload bay.
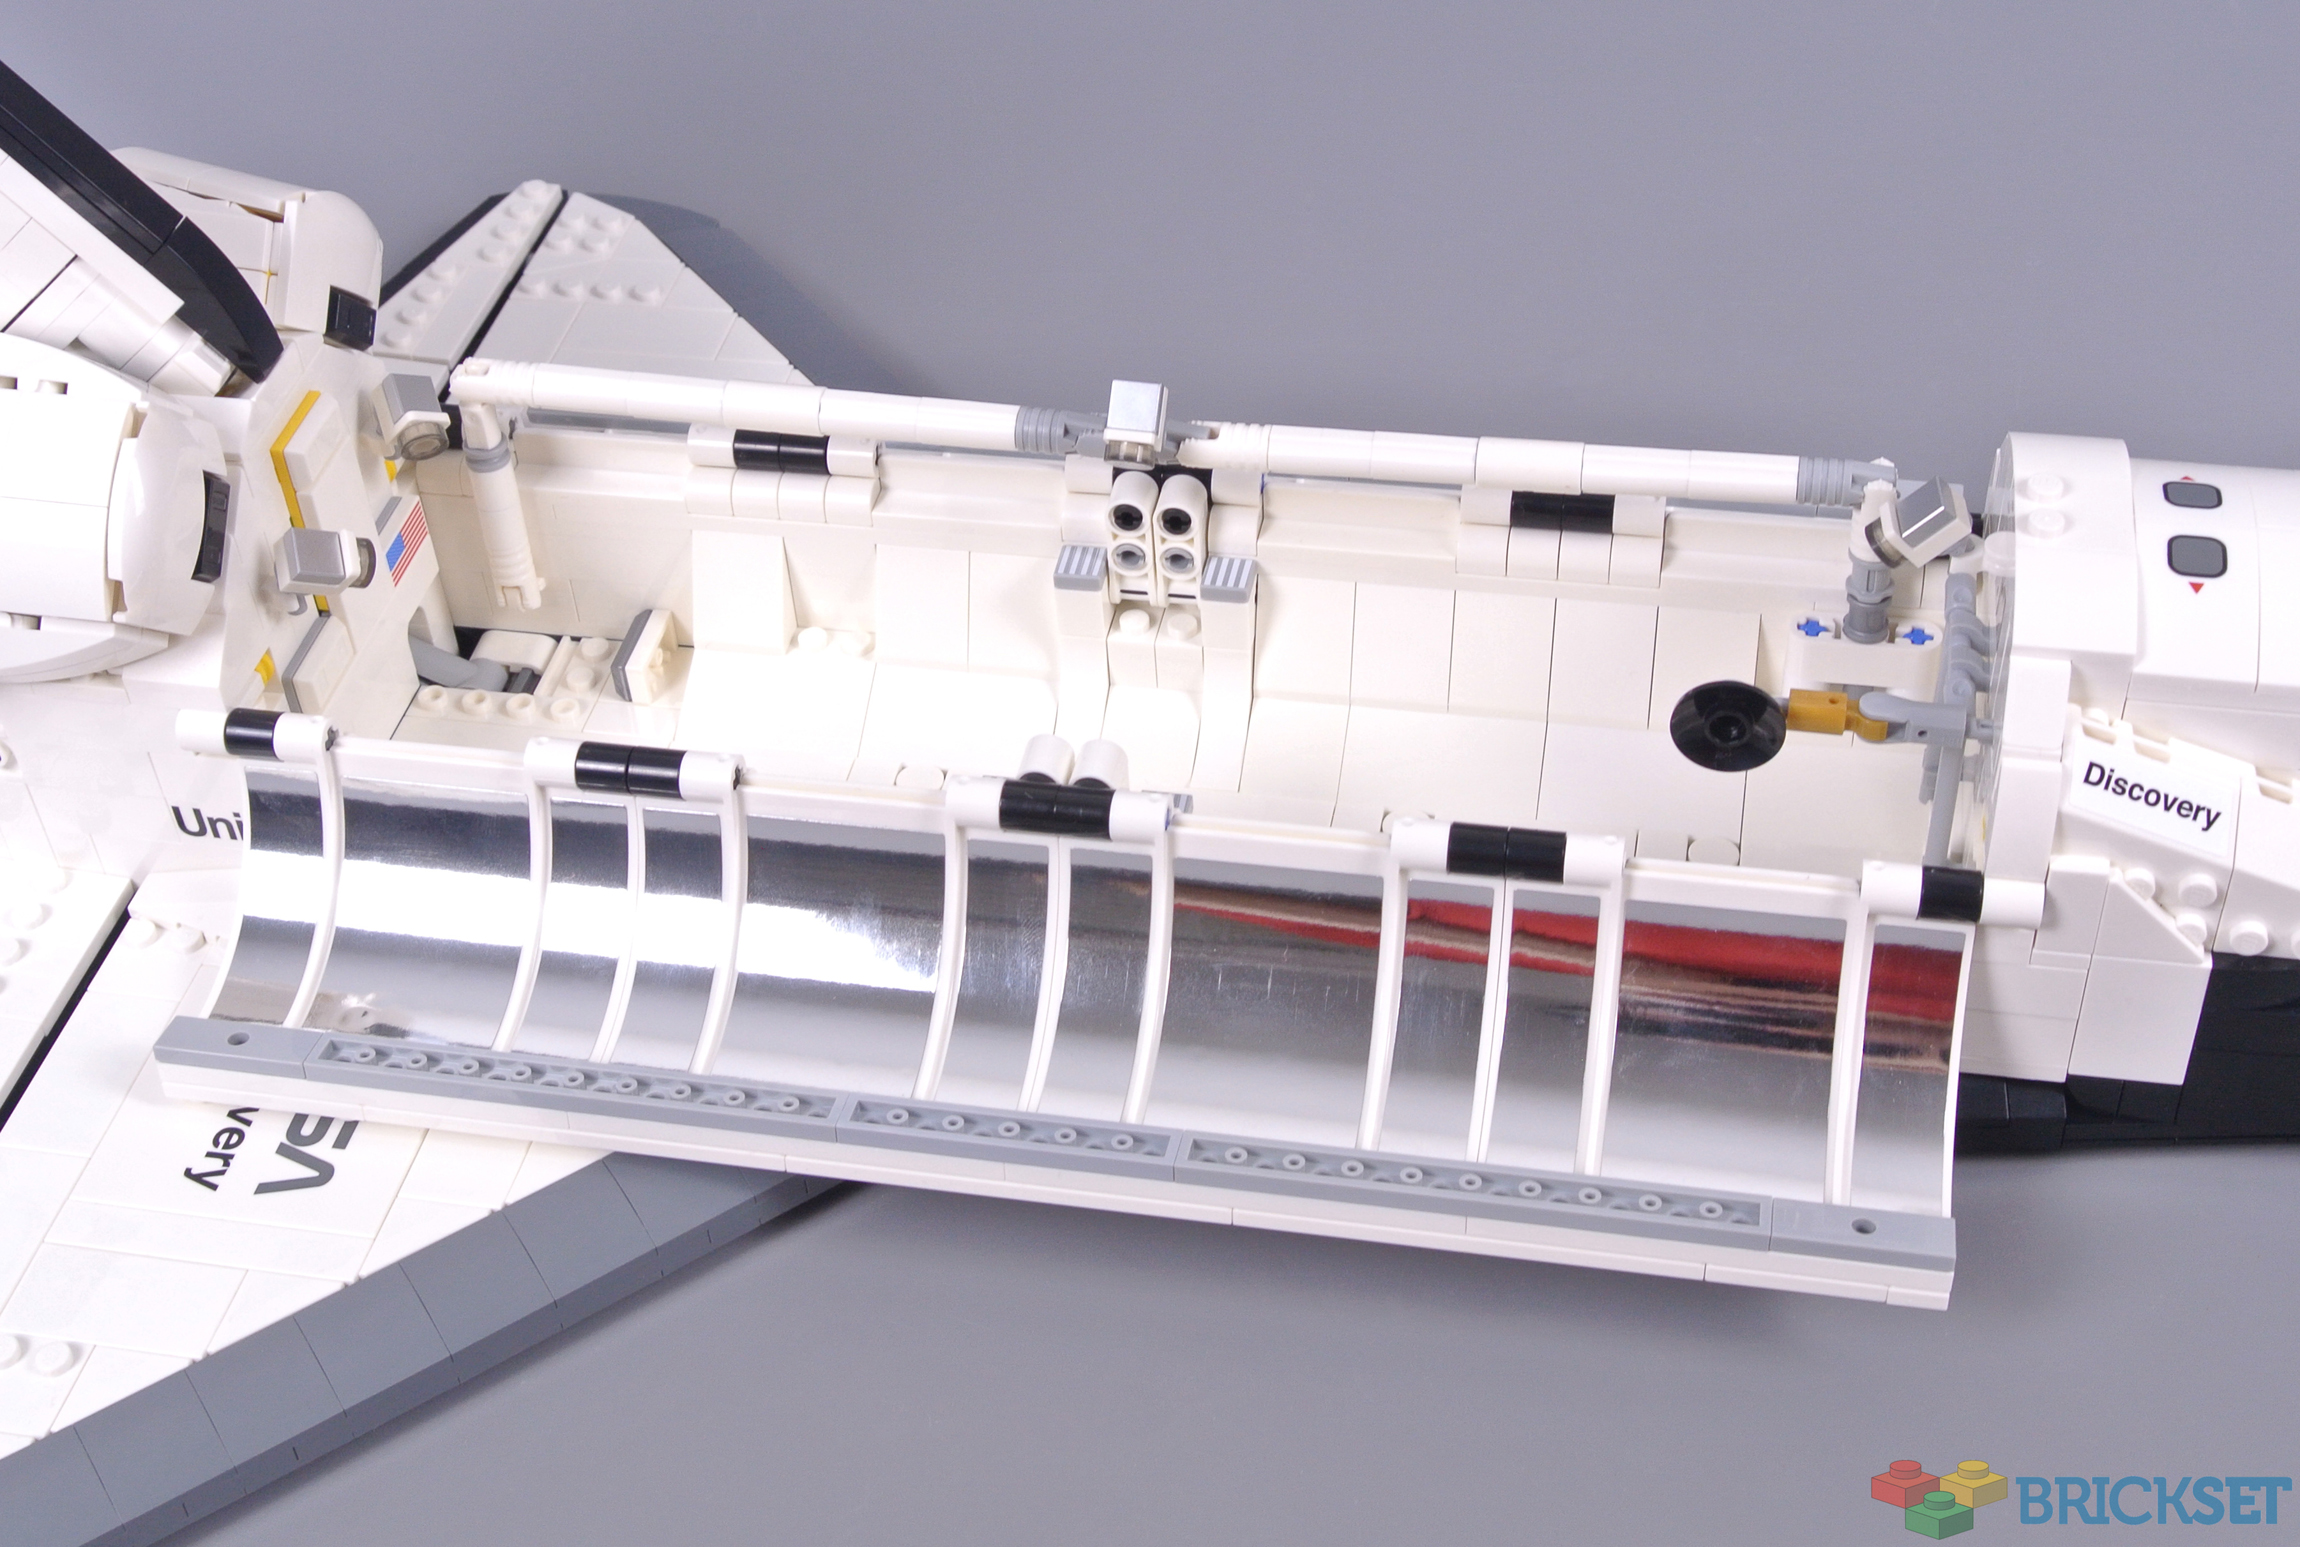
Despite their difficult application, the silver stickers which represent radiators look marvellous when positioned correctly. However, these can be omitted without dramatic effect, particularly since they are located inside the payload bay. Naturally, the American flag appears inside with two additional cameras and springs for the landing gear remain visible underneath. These are relatively unobtrusive though.

The elegant delta wings incorporate dark bluish grey 2x2 curved slopes, depicting the thermal protection tiles which were vitally important on the original Space Shuttle orbiter. Their curving shape looks absolutely brilliant and I think dark bluish grey was the correct colour choice. This model displays Discovery's markings from mission STS-31 during 1999, hence the NASA logo deviates from its modern counterpart.
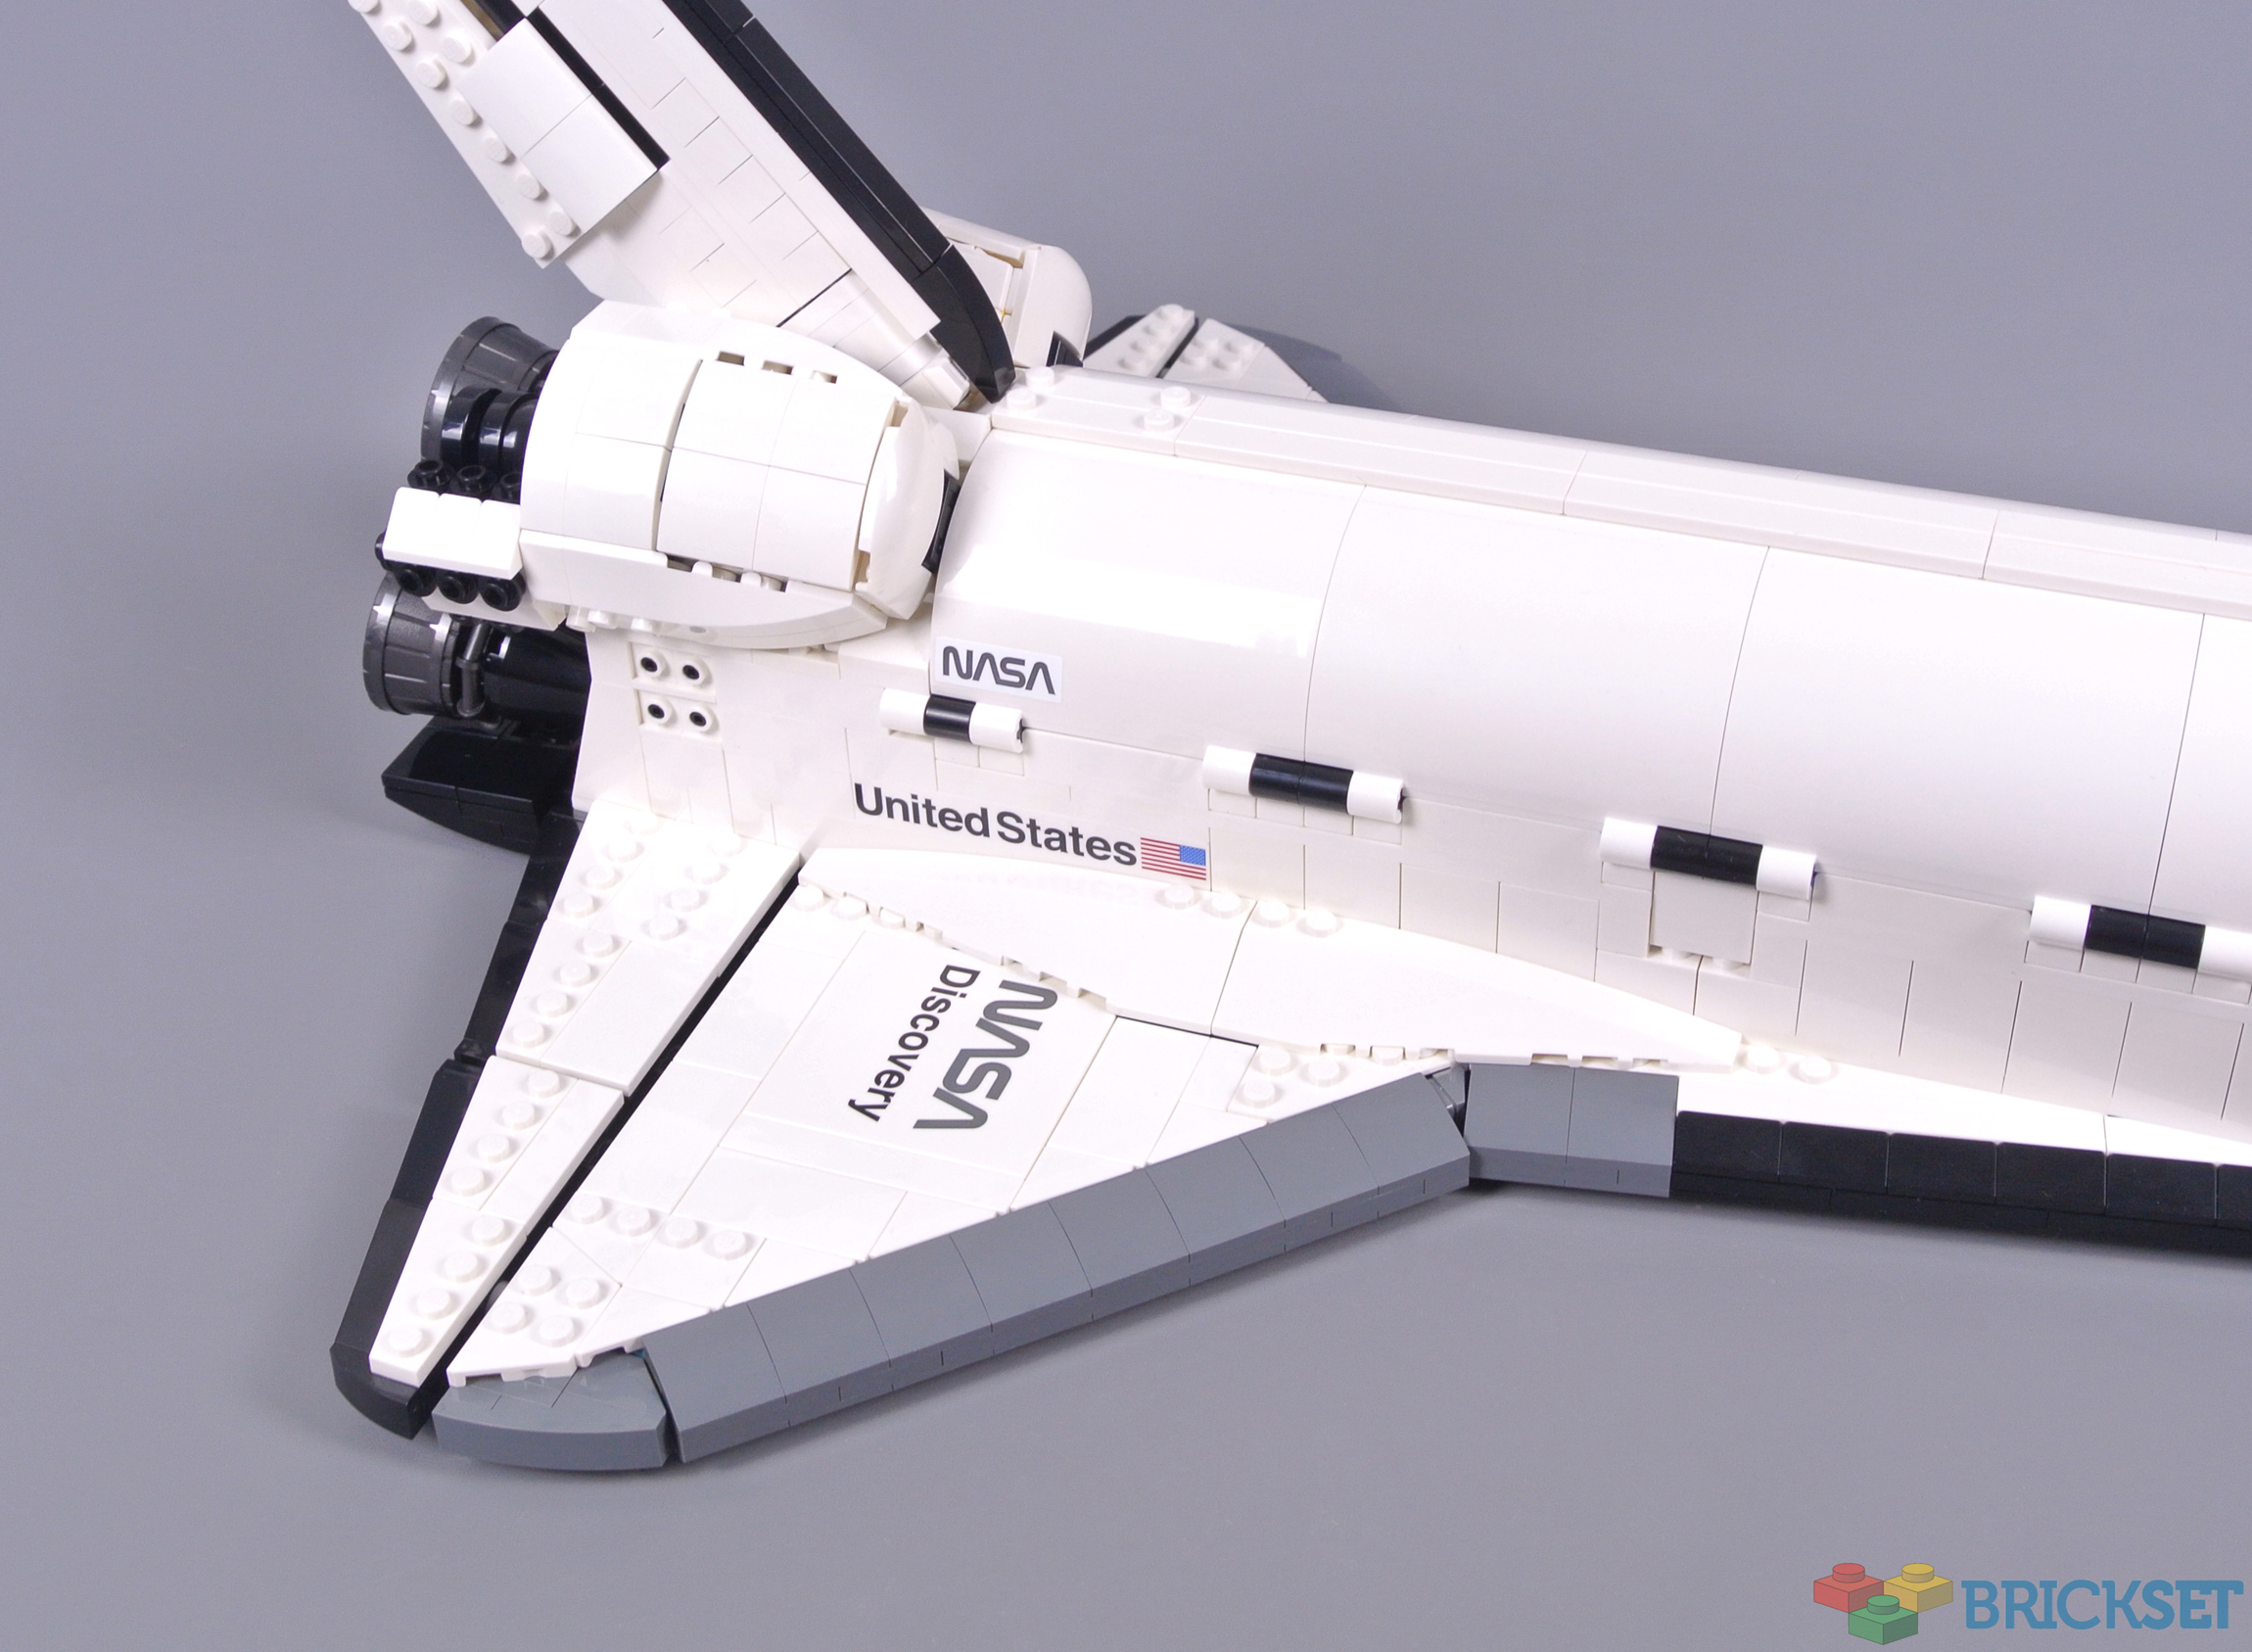
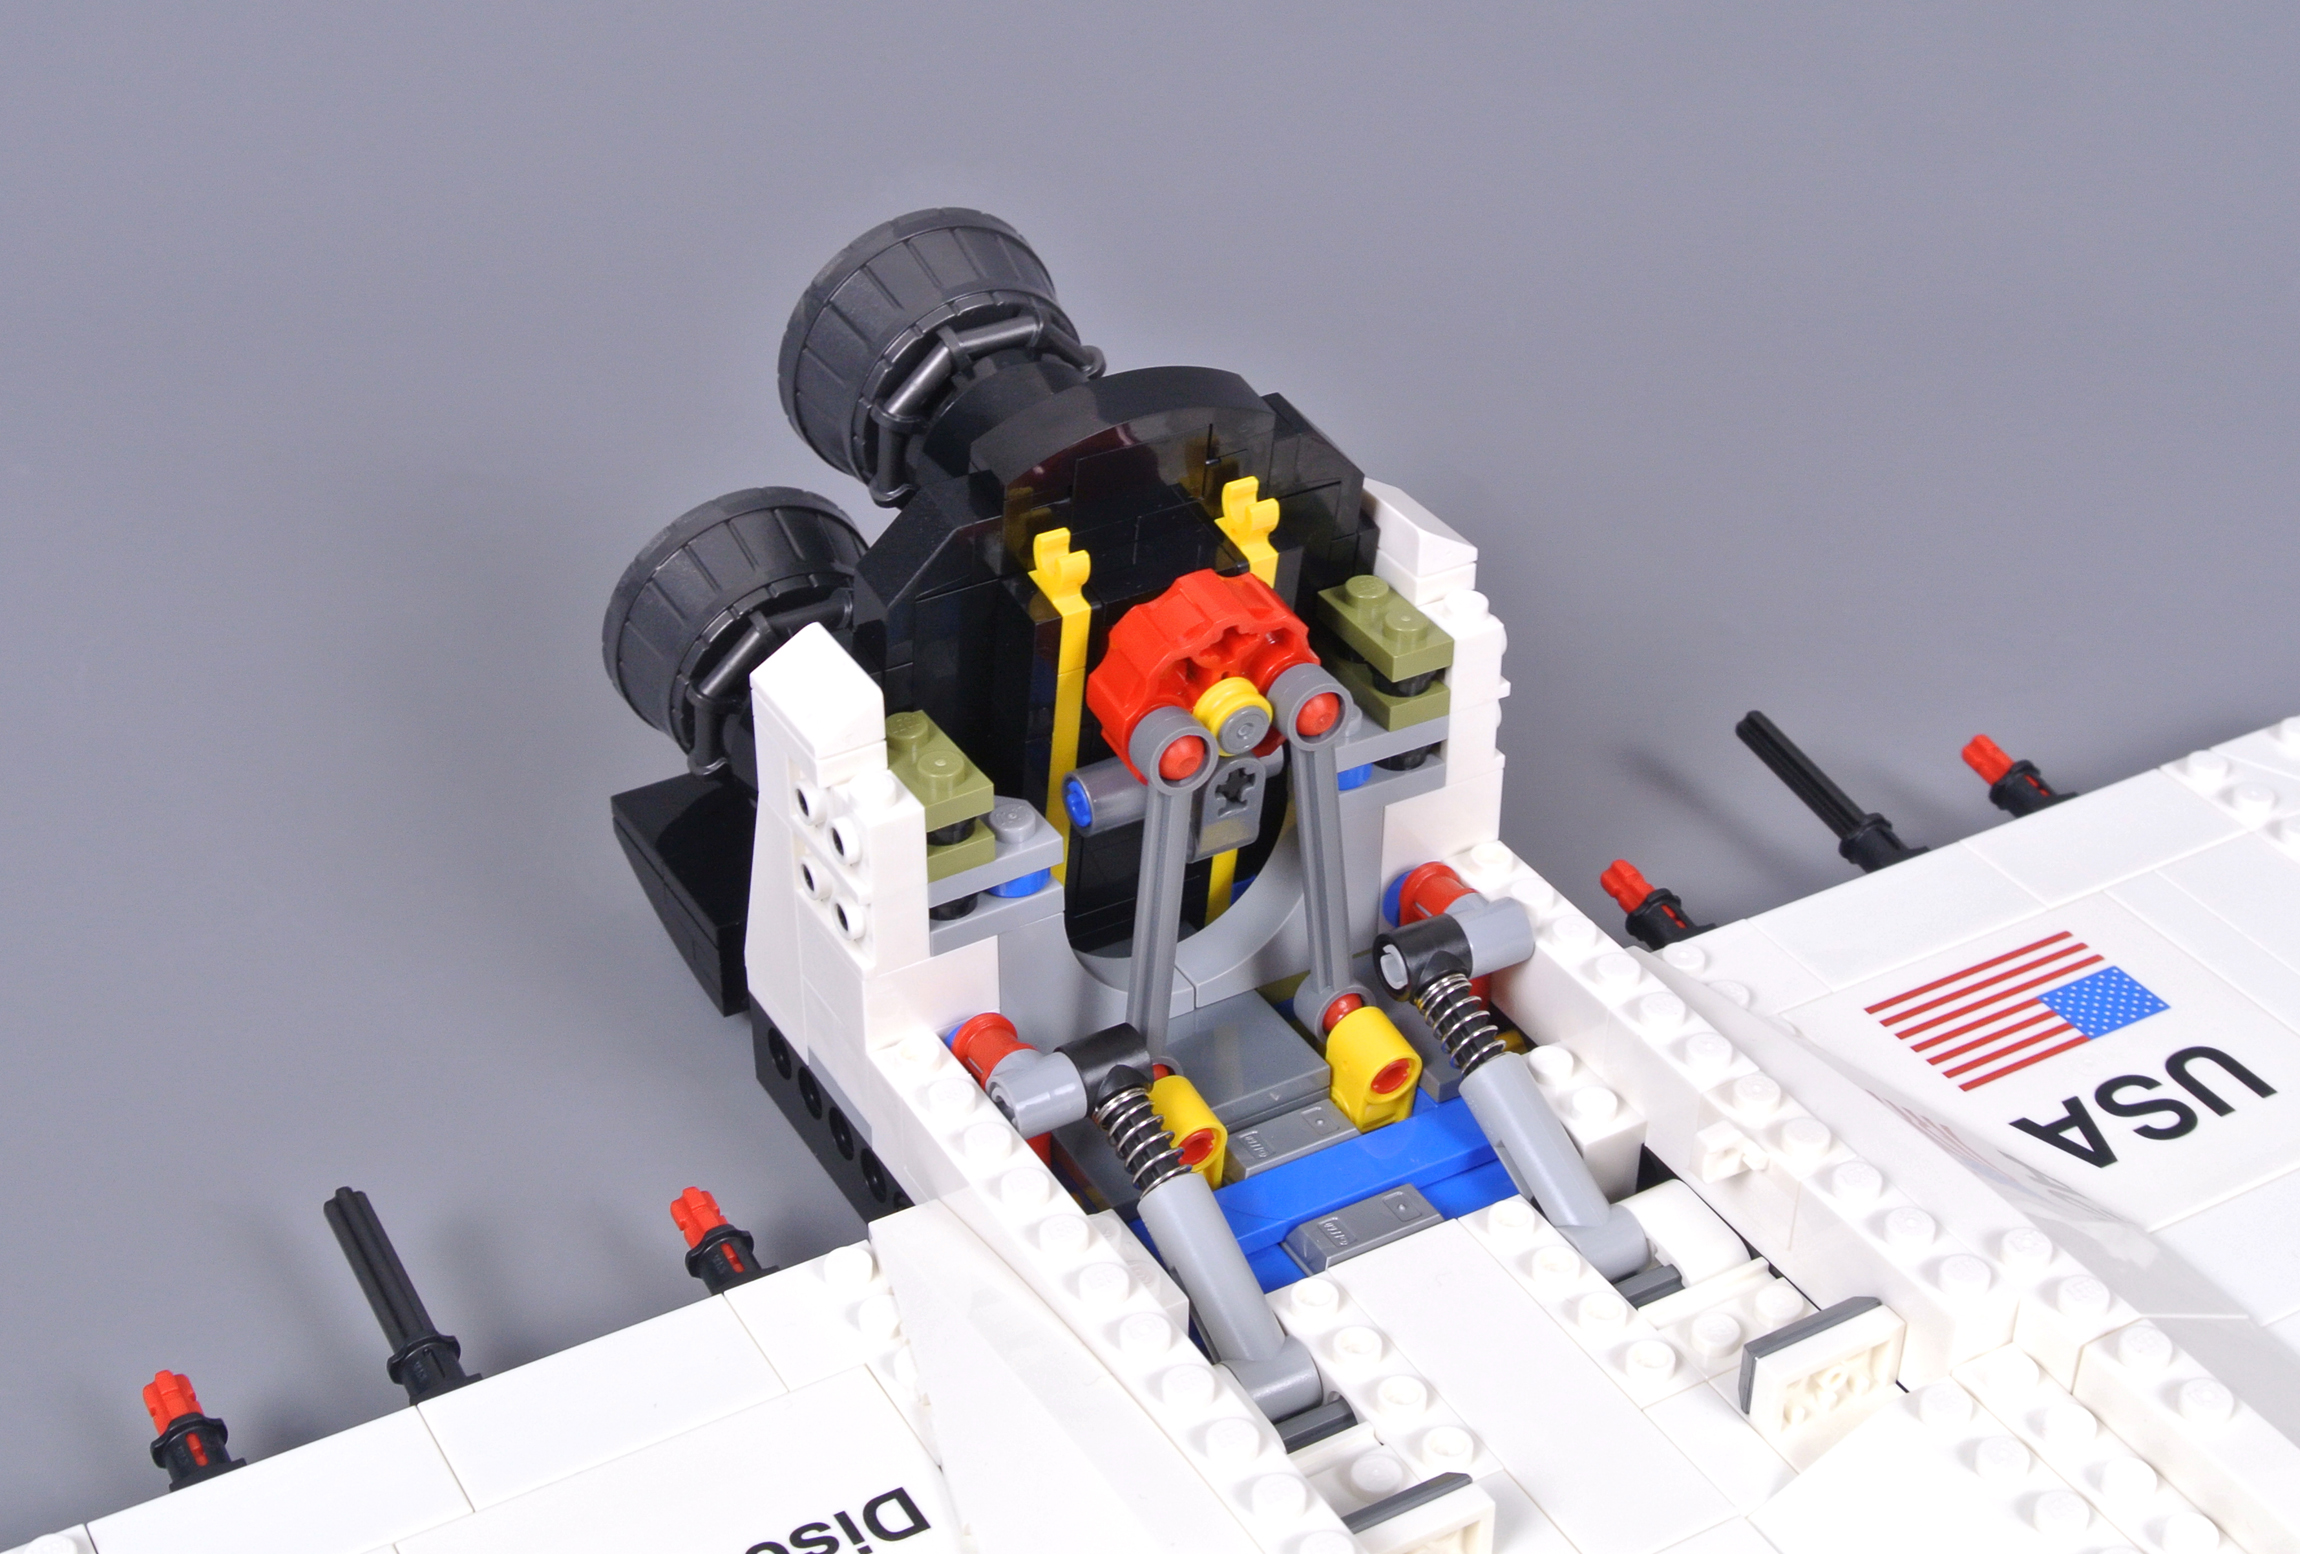
Both wings include printed 6x6 tiles and the 'United States' markings on the fuselage are also printed, while the NASA symbols on the payload bay doors are formed using stickers. Beyond their authentic appearance, the control surfaces on each wing may be adjusted by rotating the central engine nacelle. This function is ingeniously integrated, wholly concealing any evidence of the mechanism inside.
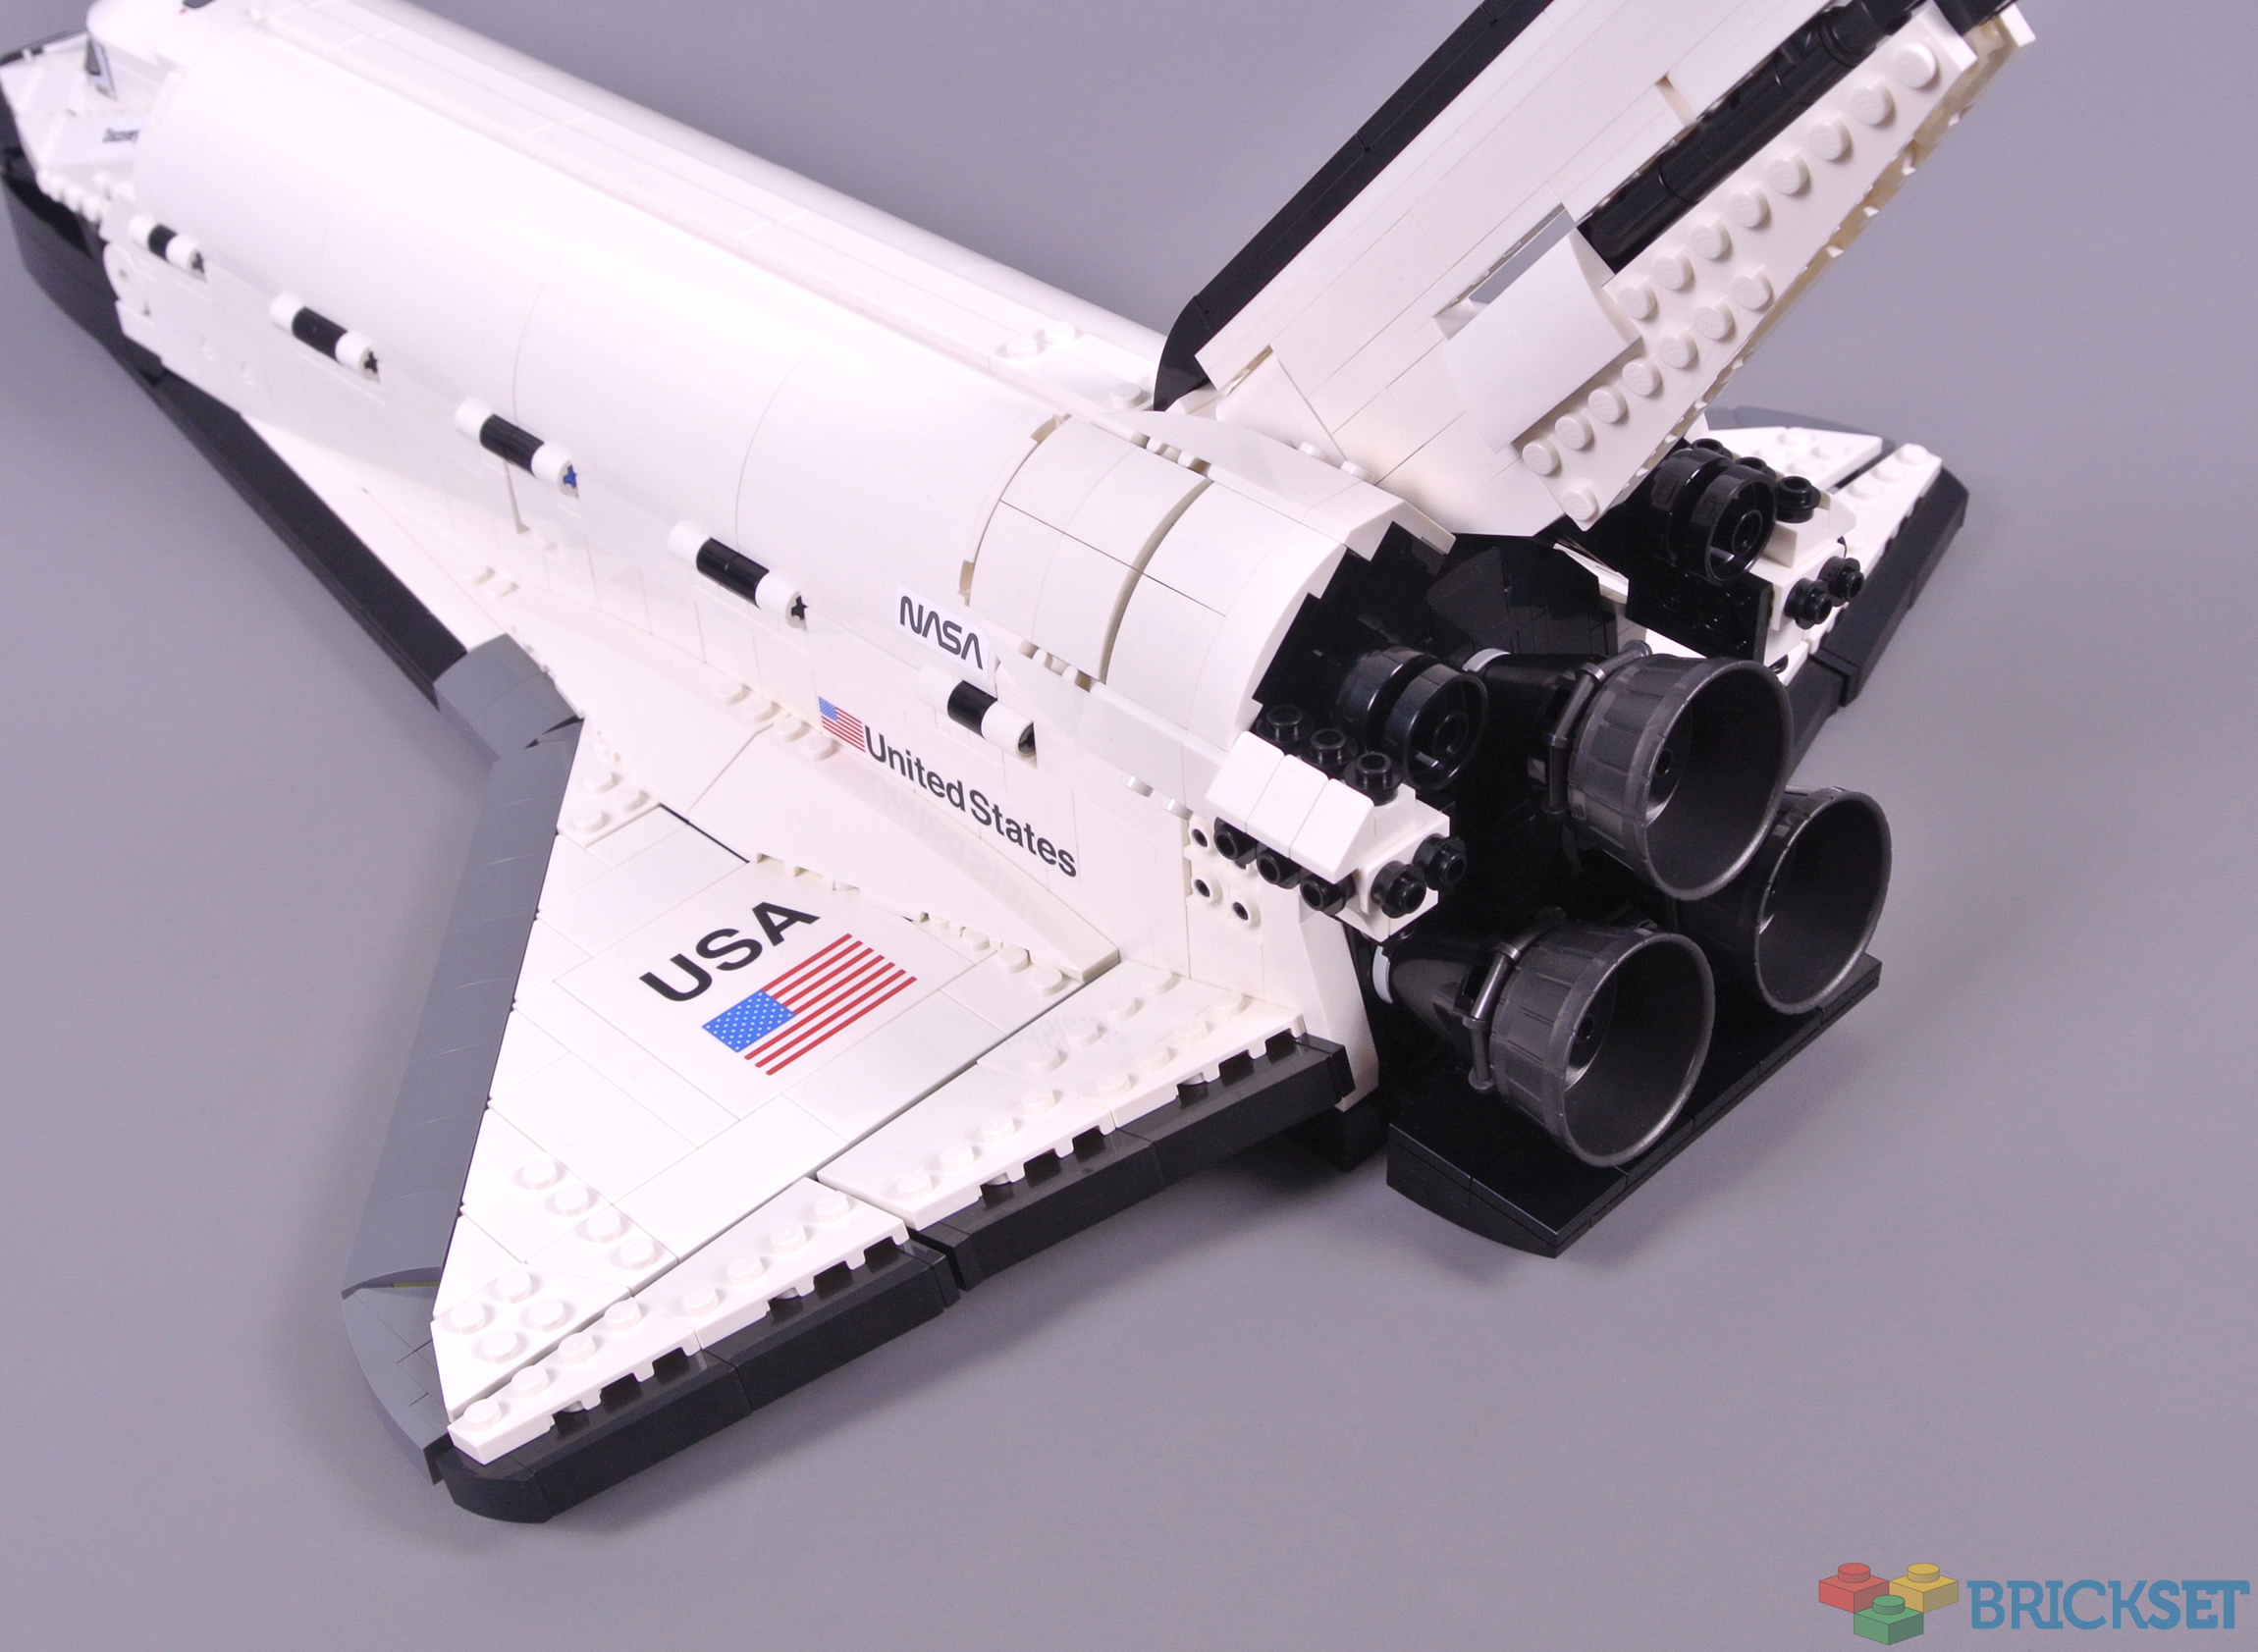
Another adjustable flap is positioned beneath the engines and attached using ball joints. This body flap assists in aerodynamic control during descent and seems accurate when compared with the original spacecraft. The angled engines also appear realistic, incorporating pearl dark grey tub pieces which previously appeared on 21309 NASA Apollo Saturn V and 10266 NASA Apollo 11 Lunar Lander.
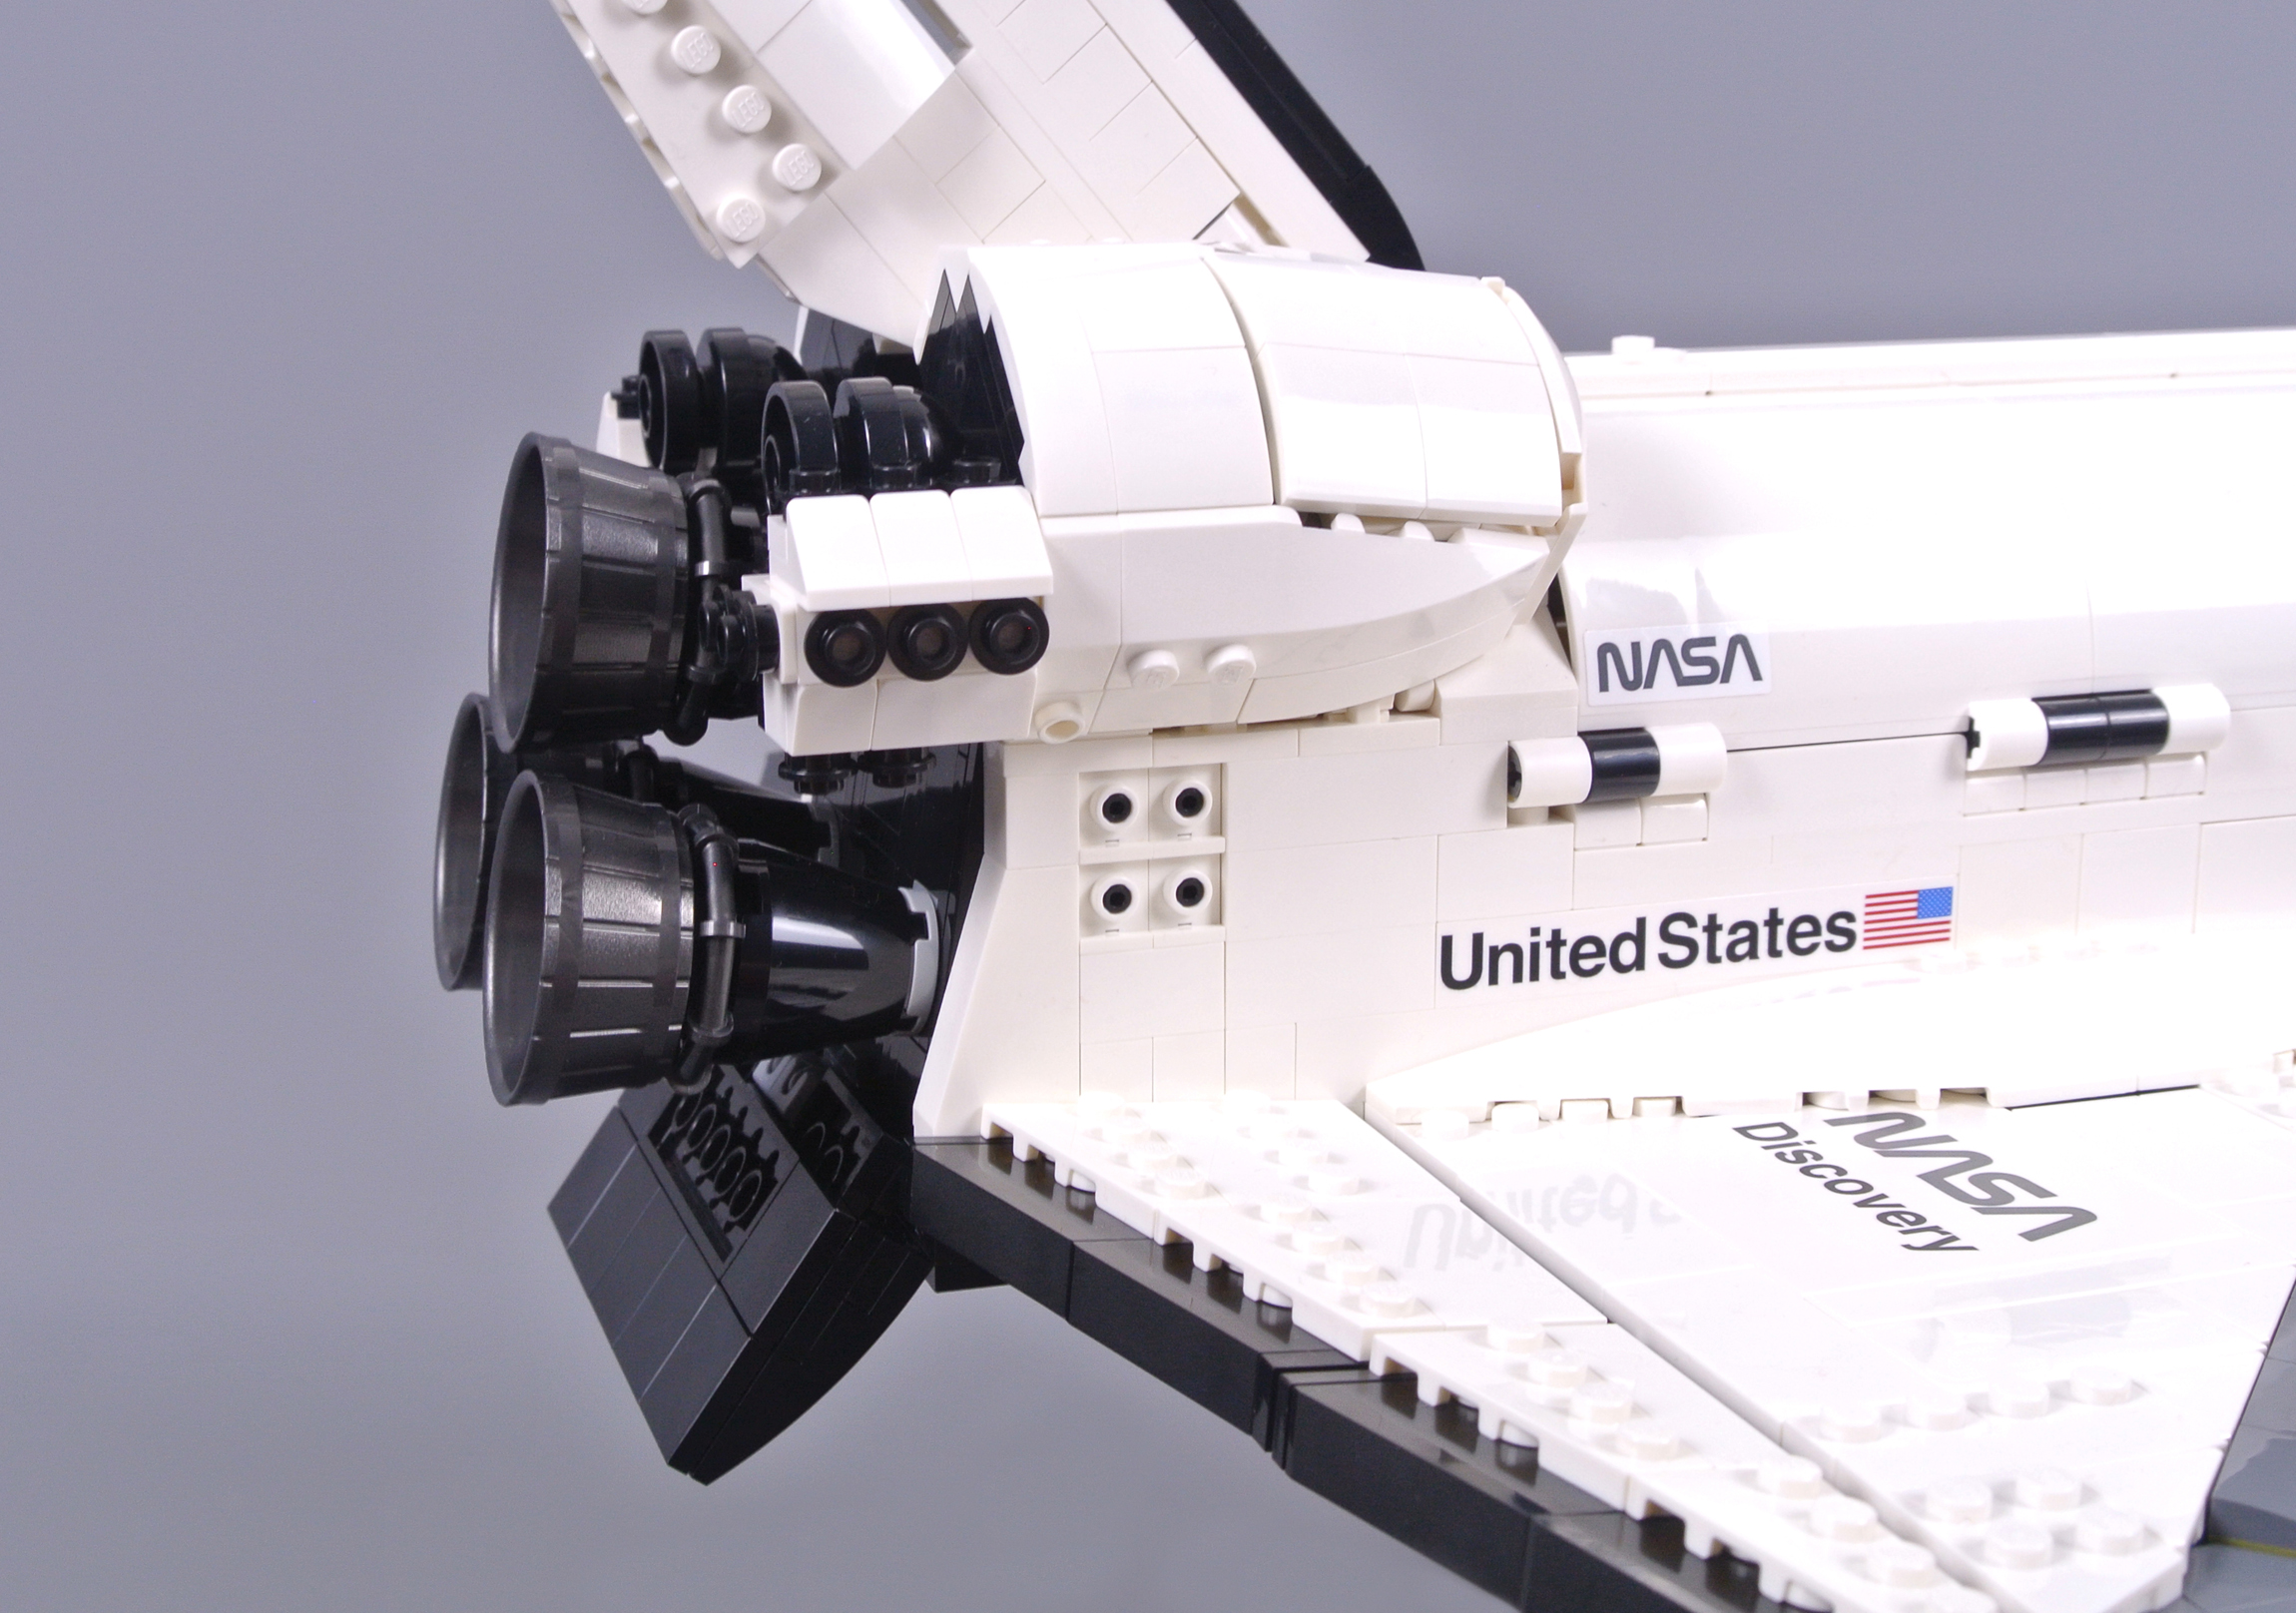
The pronounced orbital manoeuvring engines and propellant tanks feature suitable curvature while the reaction control engines look superb as well. Furthermore, I love the umbilical panel situated underneath the manoeuvring engines, comprising four headlight bricks and black 1x1 round plates with bars to represent these intricate systems. Printing such detail could achieve greater accuracy, although actually building the umbilical panel is more fun!
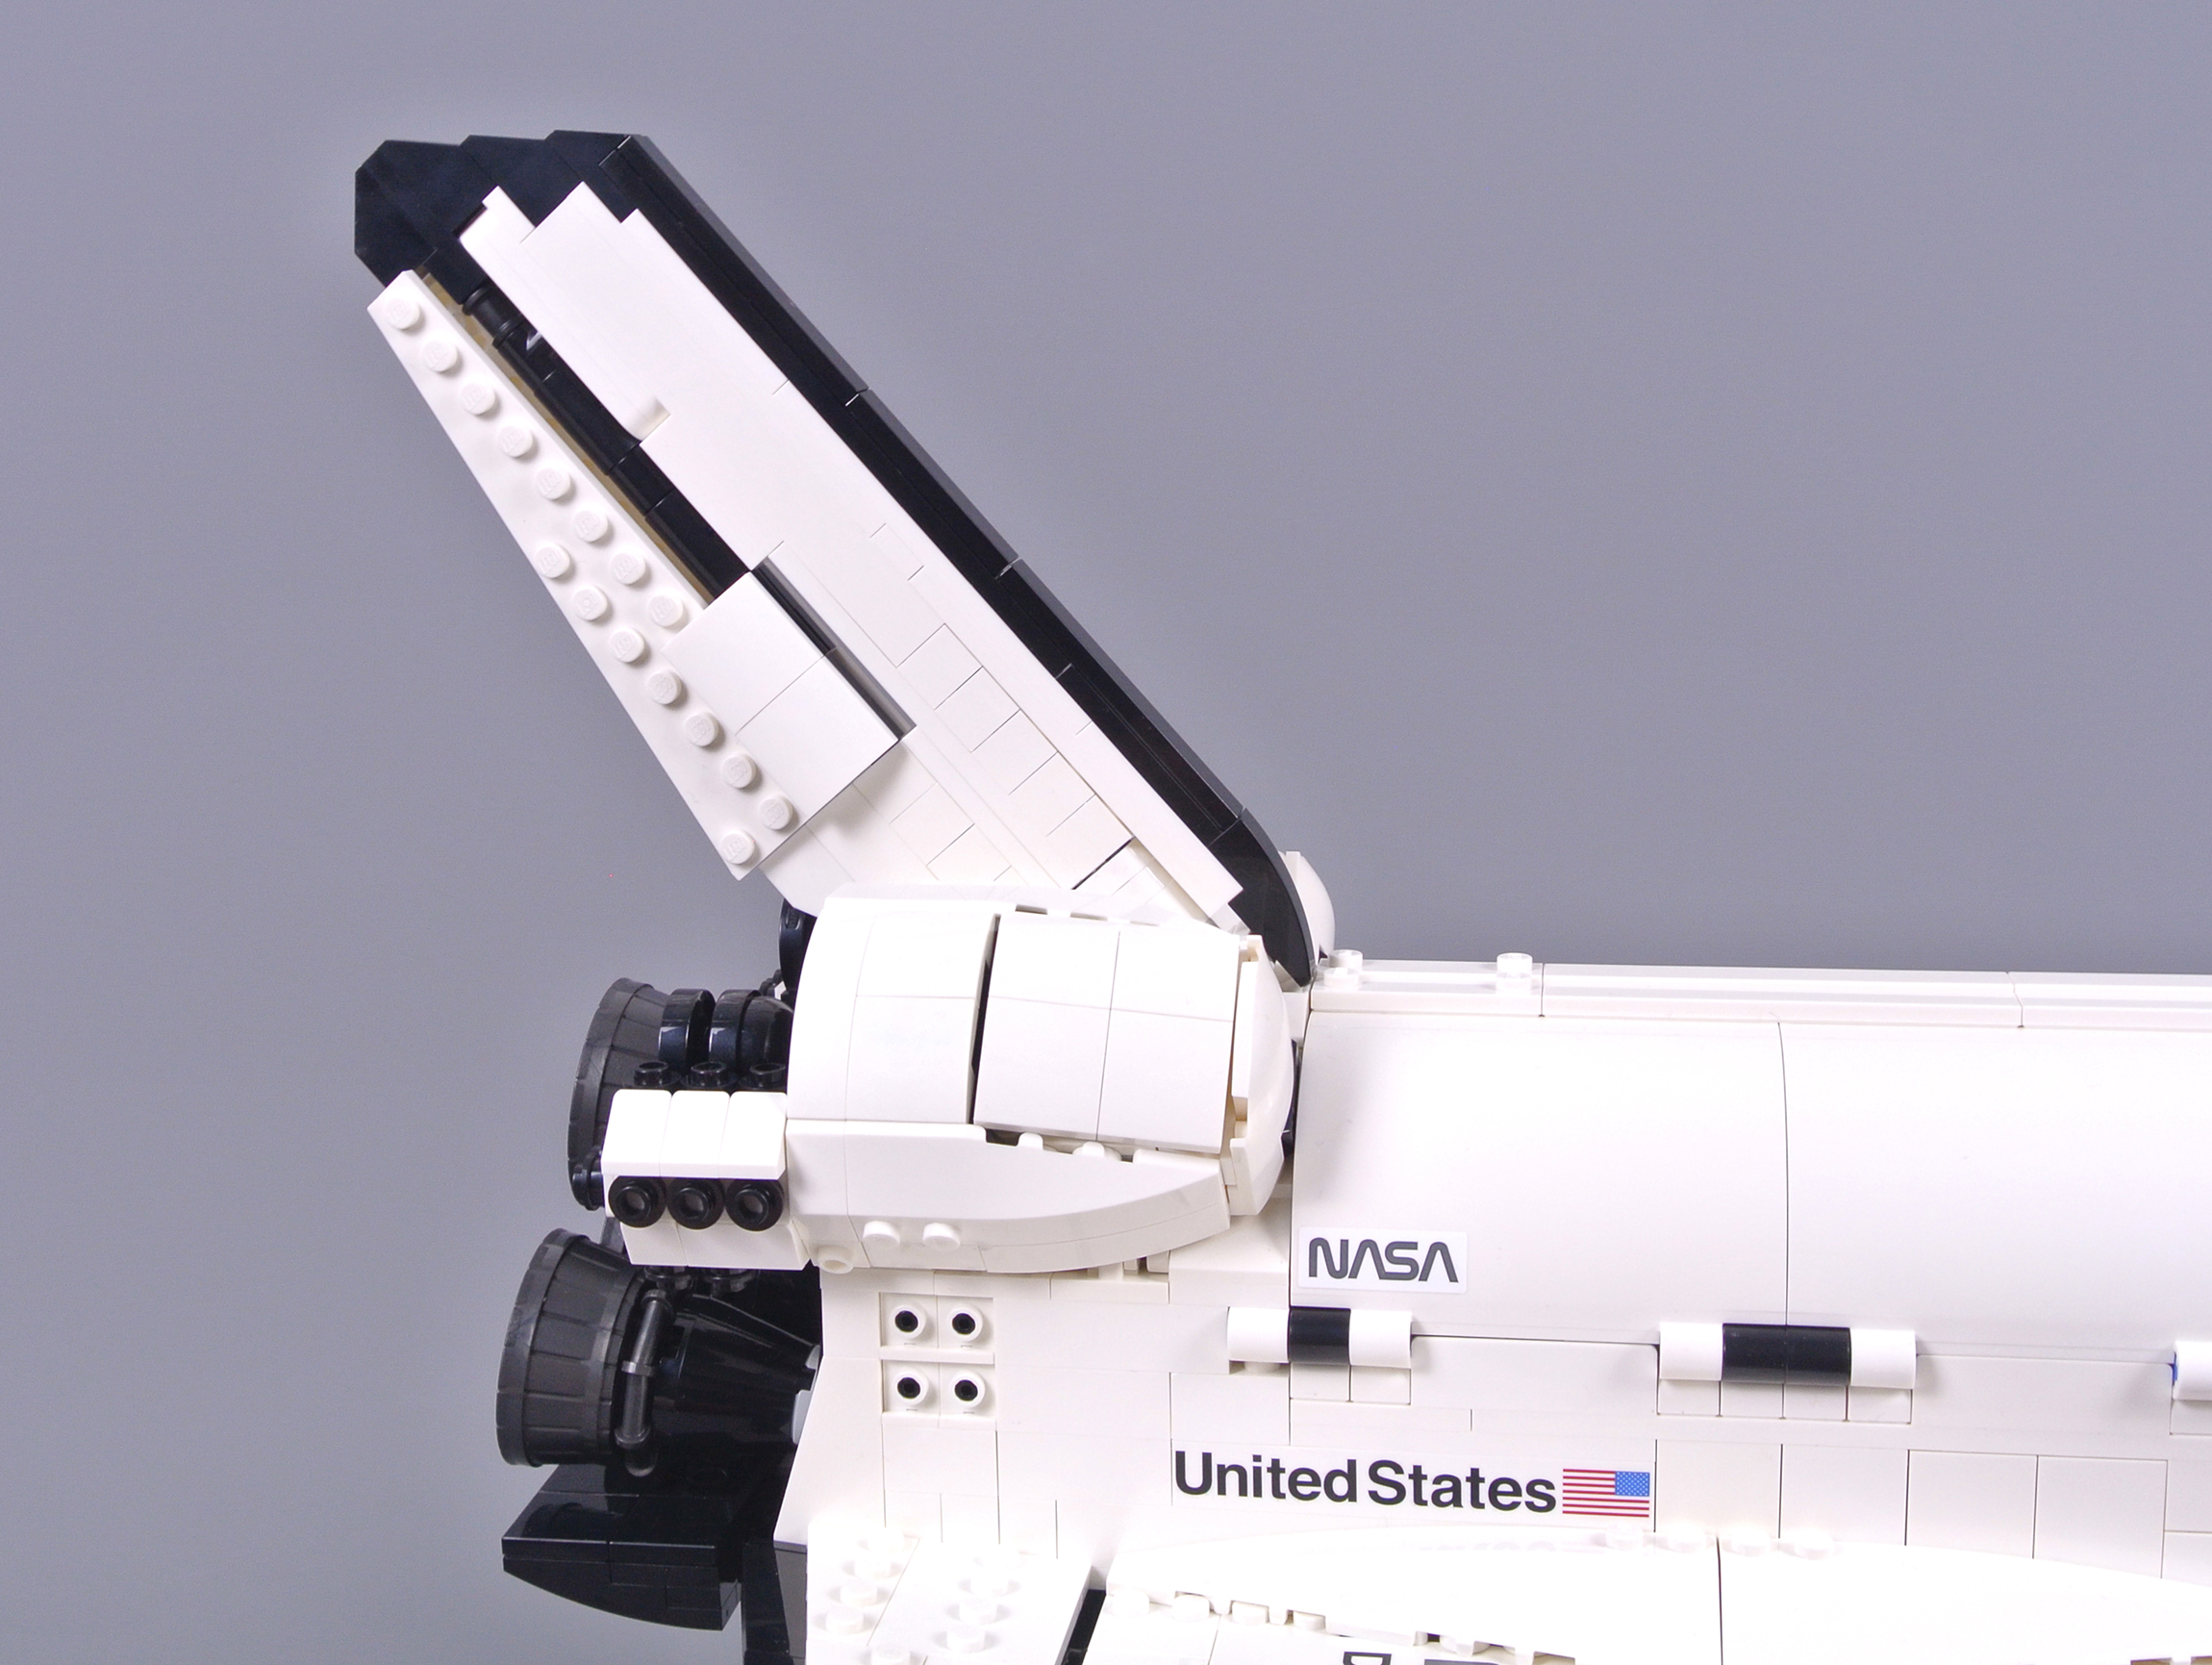
An appropriate combination of black and white components forms the vertical stabiliser, which includes an articulated rudder. The rudder can move sideways or split to create a speed brake, as demonstrated below. This function works perfectly and I appreciate its inclusion, although a gap does remain exposed between the rudder and the stabiliser which is disappointing.

While the elevon control mechanism and opening payload doors are enjoyable, my favourite function is undoubtedly the deployable landing gear under the orbiter. These are released by pushing the body flap forwards and feature springs, assuring that all three landing gear struts activate together. Ideally, they would be located further forward for absolute realism, although balancing the model presumably required some compromises.
The distinctive forward rake is present and viewing the landing gear from underneath reveals their tidy integration. The doors are understandably excluded but these struts are outstanding. Additionally, the underside of the shuttle is smoothly finished, interrupted only by landing gear and display stand slots. The inverted 2x2 wedge tiles attached on the underside of each wing are especially delightful, nestling among larger wedge plates and curved slopes.

Each landing gear strut must be returned to their stowed position manually, recalling those on the actual Space Shuttle which could not be retracted after activation. Nevertheless, they slot neatly into position and springs ensure that the landing gear will not be deployed accidentally, despite the omission of folding landing gear covers on the underside.
Overall
LEGO has achieved outstanding success with earlier NASA models and 10283 NASA Space Shuttle Discovery maintains that exceptional standard. This spacecraft integrates exceptional detailing throughout its entire length, continuing across the exterior and inside where the crew compartment looks superb. In addition, the payload bay design maximises internal space and compares favourably with the original shuttle.
Several appealing functions are also provided, including the deployable landing gear which is ingenious, while the Hubble Space Telescope appears spectacular. The metallic silver colours are attractive and numerous important details are included, matching the Space Shuttle in that regard. Their consistent size is also welcome, at an approximate scale of 1:70.

Furthermore, I appreciate the provision of three separate display stands which enable various possibilities for display. The price of £169.99 or $199.99 also represents excellent value in my view, albeit not matching 21309 NASA Apollo Saturn V or its present equivalent. I am certainly pleased with 10283 NASA Space Shuttle Discovery and believe any NASA enthusiast will also enjoy this majestic model.
This set was provided for review by The LEGO Group but the review represents an expression of my own opinions.
267 likes
111 comments on this article
Ignoring price difference, if you had to pick a favorite between this and the Saturn V - which is the better build/display piece?
My thoughts on first seeing this set:
Chrome?
Chrome?
Darn it.
Perhaps the Saturn V microfigs could be put in the cockpit? Although it would look odd to see them standing on their seat like the 5 year olds in my class.
Shapewise it is an impressive model. I really dislike the visible hinges of the bay doors though
Interesting that there was so much olive used for the 'inner' pieces, which got me wondering: Do designers make the set and mark which pieces are available for a color-swap, or do they get a list of parts that have been made in large quantities and they adjust the design to accommodate those elements inside?
Spaceship, Spaceship, SPACESHIP!
Heat shield tiles on the bottom would have raised the piece count and probably the price, but are doable and would have been more accurate.
Just being picky though. Two thumbs up!
Great review. Looking forward to picking this up ASAP. Love all the new pieces and multitude of drum-lacquered metallic silver elements!
Great review! Looking forward to building it myself!
These blue 1x1x2 brackets used as seats in this set, seem very new to me! Never seen this part before.
They did not even care to match the stickers background color with the "white" color of the bricks they are applied on. Especially visible on the small "NASA" and "Discovery" stickers which look just awful.
The fact that there are some visible studs here and there don’t bother me. With the advanced designs that we are spoiled with, something has to let us know that it’s Lego! :)
Thank you for the great review!
Upsize version of 7470.
the reflective stickers look perfectly applied! I wouldn't be able to do the same :-(
@ CapnRex101
"The robotic arm positioned beside the telescope, known as the SRMS or Canadarm, features several joints and looks marvellous when compared with its original counterpart. "
Thank you for pointing out the Canadarm/ SRMS, I was surprised LEGO made no mention of it by name, nor did the provide a small sticker for it.
The LEGO page talks a lot about how NASA and ESA collaborated to get Hubble in space, so the lack of even a nod to CSA felt a little cold.
Regardless, after reading the review, I'm looking forward to this set even more.
Are there any transparent yellow pieces to stick to side of the shuttle to represent the 2-foot long urine-icicle that occurred on Discovery's maiden flight?
Can't wait to build it myself. Was hoping we'd get a peek at the VIP reward Ulysses Space Probe set here, but I guess that was too much to hope for.
@donner89 said:
"Ignoring price difference, if you had to pick a favorite between this and the Saturn V - which is the better build/display piece?"
I would have to choose the Saturn V, which is certainly among my top five favourite sets. In fact, I consider 21309 NASA Apollo Saturn V to be the 'most perfect' model in my collection since I have essentially no complaints about the design!
@fede0184 said:
"the reflective stickers look perfectly applied! I wouldn't be able to do the same :-("
Thank you! I spent about twenty minutes applying them and am pleased with the result.
"Another matching airlock, which was used when docking with the International Space Station and Mir, is placed on the port side"
That is not an airlock or docking adapter. Its a hatch used to ingress and egress from the shuttle on Earth prior to and after launch.
Space Shuttle Discovery, when launched in 1990 as STS-31 (seen here: https://upload.wikimedia.org/wikipedia/commons/0/02/STS-31_Discovery_Begins_Its_Roll_Maneuver_after_Liftoff_%2827512132414%29.jpg) had the American flag and "USA" on the left wing and the NASA worm logo and the name of the orbiter on the right wing, which has been accurately recreated in the set.
However, it is slightly unfortunate that alternate panels were not included to represent the later look of the Shuttle, with the NASA meatball on the left wing and the American flag and name of the orbiter on the right wing (seen here: https://upload.wikimedia.org/wikipedia/commons/d/d6/STS120LaunchHiRes-edit1.jpg), though with the decision to have the set represent a specific mission, it is understandable that this was not included.
As a huge space exploration enthusiast I will definitely be purchasing this.
However, I'm upset that the extra set will be available for 1800 VIP points rather than a regular GWP. I don't currently have 1800 points and a weeks notice (or no notice at all if I hadn't looked at websites like Brickset) to make a +£200 purchase to gain the points is not a nice thing to do to your customers. 1800 points is equivalent to just over £10 - I have doubts that the set will be going for as little as £10 on ebay. Fingers crossed it turns out to be a terrible set or is easily buildable with some spare parts.
With Barracuda Bay last year and Space Shuttle Discovery this year, Lego is on a roll with their April D2C-class sets. The 7470 was one of my favorite sets as a kid, and a UCS Orbiter is something I've wanted for a long, long time. Thanks for another detailed review.
(Those payload bay door radiator stickers, though! Aaarrrgh, those will be such a pain!)
@fakespacesquid :
It's probably both. The big 10x10 wedge plates in coral blue are almost certainly in that color because it's easier to use the parts already being molded for Barracuda Bay than to take up another molding machine to produce them in a different color, since they're hidden anyway. Maybe the olive interior parts take advantage of parts produced for the Colosseum? That has a lot of olive basic bricks and plates in the base. I imagine D2Cs that have new molds, like this one, have to cut costs by taking advantage of parts produced for other D2Cs with no new molds in order to balance the budget. Barracuda Bay and Colosseum have recolors but no new molds; Space Shuttle Discovery has 3 new molds.
@kenzoo said:
"Upsize version of 7470. "
The size looks about the same. I would call it a straight up remake. The designer video hints at this a lot.
@vynsane said:
"Can't wait to build it myself. Was hoping we'd get a peek at the VIP reward Ulysses Space Probe set here, but I guess that was too much to hope for."
I am looking forward to that myself so we will publish images as soon as they are available!
@xboxtravis7992 said:
""Another matching airlock, which was used when docking with the International Space Station and Mir, is placed on the port side"
That is not an airlock or docking adapter. Its a hatch used to ingress and egress from the shuttle on Earth prior to and after launch."
Thank you, that has been corrected.
108 Metallic Silver pieces... that's worth the $200 right there!
Oh I always wanted to get set 10231 but completely missed that one. On ebay and BL they sell for way to high IMO. Super happy to get this set, a bit bummed to not be able to get the SRBs and the ET as part of the set, but the look of this craft seems even better than before. Very excited about this announcement.
Absolutely love the review and the set is fantastic. My only nitpick is minor, unavoidable and one I often have...I just wish that when you turn it upside down that the underside also looked good.
You know, for the swooshing when it’s coming in for re-entry...
Incredible model...I can't wait to get it. April 1 purchase for sure. The NASA and Discovery stickers are a bit disappointing but understandable while the reflective bay insulation stickers are 100% the right move. That would have been a nightmare to print correctly and surely would have increased costs. Don't want them? Don't apply them. Simple.
As for the overall retail price, I'm fine with it. I'd love it to be $149 but with all those lacquered pieces, the 3-color prints, and large plates / [new mold] bay doors the higher price tag was inevitable.
Thanks for the great review.
Is the first picture the actual box? If that's the case, then the NASA logo is wrong, LEGO is going to reprint it, and we're going to have a new "ultra rare factory error box" that'll be sold for five times the original price.
@CapnRex101 said:
" @xboxtravis7992 said:
""Another matching airlock, which was used when docking with the International Space Station and Mir, is placed on the port side"
That is not an airlock or docking adapter. Its a hatch used to ingress and egress from the shuttle on Earth prior to and after launch."
Thank you, that has been corrected."
Thank you! I am pretty sure including the airlock adapters for space station docking will become a popular mod to the set eventually though. This photo shows were the docking mechanism was mounted in the payload bay. The size of the Mir and ISS modules delivered by the shuttle was limited due to the space the docking adapter took up.
https://upload.wikimedia.org/wikipedia/commons/thumb/0/0e/STS132_Atlantis_undocking2_%28cropped%29.jpg/1200px-STS132_Atlantis_undocking2_%28cropped%29.jpg
Spacelab and the similar Spacehab would be another great aftermarket set mod, which placed a module inside the cargo bay that expanded the interior space available to the shuttle and was used on several free flying missions before the ISS and its lab space was installed. http://media3.s-nbcnews.com/i/streams/2013/December/131202/2D9835101-spacelab-30th-annivesary-1.jpg
STS-107 the mission that saw the loss of the Shuttle Columbia was a Spacehab mission itself, and the last time the shuttle would have flown with a mounted interior module. All future modules would be ISS equipment being transported to the station or the equipment for the final Hubble Service Mission: https://en.wikipedia.org/wiki/STS-107
That kind of is what I find fascinating about the Shuttle, its arguably one of the most beautiful spacecraft ever flown (with Buran coming across as an imitation) and the iconic craft of my childhood. But the memory of the loss of Columbia and Challenger looms heavily over the program, it was a deadly vehicle; the most deadly we have flown to space so far. The final shuttle missions were on a deadline to finish the ISS, knowing that the next accident would be an "when" not an "if" which is why as soon as it delivered its final ISS modules it was immediately axed and spaceflight services were handed over to SpaceX, ATK/Orbital and the Russian's and their aging but extremely reliable Soyuz & Progress system. I got to see Endeavour once years ago in a museum, the scale of the orbiters up close are super impressive.
Have to agree with @CapnRex101 that the Saturn V is one of the top sets I've built/had. Basically nothing to complain about and almost no boring moments. Top 5 for me, too.
They are very obviously trying not to show the NASA 'meatball' insignia anywhere. It is not present anywhere on the set, and it is even blurred in the designer video: only 'the Worm' is visible.
Does anyone know what the deal with this is? Why would it be such a big issue showing this anywhere; it would be pretty lame if this was just an issue with a license-fee.
@JPKuiper said:
"They are very obviously trying not to show the NASA 'meatball' insignia anywhere. It is not present anywhere on the set, and it is even blurred in the designer video: only 'the Worm' is visible.
Does anyone know what the deal with this is? Why would it be such a big issue showing this anywhere; it would be pretty lame if this was just an issue with a license-fee.
"
The Worm is accurate to the STS-31 mission: https://upload.wikimedia.org/wikipedia/commons/b/b4/Liftoff_STS-31.jpg
But I agree it was weird to see Lego censoring out the meatball in the designer video. I really do wonder if their is a licensing issue, but didn't Lego use the meatball plenty of times in other sets? Do they have to license it for every single set they use it in and since STS-31 is a worm era flight only the worm was licensed for it?
@CapnRex101 - the article needs to be updated. There were actually 6 orbiters. Being a Star Trek fan, I would've totally displayed it with "Enterprise" on its body.
@JPKuiper said:
"They are very obviously trying not to show the NASA 'meatball' insignia anywhere. It is not present anywhere on the set, and it is even blurred in the designer video: only 'the Worm' is visible.
Does anyone know what the deal with this is? Why would it be such a big issue showing this anywhere; it would be pretty lame if this was just an issue with a license-fee.
"
The Meatball is not accurate to this era of NASA.
@CDM said:
"The Meatball is not accurate to this era of NASA."
Yes, I know that, but is that enough reason to actively blur it in the designer video? Not including it in a set is something different than actively avoiding it :)
First set on my way to spare money for the UCS Republic gunship. I knew that the road would be tricky, but did not expected such a marvelous ambush so soon on it! It will be very difficult to resist to this one, which looks so perfectly renderer now in Lego form. A must have to me. Excellent. Guess it will be a perfect birthday present in August. Thank you for the review.
I think they should have provided stickers for all six space shuttles, as well as a choice of NASA logo. Some fans would have been tempted to purchase one for each shuttle. Only a few changes in the overall marking/colours (especially for Columbia and Enterprise) would be required. Maybe there will be custom made stickers available online. I look forward to seeing someone posting images of the entire shuttle fleet together (even if Challenger and Endeavour could never have sat side-by-side in the real world).
Ultimately it's up to the rights holder and NASA is very protective of it's IP. NASA must have told them to blur it out after the video had already been recorded, probably because it is not subject appropriate.
I thought this looked good yesterday, but this review makes it even better than that. Could possibly be my first Day 1 purchase.
Very nice review @CapnRex101
Decent quantities of drum-lacquered bows in this set.
Could we get Naboo royal starships now, Lego?
P.S. I don’t really collect SW sets myself, but I am totally in agreement with the notion that Naboo royal starships are a glaring omission in LEGO SW history.
Other than pirates of barracuda bay, I don’t know that I’ve ever wished I had 200$ than right now! I love this set, and it’s worth paying that price, but I just don’t have the money.
@JPKuiper, per NASA Media Usage Guidelines:
NASA Logo
The NASA Insignia (the blue "meatball" logo), the NASA Logotype (the "worm" logo) and the NASA Seal may not be used for any purpose without explicit permission. These images may not be used by persons who are not NASA employees or on products, publications or web pages that are not NASA-sponsored. These images may not be used to imply endorsement or support of any external organization, program, effort, or persons.
NASA Insignia, Logotype and Seal should not be used as branding devices, or used in or for advertising, trade dress, promotions, or similar marketing purposes, on third-party websites or communications material.
Absolutely want to order this day one, but not sure I can pull the money together.
Also, and I'm sure you know this, but there were actually six space shuttles built. Only five actually launched to space though, with Enterprise basically used as an inner atmosphere test model.
What are two gold sticks used for (seen next to the brick separator in this photo)?
https://images.brickset.com/sets/large/10283-1.jpg
@lordskylark said:
"What are two gold sticks used for (seen next to the brick separator in this photo)?
https://images.brickset.com/sets/large/10283-1.jpg"
Two gold sticks are to replace the solar panels on Hubble when in the payload bay (to represent furled solar panels).
@lordskylark said:
"What are two gold sticks used for (seen next to the brick separator in this photo)?
https://images.brickset.com/sets/large/10283-1.jpg"
Based on the review, I believe they represent the furled solar panels for the Hubble Space Telescope.
@donner89 said:
"Ignoring price difference, if you had to pick a favorite between this and the Saturn V - which is the better build/display piece?"
I don't have this shuttle set to compare, but I'm not sure it's even a relevant question. This looks to be an excellent rendition of the Shuttle, as is the Saturn V an excellent rendition of it's real life counterpart.
I strongly suspect people will choose a favourite based on what vehicle people have more of a connection with. The Saturn V operated before I was born, whereas the Space Shuttle missions were what I grew up with. I have a deeper connection to the shuttle, and this model will likely be my favourite of the two.
Lovely set. Can't wait to add it to my collection.
The only modifications I'll be making is a clear display stand for the telescope.
@CDM said:
"Ultimately it's up to the rights holder and NASA is very protective of it's IP. NASA must have told them to blur it out after the video had already been recorded, probably because it is not subject appropriate. "
Even then NASA is clearly a fan of working with Lego seeing how far back their history goes together. ESA and JAXA too seem to be open to Lego collaboration even if their space efforts never get the same fame as NASA does.
What remains to be seen is if more national space agencies (Roscosmos in particular) will warm up to Lego collaboration and if its something the can be sold to the public in the same volume as NASA sets can. Unless Lego wants to dive into Mercury and Gemini or Skylab it has already about ran the gamut of manned NASA programs, but Roscosmos offers up the possibility of the Soyuz and its ancestors as additional Lego sets to keep up this "space theme."
Of course the big crown jewel would be to get private space to sign onto a Lego contract... look at how many SpaceX things have hit the 10,000 club in Lego Ideas only to not pass review. Elon is clearly very protective of his IP, but I can almost guarantee that if Lego ever manages to get the license to do a Falcon 9 or Falcon Heavy or a Starship model that set will fly off shelves like hotcakes. Maybe what SpaceX needs to nudge them is for another smaller private company to sign up with Lego for a licensed set first, thus forcing SpaceX to finally follow suit shortly afterwards... RocketLab would make the best contender for a private company to sign up for a Lego set first, Peter Beck is a pretty chill guy and is pushing his company in a more public direction with their recent stock launch and addition of RocketLab decals officially to the Kerbal Space Program video game, and Electron or even Neutron (once it flies) would make a nice little Lego set. Electron in particular would be neat because its smaller size could make it much more comparable to the Mars Curiosity Rover or Women at NASA sets in terms of price if it was made to the same scale of the Saturn V. Then give it a year and I'd be willing to bet money SpaceX would follow suit for a license with Lego to make sure their massive Falcon or Starship as a $200 D2C is done next to make sure little Electron doesn't overshadow them in the Lego aisle for to long!
Is it getting a bit weird how Lego stuff is getting closer and closer to scale models? If I wanted a 1/72 Space Shuttle for display I'd probably go for the Revell plastic model kit. (it'd be interesting to see this Lego product next to it). Of course you couldn't take it apart afterwards and re-use the bits...
@Pongo said:
"Is it getting a bit weird how Lego stuff is getting closer and closer to scale models? If I wanted a 1/72 Space Shuttle for display I'd probably go for the Revell plastic model kit. (it'd be interesting to see this Lego product next to it). Of course you couldn't take it apart afterwards and re-use the bits... "
I think it depends what you want the model for. Revell models certainly have more detail and are good for display, but they're not great for playing with - drop the Revell model and I say "good luck trying to fix it". I had loads of model kits as a kid alongside LEGO, but you soon run out of space and as you said it can be taken apart and so therefore easily stored away until you want to display it again (I lost a lot of good models when we moved house as a kid). I eventually got rid of most of my models, but I still have a few including my Revell 1:96 Saturn V model displayed at work that still looks good (albeit yellow). As an adult now I have fun building LEGO sets (good for de-stress), I then display it for a while and then I put it away for another time.
I too am curious to see this set next to a 1:72 model kit.
Great model. The stickers on the side of the cockpit window look a little odd though.
Stickers I can understand to a certain extent, but the blatant colour mismatch here between 2 radically different shades of white is really hard to fathom here. Why can't Lego get it right? It looks awful.
apart from that, pretty incredible set.
@darthnorman said:
"These blue 1x1x2 brackets used as seats in this set, seem very new to me! Never seen this part before."
They were just introduced this year and only appear in three other sets! This is actually the first time in blue.
Absolute insta-buy. Now they need to update the Saturn V to the same scale! Kinda disappointed that the doors and Canadarm aren’t motorized, like the good ol’ 8480 . I’m sure some ambitious MOC’er will build an external tank and SRBs for this.
Wow, I wasn't so sure of this upon release yesterday, but the closer look changed my mind. Might have to get this on day 1
20/10 I need it!
What is that piece on the Hubble telescope with the NASA ESA decoration? Is that new?
@RonnyN said:
" @CapnRex101 - the article needs to be updated. There were actually 6 orbiters. Being a Star Trek fan, I would've totally displayed it with "Enterprise" on its body."
I am aware of Enterprise but there were only five orbiters designed for spaceflight and therefore of consistent design. On that basis, I imagine those stickers would have been omitted, even if five options had been provided for the main orbiters.
@Mechalex said:
"Lovely, thorough review as ever. @CapnRex101 How did you get that shot of the model against the blue sky?"
Thank you. I simply held the model in the air and then masked out my arm afterwards in Photoshop. I wish I could report a more elaborate method!
@greenhorn said:
"What is that piece on the Hubble telescope with the NASA ESA decoration? Is that new?"
That is a printed 1x4 curved slope, part 93273.
I am holding a funeral service for my wallet. It will take place on April 1st 2021 at 12am and be viewable on the Lego.com website.
A date for the wake and celebration of my wallet’s life is to be announced but expect it to occur on my doorstep within 3-5 working days.
Can you fit the Probe Droid in the cargo bay?
@fakespacesquid:
Yes. The designers absolutely know what colors are already available, and they also know which colors have or have not been produced in the past. Sometimes they’ll be frugal and reuse existing colors, sometimes they’ll pick a set of colors that hold special meaning to them (flag colors of the designers’ homelands is a popular signature), and sometimes they’ll throw us a treat with new colors in a situation where it really wasn’t necessary. That’s how the Modular series has produced such a wide array of baseplate colors, for instance.
@darthnorman:
They are. I just got my hands on some with Winnie the Pooh. This makes five sets that are known to include them. As of yet, the up version of this bracket does not exist.
@dontfeedthebrickster:
Being that the set specifically represents the mission to launch the Hubble, and not the design of the STS in general, it kinda does make sense that the CSA isn’t mentioned. However, it’s worth noting that, as far as I can tell, the Canadarm was really the first joint space venture. With its earliest roots involving an invitation to participate in the STS program back in 1969, it beat the first offer leading to the Apollo-Soyuz mission by about a year. After having flown on roughly 2/3rds of the STS missions, the Canadarm even outlasted the Shuttle by over a decade and counting, as it’s big brother, Canadarm2, is part of the ISS, and Endeavour’s Orbital Boom Sensor System was handed off to the ISS during its final mission.
@JPKuiper said:
"They are very obviously trying not to show the NASA 'meatball' insignia anywhere. It is not present anywhere on the set, and it is even blurred in the designer video: only 'the Worm' is visible.
Does anyone know what the deal with this is? Why would it be such a big issue showing this anywhere; it would be pretty lame if this was just an issue with a license-fee.
"
It’s probably because they used a pre-production version of this set in the video, and those details might have been changed by Lego between filming of the video and the public reveal.
It’s not uncommon for minor details to change before the go ahead for final production, and one of the reasons why early release images of Lego sets are considered confidential. They’re not intended for public consumption because details are still being worked out at this stage, and they can lead to either disappointment by fans or discussion that takes focus away from the final product.
Shuttle Discovery flew with the meatball logo for the last decade or so of its service, but during the launch and deployment of Hubble it flew with the worm logo. My guess is that Lego’s designers used later reference images during development, but then decided to change to reflect its livery during the original Hubble mission.
Now that I've gotten interested about the NASA "worm" and "meatball" logos from tons of comments, I researched them and discovered the older NASA seal, which clearly influenced the Classic Space logo: https://upload.wikimedia.org/wikipedia/commons/thumb/a/ae/NASA_seal.svg/800px-NASA_seal.svg.png
@kolaxanthe said:
"I think they should have provided stickers for all six space shuttles, as well as a choice of NASA logo. Some fans would have been tempted to purchase one for each shuttle. Only a few changes in the overall marking/colours (especially for Columbia and Enterprise) would be required. Maybe there will be custom made stickers available online. I look forward to seeing someone posting images of the entire shuttle fleet together (even if Challenger and Endeavour could never have sat side-by-side in the real world)."
Kingsknight’s shuttle MOC (can be found on Rebrickable) has a sticker set and instructions to dress up to any of the 6 shuttles. Not sure how historcally accurate they are. That set is 1:110 scale, so they would need to be scaled up.
I would love to see spaceships from the old soviet space program.
...It would go on to complete 39 missions, fly 238 kilometres...
I think they did a small error on the instructions manual, by a factor of one million. But it is an amazing model anyway, nice review!
"I am surprised that alternative names were not supplied for all five Space Shuttle orbiters."
I think it was the right decision to include only the sticker for the Discovery. It is the space shuttle that lauched the Hubble space telescope, which is represented in this set. Adding stickers for Challenger and Columbia would remember the tragedies and be disrespectful to the astronauts families; adding alternative stickers for Atlantis and Endeavour only, ommiting the other two, could cause the same impression.
Just placed a hasty order at Lego.com in order to have 1800 VIP points in hand for the "second payload"--thanks for the timely warning! For those of us who grew up with the space program (I don't have personal memories of the Mercury programs, but I definitely still remember classes at school being halted to watch important highlights of the Gemini missions) Lego versions of Nasa achievements are very special. I'm going to be proud to add this set to the Saturn V, the Lunar Lander, and the ISS.
Fantastic review and pics! One of the best yet!
If I didn’t already have 10213 Shuttle Adventure (with the awesome booster Rockets!), I’d be all over this .... at a discount
@DFX:
Huh. Yeah, they did. For an April 1 release, there’s no way they can get it fixed in time for the initial batch.
Something I hadn’t realized before is that it holds the record for number of space flights across all craft, because it’s the oldest surviving Shuttle (barring the Enterprise, which was never built to go into space). Something else I didn’t realize is that the mission numbers are not sequential by launch date. Discovery’s first mission was STS-41-D, last mission was STS-133, and tenth mission was...STS-31. I know TV scripts are numbered by start date, not broadcast order, and some shows have to delay specific episodes for various reasons, but the numbers are already assigned. I imagine this jumbled mission order has a similar origin, with mission numbers being assigned at the start, rather than at the launch date. Some missions have multiple launches (hence the “D” on STS-41-D).
@PurpleDave - Read this:
https://www.nasa.gov/feature/behind-the-space-shuttle-mission-numbering-system
Simply a gorgeous LEGO set
@iwybs:
Blech. Determining the ideal viewing order of Babylon 5 seems comparatively simple.
@DFX said:
"...It would go on to complete 39 missions, fly 238 kilometres...
I think they did a small error on the instructions manual, by a factor of one million. But it is an amazing model anyway, nice review!"
Its that darned NASA luck in converting units... just like the Mars Climate Orbiter!
A great updated version of 7470!
Looks like an amazing set, and I appreciate CapnRex101's accompanying Space Shuttle knowledge!
@dontfeedthebrickster said:
"@ CapnRex101
"The robotic arm positioned beside the telescope, known as the SRMS or Canadarm, features several joints and looks marvellous when compared with its original counterpart. "
Thank you for pointing out the Canadarm/ SRMS, I was surprised LEGO made no mention of it by name, nor did the provide a small sticker for it.
The LEGO page talks a lot about how NASA and ESA collaborated to get Hubble in space, so the lack of even a nod to CSA felt a little cold.
Regardless, after reading the review, I'm looking forward to this set even more.
"
I was pleased to see the Canadarm mentioned as well. My Mum's second cousin is Roberta Bondar, Canada's first female astronaut.
She flew on Discovery mission STS42 so when I get this set I'll be displaying it with her flight patch and photo.
@Snaz said:
"My birthday is April 17, and I'm expecting this to be out of stock on release day :("
27th here, I share your worry!
@fakespacesquid said:
"Interesting that there was so much olive used for the 'inner' pieces, which got me wondering: Do designers make the set and mark which pieces are available for a color-swap, or do they get a list of parts that have been made in large quantities and they adjust the design to accommodate those elements inside?"
While I usually hate those odd colours on the interior of sets, in this case I think it is even accurate, as often when you see documentaries about planes and space vehicles, the interior metal is coloured in some kind of olive green. Don't know why, but there has to be a reason.
Will this only be at Lego shop or will it be at other stores too, and hence might be discounted?
@Rare_White_Ape said:
"...but expect it to occur on my doorstep within 3-5 working days. "
Really? I'm still waiting on two orders to ship that were placed over a week ago. Seems to be the norm with LEGO these days, at least with any order I place with them.
It seems that the secondary mirror on Hubble is mounted wrong. The convex side must be towards the aperture and the concave side towards the core.
Other than that: i want!
b.
At this scale at least they should make the cockpit accessible and able to fit minifigs, consider they could do that in town/city sets. And these kind of space vehicle sets are too plain (almost all white) to interest me. Other themes such as modular buildings are way more appealing to my taste. Good for space fans though.
@vader11 said:
"At this scale at least they should make the cockpit accessible and able to fit minifigs, consider they could do that in town/city sets. And these kind of space vehicle sets are too plain (almost all white) to interest me. Other themes such as modular buildings are way more appealing to my taste. Good for space fans though."
At this scale, minifigs would not make sense. A minifig-scale shuttle would have to be 122 bricks tall.
Maybe with an additional orange center line fuel tank and solid fuel side rocket boosters it would be great
@fakespacesquid said:
" @vader11 said:
"At this scale at least they should make the cockpit accessible and able to fit minifigs, consider they could do that in town/city sets. And these kind of space vehicle sets are too plain (almost all white) to interest me. Other themes such as modular buildings are way more appealing to my taste. Good for space fans though."
At this scale, minifigs would not make sense. A minifig-scale shuttle would have to be 122 bricks tall. "
To back that up, minifigs are about 1:25, so this model would have to be about 3x larger in every direction. That would be EPIC!
An awesome set, which I’ll definitely get.
I can’t wait to see the MOCs of external tanks and SRBs to go with it
- like all the MOC launch towers that were built for the Saturn 5 !
@AustinPowers:
On a WAG, it could be an anti-corrosion coating. My dad was a C-131b mechanic in the USAF, and he said that aircraft are routinely stripped down to the bare metal so you can inspect them for stress fractures, then repainted. Unless you want to drill out the rivets, pull all the structural components apart, and then re-build it, you pretty much aren’t going to be able to do that level of inspection on the interior, but you also don’t want your frame to be weakened by corrosion. I’ve seen steel framing members for pole barns, which have a protective red coating to keep them from rusting between the time they’re made and when they’re turned into a building.
I also asked a coworker, who used to be an Airedale in the US Navy, about this. He didn’t know why they did this, but confirmed that he’d seen it, and also mentioned that sometimes you could see a layer of dark red under the green. That would further suggest this acts as an anti-corrosion coating, if it’s the same shade of red. He also mentioned that the green is a flat paint, so not very reflective, which might also be a consideration.
I’ll try to ask my dad if he has any knowledge about this. He ended up in charge of a service crew by the end of his enlistment, so he might have more in-depth knowledge.
@legoed19:
The 10xxx series set number implies that it might be a D2C set, so it could be exclusive on launch. Most of the big-ticket D2C sets end up available through various retailers’ websites, though, so that might be an option a bit later.
@Jaybee:
From the review, it sounds like the interior of the tube is severely truncated, and the main mirror (which should completely fill the tube) would then have to be moved towards the aperture. The 3x radar dish is clear, where a mirror should be silver. It doesn’t completely fill the aperture, like the real mirror should, but neither is it small enough to represent the little chunk that is directly inside the aperture (unless clear is the big mirror, and gold is what’s just inside the aperture). Either what you’re seeing as the forward second mirror is supposed to represent the entire length of the real interior, or someone might have goofed and given it a glass lens instead of a mirror.
@fakespacesquid:
Minifigs _ALWAYS_ make sense. Just because they wouldn’t fit in the cockpit doesn’t mean you couldn’t add them to the stand, like so many of the SW UCS ships, the Tumbler, Burtonmobile, or Batwing, the Ideas Ecto-1, and various other large-scale vehicles that are too big to realistically seat minifigs.
Just watched the terrific video on VIP of the interview with Dr. Kathy Sullivan, first American woman to walk in space and she was on this shuttle mission to launch the Hubble telescope:
https://www.lego.com/en-us/vip/rewards-center?icmp=LP-SHH-Short-MT_Hero_S_Space_Primary_Key_Visual_LP-MP-MT-SMSM4EZCRN-1
Now that really makes me want this set and it gives a great representation of the set's actual size.
@AustinPowers:
Gah! I meant C-141b. So, I was right. He said that the C-141a and C141b had a particularly bad problem with electrolysis between the rivets and the material they were holding together. When he first started working in them, the exteriors were largely paint-free (probably because it takes a few hundred pounds of paint for each plane). Then they started painting just the biggest problem areas, and eventually the entire exterior. The paint helps prevent corrosion, but it costs weight off your max payload, I think ice builds up on painted surfaces more than the bare metal, and you can’t inspect the metal surfaces for fatigue without stripping the entire paint job off. On interior surfaces, you can’t do that level of inspection without stripping all the rivets and disassembling the entire plane. But, metal fatigue will show up on both sides of a piece of sheet metal, so a full exterior inspection basically eliminates the need to see every interior surface anyways.
The problem is that electrolysis happens on both sides of the metal panels. To prevent the same problems from eating away at the materials from the inside, they just apply a layer of paint on everything before assembly. It’s out of the elements, it’s shielded from most sources of abrasion or impact, so a single layer is all that’s really needed, and it just happens that they use a primer that’s green. On the exterior, they’d paint over the primer, but it’s just extra work and extra weight for interior surfaces.
@PurpleDave said:
"(unless clear is the big mirror, and gold is what’s just inside the aperture). "
I guess this is mostly the right answer. The 3x dish is just a fixture for the single gold dot that represents the secondary mirror. Look at the first image on this site: https://hubblesite.org and you can see that the secondary mirror is indeed very small. The primary mirror is deep inside the tube and obviously not represented in this Lego set.
j.
@PurpleDave : thanks for the heads up. Very interesting.
I remember I once saw a documentary about the history of the Boeing 747, and when they showed footage of the early production line, the interior metal shown there was also this type of green.
@Jaybee:
Since the 3x radar dish is basically just a 1x1 round of late with a fancy flange, it clearly isn’t necessary to mount the gold 1x1 round plate. But they used dark-bley plates to create the attachment point for this, and that looks entirely unlike the interior of the Hubble’s tube. Here’s a crazy theory, then. Maybe they picked clear to create an optical illusion of the main mirror deep in the back of the tube. They’ve made that part in drum-lacquered silver, which is the closest look to a silver mirror, but a real mirror doesn’t look like a mirror at all. It looks like whatever you’re seeing reflected in it. Clear gives you something like a parabolic reflection without reading like brushed aluminum, and it helps obscure the ugly dark-bley frame right behind it. A 3x dish in a 4-wide tube creates a forced-perspective illusion of depth.
@AustinPowers:
Rivets aren’t designed to be repeatedly disassembled, and doing so will probably cause metal fatigue, as well ask risking damage to the panels (maybe you drill out a rivet head a little too deep and weaken the hole where it’s attached). Imagine what kind of mess they’d have if they had to strip all of the sheet metal off every 747 before performing a recertification inspection.
@Your_Future_President said:
"My thoughts on first seeing this set:
Chrome?
Chrome?
Darn it.
Perhaps the Saturn V microfigs could be put in the cockpit? Although it would look odd to see them standing on their seat like the 5 year olds in my class. "
I agree, would have been nice to include microfigs to be consistent with the Saturn V and the Lunar Lander. Still, looks like an awesome set. I plan on putting this right next to them.
This overall looks awesome and will be the first advanced LEGO Space Shuttle I'll get, which is nice. I am gonna nitpick the red pins in the landing gear, like LEGO why can't you make those pins in black like you already sometimes do. Doesn't make any sense to me.
@xboxtravis7992 said:
""Another matching airlock, which was used when docking with the International Space Station and Mir, is placed on the port side"
That is not an airlock or docking adapter. Its a hatch used to ingress and egress from the shuttle on Earth prior to and after launch."
The OP may have been thinking of the Bond film 'Moonraker' where the Orbiter is indeed shown docking with the villain's space station using the side hatch. However the film was made before the Shuttle's maiden flight so presumably they had to guess, and got it wrong.
Brilliant review!!! Thanks for it!! Can't wait for this set! I looking forward to next week! :-)
@GordonEdin I didn't know about Moonraker before. Looking at it you are correct, they seem to dock via side hatches in that film. Another weird thing, none of the shuttles in space have their cargo bay doors open. Even on flights with no cargo, shuttles had to have the bay door open for the radiators (the reflective stickers in the set) to operate and manage heat in the ship. Kind of a weird artifact of the film being shot before the real shuttles got going I guess? Of course even then we wouldn't see an actual shuttle docking a space station until MIR.
That orange racing stripe is cool though.
@Darth_Dee said:
" @kenzoo said:
"Upsize version of 7470. "
The size looks about the same. I would call it a straight up remake. The designer video hints at this a lot. "
7470 is 828 pieces, this set is 2400+ ??
7470 is 40cm in length, this set is 54cm.
In volume, 10283 is about 2x in size.
*SIGH*...seeing this set make me realize something: NASA needs a new/next generation Shuttle...
Seriously; the problem(s) wasn't w/the Shuttles, it was with their age. They were being 'pushed' ,what; about ten years past their prime...(looks it up: Columbia launched 1981, 'til the program's retirement in 2011...w/no replacement...30 years).
Anyone who has ever seen 'Venture Star', or more recent 'Big Star'...'VS' was "seen" as part of G.I. Joe's line ("Defiant"...years before ST:DS9:)), and "B..."um...moving on: 75975 ...well; not quite, but it's as close as the 'Joe's' got...:).
@donner89 said:
"Ignoring price difference, if you had to pick a favorite between this and the Saturn V - which is the better build/display piece?"
Sorry, I can't choose! I already have the Saturn V and will buy this tomorrow for sure ;-)
@brick_r:
Columbia was the first space-capable orbiter in the fleet, and was almost 22 years old when it was lost. Challenger was second, and wasn’t quite three years old when it was lost. Discovery was third, and the oldest in the fleet when it was retired after 26.5 years. Atlantis was the fourth and final of the original fleet, and retired at just under 26 years. And the final orbiter was Endeavour, which had just turned 19 a few days before being retired. Now, manufacture of the original fleet stretched out over at least five years, based on the four-year stretch between first flights. The one replacement orbiter first launched 11 years after Columbia. Even by the time they built Discovery, they’d made several changes to the design (they were kinda like Navy ships in that regard), since I remember reading that the two we lost were too heavy to achieve certain orbits. By the time Discovery was built, they’d shed a full _four_tons_ from the design, so as callous as it sounds, it was considered a small mercy that the two lost orbiters were the two oldest and heaviest, as neither could have hauled ISS modules to the station. If they’d lost two of the other orbiters instead, it pretty much would have ended ISS construction right then.
In the original plan, they were expecting to launch two missions per month, made affordable by recovery and reuse of everything but the orange external tank (which wasn’t much more than a hollow shell with some valves and mounting points). With a fleet of four orbiters (Endeavour was only built to replace Challenger, and Enterprise was not built to be space-worthy) that means a 2-month turnaround for each craft, and six launches per year. At some point, under that schedule, they would have had to mothball older orbiters and build new ones to replace them. As with new year models of cars, upgrades to the design could be rolled out each time, and the service life of the STS program could have been extended indefinitely.
There were just a few problems with this theory. One is that they never really got out of the “experimental spacecraft” phase, so instead of 24 missions per year, they averaged just over four for the life of the program. Two was that this is the only manned spacecraft (at least for NASA’s program) that has no means of ditching the mission during takeoff. Mercury, Gemini, and Apollo all had small rockets mounted to the top of the command capsule that could yank them free if they thought the main rocket was going to fail. With the STS, you had to achieve orbit to line up an emergency landing. And what really ended the program is that the STS trapped us in our own yard, basically. Even the Endeavor is incapable of achieving lunar orbit with an empty bay, much less actually landing on the surface. Where the STS would have been useful for further manned explorations is in assembling a space station that could be used as a staging point for future missions to the moon and beyond. With the slow pace of the actual launch schedule, by the time they got the ISS ready to serve in that capacity, the oldest components would be needing replacement, so you’d never get far enough ahead to start working on the next jump.
It’s not that they were too old, but that they compromised the design right out of the gate for military use that never happened, got stuck depreciating the result at a snail’s pace, and couldn’t afford to do anything that didn’t use the STS. Paired with something akin to the Saturn V (and with an ejection system), they could have been going strong today.
@PurpleDave said:
"Mercury, Gemini, and Apollo all had small rockets mounted to the top of the command capsule that could yank them free if they thought the main rocket was going to fail."
Just a nit: Gemini didn’t have a launch escape tower. They used ejection seats for launch aborts. I think it was the astronauts themselves who felt this was too dangerous, so for Apollo they went back to the system they had during Mercury.
Just finished building ours, and this is one of the best builds ever... an incredible model. So many fun things about it and an impressive investment piece. Loved it very bit as much as the Saturn V... maybe more. A must-have.
@aamartin0000:
Ah, I knew that the STS was the first to lack any sort of abort/eject system, and I was familiar with the nose rocket, but didn't know they'd dropped it for Gemini. I have learned from various miniseries, movies, and documentaries in the last decade that at least until the later Apollo missions, the astronauts really were deeply involved in the development of the technology that got them into orbit. From what I understand, Schirra, the only astronaut to fly under all three programs, even retired two weeks before Apollo 11 launched because he'd signed on as a test pilot and felt he'd completed his job at that point.
@PurpleDave:
After I posted, I looked it up, and the reason for Gemini’s ejection seats is, at one point they were going to go to a glider-like re-entry (dynasoar), and the ejection seats would have been useful in case of a problem during landing. Not sure why it was never done. As an aside, can you imagine what the Apollo 1 fire would have been like if there were ejection seats in that pure-oxygen atmosphere? Or, if the spark that disabled Apollo 13 reached the CM and lit up the ejection seats somewhere between the earth and the moon?
@aamartin0000:
Apollo was a whole different ball of wax. Mercury and Gemini capsule interiors basically consisted of enough room to sit down, controls to operate the craft, a few viewports, and egress hatches. For Apollo, they had to be able to get up and move around, transfer to the LEM, and put on those bulky suits for walking on the moon. Hopefully even if Gemini had gone that route, they would have figured out that it wasn't going to work for Apollo. I mean, can you imagine being halfway out of the seat, or floating above it when it ejected?
@PurpleDave said:
"Apollo was a whole different ball of wax. Mercury and Gemini capsule interiors basically consisted of enough room to sit down,"
Certainly. I don’t know how the astronauts got through the long duration missions (e.g. Borman and Lovell sitting together for 14 days in Gemini VII).
Besides just the size of the capsule, the intent and capability of Apollo was different from the earlier programs, and was designed by a different contractor, so naturally there aren’t many similarities. A lot of the components changed over the course of the program, as the missions became more sophisticated (and they addressed weaknesses discovered by previous flights). Same could be said about the shuttles.
I built this set yesterday. Now I want a same-scale SRB set and the orange Fuel tank to mount it to. It would be MASSIVE but I really think it would look cool set up in launch configuration.
@wookietiddy said:
"I built this set yesterday. Now I want a same-scale SRB set and the orange Fuel tank to mount it to. It would be MASSIVE but I really think it would look cool set up in launch configuration."
That didn’t take long: MOC-73206 at Rebrickable, probably the first of many.
@fakespacesquid said:
"Interesting that there was so much olive used for the 'inner' pieces, which got me wondering: Do designers make the set and mark which pieces are available for a color-swap, or do they get a list of parts that have been made in large quantities and they adjust the design to accommodate those elements inside?"
I'd have to think that the designer purposefully picked the olive color as it properly represents the inner aluminum core of the shuttle. Pictures of the shuttles being built show this color is plentiful among it's inner structures.
It's a great piece of detail that I loved discovering upon building the model.