Review: Lightailing Downtown Diner Kit
Posted by benbacardi,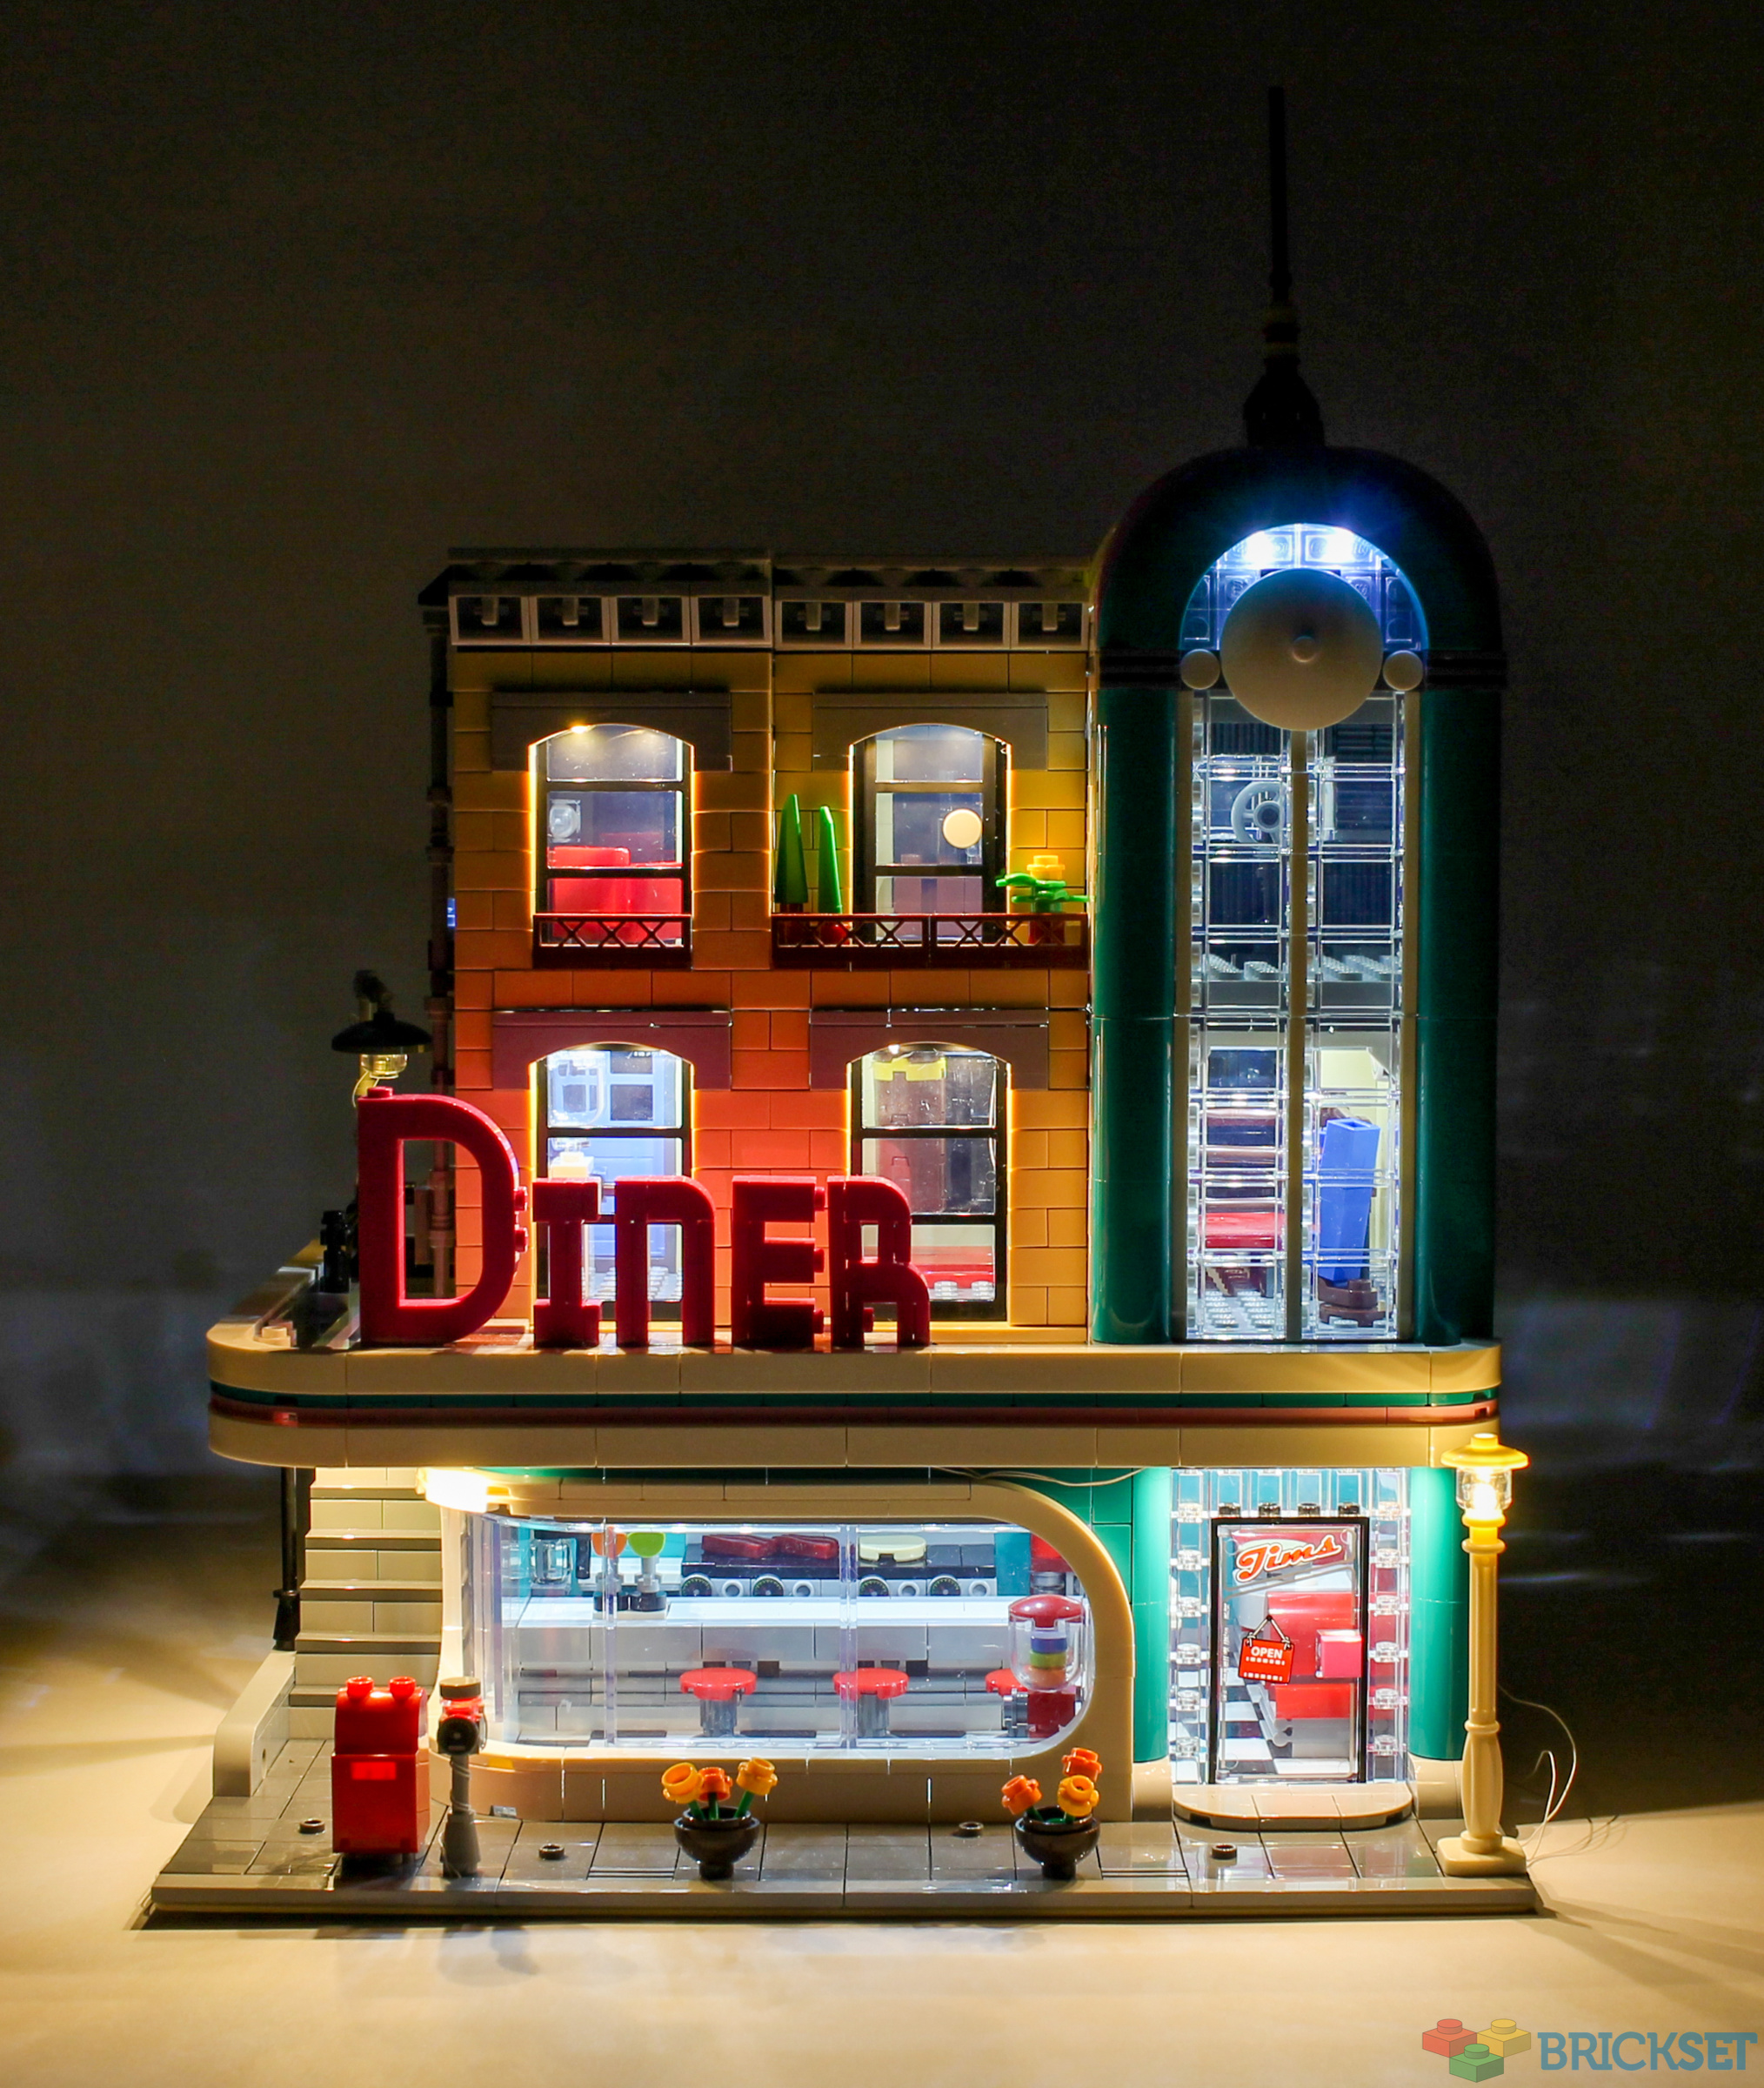
Adding lighting to LEGO sets is something that's taken off relatively recently, with a variety of companies providing third-party kits and instructions for a wide range of sets. In fact, the first article I wrote for Brickset was a review of a lighting kit for 10266 NASA Apollo 11 Lunar Lander in 2019.
When Lightailing reached out with an offer of the choice of one of their lighting kits for review, I took the opportunity to go for a popular scenario: lighting a modular building. Perhaps surprisingly, the only one I own is 10260 Downtown Diner, the kit for which turned up in the post a few days later.
Packaging, Instructions, and Components
The kit arrived in a sturdy box similar in construction to the LEGO Architecture theme, although slightly lower quality. Most of the box is printed, but the kit number and set photo are a sticker.
Inside the box, a small instruction booklet sits on top of the bubble-wrapped components. It's a snug fit, but I think this is one of the larger sets of lights they offer. I'm not sure if smaller kit are provided in a smaller box.

Each individual component is packaged in its own resealable bag. For this kit, there are eight numbered bags: seven lights, and a USB splitter, used to connect the individual lights to the battery box, which was in its own unnumbered bag. The bags are surprisingly high quality material.

The instruction manual contains exactly 100 numbered steps, four to a page. There are no words, and each step is simply a photo of either the light component you're about to install, the parts you need to remove from the model, or where to place each individual part or cable.
Bizarrely, where the instructions show the removal of parts where a brick separator would be helpful, they use a very strange orange giraffe-shaped separator! You can see the head in step 33 below.

The bags of components are numbered in the order they'll be used in the instructions, which is very useful. The bag numbers aren't referenced at all, however, which seems like an odd choice.
Inside each bag, the lighting components vary depending on their specific placement within the model, but they all terminate in a standard USB-A connector. They range from a single 1x1 stud on the end of a lengthy cable...

...to more complex arrangements involving plates, minifig heads, arches, and even an entire lamppost. Some of the parts are designed to replace existing parts in the build; others just connect to what's already there. I was pleasantly surprised to see that all the lit components are genuine LEGO parts! As reluctant as we may be to drill holes in our own sacred plastic, this is far preferable to using clone brand components where the clutch power is often less than ideal.

Each component is clearly custom-built for this particular lighting kit. The exact arrangement of parts and the length of each thin wire is a deliberate choice. I doubt many of them are reused from one kit to another. The USB splitter contains exactly seven USB-A sockets, one for each of the seven lighting components provided for the Diner.

The battery pack takes three AA batteries (not provided) and connecting up some of the lights to the pack via the USB splitter (I've taken to calling it an octocable in my head, despite there only being seven tentacles) shows them in action. The majority of the lights are a warm white colour, although some are dimmer than others; I think intentionally. A handful are red, and some of the red ones even flash!
You can also see below the largest replacement piece, the lamppost. Whereas in the model it is constructed of three separate LEGO parts, the lit version is glued together into a single component.

Installation
The first bag contains the most simple of components, a single 1x1 trans clear stud on the end of a long cable. The instructions direct us to remove a handful of tiles from the front of the build, wrap the cable around the parking meter, and replace the 1x1 stud in the meter with the one from the lighting kit. I tested each set of lights as I installed them, and this particular one flashes red.

The cable is fed along the baseplate and secured beneath a tile to exit the left of the build. The wires are fairly thin, but the tolerances between LEGO bricks are such that there is barely a gap, and it is difficult to get the tile to sit completely flush again. It's clearly unavoidable, but is more noticeable elsewhere than this particular example.

Bag two contains the lamppost to replace the one standing at the opposite corner. So far, neither of the installations have been particularly onerous!

The next component to install is more involved, with two strands of lights from the single USB connector: one chaining three white plates together, and the other a 1x1 trans-clear and a minifig head.
The first plate provides lighting above the Diner's entrance...

...with the other two plates lighting the alley and the stairs to the rear of the shop. This was the only mistake I found in the instructions; where to place the third plate was completely omitted. It was fairly easy to figure out, based on where they tell you to route the cable, though.

The rest of this component is used to replace the "bulbs" in the light fitting above the back door and outside the door of the floor above. It's starting to get a little tricky routeing these cables while keeping them looking neat, now...

With that, the ground floor lighting is complete. I was surprised there weren't any lights inside the diner itself, but they're installed later as part of the floor above, as we'll see in a bit.
Bag four provides lighting above the two first floor windows, replacing the 1x6 arch bricks entirely, routing the cables between them inside the building. The wires then run out the front window and to the underside of the floor...

...where five chained 1x4 plates are spaced out throughout the floor, providing the interior lighting for the diner below. The wire finishes by running out the rear of the building.

The second floor works in a very similar manner to the first, providing lighting above the windows as well as at the top of the tall windows above the diner door, although I was instructed to thread the wire a rather circuitous route around the top of the walls to the rear.

As before, the lighting for the boxing gym on the floor below is provided on the underside of this floor. The design is rather clever, allowing the floors to easily be separate from one another still, without risk of tangling and damaging long cables.

Finally, for the building, at least, lighting for the recording studio is added to the underside of the roof, using the now-familiar 1-stud-wide plates.

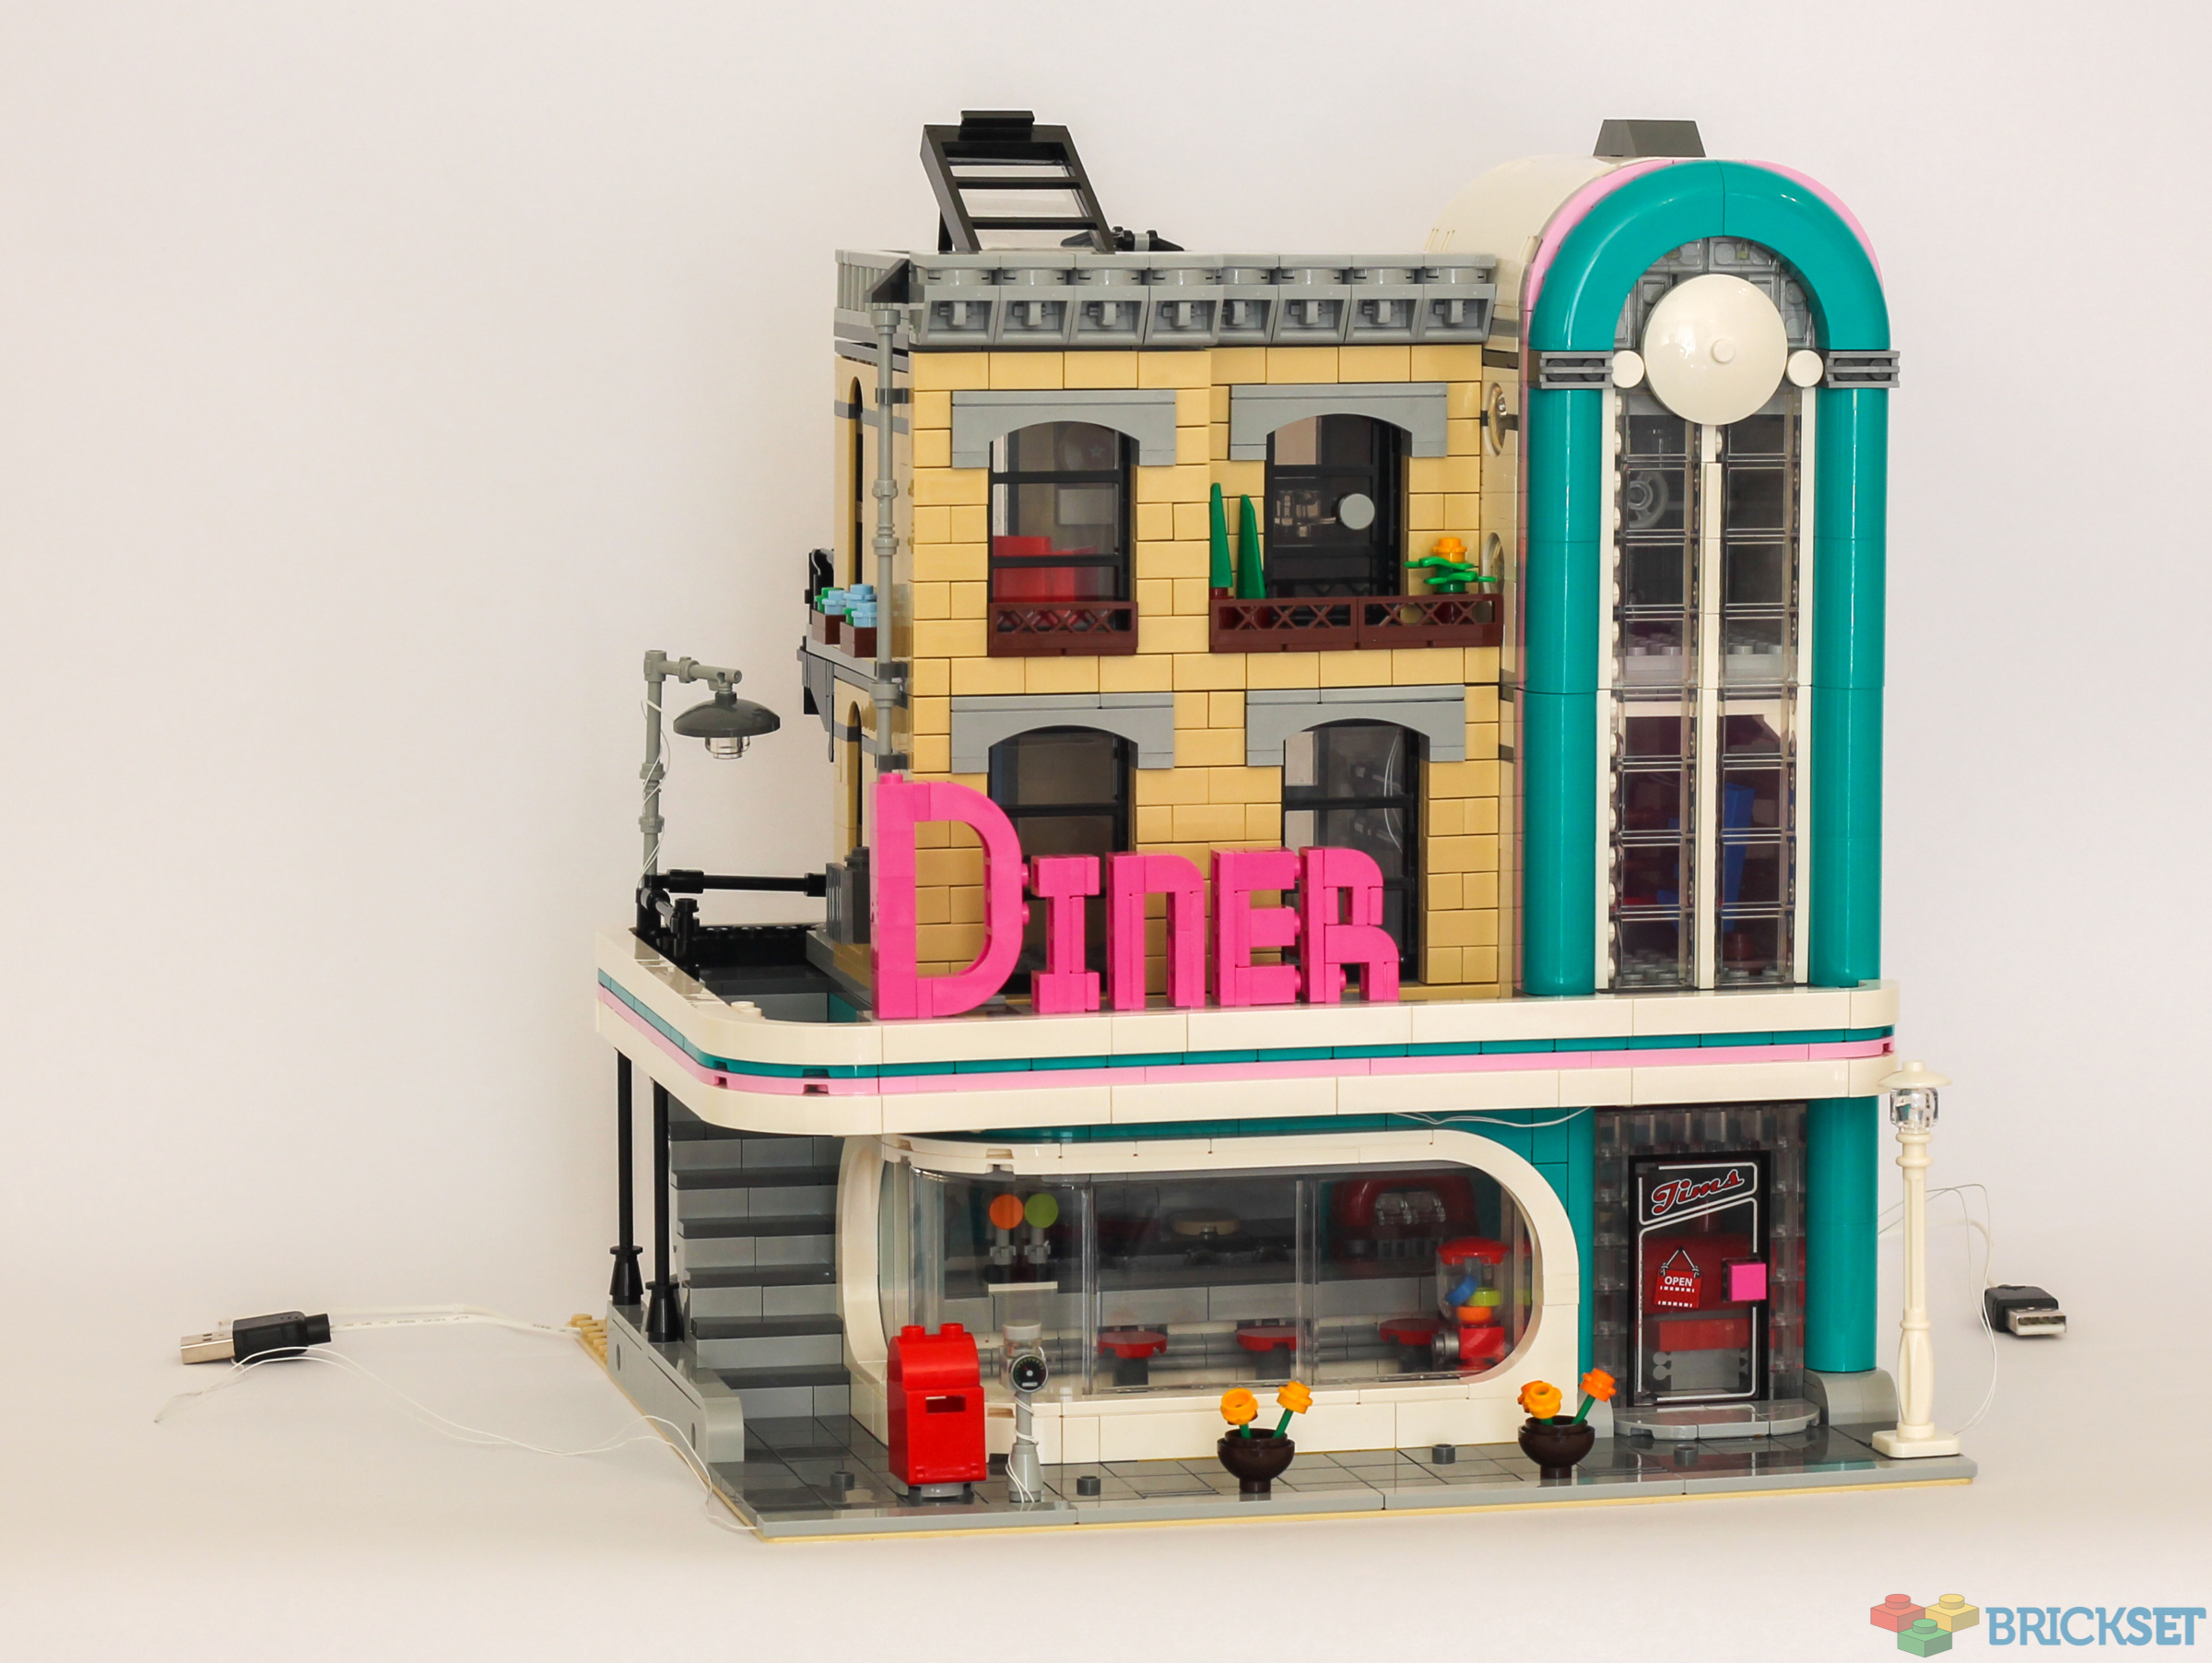
With the building reassembled, the lighting isn't too obvious at first glance. It's most noticeable where the cables are wound around poles to reach the top of the rear lamppost or the parking meter.
Unfortunately, it was a bit of a struggle getting the roof to sit back on top tightly after the way the wires were threaded through the studs of the walls below, as you can see here. It takes some pressing together, and is liable to pop back up again. This could perhaps be remedied a little by finding another route for the cable inside the building.

From the rear, the rather ugly mess of cables is obvious. It is somewhat unavoidable, however, and in a row of modular buildings or on display on a shelf, it is at least hidden behind the models. With the exception of the front lamppost and parking meter, all the cables are designed to exit the building in the centre.

The USB splitter and battery pack obviously adds to the bulk behind the building. If close enough, the lights can also be powered by a USB port on a computer or a power brick (such as those used to charge phones, etc.)

The final bag provides head and taillights for the pink car, replacing the round 1x1 tiles currently used. The headlights route the wires under the bonnet and out the side door.

All four taillights are replaced, with cables routing beneath the boot of the car and through to join the headlight wires exiting to the side. The car is obviously far less mobile now that it's tethered to a battery pack!

Lights, Camera, Action!
With all the lights installed and the building assembled, it's time to turn them on! They're a decent brightness, and are obvious even during daylight. They've all been well-placed to provide even lighting within each floor, as well as highlighting the full-height feature window and diner doorway.

Obviously, it's when the rest of the room is dark that they really shine (if you'll pardon the pun.) The lighting is superbly realistic, lighting the building and the street in a way that you would expect if it were life-size.
Around the side, we can see that the lighting above the rear stairs is dimmer than those inside, or around the front, giving the impression of a more dimly-lit alleyway when compared to the bright, enticing, diner on the street.

The headlights on the car are nice and bright, and two of the taillights flash, one on each side. The instructions don't tell you which way round these should go, and unless you test the lights before installing them (like I did) you'll be unaware of this until you plug it in. I chose to make the top two lights flash. Frustratingly, they don't flash together, or even at the same time interval; they drift in and out of sequence with each other over time.

Conclusion
I've always quite liked the idea of adding lights to display models, but I've mostly been put off by the fear of fiddly, fragile installation that's easy to mess up, and unsightly cables running around the model ruining the display.
The kit from Lightailing proved me wrong on both counts. The installation instructions were as clear as I think it would be possible to make them (with the exception of missing a step!) and the cables are mostly cleverly hidden away within the walls and under the floors. I think the installation took me around an hour.
It's worth testing the lights before you install, however: the headlights on the car of the kit I was originally sent were faulty, but a replacement set was sent out without problem.
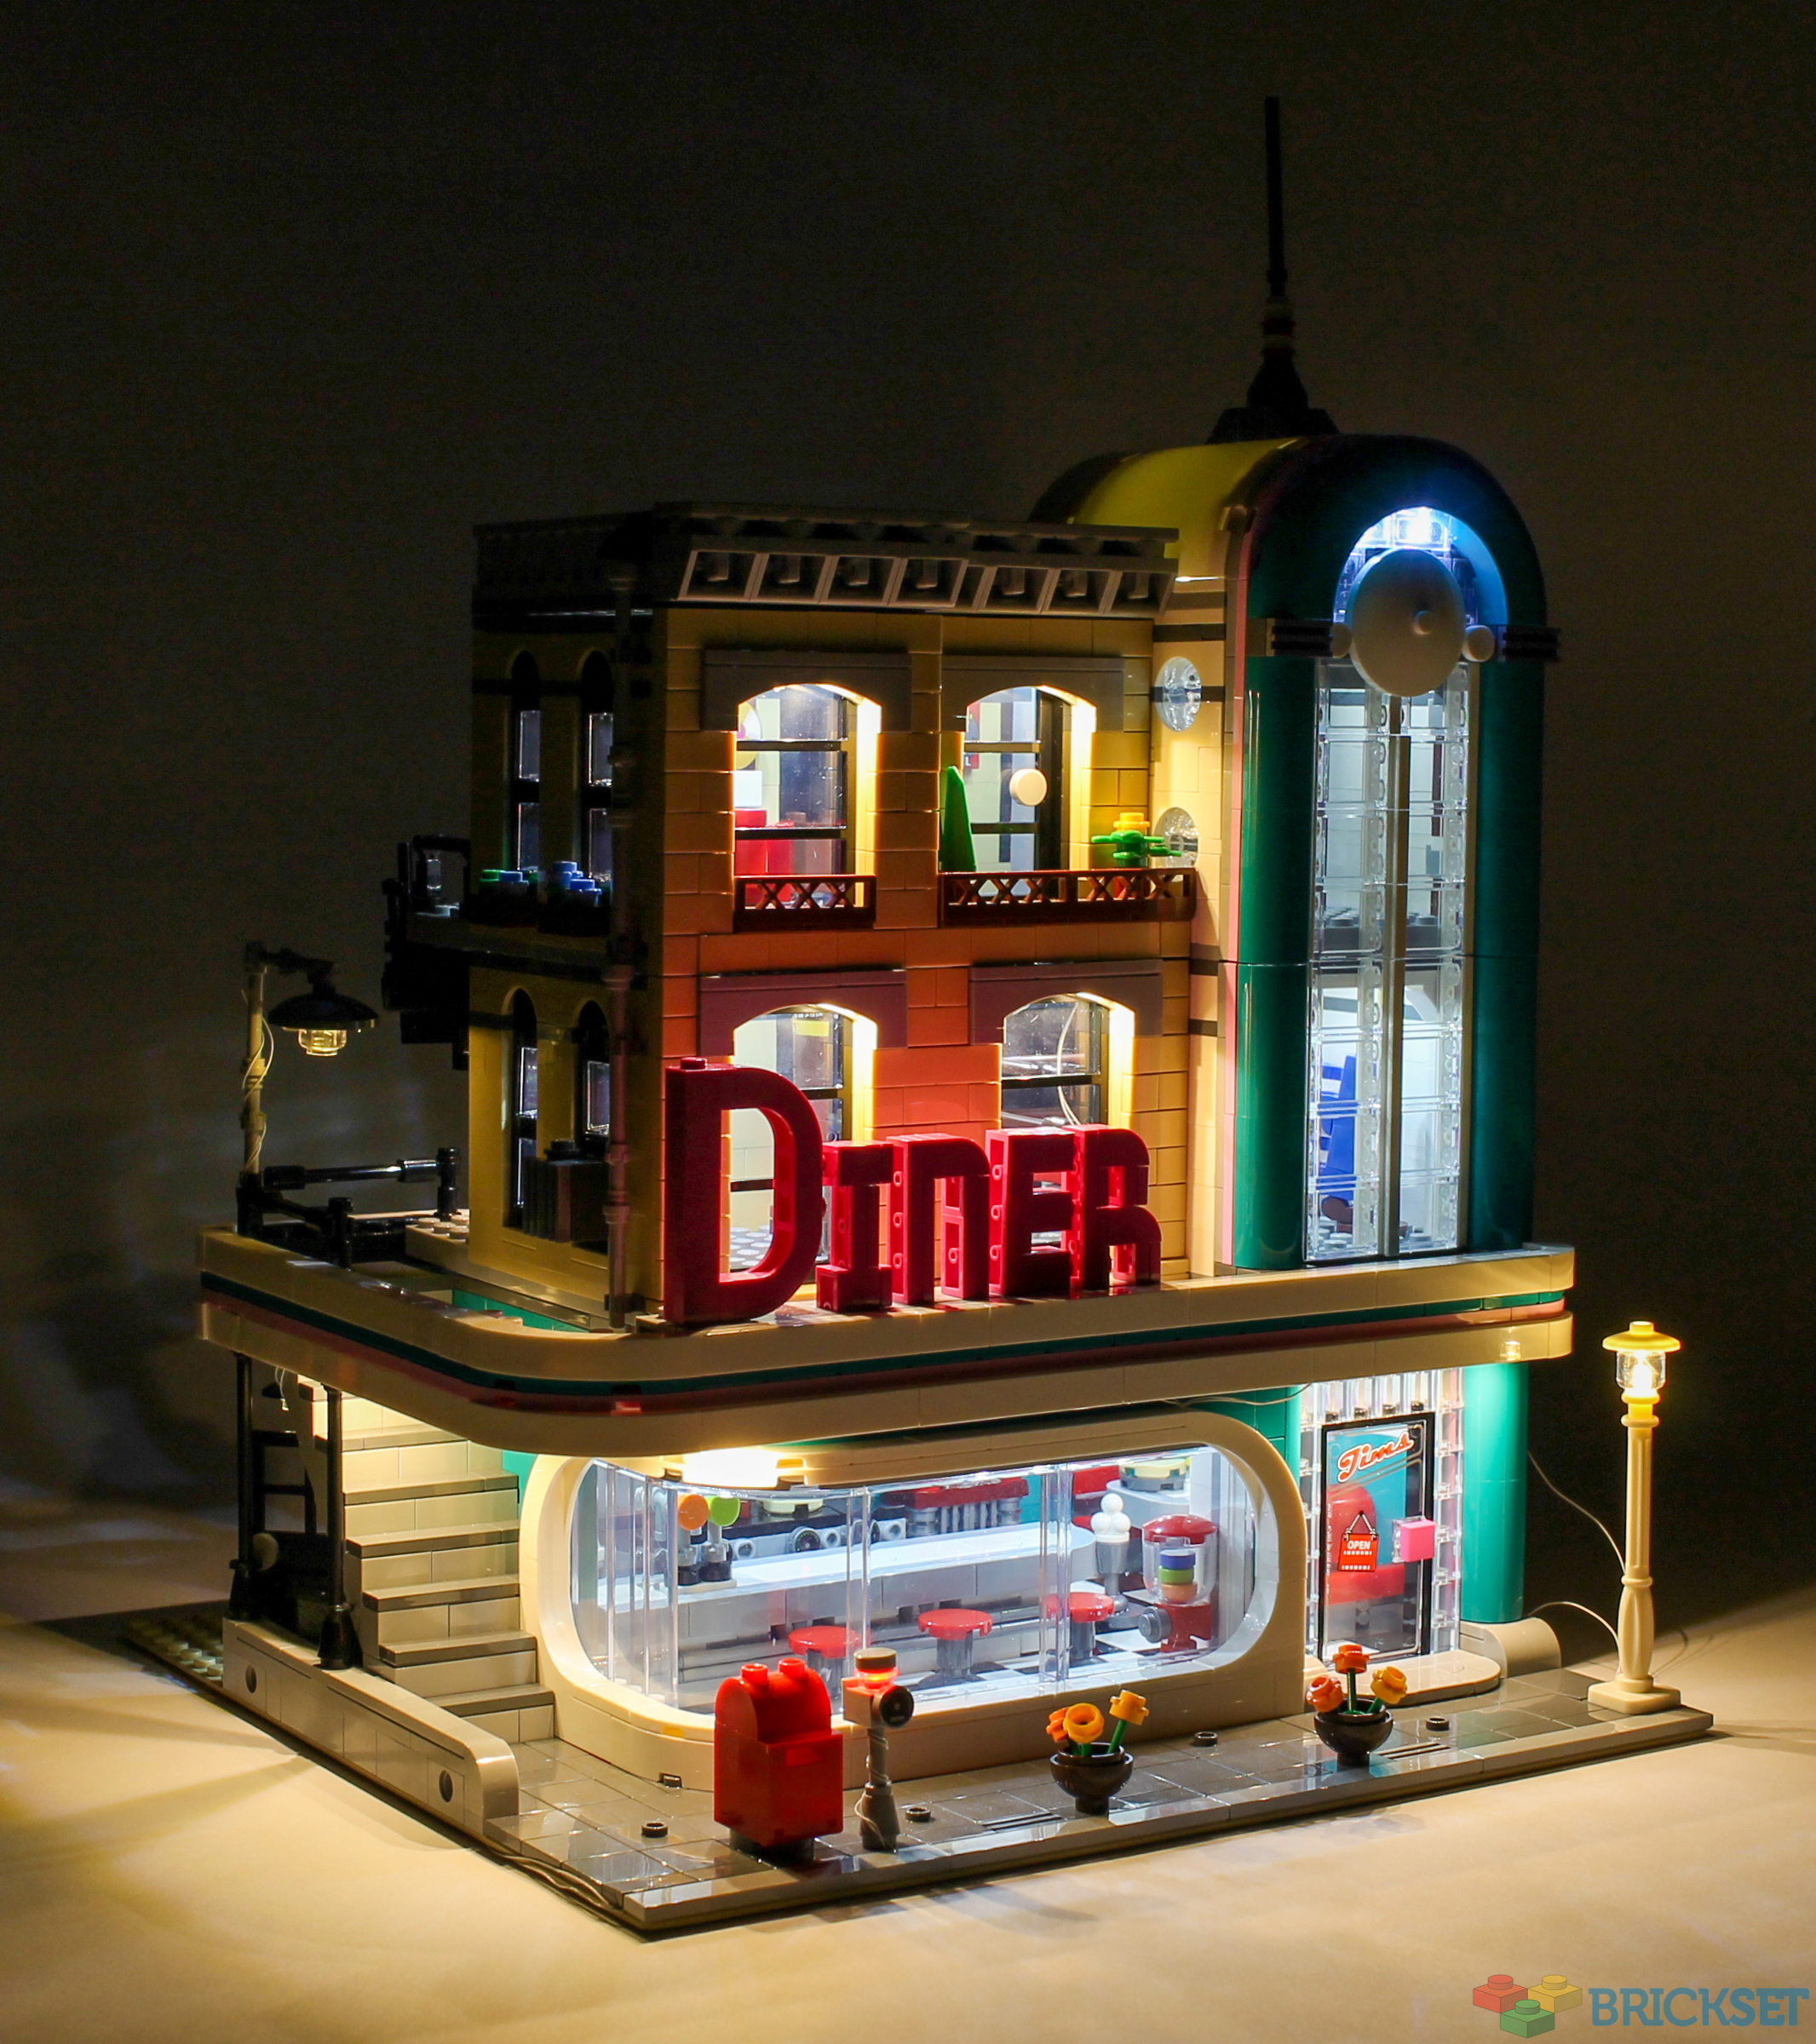
I think the final model looks fantastic, particularly in the dark. There's variance to the lights, lighting the model in a realistic way, and I can imagine an entire line of modular buildings lit this way would be quite impressive. I also appreciated that the replacement parts they provided with the lights installed within are genuine LEGO parts!
Lighting such as this clearly lends itself to particular types of display models more than others, which is the reason I asked to be sent the kit for a modular building. According to the website, the kit costs £49, which does feel fairly expensive to light a single model, but I can't deny that the results were satisfactory.
There are a variety of third-party companies out there providing lighting for LEGO models recently; if you're in the market for some prebuilt kits for your own sets, I'd certainly look at giving Lightailing a shot.
The kit, and others for a whole range of modular buildings, vehicles and more can be purchased from the Lightailing website.
Thanks to Lightailing for sending the kit for review. All opinions expressed are my own.
101 likes
46 comments on this article
Not for me but looks good in the dark.
"I can't deny that the results were satisfactory."
Quite the glowing endorsement there, Ben! :-D
That looks shockingly good
It makes the ground floor look like an Edward Hopper painting
That harsh lighting within the diner itself almost makes it look real. I would have thought that the whole of the turquoise arch was supposed to light up too, but that would be asking a bit much. It looks good, although I don't collect the modulars any more, nor do I have an interest in lighting any LEGO sets (none that I currently have anyway), but I'm sure there are plenty of fans who'd love this.
It does look good lit up, but until Lego releases their own solution I’ll hold off. Those wires are pretty unsightly.
An article with a list of third-party companies providing lighting for LEGO models would be very welcome!
I've lit up a few sets now using the Light My Bricks kits that I purchased through Elegant Bricks. With the help of Oliver the owner of Elegant we swopped out some of the flashing lights for solids and changed out the battery box for a USB to mains connection. They use smaller connections than direct USB which makes the cabling much less obtrusive.
Doing that we have lit up 21318 Ideas Treehouse, 75827 Ghostbusters Firehouse & 21108 Ecto-1, 21304 Doctor Who and 10225 R2-D2. They are connected to a homekit switch that brings them on at dusk every night and they look great.
The lights looks most effective on the winter village sets although the kits are slightly too blinky for my taste so more lights have been changed to static.
We have this one, plus the light sets for the various Winter sets - yes they can be a bit fiddly with the wires, but you can usually find ways to hide or minimise them.
The winter sets look great with the lights on, we set them up early in December and then the kids setup up the winter town around the various buildings, market stalls, trees and street lights - its looks awesome come evening!
The diner set we are still 'uming' and 'aaring' about - part of the problem is we have it next to two sets without lights and perhaps its an 'all or nothing' approach. When the lights are on the set looks great - bit too bright maybe in the main diner but that's manageable.
I will say for the larger sets once the lights are in and the wires tucked away it can sometimes restrict some of the playability as you try to avoid pulling the wires out etc - but if your going for display only its fine.
PS; The "very strange orange giraffe-shaped separator" sadly, and please don't judge me -is a certain famous clone brands separator piece.
This kit actually looks nice and modular. I'm not a fan of the whole lighting kits for specific sets thing, but this type of kit looks like it could work for MOCs, too.
I prefer Light My Bricks. The cables are more hidden than Lightailing and seem better quality. The cables aren't connected in set strings, so it gives you the opportunity to change or custom them more. I have most of my Winter Village collection lit with them, plus the Ideas Treehouse which my son loves.
I have the lighting kit for the Barracuda Bay set because the lights were fifty percent off and I had wanted to try them out. The results are great! The ocean glows blue, the lamps are all orange-yellow, and the inside lights can be set to whatever colour you want using a remote control. They can flash and do a few patterns. The tavern can become a rave even! It’s great. Still, I may repurpose them sometime soon for my Medieval Blacksmith set since I can attach an extended USB and plug it into the wall using an adapter. I don’t enjoy the Black Seas Barracuda set enough to justify the lighting.
I love the idea of lighting sets but pretty much all of the set-specific kits are incredibly ugly and garish, with internal spaces illuminated to a industrial brightness, and lots of weird “unmotivated” lighting (e.g. illuminated water).
Presumably much of this to justify a particularly high price point, but I find it massively off-putting.
I have however bought individual lighting components from Brickstuff (US based), which are far less bulky than the various knock-off Chinese brands, and had a really good result with lighting the Ideas Treehouse.
It can be difficult navigating the various companies offering lighting systems in order to work out quality and value (given the massive price points).
Following some of the previous discussion the last time Lego lighting systems we’re in the news, it’s probably also worth pointing out some of the IP controversies…
https://www.brickfanatics.com/lego-night-mode-more-answers-more-questions/amp/
I like the look of some of subtly done lighting, but the price of the kits is just obscene.
A quick look on Amazon gets
1000 assorted colour LEDs - £11.99
1050 assorted value resisters - £11.99
100 flashing LEDs - £8.99
So, anybody happy to do a bit of soldering can get the same effect as a £50 set for under £1
Sell the £50 sets for a more sensible £10 - £15 max, and I'm sure they'd sell more than 5 times as many!
I've always been curious about these lighting kits. Thanks for the article!
I own all MB-sets and also have lights for al sets.
This fall I'm hoping to get a new displaying wall for the sets. At that time I will build all models including te light system. I can let you know when it's finished. I'll bet it looks great!
I give props to whoever designed and produced these kits, but this isnt for me. The light quality makes it look as though every floor has the same blinding fluorescent light. I'd be more inclined to try it out if it gave a cozier warm light look and feel.
@sjr60 said:
"I like the look of some of subtly done lighting, but the price of the kits is just obscene.
A quick look on Amazon gets
1000 assorted colour LEDs - £11.99
1050 assorted value resisters - £11.99
100 flashing LEDs - £8.99
So, anybody happy to do a bit of soldering can get the same effect as a £50 set for under £1
Sell the £50 sets for a more sensible £10 - £15 max, and I'm sure they'd sell more than 5 times as many!"
By the same reasoning you can buy Lego sets and part them out for an insane profit.
The fact of the matter is that as soon as you have to do all the work, it starts becoming.... work. Figuring out the length of the cables, drilling the holes, soldering everything, neatly packaging it with instructions that are easy to follow so you don't get endless customer service calls.
I think the price asked is very fair considering the amount of time they need to put in to make this all this easy. Of course if you're a hobbyist who likes doing all these things themselves, you would probably order the components and do i yourself. But with a product like this you're not paying for the components, you're paying for ease.
Would love to see a review of all the different light kits out there. They vary to differently in price, in style and what they do. I've gotten them from a few different companies, mainly due to price and have loved the design from Light my Bricks, but they are super expensive as they come out of Australia and shipping on top of the cost of the light kit is astronomical.
Interesting to see this one for the Diner, as with the one I have purchased there are a lot more flashing lights too - The Jukebox blinks, and the red light on top of the radio antenna also blinks. I guess for some that might be annoying, but it adds another level especially for sets like the Movie Theater with the Marque blinking.
So again would love to see a review of all the different companies as there are quite a few now.
Thanks for the review!
I have buy a lot of sets from Brickloot and a few from Lightailing for my city. At first I followed thoroughly the instructions but it let a lot of cable loose hanging at the back. So now I run all the wire inside all through the ground floor and exit it there. It is more clean. It is easier to do with Brickloot because they have extension wires.
It is pricey. It make somewhat a mess of the lego modulars ( more difficult to separate each stairs afterwards) but is so great to see the city glow in the dark!
There is also Briksmax which appears to be much more modular ( you connect each light with separated cables and expansion boards) but also seem more difficult because the pieces are so tiny. I have bought the one for 21325 and I am installing it now.
I have always been interested in these types of kit too, mainly to see how things still go back together again and are the cables largely invisible. A vast improvement on my circa 1983 intercity train and road plate layout with working 12v lights (all held together with bell wire - not that invisible). In the future I may investigate lighting my whole city but at the moment it would be too disruptive, too frustrating, oh and too expensive!
If I were to have my sets permanently displayed I would totally get lights for all of them.
Funny story, I actually won a giveaway Lightailing had on instagram, along with a few other people. Lightailing never sent out the prize (lightsaber lighting kit) to me or any of the other winners, after asking us for our contact info, addresses, etc. They then deleted their instagram page and opened a new one with a slightly different name.
Feels kind of grimey, there's a lot of other options out there. I don't want to support these guys.
I have this exact kit and a kit for the pet shop under the same brand (lighttailing) and also very impressed. I was very concerned about gaps and wires being visible but from the front everything is 100% hidden. The light temperatures and brightness are very good as this article attests. My favorite touch is the blinking light on the expired parking meter! The costs are incredibly high though so I have to space out the purchases which means only 2 of my modulars are lit at the moment.
While I love the idea of lighting my sets up, I can't justify the cost of the sets when I could be spending that money on more Lego :)
I bought some electric tealights out of a bargain store, 12 for a £1 and stuck them inside Hogwarts, far cheaper! :)
I think that after minifigs, lighting really brings a set 'to life'. I agree with folks though that the price for these particular kits are pretty high, with some kits costing nearly half as much as the original Lego Set itself.
There are cheaper alternatives out there however if you look , I've used EDCAA sets for example in the past which are much cheaper and work absolutely fine.
Yes you can go down the road of 'bulk buying and DIY'ing' if you have the 'know how' or keen interest in learning and also want to invest in all the necessary soldering kit to do so , but not everyone has the skills/patience or workbench area to do that.
I'm guessing most folks that want to add lighting to a set would be happy to do so with everything in a box '... but at a reasonable price
Honestly most of these lighting sets look really tacky and off putting because they go overboard with trying to cram in as many lights as possible, probably to inflate the absurd price. Buildings like this look ok-ish but for vehicle sets like 10283 they really jump the shark
All of these kits are *way* too bright for my taste. I prefer the older, softer, 12V lights from the 80's. I keep looking for similar LEDs, but can't find any.
Using a usb connector is just too bulky and ugly. The company should invest in a smaller solution.
I don’t get why the Diner letters aren’t lit up? That would be the case in real life
One can get the same or at least almost identical lighting kits from AliExpress for a fraction of the cost of this offer.
Not that I am interested in lighting kits in general, just noticing.
Funny too that they use the Lepin giraffe brick separator in their official images.
Kind of disqualifies them as a trusted brand imho. I mean, why not use the standard LEGO one?
UK stockist for Lightailing and Briksmax lighting kits is https://www.brick-a-brac-uk.com
A fairly good range available with better prices than buying direct. Also stock is already in the UK, not sent from China or EU.
Briksmax are made by the same company but are a component kit with all parts needing to be attached manually. This allows for more customisation and it is easier to replace if any lights or cables get damaged.
I would like to see a few options available before I really went all-in on lighting. Caveat, these may all currently exist, and if so I just don’t know about them yet:
1. Options for “realistic” light sources only. I agree with others above, I would personally prefer more subtle lighting. Best case: you get a kit and have the flexibility to remove components. Alternate option: you pick a specific kit with a certain level of lighting.
2. Brightness control . I know this adds cost and circuitry. Best case: dimmable. Alternative option: give a “low, medium high” switch.
3. Color temperature options. For a diner, bright white may be the best choice. For many other applications I’d prefer a warm glow. Best case: controlled by a switch. Alternative option: You have to select beforehand and be stuck with what you get.
I agree that a list of lighting kit brands with a breakdown of features would be helpful.
@Djhorn said:
"I give props to whoever designed and produced these kits, but this isnt for me. The light quality makes it look as though every floor has the same blinding fluorescent light. I'd be more inclined to try it out if it gave a cozier warm light look and feel. "
Totally agree. A generous assortment of brackets surrounding the lights (boxing them a little bit) should 'reduce' a little bit the strength of these lights. Ideally a potentiometer would be needed but that would increase the price even more and then you have a bunch of potentiometers to hide.
I've purchased several of these kits for various set's..like author notes instructions and quality is very good. On prices checkout the Official Lightaling site on AliExpress same boxes etc often good prices make sure you select AliExpress Shipping around 10 days to UK and it's fully tracked.
@DavidBrick said:
"Oh yeah. Just buy some battery tea lights and stick them in. For 50 pounds you can get hundreds."
Thank you for revolutionizing my Winter Village.
This does look fantastic when lit up.
And I do understand how much work goes into the sets, making them the price they are.
But…
I have all 16 modulars and 10 of the winter village sets,
So if kits are £49 each, that means I need to spend over £1,200 to light them!
(Before I even get onto Ghostbusters HQ, fairground sets and UCS Star Wars sets etc)
I think I’ll just get better with a soldering iron, and spend the £1200 on more Lego instead!
I think the giraffe brick separator is the Lepin equivalent of the lego version.
These are definitely cool.
But for someone who builds a full on City, the wires can become a mess. I have always liked the Battery Powered lights way better. Out of the way and I can easy to connect in Buildings.
I use Light Up Bricks in my City right now. a simple button push turns them on. I also have used battery Lamp Posts.
Funnily I just decided to light a few of my buildings and picked up 3 sets from LightMyBricks. (they have a 20% off sale). I can't wait to see how they work out. I also got some LED lighting strips to mount behind my shelf layout. They have some neat controls, so I mau be able to use an old old model railroaders trick. Projecting a fading blue->violet->red->orange onto the clean white wall that forms the backdrop. Giving them a dynamic time of day sky effect.
Below the fancy detail light kits they also make some down and dirty simple interior lighting kits like these. Enough to light up some windows. At $10-$15/set
https://www.amazon.com/gp/product/B07VC2C2HN/ref=ppx_yo_dt_b_asin_title_o02_s01?ie=UTF8&th=1
@Brickodillo said:
"I don’t get why the Diner letters aren’t lit up? That would be the case in real life"
That was my first reaction as well - it looks really false that big sign on the front of the building is in darkness when the rest is so garishly bright!
@MrJay520 said:
"These are definitely cool.
But for someone who builds a full on City, the wires can become a mess. I have always liked the Battery Powered lights way better. Out of the way and I can easy to connect in Buildings.
I use Light Up Bricks in my City right now. a simple button push turns them on. I also have used battery Lamp Posts. "
I have a pretty big city (Brick__Sanchez on IG and YT) and almost all of my buildings are lit using either lightailing/game of bricks/lelightgo/kyglaring lightkits and there are a couple of ways to hide those cables, I use the little corner on the baseplate to channel the wires through (4 baseplates together makes a perfect sized hole) another 2cm hole in the table which connects all of the kits underneath to usb splitters and main power supply and the cables on the backside of the modulars are mostly hidden using foliage or tiles. That is a solution for the city surface but the underside of the table is messy as hell tho. There are some amazing new type of tile&plate connectors in these kits now (Only with Game of Bricks and Light my Bricks who use the microplugs system) that allow you to take apart floors of buildings and only light them back up when the plate on the above floor is touching the tile on the floor below, this way you can get rid of some wires running down from the upper floors. I recommend lightkits to everyone there's just something so magical about them!
@Ridgeheart said:
"It looks absolutely lovely, and I am definitely in the market for a reliable source of... light-sources, but what worries me is the temperature that some of these LEDs might reach (that is also the main reason why I don't want to bother with aliexpress or the likes - in my experience, those kits are quite literally hot garbage).
So my question is, just how hot do these LEDs get? Do they cause neighbouring bricks/plates to warp at all, especially after a full evening of illumination?"
The leds don't get hot at all actually! I have a city with over 30 lightkits plugged in together and sometimes I leave them all on for hours and I've never had any temperature or shortage issues, the voltage is also very low even with lots of them connected. And almost all my kits came from Aliexpress and are all still working perfectly after a year or longer, so I wouldn't exacty call all of them hot garbage. Lightailing and other chinese brands are reselling these kits on European webstores to seem more "legit" because people don't seem to trust Aliexpress. The kits used to be cheaper on there but the shipping & importing laws for China are more strict and expensive now which made the price equal to the European stores. I've tried out many different brands but to me Lightailing (not Briksmax), and Game of Bricks are the best price/quality brands, but Light My Bricks has some great customisation options. I suggest checking some of these brands and looking at the videos or instructions to find out which suits your needs the most, I have some lightkit videos on my yt channel aswell. Cheers
I just finished installing the Lightailing kit in my Downtown Diner and it looks amazing. I'm steadily working through all of my Modular Buildings. Using a variety of kits. I seem to be hitting three main price/complexity points.
1. Upper Tier Cadillac Light Kits. Stuff that will have not just static lights, but a lot of effect lighting. I've been using the Light My Bricks kits for these. They look spectacular, but damn are they expensing. I'm limiting them to the Daily Bugle and the Three Ninjago sets for now. The Modular nature of the Lighting Kits allows for a lot of expansion and customization. I had started to price out some components to do a few of my MOC Buildings, but if anything the price by component parts is worse. I do love the wireless connectors they have come up with to jump power between modular floors without having to tie them together with wires. It will take most of a Saturday to Wire up a building with one of these sets.
2. Mid Tier - Medium Cost, some effects. But everything is designed just for that building. No modularity. No customization. Mostly Lightailing, which I have found to be the easiest most user friendly to install. They come as prewired pre lit (sadly non Lego) bricks that you attach or swap into various points of the model. And all come together for USB Power. The newer Lightailing sets seem better designed and laid out and install much easier. The Diner is a delight and took 1 maybe 2 hours. The Palace Cinema looks incredible, but the weird floor jumps of the wiring runs make it frustrating. The Detectives Office is sort of a nightmare. Once lit don't plan on getting back into the lower floors to place minifis. There just isn't enough slack in some spots. If you want to start experimenting these would be the ones.
3. Bottom Tier - Low Cost strings of USB lit plates in either Warm White or White. Typically 4 or 6 to a string. Quick easy and cheap. They can get you interior lighting cheaply. Good for buildings with no external signage. You can also get strings of 5 streetlights. Provide decent bang for the buck.
4. DIY Goodness - Depending on your electrical skills or just how comfortable you are with RGB LED strips. If you know how to cut and splice them, such as for shelf lighting, you can cobble together some effective interior lighting. Since my layout is a Shelf City that stretches around my office walls at shoulder height I used some newer fully controllable strip lighting behind the buildings to get a slow moving fading color change thrown on the white walls behind them. It's kind of a neat effect.
The biggest improvement from lighting is it lets you see the scenes inside the buildings. Which really makes them come alive.