Review: 42069 Extreme Adventure
Posted by FlagsNZ,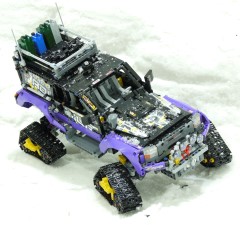
As we come to the end of 2017, the fortieth anniversary of the Technic range of sets, this is a review of 42069 Extreme Adventure, the last of the large sets. Huw has already reviewed 42068 Airport Rescue Vehicle and 42070 6x6 All Terrain Tow Truck.
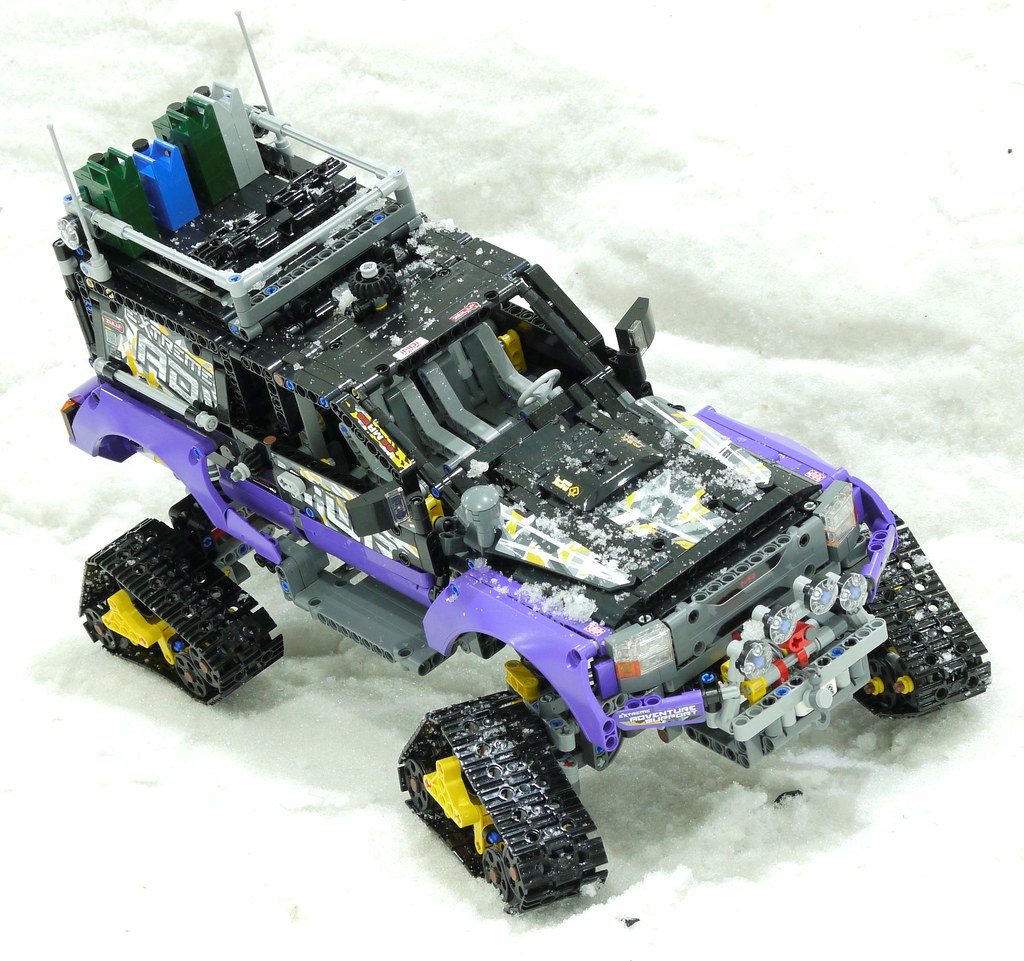
Looking at the images of this vehicle, I was intrigued about such a strange snow mobile. This is a style of extreme vehicle that I am not familiar with.
Read on as I review this Extreme Adventure set.
Box and instructions
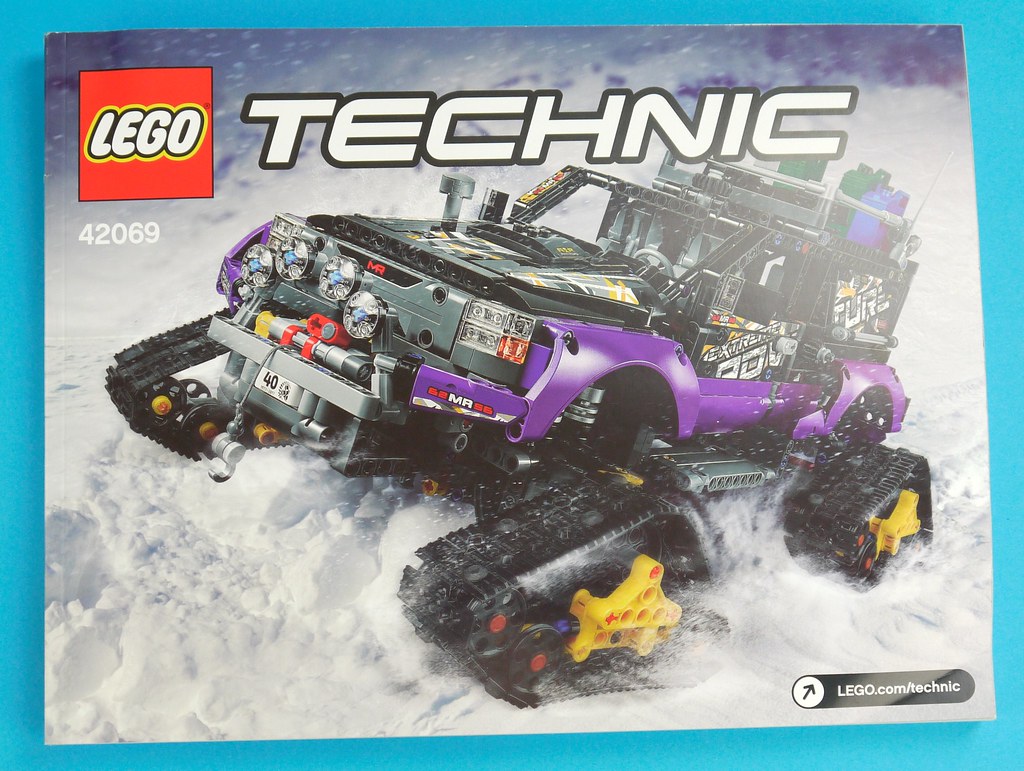
The front of the box shows the Extreme Adventure vehicle driving in a snow blizzard. There is a small thumbnail image giving the set's length (44.6cm or 17 inch).
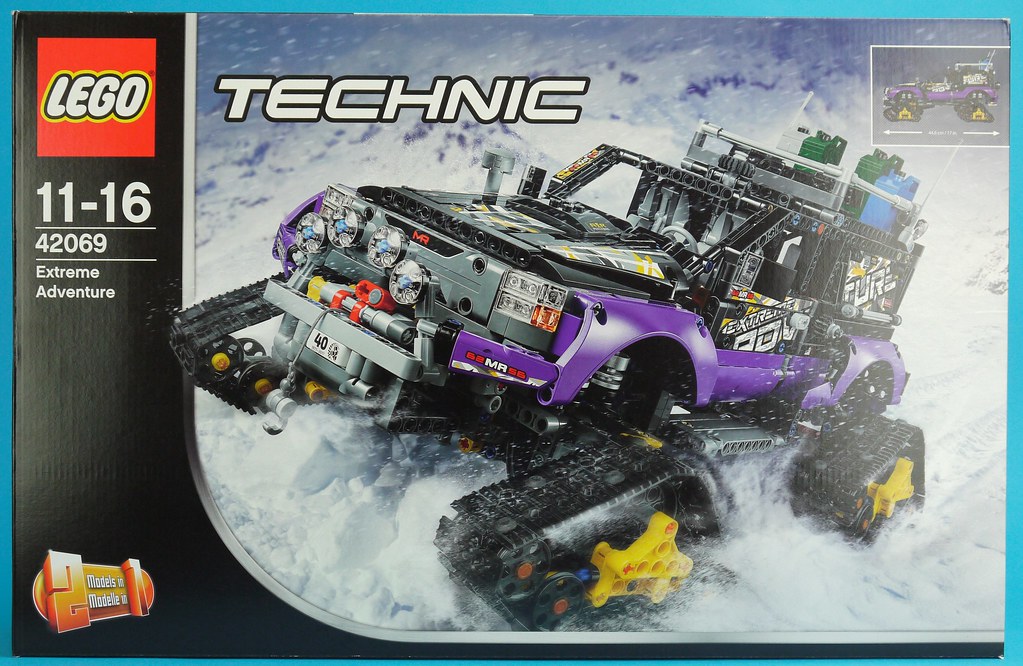
The rear of the box shows all the functions of the main model and the B model a Mobile Base Vehicle.
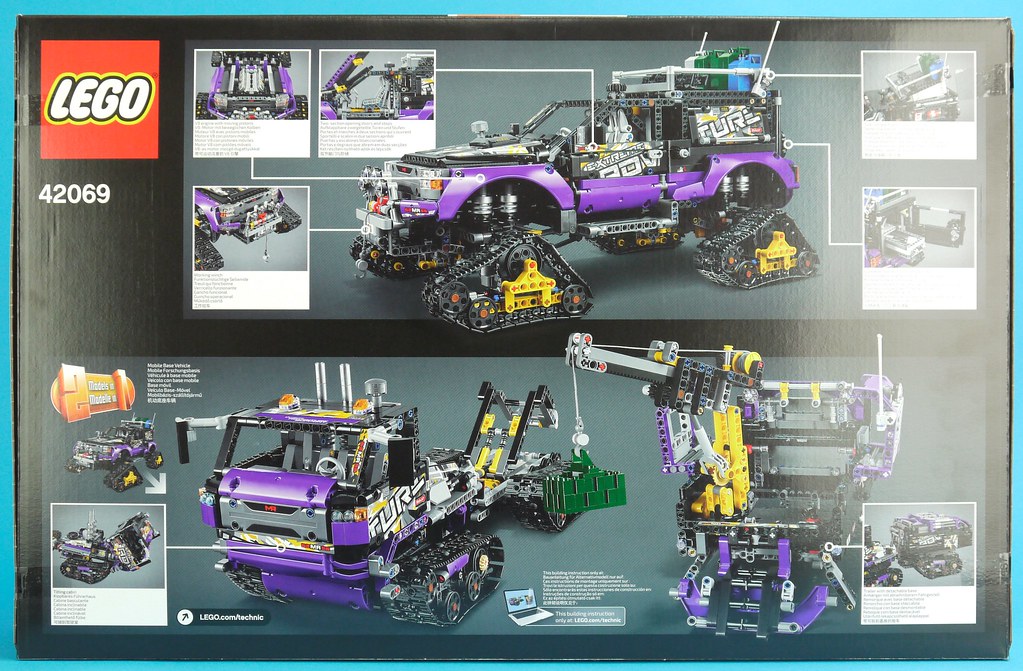
All the functions are described in eight languages.
The instructions for the main model come in one huge book of 395 pages.
There are plenty of stickers that add some detailing to the finished model.
The stickers have three functions:
- The Extreme Adventure Support branding
- Sponsors' advertising, and
- Functions and safety
The Extreme Adventure Support branding is made up of three stickers that spans three separate parts on each side of the vehicle.
The sponsors' advertising is made up of the following;
- Air PHYLTERS
- WRE NCH
- ZULU
- UP Away
- iNDi KATOR
There are stickers for the two manual functions: winching and opening the canopy. The first-aid kit has a sticker. There is a warning not to step on the front panelling and the bonnet has two toggle fasteners.
There is reference to Milan Reindl as the set's designer as MR features in the branding on the vehicle. I haven't found out what the 62MR56 is referring to.

The sticker sheet comes protected in the same bag that holds the instructions. The sheet started to curl up almost immediately it was removed from the protective bag.
Parts
The 2382 parts come in 20 un-numbered bags.

There are several parts in new colours in this set. Of particular note is Technic parts in Medium Lilac
- Four Panel Wheel Arches 5X15X2 W/ 4.85 Hole
- Three Bowed Panels 3X11x2 W/ 4.85 Hole
- One Left Panel 3X5 and one Right Panel 3x5
- Two Left Panels 2X5 (Nr 22) and two Right Panels 2X5 (N0 21)
- Three Bowed Panels 3X7X2 W/ 4.85 Hole
- Three 11M Beams
- Six Double Angular Beams 3X7 45°
- Six Technic Ang. Beams 4X2 90 Deg

There are several other parts that are in new colours. I am sure many people will be interested in the eight Rim Wide wheels 18X14, W/ Hole, Dia. 4.8, No. 1 in cool silver. There is one blue Box 2x2x2.
This is the first Technic set to include the small Rubber Attachment For Track No.2. A bag containing 52 attachments is found in the big bag of track pieces.
They were used in two System sets in 2016 and also come in orange colour in the Boost set

The Build
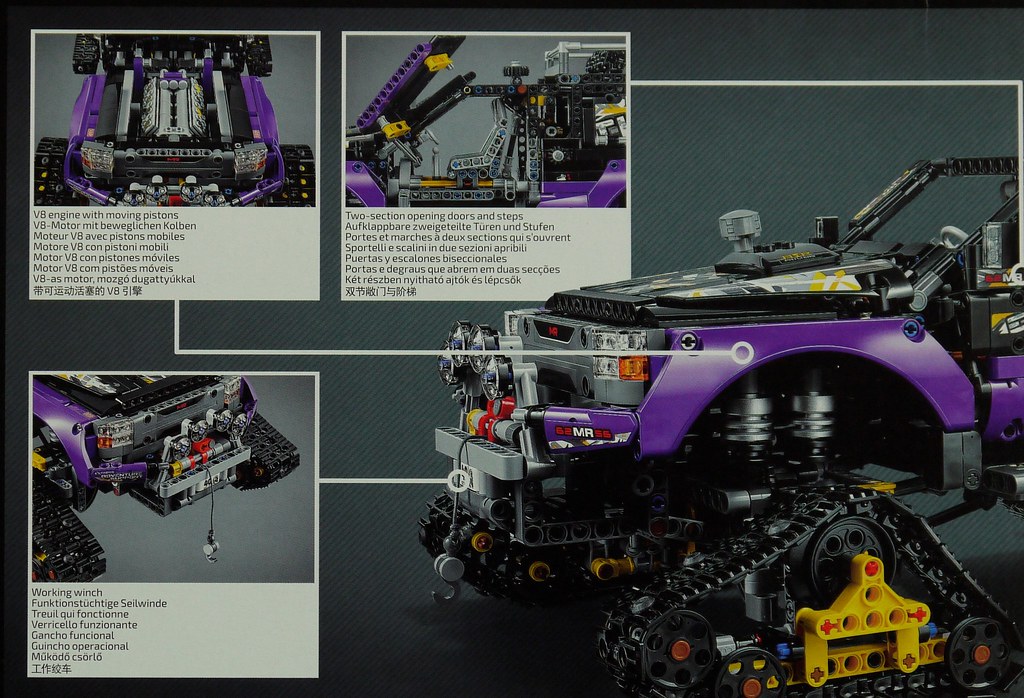
By Step 101 the main chassis has been formed. The V8 engine is attached.

The Winch sits in front of the vehicle. A clever ratchet mechanism has been built using a rubber 2M damper to provide resistance.
The silver coloured string used on the winch is new this year. It is 1mm (1/32 inch) in diameter and 1.5m (4 feet 11 inch) long.
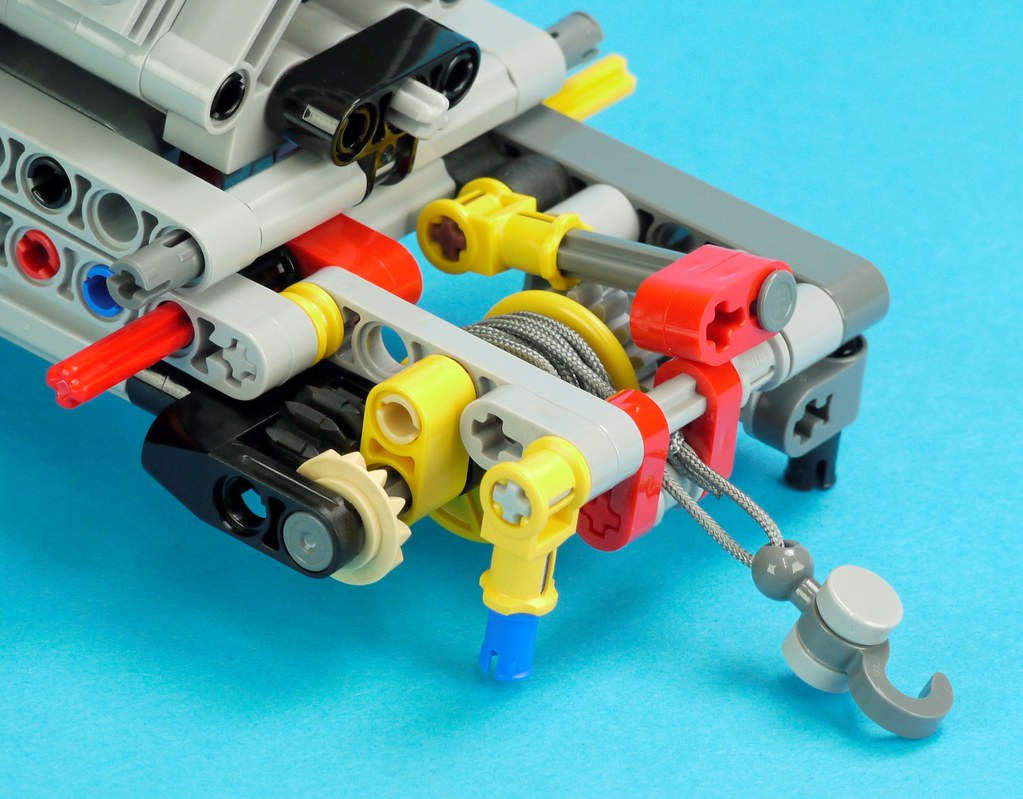
Please note, the string should be reeved the other way around for the ratchet to work as designed.
I tied the string using an Anchor Hitch on the yellow drum and a Bowline on the hook.
By Step 203 the cab is taking shape and some body panelling has been added.

The Medium Lilac is appearing on the rear panelling.

A small equipment drawer pulls out from under the rear tray.

By Step 307 the cab is nearing completion.

Side opening doors reveals two equipment lockers. There is a fire extinguisher on each side and a first aid kit in the left locker.
The cab doors have a very clever mechanism and open and close easily

By Step 394 the rear axle has been assembled. The rear axle uses two Extra Hard yellow shock absorbers. The cool silver wheel rims are used here as air bag shock absorbers.

Note: I have not applied the rubber attachments to my tracks.

By Step 483 the front axle is assembled. Two Hard grey shock absorbers are used on the front axle.
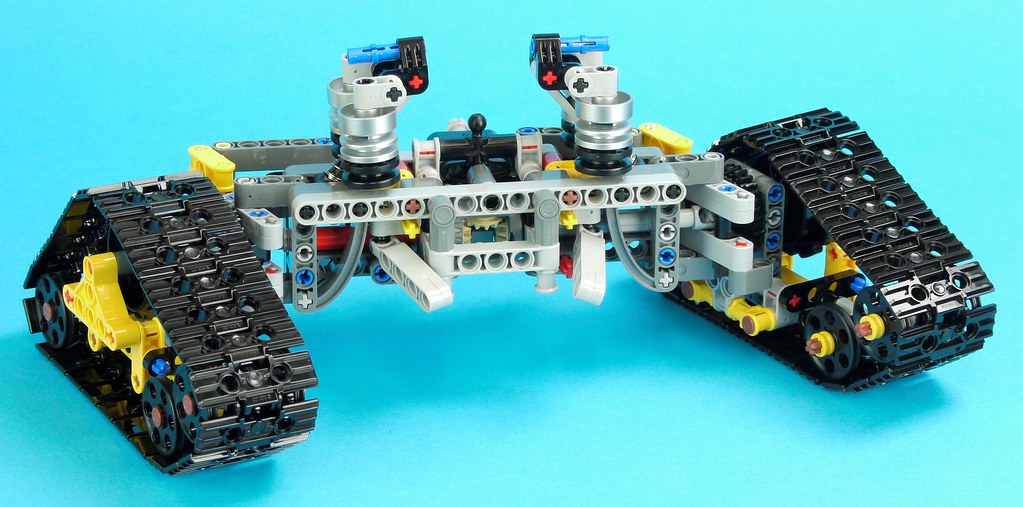
The steering linkages are quite heavily built. The steering also uses Ackermann geometry.

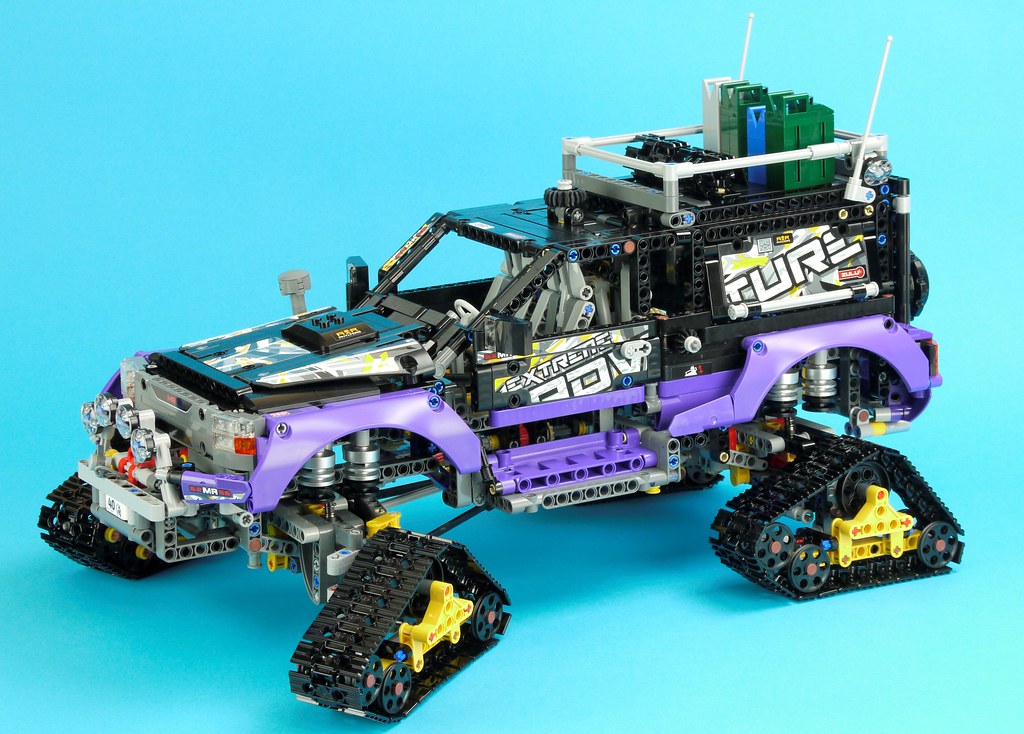
The completed model (Before stickers are applied)
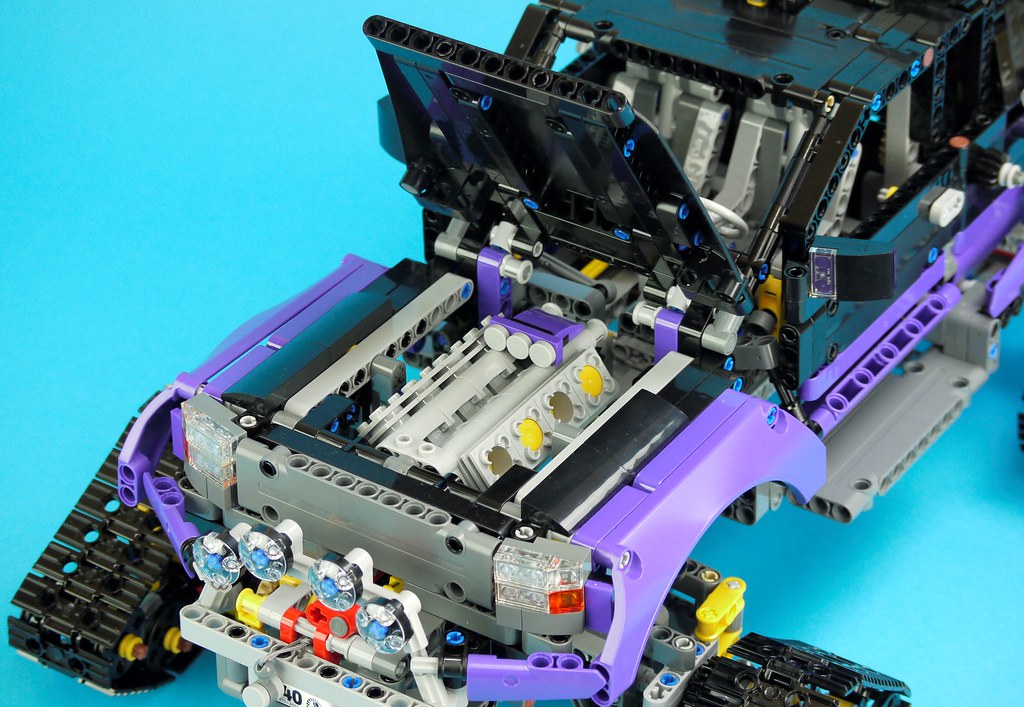
When complete, the model looks remarkably like a SUV.

The rear door has a simple, but effective, latch.

The bonnet opens to reveal the V8 engine. I like the brick built turbo-charger air intake.
The completed model (With stickers)
For those people who have sticker application anxiety, this model will be a challenge. Three large stickers are applied each side to get Extreme Adventure painted on the panelling.


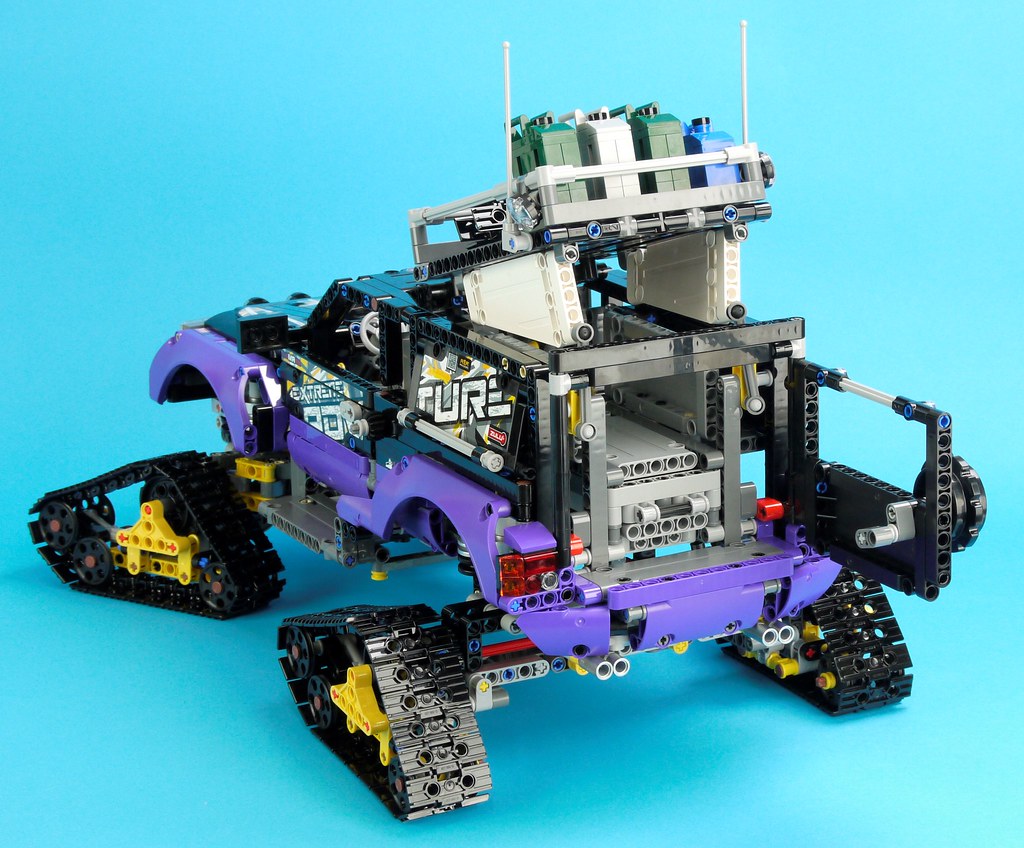
Accessories
The set comes with a range of accessories made using System bricks:
- Two green, one grey and one blue jerry-cans.
- Two fire extinguishers
- A first aid kit which contains two syringes
- A small spade
- Two sections of spare track

Functions
This model has four manual functions:
- There is a hand-of-god steering above the cab.
- The 12-tooth gear on the left side opens and closes the canopy
- The 12-tooth gear on the right side operates the winch
- When you push the vehicle along the V8 engine operates.
There is no provision in the instructions for adding Power Functions.
Verdict
This is an unusual set and so, for me, it comes with a mixed bag of views.
Pros:
- There is a certain appeal due to its unusual nature.
- The axles and drive train function really well.
- I like the winch and the ratchet is ingenious.
- It is really well built.
- The overall look of an extreme 4x4 SUV vehicle has been captured well, although this is achieved with the use of some effective stickers.
- I like the Medium Lilac colour.
- Price: it has 30% more parts than 42070 6x6 All Terrain Tow Truck and retails for 30% less.
Cons:
- Building a set with more than 2300 parts that are not sorted into bags and building stages was daunting. Sorting all those parts on a large table took some time and it felt like the build had to be completed in one session.
- There is no obvious way of adding Power Functions.
- Some people will be intimidated by the large stickers and the fact that several stickers need to be aligned correctly to achieve the correct look.
- While it is a 4x4 vehicle, there should be a third differential in between the two axles.
- Real tracks can be attached and removed easily. The tracks on this model are integral with the axles. People who want to MOC a wheeled Extreme Adventure SUV will have to substantially re-engineer both axles.
In order to get some context to this model, I contacted Paul 'CrowKillers' Boratko for some advice.
"The Trax conversion for trucks (and even cars) is relatively simple. I don't know if they are relatively common anywhere though.
"There is a guy who lives near me that has a Jeep Wrangler and he installs his Trax mods from time to time when he plows snow from his parking lot at his dealership."
Have a look at this Ford F-150 Rraptortrax gallery for some images of this type of vehicle in the real world.
I visited Snowplanet today to get some images of this unusual model in a snow environment.


Thanks
A special thanks to Snowplanet. Snowplanet's snow dome features two platter lifts on either side of the dome to transport skiers and snowboarders to the top of the snow slope. There is also a beginner's slope, which is served by a ski mat to transport learners one third of the distance up the slope.
Snowplanet allowed me access to the snow slope so that I could get some images of 42069 Extreme Adventure in a snow environment.
Thanks also to Toyworld West Auckland who offered me this set at a discounted price so that I could review the set for Brickset. Toyworld West Auckland also supplied some free LEGO sets for Snowplanet to use for a youth promotion as a result of my contact.
Thanks to Paul 'CrowKillers' Boratko for giving me some information about these very unusual vehicles.
57 likes
24 comments on this article
Surprised to read it is Med. Lilac. In all the promo pics it looked to me like regular dark purple. What is the alternate model?
^ B model is a Mobile Base Vehicle.
I used the official Med. Lilac colour name but the hyperlink takes you to the Brickset page which lists the alternate Bricklink name.
We may know it as 'purple' but LEGO calls it medium lilac: https://brickset.com/parts/colour-Medium-Lilac
To me, this is the flagship model of 2017, it just looks so much better than the 6x6. Also there are more parts and it's cheaper.
Wow a lot of system parts! Seems like a nice set!
Appreciate the extra effort for the snow pics! Superb
Ah Ok, for some reason I was thinking lilac was the lighter shade found in Friends.
I honestly mean no offence with the following comment, but I am always surprised by people who say they are sorting the bricks before they start building. I've never done such a thing and can't imagine why looking for a specific part is a con of a building experience. It boggles my mind, really.
I would appreciate a word or two about the B model
Ok, those jerry cans look FANTASTIC! I've got to make my own to put in the front section of my Ferrari F40. Maybe a red one?
I love that you even took the effort to go to a snow dome to photograph this thing!
I didn't know this had McLaren doors!
I have to admit, when this set was first announced I had a bit of a giggle at its ID number. ;)
This set would have been great with normal wheels, would then have been very similar to vehicles often seen on Iceland. I have never seen vehicles with tracks.
I'd love to see a comment on the effectiveness of the rubber attachments to the tracks to prevent them from slipping from the reviewer!
In countries with a tropical climate floor tiles with a smooth surface are extremely common, cause easy to keep clean, no moist/humidity issues, etc. The big exception to all this practical stuff unfortunately is that theses tiles tend to be extremely slippery for Lego tracks. When pushing around something on Lego tracks the tracks tend to keep slipping, preventing Technic fake engines from running! The rubber attachments seem a great idea to solve that issue, hence my question.
^ They are rubbish and don't help at all on smooth surfaces. They are better on carpet but then the tracks alone are OK on it.
Very nice review.
Glad they have made this set as I really enjoyed the look of the 'B' model on 42038 but was disappointed with the lack of function.
I'm looking forward to building this one.
@huw : so they only exist to bump up the parts count?
@huw : Sariel found via experimenting that they are, on the contrary, quite effective. What did your setup look like, what were the differences? https://youtu.be/nwU5f_ZAgcc
^ The issue with this model is that there's not enough weight, so when you push it along a smooth surface the tracks just slide. Admittedly I'm trying on my varnished wooden desk which is particularly frictionless, but still.
@Huw: For what it's worth I didn't have any trouble with the rubber tread bits on the Fortrex or Ultra Stealth Raider slipping.
I plan to add the rubber attachments to my Tracked Racer and take a video with before and after effects.
RacingBrick has already done a comparitive video:
https://www.youtube.com/watch?v=ksAbTqtPsas
have a look at his other videos. He has made a MOC of 42069 with Power Functions:
https://www.youtube.com/channel/UCfU8ME4_m48QwDJCUvpzqyQ
I had thought it was fairly simple process to remove the track assemblies and use wheels and tires? I watched Sariel's video. Also on the Eurobricks.com Technic forum one of the moderators, Jim, did a text review as well and showed different wheel/tire combinations. However, I have not found any real instructive vid or anything showing what needs to be done to apply wheels to the model. I am not at all good at mods, I just build sets with instructions, but I think I would like to add wheels to this one just to see what I like better.