Micro-Scale Architecture
Posted by benbuildslego,
Since their introduction in 2008, the Architecture series of sets has been a source of inspiration for LEGO builders of all ages. The official sets naturally inspired fans to build their own favourite landmarks.
While my previous articles focused on creating MOCs in the style of the Skyline series, I also enjoy designing MOCs in the style of the Architecture Landmark series. Compared to the micro-builds you find in Skylines, the builds for stand-alone landmarks are typically slightly larger and can contain more detail. In this article, I will provide you with some key tips I have learned so you can design your own favourite landmarks in micro-scale!
Landmark Scale
In my previous article, I discussed how the scale / piece count of micro-scale builds can vary tremendously. For example, the enormous Hogwarts Castle (71043) set with over 4,000 pieces is technically micro-scale! However, the official micro-scale sets of the Architecture Landmark series vary between about 400 and 1,600 pieces – so that is the scale I will mainly focus on.
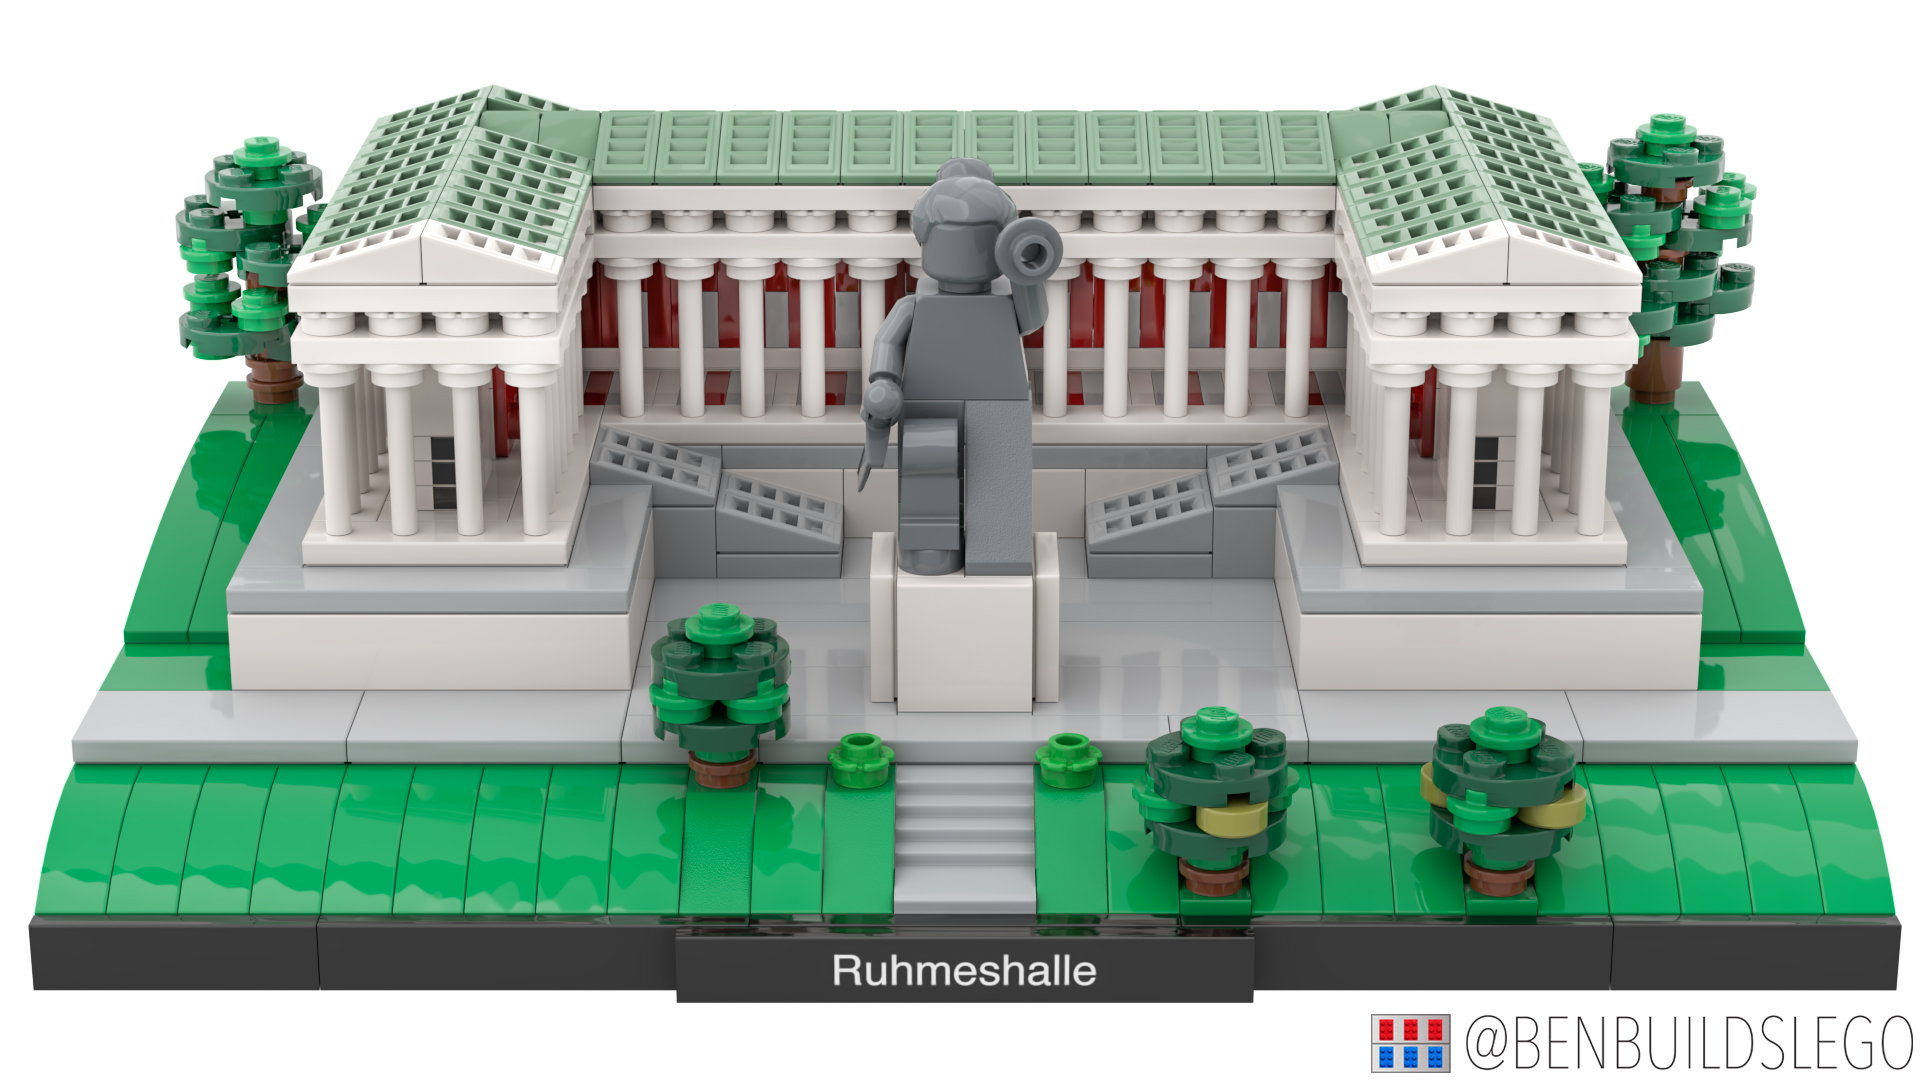
With this reasonable piece count limit in mind, you must first become accustomed to the fact that you simply cannot achieve an exact replica. Details will inevitably be lost. Proportions will not translate perfectly. I am certainly no stranger to this often-distressing realisation. For example, I recently designed a MOC of Munich’s Ruhmeshalle (“Hall of Fame”), which faces the Oktoberfest fairgrounds. In front of this colonnade is a giant bronze statue representing Bavaria, who holds a wreath of oak leaves high above her head. Since this scale necessitated using a minifigure for this statue, I was never going to find a way to perfectly recreate this particular detail – minifigures’ hands simply do not extend high above their heads!
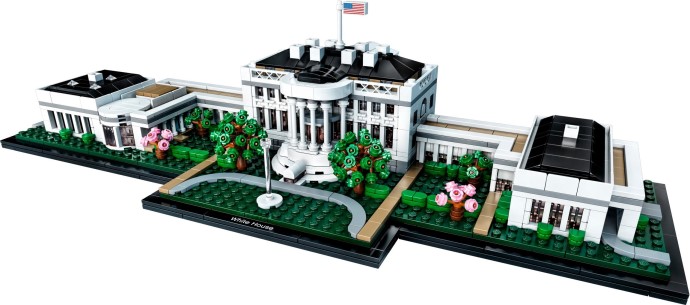
Walking the fine balance of accuracy and art is what makes building LEGO fun and challenging. There will be trade-offs to every decision you make. Paradoxically, sometimes adding more detail or utilising more advanced techniques comes at the expense accuracy. A great case in point is the two official sets for the White House. As astutely pointed out by Tom Alphin over on Brick Architect, the newer set, which features fancier techniques, ends up being even more out of proportion than the original, simpler set.
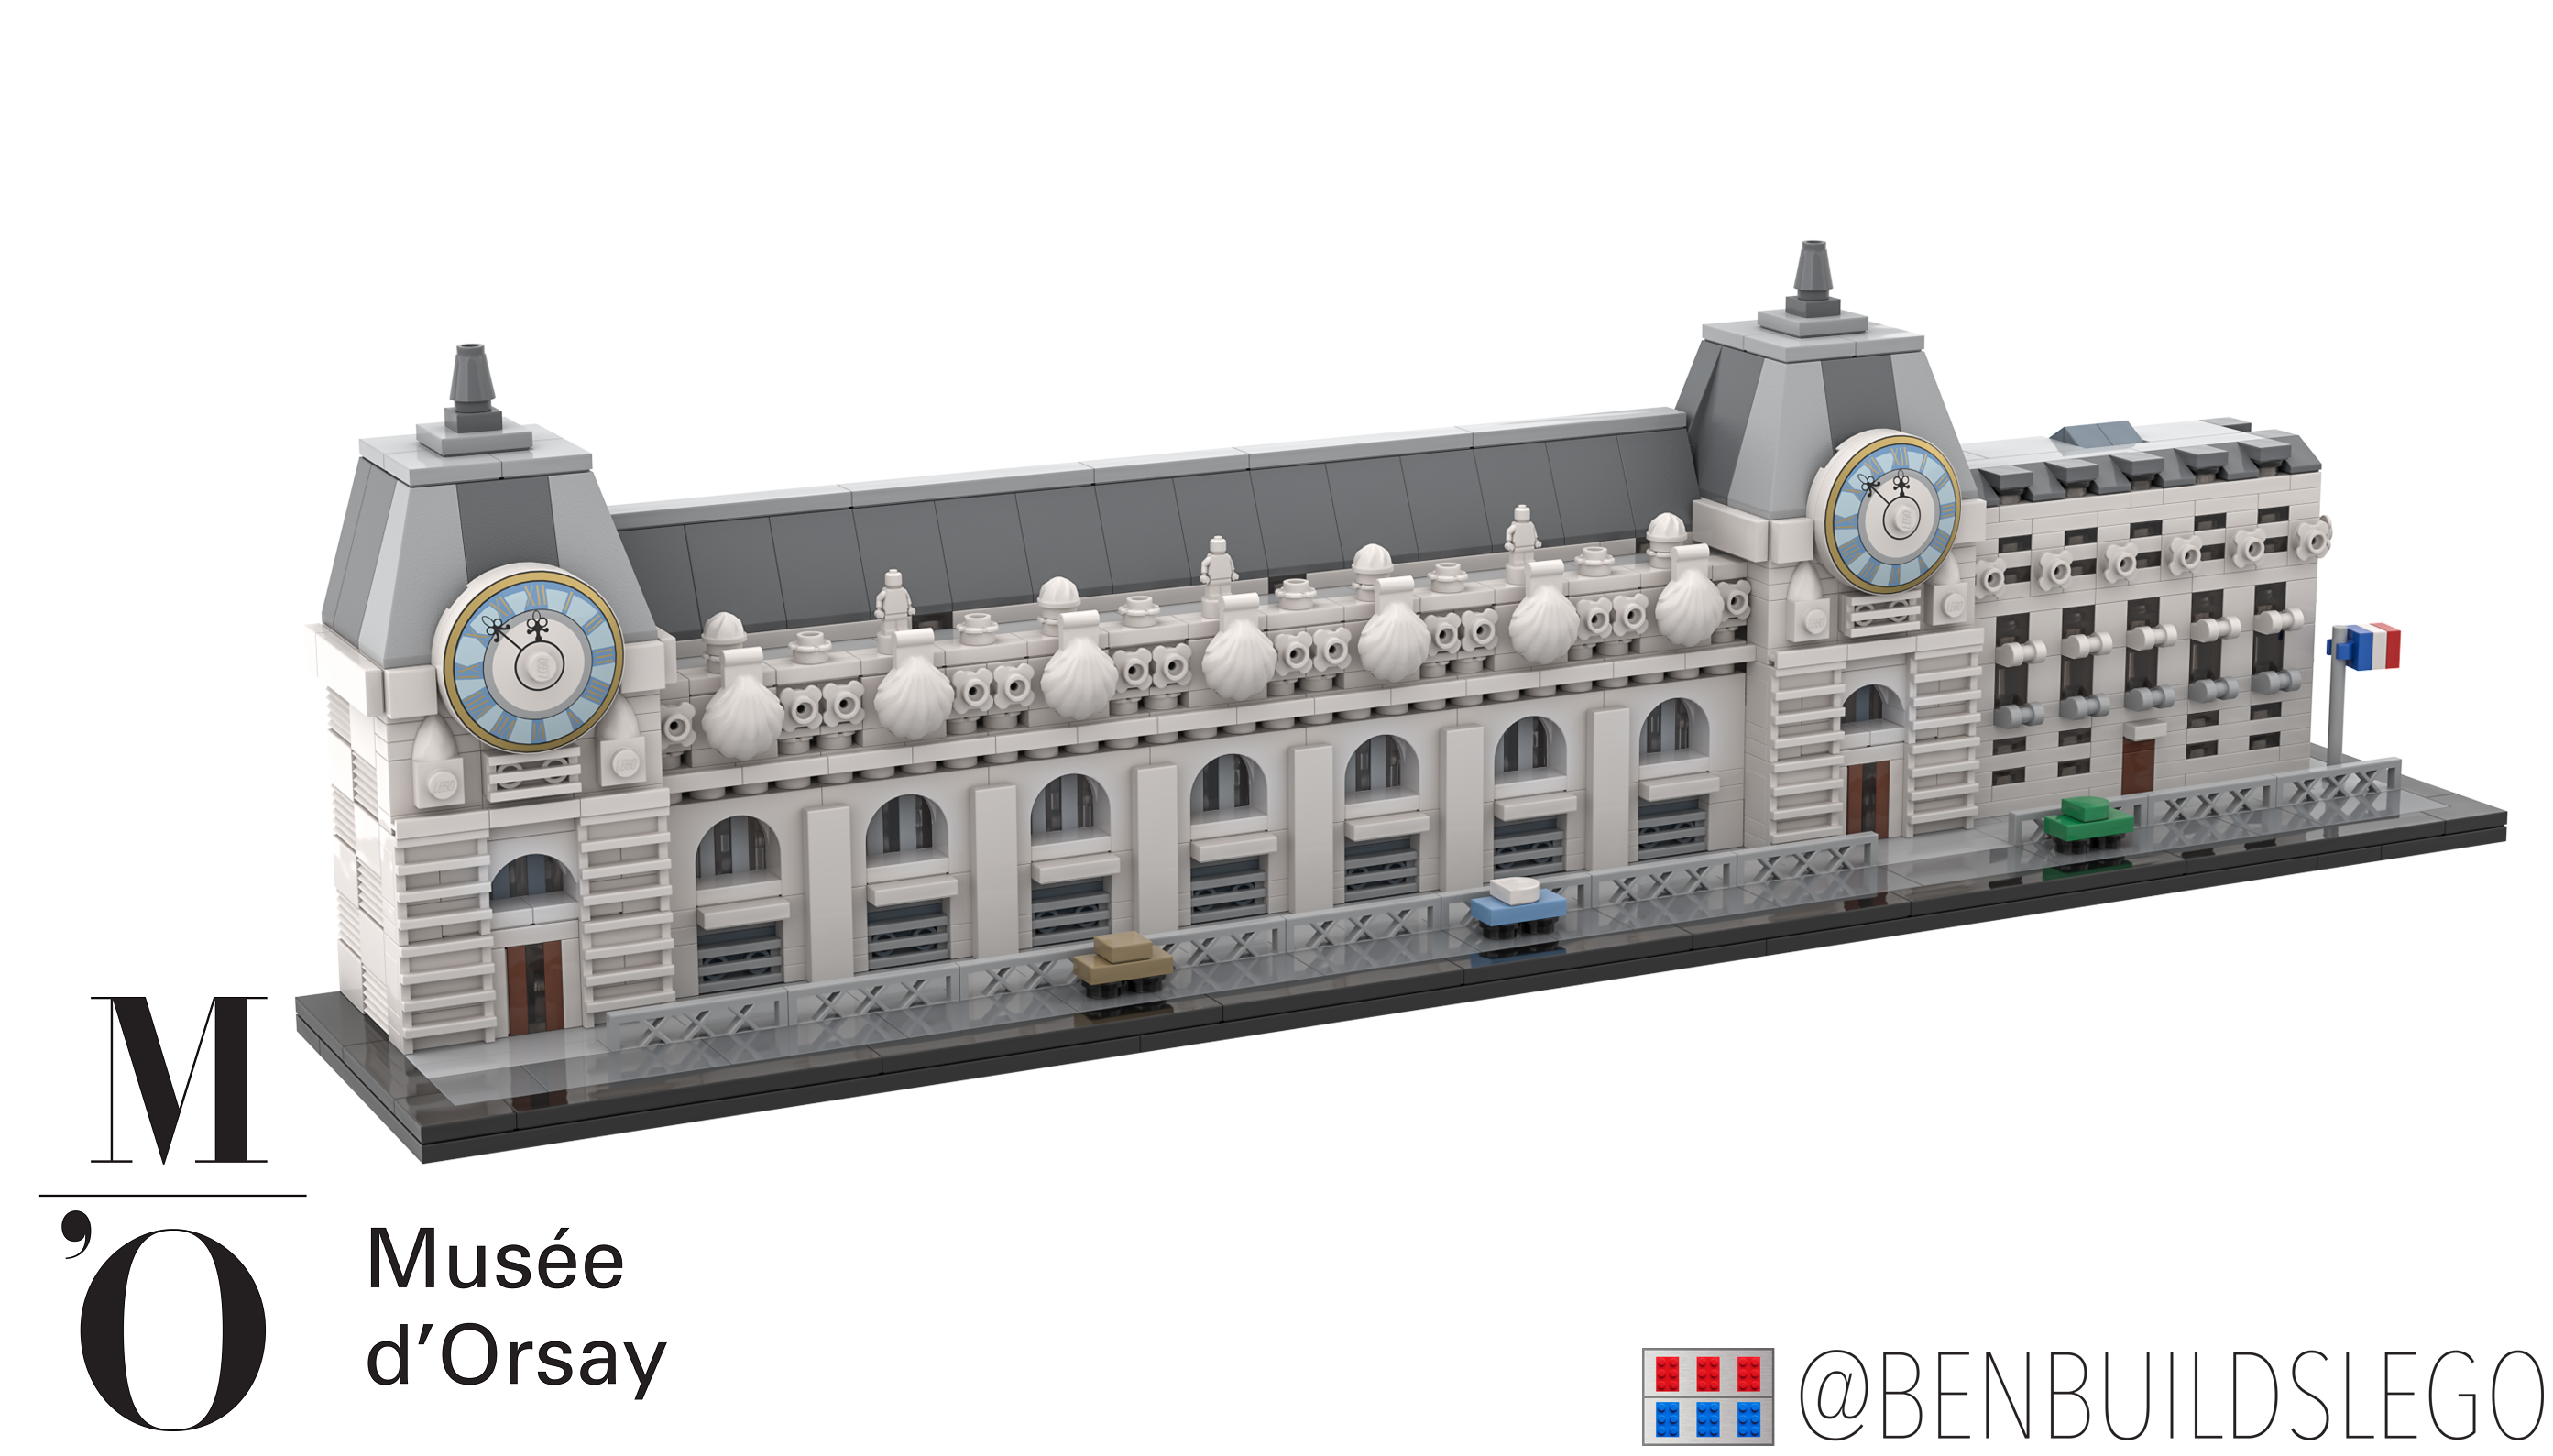
So while you are always striving to get as close to reality as possible, the limitations of the LEGO system will force you to make trade-offs. How you navigate these trade-offs is up to you and your creativity. As I have suggested before, try letting the LEGO pieces themselves be your guide. You may find that there is a single piece around which a whole build must hinge (“seed” pieces). You can see this concept clearly in my MOC for the D’Orsay museum, for which the printed clock piece was my starting point.
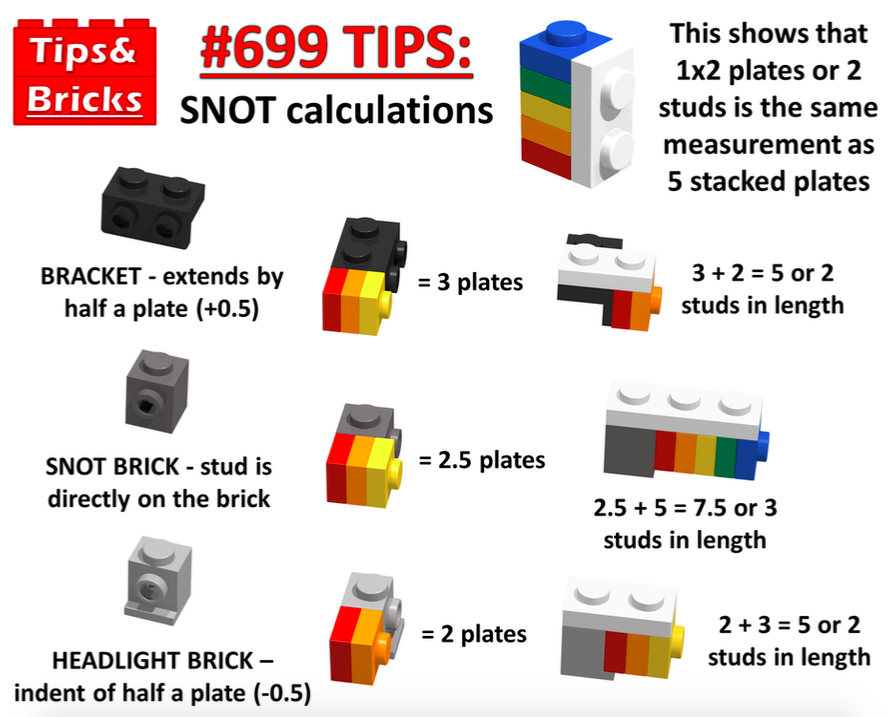
Learn LEGO Math
I know, I know – math was not my favourite subject in school either. Thankfully, basic LEGO math for Studs Not On Top (SNOT) techniques is not terribly difficult (but don’t get me started on calculating angles…)
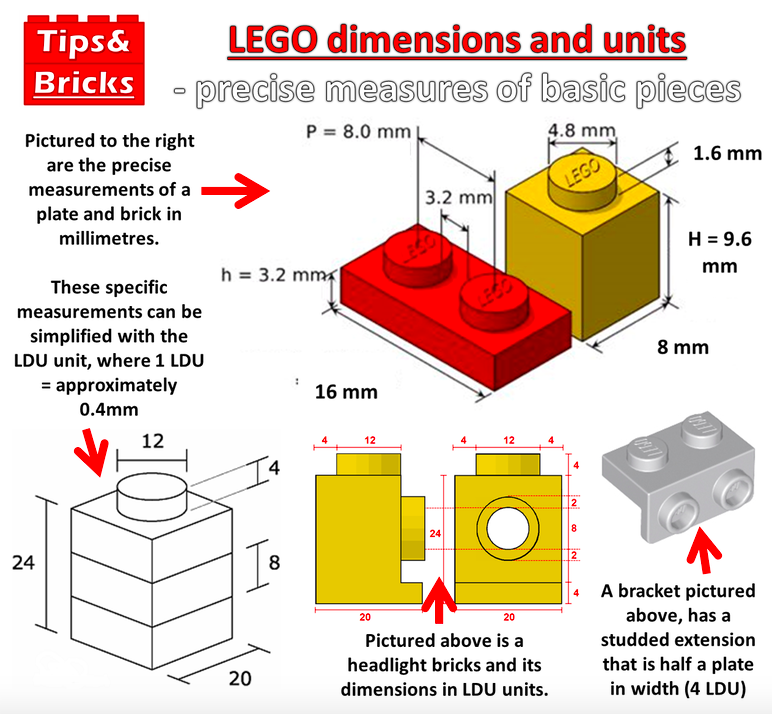
As demonstrated by the excellent visuals provided by Tips & Bricks, the variations of studs-on-the-side pieces offer a wealth of possibilities and challenges. I still remember when my mind was blown finally realising that the height of 5 plates is the equivalent height of a 1x2 plate on its side (I’m a slow learner, I guess). If you study these calculations, you will empower your own creativity and open up new dimensions in your building techniques.
I highly recommend that you discover even more great tips and inspiration at the Tips & Bricks website!
Colour Choice
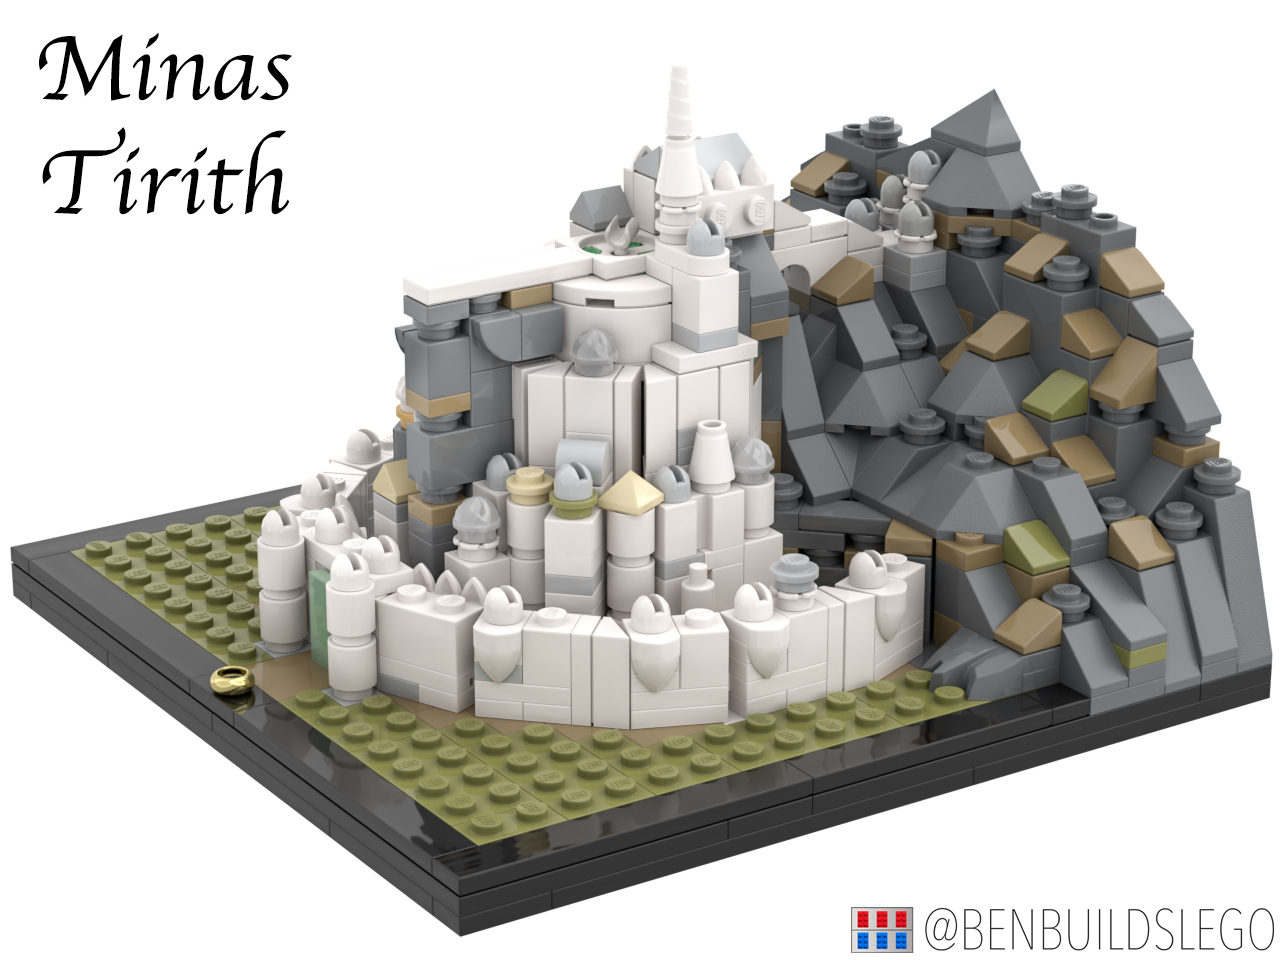
Colour choice at micro-scale can make all the difference in the world. The simple contrast between different colours tends to suggest depth and detail. Take for example my MOC of Minas Tirith from “The Lord of the Rings.” While this iconic city is predominately white, the build would run the risk of looking too bland if only white pieces were incorporated. To add additional interest, you can see small splashes of light bluish grey, tan, and olive green.
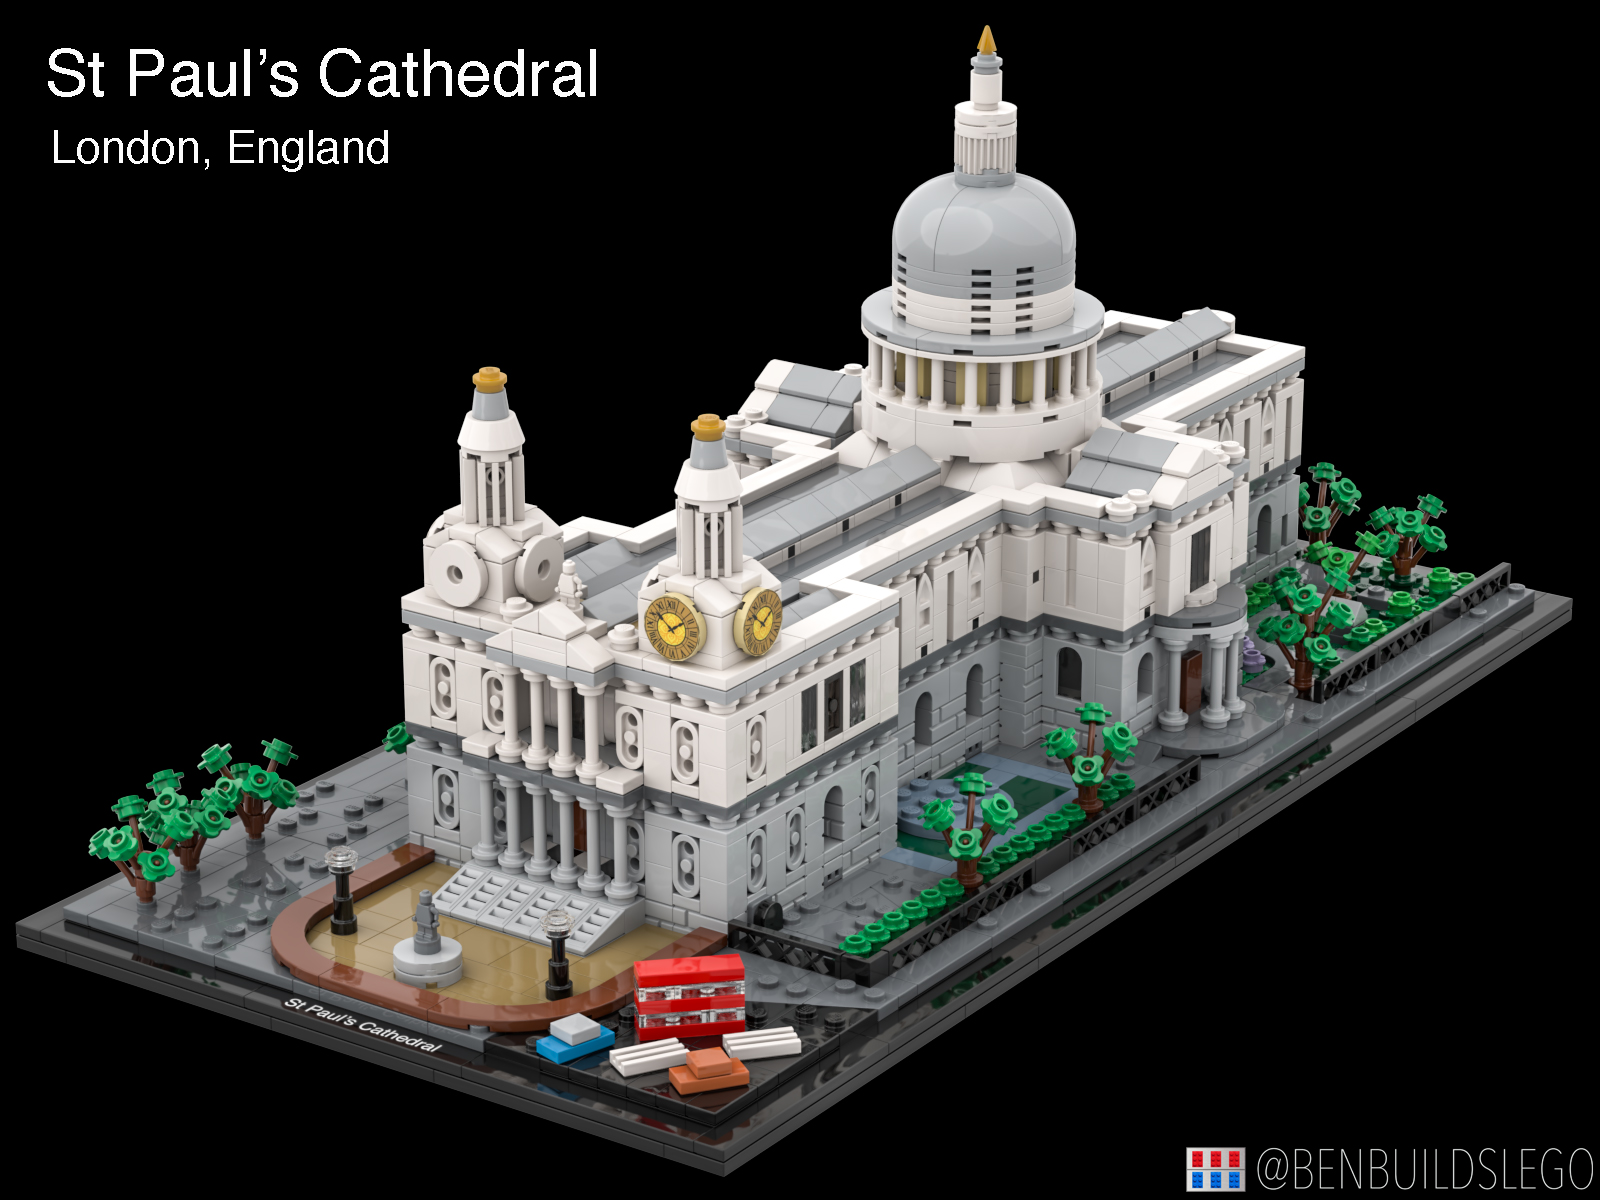
If you are designing a building, a simple change in colour between the different levels can provide visual clarity. In reality, there may not actually be a distinct colour difference of whatever building you are recreating, but implementing this tip may still help. In my MOC of St Paul’s Cathedral in London, you can see I have a darker grey colour between each floor section. If you look at photos of the actual St Paul’s, you will notice that this colour difference does not actually exist. Instead, this colour difference is hinting at the shadow of the slight overhang between each floor.
Match the Official Aesthetic
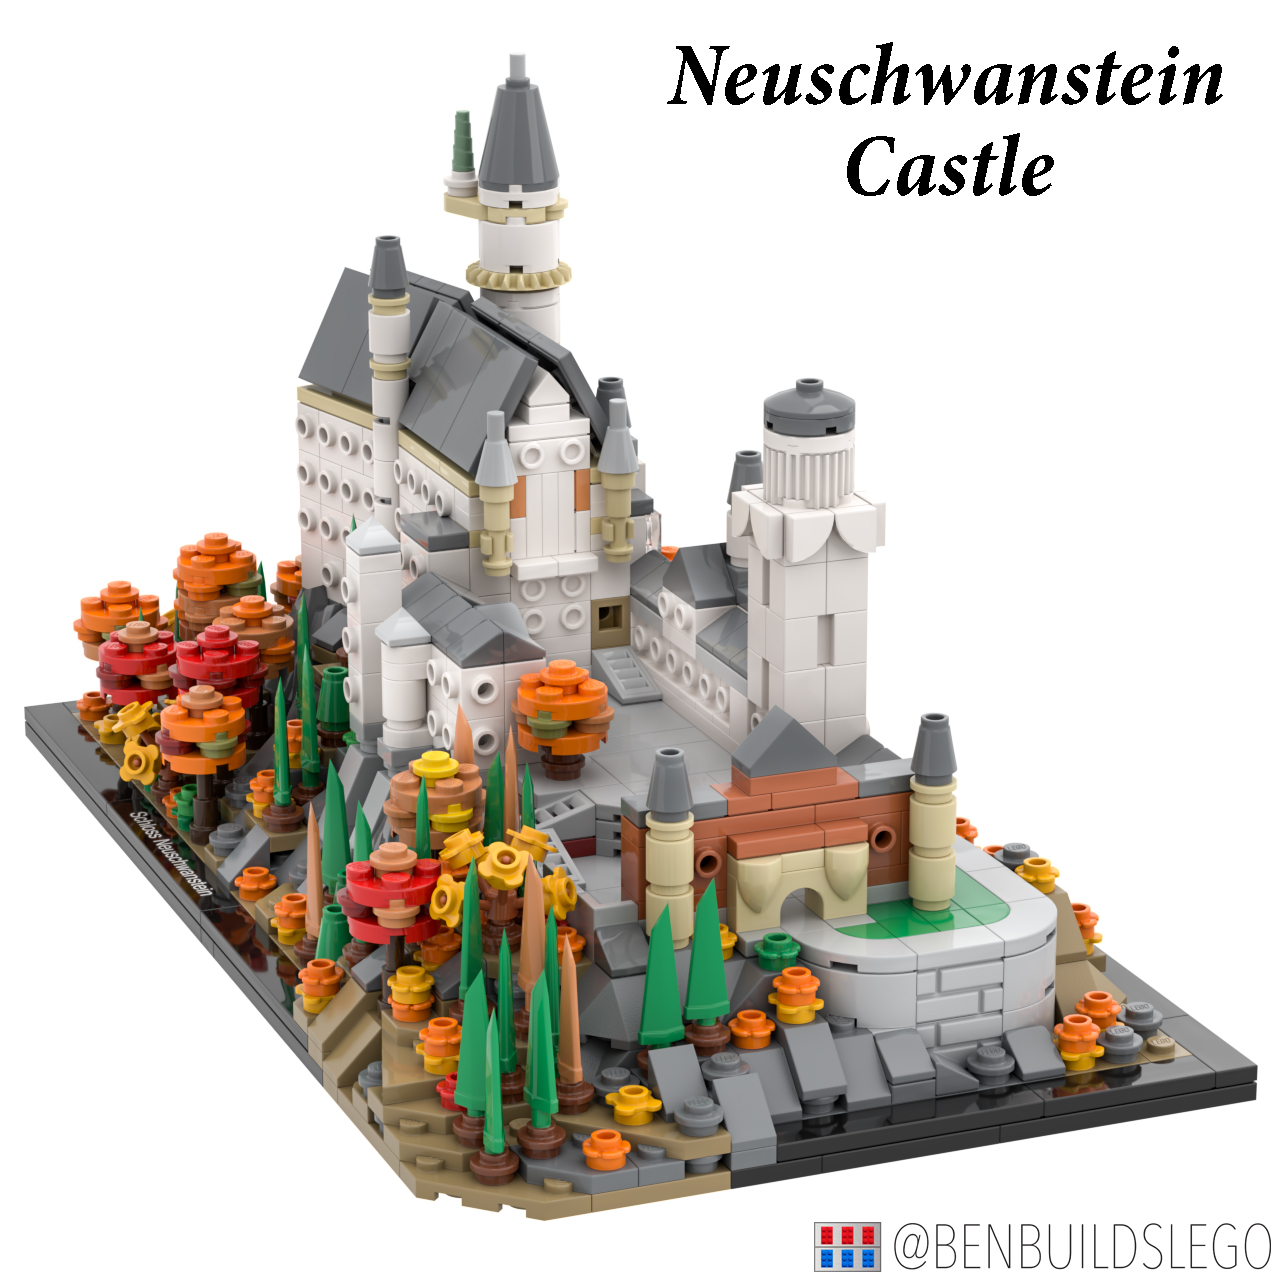
For the final touch of your Landmark-style MOC, be sure to match the black trim aesthetic of the official sets. This is accomplished simply by leaving a single stud perimeter around your MOC that is covered with black tiles. But as always, I encourage you to explore your creativity and break the rules – I broke this rule for my MOC of the famous Neuschwanstein Castle in Bavaria. You can see in the bottom left corner I let the natural surroundings of the castle “overrun” the traditional black tile. Sometimes nature cannot be reigned in!
I hope these basic tips gave you some help and inspiration for your own Landmark-style builds. I know I would love to see what you come up with!
You can see all my Architecture-style MOCs on Instagram (@BenBuildsLego) and on Facebook.
If you are a Redditor, come join the fun on /r/DigitalLego, where you can share and discuss building LEGO in the computer!
141 likes
23 comments on this article
Thank you for the tips!
Nice thing to "break the rules" in that corner of Neuschwanstein Castle, as an idea.
Unfortunately, exactly in that corner the "nature" in real life is not that present because there is a ravine, starting close to the castle's walls.
@Felix_Mezei said:
"Thank you for the tips!
Nice thing to "break the rules" in that corner of Neuschwanstein Castle, as an idea.
Unfortunately, exactly in that corner the "nature" in real life is not that present because there is a ravine, starting close to the castle's walls."
It looks pretty accurate to me: https://i.insider.com/5af08d0fbd96711e008b45e8?width=1100&format=jpeg&auto=webp
But perhaps that's just another example of artistic license for the sake of the medium.
Great tips, Ben!
@benbacardi
It "looks accurate" for you, or is an "example of artistic licence"?
The black tiles are like a slice on that height. You could easily put black tiles there because the nature is not there. Nature "stops" way before reaching the black tiles at the height the author made his creation.
When you search for pictures on the internet as an argument for replicating a real thing and you found one with trees but not the actual ground or rocks, please trust people who are doing this for a year.
https://www.pinterest.ch/pin/565553665691889932/
https://www.google.ro/search?source=univ&tbm=isch&q=neuschwanstein+castle+winter&hl=ro&sa=X&ved=2ahUKEwj9iOLxko7rAhWt-ioKHW7-AR4QsAR6BAgJEAE&biw=1536&bih=760 imgrc=fry9dtimwt3YsM
Honestly, I'd love to buy these! Neuschwanstein, St. Paul's cathedral, the two... Disney castles(?) at the top. As sets, with all bricks and instructions included. Should I take a look at Bricklink? Are there any other options?
@Felix_Mezei said:
" @benbacardi
It "looks accurate" for you, or is an "example of artistic licence"?
The black tiles are like a slice on that height. You could easily put black tiles there because the nature is not there. Nature "stops" way before reaching the black tiles at the height the author made his creation.
When you search for pictures on the internet as an argument for replicating a real thing and you found one with trees but not the actual ground or rocks, please trust people who are doing this for a year.
https://www.pinterest.ch/pin/565553665691889932/
https://www.google.ro/search?source=univ&tbm=isch&q=neuschwanstein+castle+winter&hl=ro&sa=X&ved=2ahUKEwj9iOLxko7rAhWt-ioKHW7-AR4QsAR6BAgJEAE&biw=1536&bih=760 imgrc=fry9dtimwt3YsM
"
If you look at the real photo, there is a rock cliff right near that round tower, exactly where he placed it in the micro scale. His representation seems very accurate for the scale.
@STL_Brick_Co
Yes, since October 2019 I am looking at that rock and others near the Castle. That rock is going sideways 2-3 meters from the round tower and after is descending abruptly. The round entrance is at 10-15 meters from the round tower and the Black tile in the replica is at 16-18.
So, in the LEGO replica, between the round tower and a 1 stud wide rock, there should not be anything but a big hole until reaching the black tile.
Not very accurate.
If you want more details I can tell you that the rock underneath the round tower is actually made on the edge by pouring concrete on the real one.
Funny how people comment simply by watching pictures on internet, now when "everybody is entitled to an opinion".
I like Ben's creation but I also like The Neuschwanstein and an accurate replica.
About time we get a Neuschwanstein in the scale of the Hogwarts or Big Ben set. But I guess the 9,035 piece Colloseum is first in November.
I don't think we need get too worked up about the placement of a couple of tiles and slopes at that scale!
All LEGO architecture sets have some degree of 'artistic license' so I think we can let it slide...
@Huw
Sorry for my comments, it is your website and I admire your way of looking at different points of view in a debate. I forgot in the LEGO world "everything is awesome".
In my opinion, only 2 gears that are getting destroyed fast is not something to get worked up at the scale of the Technic Osprey. But I am not a Technician and I was reading with great pleasure your article about fixing that flaws.
As much or less I know about Architecture, this castle is not an accurate Neuschwanstein Castle, both in the building proportions and in the surrounding nature. I am not speaking about things cannot be replicated because poor availability of LEGO parts shapes. If you want to let the nature go over the black tiles, you can do it in other sides of the castle where actually this is happening in real life, but not on that corner.
But who cares in the era of "flat Earth"?
Who cares, can contact me in private as some other people did last time when I commented about this Neuschwanstein micro-scale.
i visited this castle 10 times and I am working for the last 10 months on measuring and replicating this castle.
I was hoping my opinion based on thousand of hours of working on this castle is welcomed like criticism is a way of improving and progress.
Waste of time.
@Feliz_Mezei Why get yourself so worked up over someone else's MOC? Maybe during this pandemic you really have nothing better to do. You sound like those sad Star Wars fans that lose sleep because the button on Darth Vader's chest panel is 2 pixels out of place.
@benbuildslego excellent article and love the tips. Your MOCs are inspiring.
@Chills said:
@benbuildslego excellent article and love the tips. Your MOCs are inspiring. ]]
Thanks for the kind words! Always very much appreciated! :)
I think the Neuschwanstein Castle looks amazingly accurate especially for the scale it is done in. Actually having seen this in person, on a wonderful trip to Europe a few years back (actually 13 yrs ago), seeing this takes me back. I remember walking up the very steep road to get to the castle. Then up to a footbridge (which is rarely scene in photos), to take pictures of this iconic castle.
This article was very interesting, as I only build from instructions right now. I will think of it when I am building though. Maybe one day I will create a micro MOC, which I had never thought of doing before, thanks to this article.
@Chills
Starting 5 months before the pandemic, and 5 months during the pandemic, I've had nothing else to do but measuring and replicating in about 50.000 parts a Neuschwanstein Castle, because I was hired to do it and I do just this all day long and not just as hobby after a regular job.
If you and others don't care to benefiting from my experience and my opinion (that was simply about a few things not accurate and not about Ben's creations or talent), than I have nothing else to say.
But do not compare the SW fantasy you are in, with engineering, geometry and a real castle that exist and which can be easily measured.
I have something better to do. To tell Ben who probably liked this castle enough that he replicated, that there are some inaccurate segments.
You are wonder why I do this; it is because I love this castle, but this information you could already read in English above.
Actually now I am wasting my time to enlighten you about a real thing instead of working in some Neuschwanstein steps.
Indeed, it is sad to be a SW fan like you said and worrying about your idol's chest pixels, but I am not one of them, I am more into real life.
I have really enjoyed following this builder on instagram. I would one day like to try an tackle either building some from instructions or possibly trying to create something of my own however I have never felt I had a creative bone in me.
It's unfortunate there are a few people here that can't appreciate the scale here and the idea of artistic license.
If its not to your liking build your own and show it to the world!
I adore your Neuschwanstein Castle and the choice to have nature spilling over the edge. The level of detail is astounding at this scale! I really like the choice of colors for the foliage too, the colors of the leaves give the illusion that the season is changing and makes the whole MOC seem alive. Well done @benbuildslego!
I’m not into buildings/architecture on Lego, but read this article because I am interested in learning new techniques. There are certainly good ideas I’ll file away as I do my own creations.
I don’t understand the backlash against Felix Mezei. While he points out that “breaking the rules” is unnecessary in this case, the technique is still valid. But arguing about the accuracy of the model is ridiculous. It’s Felix’s opinion, apparently based on his study, and it’s ok for him to point it out. It’s also ok for others to have different points of view. I’m just saying, keep it civil.
For a lot of us, the whole point of Lego is to take an existing design, whether that’s an official set or a MOC, and modify it as you see fit, making it more accurate or into something else entirely. (Massive kudos to set/MOC creators. I wish I had that kind of creativity.)
@Huw:
If the purpose of this article was to show off a MOC by a serious builder, criticism over scale issues should be welcome (though this is not always the case), and in microscale a single piece can throw things completely off. But this article is more of a tutorial, intended to be informative. Any criticism should be largely directed at how well it accomplishes that.
@Felix_Mezei:
Two gears stripping within a day of building an official model is absolutely a huge deal. They set up an entire department to prevent that issue after releasing a tiny car that crimped the tip of a Technic half-pin, and they should have caught this issue long before we even saw images of it. They have a set of rules designed to prevent stressing elements (and young kids) to the breaking point. Quality control can be a sore point for many AFOLs, but they've rolled out repair packages for sets that are just not built sturdily enough, and they redesigned the Teenage Mutant Ninja Turtles Shellraiser so extensively that Bricklink treats it as a distinct set because the original design was so fragile. But none of these sets _broke_ the parts. Neither does building to the wrong dimensions.
@Snazzy_Bricks:
Yeah, it's an ugly little quirk of math. If you look at the T&B schematics, it _should_ be possible, but the only two bricks you can place directly in front of a headlight brick are another headlight brick or a Technic brick where the hole lines up with the stud (even that's not a perfect alignment, but the lip provides enough room that it's not a problem). The base of the brick is 20 LDU deep. There's 4 LDU of depth behind the stud, 12 LDU diameter of the top stud, and the height of the front-facing stud is again 4 LDU, which all adds up to 20 LDU. But all studs (not just the one on the front of a headlight brick) are just a teeny bit taller than 4 LDU, and solid studs are even taller when you factor in the raised logo. I've never seen an actual accurate dimension for the different types of studs, but sometimes it doesn't matter. I've recently been designing a 60's Ford Good Humor ice cream truck in minifig scale, and due to the weird shape of the freezer box in the back, I have a few places where I left a half-plate gap to accommodate an unused solid stud w/ logo. There's enough give in the construction that there's no issues with the extra height forcing the construction apart. But if I tried to place those same studs face-to-face across a full-plate gap, they'd never fit without some modification.
Another weird geometry fail that I've run across is that you can take the 1x2-1x2 up bracket and the 1x2-1x2 down bracket, and if you attach them to the top and bottom of a 1x2 brick, you can attach a 2x2 across their combined face, exactly as you'd expect. But if you remove the brick and put the up bracket on top of the down bracket, attaching a 2x2 across their combined faces will usually cause the plates to separate along the far edge.
Great article and tips. Creaitons were also beautiful.
Great tips!
By the way, I love the Neuschwanstein Castle. Nice one!
@Felix_Mezei
I don't think anyone here doesn't want to hear what you have to say, you clearly have some expertise on the subject. But your tone is coming off quite rude and arrogant. I'm sure it's unintentional. Just trying to shed some light on the conflict here.
I love this series of articles. Really makes me want to start building micro!
Nice article! I recently completed 6 Game of Thrones locations in micro-scale: The Wall, Winterfell, the Twins, the Eyrie, King's Landing and Meereen :-)
Love these kind of articles! Keep them up! ^^
@Felix_Mezei I for one am looking forward to seeing your version of the castle.