Mecabricks - let's animate our bricks!
Posted by BrickJonas,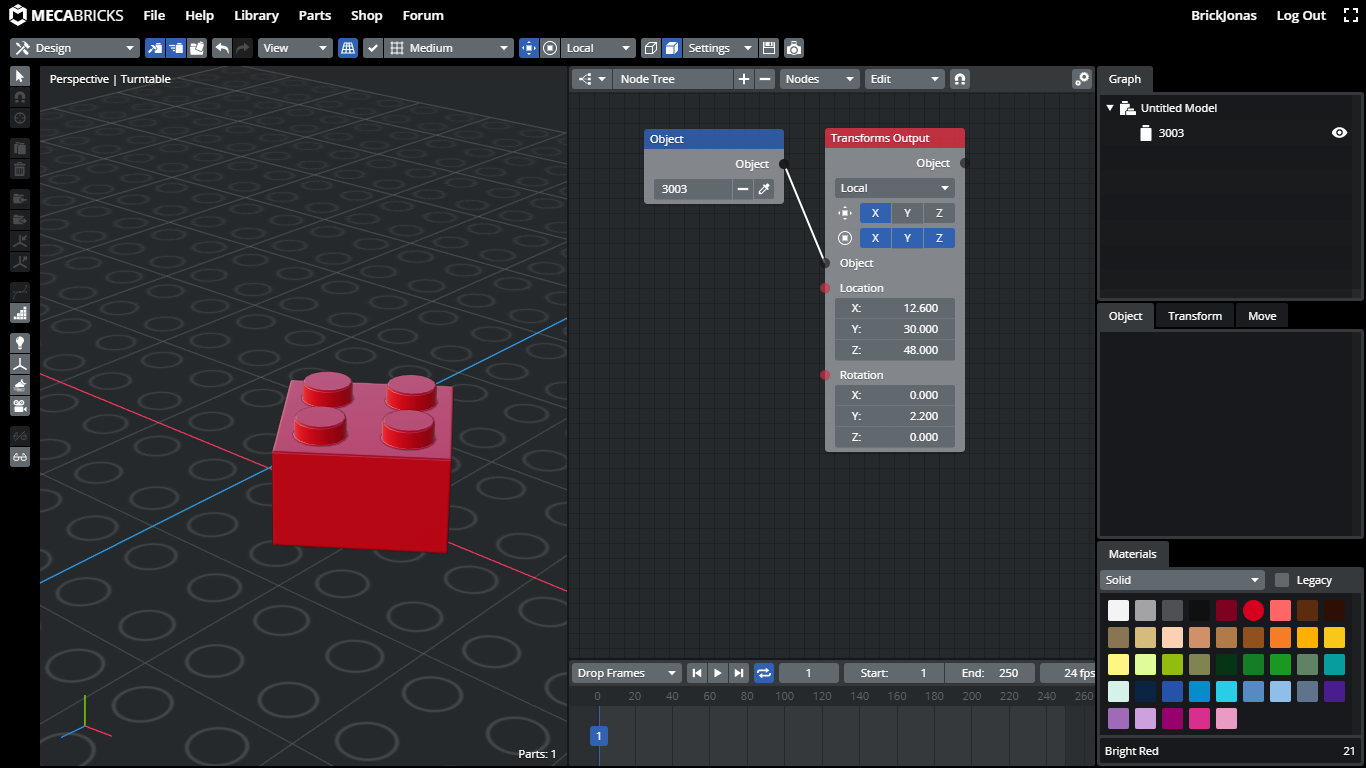
This is my fourth - and, for now, probably the last - article about Mecabricks here on Brickset. In the first three tutorials, you basically learned everything that you'll need in order to build fantastic digital MOCs, add custom decorated pieces to them, and make beautiful lifelike renders of your creations on Mecabricks. There's one more thing that you might want to do, and Mecabricks gives a really nice solution for it - animations.
Before I start, I'd like to thank you everyone who read my tutorials, and tried out Mecabricks, and also thank you for your kind comments, it gave me so much motivation lately! I'd also like to say a huge thank you to the developer of Mecabricks, Nicolas for answering my questions about this fantastic software, and for helping me to realise these articles.
Last but not least, thanks to Huw for this opportunity, and for publishing my tutorials here on Brickset! Let's finish this series with the most complex (and the coolest) feature of Mecabricks.
This is a pretty fresh addition to this software, so I'm not an expert in it, but I'll try to sum up what I know about making animations on Mecabricks, and I believe it will be enough for most of us, and this knowledge will be a good starting point to make more complex animations.
Animation nodes
Mecabricks uses animation nodes for making animations. Nodes are basically small boxes which you can drag & drop to the node editor, and also connect them. You'll define every movement in your scene with nodes, and it's like defining animations mathematically. Let's stop here for a moment: if you feel like this won't be your thing, please just keep reading, it sounds more complicated than it is. And you'll also see an example which I made with this feature at the end of the article. ;)
Let me introduce you the most basic nodes, so you can make your first animation yourself. First of all, you'll need to open up the node editor. You can do this by clicking on the middle icon of these three:
![]()
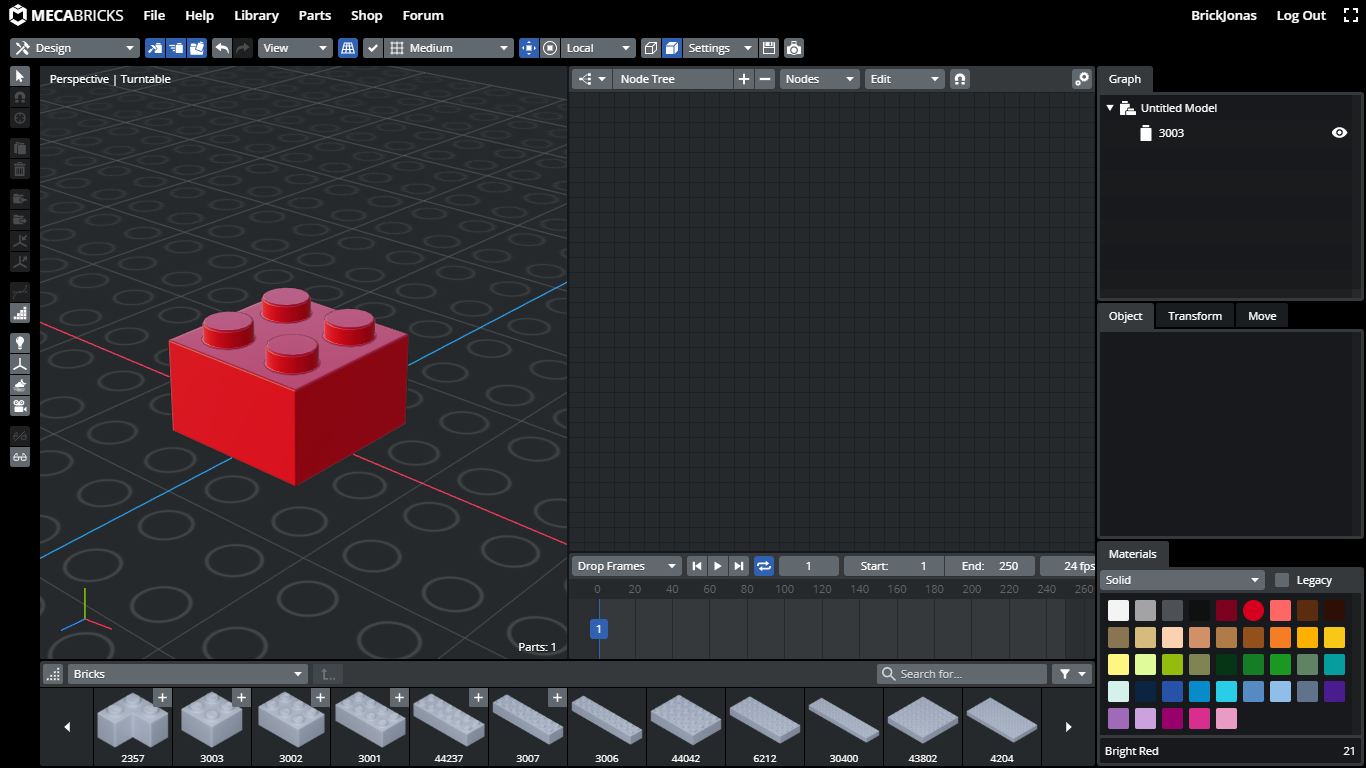
This is what you should see at this point. On the left, you can still see the workshop, but you can also see the animation node editor on the right side:
Your best friends
There are two really simple nodes which I'd like to show you before I do anything else, because they'll be your "best friends", you'll use them all the time.
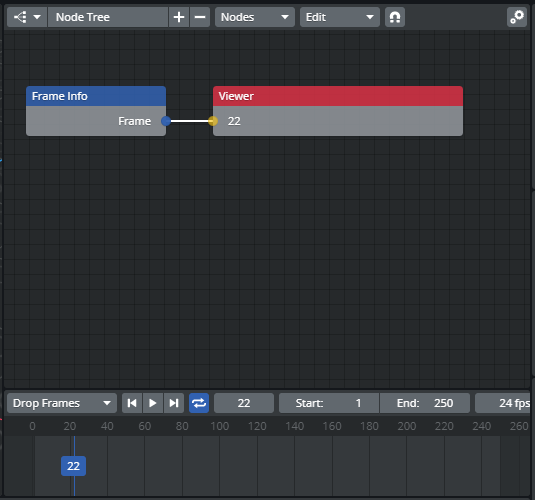
Frame Info - you can find this node below the Nodes -> Animation -> Frame menu item. When you click on it, a new node will show up next to your cursor, and you can add it to the node editor by just simply left clicking somewhere on the blank area. This node will give you the current frame's number. So, its value will be basically the frame number.
Viewer node - this node is for debugging. You'll find it under Node -> Viewer -> Viewer You can connect another nodes to it, and it'll just show the output value of the node which you connect to it. Let's connect the Frame Info node with this one by clicking and holding the small point on the first node, and dragging it to the second one.

Now, if you move the blue marker on the timeline, you'll see that the value of the Frame Info node updates every time you change the marker's position.
So, I think at this point you realised that you'll most likely need to start your animation with this Frame Info node - and that's right! But let's see which other nodes do we have here. I won't cover every single one, but only the most used ones. You can of course find all of them under the "Nodes" drop-down.
Nodes - Number
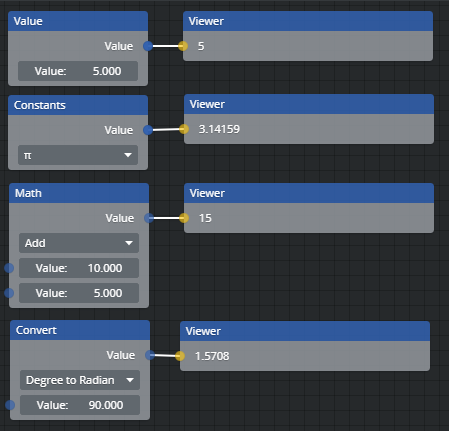
Value - This is just a "number" node. What you type in the "Value" field of it, that will be the output of it. It's useful when you want to use the same number in many places, so you don't need to change it everywhere, just in one node.
Constants - This node can output predefined constants, π and e (Euler's number).
Math - This node can perform mathematical operations. You can choose the operation from the drop-down on this node, and you can also define the two values. You can also use values from other nodes by connecting them to this one.
Convert - The convert node will be useful when you'll rotate things. It can convert degree to radian and vice versa.
Nodes - Vector
You can define position of different objects in the 3D space with vectors, so of course we'll use vectors here too.
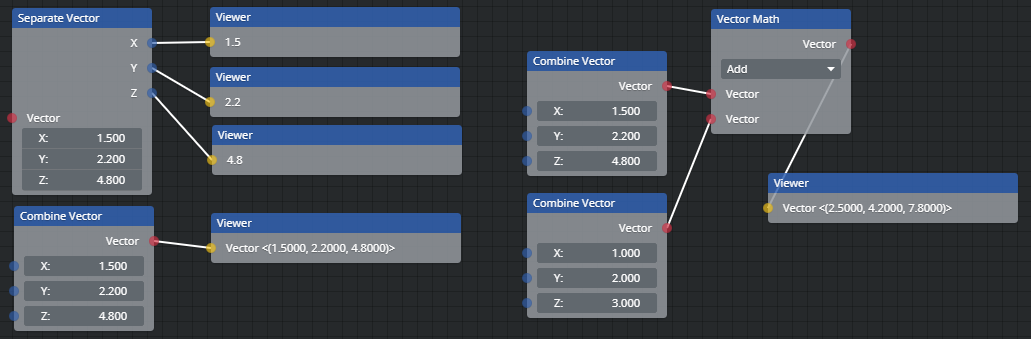
Separate Vector - It accepts a vector (x,y,z) as an input, and can separate the three axes.
Combine Vector - This node can combine three values into one vector.
Vector Math - This node has the same functions as the Math node which I mentioned above, but it works with vectors, and not just simple numbers.
Nodes - Object
Here I'll mention just these two nodes:
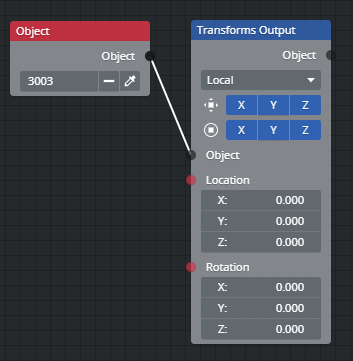
Object - you can pick an object from the 3D viewport and store a "reference" to it in this node, so if you'd like to apply multiple animations for the same object, you don't need to pick it by hand every time you'd like to use that, you just need to connect this node and you're good to go.
Transform Output - You can specify an object's location and rotation with this node. Keep in mind that you need to activate the 3 axes by clicking on them. In the example below, you can see that I only activated the X axis for location, so the brick is also transformed on the X axis by 12.6mm, and I activated all 3 axis for rotation, but changed only the value for the Y axis, so the brick is only rotated around that.
Nodes - Animate - Animate Vector
Last but not least, this one is the most powerful node which you'll see in this article - the Animate Vector node!
With this one, you can define 2 vectors (basically the start and end position of your object), the time difference between the 2 positions, and you can pick from a good amount of predefined movement types.
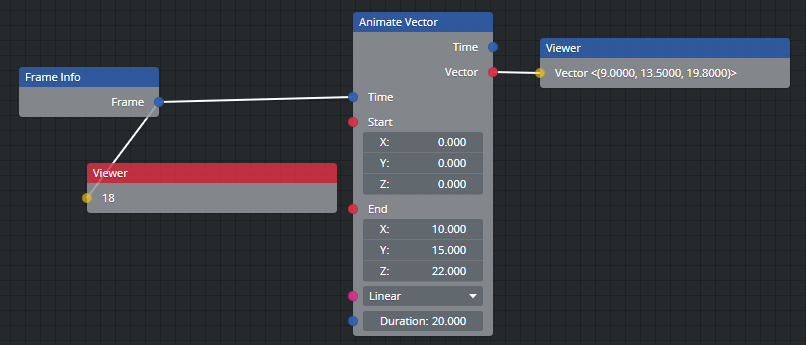
You can connect a Frame Info node into this one, and for now connect its output to a Viewer node, so you can see the value of the vector, just like on the screenshot above.
It is worth to mention that there's an Animate Number node too, which is of course really similar to this one, but it accepts only one number as an input, and its output is a single number too.
Enough of "theory", let's make an animation!
Sorry for the long explanation, but I think making animations will be much easier if you understand how can you use these nodes which I mentioned above.
For now, let's import a model to the workshop, and make a "360 degree view" animation of it. I suggest you to place an empty object to the origin of workspace, then select all bricks and parent them to the empty. This way, we'll just need to animate the empty objects, and every brick will move with it. Now, we should think about our node setup:
- First of all, we'll need a Frame Info node - this will give us the "Time" input for every frame.
- We'll probably need a viewer node, so we can see the output of our nodes.
- We will probably use an Animate Number node, just to keep things simple (this way we can easily change the animation duration). We'd like to animate only the Y axis, so we don't necessarily need an Animate Vector node.
- Speaking of animation duration, the default setting for the frame rate is 24fps, so if we'd like to make a 10s long animation, we'll need to type 10*24, so 240 in the "Duration" field. Let's use a Math node for that, so if we'd like to make a 12s long animation instead, we don't need to calculate the frame number.
- Most people would probably use degrees when talking about rotation, so we'll need a Convert node, which will convert degrees to radian
- We'll also need a Transform Output node, so we can apply the rotation to our object
- And since we're using vectors in the Transform Output node, we'll need a Combine Vector node too
So this is the final setup:
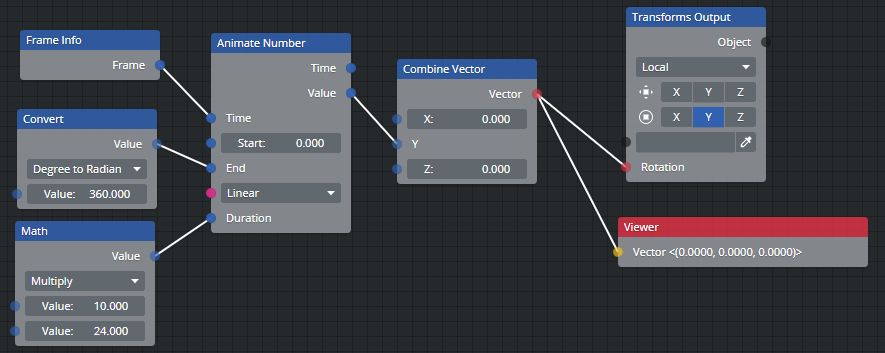
After we finalized the setup, we can pick our empty as our object for the Transform Output node, and play the animation. Here is a short video, where you can see me making this one:
Of course there is another way to do the 360 degree rotation, and that's with the Animate Vector node. You'll only need 3 nodes if you do that - I let you make an animation with that node on yourself, let me know if you were successful! ;)
Rendering animations
It is also possible to render your animations on Mecabricks. You'll need to use Mecabricks Credits for that, but it's pretty affordable. You can set up your scene the same way as you'd do for regular renders, you'll just need to specify the start and end frame of your animation, and that's it.
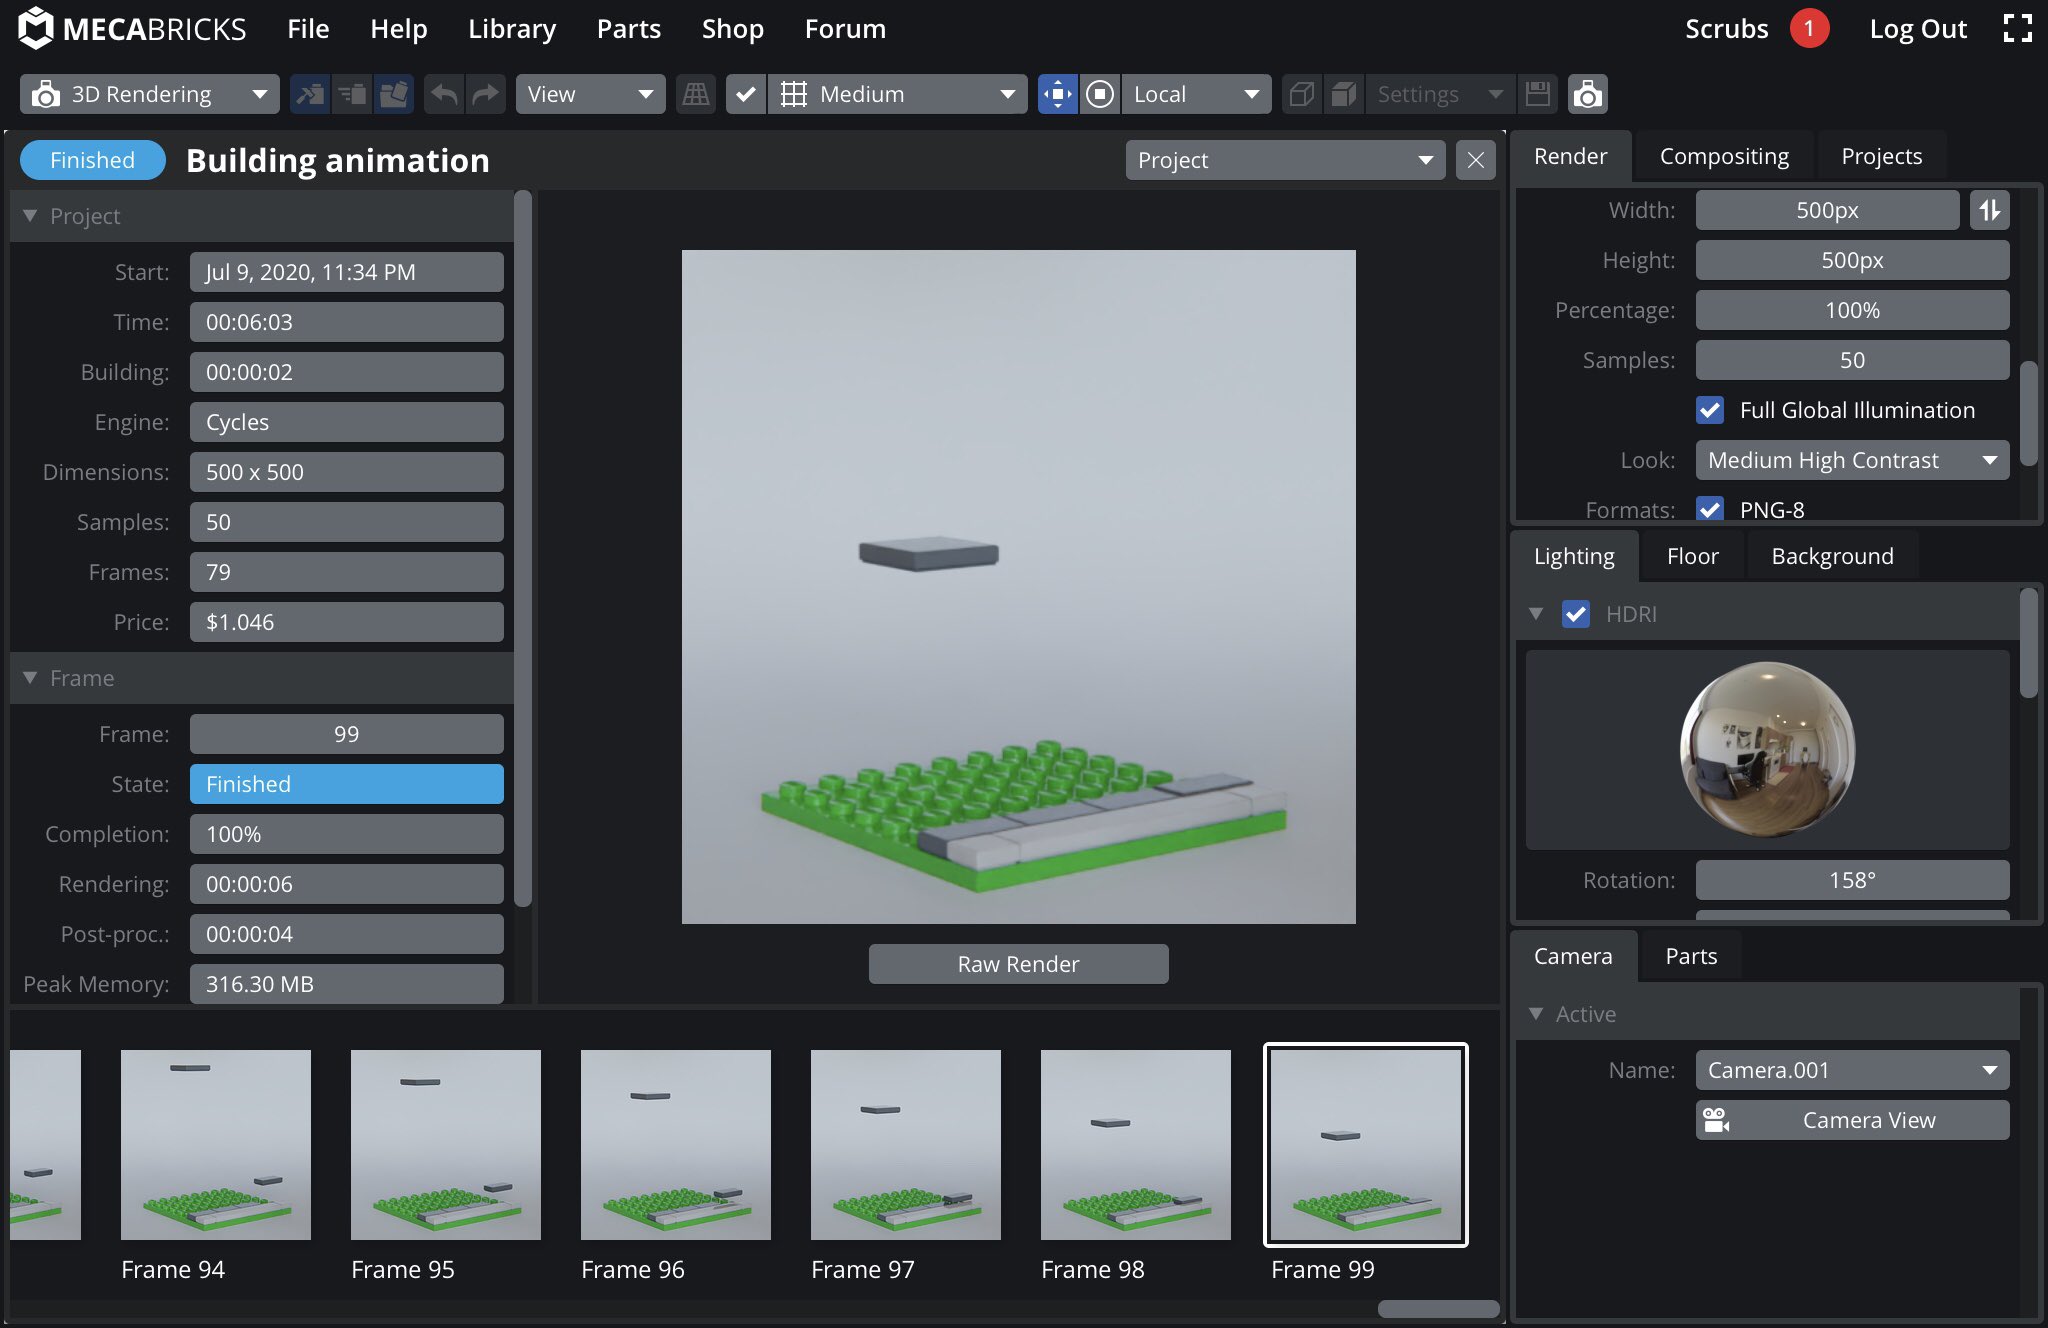
Here is the finished render of this animation which you can see on the photo above:
Now you know every function of Mecabricks, and you can make amazing creations, custom pieces, renders, and animations with it, so I'd like to finish this article here. There's an exciting new feature coming to Mecabricks in a couple of months, so I might write an article about that too, but until then: thank you everyone for reading these tutorials! Here is a short video of my workflow, where I'm building a MOC, animating it, and making a render of it!
About DigiLUG
Now that you got to know a new LEGO building software, I'd like to invite you to the DigiLUG Discord server. We're a group of digital LEGO builders, and we welcome everyone who is interested in this kind of stuff. It doesn't matter if you use Mecabricks, LDD, or Stud.io - we have channels for everything over there! ;)
54 likes
8 comments on this article
Really good series and a big thanks to brickjonas. Even though I won’t use it because I’m more of a physical builder, it provides some great insights on some amazingly complex and impressive software.
As a side note, is the AT-AT review coming soon Capn?
@Slobrojoe said:
"As a side note, is the AT-AT review coming soon Capn?"
Yes please, that would be nice.
@Slobrojoe said:
"Really good series and a big thanks to brickjonas. Even though I won’t use it because I’m more of a physical builder, it provides some great insights on some amazingly complex and impressive software.
As a side note, is the AT-AT review coming soon Capn?"
Thank you so much, I'm glad you like these tutorials!
Excellent. I'll have to try this sometime.
Many thanks for another brilliant tutorial!! This will be really helpful to me in the future, I struggled quite a bit when I tried my first Mecabricks animation a few weeks back: https://www.mecabricks.com/en/models/VzvM1gJ7vJp
Can't I render locally to save credits?
@tomchiverton said:
"Can't I render locally to save credits? "
You can render your models locally, but unfortunately you can't export animations.
In response to one of the other articles about this program, is it possible to then print stickers once you have designed them in here? I'd love to be able to design and print my own. Thanks