Review: 10240 UCS X-Wing Starfighter
Posted by Huw, In a few days time, the highly anticipated UCS X-wing will be available. LEGO has graciously provided us with a copy to review ahead of its release.
This pictorial review will consider its design, construction, the completed model and will also compare it to the original 2000 UCS X-wing which I reviewed last month.
Since the start of the Star Wars licence in 1999, an X-wing has always been part of the product line-up and this is, I believe, the 9th version. We've had three mini versions, four minifig-sized ones and, with the release of this set, two UCS versions. You can view them all in the database.
Box
The box is the standard 2013 design with Yoda in the corner. This is the European version and does not show the piece count. The small box at the bottom centre, which rather spoils the image, shows the ship's dimensions, 47 x 52cm.

The image on the back shows the X-wing resting on its stand along with action pictures and diagrams showing what parts move.

Contents
The bags are numbered 1 to 10 which of course means you don't tip all 1559 pieces out on the table and then spend hours hunting for the right one during construction. Some people prefer that challenge, but personally I like numbered bags.
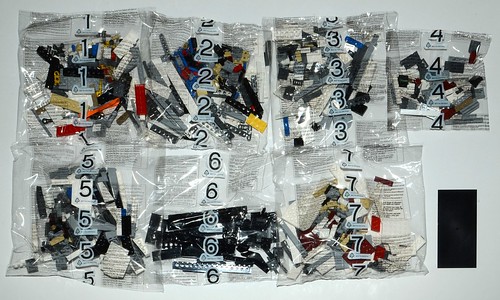
There were two bags numbered 4, as I found out after taking the photo above! The instructions and stickers are packed with card to ensure they remain pristine.
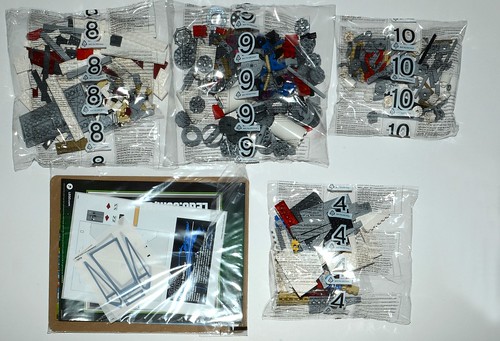
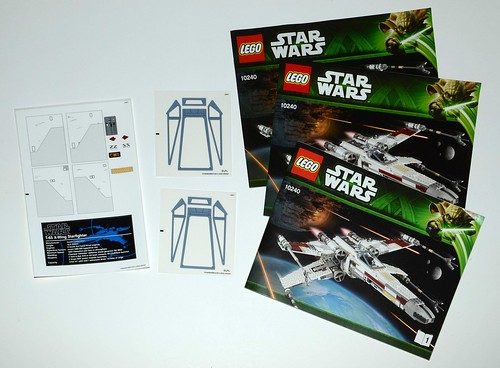
Inside the instructions bag there are three manuals, two cockpit sticker sheets -- I will explain the reason for that later -- and another sticker sheet.
I've scanned the parts lists from the back of the instructions and you'll find them on flickr: page 1, page 2, page 3
Construction
These two pages of the instructions neatly show what's in each bag and the order in which the model is constructed.
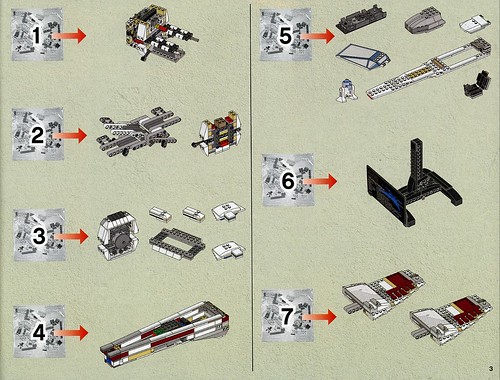
So, on with construction then, with bag 1. The wing opening mechanism is, as you might expect, the most complex part of the model. The clear gearbox block, which you can just about make out on the left, is mounted upside down. The dark metallic silver parts (Cross Block 3 x 2 x 1) on the right are new this year, and have been used in a couple of HERO Factory sets. Apart from the canopy, they are the only new parts in the set, I believe.
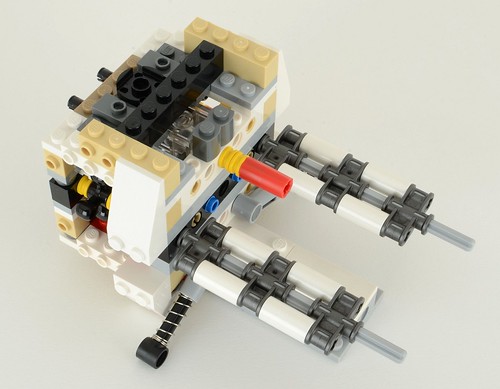
Bag 2 completes the mechanism. You can begin to see how the wings are operated. The axles with the new cross blocks you can see above are rotated via the gear on the right which forces the wing-bearing struts apart.
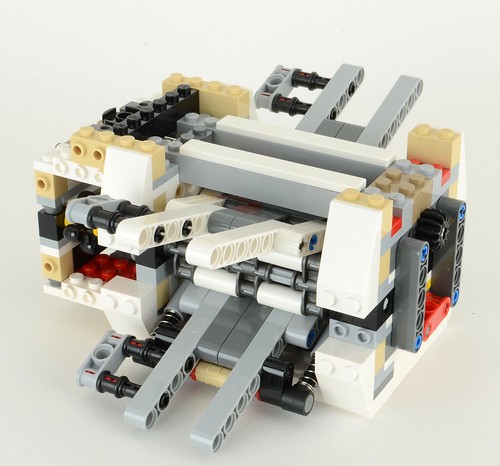
Here it is from another angle, with the wings closed.

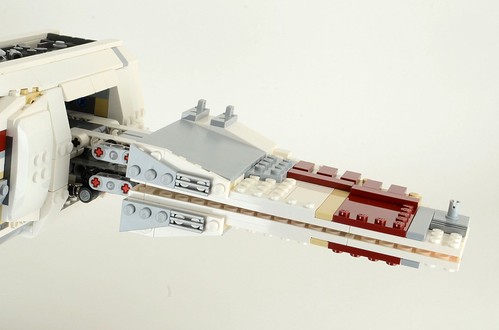
Bag 3 tidies it up and completes the rear fuselage assembly.

The rear is nicely greebled. The 4 x 4 dish and circular brick rotate to operate the wing opening mechanism.

Bag 4 constructs the tapered body, by way of brick hinges. It's mounted to the rear of the fuselage via Technic pins.
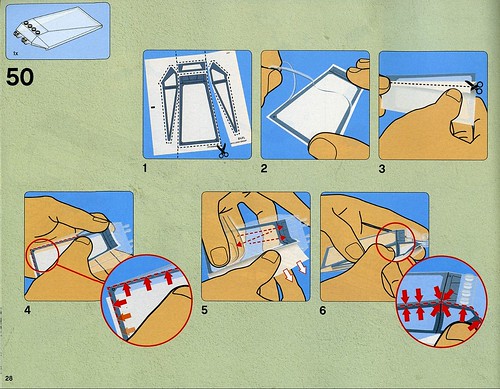
Bag 5 completes the fuselage, and adds R2-D2 and the cockpit canopy, which is one stud longer than that used on the old UCS model. It is now that you have to attempt the sticker, if you are brave enough!
Here's the instructions for applying the sticker: 1. Cut the sheet. 2. Remove the sticker. 3. Trim the backing sheet. 4. Try hard to line it up on the cockpit. 5 and 6. Slide it about until it all lines up. Basically there is not a hope in hell of getting the sticker on satisfactorily, straight and without air bubbles or fluff under it.
LEGO realise this too: that's why they provide two sticker sheets. I did not attempt it. I will be interested to hear whether you do and if you're successful. Luckily it does not look too bad without the stickers, but nevertheless it would have been so much better if they'd printed the canopy, which in a premium priced model such as this, you would perhaps expect.
Bag 6 builds the stand. Unlike that in the original UCS X-wing, this one is fixed and can't be positioned at two different angles.

Bags 7 and 8 build the wings. There are two left-handed ones and two right-handed ones, which are mounted diagonally opposite each other.

They are connected to the opening mechanism by Technic pins.
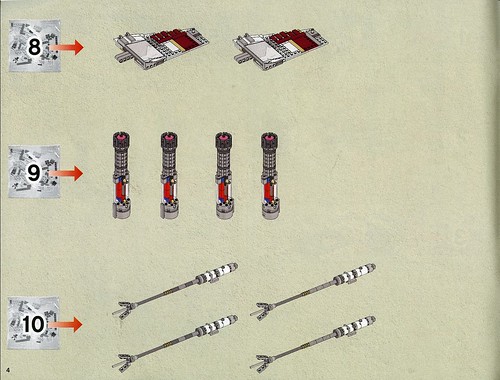
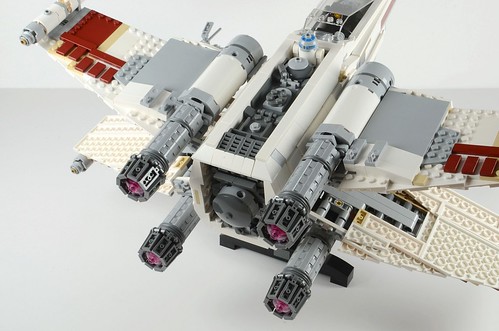
Bag 9 builds the engines, again two pairs are constructed identically. They are mounted onto the wings by the tan Technic pins.

Finally, bag 10 builds the weapons that are mounted at the end of the wings.

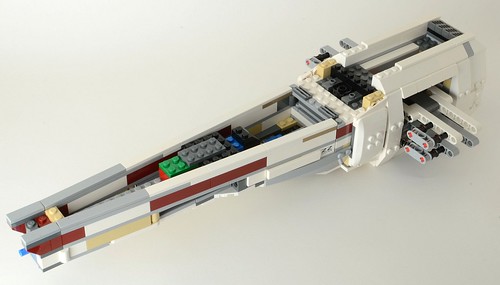
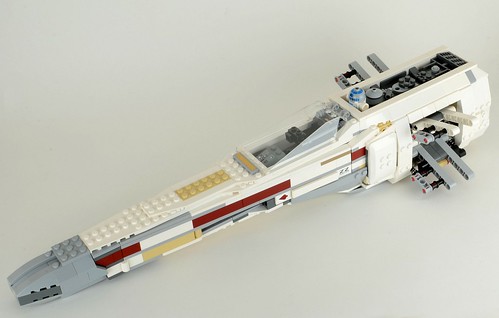
The finished model
I'll let the pictures do the talking...


Overall opinion
There's no doubting that this is an excellent model and perhaps the best version of the X-wing LEGO has made. It's also a vast improvement over the original UCS model, both mechanically and aesthetically, but it is not without its faults.
- The wing opening mechanism is far more robust. On the old version, when the wings were fully opened or closed, rotating the knob further resulted in the gears grinding. On this version, the wings simply open, then close, then open, and so on.
- The wings are mounted far more sturdily. Just two tiny axles held them on in the old version, this ones uses stud-less beams and multiple Technic pins and as a result, the wings do not sag.
- This version makes good use of the many new parts that have become available since 2000 to give it a more streamlined look.
- The back of the engines look excellent (using this part in grey) and they are not prone to falling off like they were on the old one.
- But, it's still a bit technicolour, isn't it! It's nowhere near as bad as the original (that was so bad I felt it necessary to rebuild it all in light grey) but I still think some bad decisions have been made with regards the colour of some of the parts. Those that annoy me the most are the grey 'Left shell 3 x 10' (and the right one on the other side) slopes on the bottom of the fuselage under the cockpit. Why are they grey? White would look so much better: I've swapped them on mine and it makes a big difference. The grey 6 x 8 x 1 slopes on the wings should have white stickers on them which would make them look white, but I didn't apply them as the chance of perfection on all four is slim. Consequently, they also look out of place in grey. I haven't yet swapped them for white but I do plan to do so.
- There is no chance at all that you'll be able to apply the canopy stickers perfectly, unless you do so in a vacuum, so bear that in mind before buying: if you can't live with the model without the canopy sticker applied, don't buy it.
It's an essential purchase for all Star Wars fans. That's not true of every UCS set, some of which are far too big and cumbersome and of obscure subjects, but the X-wing is perhaps the most iconic craft in the whole six-movie series, and this model is just the right size: big enough to be impressive but not so big that you'll have nowhere to put it and it becomes a dust-gathering liability. Thanks to vast improvements in its construction you can swoosh it around without fear of bits of wing or engine falling off, too.
Verdict: I'll give it a score of 9/10. I've dropped one point because of the canopy sticker and questionable colour choice of some parts, but other than that, it's highly recommended. Good job LEGO!
It goes on sale on May 3rd (might be May 4th in the USA) and is priced at US $199.99, €199.99, £169.99. Keep an eye out on the home page for news of its release.
Many thanks to Kim in the LEGO CEE team for providing the set for review.
Update: More reviews have started to be published around the 'net now: FBTB has done an excellent job of reviewing this new set with a particular emphasis on how it compares with the 'real' X-Wing (something I did not feel qualified to do), and also has constructed it side-by-side with 7191, which makes for fascinating reading.
Eurobricks has just published their review, which goes in to a very high level of detal. So much, that once you've read it, you won't feel the need to buy the set :-)
3 likes
51 comments on this article
I totally agree with your score. Set is amazing, there are so many details, that you could count them hours and it's very simillar to film model. Indeed, Lego did great job and personally I prefer it more than last years's B-Wing. I hope, that I will be able to buy it, because I like it very much. Also, thank you for great review, which has changed my mind about it.
Very nice model,but I couldn't justify spending that money on model when they have sets around same price for a brand new model. Also being released in past year or so,a lot of people will have this plus Manu of the other versions.
Mmmmmmmmm! Great review Huw, I'm coming very close to being convinced now. Every time I've seen it I've thought better and better of it, but I'm still not convinced by the nose, it looks a bit too chunky and clumsy for my liking.
I wonder if I might take a trip into Cardiff and make my mind up in the store. I'll either leave with a modular town house and pet shop set, or this, and I'm hoping I can persuade them to part with a brown Han in either case... I can try at least! I've got the snowspeeder and rancor sets already, if they were releasing the sailbarge there wouldn't be a problem! ;)
I gave the UCS B-Wing a pass because I felt it was a $150 set sold for $200.
I think I will be picking up this UCS X-Wing though. It seems more reasonable.
A possible May 4th purchase. :)
I will be getting one regardless, i need it to balance out the bookshelf with the 2000 version!
Great Review, great set. Will definitely geht one, i just can't decide if i should go for the may 4th promotion or wait for the next AFOL Shopping in germany and get it 15% off.
I for one would like to welcome our ant overlords... :oP
LOL
As for the set, I dunno', there's something about it that just looks 'off' to me, but i can't quite put my finger on what.
As such, I'm content to pass... I just don't want to spend a huge chunk of money on a/any set that will keep giving me an indefinable 'bugging me' sensation when i look at it.
I just don't know... maybe it has no soul. :oS
Lol.
Basically, they have to put a minifigure for example Luke Skywalker in this model!!!!
Yeh bizarre canopy sticker... but I'm glad as there are too few cool canopy pieces out there that have no printing!
Cutout stickers?... never going to get this set, that's for sure.
The stickers themselves are die cut, but the suggestion is to cut the sheet to make them easier to separate and apply.
Ug, stickers… those ruthless and painful companions to a set. Great review Huw!
^^Thanks for the clarification on that. I thought I had worked that out from what you put but I wasn't totally sure.
And thanks for the FBTB links, great to see another perspective. Both those articles share my concerns about the nose too, the comparison one noted an AFOL who had already redesigned it before the set is even released!
I might pass after all, but I've loved reading the reviews, and hey, they're meant to help you chose one way or the other. Lego may well win in the longrun too, it'll be my first modular - a new obsession to sap my cash! :D
getting this set :)
I'm trying to wrap my head around the stickers instructions. Maybe one of you could help.
In step 1, it looks like they are asking you to cut the sticker sheet into 4 separate stickers.
In step 2, it looks like they are using the larger part as an example, and that only part of the sticker is lifted up (?) - Only the thin border portion of the sticker, perhaps?
In step 3, it looks like they're asking you to cut that large sticker in the middle!
Can someone maybe give their perspective on this?
Thank you!
I think step 3 is suggesting to peel the sticker back a little, then cut the backing so that when the sticker is laid flat again, there's no backing under it which, in theory at least, should make it easier to apply.
Sorry, but with a drawback of such a caliber like the unalignable stickers this does not warrant a near perfect score in my opinion. Will not buy.
I don't have this set but, speaking from experience laying vinyl in a professional capacity you can make this much easier on yourself. Clean the cockpit with windex or any glass cleaner or even slightly soapy water. After its clean reapply your cleaning solution to the cockpit so that it is visibly wet. Apply the stickers to the still wet area and then they will move around freely. Smooth out all air bubbles with a credit card or similar object and the stickers will become perfectly adhered. Extra work, I know but worth it if you HAVE to put the stickers on.
P.S. Be sure to work from the center out while smoothing the stickers with the credit card so that no bubbles become trapped.
Great review Huw. I was lucky to get a preview of this set at my local store. The set really does look impressive and the wing mechanism is perfect. Shae about the cockpit sticker though.
Thanks for the excellent review Huw. I am looking forward to getting my hands on this set this weekend hopefully, although I must say that having stickers for the cockpit is very disappointing.
CAN'T WAIT TO GET ONE!I WILL WAIT OUTSIDE THE LEGO STORE FOR IT TO OPEN THE DOOR!
The sticker whining is expected, but those cockpit pieces would have been fairly unreasonable to print-- they are, after all, decorated on four separate surfaces, and this is a cockpit mold that is not likely to be widely-used in the future. Why introduce complex new printing machines just for this one piece in this one set? Especially when the classic version used stickers for its cockpit and I don't imagine many tears were shed
Personally, I think it's nice that there are directions on how to apply the stickers most effectively. And I think it's somewhat shameless that you insist applying them will be impossible without attempting it even once. Want to avoid fluff under it? Make sure your building space is clean! Want to avoid air bubbles? How about perhaps following the provided instructions, which seem especially geared towards preventing that sort of experience?
Stickers have long been a reality in adult-oriented themes like Technic, Model Team, and yes, Ultimate Collectors' Series Star Wars. The expectation is presumably that an audience of adults or kids who are into high-detail model kits will be "grown up" enough to apply stickers carefully and effectively. So I continue to find it simply baffling that AFOLs complain to no end about stickers. There are certain settings in which stickers can be a real inconvenience, like the dreaded STAMPs, but generally TLG has phased out those sorts of uses for stickers, and in this day and age I don't think there's very much reason to dread the DSS.
With that rant aside, this is a gorgeous set that makes some major improvements on the classic version. It's a work of art and I may very well pick this one up even though I more or less stopped collecting LEGO Star Wars several years ago.
Thanks very much for the review! Good, clear pictures at good angles, with relevant commentary.
Re: The stickers - I am pretty sure the instructions are saying to cut out the sticker from the sheet. Then cut off a narrow section of the backing sheet. Having done that, you can align that edge with the canopy to keep the sticker in the correct place (kind of like a Post-It note). Then you slowly and carefully roll off the rest of the backing sheet to gradually adhere the rest of the sticker.
If you took off the whole backing sheet at once, it'd stick to your fingers, to the canopy where you don't want it, slide around, etc.
Perhaps someone already said this, but it wasn't clear.
The stickers have to be simple stickers as all the lego sets do
Guys, I'm afraid of getting this set because of the stickers. Think about it. If you get this and you fail by putting the stickers what do you going to do ?
^ I suppose in that case your only option would be to head over to Bricklink and purchase the canopy piece individually, although demand may be high for exactly the reason of the difficult to apply sticker, and therefore the prices might be a little bit high accordingly.
^^I thought the same as ^, but you also get a second sheet of canopy stickers so you can afford to have a go and mess it up, and hopefully you'll learn enough from the first attempt to get the second one right.
Excellent review, can't wait to get it. Can u provide the dimensions of the box? Need to factor in shipping cost. Thanks
^^^^^^^ Tears were very much shed over stickers in the classic version. Look no further than the FBTB post linked to from this very review. Now, my understanding is that the stickers have since been greatly improved, but still, they deteriorate over time.
As to cockpit pieces that would have been fairly unreasonable to print, it's not like TLG never did just that. In SW sets, too. In cheaper ones, too. (Anakin's Y-wing Starfighter, anyone?)
Anyway. Some people certainly are obsessed with mentioning on every occasion how long the poles are they are not going to touch stickers with. But other people are equally obsessed with mentioning on every occasion how they don't mind stickers, and nobody ever should. Shrug. The former won't purchase the set, or won't apply the stickers; the latter will. Big deal. Ultimately it's a matter of personal preference, can't we all just get along.
And for the record: I own over 200 sets with stickers, and I have yet to apply a single one, so my pole is over 200 feet long.
Great review!
Has anyone else noticed that the cockpit canopy is not really accurate? It's supposed to be pointed inwards to the front, not outwards.
After reading the FBTB review, I've decided to pass on this one. There's just a lot of 'scale' issues compared to the actual ILM model. I'll end up just looking at those flaws over and over on my finished model.
It's sad because I was so looking forward to getting this...oh well, at least I can save my money for the next modular.
I like this set but I agree with the color-thing. What is the reason of LEGO not to use the right colors on some parts?
Huw, this is a good signwriter's trick for applying large stickers to signs:
Dip your canopy stickers and the canopy in some very mild soapy water. Apply sticker to canopy. The soap will allow you to move and position the sticker as you like. When you're happy, carefully squeeze the water out from under the sticker from centre-to-edge, letting the glue take hold of the plastic.
looks kind of the same design from the old u.c.s model...... Looks great!
@Schwallex: There is a difference between saying "I hate stickers, they are terrible, I will not apply these and neither will many other people" and saying "there is not a hope in hell of getting the sticker on satisfactorily, straight and without air bubbles or fluff under it."
Naturally I don't expect everyone to love stickers, but it seems like so many reviews of sets with stickers in them spend a disproportionate amount of time ranting about how awful they are, even when TLG is taking great care to help builders apply the stickers effectively by including a second sheet and a set of instructions. It's fine to hate stickers, but a review like this could do without that level of hyperbole and melodrama. Whether or not you like stickers or prefer printing, I think TLG has justifiable reason to think the audience for this set would be capable of applying them, and I think it's out of line to just say "nope, impossible" without a single attempt.
In some of the official LEGO pictures and other pictures on the internet, it looks like the wings sag forward slightly, making the laser cannons not parallel with the fuselage when viewing the X-Wing from the side. Have you noticed this?
Im quite sure that in step 2 they meant that you should remove the disposable parts of the stickers. Not the actual sticker, but the part that surounds it. Then you just peel a fraction in one side so you can cut the back paper. This will make your life easier when aplying. The tecnique with soapy water works great also. I did that applying an "invisible shield" to my iPad, and no air bubles appeared.
@Aanchir, I stand by my comment about the canopy sticker. You will note in the FBTB and Eurobricks reviews that the reviewers have both had issues applying the stickers and neither has been able to do it perfectly. I've applied enough in my time to know when success is possible hence knowing that in this case, even without trying, that it is unlikely.
Using window cleaner or soapy water or something to prevent bubbles and allow them to be slid about may well be the answer, but if that's the case, LEGO should have suggested that in the instructions.
Given there are two sheets, I can afford to spoil one, so I will try and apply them using a wet method over the weekend.
Hello new here. Got re introduced into Lego bcuz of my boys. I also dislike stickers too, but they are manageable to apply. Doesn't everyone else here use the windex/ soapy water trick? So far I've been 99% happy with my results. Just wondering if what I'm doing is bad.
Perhaps the only risk would be in causing the clear portion of the sticker to go cloudy-white if the sticker glue reacts badly with a soapy solution. I would suggest testing with a piece of unused sticker sheet, or maybe Googling info to see what products work and what doesn't.
Having seen it in the flesh today I'm still unsure. It does look really good, but the too small engines, too wide front section and bulky nose do throw too many niggles in that I just couldn't look at it and like it without reservation.
I'd want to change it to three studs wide at the end of the taper, and take a stud of width out of the nose itself, and I don't know how easily possible that would be, it looks like you'd need to change a lot of parts at the end and it could well impinge on the cockpit area too.
Still, I went for 10218 pet shop instead, and I've already had to order another modular (and another Han), so I'm happy. :)
Well, I bought and built it and applied the stickers!!
The results were as expected: I screwed up applying the stickers (but not too badly) and now whenever I look at the model I see the badly applied stickers....
The cockpit stickers really are the worst to apply. Don't know how anybody should do that right. Well done Lego! The rest of the model is superb in my eyes.
LG
Fox
I too have given it a shot, but ultimately I just cut away the large transparent parts of the canopy stickers. It requires a steady hand and a sharp knife so I don't recommend it as feasible for anyone, but if you really know what you're doing you could try. Although it's not a purist solution, I like the result.
The results, for who's interested: http://www.flickr.com/photos/miies80/sets/72157633415621927/detail/
I got one on the 4th along with a half-price B-wing, Han, and Yoda ears. I could get half of the canopy stickers on without a problem. There were just 2 that I could not get without clouding. :( Overall, it is one of the best UCS Star Wars sets to me.
For the stickers, how about using a craft knife to cut out the frame part, and bin the clear part. Not something I've tried, but I would have thought that applying the frame only may be a little fiddly but you won't be left with the dreaded bubbles or fluff. Just a thought?
So the only complaint is applying the stickers for the set?
For the extra $50 LEGO is overcharging Star Wars fans you would think they could have printed it on.
Disgrace the special piece with the details is a sticker.
Hi Huw, it seems you didn't found a person who was able to put the stickers correct on the canopy. Now you found one ;) - I manged it with a quite pleasing outcome.
But to be fair: I have to use the second sticker set ;)
But anyway - a very good review Huw!
And I can only support your opinion that this is a great set.
Stickers ... Why'd it have to be stickers? Still an impressive model, nonetheless.
Would it be a better idea to buy this X-Wing or the minifig-scale X-Wing?
Great review. I too question some of the colors chosen but otherwise I can't wait to pick one up.
Did anyone else think it was interesting that the massive X-Wing in Time Square the other week wasn't the UCS version? I guess they were promoting the more accessible one that fits with the scale of most of the other sets, but I did have a sneaking thought that they didn't quite have faith in this set. (Plus, maybe creating a sticker sheet that big wasn't viable...)