Building a Launch Tower for 21367 Tintin Moon Rocket
Posted by FlagsNZ,
Yesterday, the world witnessed the successful launch of the first crewed space mission to the Moon in fifty-three years. The debut crew of the Artemis II mission is a diverse range of astronauts which includes a woman (Christina Koch), a person of colour (Victor J. Glover), and a non-US citizen (Canadian Space Agency (CSA) astronaut Jeremy Hansen). The fourth astronaut is Reid Wiseman.
When looking at these four crew getting ready in their orange space suits I can't help but be reminded of Tintin and the crew of his Moon Rocket that launched to the moon seventy-two years ago wearing their similar orange space suits.
Watching the countdown of the Artemis II rocket standing at Launch Pad 39B at NASA's Kennedy Space Center in Florida, the rocket had been supported by a launch tower. The Apollo 11 Saturn V rocket launched from the nearby Launch Pad 39A in 1969.
.jpg)
When the Tintin - Space Rocket was uploaded to LEGO Ideas it included a Launch Tower as part of the project. This tower that supported Tintin's Moon Rocket was deliberately left out from 21367 Tintin Moon Rocket to make the final product a more affordable LEGO set.
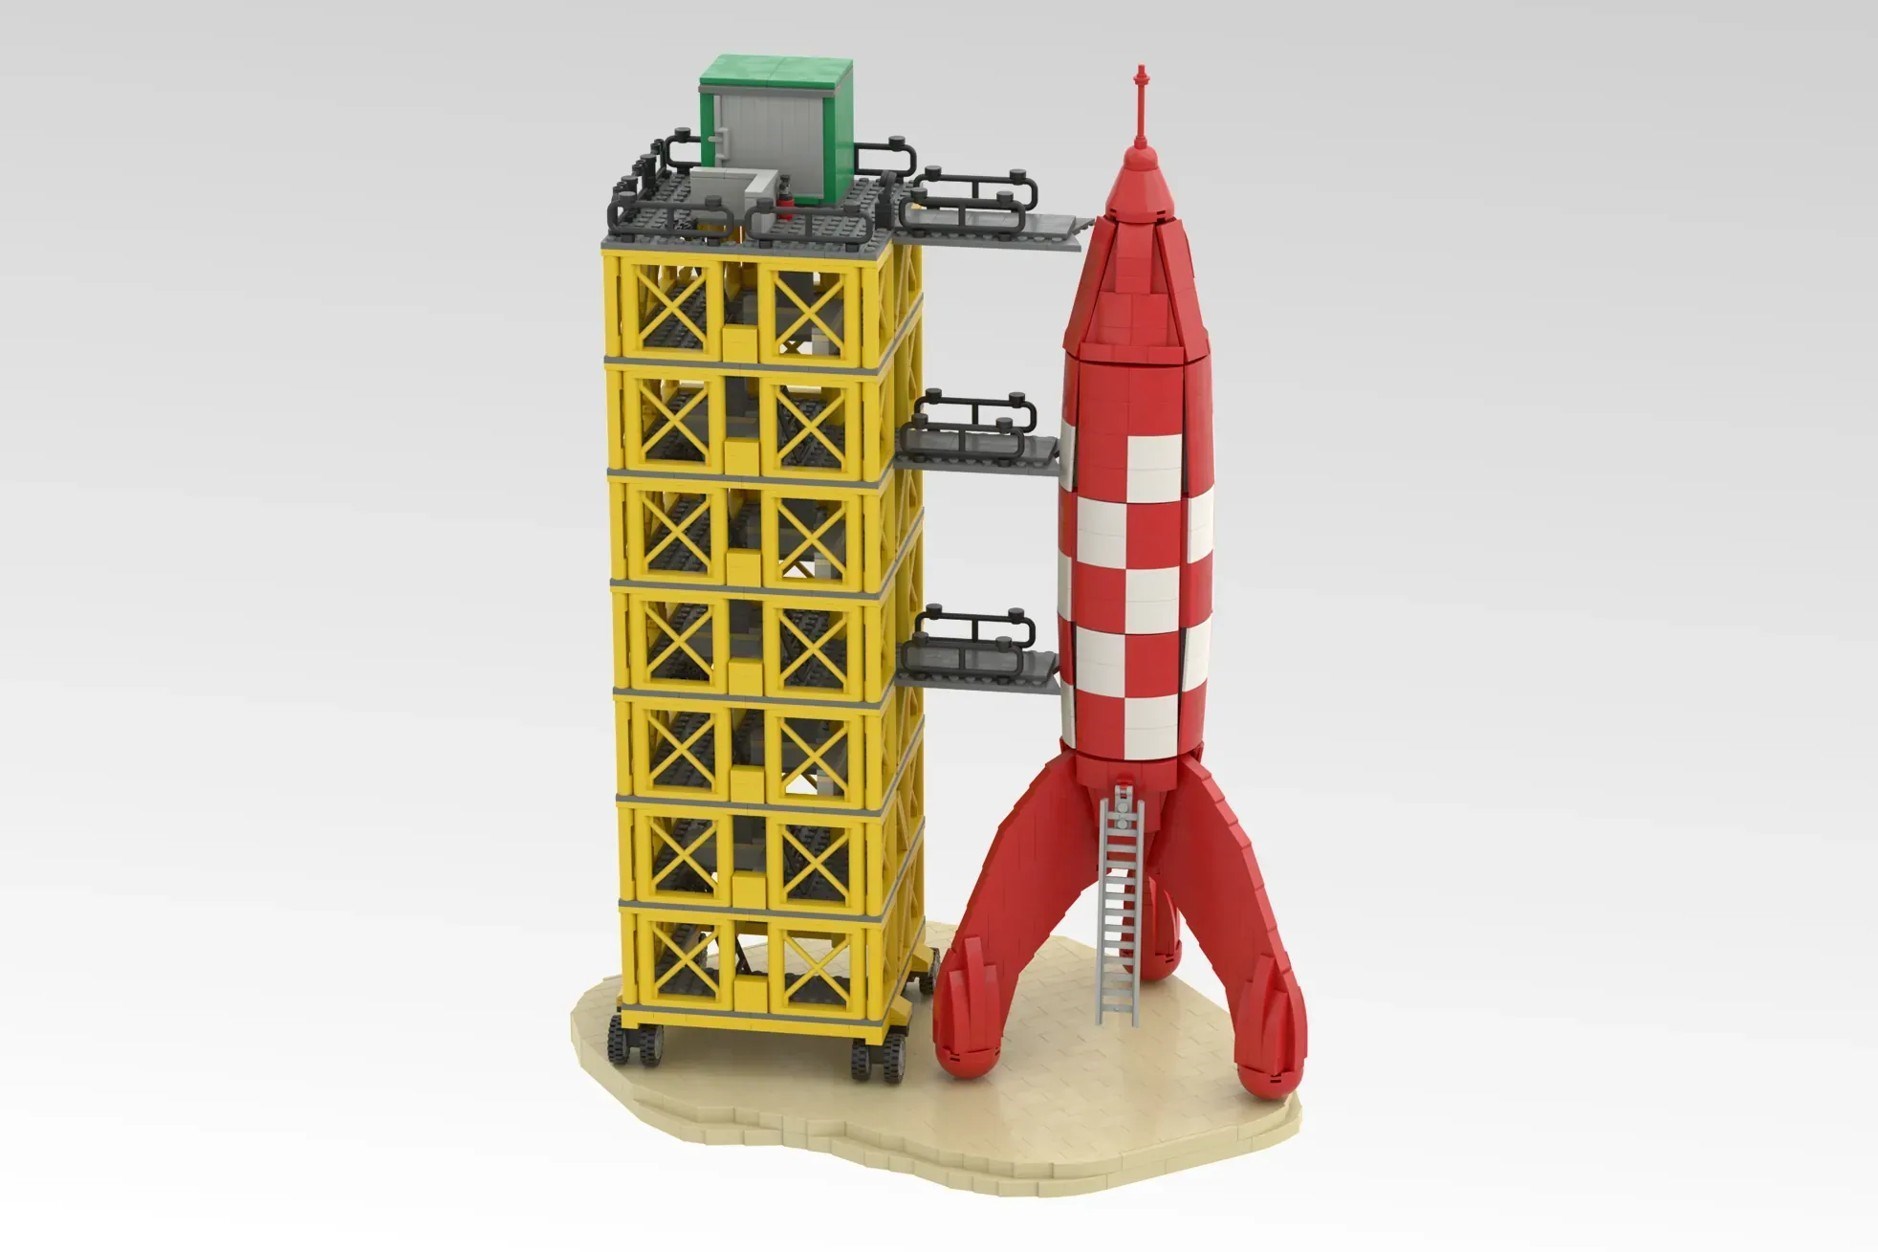
Read on as I describe step by step how I have assembled my own Launch Tower befitting Tintin's Moon Rocket.
Tintin – Space Rocket
When the Tintin – Space Rocket was uploaded to LEGO Ideas in August 2022, a Launch Tower was included in the project.
The designer, Tkel86 – also known as Alexis Dos Santos – commented on the project's description:
. . . I tried to represent, as best as possible, the launch tower and the rocket in a slightly smaller scale than the minifigure [scale] so as not to be too big and be easily displayed on a desk or shelf.
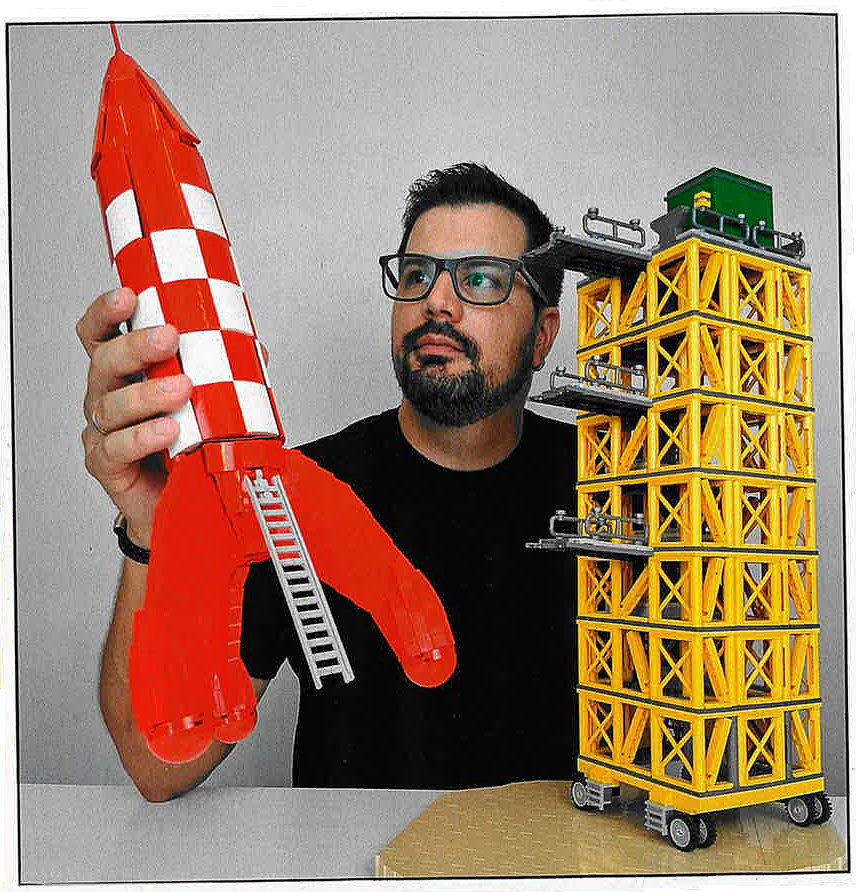
Alexis Dos Santos also appears on the first page 21367 Tintin Moon Rocket instruction book holding his creation. Here you can see him holding his original product design which also included a launch tower. The rocket also had a ladder attached.
Launch tower
The inspiration for Alexis Dos Santo's original submission for his LEGO Ideas submission was the image found on page 56 of The Adventures of Tintin – Destination Moon.

Image source: Destination Moon page 56
In the instruction book there is a comment from the LEGO designers as to why they removed the Launch Tower from the final design:
The fan model was really well done – it was also enormous! So, we agreed to remove the tower and focus on the rocket itself, take Alexis' model from Earth to space, and feature the characters in their iconic space suits including, of course, a LEGO Snowy figure!
You can read more from Ellen Bowley, Master Model Designer, and Anthony Palmaro, Senior Graphic Designer in their LEGO Ideas blog post, Meet the creators of the LEGO Ideas Tintin Moon Rocket.
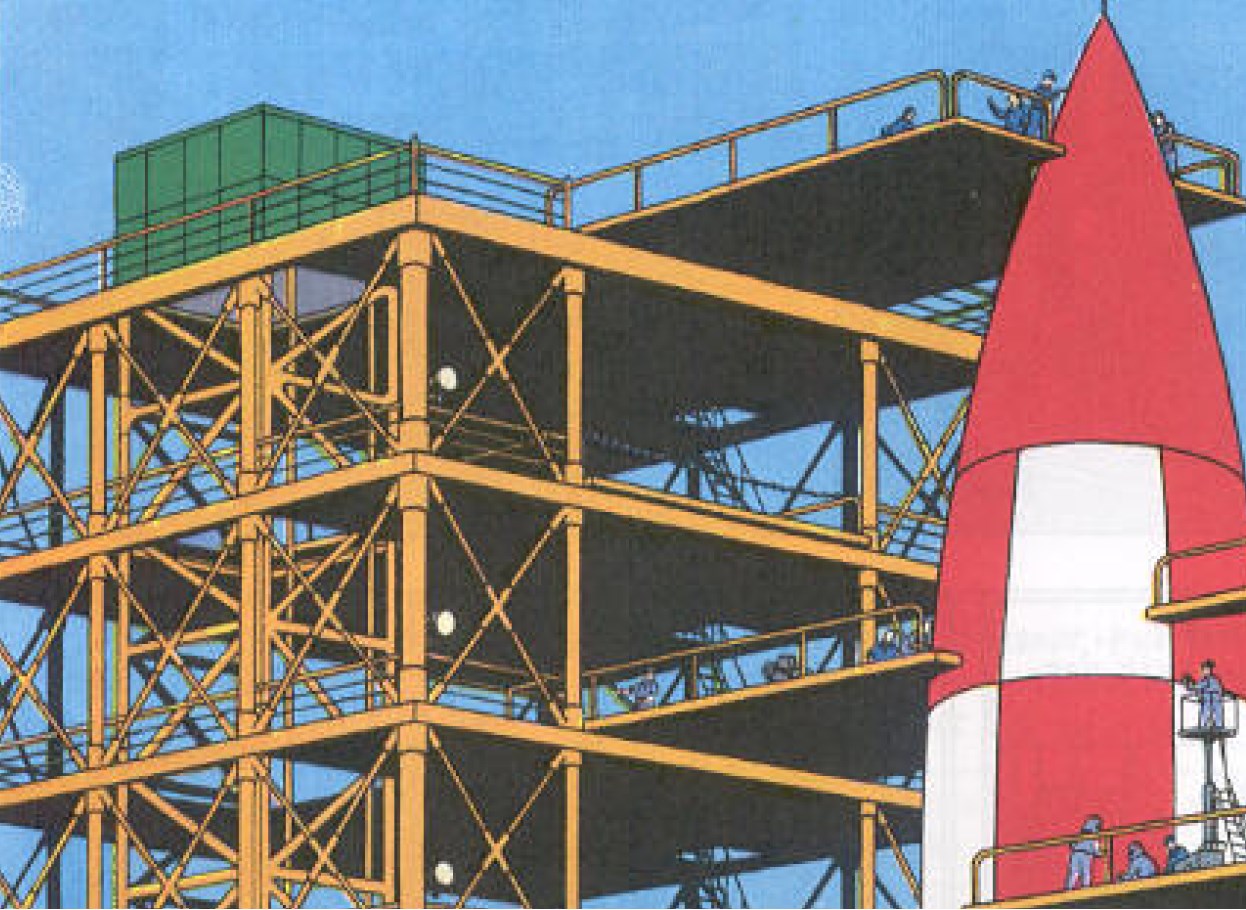
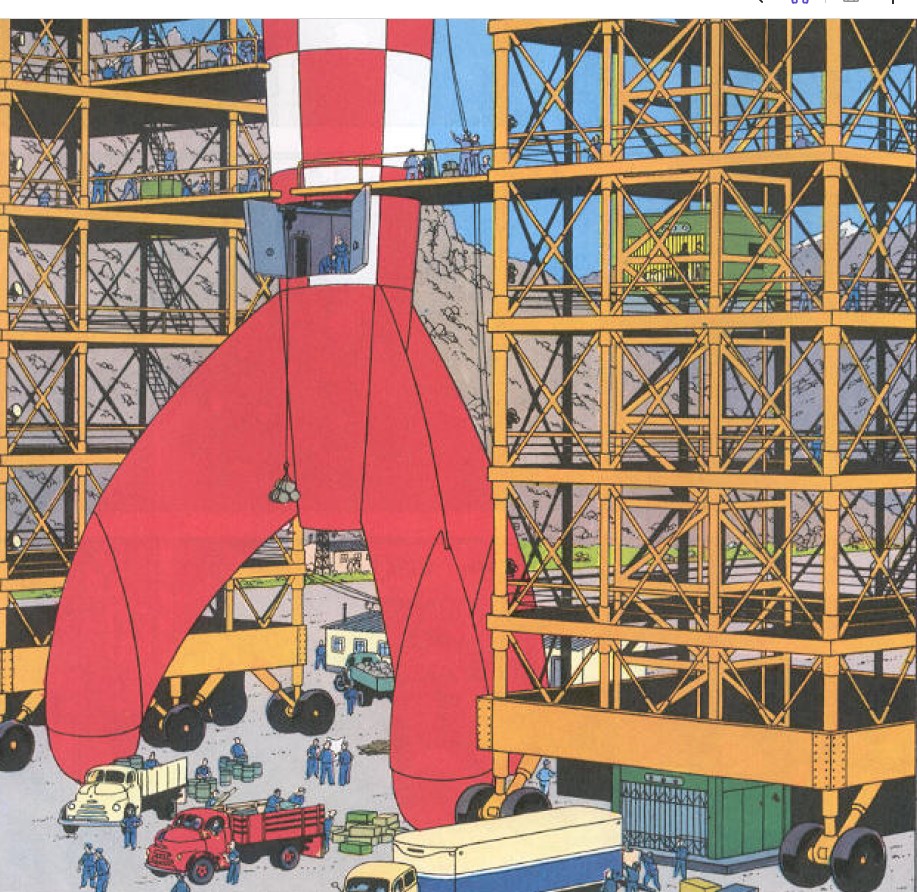
There is a full-page illustration of the Moon Rocket standing at the launchpad protected by the two Launch Towers on page 42 of The Adventures of Tintin – Destination Moon.

Image source: Destination Moon page 42
Details
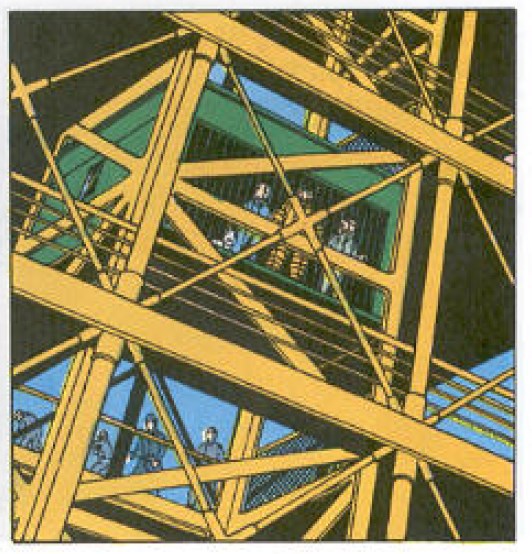
These cropped images have been taken from pages 42, 43 and 44 of The Adventures of Tintin – Destination Moon.
At the top level of both Launch Towers is a green lift house. You can see the cutaways in each floor level to allow for the lift shaft between each level. You can also see that there is a stairway at the rear of the tower.
The lift shaft is at the front of the Launch Tower while the stairway is at the back of the Launch Tower.
Platforms extend out to the Moon Rocket at several levels. These platforms are shaped to fit snugly around the Moon Rocket at each level.
Note that there is also floodlighting on the corner of the tower. The lamps are directed towards the Moon Rocket.
The image below shows the left-hand Launch Tower. There is structural framing surrounding the lift shaft.
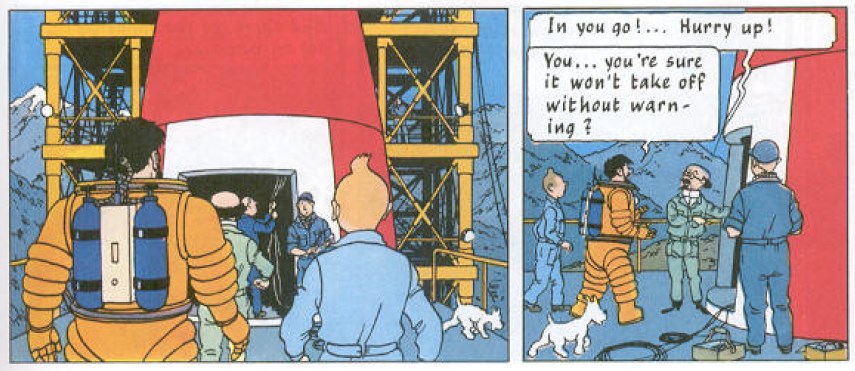
In this scene, Professor Calculus is escorting Tintin, Snowy and Captain Haddock up to the Control Cabin of the Moon Rocket.
The lift on the right-hand Launch Tower is about one third of the way up the tower (between levels three and four). The ground level lift gate is closed while the lift is occupied on another level.
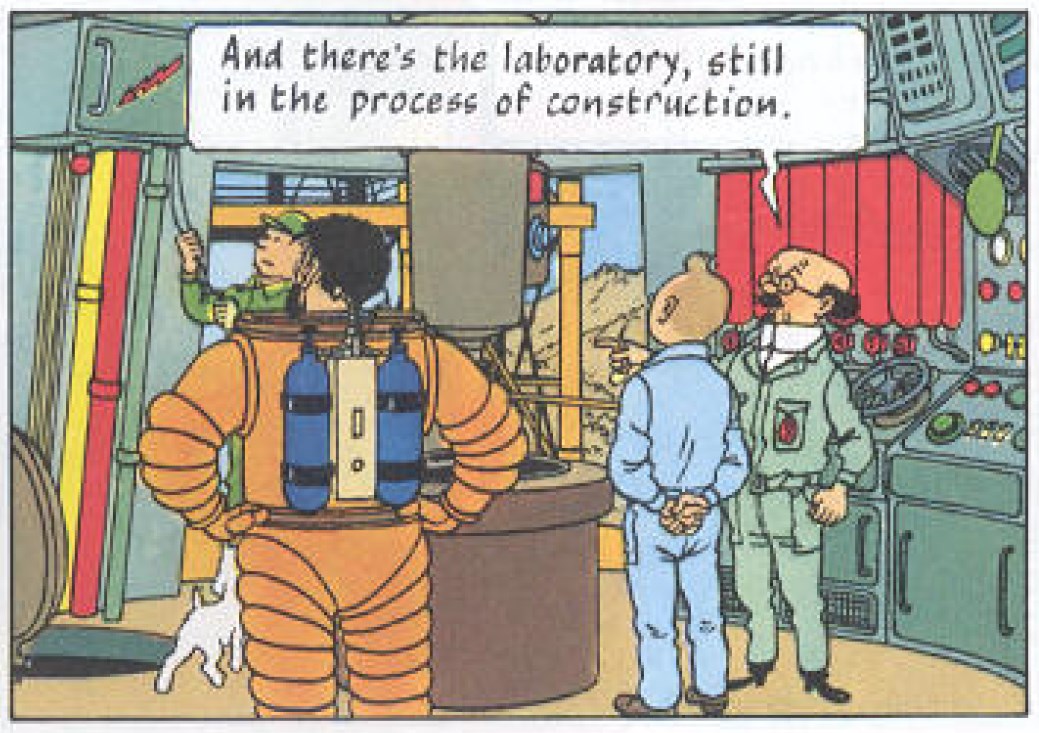
These images below show the Control Cabin as viewed from outside and inside the Moon Rocket. The Control Cabin is located where the first band of red and white chequers are painted on the Moon Rocket. The entrance leads directly into the Control Cabin.
The build
I have made a few compromises with the Launch Tower that I have assembled. I decided not to have any cutouts in the deck levels for either the lift shaft or a stairway.
There is a complete parts list to assemble one Launch Tower at the end of this tutorial.
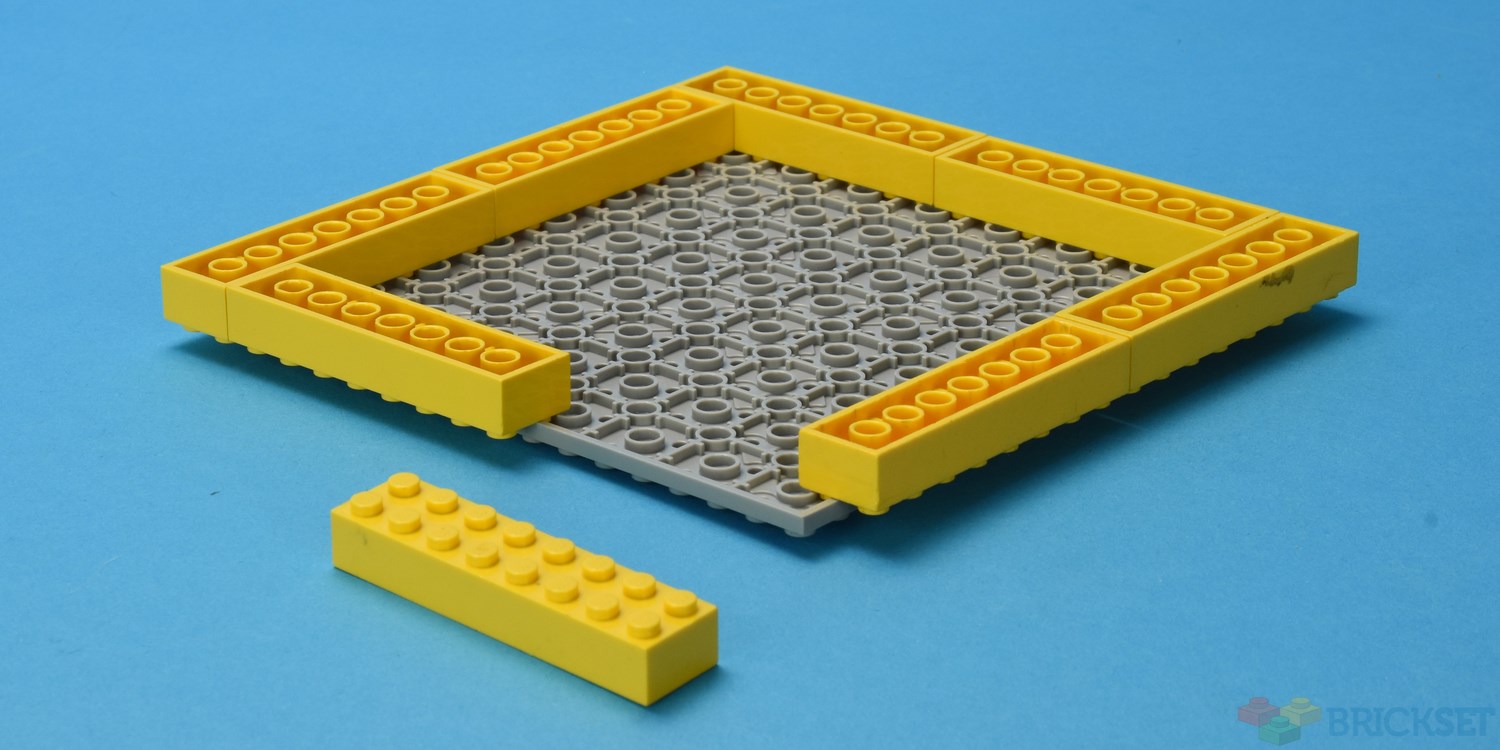
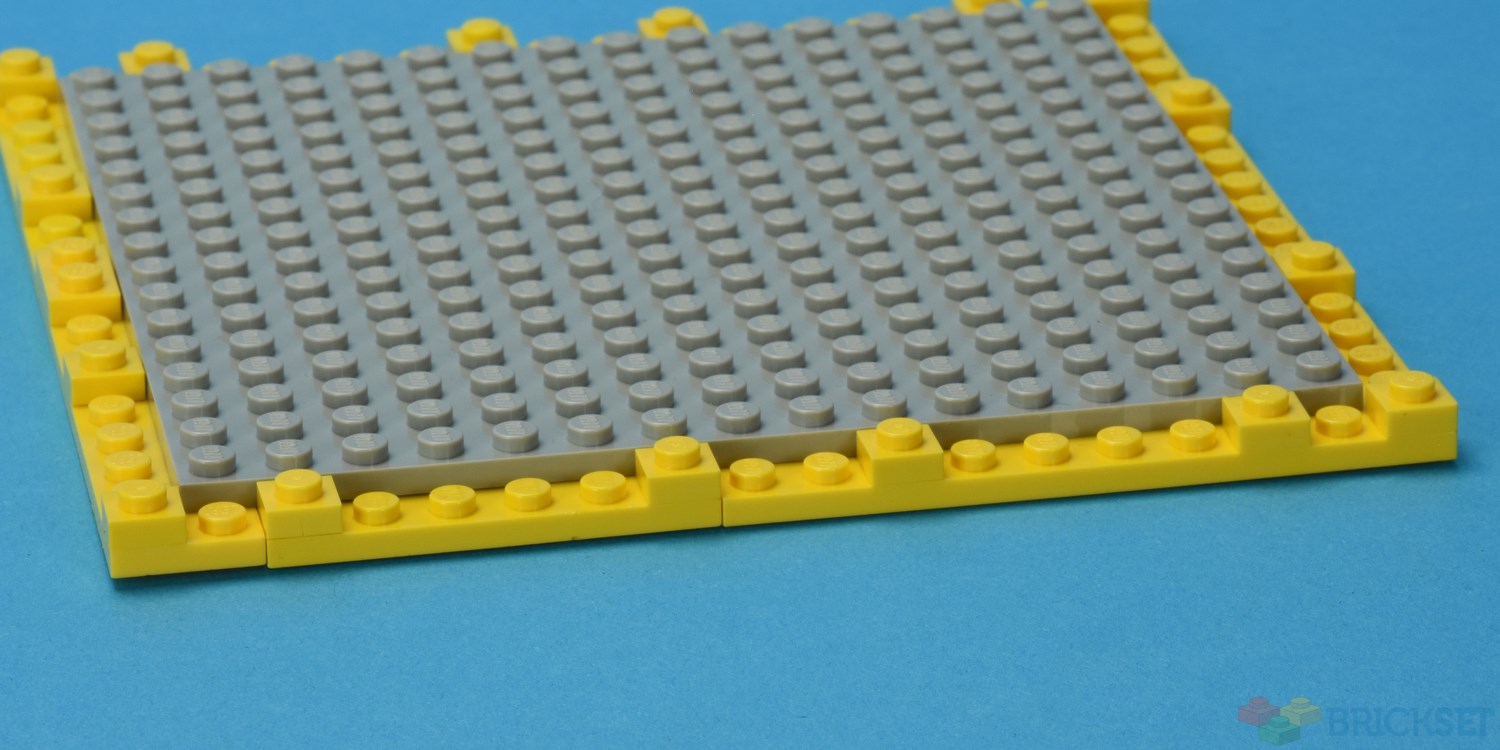
The base
I have used a Medium Stone Grey 16x16 plate for each of the nine levels,
I have used eight 2x8 Yellow Bricks around the perimeter of the base level. This makes the Launch Tower a column measuring 18x18 studs.
Any configuration of standard 2-wide bricks would work here.

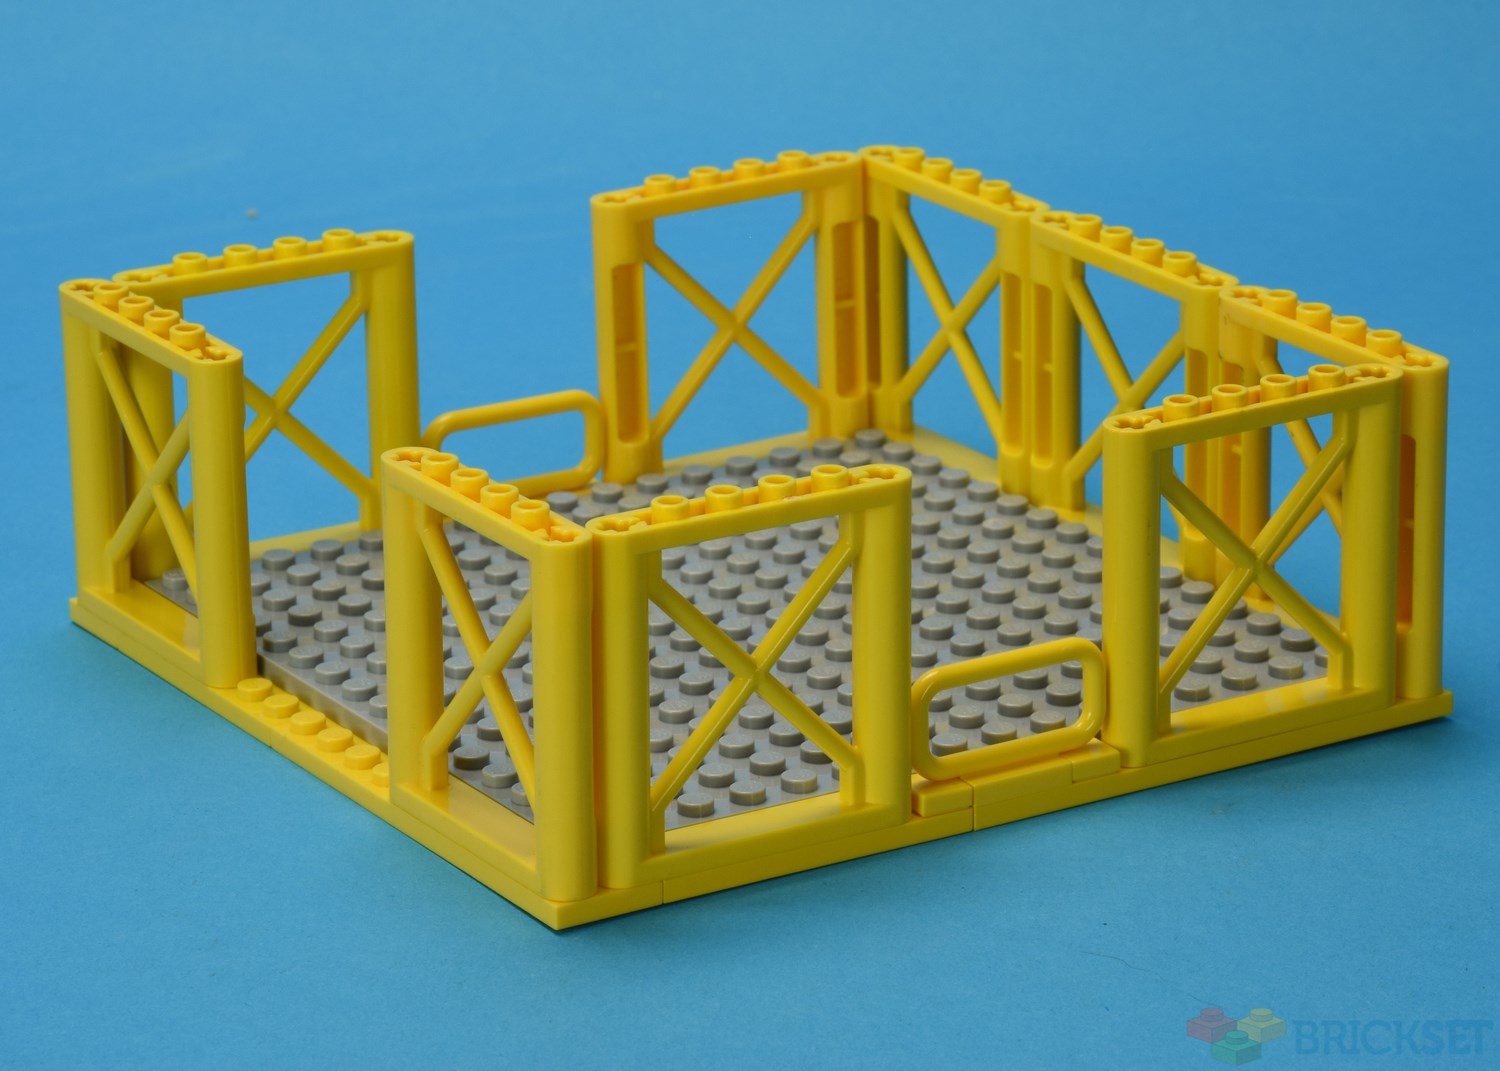
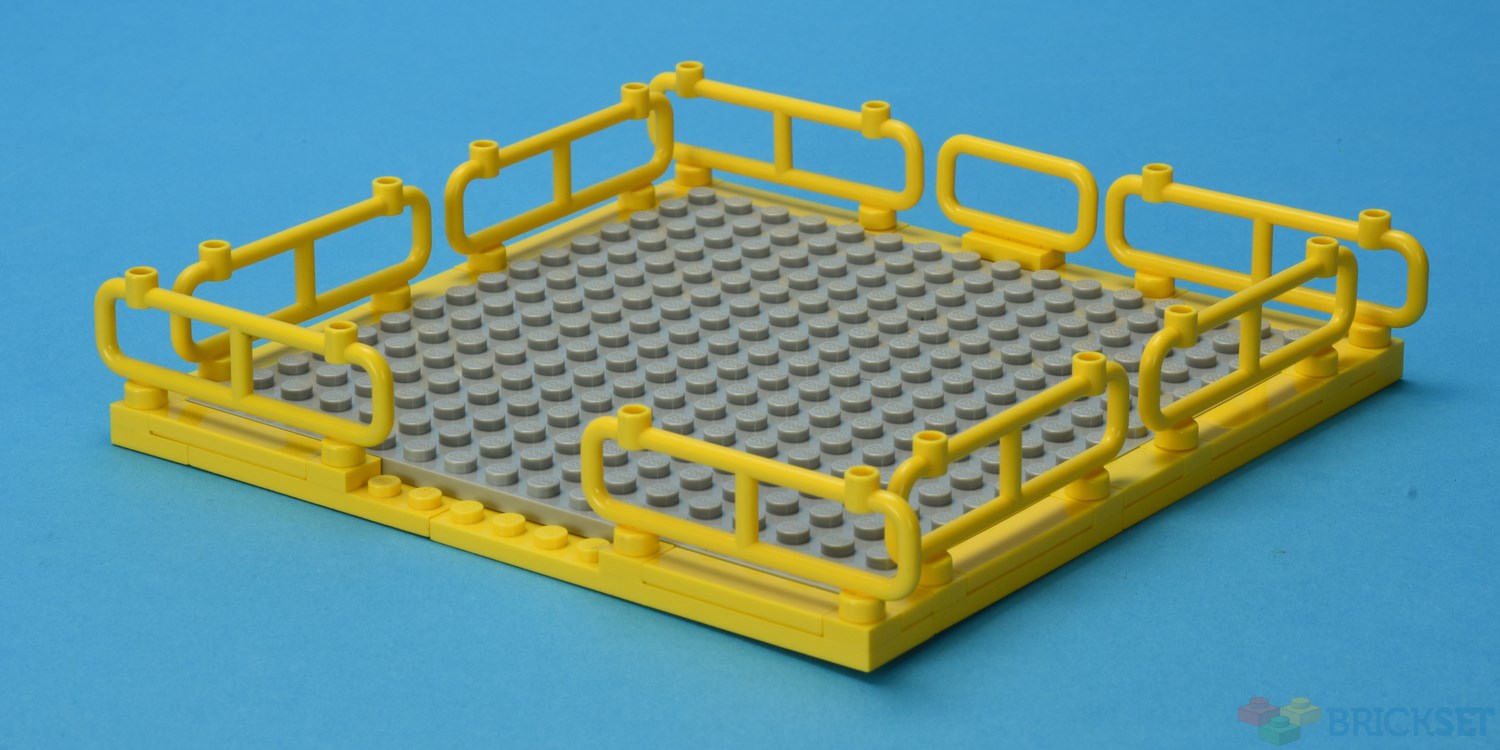
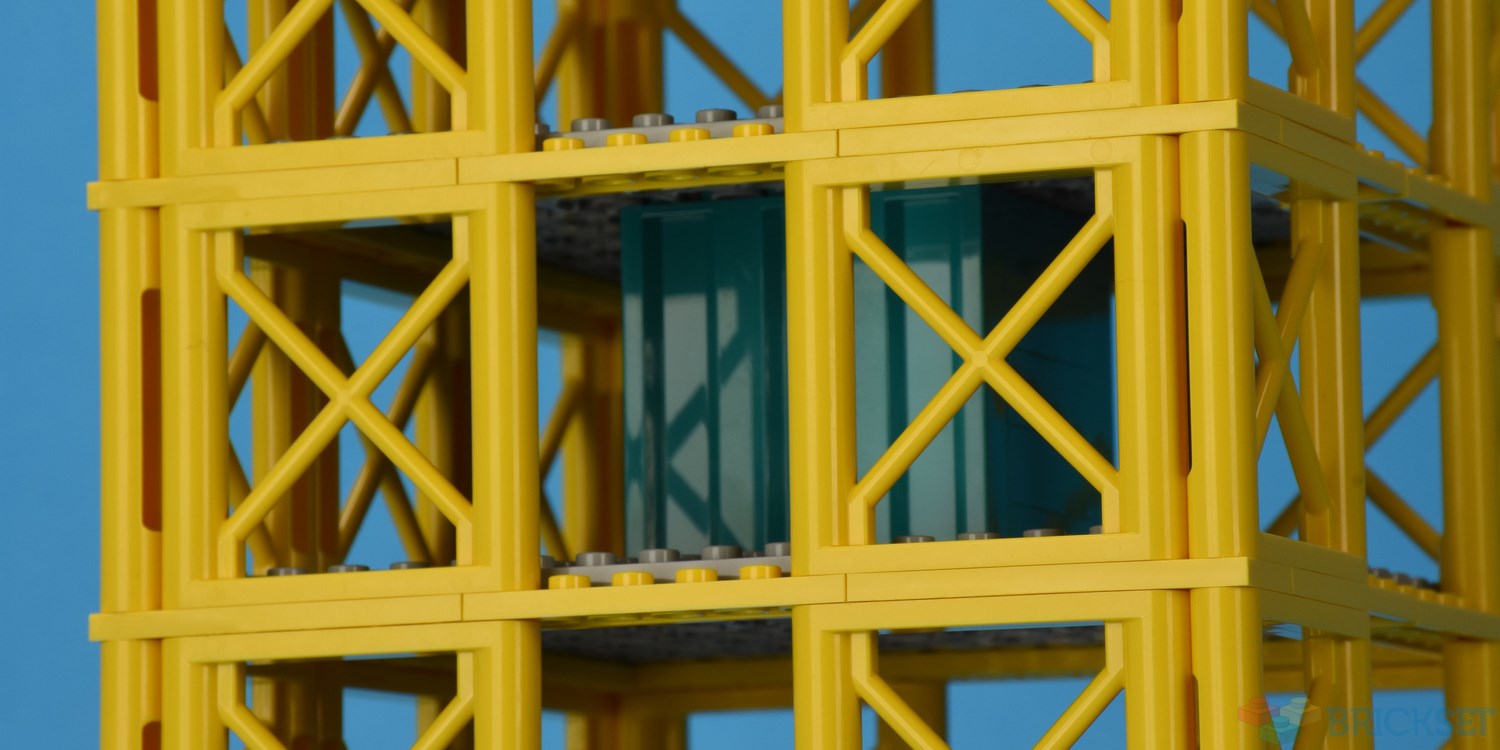
Each of the Launch Tower levels is separated using nine 1x6x5 Yellow Lattice frames. There will be 72 of these parts used in each tower.
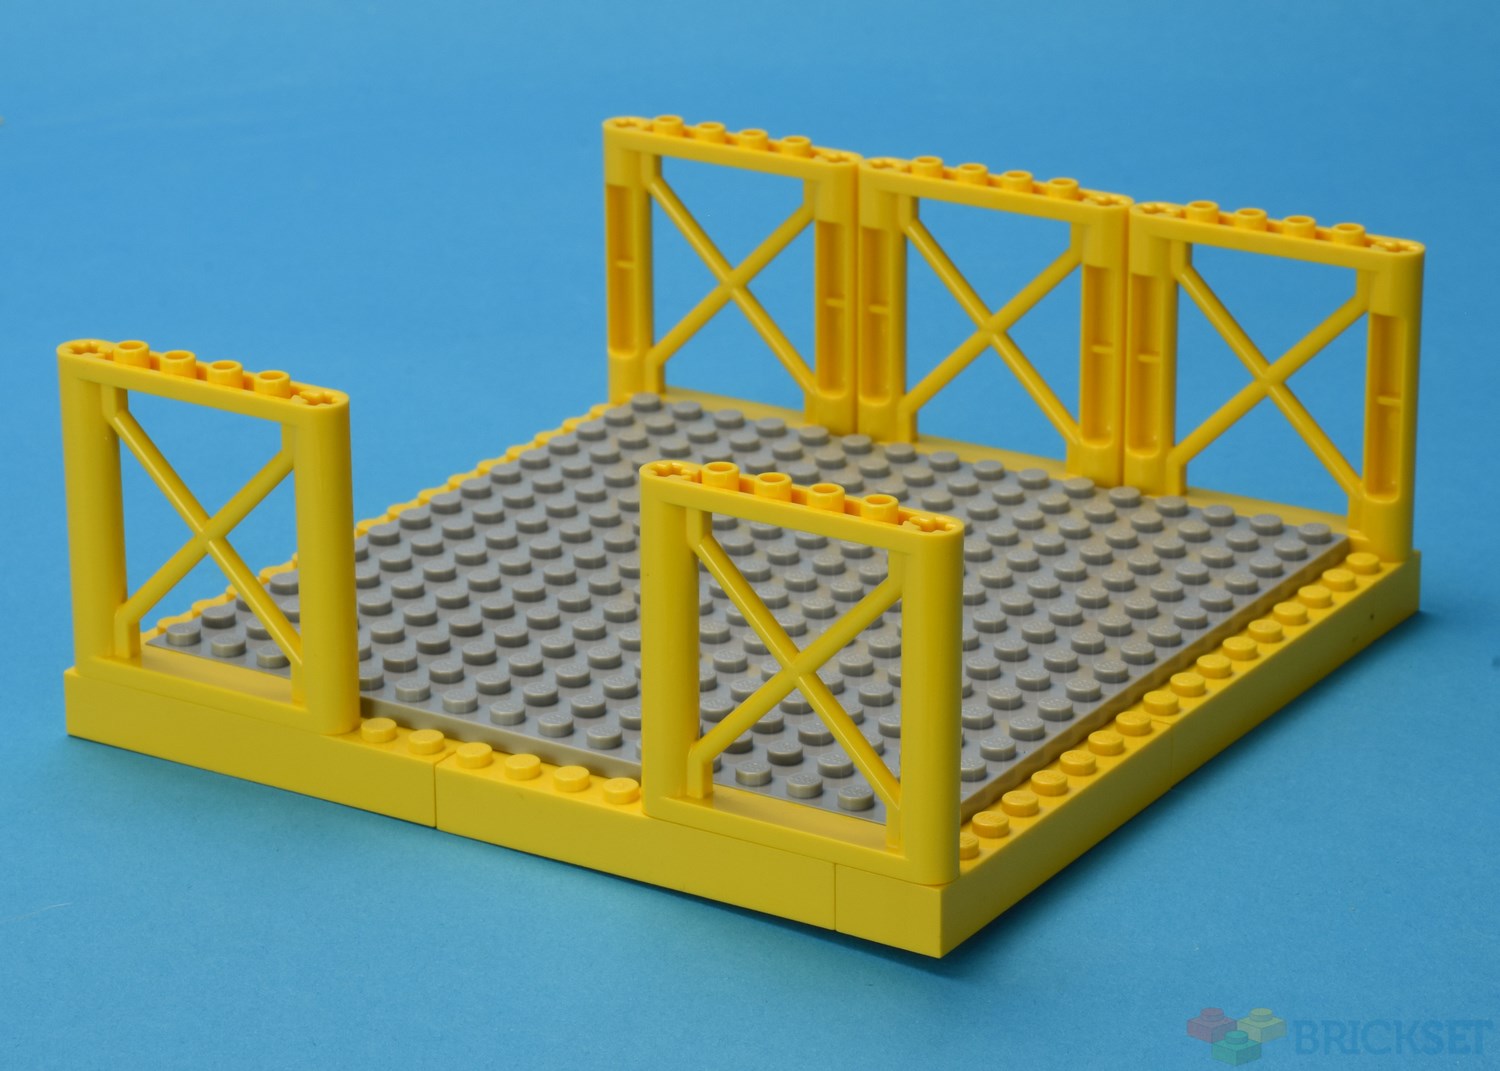
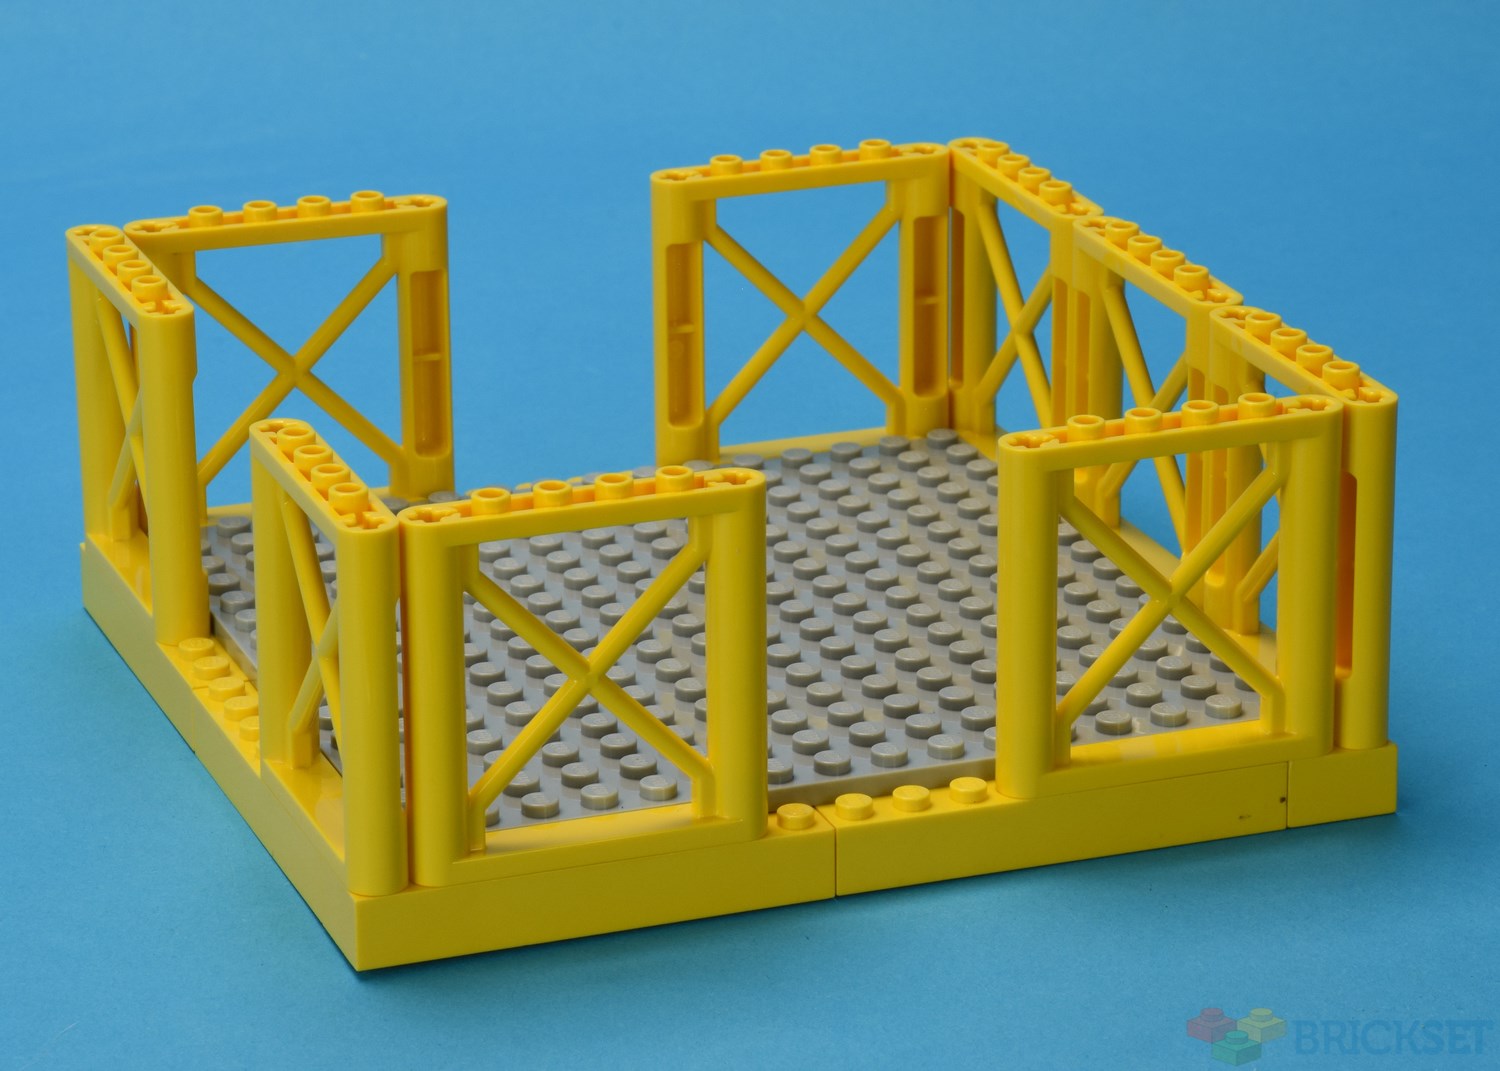
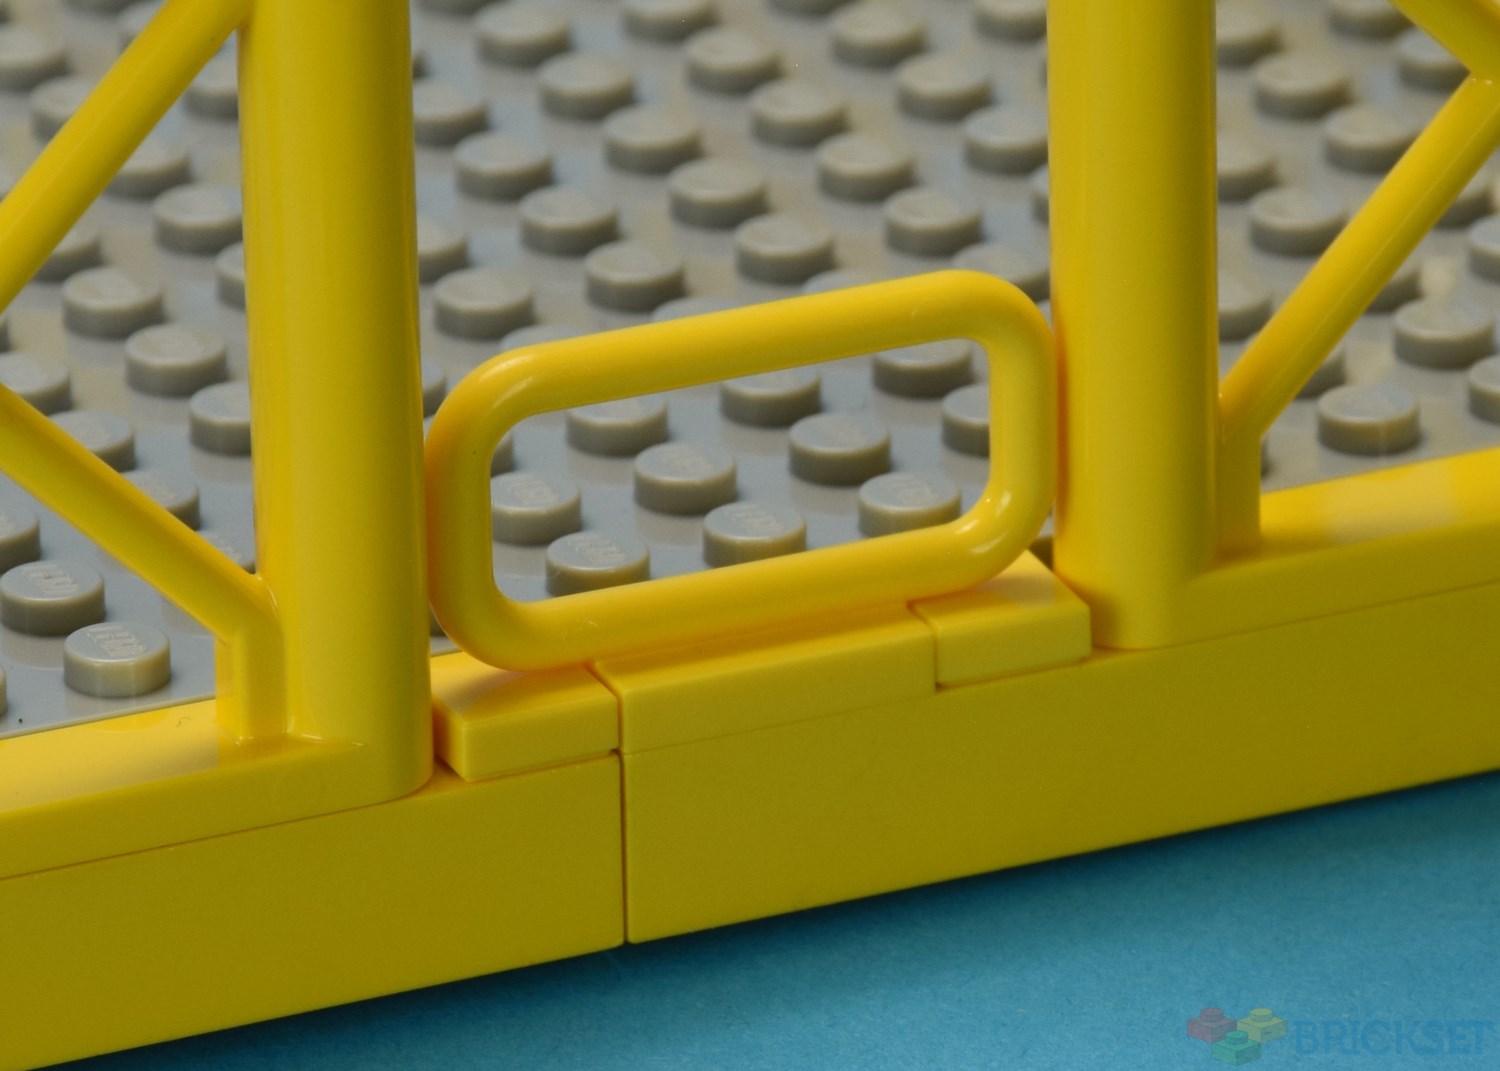
The six-stud-wide gap will be for platforms that extend out to the Moon Rocket.
I have filled the four-stud-wide gaps on each side of the platform with a Yellow 1x4x2 handrail and two 1x1 Yellow tiles per side.
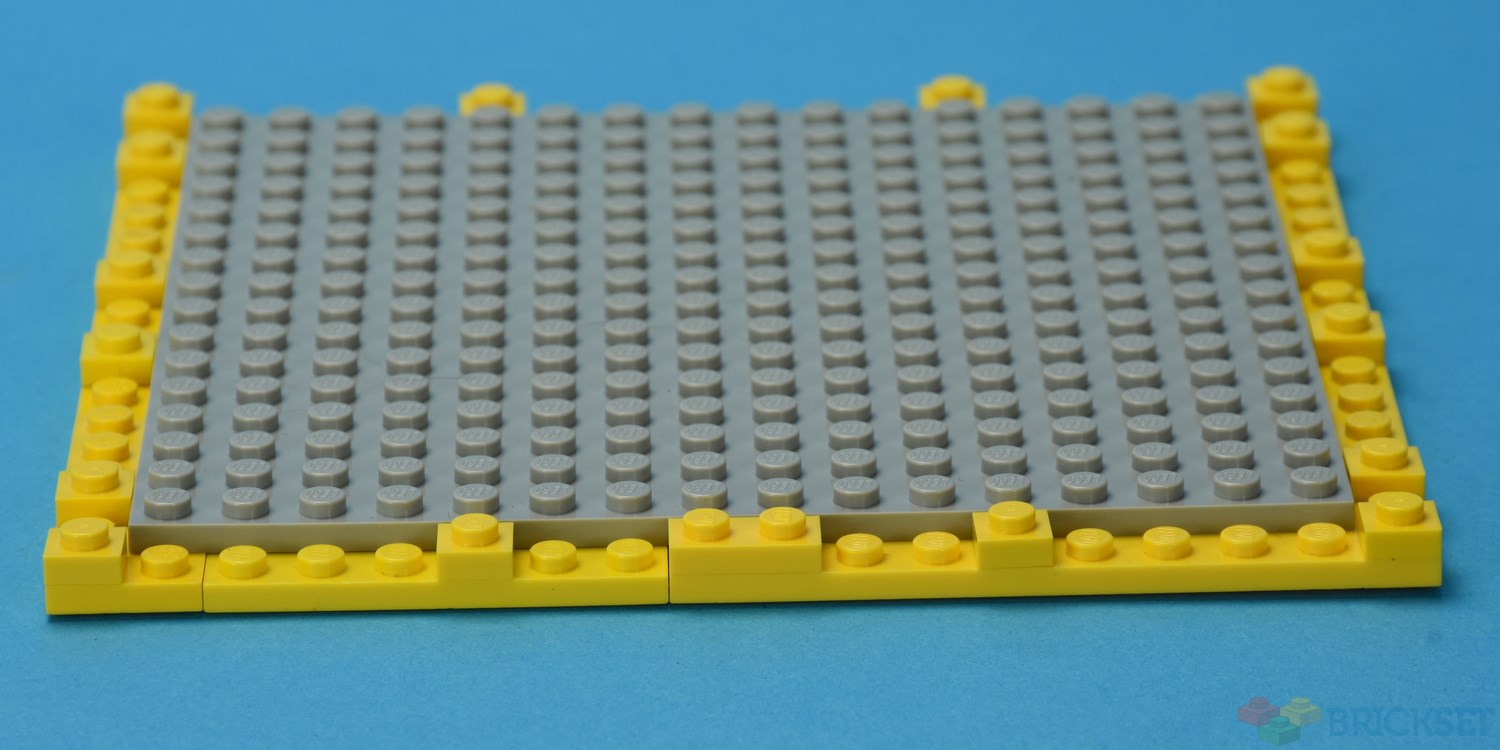
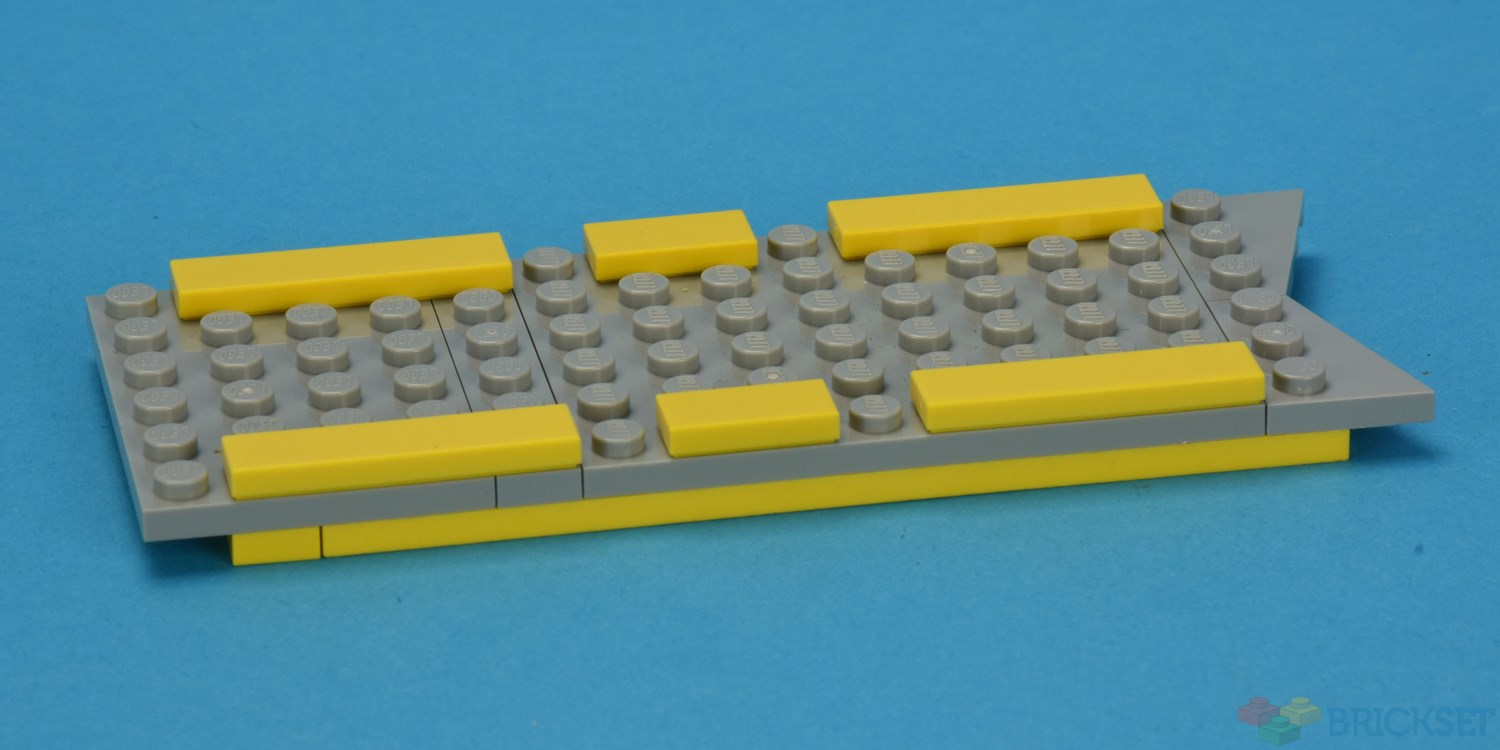
Intermediate levels
There are seven intermediate levels to be assembled.
The construction is identical to the base except for using 2x8 Yellow plates instead of bricks.
Any configuration of standard 2-wide plates would work here. You can see that I have used a combination of 2x6 and 2x10 Yellow plates here.
The intermediate levels all have nine 1x6x5 Yellow Lattice frames, two Yellow 1x4x2 handrails and two 1x1 Yellow tiles per side.

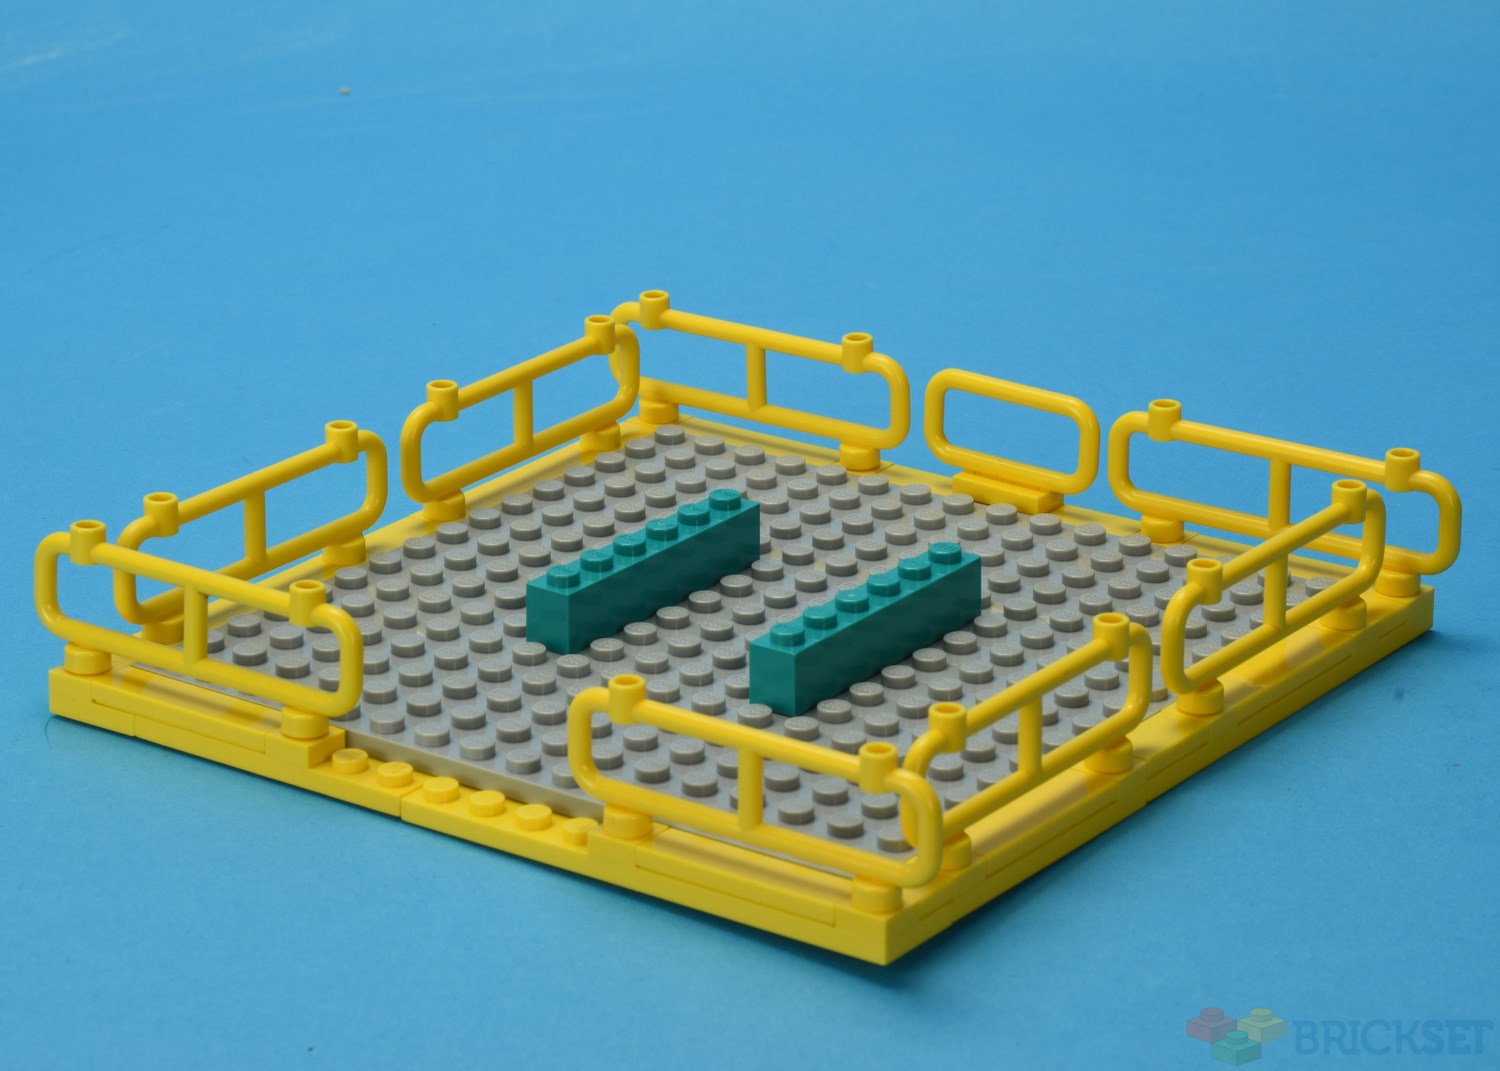
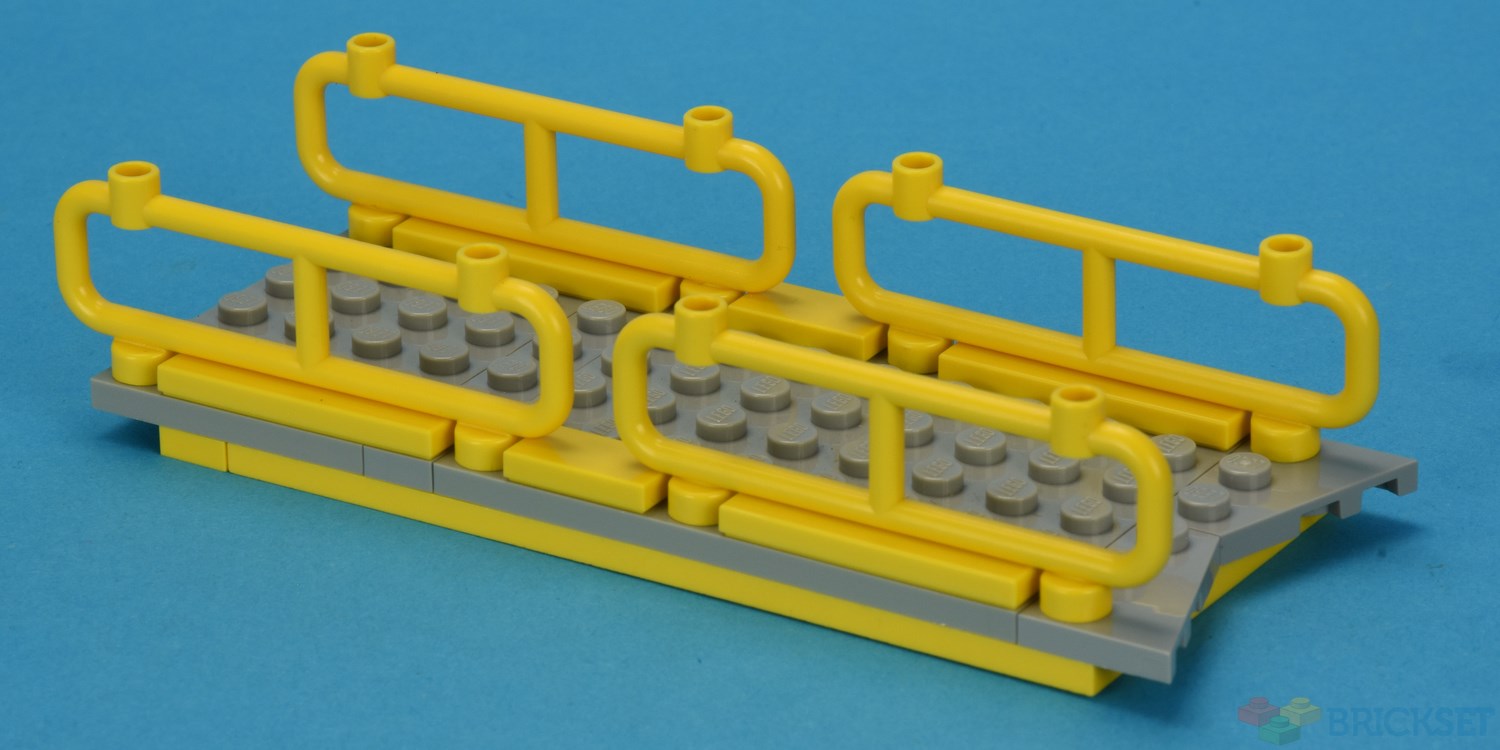
Upper level
The upper level has a perimeter of two-wide yellow plates similar to the intermediate levels.
On the side of the upper level of the Launch Tower that faces the Moon Rocket are four 1x1 Yellow plates (image top left).
On the side opposite the Launch Tower are four 1x1 Yellow plates and one 1x2 Yellow plate (image bottom left).
On the other two sides are four 1x1 Yellow plates per side (image top right).
Apart from the six wide gap on the edge that faces the Moon Rocket, the remaining spaces are filled with 1x1, 1x2 and 1x4 Yellow tiles (image bottom right).


Then a safety rail is assembled around the perimeter of the upper level. Eight 1x8x2 Yellow balustrades and one 1x4x2 handrail have been used.
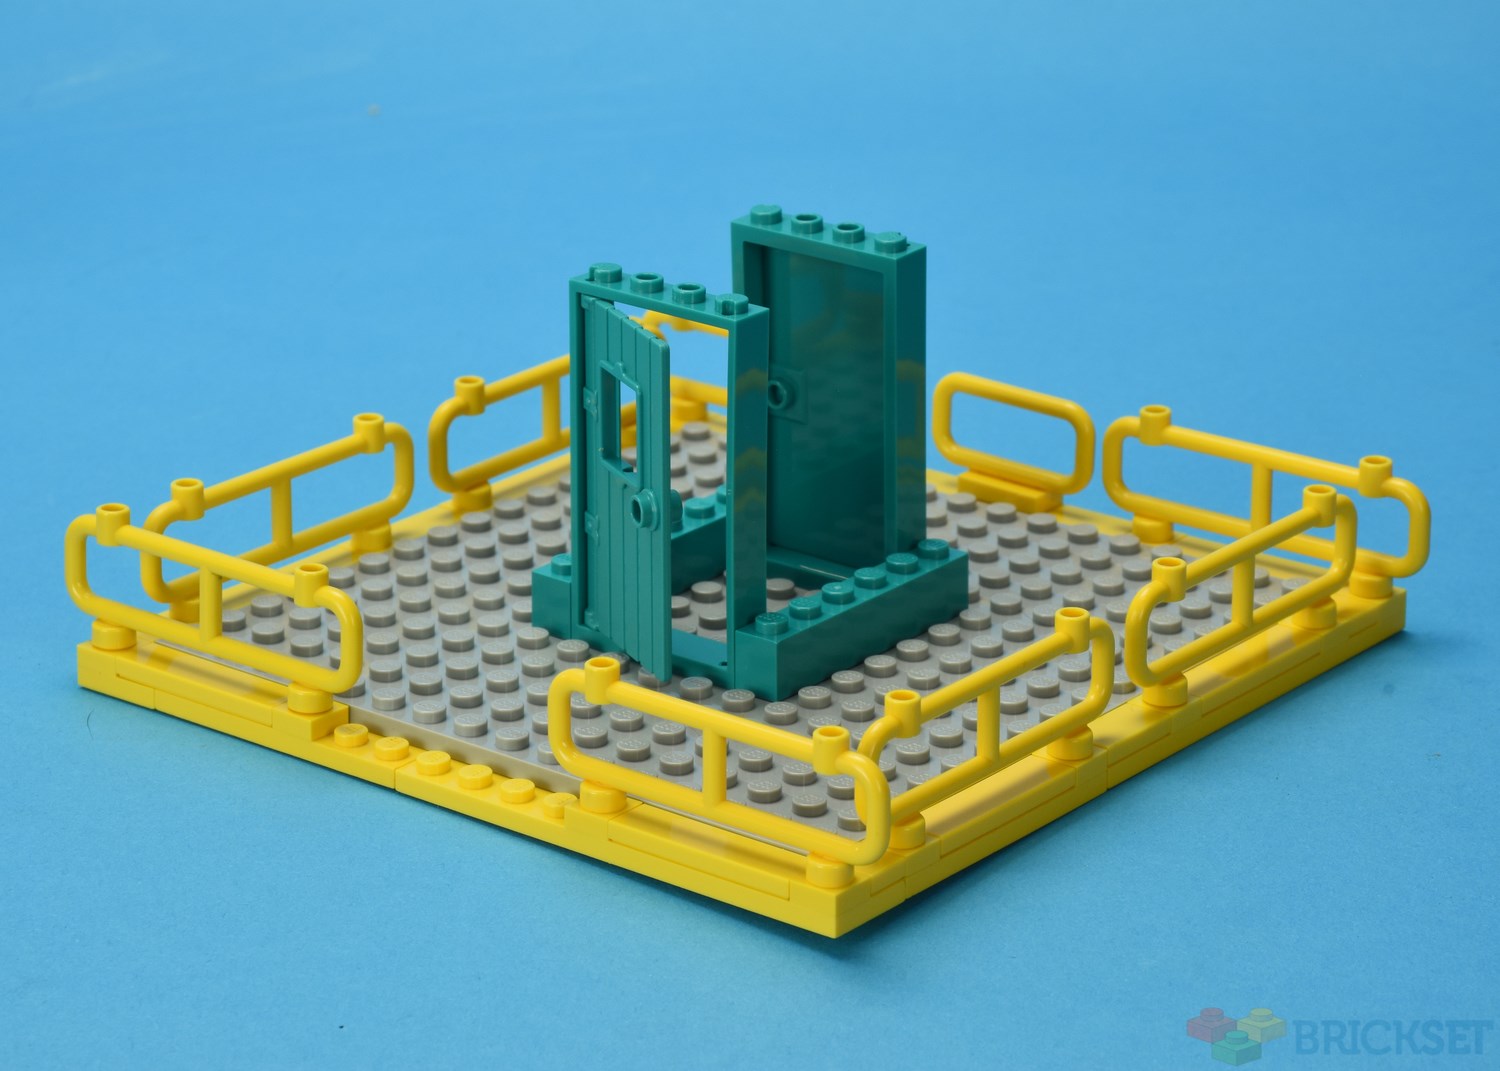
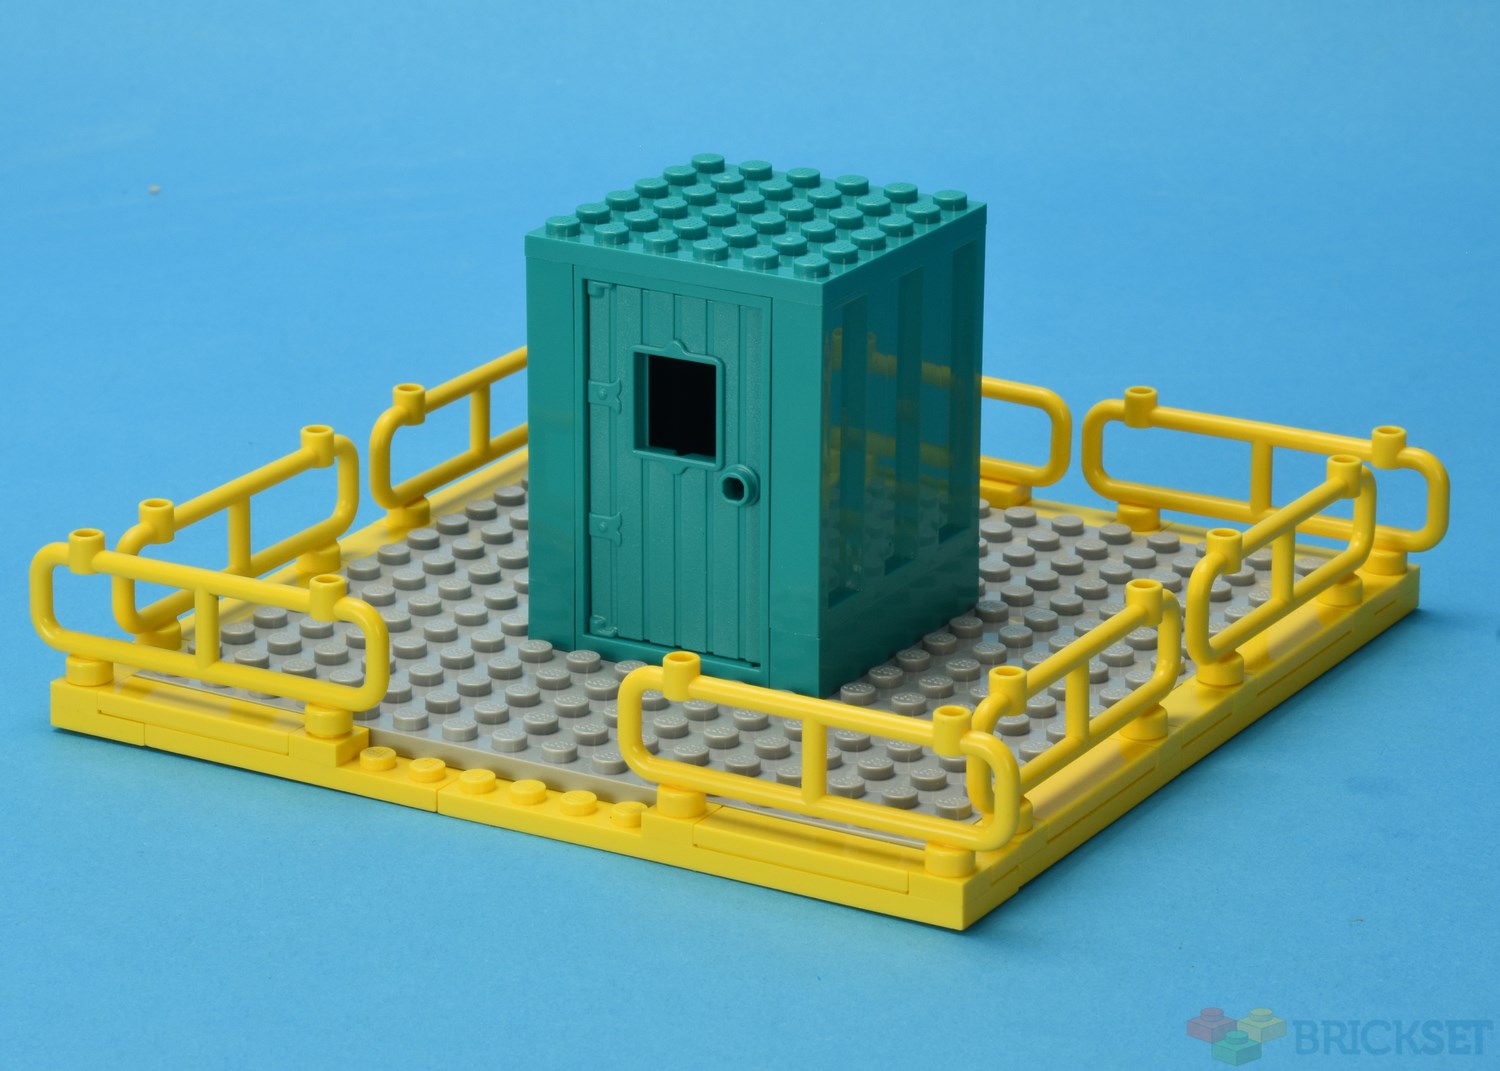
Lift house
My Launch Tower has a Bright Bluish Green (Dark Turquoise) Lift House centred on the upper level.
The lift house has been assembled using two 1x6 bricks, two doors with two 1x4x6 door frames and two 1x6x5 container wall elements. There is a 6x6 plate for the roof of lift house.
The right-hand Launch Tower has the lift lower down the tower. There is still a lift house on the upper level.
This lift is assembled using two 1x6x5 container wall elements and ten 1x4 bricks.
I have not completed this Launch Tower – I am still awaiting a Bricklink order for a few remaining parts.
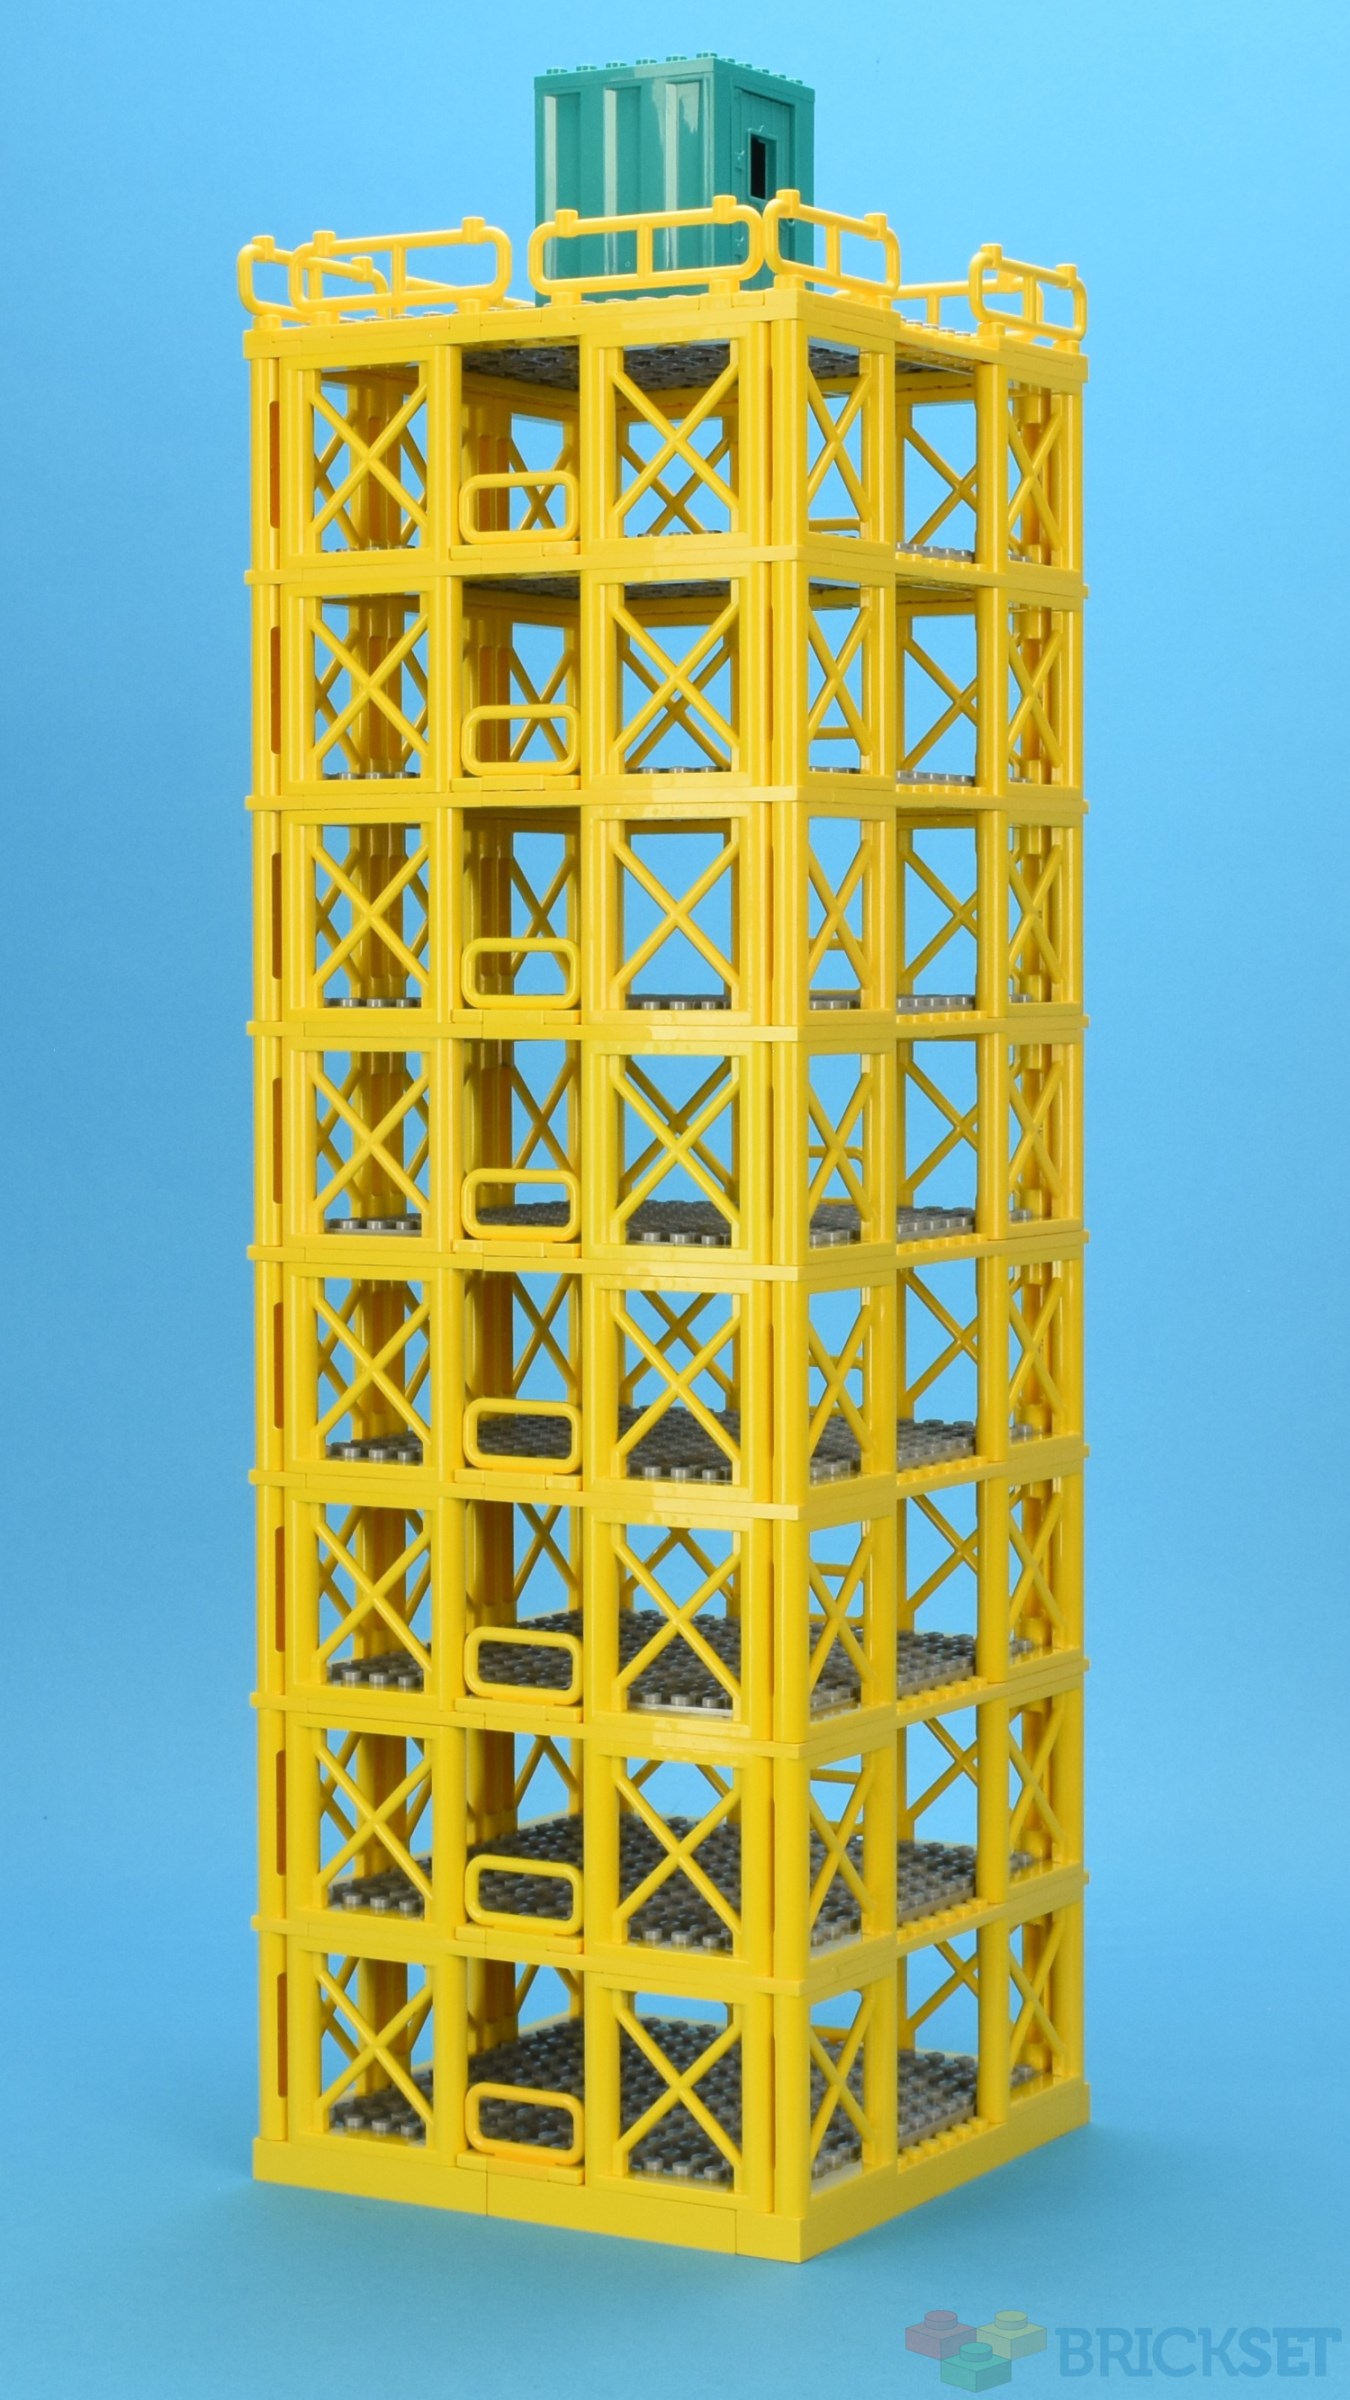
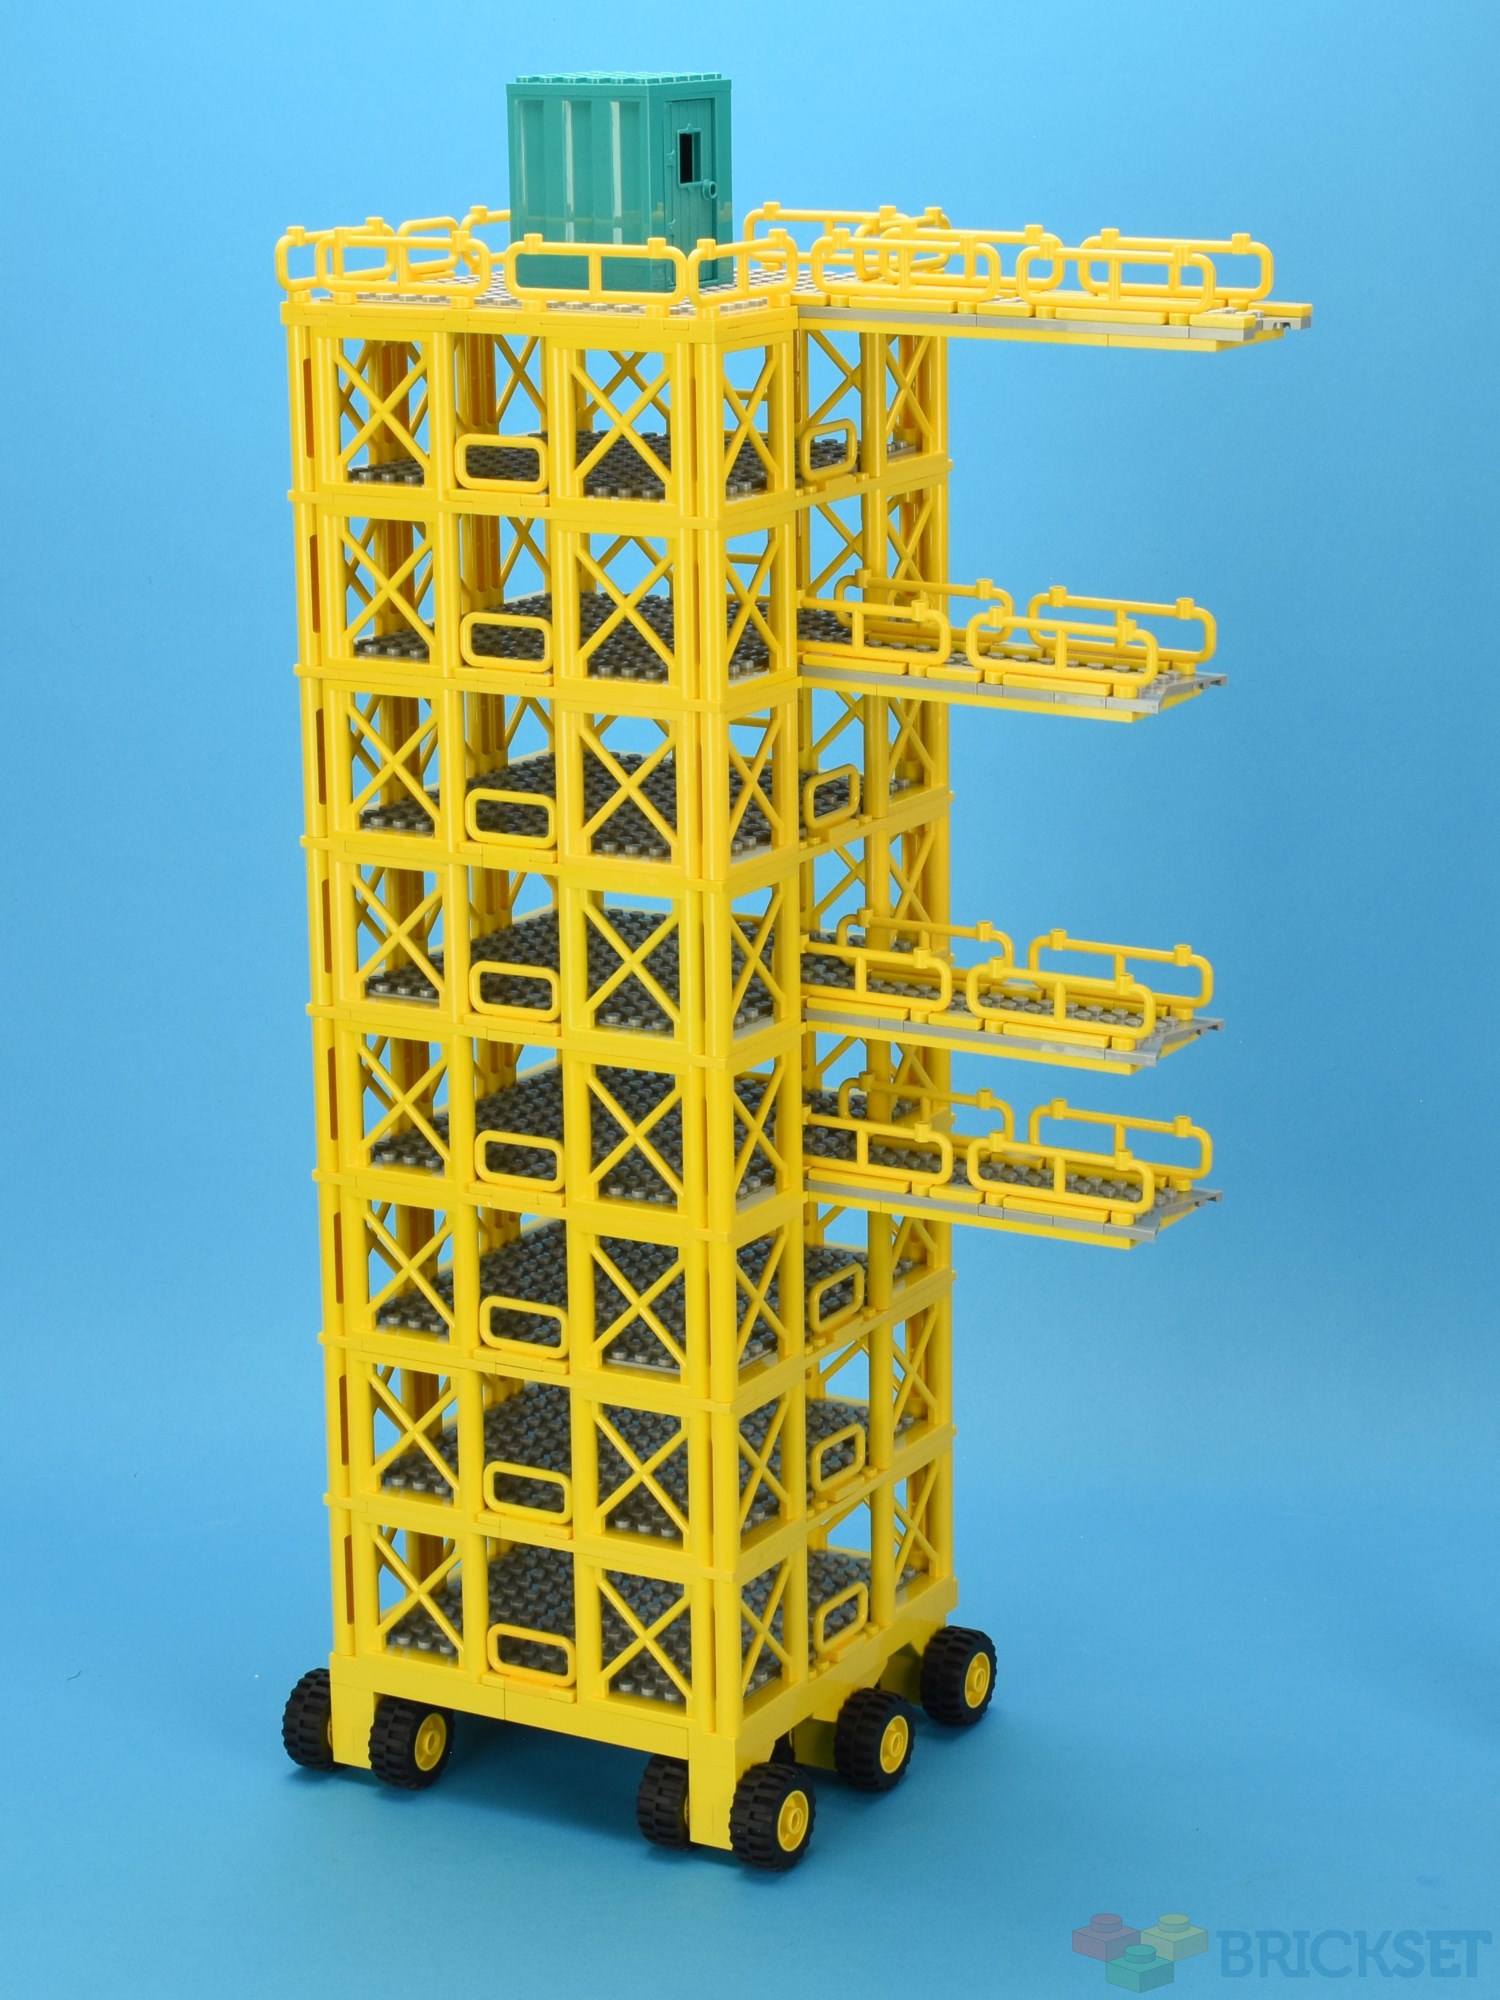
Tower
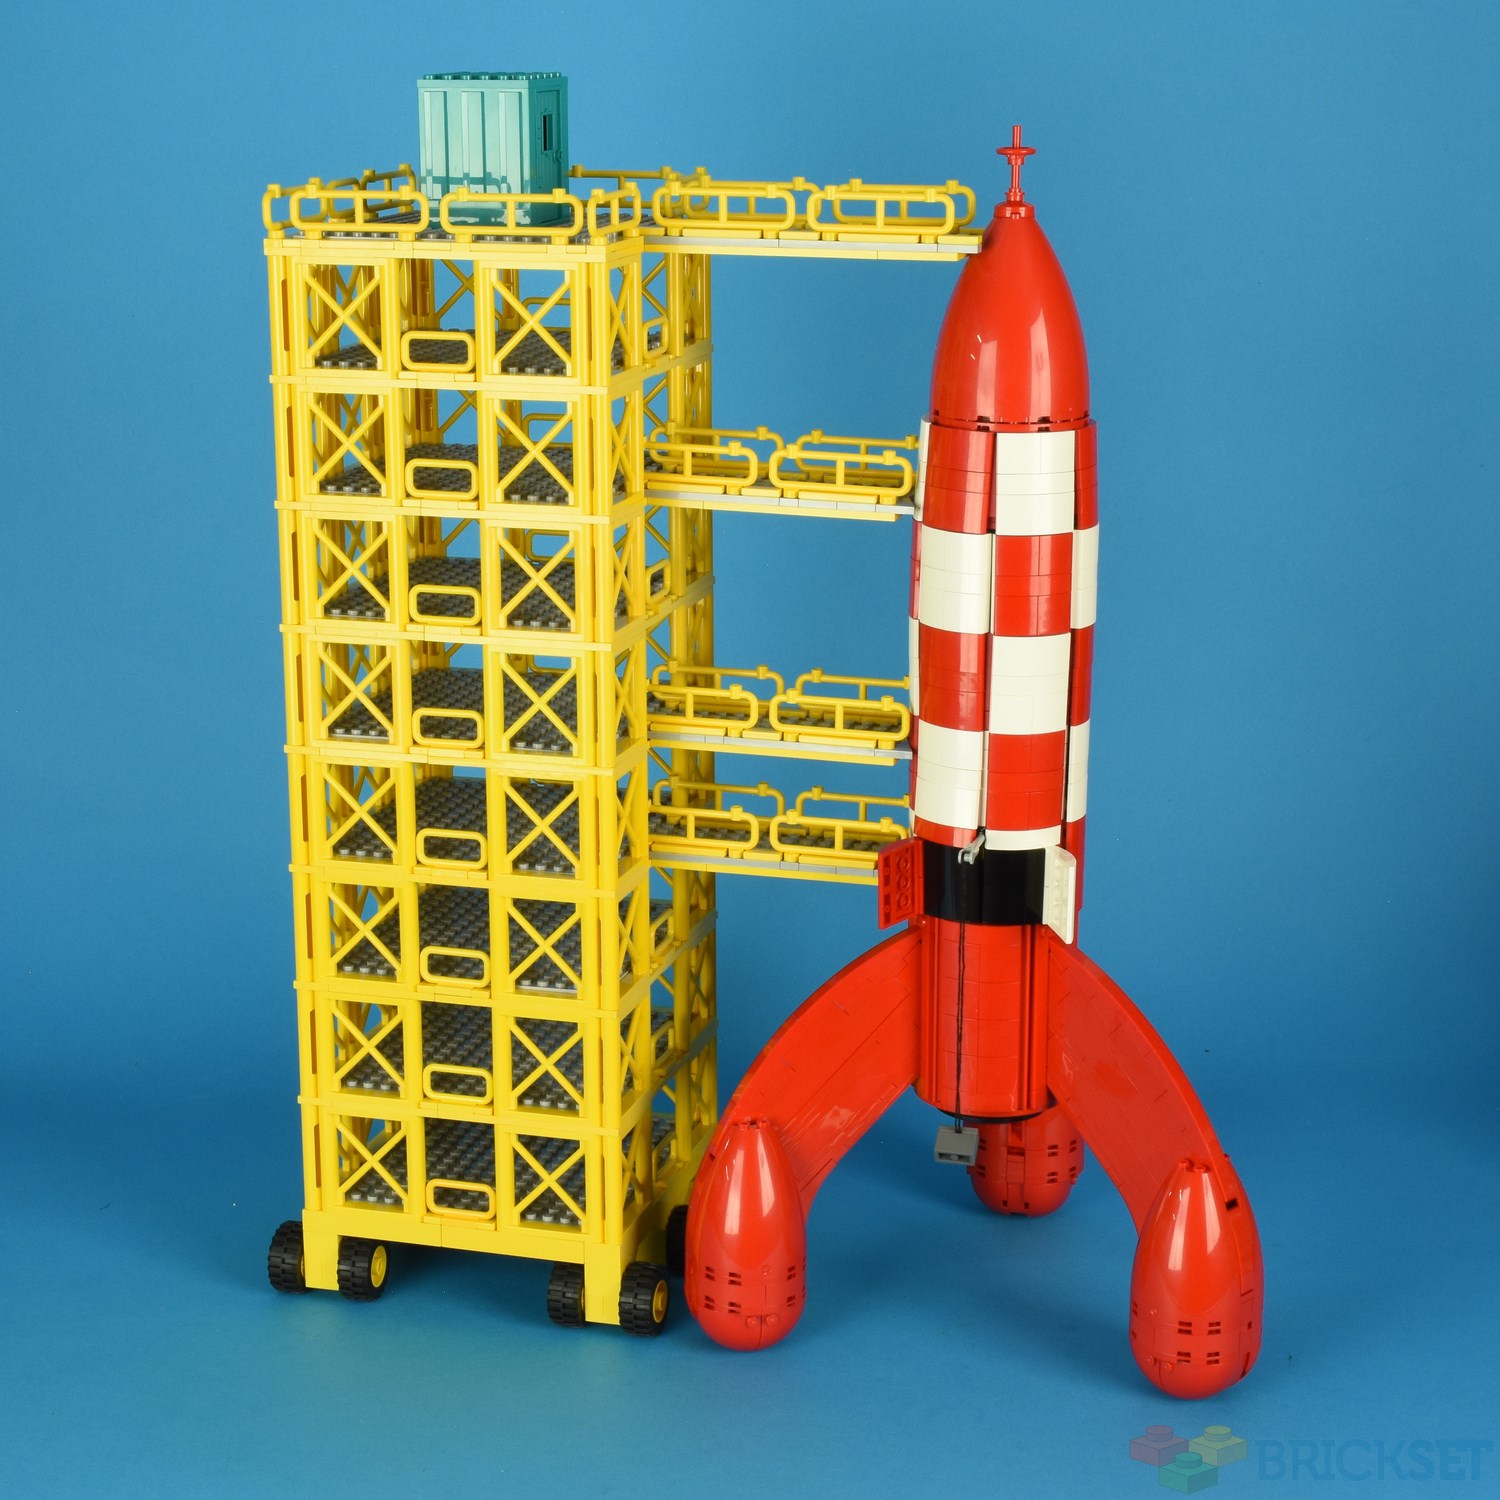
Assembling all these levels will give you the nine-story Launch Tower.
Wheels
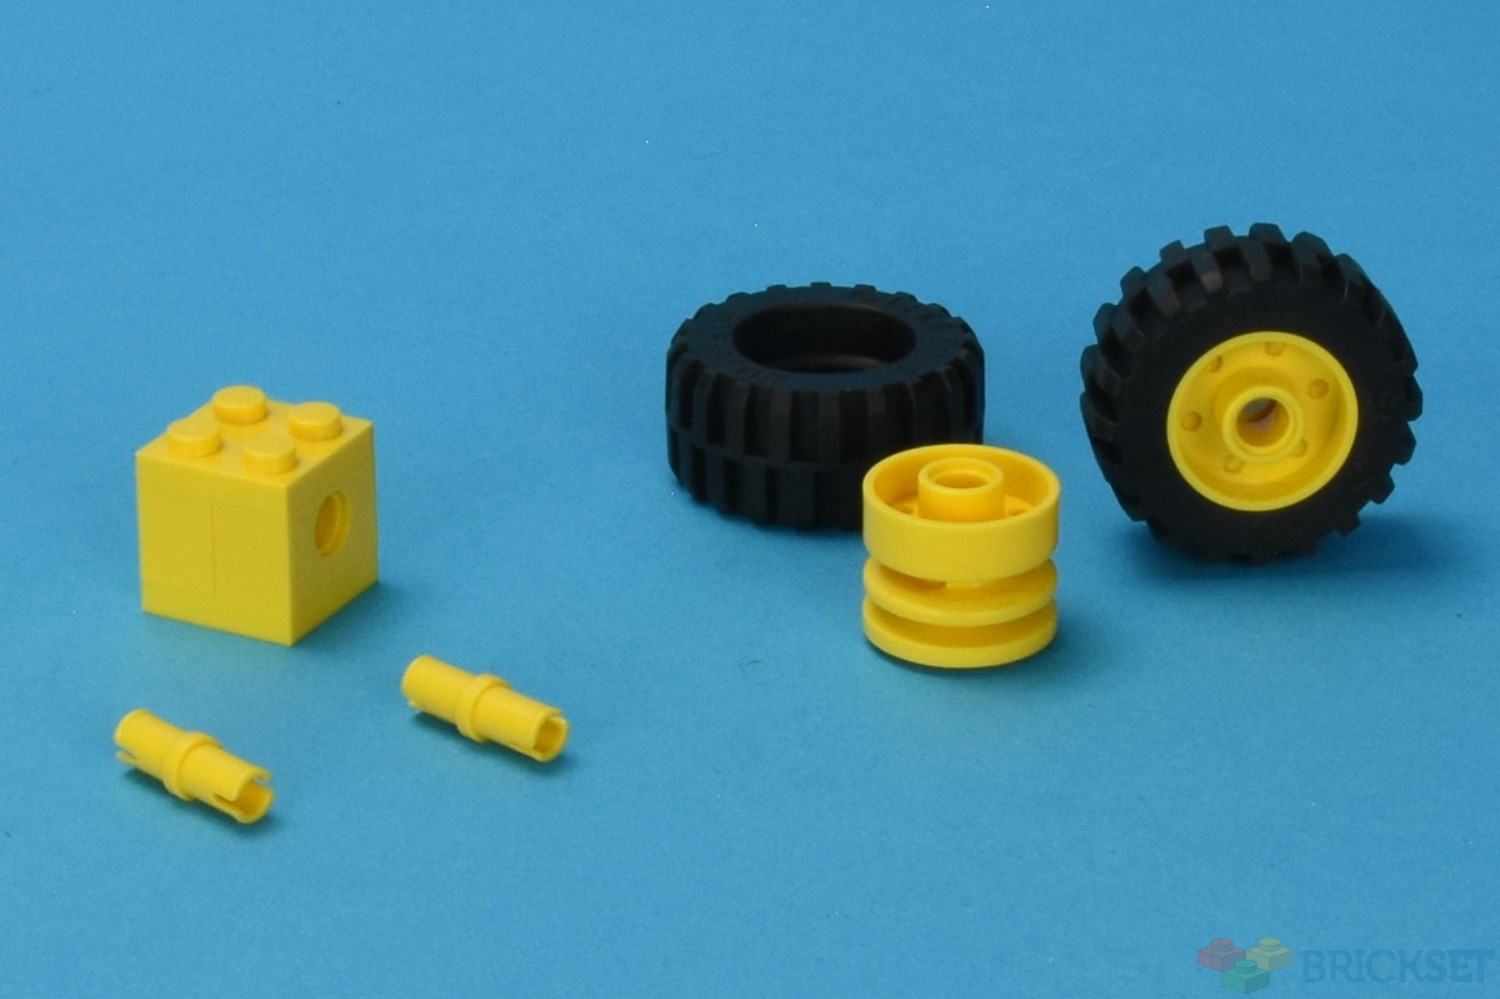
Each Launch Tower rolls back and forth on six sets of wheels.
Each wheel set is made with two 1x2 Technic bricks, two 2x2 Yellow plates and two Yellow Technic pins. There are twelve Yellow wheels and tyres.

The corner foundations of the bogies are made with four 1x2 Bricks, and four 2x2 Inv Roof Bricks.
The middle foundations have been made with four 2x3 Inv Roof Bricks.

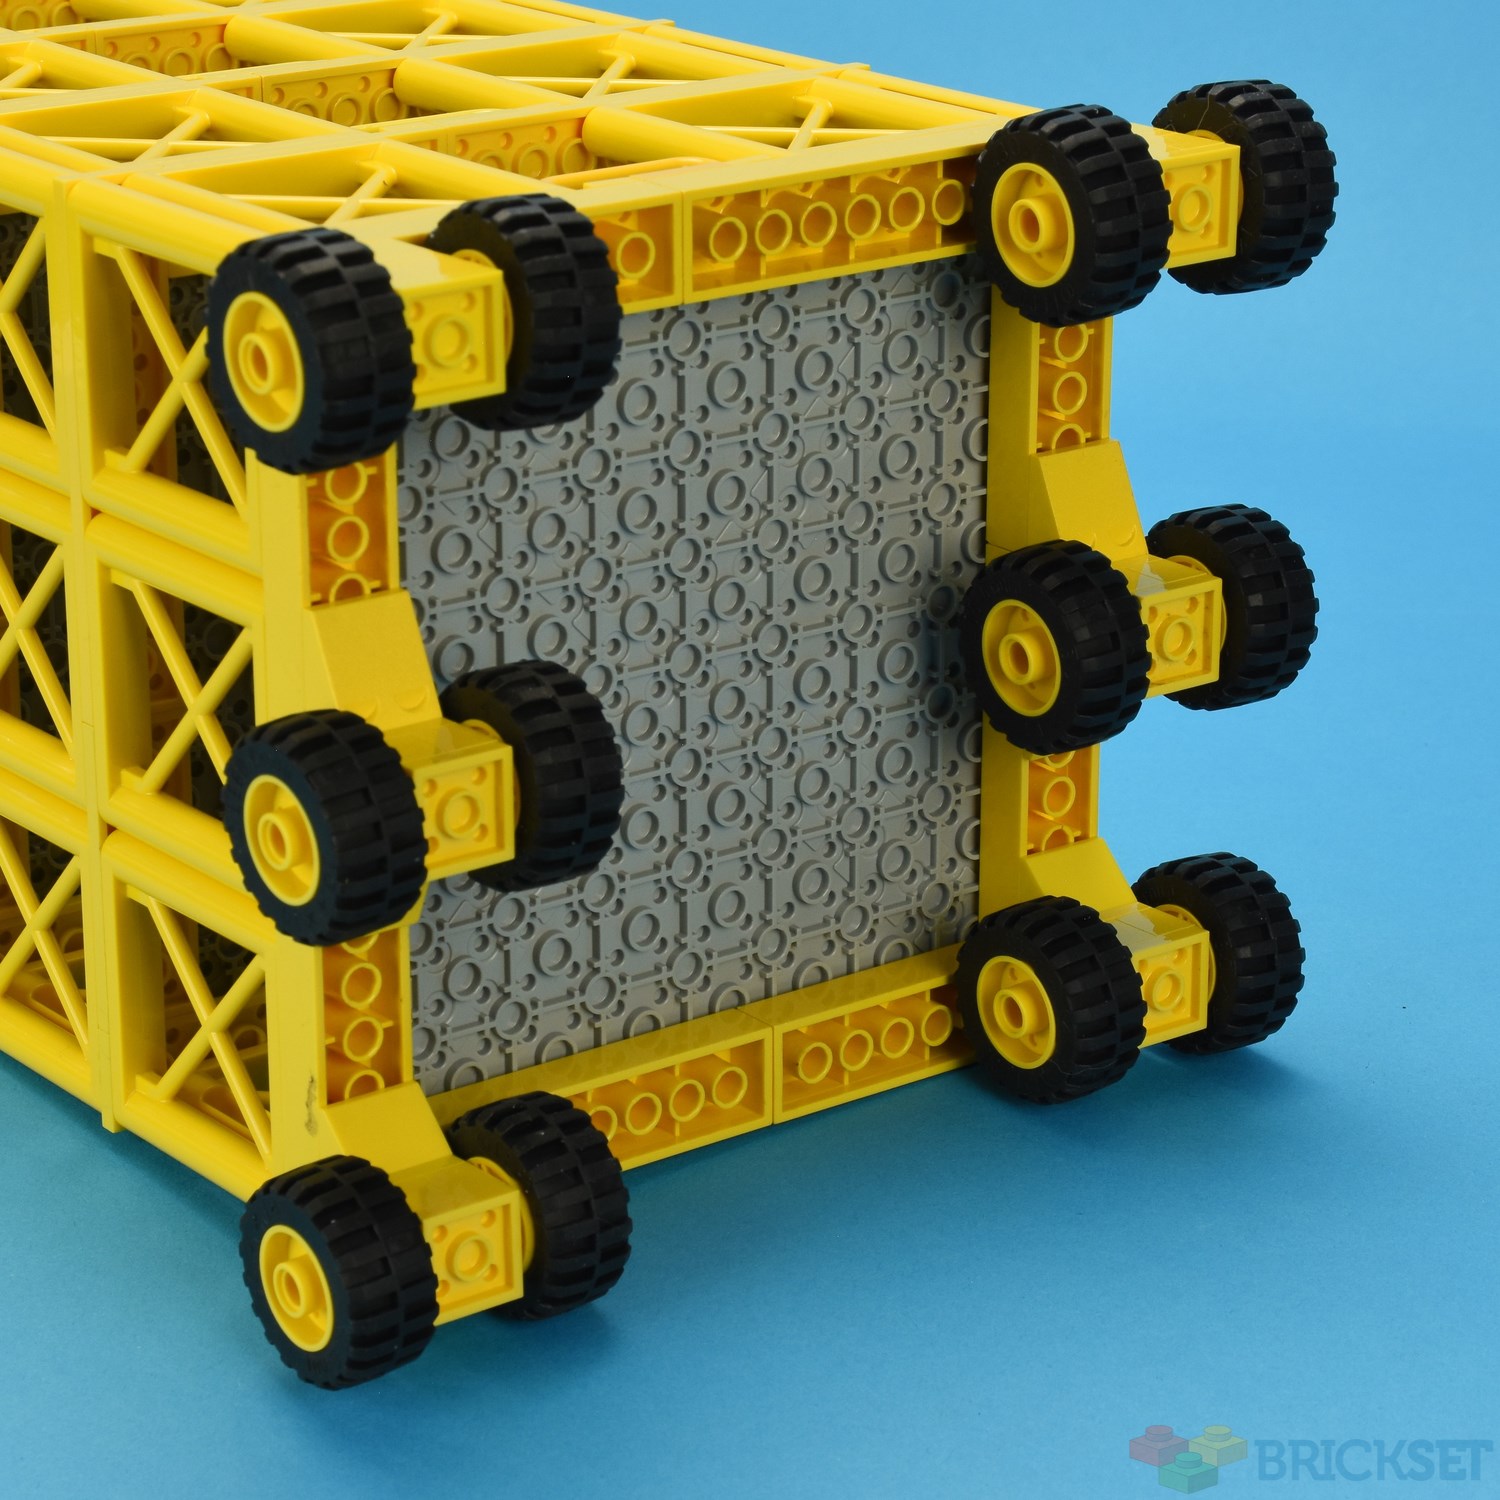
The Launch tower with the six wheel sets attached.

Extended platforms
There are four platforms which extend out to the Moon Rocket on the left-hand Launch Tower.
There are three platforms which extend out to the Moon Rocket on the right-hand Launch Tower, although one of them is not fully extended.
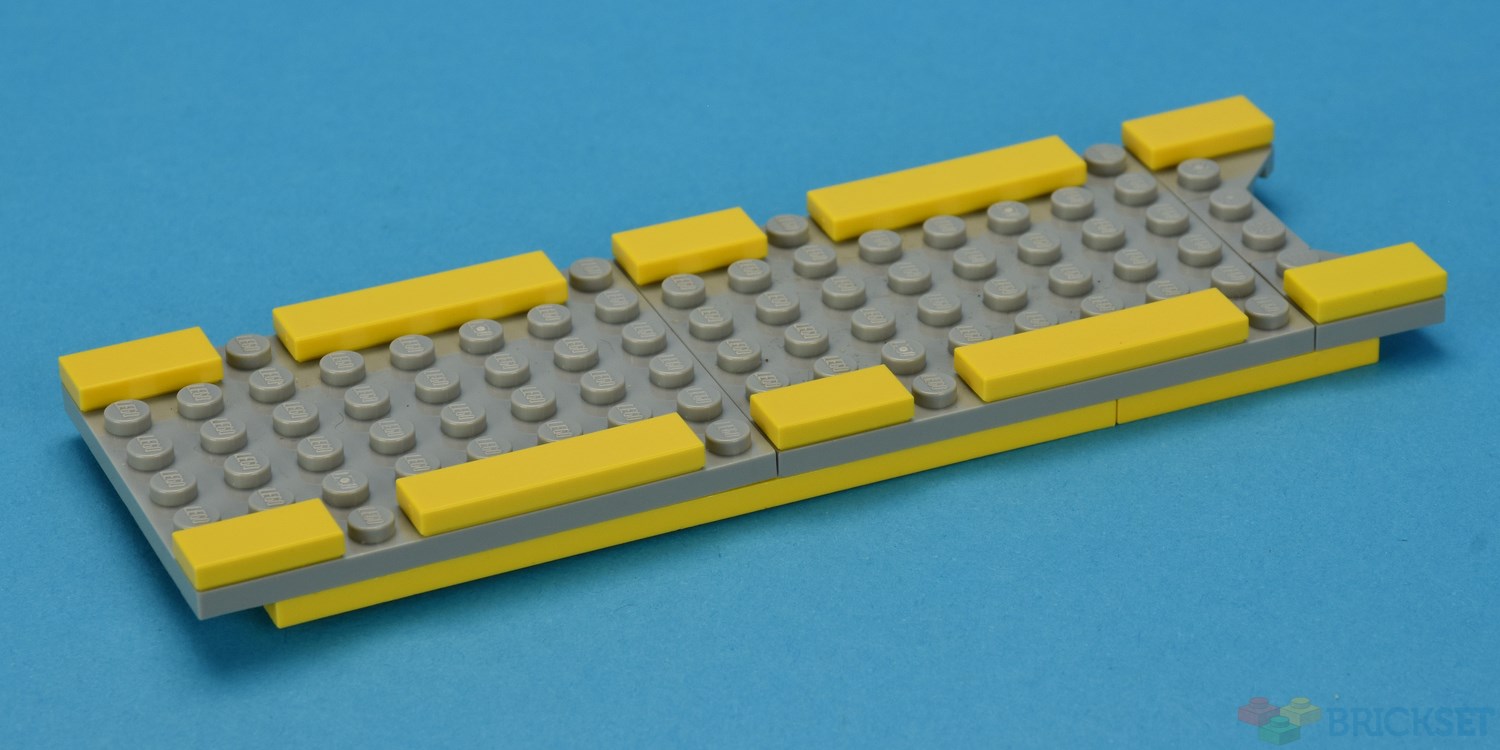
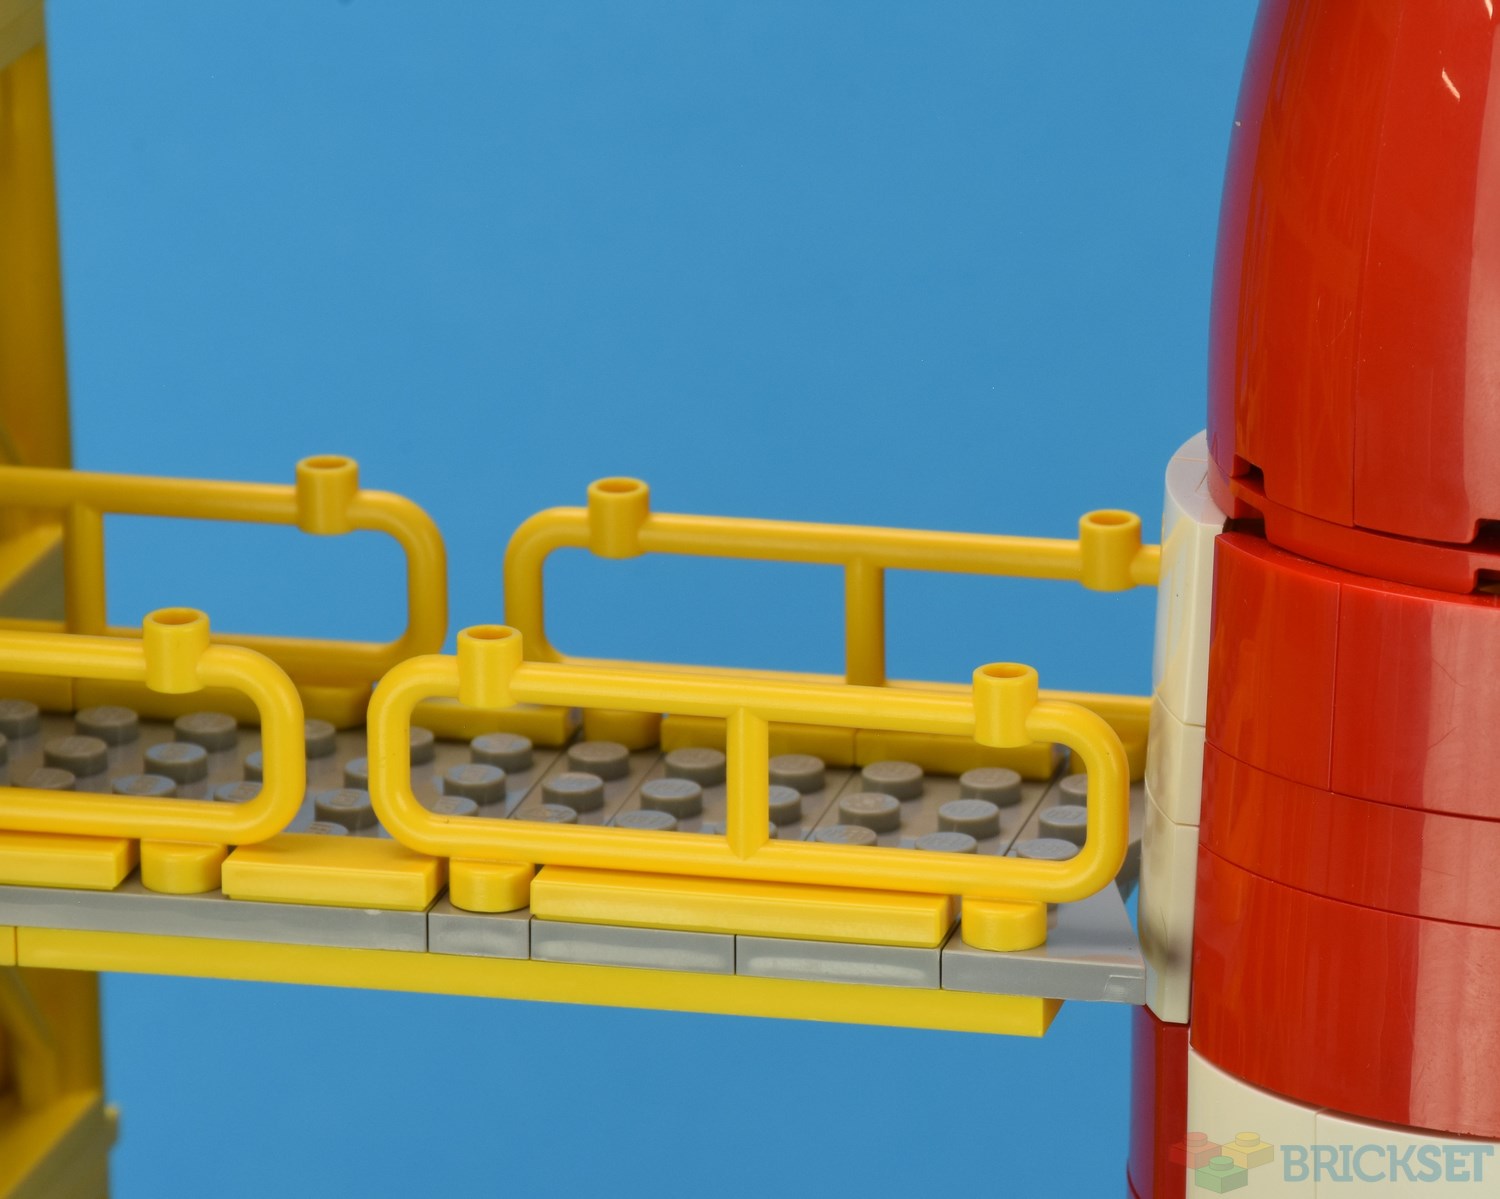
Upper extended platform
The Moon Rocket measures 30 studs wide across the Stabilising Fins, and the Launch Tower wheels extend out two studs from the tower base. At the level of the upper platform, The Moon Rocket's diameter is four studs.
Doing all the maths, the upper extended platform needs to be eighteen studs long for it to be long enough to reach the Moon Rocket while leaving sufficient room for the Stabilising Fins to be clear of the Launch Tower wheels. One row of studs are used to connect the extended platform to the Launch Tower deck.
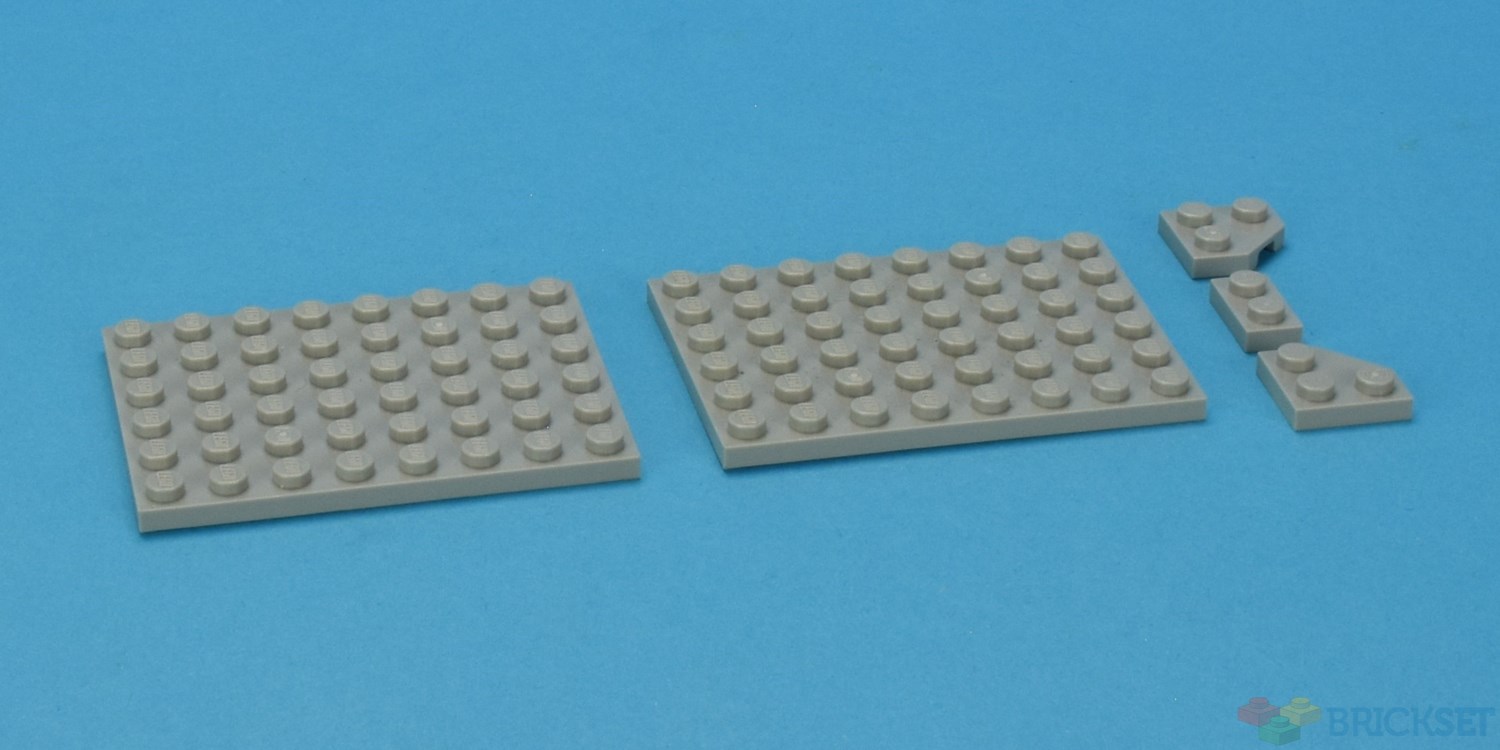
The Medium Stone Grey coloured upper extended platform is assembled using two 6x8 Plates, two 2x2 Corner plates and one 1x2 Plate.
The underside of the extended platform is reinforced using two 1x12 plates, two 1x4 plates and one 2x4 plate, although there are many alternative arrangements that could be used here.
The upper edge has six 1x2 tiles and four 1x4 tiles.

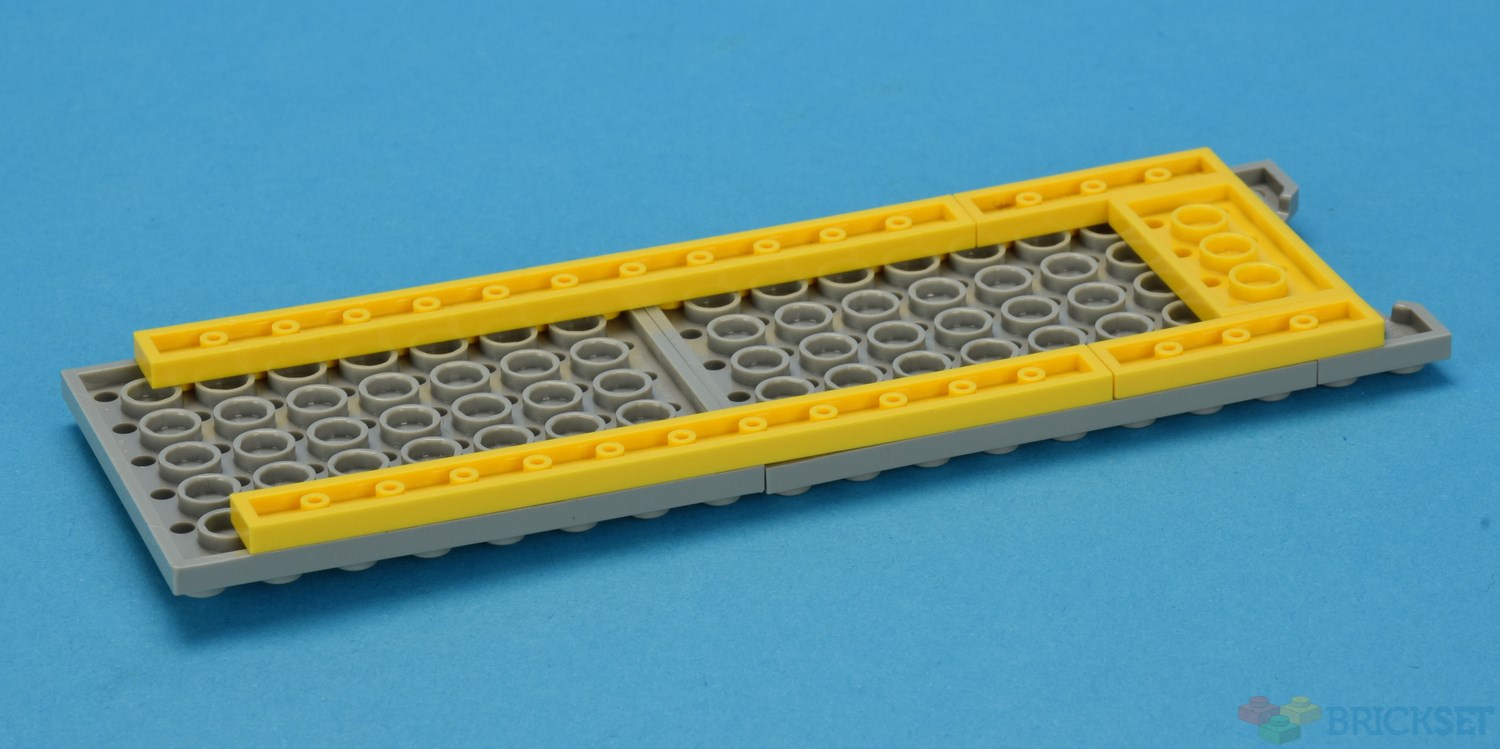
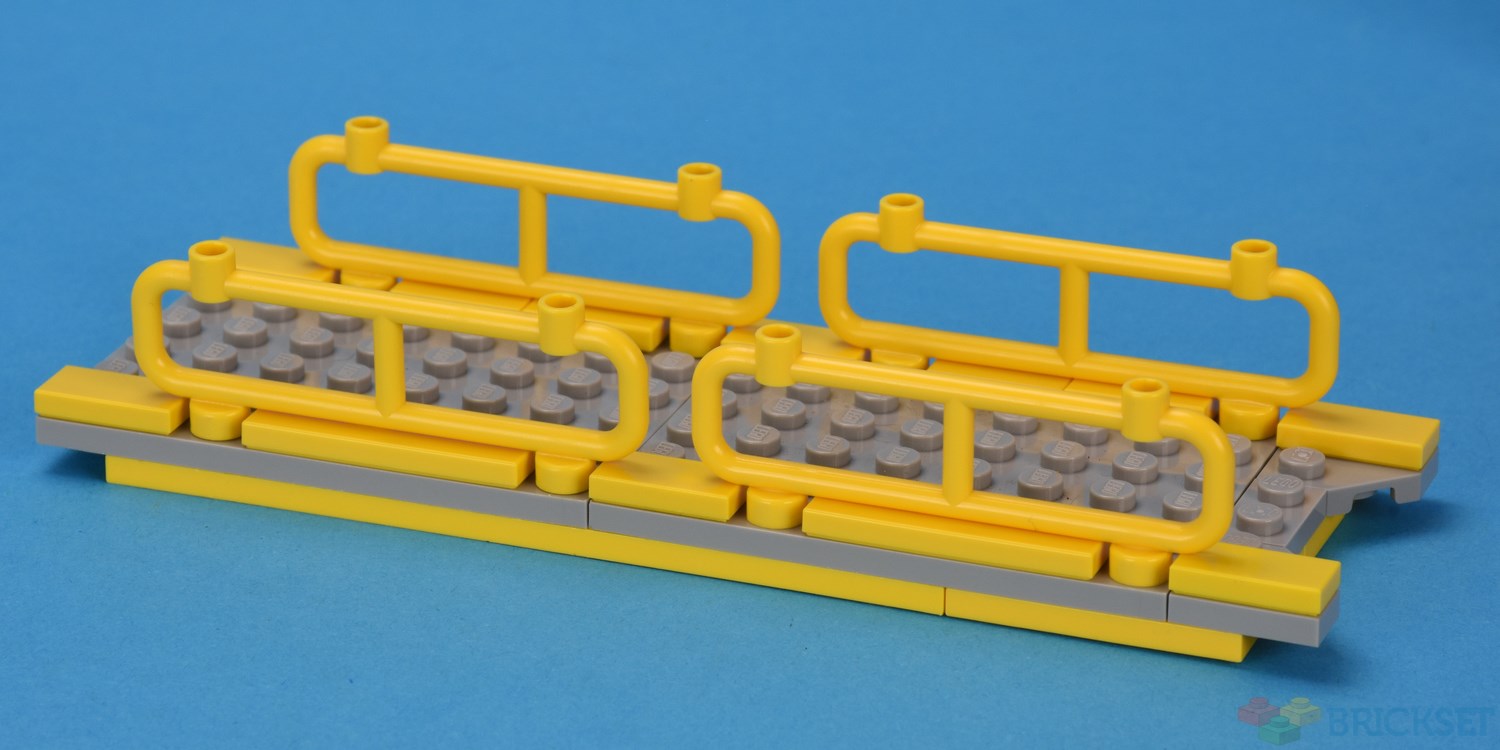
The upper extended platform is finished off with four 1x8x2 Balustrades.
The three shorter extended platforms
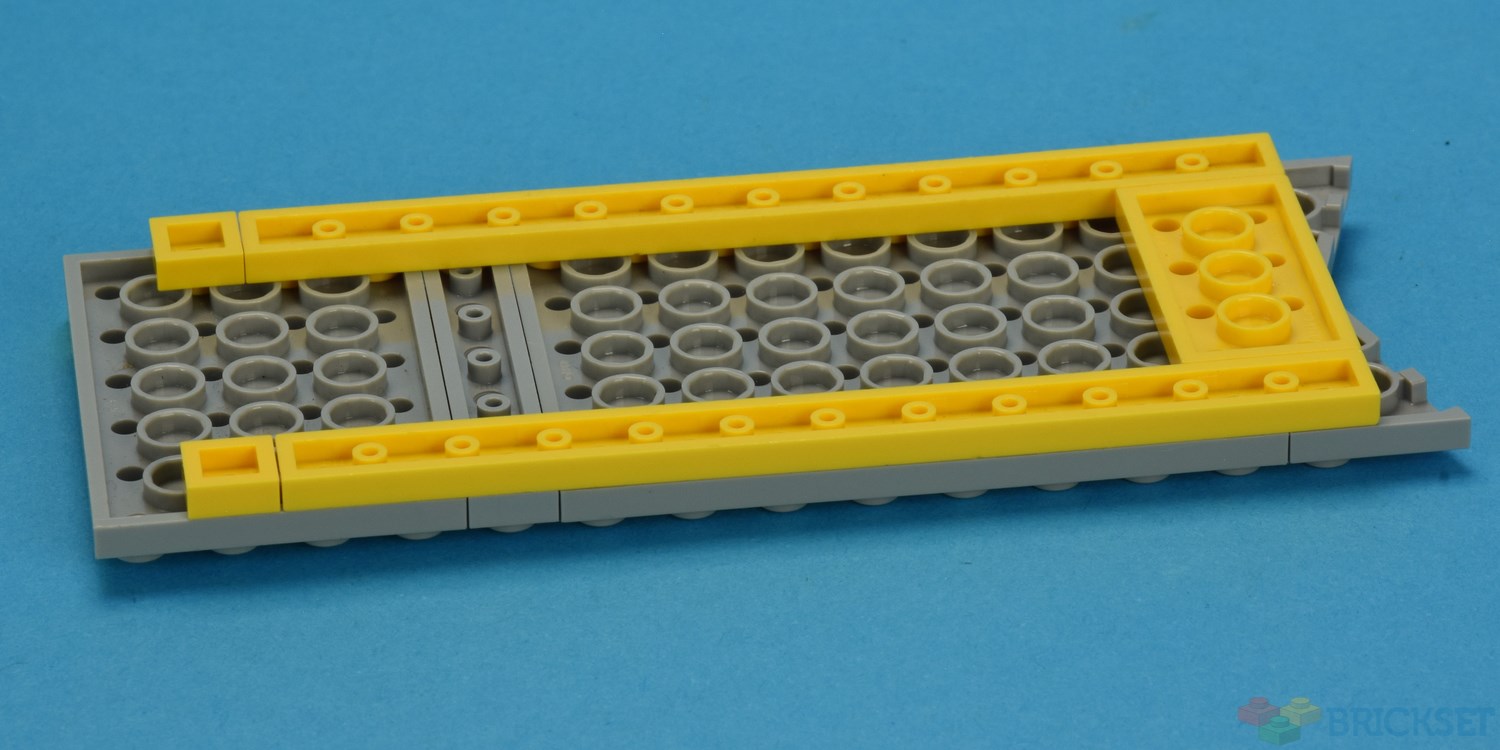
The Moon Rocket is nine studs in diameter at the levels of the three shorter platforms. The shorter platforms need to be fifteen studs long for them to be long enough to reach the Moon Rocket.
There are three identical short extended platforms.
The Medium Stone Grey coloured shorter extended platform is assembled using one 6x8 Plate, one 1x6 Plate and one left and one right 2x3 Wedge plates.
The underside of the extended platform is reinforced using two 1x12 plates, two 1x1 plates and one 2x4 plate, although there are many alternative arrangements that could be used here.
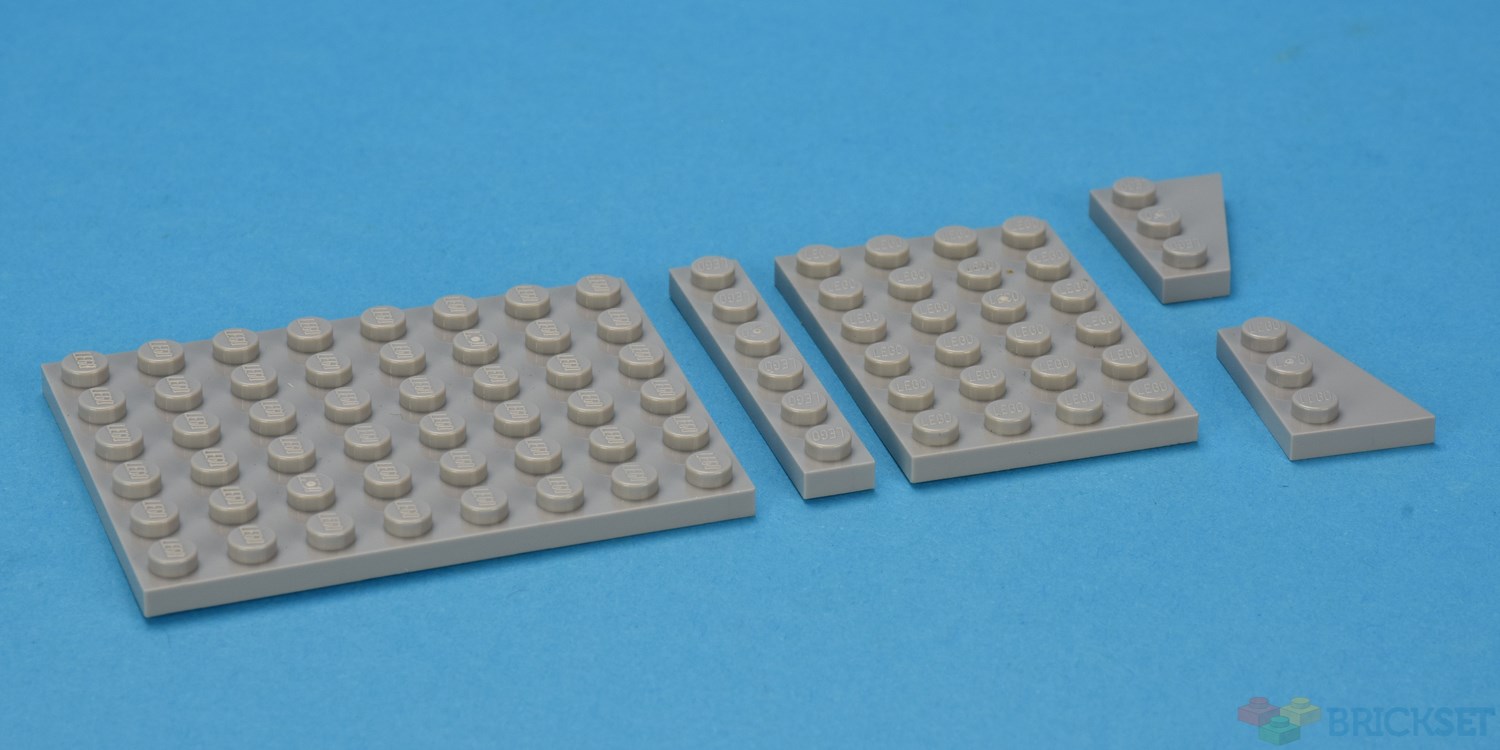
The upper edge has two 1x2 tiles and four 1x4 tiles.
The short extended platform is finished off with four 1x8x2 Balustrades.
Completed tower
The Moon Rocket
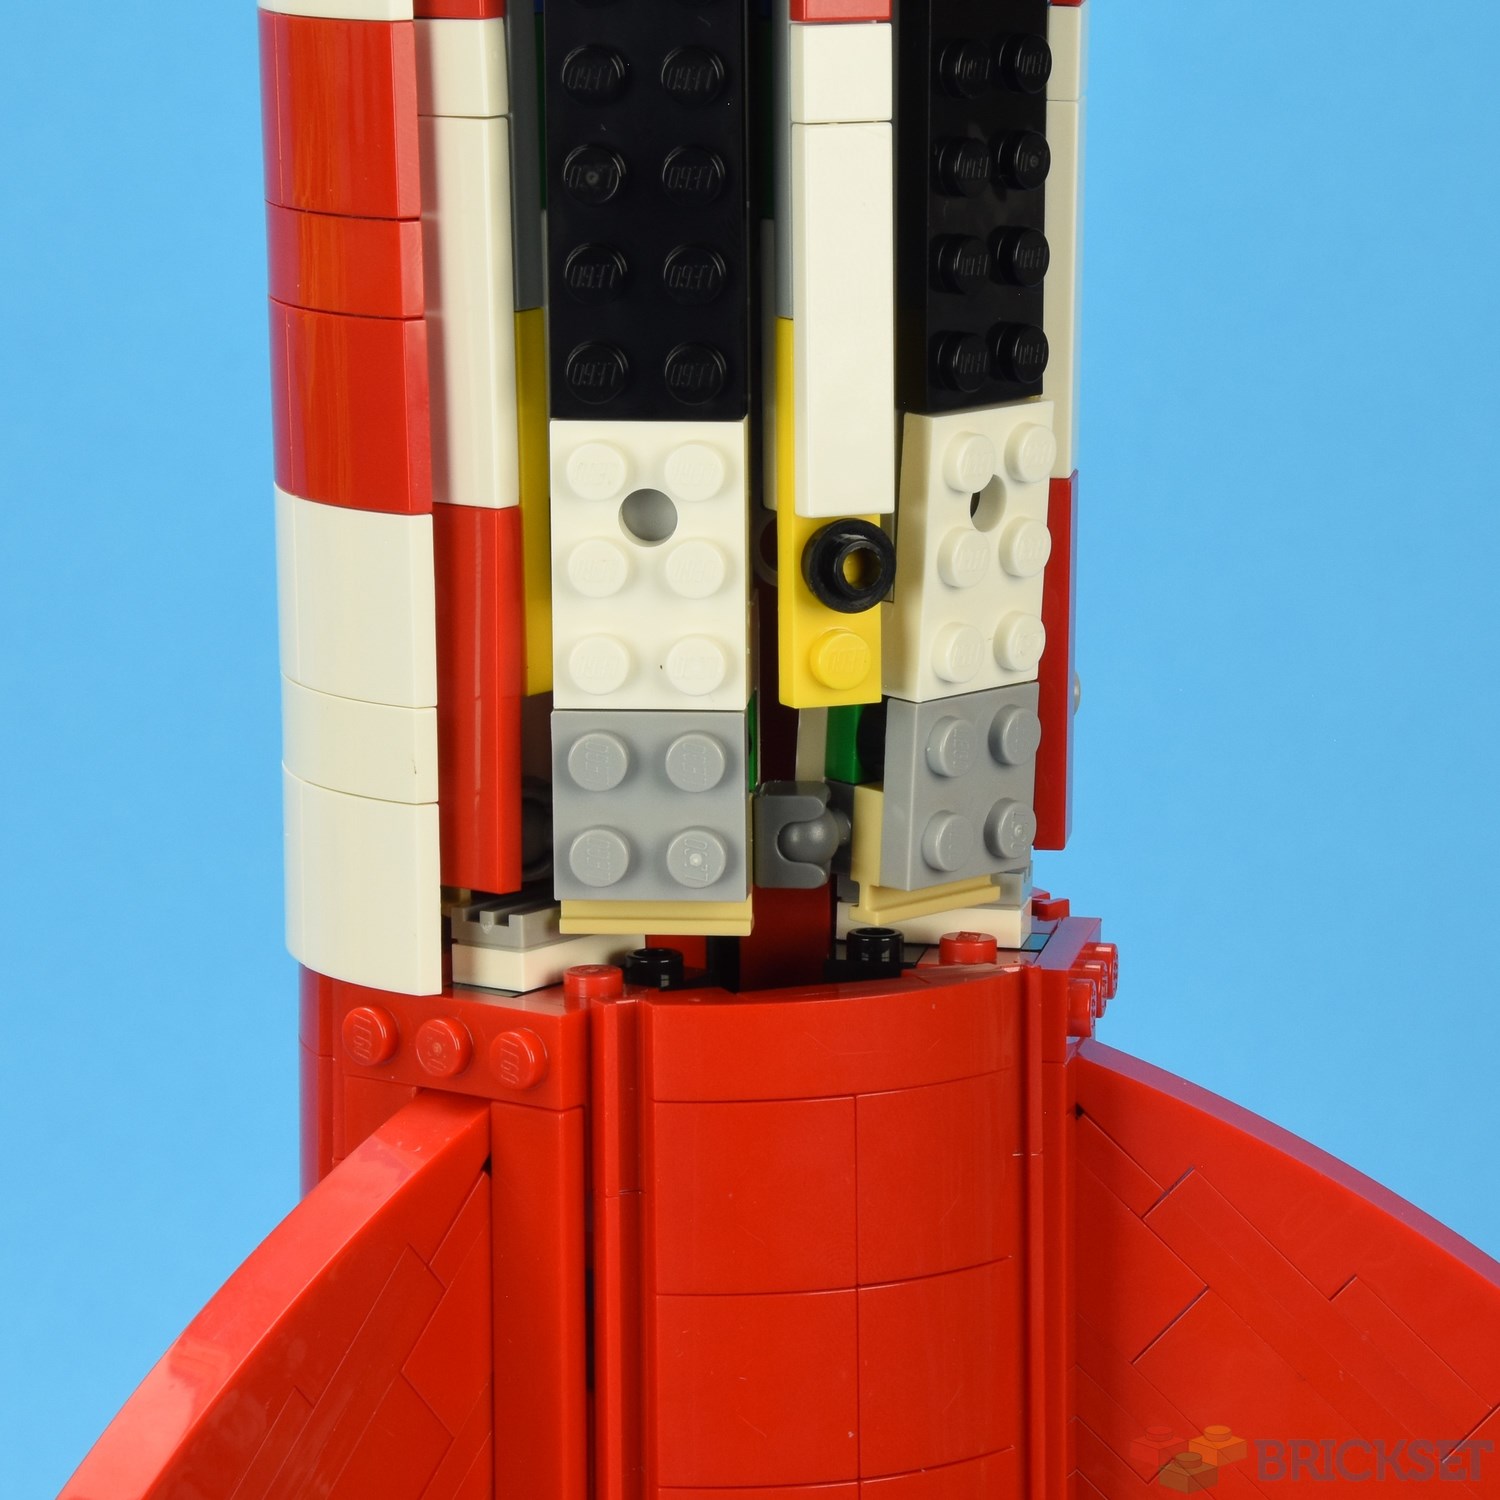
I have modified the Moon Rocket to give it the impression that there is a pair of doors open.
A word of caution. Undertaking these modifications can be very frustrating as the internal structure of the Moon Rocket is quite fragile.
Step 1 – Remove two of the chequered panels.
Shorten them by four studs. To do this, you will need two 2x8 plates of any colour and one each of a red and white 2x2 plate. See the left image below.
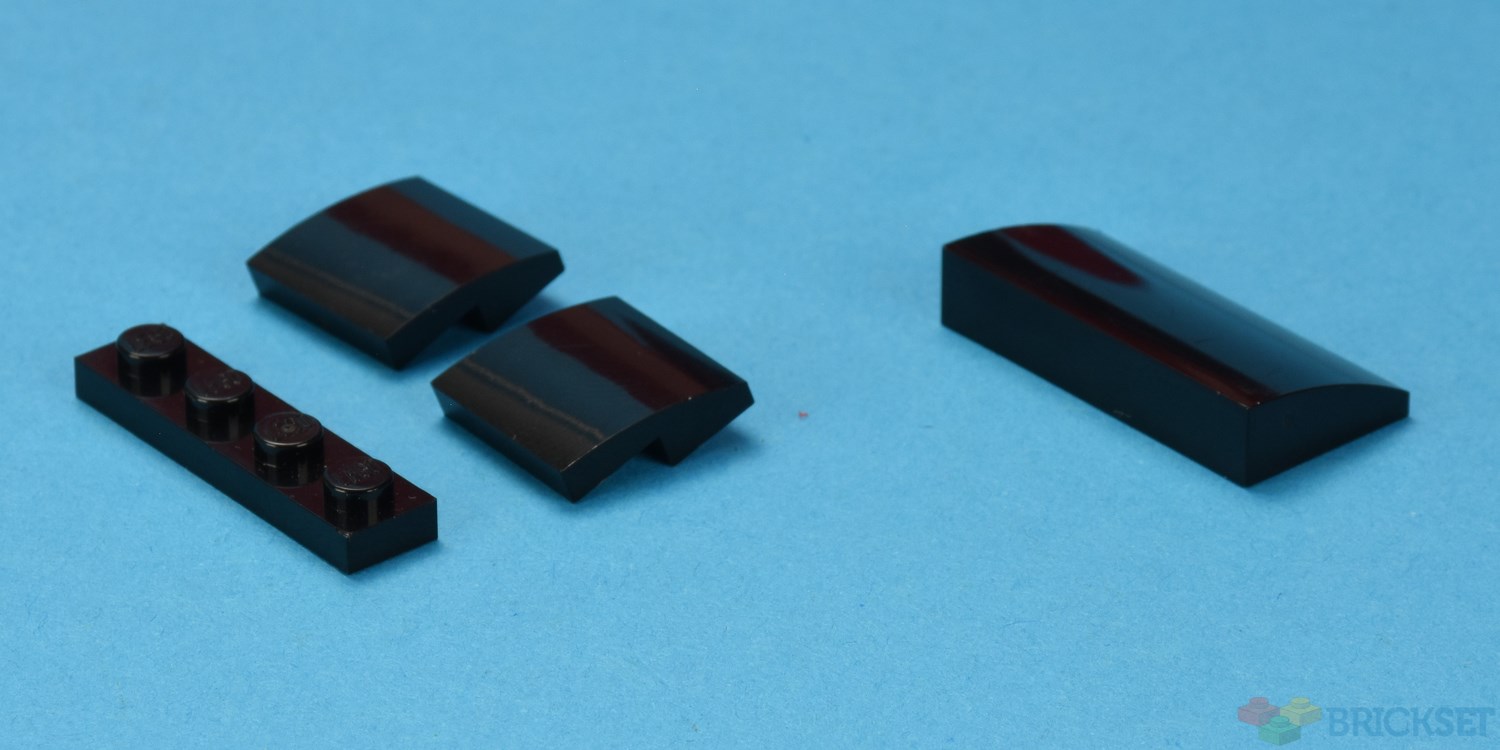
Step 2 – Build two 4x4 doors.
See the right image below. You will need:
- One each of red and white 2x4 plates,
- Two each of red and white Angular Plate 1.5 Bot. 1x2 1/2, and
- Two 1x4 black tiles
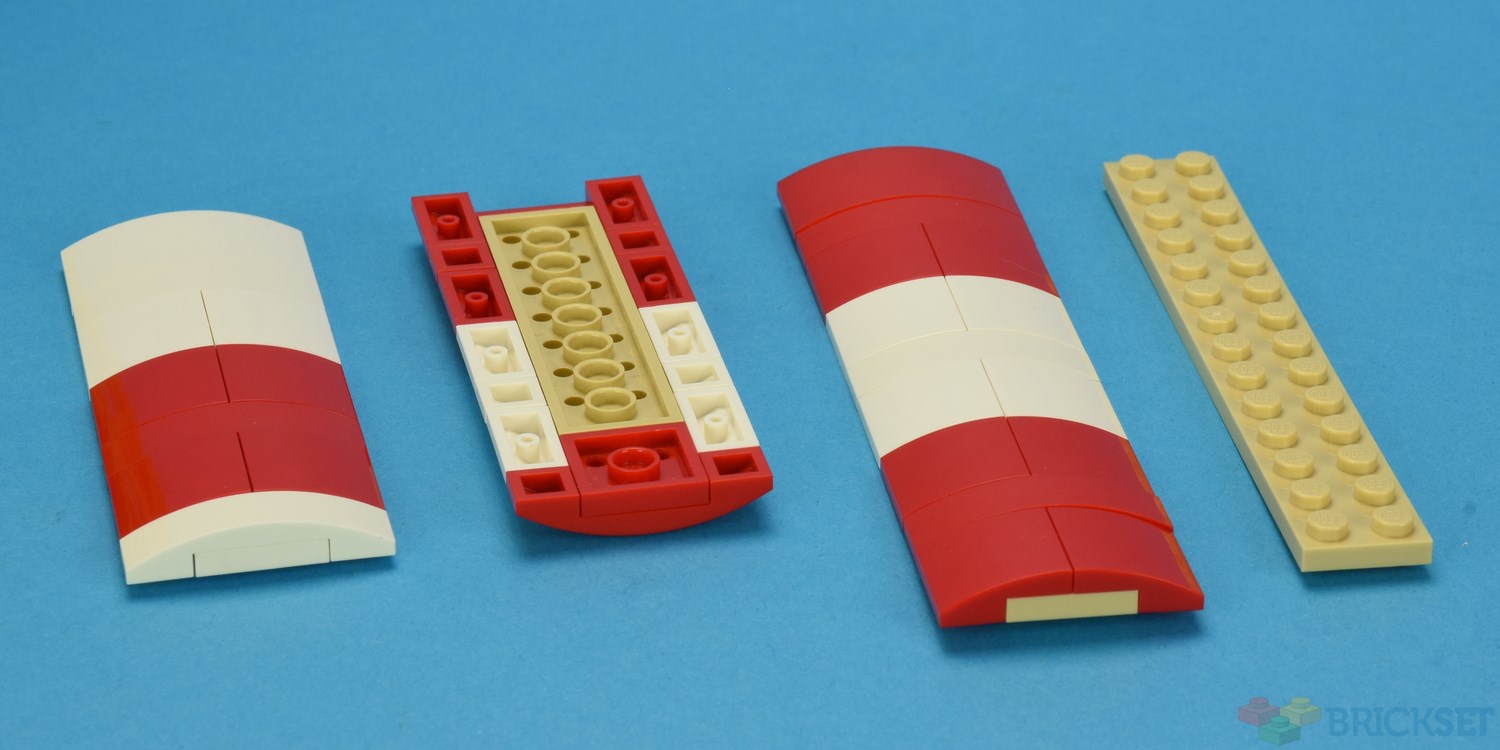

The two doors assembled.

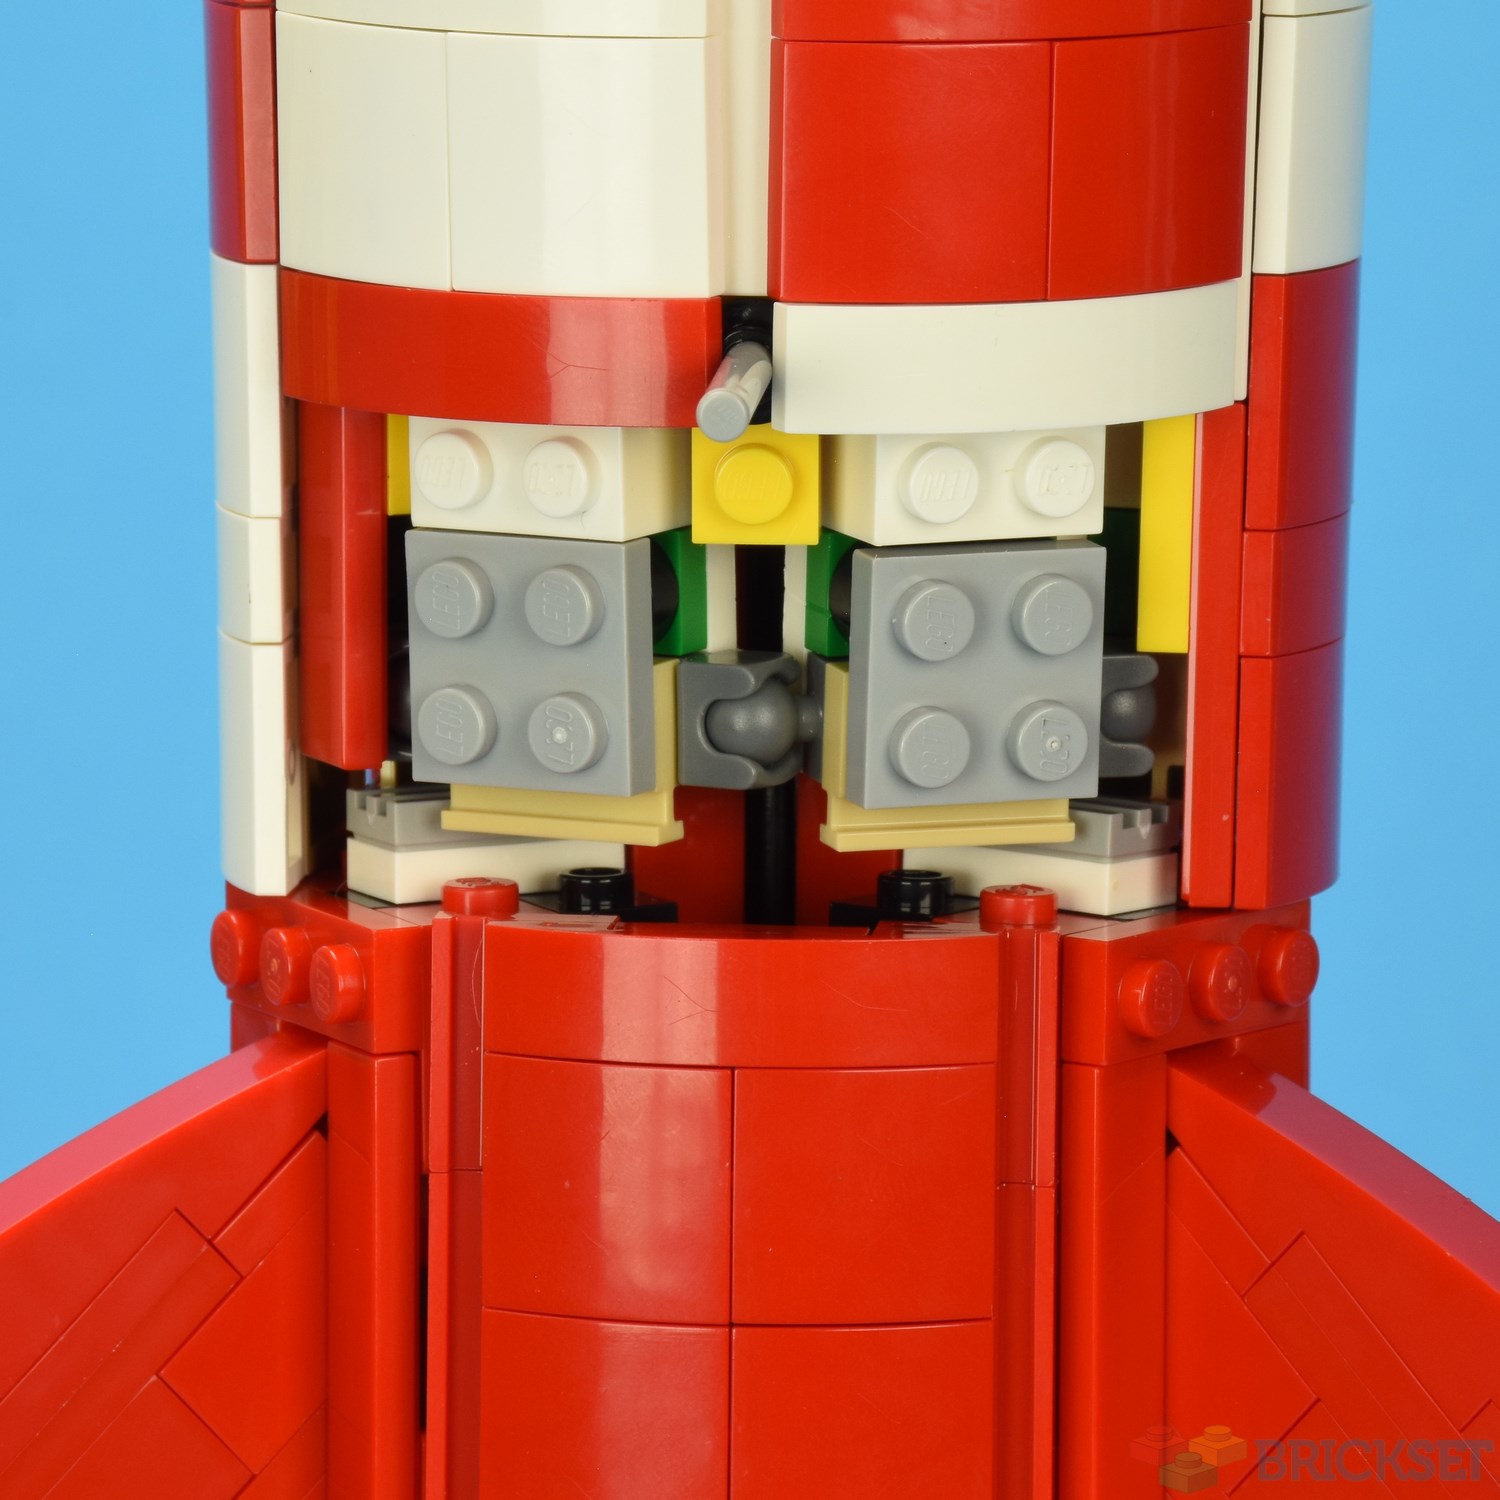
Step 3 – Prepare the door area.
I have removed one 1x4 red tile that would normally sit between the two panels ai removed as described above. In its place, I have added one 1x1 round stud with through hole , also known as an Apollo stud (image left).
The two shorter curved panels have been reinstated. A Medium Stone Grey 3M shaft has been installed as the Moon Rocket's crane (image right).
I want to repeat the warning: the Moon Rocket internal structure is quite fragile, so take care during these steps.
Apollo stud
It is appropriate here to have a shout-out to Tim Johnson at New Elementary and him coining the phrase Apollo Stud to describe the LEGO element: 1x1 round stud with through hole.
When this new element was released in 2014, it is said that Tim misheard the LEGO design team describe this new element. Allegedly, what was said was that the element had a hollow stud and that Tim misheard that statement and accidentally christened the element as an Apollo stud ... and the name stuck!
Artemis is the twin sister to Apollo. The Artemis and Apollo space programs have involved sending people to the moon.
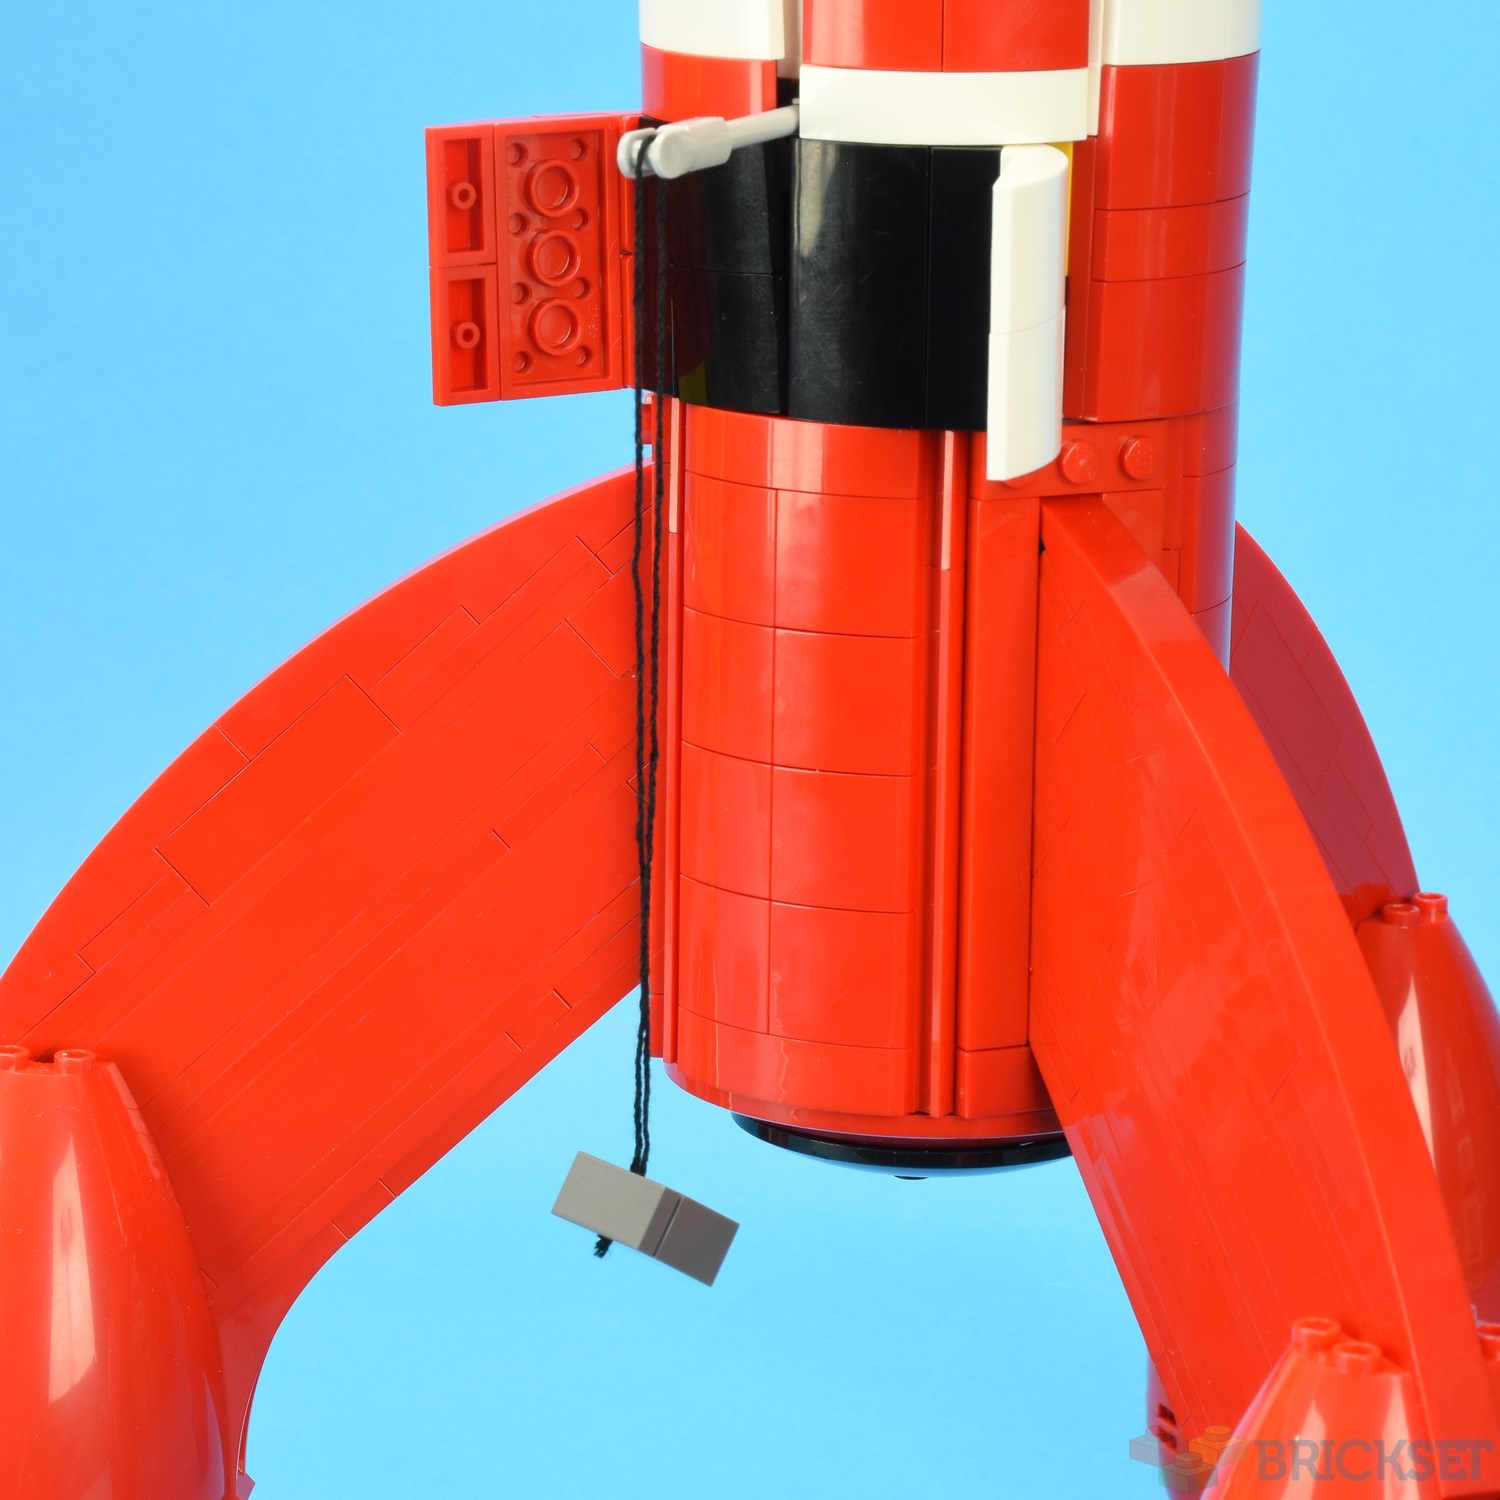
Step 4 – Install the doors.
The two doors have been attached. The remaining gap can be filled with either four black Plate W. Bow 2X2X2/3 or two Plate W. Bow 2x4x2/3 elements. If using the smaller curved plates, a 1x4 black plate is also needed (image left).
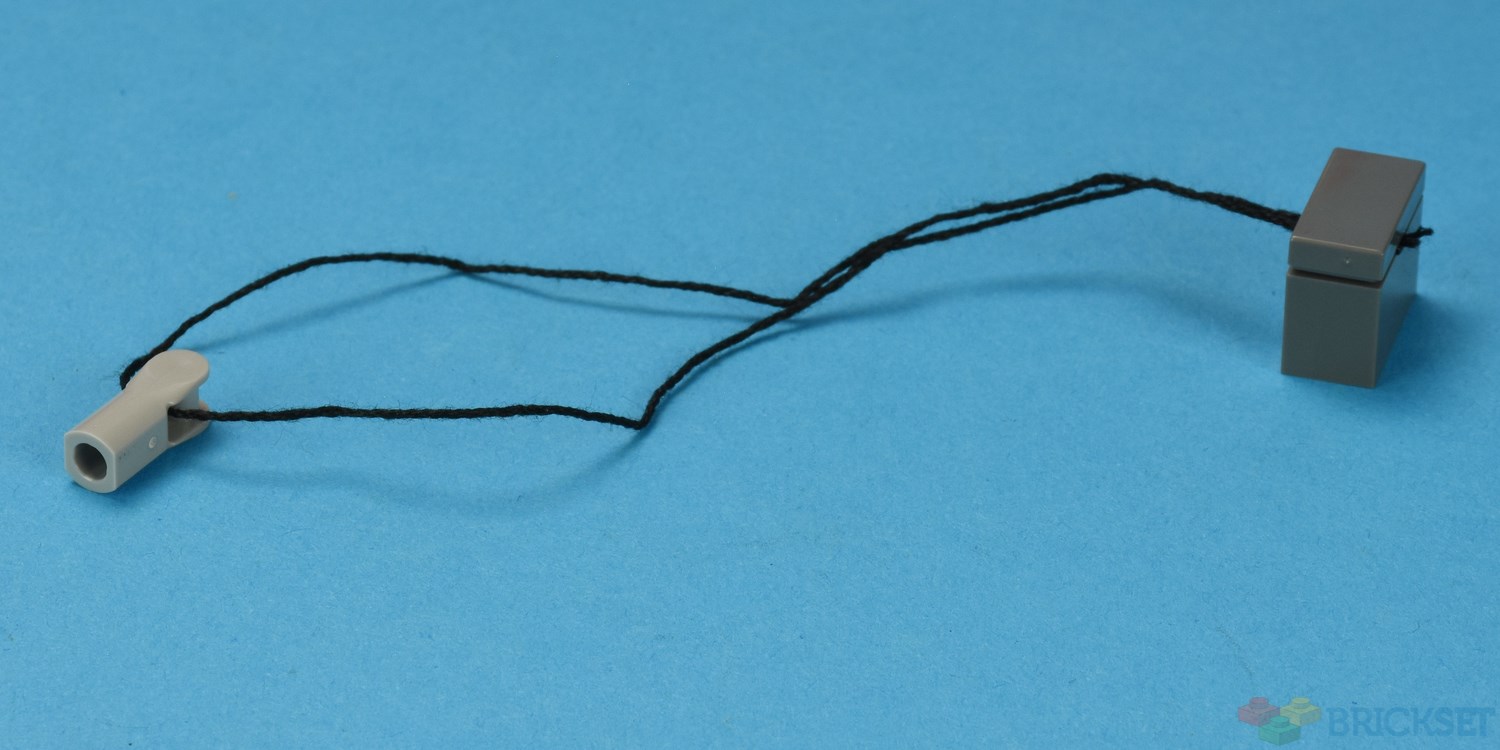
The load suspended from the crane is simply a brick and tile and a short length of string threaded through a 3.2 Shaft W/3.2 Hole element (image right).
The completed Moon Rocket modification
The completed MOC
A close-up of the upper extended platform.

A close-up of one of the shorter extended platforms.
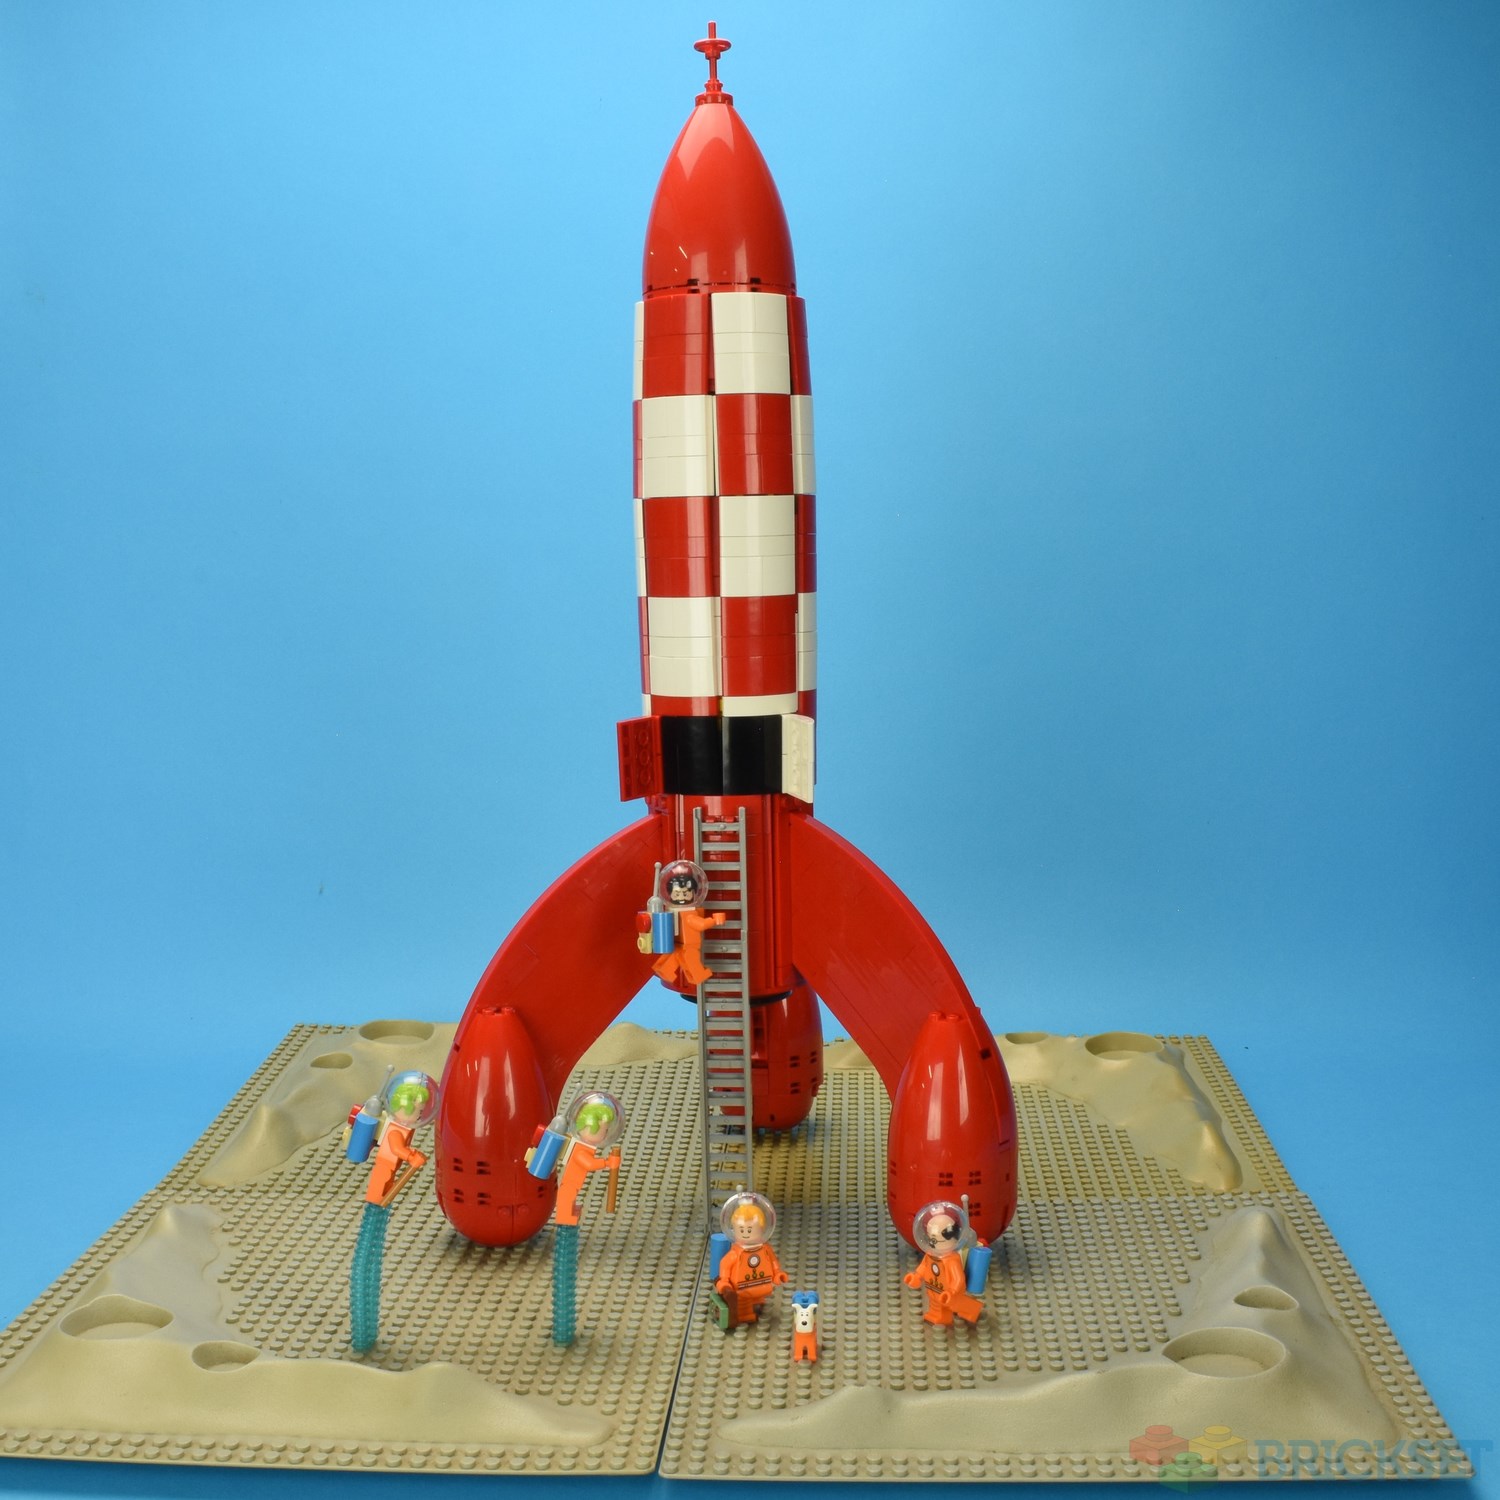
Tintin, Snowy and Captain Haddock are walking out to the Moon Rocket, and they are about to board for a flight to the Moon.
Moon landing
21367 Tintin Moon Rocket has landed on the Moon. I have a few of the very old, and brittle, 32x32 Crater Plate without Crater Studs that first appeared in 1979.
What I need to MOC next is a blue Moon Tank!

On display
Last weekend I attended a school fundraising Brick Show and my 21367 Tintin Moon Rocket was on display.
I had an English and French version of the two Adventures of Tintin books on display, too.

Parts list
Below is the parts list for one Launch Tower as assembled in this article. All these links will take you to the corresponding Bricklink page for each element.
You can create and add these items to a Wanted List on Bricklink.
Medium Stone Grey
- 1x2 plate - 1
- 2x3 left wedge plates - 3
- 2x3 right wedge plates - 3
- 1x6 plates - 3
- 2x2 corner plates - 2
- 6x8 plates - 5
- 16x16 plates - 9
Yellow
- 1x2 brick - 4
- 2x8 bricks - 8
- 2x2 inv roof brick - 4
- 2x3 inv roof brick - 4
- 1x2 Technic bricks -12
- 1x1 plates - 22
- 1x2 plates - 1
- 1x4 plates - 2
- 1x12 plates - 8
- 2x2 plates - 12
- 2x4 plates - 4
- 2x8 plates - 64
- 1x1 tiles - 32
- 1x2 tiles - 16
- 1x4 tiles - 24
- 1x6x5 lattice supports - 72
- 1x4x2 handrail - 17
- 1x8x2 balustrades - 24
- Wheel 18mm D. x 14mm with Pin Hole - 12
- Technic pins - 12
Dark Turquoise
- 1x6 bricks - 2
- 1x6x5 container walls - 2
- Doors - 2
- 1x4x6 Door frames - 2
- 6x6 plate - 1
Other
217 likes
26 comments on this article
Thanks for another out-of-this-world article, @FlagsNZ!
I often just skim these long Brickset articles but as a lifelong Tintin fan I had to read this one word-for-word!
I really hope they introduce more Tintin sets, even just a miniature model of le château de Moulinsart, just so it can include Tintin in his traditional garb.
Thanks @FlagsNZ, really informative article! :)
Love the article and thanks for sharing the parts list.
Seems to be turning into the Titanic of 2026... Shipping date now dropped back to mid June!
I foresee those big yellow lattice pieces going up in price and becoming quite rare in the future...
Great article and great build. Already in progress off copying it!
@Murdoch17 said:
"I foresee those big yellow lattice pieces going up in price and becoming quite rare in the future..."
Yes, I agree. And those old moon baseplates, too.
Now I'm wondering what 21367 would look like up against the launch pad from 10341.
@sjr60 said:
"Seems to be turning into the Titanic of 2026... Shipping date now dropped back to mid June! "
Tintinic?
@TheOtherMike said:
"Now I'm wondering what 21367 would look like up against the launch pad from 10341.
@sjr60 said:
"Seems to be turning into the Titanic of 2026... Shipping date now dropped back to mid June! "
Tintinic?"
Maybe after discovering the Unicorn, Tintin should take his sub to explore the Titanic.
Many thanks for your passion, Flags!
I think I recall some LEGO Store Pick a Bricks at least in Japan have or had those lattice walls.
nicely done and documented
It's a good decision to leave out the platform from the offficial set. Having said that, now that the gang is portrayed on the moon, a micro build moon tank would have been a nice inclusion. I have ideas but not the pieces with the right color.
Re: Tintin, Snowy and Haddock boarding the rocket - I believe the entrance directly to the control room was just a temporary one, used during construction but later sealed with a wall section. The actual entrance used at launch was on the airlock deck (16/8/II on the blueprint), just left of the large cargo door.
Just fantastic! Definitely on the list for future build.
Thx for a thorough look at it.
Dang. Those crater plates are so yellowed it looks like they're faking their moon landing in the Wild West.
But yeah, this is both a really cool addition to the official set and one where you can immediately see why they didn't do it in the first place.
@BrickAnomie said:
" @TheOtherMike said:
"Now I'm wondering what 21367 would look like up against the launch pad from 10341.
@sjr60 said:
"Seems to be turning into the Titanic of 2026... Shipping date now dropped back to mid June! "
Tintinic?"
Maybe after discovering the Unicorn, Tintin should take his sub to explore the Titanic."
I'm not familiar with Tintin's background. Is he a billionaire?
@FlagsNZ said:
" @Murdoch17 said:
"I foresee those big yellow lattice pieces going up in price and becoming quite rare in the future..."
Yes, I agree. And those old moon baseplates, too."
What I found fascinating was that Bricklink also lists a variant of the crater baseplates WITH crater studs, of which I had never heard before.
Can't remember any sets with that variant, and Bricklink doesn't list any either.
Strange. Maybe prototypes that never made it to production.
@AustinPowers said:
" @FlagsNZ said:
" @Murdoch17 said:
"I foresee those big yellow lattice pieces going up in price and becoming quite rare in the future..."
Yes, I agree. And those old moon baseplates, too."
What I found fascinating was that Bricklink also lists a variant of the crater baseplates WITH crater studs, of which I had never heard before.
Can't remember any sets with that variant, and Bricklink doesn't list any either.
Strange. Maybe prototypes that never made it to production. "
It made it to production; there's a printed version in 6190. That's the only set I have with a crater baseplate, so it wasn't until fairly recently that I found out that the crater plates hadn't always had those studs.
Great article and build!
However, if I may be so bold as to point out what I see as an obvious a design flaw in both the original illustrations and in the build of this tower. The way the wheels are placed, the tower can not move away from the rocket without having the platforms coming into contact with the rocket's body (unless the platforms would be hinged to move up & down). The proper situation would be to have the tower back away from the rocket (rather than moving to the "side"). To achieve this the wheel placement would have to be adjusted by 90 degrees, or the wheels should be able to swivel....
@Andrusi said:
"Dang. Those crater plates are so yellowed it looks like they're faking their moon landing in the Wild West.
But yeah, this is both a really cool addition to the official set and one where you can immediately see why they didn't do it in the first place.
@BrickAnomie said:
" @TheOtherMike said:
"Now I'm wondering what 21367 would look like up against the launch pad from 10341.
@sjr60 said:
"Seems to be turning into the Titanic of 2026... Shipping date now dropped back to mid June! "
Tintinic?"
Maybe after discovering the Unicorn, Tintin should take his sub to explore the Titanic."
I'm not familiar with Tintin's background. Is he a billionaire?"
Ostensibly, Tintin is a journalist, but he is a journalist in the same way that Indiana Jones is an archaeologist; he never does any of the actual work of the profession, it's just an excuse to travel and get into fistfights with thugs.
@BrickAnomie said:
" @Andrusi said:
"Dang. Those crater plates are so yellowed it looks like they're faking their moon landing in the Wild West.
But yeah, this is both a really cool addition to the official set and one where you can immediately see why they didn't do it in the first place.
@BrickAnomie said:
" @TheOtherMike said:
"Now I'm wondering what 21367 would look like up against the launch pad from 10341.
@sjr60 said:
"Seems to be turning into the Titanic of 2026... Shipping date now dropped back to mid June! "
Tintinic?"
Maybe after discovering the Unicorn, Tintin should take his sub to explore the Titanic."
I'm not familiar with Tintin's background. Is he a billionaire?"
Ostensibly, Tintin is a journalist, but he is a journalist in the same way that Indiana Jones is an archaeologist; he never does any of the actual work of the profession, it's just an excuse to travel and get into fistfights with thugs."
What's his opinion on Nazis?
@legogeek said:
"Great article and build!
However, if I may be so bold as to point out what I see as an obvious a design flaw in both the original illustrations and in the build of this tower. The way the wheels are placed, the tower can not move away from the rocket without having the platforms coming into contact with the rocket's body (unless the platforms would be hinged to move up & down). The proper situation would be to have the tower back away from the rocket (rather than moving to the "side"). To achieve this the wheel placement would have to be adjusted by 90 degrees, or the wheels should be able to swivel....
"
It is my impression that those platforms retract back into the tower. The right-hand tower as shown on the daytime image (on page 42 of Destination Moon) has the upper platform partially retracted.
I haven't enabled that feature in my MOC.
@TheOtherMike said:
"What's his opinion on Nazis?"
Tintin never gets to punch actual Nazis or Commies, but he does his fair share of punching Nazi and Commie stand-ins from the fictional country of Borduria.
@TheOtherMike said:
" @BrickAnomie said:
" @Andrusi said:
"Dang. Those crater plates are so yellowed it looks like they're faking their moon landing in the Wild West.
But yeah, this is both a really cool addition to the official set and one where you can immediately see why they didn't do it in the first place.
@BrickAnomie said:
" @TheOtherMike said:
"Now I'm wondering what 21367 would look like up against the launch pad from 10341.
@sjr60 said:
"Seems to be turning into the Titanic of 2026... Shipping date now dropped back to mid June! "
Tintinic?"
Maybe after discovering the Unicorn, Tintin should take his sub to explore the Titanic."
I'm not familiar with Tintin's background. Is he a billionaire?"
Ostensibly, Tintin is a journalist, but he is a journalist in the same way that Indiana Jones is an archaeologist; he never does any of the actual work of the profession, it's just an excuse to travel and get into fistfights with thugs."
What's his opinion on Nazis?"
Sadly ambivalent. Tintin's creator, Herge, was a Nazi collaborator after Belgium was invaded Germans during World War II.
@iwybs said:
"Thanks for another out-of-this-world article, @FlagsNZ!"
the needed 3 medium stone grey 4x6 plates are not in the parts list of the launch tower