Building display cases for LEGO Minifigures using IKEA RIBBA picture frames
Posted by Huw,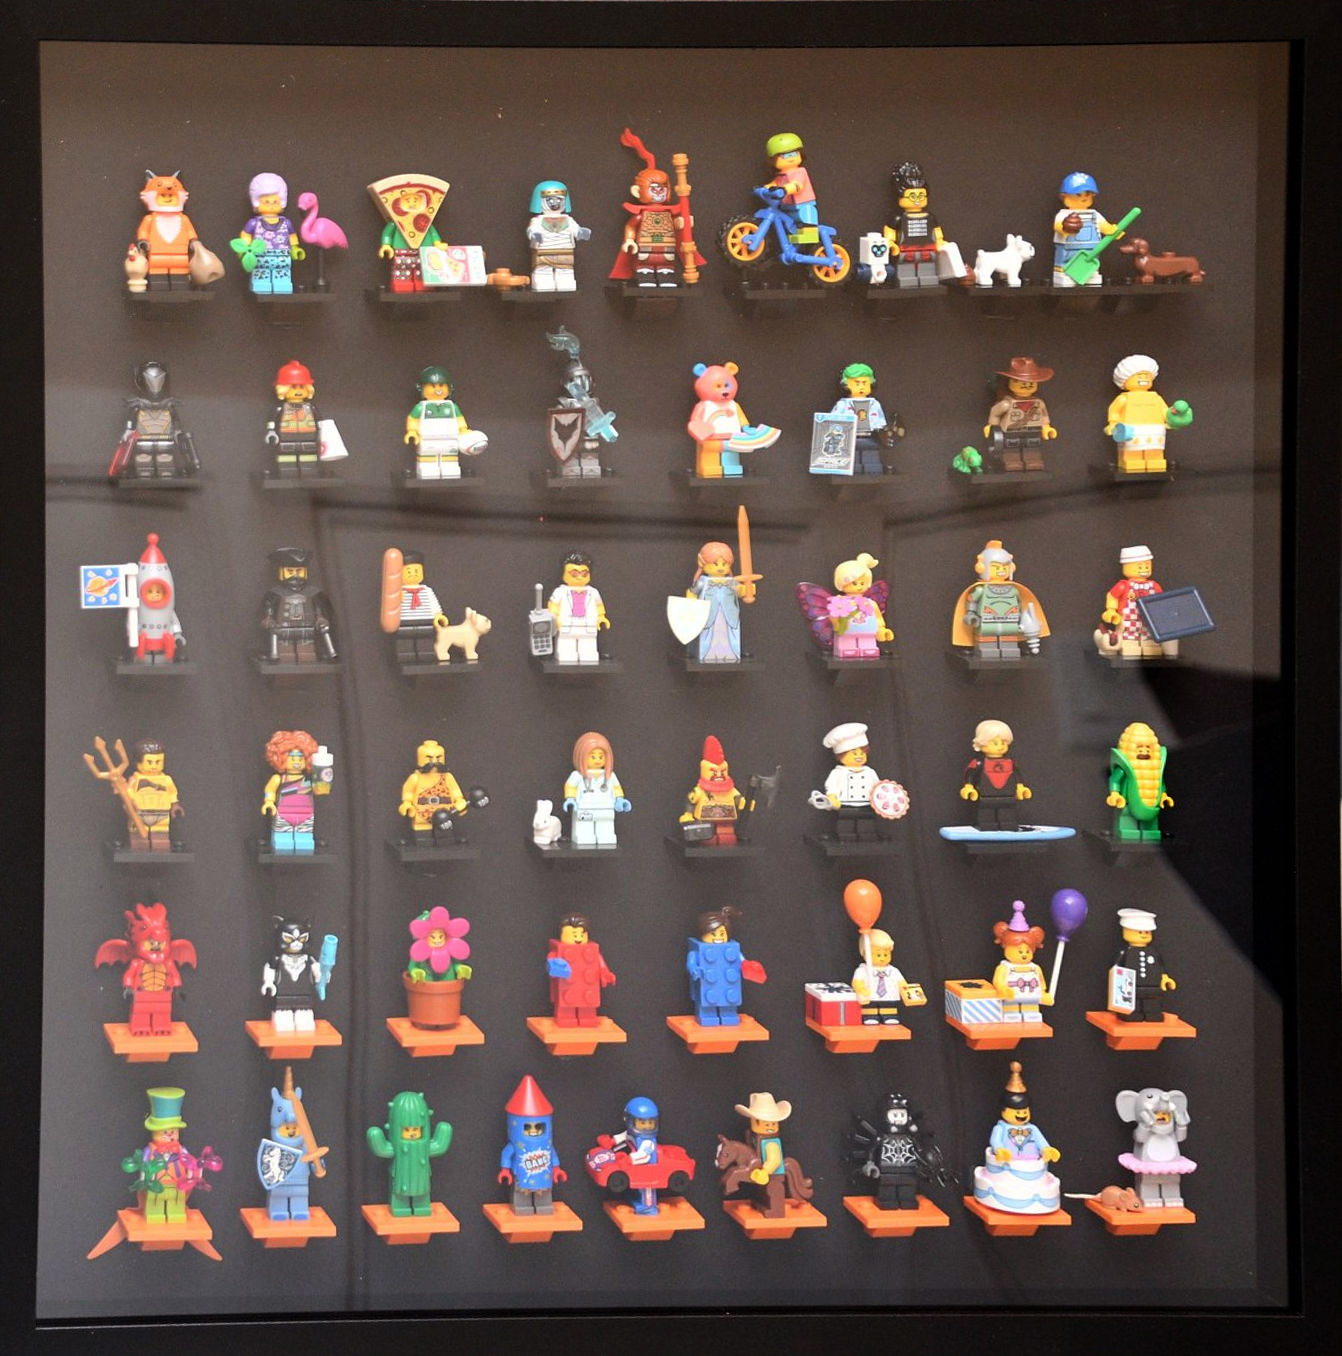
There are plenty of minifigure display solutions available commercially but if you prefer a DIY approach you will be interested in this article by Ronny Nußbaum (RonnyN) that explains how he goes about creating his own using an off-the-shelf IKEA frame:
A few years ago, I came across an online post where the author used IKEA RIBBA frames to display their minifigures. I thought that it was a great idea, and since then created several frames to display my minifigures.
I never fully documented the process I use and thought that the holiday season break would be a good time to do so. This article shows you my way of doing it. There are several other ways to display the minifigures in IKEA frames. However, I always liked the 6 rows approach. I feel that it is much less cluttered.
I hope that you’ll find it useful, and that it’ll help you display your collection in a beautiful way.
Required items
- Ruler. In this manual I decided to use centimetres. I think that you can achieve higher accuracy when cutting the back frame, as we’ll shortly see. To that end, I also purchased a steel ruler that’s 60cm (24”) long.
- Utility knife / box cutter such as this one
- X-acto knife such as this one
- Hot glue gun with transparent glue sticks.
- Black foam board – you’ll need one large enough that can be cut into a 50cm x 50cm square. Elmer’s in the U.S. has ~50cm x ~76cm (20 in. x 30 in.) boards
- Clear museum gel such as this one
- Enough LEGO bricks to build an alignment and spacing tool. This is the tool we’ll use to properly space the minifigures on the board
- Enough Slope, Inverted 45 2 x 2 elements to place the minifigures on. Since the recently released minifigures came with black, orange, and white plates/tiles to be placed on (Tile, Modified 3 x 4 with 4 Studs in Centre), I got the slopes in matching colours.
- You may want to get a few more minifigure tiles/plates. In some case, more than the one that came with it is necessary
- The frames I used are IKEA RIBBA frames, sized 50cm x 50 cm (19 ¾ in. x 19 ¾ in.) You can see them here . IKEA recently changed them from glass to plastic. This is actually good, because sometimes the minifigures poke a few millimetres out, and the plastic is bendable

Building the frames
The first step is to take the foam board and cut it to a square of 49.5cm x 49.5cm. The original backboard is 50cm squared, but the thickness of the foam board requires us to cut it just a tad smaller.

If you’re planning to build several frames, it’s a good idea to cut them all at the same time. I used my back deck in a beautiful December day to cut 3 boards.

Remove the original backing. I found that the brick separator works very well in lifting the black fasteners that hold the backing in place. Contrary to the picture, turning the brick separator upside down may work better…

Place your newly created backing into the frame to make sure that it fits properly.

As mentioned above, the frames now use plastic instead of glass. Now will be a good time to remove the protective film from both sides of the clear plastic.

The frame contains a square inner frame that the backing sits on. Put it back into its place after removing the protective film from the clear plastic.

Spacing and alignment
We’ll create 6 rows of minifigures on the vertical axis.
Take the foam board and decide which side of it will be the top of the frame. From the side you decided is the top cut 6 little slits, starting at 4.5cm from the top and every 7.2 cm thereafter as shown:

Do the same on the other side, so that the 4.5cm slit on the left has a parallel slit on the right, and the same goes for the 5 other slits.
Now will also be a good time to decide how you want to place the minifigures within the frame.
Do you have 3 series of 16 minifigures? 18 minifigures? 20? 22? Maybe you have 17 of them, as we’ve seen with series 18, and maybe it’s a mix of series with a various number of minifigures. Are some of them taller than average? Do they take extra space on the left or the right? How about the back? Many minifigures have tails or wings. Do they have accessories that you want to display?
Whatever number of minifigures you have, you should always plan ahead and decide where each of them should go. Place them on a table and move them around until you find each minifigure’s final location.
This manual was created as I was framing series 17, 18, and 19. Each of them had special scenarios I had to accommodate for. Here are some of these cases and how I addressed them (jumping ahead a little bit, and showing you the final product):


The surfer is on his surfboard, the party clown has his tailcoat tucked between the plate and the frame’s backboard, and the race car guy is turned 90 degrees and secured with museum gel (clear putty).
Other accessories were placed in such a way that they fit on the plate or somehow secured with the gel. This is the part where you’ll have to be creative and find what works for you. Everything will work out just fine with extra pieces from your spares bin, and a bit of imagination!
Using the tool to space the minifigures
To make sure that our minifigures are properly spaced horizontally, we’re going to build a tool from… what else? LEGO elements!
The tool I built looks like this:

The top part is made of five 2 x 12 plates (light gray) with an additional 2 x 1 plate (dark gray – on the left side). Therefore, the entire length of the structure is 61 studs.
I then added 3 rows of red bricks and a few pink 1 x 4 bricks which will be used to align the inverted slopes upon which the minifigures will be placed. The colors obviously don’t matter and are used here to distinguish the various sections of the tool. The two 2 x 8 bricks on the sides act as “handles” and will help us with alignment of the tool. If you remove the two handles, the 61-stud long tool should fit perfectly in the IKEA frame. This is what makes it so great for our purpose.
After Planning was done, I decided to put series 19 on top, then 17 in the middle, and 18 on the bottom. This meant that my six rows will have various number of inverted slopes in each row.
Through experimentation, I decided to space the minifigures for 8, 9, 10, and 11 in a row as shown below. However, you can space them in any way that works for you. Note that for taking these pictures, I removed the two handles and replaced them with two 2 x 3 bricks.
Spacing for 8 minifigures

Spacing for 9 minifigures:

Spacing for 10 minifigures:

Spacing for 11 minifigures:

Depending on the row you’re currently working on, place the right number of inverted slopes onto the 1 x 4 bricks, so that only one stud of the slope is connected to the brick above it.
Then, attach the handles (2 x 8 bricks) onto the tool, and place it so that its bottom is aligned with the previously cut slit.

Place some bricks on the left and right to help you center the tool. In the picture above, I used two 2 x 3 bricks on each side. They are touching the orange slopes on the left and right. Now, by slowly moving the tool by its handles left or right, align it so that the handles are right above the slit on each side, and the two 2 x 3 bricks are taking the same space on the left and right. In the picture above, it’s about 5 studs on each side, as the 2 x 3 bricks go slightly over the edge.
Now, very carefully, remove one of the side slopes and add glue to its back.
Quickly attach it back to the board, using the brick (pink, in my case) as a guide. Remember that it should only be connected by one of the four studs that are on the inverted slope. Be careful not to put too much glue. You do not want glue to come out of the top part of the slope (between the studs of the inverted slope and the foam board), because this will prevent the minifigure’s plate from attaching. A little glue coming from the left, right, or bottom of the slope is fine. It is mostly transparent and will not be visible.
Here’s an example of good glue placement:

After gluing the inverted slope on the other side of the alignment tool, the tool will be secured on both ends and the process to attach the inverted slopes in the middle should be much easier.
Repeat this process, slowly, for each of the rows on your foam board.
As previously stated, in my case, I had a different number of minifigures per row. The result, as you can see below, is a frame with 6 rows containing 10, 8, 8, 8, 8, and 9 inverted slopes to hold all the minifigures and their accessories. The 3 black slopes on the upper left were a special case – to hold the dog sitter on 3 plates.

By the way: if you ever need to separate the glue from the inverted slope, rubbing alcohol is your friend. Here you see an inverted slope that I had to rip from the foam board due to a mistake. I placed it in a small bowl with rubbing alcohol in it, and it just peeled off!

By the way 2: if (when) you make a mistake and need to rip all of your inverted slopes out of the foam board, use its other side and try again!
Placing the minifigures
We now need to place the minifigures based on our predefined plan.
The challenge you’ll mostly have to deal with here is with minifigures that have accessories or elements that poke out of their back. Don’t be afraid to cut the foam board and make room where necessary. Start with a small hole, then place the minifigure to see if adjustments are needed. Continue to cut until the minifigure fits just right.
Take the Unicorn Guy from series 18 for example. After placing it on what would be its final location, I marked two slits in the foam board for its tail:

Then, using the X-acto knife, I cut out a small piece of the foam board to accommodate for its tail.

Finally, I placed it on its plate, and the result looked great:

I had to do that several times for other minifigures as well. The really big cut on the bottom left of the picture below is the birthday cake guy!

…but, it’s the back! It can be ugly.
This document provides examples of how I addressed several other minifigures with their accessories
When you’re done, slowly attach the foam board back to the IKEA frame, secure with the fasteners, and enjoy your new creation!

113 likes
50 comments on this article
Much appreciated, shame that some LEGO parts will be sacrificed as well some figures will need to meet Kragle but it's a worthy sacrifice.
Like the idea of displaying Lego collectible minifigs on a stand but not so keen on the glueing part.
Do we have any idea what the LEGO and IKEA project is going to be? Maybe they’ll do this for us!!
I looked high and low for the best display option for my minifigs, and I ended up using Ikea’s Kasseby frame. True you can’t fit as many in the display as the Ribba (I can only fit about 30) but I like that I can open the magnetic door and switch them out easily (which I usually do when a new CMF series comes out). I also use 2x3 inverted slopes and just put the mini on those (without the base plate)- yes I glue the slopes to the board, but I don’t glue the minis. I have found that the 2x3 works for every mini I’ve wanted to display except the Dragon Guy from last years series. So I just have him in there at an angle. I also use the “brick ruler” method. I forgot that IKEA and Lego are teaming up...I bet it will be a display frame!
Thank you for this guide!
I have a white Ribba frame lying around for more than a year already for this purpose. My plan was to cut a (3rd party) trans-clear baseplate into 2 or 3 stud wide strips and glue these to the background board in 6 or 7 rows, then connect the minifigures with the help of trans-clear 1x2 bricks attached to the lower back of the figures legs (the "calf anti-studs") or using some bracket for no-legs minifigs.
I hope I can bring myself to complete this project before the year is over. ;-/
@mathmatt88 said:
"Do we have any idea what the LEGO and IKEA project is going to be? Maybe they’ll do this for us!!"
I actually clicked this story thinking this was related to that project.
Hello everyone!
Thank you for the feedback so far.
@Lordmoral , @Slobrojoe , thank you.
Note that NO minifig elements (or anything else that comes in a new minifig bag) are glued or kraggled! The Museum Gel used is not permanent either.
The only elements (hot) glued using my guide are the reverse slopes, and at any time, you can open the frame, and remove all minifigs with their accessories if you need to :)
In my case, I'm very happy keeping them there permanently.
That being said, hot glue is nothing like super glue, and isopropyl alcohol will easily separate it from the plastic elements with no damage at all and quite easily. I had to do it several times...
Thank you
Ideal...but my OCD says no haha.
Great idea for beginners.
Please note: we make several hundred of these a week and this method can be and is very weak. Over a short period of time the backing will become very weak with the weight of minifigures placed into it.
Cardboard and foam backing should not be used for the long life of these. You additionally can not change any background pictures etc ie change the theme.
There are better methods to make your frame as unique as the minifigures you place in it with precise results.
Hope this helps.
I saw somewhere that one of the base plate can fit into one of the Ribba frame and just use tiles to keep it in place without glue.
Wonderful!!! That's a realy good idea. And your making of is very good too. Thanks a lot
Been doing this for several years with each new collectible minding series. Don’t do the foam back rather theme them for each series with paper for that series and the leaflet they came from.
@Dancrx said:
"Great idea for beginners.
Please note: we make several hundred of these a week and this method can be and is very weak. Over a short period of time the backing will become very weak with the weight of minifigures placed into it.
Cardboard and foam backing should not be used for the long life of these..."
I have to disagree. I have the minifigures in the IKEA frames for over 5 years using this method. Nothing ever falls. The weight of the minifigs also has no impact on the backing, which is quite strong. The weight of the backing with the minifigs on it is also supported a bit by the front glass/plastic.
So much work and glue... Get a Ribba frame, adhesive band and a 48x48 grey base plate. Tape the baseplate onto the passepartout/cut out from its back, then space any form of standees made from lego evenly across the base plate. Done. Made 4 big and 3 small Ribbas for Marvel and Star Wars figures like this.
@shirhac said:
"So much work and glue... Get a Ribba frame, adhesive band and a 48x48 grey base plate. Tape the baseplate onto the passepartout/cut out from its back, then space any form of standees made from lego evenly across the base plate. Done. Made 4 big and 3 small Ribbas for Marvel and Star Wars figures like this."
I didn't want the back to be grey...
@RonnyN said:
"Hello everyone!
Thank you for the feedback so far.
@Lordmoral , @Slobrojoe , thank you.
Note that NO minifig elements (or anything else that comes in a new minifig bag) are glued or kraggled! The Museum Gel used is not permanent either.
The only elements (hot) glued using my guide are the reverse slopes, and at any time, you can open the frame, and remove all minifigs with their accessories if you need to :)
In my case, I'm very happy keeping them there permanently.
That being said, hot glue is nothing like super glue, and isopropyl alcohol will easily separate it from the plastic elements with no damage at all and quite easily. I had to do it several times...
Thank you"
I’m not saying that it doesn’t look good. It happens to be a very practical display unit with the only downside of one element being glued. I have been searching for a way to store my minifigs (especially Star Wars) that don’t fit on ships or buildings alike. I really appreciate that you’ve put forward this guide and I’m sure many people will be inspired by this. It’s such a relief that you haven’t glued the minifigs. Keep up the good work and thanks!
I use these. Glass door. Easily changeable. Holds 60 minifigures. No glue. No cutting. On sale, you can grab them for ~$25 USD. They have several versions but this one, for me, works best.
https://www.michaels.com/studio-decor-keepsake-display-case/10227067.html
@TCSBGDADY said:
"I use these. Glass door. Easily changeable. Holds 60 minifigures. No glue. No cutting. On sale, you can grab them for ~$25 USD. They have several versions but this one, for me, works best.
https://www.michaels.com/studio-decor-keepsake-display-case/10227067.html "
Thank you!
I saw in the comments here that some people like to change their displays, which was obviously not my intention. These look great if you indeed want to move things around every now and then. I'll give it a try!
I'm going to have to get some of that Museum Gel. I had never heard of it before as I don't live in an earthquake zone, but I do have a cat hellbent on destroying Lego displayed on open shelves. It sounds like a good solution to that problem.
what would be good is a tutorial on making backgrounds, and where people that do create backgrounds get the cmf images from for their backgrounds!
Good article. I've seen frames from www.minifiguresdisplay.com that are handmade and are deeper to adapt all Lego Minifigures.
They say that can adapt 2x4 bricks!!
@Daysali
Another vote for Kasseby!
Aside from minifigs, the 52 mm/6.5-stud depth can accommodate (some) Architecture Skylines sets. Together with a felt background that can pin photos and small objects to, it can make for a great display piece.
Is there a way to save an article so I can reference it later? No way am I going to memorize this before it gets buried. Sure, I could search for it later, but always trying to remember the right keywords can make it tricky. Thanks
Great article. I had bought some shadow boxes from Hobby Lobby a few years ago to do something similar. Obviously measurements will differ, but the plans gives me a lot of help. Thanks.
@Sethro3 said:
"Is there a way to save an article so I can reference it later? No way am I going to memorize this before it gets buried. Sure, I could search for it later, but always trying to remember the right keywords can make it tricky. Thanks
Great article. I had bought some shadow boxes from Hobby Lobby a few years ago to do something similar. Obviously measurements will differ, but the plans gives me a lot of help. Thanks."
I asked @Huw the same question and he taught me something I didn't know.
While you're on the page (the one you're on now), click the rightmost menu item on the top of the page - "My Menu" - and add the page to your saved links.
You also have the ability to save links/bookmarks in every modern browser.
These frames are a very nice - and cheap - solution. I already had a lot of trial and error with them.
What I do different:
- I paint the wooden backside in stead of using another board.
- I add 4 mm wooden slats to the inner frame. This makes a total depth of 4 studs. This allows to put almost all minifigs in it. So far, I only had to pimp medusa. Downside of this solution: opening and closing the frame is tricky.
@RonnyN said:
" @TCSBGDADY said:
"I use these. Glass door. Easily changeable. Holds 60 minifigures. No glue. No cutting. On sale, you can grab them for ~$25 USD. They have several versions but this one, for me, works best.
https://www.michaels.com/studio-decor-keepsake-display-case/10227067.html "
I also use Michael's cases. Check out my monofig display:
https://flic.kr/p/2ihaD3g
@Rob42 said:
" @Daysali
Another vote for Kasseby!
Aside from minifigs, the 52 mm/6.5-stud depth can accommodate (some) Architecture Skylines sets. Together with a felt background that can pin photos and small objects to, it can make for a great display piece."
That’s a fantastic idea!!
I'm going to hold off on reading this until I can play Nanowar of Steel's song "Valhalleluja," about the church of IKEA.
@RonnyN said:
" @Sethro3 said:
"Is there a way to save an article so I can reference it later?
I asked @Huw the same question and he taught me something I didn't know.
While you're on the page (the one you're on now), click the rightmost menu item on the top of the page - "My Menu" - and add the page to your saved links.
You also have the ability to save links/bookmarks in every modern browser."
Thank you so much! Super helpful
Gorilla tape might be a good alternative to glue, super strong, flat, and no risk of splurting out the sides.
By the way 2: if (when) you make a mistake and need to rip all of your inverted slopes out of the foam board, use its other side and try again!
Had some laughs with the "when" word!
So we all agree that for a (semi)permanent solution, RIBA cases can be used, while for easier access, the ones at "Michaels" are better. Meanwhile, we are all waiting for the launching of IKEA's products in colaboration with LEGO (probably Trofast with glued baseplates on top)
I’ve been using these, and similar deep frames for a while. Just be sure you don’t need to keep adding or rearranging the figs as removing the backplate too many times causes the metal tabs to snap. Tempted to get some of the front opening digs for figs frames, but they’re a lot deeper.
Great tutorial. I went the 'easy' route and just stuck a 48x48 baseplate to the back. The figs are a bit more bunched up, but I quite like the white border. The main problem I've found is the depth. Anything on the figs back makes them stand at a strange angle, or anything held in front (weapons, instruments etc) ends up touching the glass. Still trying to find a good solution for this...
I'm using these frames for a long time now, but with 2x4 bricks on which I place the minifigs. I have the background in PDF with the placeholders for all 48 bricks. It's with white background and the bricks placeholders are very light gray, so one can easily glue the bricks. It can be previewed and downloaded here: https://gofile.io/?c=k347hQ
It can be easily edited as well, if you have Photoshop or Affinity per example :)
@ab21 said:
"Thank you for this guide!
I have a white Ribba frame lying around for more than a year already for this purpose. My plan was to cut a (3rd party) trans-clear baseplate into 2 or 3 stud wide strips and glue these to the background board in 6 or 7 rows, then connect the minifigures with the help of trans-clear 1x2 bricks attached to the lower back of the figures legs (the "calf anti-studs") or using some bracket for no-legs minifigs.
I hope I can bring myself to complete this project before the year is over. ;-/"
Am in exactly the same situation. Have all the parts but not got round to it. This is just the prompt to get on with it.
I'm glad you gave us those tips and DIY display solutions. Because, as mentioned several times on Brickset, Minifigures Display. com sales great display frames, but I have order one a week or so BEFORE Christmas and I still not even received the manufactured update... So next time I guess I will just order a Ribba frame, follow up your build and have a good display case in just a few days, or even hours. For more than 50 euros. I am really disappointed by the way things are going on with Minifigures display which seemed to be a very serious and reliable service. Maybe it is, but it's far too long for me to eventually appreciate it. Hope I will receive it, one day nonetheless. Sorry for bad add and angry mood this time, but more than a full month after purchase and still not shipped is something I never had encountered before with any of the numerous display items orders I have made during the past years. Worse experience ever for the moment. Hope I will forget and forgive when I get the frame... If I eventually get it.
@Brick_t_ :
Sorry for your experience. I really hope you'll find my solution helpful for your needs. For me, it's also fun looking at them and thinking "I did that!" :)
@handyandi, you got this!
@CCC, good question.
I look at the frames as a permanent storage solution. I can see in some of the responses that people like to change their displays. That's never been the case with me. For that reason, I'm always putting the minifigs and everything they came with into the frames. I guess it's about keeping all the elements that need to be together, together.
there are also plenty of layout templates for both the 23x23 and 50x50 frames for all manner of figures. i can't remember where i saw them, but i know they are out there - maybe google "minifigure backgrounds for ikea ribba frames" and see how your luck holds :)
also, the 2x3 inverted slopes work as well as 2x2!
I have design and build display case myself for 100 to 150 minifigs. First, what I want, 10 minifigs in a row and that giant fig can fit. Second, build it in LDD. 6 studs for one minifig so that it can fit if it have accessories. That's 60 studs long for 10 minifigs (or 15 if is 4 studs). Wide 7 studs, that's 6 stud plate + place for bracket and 2x4 tile for name tag. Third, build one row out of Lego bricks to see measures. Forth, draw it in AutoCAD with shelf made of 5 mm thick load bearing parts that will be made of transparent fiberglass. I made cover for shelf like "glass bell" (no touching or dust). Send drawings to companies dealing with fiberglass cutting, all part cost me cca 55€. One Bricklink order for all plates (6x12), brackets (1x2) and tiles (2x4) for 60€. Glue the fiberglass parts. It's going to be for Batman theme minifigs, superheroes and supervillains.
id suggest E6000 glue. it's clear, strong, and peels-rubs off quite easily without the need for rubbing alcohol, most of the time.
@RonnyN said:
" @Brick_t_ :
Sorry for your experience. I really hope you'll find my solution helpful for your needs. For me, it's also fun looking at them and thinking "I did that!" :)
"
Yes you are absolutely right. I have already crafted some dedicated shelves with integrated led lights and also a display frame of my own, which eventually provided much more satisfaction than simply ordering, paying and waiting for a delivery. But I wanted to get a "true" and say... more professional looking display frame for my "top selection / best minifigs" and then decided for once, after many hesitations (to be true each time I read an article or saw an add about it ), to try this manufacturer and seller because they have many good feedback. So I won't judge them one difficult and "delayed"experience, but must admit that I am a bit disappointed. The next time I need a display frame I will do it myself again, following step by step your tutorial, which proves to give a very satisfying result, and while looking at it will have the enjoyable feeling of thinking:"I did that. " Thank you for your kind words and support :)
Nope, not glueing any of my parts. I'll find another solution.
@Snazzy_Bricks said:
"Practically IDENTICAL to the frame in i believe issue 11 of Brick Fanatics Magazine"
LOL. I have evidence of building these for years...
@TCSBGDADY said:
"I use these. Glass door. Easily changeable. Holds 60 minifigures. No glue. No cutting. On sale, you can grab them for ~$25 USD. They have several versions but this one, for me, works best.
https://www.michaels.com/studio-decor-keepsake-display-case/10227067.html "
those work greatm possible maybe hold 75-100,
@Slobrojoe said:
"Like the idea of displaying Lego collectible minifigs on a stand but not so keen on the glueing part."
Hobby Lobby sells deep shadow boxes, I use this instead and make shelves/cubes out of sturdy foam board (Elmer's display foam board).
@shirhac said:
"So much work and glue... Get a Ribba frame, adhesive band and a 48x48 grey base plate. Tape the baseplate onto the passepartout/cut out from its back, then space any form of standees made from lego evenly across the base plate. Done. Made 4 big and 3 small Ribbas for Marvel and Star Wars figures like this."
Pretty much what i did, you can also use those 'non damaging' adhesives for the base plate
Ive done this a few times already, its just easier to hot glue, (removable adhesive) a large 48x48 base grey plate to the back of the frame. The back of the base plate doesnt have anti-studs the glue can be removed easily.
The only downside to this method is possible flex of the base plate, which will wobbles when you adjust the display. I keep mine 'open' without the clear glass/plastic.