Mecabricks - The Render Farm
Posted by BrickJonas,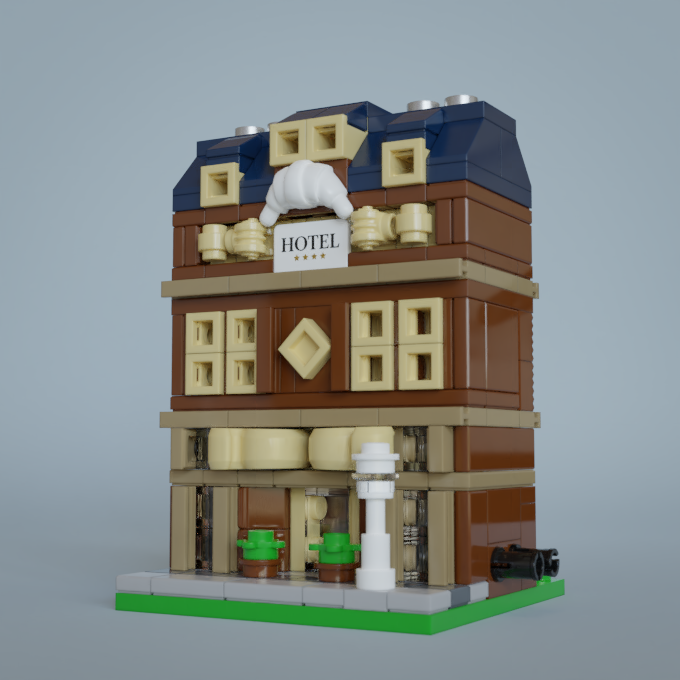
In my first article about Mecabricks, I've covered the basics of the workshop, but as some of you might already know, Mecabricks is known for its amazing render farm.
Grab some snack before you start reading the article, because it'll be a longer one! :)
Render farm? What?
Some LEGO building programs come with a built in rendering function, Mecabricks is an online tool, so it's quite hard to think of a built in rendering solution, right? Well, it's still possible to make photorealistic renders with Mecabricks in your browser!
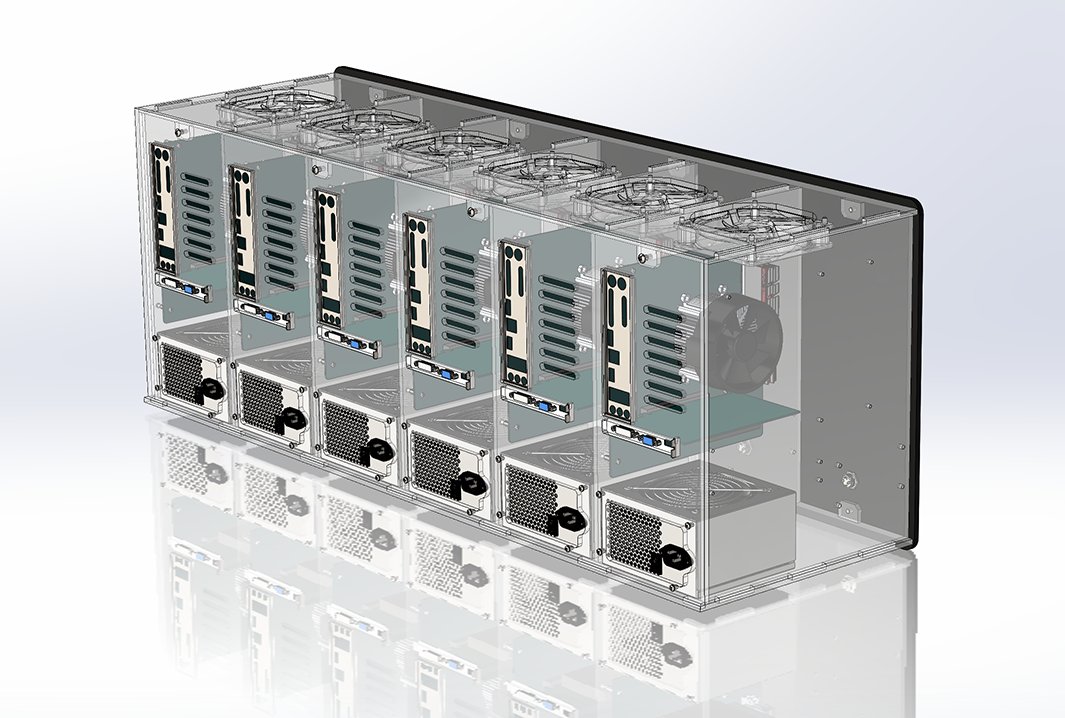
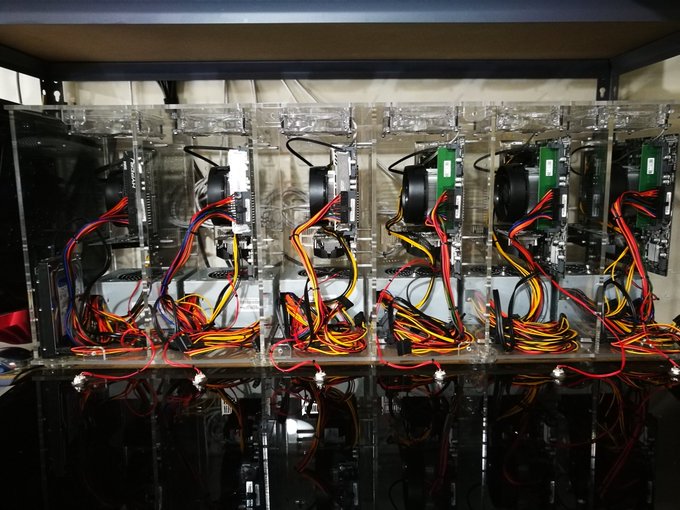
What happens exactly is that when you want to render your creation using Mecabricks, it'll send it to Mecabricks' very own render farm, and pack it in a .blend file. The render farm consists of 6 computers which are mainly a combination of RTX2080Ti and RTX 2070 for the GPUs and 60 CPU threads.
Your project is split between these machines, which will render some parts of your image, then combine them, and send it back to Mecabricks where you can see and download the results. Nicolas designed and custom built the hardware case for the PCs, and he also designed and coded a custom Python server and clients to handle the projects. Impressive, right?
Here are some screenshots of the 3D plan and a real photo of the machines behind the render farm made by Nicolas:

Of course Nicolas made a huge investment to build these machines, and maintaining them isn't an easy task (and obviously isn't free), so that's where free and paid options come in in the Mecabricks rendering function.
You can make 10 free renders per day, at maximum of 0.7 million pixels, 200 samples, and your model can contain maximum 1000 pieces. You can export .png and .jpg image formats in the free version, but you can't export openEXR, and your final renders will be stored for 3 days in the system. You also can't use HD minifigures and special effects like scratches, dents, fingerprint on the LEGO parts. These might sound like a lot of limitations, but actually you can easily achieve beautiful render quality even without the things which I mentioned above.
Okay, what about the paid functions?
There's a page on Mecabricks website, where you can buy Mecabrick credits. You'll be able to use these credits when you make a render, and use every paid function on them. You can also see how is the render cost being calculated on the linked page.
I made a lot of renders on Mecabricks in the last 2 years, and I have to say it's really affordable. In fact, it costs less than you'd think. My most expensive render which I set up and made on Mecabricks was $0.434. It was a 2560x1920px image, and I used effects (scratches, fingerprints, dents) on the bricks. I also used a backdrop.
Let's start rendering!
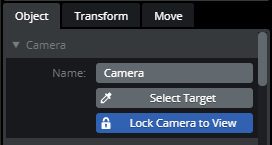
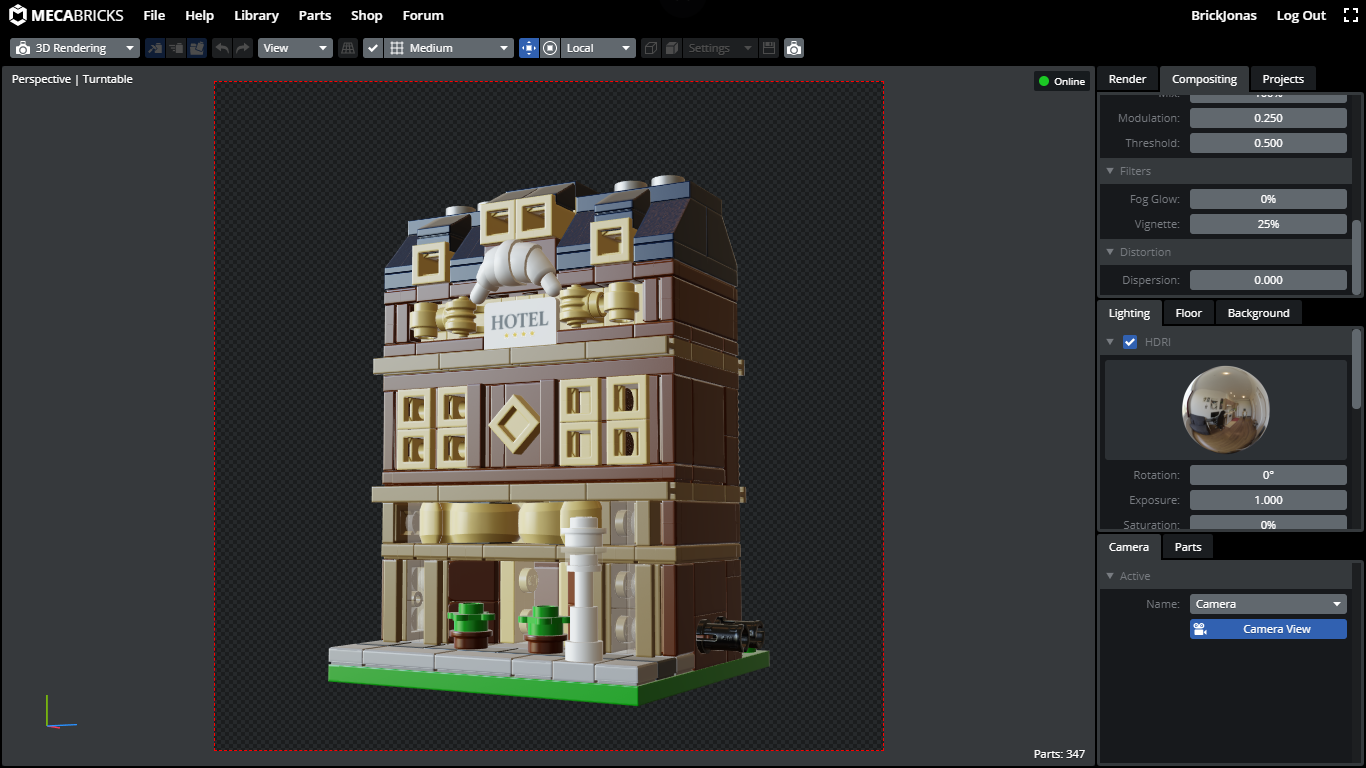
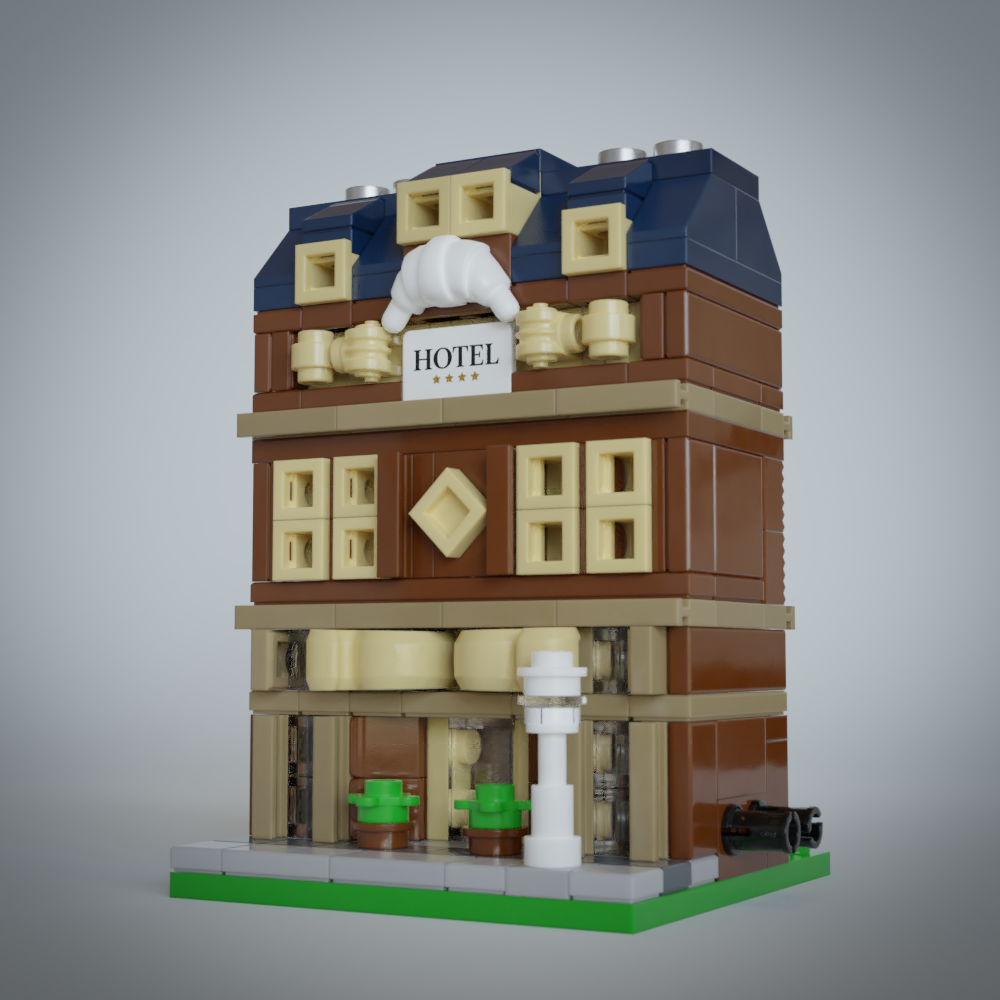
Okay, so let's say you've built a new MOC on Mecabricks, and you want to make some nice photorealistic renders of it. The first step is to add a camera to your scene. You can do this by clicking on the small camera icon on the left toolbar. When you do this, a small camera preview screen will appear in the bottom right corner of the editor. There are many ways to move around the camera (check this nice video tutorial on Mecabricks' YouTube channel), but the easiest way for me is to use the "Lock camera to view" function. This way you'll see the same thing in your camera that you see in the 3D viewport.
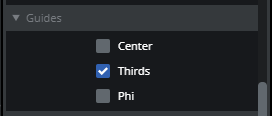
I also suggest you to turn on the guidelines on the camera, so it'll be easier for you to set up the right camera position and angle.
You can also play around with depth of field, it can add a really nice touch to your renders. I activated it in this case, and picked one piece on the front of the building with the picker tool which you can find under the "Depth of field" section on the right sidebar when your camera object is active.
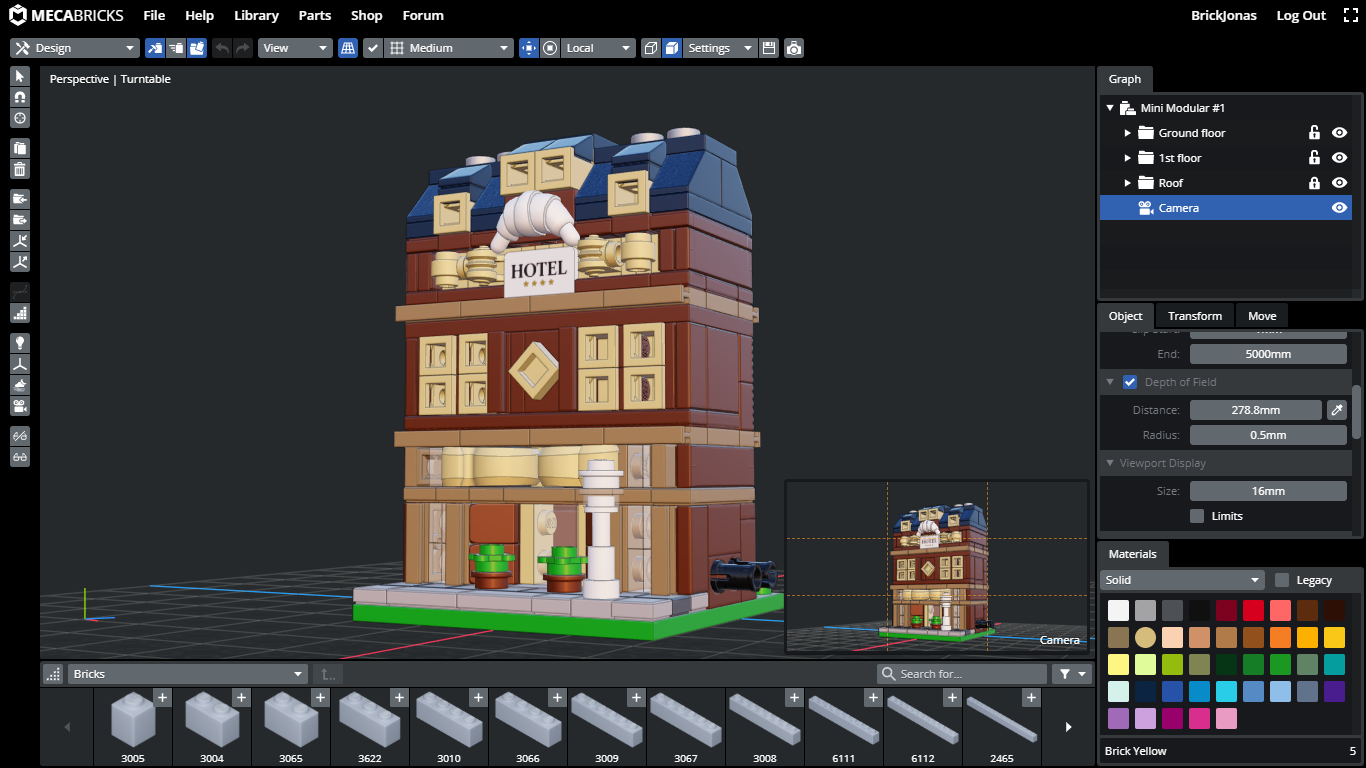
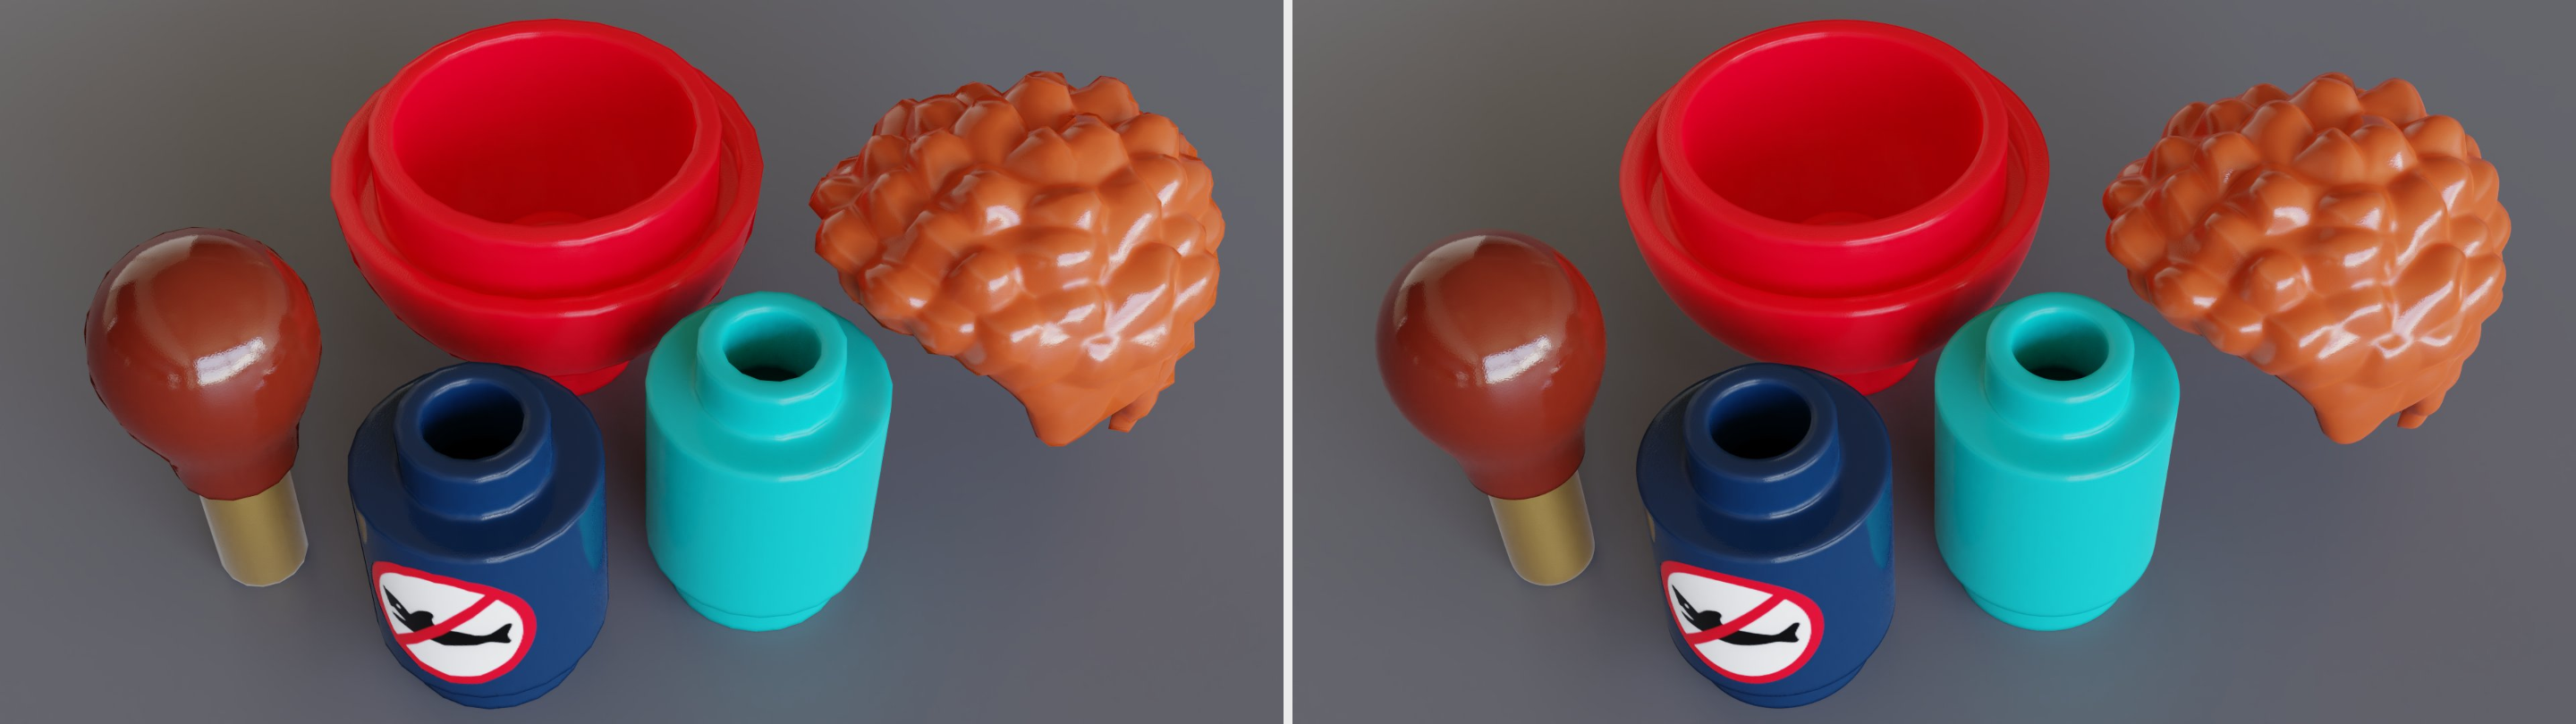
For this article, I used one of my older creations. I don't really like the 16:9 ratio for this render, because the two sides of the image are empty, but we can change it in render mode. So, go ahead and switch to render mode using the mode switcher drop-down in the top left corner!
As you can see, the left toolbar completely disappeared, we can't see the brick palette, and the right sidebar's content also changed - now we have some options that we can use for our render!
Basic render settings and colour correction
The first thing that I changed is the ratio, I set it to 1000x1000px, and also decreased the percentage, so we can fit into those "0.7 million free pixels". I usually make a couple of free test renders, and when I'm happy with the outcome, I'll switch to 100% resolution percentage, and also activate the paid features.
You can also pick the output format of your render, I usually use just PNG-8, and pick a predefined look of it. I'll leave it on "none", so we can see the raw render output, but I usually use "Medium High Contrast".
You'll see a "Denoising" checkbox in the render settings too, and I highly recommend you using that. I don't want to go into details about denoisers, but if you turn this option on, you'll be able to make good-looking renders even with low samples (and shorter render times).
There's one more setting here which I'd like to mention, and that is Full Global Illumination. If you active this, ray bounces will be set to 128 for all surface types, and because of that, your renders will look more accurate, and take a little more time to render. It's recommended mainly for renders where you use a lot of glass elements.
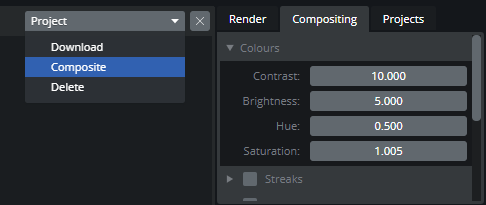
If you switch to the Composition tab, you can play around with some post process options, like contrast, brightness, hue, saturation, and add effects like ghosts and streaks, vignette style, and distortion. I'll now go with a little of vignette effect for this render, because I don't like to use too many effects. It's important that you can change these settings after your render is finished too, and apply them by clicking on the "Composite" option above the render, so you don't need to re-render your whole image just to change contrast for example:
Lighting and background
Lighting is really important when it comes to rendering. On Mecabricks, we can use HDRI maps for lighting, and I highly recommend you to change the default map to something more interesting. Just click on the preview of the HDRI map, and you'll see a nice variety of other images.
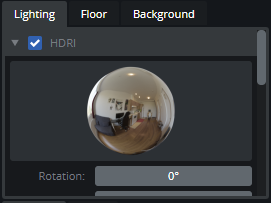
I usually use this one which you can see on the photo above. It's a great "everyday" environment, and it'll give a nice natural lighting to our scene. Good thing is that you can see the lighting preview in the 3D view, so now we can rotate the HDRI map if the reflections are too high on our model, like here:
After you found the perfect lighting for your model, you can add some different kind of backgrounds! Click on the "Floor" tab, and let's see what we have there. We can use a circle floor, a simple square floor, or a backdrop. I think for most of us, the backdrop will be the best option. You can rotate it and change its colour too. Keep in mind that you need to check the small checkbox next to the "Floor" label in order to activate a floor/background for your model.
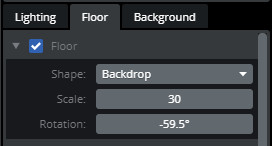
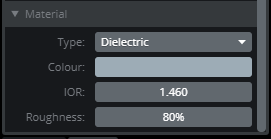
You can also change the backdrop material: you can either use a simple dielectric, or a metallic one. I usually use dieletric, with around 80% roughness.
I'd like to mention one more thing here - the shadow catcher. When you select a simple square as the floor, a new checkbox will appear with the "Shadow catcher" label. If you check it, you won't see the actual floor on the finished render, but the shadows will still be there. It's really useful when you'd like to add a custom image background later, because shadows will make your final photo much more lifelike.
We have two more tabs in the bottom right corner - Camera, and Parts. In the Camera panel, you can switch between different cameras (if you have more than one, of course), and also switch to camera view. On the Parts panel, you can add logo on the studs, add HD minifigure parts, and add effects to the bricks (you'll need to user credits for this).
If you think that the preview of your model looks great, you can click on the Render button.
So this is my first try. Looks great, right? I think the backdrop is a little bit too dark, and I'd also like to see more of the vignette effect, so let me tweak these options. Of course you could also add that effect in a program like photoshop, but why not to add it on Mecabricks if you can?

There we go! I like this one more! And notice that this was still rendered with the free version! If you render simple and light images, they'll look better with less samples, so you'll like the result of the free version I think.
Let's add some scratches to the bricks, and increase the resolution, then check the "Use credits" checkbox. If you change these values, they'll become red, that's just so you know that you can't use them in the free version. If you use credits, they'll become gray again.
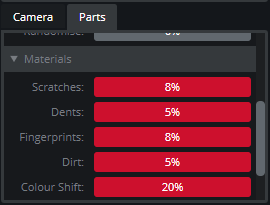
I don't like if my model if full of scratches and fingerprints, so I'll increase those just a little, around 5-10%. Colour shift will also add a nice effect to it, some bricks will be basically discoloured a little, just like in real LEGO models, and deformation will add a little unevenness to the bricks, just like in real life. Let's see the results!
(8% scratches, 5% dents, 8% fingerprints, 5% dirt, 20% colour shift, 40% deformation)
Okay, I probably used too low values for these options, let's increase them. :) I also feel like I need some more contrast, so I'll increase that just a little.
(15% scratches, 10% dents, 15% fingerprints, 10% dirt, 28% colour shift, 60% deformation, 10.0 contrast, 5.0 brightness, 1.01 saturation)
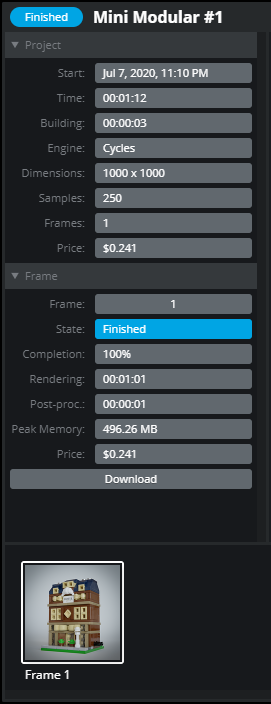
I think this the final version, and costed $0.241 for me and it was rendered in 1 minute. Yes, only 24 cents. I guess that's a really fair price for this, right? I think if I would turn down the vignette style, and backdrop, that would result in an even lower price.
You can see the render time, cost, and such data on the left side of the editor, and you'll also see a download button there! On the bottom, you'll probably see only 1 frame, and that's the rendered photo. That's because it is also possible to make animations on Mecabricks, and in that case, you can see every frame in the bottom part of the screen.
If you accidentally close the window after the render is finished, or you forget to download it, that isn't a problem! In the workshop, in render mode, you can see a "Projects" tab on the right side. You can access your renders here, and download them again. (Keep in mind that as I said above, free renders will be stored for 3 days, and paid renders will be here forever!)
Add some life to your renders!
Now you're at a point where you can make renders of your creations, but let's take a look at some more advanced features, which you can use to enhance the look of your final images.
Emission
Below the HDRI map settings, you can find one more section, and this one is a really great feature - Emission. With these options, you can make transparent materials emit light, which adds a really nice effect to your renders, here is an example:
HD Minifigures & subdivision
For close-up renders, you can use HD minifigure parts, and subdivide pieces, so they look really smooth - I recommend you to use subdivision on round parts and organic elements. You can find this setting on the "Object" tab when you select a brick in Design mode. Here are two renders made by Nicolas, so you can see the difference. Non-subdivided pieces on the left, subdivided pieces on the right:
HD Minifigure parts look better from close, and you can see nice mould lines on them:

Depth of field
I mentioned depth of field above, and I think you should use it in order to add a nice touch to your renders, but you can't really notice it on the render which I made in this tutorial, so here is a better example for it. Beautiful, right?

Motion blur
This great function was added to Mecabricks this week actually. I'm planning to cover the animation nodes in another article, but for this feature, we'll need to use a simple node setup.
 (Render by Scrubs / Mecabricks)
So, how can you achieve a motion blur effect on your renders? You'll need to animate the moving part(s) of your scene, set the camera stutter speed, and render a frame where the moving piece is actually moving (so in short, you probably won't see any motion blur on the first frame of the animation).
This is the simple animation node setup which was used for this render:
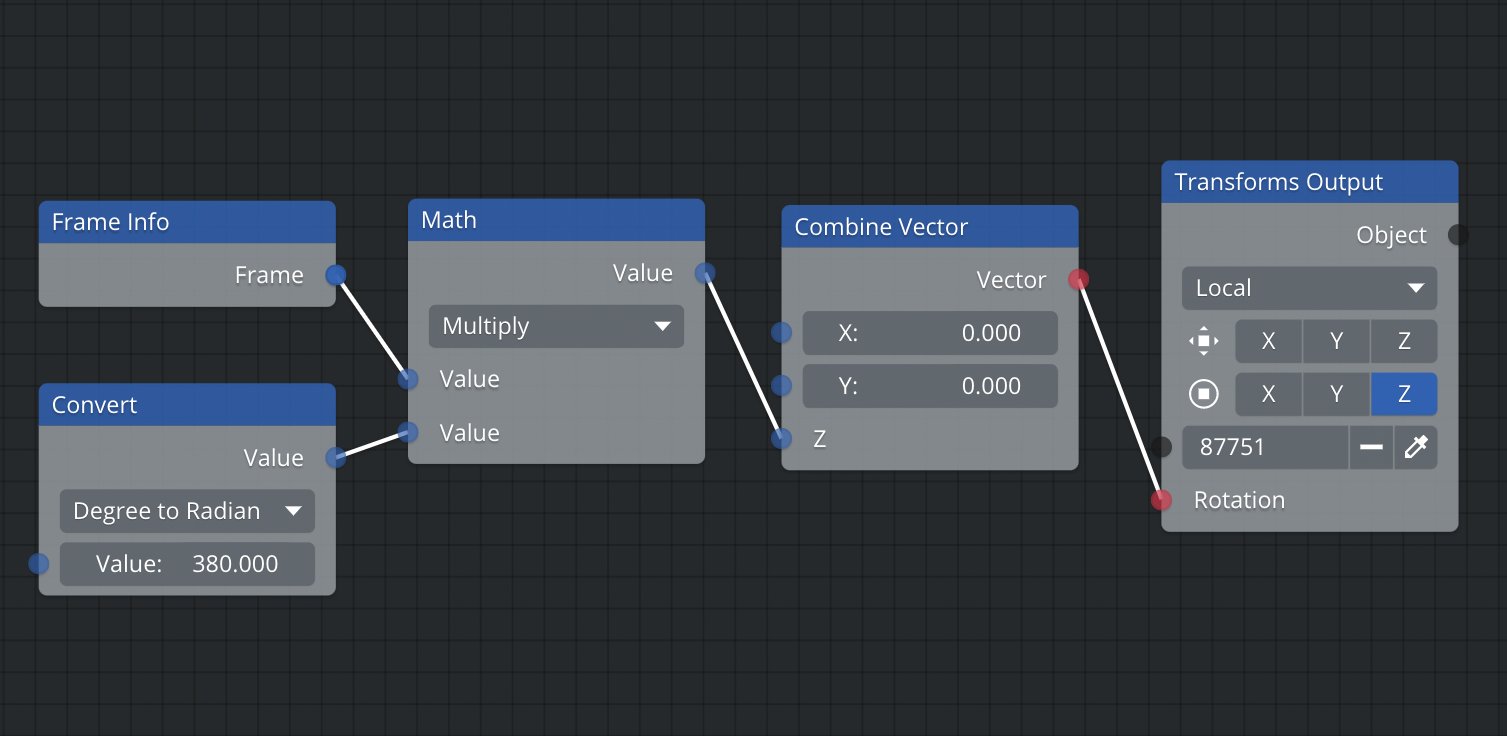
And here are the render settings. Notice that Nicolas rendered the 140th frame, so the LEGO piece which is animated is actually spinning at that frame:
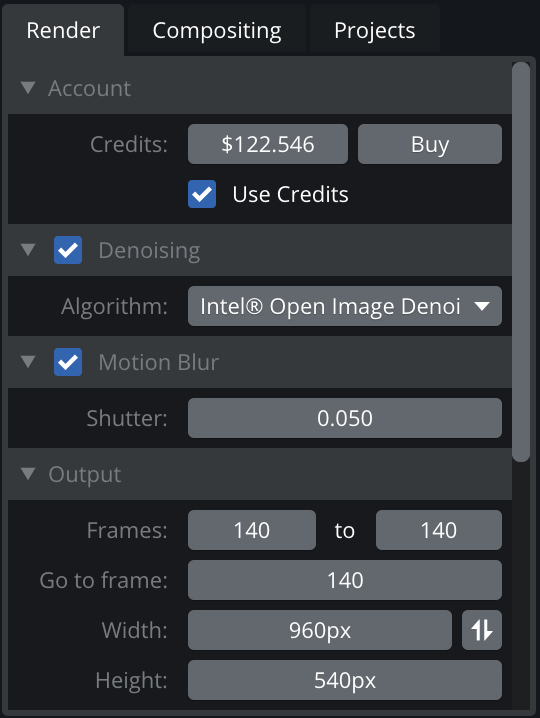
Maybe it seems like it's a little complicated, but you can just replicate this node setup when making a render where you need fast spinning parts, and that's it. Just don't forget to check the checkbox before the "Motion Blur" label.
Congratulations!
Thank you for reading this long article, hope you enjoyed it. :) Now you know everything that you need in order to make amazing, photorealistic renders of your creations! So what are you waiting for? Head over to Mecabricks, and give a try to the render farm! In the next article, I'll show you another exciting feature of Mecabricks, the Part Manager, where you can add custom or official decorations or stickers to the virtual LEGO pieces!
I'd like to mention here that you can check out Mecabricks' Flickr photostream, because most renders that you can see there are made with the online Mecabricks render farm.
85 likes
38 comments on this article
This is fantastic, I may be completely useless to me as I only really enjoy physical building, but the I’d be hard pressed to tell some of those renders apart from photos, they almost move into an uncanny valley of looking too realistic
I have been a huge fan of mecabricks, but render for me was too difficult, thanks fit the tutorial!
Wow, with tools like that it's hard nowadays to tell what's real and what's not.
I absolutely hate when people turn scratches on in a render. It totally runs the immersion for me.
Not a clue what that was all about?
Thank you everyone for the positive feedback so far, I'm glad you guys found this tutorial helpful!
@grandadlegoman said:
"Not a clue what that was all about?"
I basically explained how can you make a lifelike images of digital LEGO models (using a software called Mecabricks). Let me know if you have any question, or if there's anything else you haven't understood! :) I tried to keep it as simple as possible, but I also wanted to show fellow digital builders every setting that they can use while making these renders.
This is an absolutely awesome article! Thank you so much!
Many thanks for this - when you want to learn how to render there's so many settings and terminology that it can be rather intimidating. I'm not quite sure what "samples" mean though?
About Emission - which seems great! - is it just possible to use on transparent parts? Also, is it possible to imitate sunlight through a window for example, if you have made an interior build and want some natural lighting? I guess that could then be combined with Emission so that you also have light inside from ceiling lights etc?
Great article, I learned a lot!
However, there are supposed to be differences between the 2 pictures of parts (Here are two renders made by Nicolas, so you can see the difference. Non-subdivided pieces on the left, subdivided pieces on the right:)....I can't make out any differences!!!!
What am I missing?!?!?
Thx!
You're welcome, guys!
@MrClassic said:
"Many thanks for this - when you want to learn how to render there's so many settings and terminology that it can be rather intimidating, great to get some of that explained. I'm not quite sure what "samples" mean though? About Emission, is it just possible to use on transparent parts? Also, is it possible to imitate sun light through a window etc, if you have made an interior build and want some natural lighting?"
Well, I don't really want to explain professionally what samples are, but basically more samples will give you a better, less noisy image, but at the same time your render time will be longer of course. By my experience, around 250 samples work perfectly for Mecabricks renders. If you'd like to render a darker scene, you'll probably need to increase the sample number.
And yep, I think I mentioned light types in the first article where I covered the different functions in the Mecabricks workshop. You can basically add a light source (point light, area light, sun, etc.) to your scene, rotate and position it properly, and then when you switch to render mode, you'll actually see a realtime preview of the light, so you can adjust it's strength, position, and rotation! ;) Let me link you a video where you can see lights in action: https://www.youtube.com/watch?v=cotWGBxObD8
P.s.: you can actually preview the lights in design mode too, you just need to turn them on in the settings.
@speedorz4ever said:
"Great article, I learned a lot!
However, there are supposed to be differences between the 2 pictures of parts (Here are two renders made by Nicolas, so you can see the difference. Non-subdivided pieces on the left, subdivided pieces on the right:)....I can't make out any differences!!!!
What am I missing?!?!?
Thx!"
Thank you! Well, look closer at the sides of the round pieces (you can open the image in a new tab, so it'll be bigger), you'll see that it's much smoother on the right side render ;) This feature is good when you make close-up shots.
@BrickJonas : Ah I see, so for light from say a bedside lamp you may use "Spot" and for a ceiling lamp "Area", and then there's "Sun" and "Point", while "Emission" is rather used for glow etc. I guess you may then combine all of those, and have several "Spot" and "Area" lights in the same image? Also, I suppose you may use "Emission" to have the bedside lamp really "glow" while it's "Spot" that actually lights up the area below? I really must get into this!
@MrClassic yep, exactly! ;) You just need to practice a little bit and try out all these light types, and I'm sure you'll be able to make something amazing!
Thanks for the fantastic article but... Welp! I tried rendering my Tumbler Batmobile MOC and the final render came out extremely fuzzy! I could barely make out the pieces! The denoiser was on yet there was still a lot of visual noise. Wonder if this is due to the MOC being 100% black. I tried again with a LOT of lights but the final render is still no better.
I forgot to ask about that free Blender plugin you may download and use to render on your own computer - how does that differ to the paid options?
@TheRightP_art have you maybe activated the depth of field, and haven't set up the "focus" properly?
@MrClassic said:
"I forgot to ask about that free Blender plugin you may download and use to render on your own computer - how does that differ to the paid options?"
You won't be able to use special settings (like bevel width), and effects (like scratches, dirt, fingerprints), but I think you can still achieve really-really good results with that free add-on!
@BrickJonas said:
" @MrClassic said:
"I forgot to ask about that free Blender plugin you may download and use to render on your own computer - how does that differ to the paid options?"
You won't be able to use special settings (like bevel width), and effects (like scratches, dirt, fingerprints), but I think you can still achieve really-really good results with that free add-on!"
You also then of course, rely on your own hardware which can be intense! You most likely need an RTX GPU so that it won’t take forever. And yes, you would have to apply your own texture packs. Honestly, render farms have come down in cost so much, it’s not worth the hardware investment if you don’t already own it.
Great article, thank you!
'they'll look better with less samples'
fewer.
@Stiel said:
"'they'll look better with less samples'
fewer."
Thanks for the correction, and sorry, English isn't my first language.
@Sidorak said:
"Hi @BrickJonas! Whenever I try to build in mecabricks, (in the building phase) all my bricks turn out black no matter what color i change them too in the sidebar. Is this normal? "
Hey! I guess you accidentally switched to wireframe view. On the top menu bar, find the "Settings" dropdown. You'll see 2 cubes on its left. Click on the 2nd (right) one! :)
Is the paid option dollar to dollar value? e.g. I get $10 credits with $10 dollars? Anyway to earn credits from using Mecabricks?
@darkstonegrey said:
"Is the paid option dollar to dollar value? e.g. I get $10 credits with $10 dollars? Anyway to earn credits from using Mecabricks?"
Kinda.. if you buy more, you get a little bit extra. Check out this page for more info on credits: https://www.mecabricks.com/en/credits You can sometimes win credits, for example the $5 (or more) Mecabricks Patrons on Patreon can win credits every month.
I made one for free, check it out here: https://mecabricks.com/image/rendering/o/DxWY8j.png
It's a bit finicky but kinda fun.
Hmm, very interesting. Does Mechabricks have an option to export a 3d file, like OBJ? Since the quaratine has started, my gaming group has been doing a lot of virtual gaming using Tabletop Simulator, I'd love to be able to import some of my MOCs to use in games.
@Stiel said:
"'they'll look better with less samples'
fewer."
With all due respect, I think this comment is in poor form. The terse delivery and lack of any accompanying reason for the unsolicited correction reduces the author’s extensive hard work (offered for free to the public) to one grammatical slip—a slip which is frequently (and conventionally) made by many native speakers here in the US. The author’s response was beyond charitable, and I commend BrickJonas for responding with such aplomb.
I humbly submit that you reconsider your comment, keeping in mind that it neither improves the quality of the content nor furthers the discussion at hand. BrickJonas has shared these tips to help builders familiarize themselves with a tool which can enhance their (digital) building, thus serving our community and fostering the growth of LEGO art. I heartily believe such gestures should be gratefully received and commended, not proofread.
Great introduction, I will be giving this a shot in the near future
@BrickJonas said:
" @TheRightP_art have you maybe activated the depth of field, and haven't set up the "focus" properly?
"
Thanks for the reply! I haven’t activate depth of field.
The crazy part of this is, that Lego as multi billion company can not make this and then there we have fan who loves lego and created this absolutely amazing program which can things on same level or maybe even better than Lego itself.
@SeekerBear said:
"I made one for free, check it out here: https://mecabricks.com/image/rendering/o/DxWY8j.png
It's a bit finicky but kinda fun."
Ok that build is hilarious on its own, but it's even better with the way you rendered it. If you didn't see the benefit of this amazing tool before, that ridiculous sky pirate crew image sold it for me.
Wow, thank you everyone for the overwhelming positive feedback! I'm glad that some of you decided to try Mecabricks and make renders with it!
@HandofBobb yep, sure! You can export your models in .obj, .dae, and .stl format! ;)
@spiritedmatt Thank you so much for your kind words! I'm trying to handle every situation in the best possible way... :) At least I learned something new today.
Just... Wow. Maybe a bit tough for me, not used to such things, but amazing results. Thank you.
It is great, but it cost. Studio is free, and with solid render images (except trans- colored parts)
@gsom7 said:
"It is great, but it cost. Studio is free, and with solid render images (except trans- colored parts)"
Yep, but stud.io uses your own hardware, and Mecabricks render farm uses 6 powerful PCs. :) You can still use the free Blender add-on, and make your renders on your own machine just like with stud.io.
@BrickJonas This question may have been answered in the first part. Will Meca allow import from Stud.io models? I prefer the usability of Studio over Meca
@Stiel:
That's a non-rule that originated with the aesthetic preferences of a single grammarian named Robert Baker in 1770, while the use of "less" in the same situation dates back to at least the year 888 in an Old English quote from Alfred the Great.
A similar situation occurred in 1672 when John Dryden objected to the use of a dangling preposition with no explanation given (though it has been noted that he had an obsession with the styling of Latin, where such sentence structure is impossible). That eventually resulted in the quote, "This is the sort of English up with which I will not put," being attributed to Winston Churchill. Shakespeare and the King James Bible both reportedly have numerous examples to the contrary.
Neither is a hard and fast rule in English. Both were based on the personal preferences of a single person a few hundred years ago, and both have historical counter-examples that predate these "rules" by a century or more.
One more example in the same vein is English vs American spelling. The former was formally put to page by Samuel Johnson beginning in 1755, while the latter grew out of Noah Webster's push for spelling reform starting in 1828. The irony is that, prior to this, free-form spelling was considered perfectly acceptable, and indeed encouraged as a form of embellishment. An appropriately varied set of quotes regarding "having no use for a man with only one way to spell a word" has been attributed to the likes of Mark Twain and President Andrew Jackson.
@STL_Brick_Co said:
" @BrickJonas This question may have been answered in the first part. Will Meca allow import from Stud.io models? I prefer the usability of Studio over Meca"
Hey, yep, you can already import stud.io models. Just open the workshop (https://mecabricks.com/en/workshop), and go to "File -> Import...", then pick the right format from the dropdown, and that's it! ;)
hoping there would eventually be a good LEGO builder mobile app someday