Review: 76023 The Tumbler, part 2: Construction
Posted by Huw,
All 1869-pieces of 76023 The Tumbler have been clicked together and the model is now complete. It's an utterly fascinating build that really pushes the limits of what's possible with LEGO.
This part of my review is profusely illustrated with photos taken during construction so you can get a feel for how it goes together. Tomorrow, I will finish off with photos of the completed model and give you my verdict.
First though, several people have asked about parts in the set, so while we wait for LEGO to publish the inventory here are scans from the instruction manual showing the inventory.


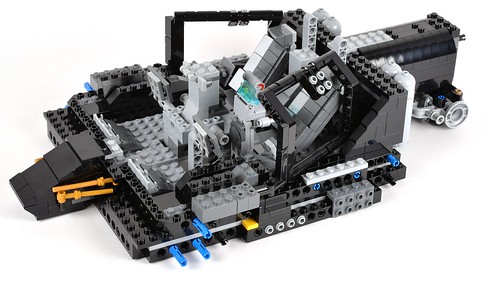
Construction begins with the chassis. It's formed of 8x6 Technic frames connected with a multitude of pins, then covered in large grey plates. As a result, it's extremely rigid.


The seat bases are then added along with other parts.

Studded and studless Technic beams are used throughout the model.

By the end of construction from bags #1, the chassis is complete and the controls are in place. I'm not entirely sure why the central control section needed to be held in place by the vertical grey studless beams, it's not like the parts are likely to move. They add a lot of complexity to the chassis and look a bit untidy compared to the rest of the interior, so it's a bit of a mystery.

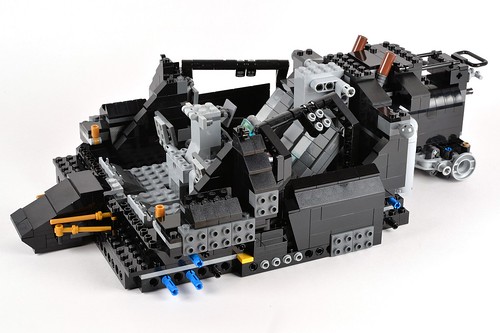
Bags #2 completes the seats and interior, adds side panel frames, and bulks up the engine area at the back.

The control panels are all stickers but easy enough to apply. The interior would not look so good without them.

Parts in bags #3 are used to build up the sides and start on the front...
...and add details to the back, including some 1x1 tiles printed with dials.

The front windscreen, if you can call it that, is then added. It uses two 1x6x5 trans-clear panels which are partially covered with wedge plates to give the apertures that are left, their distinctive shape.

A couple more control panels are added at the side of the interior in this step.


Bags #5 add the wheels. The means of connecting the front wheels is pure Technic and utilises four 3x11 panels, which are new this year and appear in black only in this set.

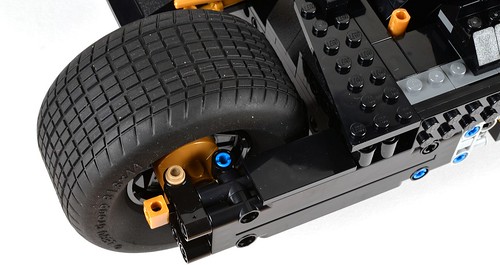
The four 38mm-wide tyres at the back must provide a lot of traction.

The 'suspension' is fake; it's just made from worm gears.

Next, detail is added to the rear of the sides, along with the doors.

The gold 2x2 round tiles have stickers representing locks or handles or similar.

Next, a panel is added to the front of the sides and some sort of air intake to the back. I'm not sure what the grey light sabre blades at the front represent and why they are at odd angles.

Each side is then finished off with a thin jointed panel connected to the body by a ball joint, which gives total flexibility in terms of its positioning.


The rear is finished off with a huge exhaust pipe/jet engine outlet.

Various panels are then added to the front held on in all manner of ingenious ways to get them to sit at the required angle.

Nearly finished... Bags #10 provide parts for the roof which consists of two removable panels above the cabin and two sections over the wheels at the back.

This image shows one roof panel removed.

Finally, bags #11 finish off the model with six 'wings' at the back which are also held in place using ingenious and often fragile means.

Overall it took about 4 hours to build, including time messing about photographing it.
As I said in the introduction, the model has really pushed the boundaries in terms of building techniques of an official model.
Every trick in the designer's book has been used to achieve the angles needed to give the vehicle its distinct look: plate hinges, click-hinges, brick-hinges, ball joints, SNOT, even fishing rods and light-sabre blades. However, some of the joints are a bit precarious so sections can be displaced when handling it.
It's a fascinating model to build and I enjoyed every minute of it.
Part three of the review will include photos of the completed model and, once I've dusted it off, pictures of it alongside 7784 UCS Batmobile.
4 likes
25 comments on this article
Almost makes me wish I was a Batman fan!
The more I see the reviews the more I am thinking I should buy it. It would be my first UCS set ever.
Nice review and excellent photography.
The set doesn't interest me at all, but the build looks like a lot of fun.
Wow, it looks great! Can you show us the functions too?
This is a rather interesting build... it doesn't look like anything Batman at all until halfway through!
Dagnammit, I'm trying to take a stand against stickers in expensive sets here, stop making them look so tempting!
I NEED one!!!!!
Well I'm sold...
I don't see a Batpod. That's a huge disappointment. I still don't much care for the overall look of it. It's very cool, just doesn't look as sleek as the real thing. It's kind of messy actually. Too much technic, not enough smooth pieces for the exterior, and too many stickers. I love Batman and I have more Batman Lego than anything else, so I think I'll have to get it anyway; but I'm actually feeling less excited about it than I was when I first heard about it. The Joker is pretty much the main redeeming quality for me. That's going to be a lot of money to pay for one awesome minifig, a huge box that I have no more room to store, ditto for the manuals, a lot of cool pieces and some Technic junk. Really hoping I change my mind about it once I build it. Wouldn't be the first time.
I'm currently building this model for the forthcoming Brickfanatics review and it's a beast. The build is simply awesome. When you build the model you will appreciate just how parts dense it is. It's great!
Here is a great comparison for a Tumbler from the movie, https://www.youtube.com/watch?v=ydtGew7bWuw
Not sure if the link will work outside the US.
This set looks unbelievable, can't wait for it!
OK, I am loving all the techniques used... just a pity the vehicle is lacking any sort of features like a steering, suspension, or even a Batpod. Frankly, after this, I hope LEGO is done with the Nolan trilogy. I'm sick of Tumblers. I wish the control panels had been printed... it's not like people have $200-shaped extra bits in their budget. But, congratulations Brickset on the first English review of this set! (I mean English as the language; there's been a Korean review of this floating around for some time. I am not, however, fluent in Korean.)
In your opinion, how tricky it would be to implement a real steering for the 2 front wheels ?
@StorzN, "Can you show us the functions too?" What functions? There are none other than the wheels turning.
@Mirakle, I would say it would be impossible.
@JusJeff, thanks for that link, I'll refer to it in my summary tomorrow.
Cool video! I want to be Jay Leno!
Nice review, Huw - thanks!
Sad to see people knocking 'Technic junk'.
That Technic, my friend? It's Lego for grown-ups...
;o)
To demonstrate the scale of the Tumbler, could you take a picture of a minifigure in its seats?
I'm currently saving money for this UCS. I wanted a Lego Batmobile but I never knew about the first UCS. But this Tumbler? Wow, I can't wait to get it! The build looks a bit difficult with the angles but the final result seems to be fantastic. If you enjoyed building it, then I'll for sure. Thanks for this, Huw. ;-)
Oh wow...the usage of ball joints to create those two panels at the back is ingenious, though it seems a bit sketchy as the panels could be prone to move?
The interior looks beyond fantastic, every detail there well thought-out. Wish I had a bit more money in my pocket...
@BooTheMightyHamster, to be fair, I think I was the only one knocking the Technic parts, and didn't mean that Technic in general is junk. I knew I'd get slapped for that remark. The technic parts are just the least desirable for me, but then again I never did grow up; so maybe that explains my disinterest.
Looks nice enough but far too much money like most UCS models which are just display pieces and lack general playability due to fragility.
Quick questions: The large "engine block that supports the rear axle, could it not be replaced with a modern motor box? I think the battery box/control would have to attached free floating by wire so it doesn't just rush off and crash though!
"grey light sabre blades at the front"
Those are hydraulic rams.
@polyester333
No offence - only kidding. Sooner or later, everyone will come to realise that Technic is the greatest Lego of them all!
;o)
so good!!!!