It looks like you're new around here, so we thought we'd let you know a bit about the site and what it has to offer.
Brickset is primarily a database of LEGO sets. We've been online since 2000 and are now a cornerstone of the online LEGO community: a resource used and trusted by LEGO fans around the world.
As well as virtually every LEGO set ever made, our database also contains information about minifigs, parts, colours, set inventories and much more. We also maintain comprehensive lists of discounts and new products at online LEGO retailers, making it easy to grab a bargain or bag the latest set.
Additionally, we publish news and comprehensive reviews of new products on our home page, making us a one-stop-shop for everything LEGO-related.
Over 300,000 people use the site to keep track of their LEGO collection, review and rate sets, post comments, maintain lists, and much more. So, sign up today to join us and start enjoying everything the site has to offer!
Today's random minifigure is sh0668AIM Agent - Night Vision Goggles, a Super Heroes figure that came in one set, 76164 Iron Man Hulkbuster versus A.I.M. Agent, released during 2020.
Our members collectively own a total of 3,313 of them. If you'd like to buy one you should find it for sale at BrickLink, where new ones sell for around $3.10.
Today's random set is 7816 Shell Tanker Wagon, released during 1980. It's one of 28 Trains sets produced that year. It contains 120 pieces and 1 minifig.
It's owned by 631 Brickset members. If you want to add it to your collection you should find it for sale at BrickLink, where new ones sell for around $292.60, or eBay.
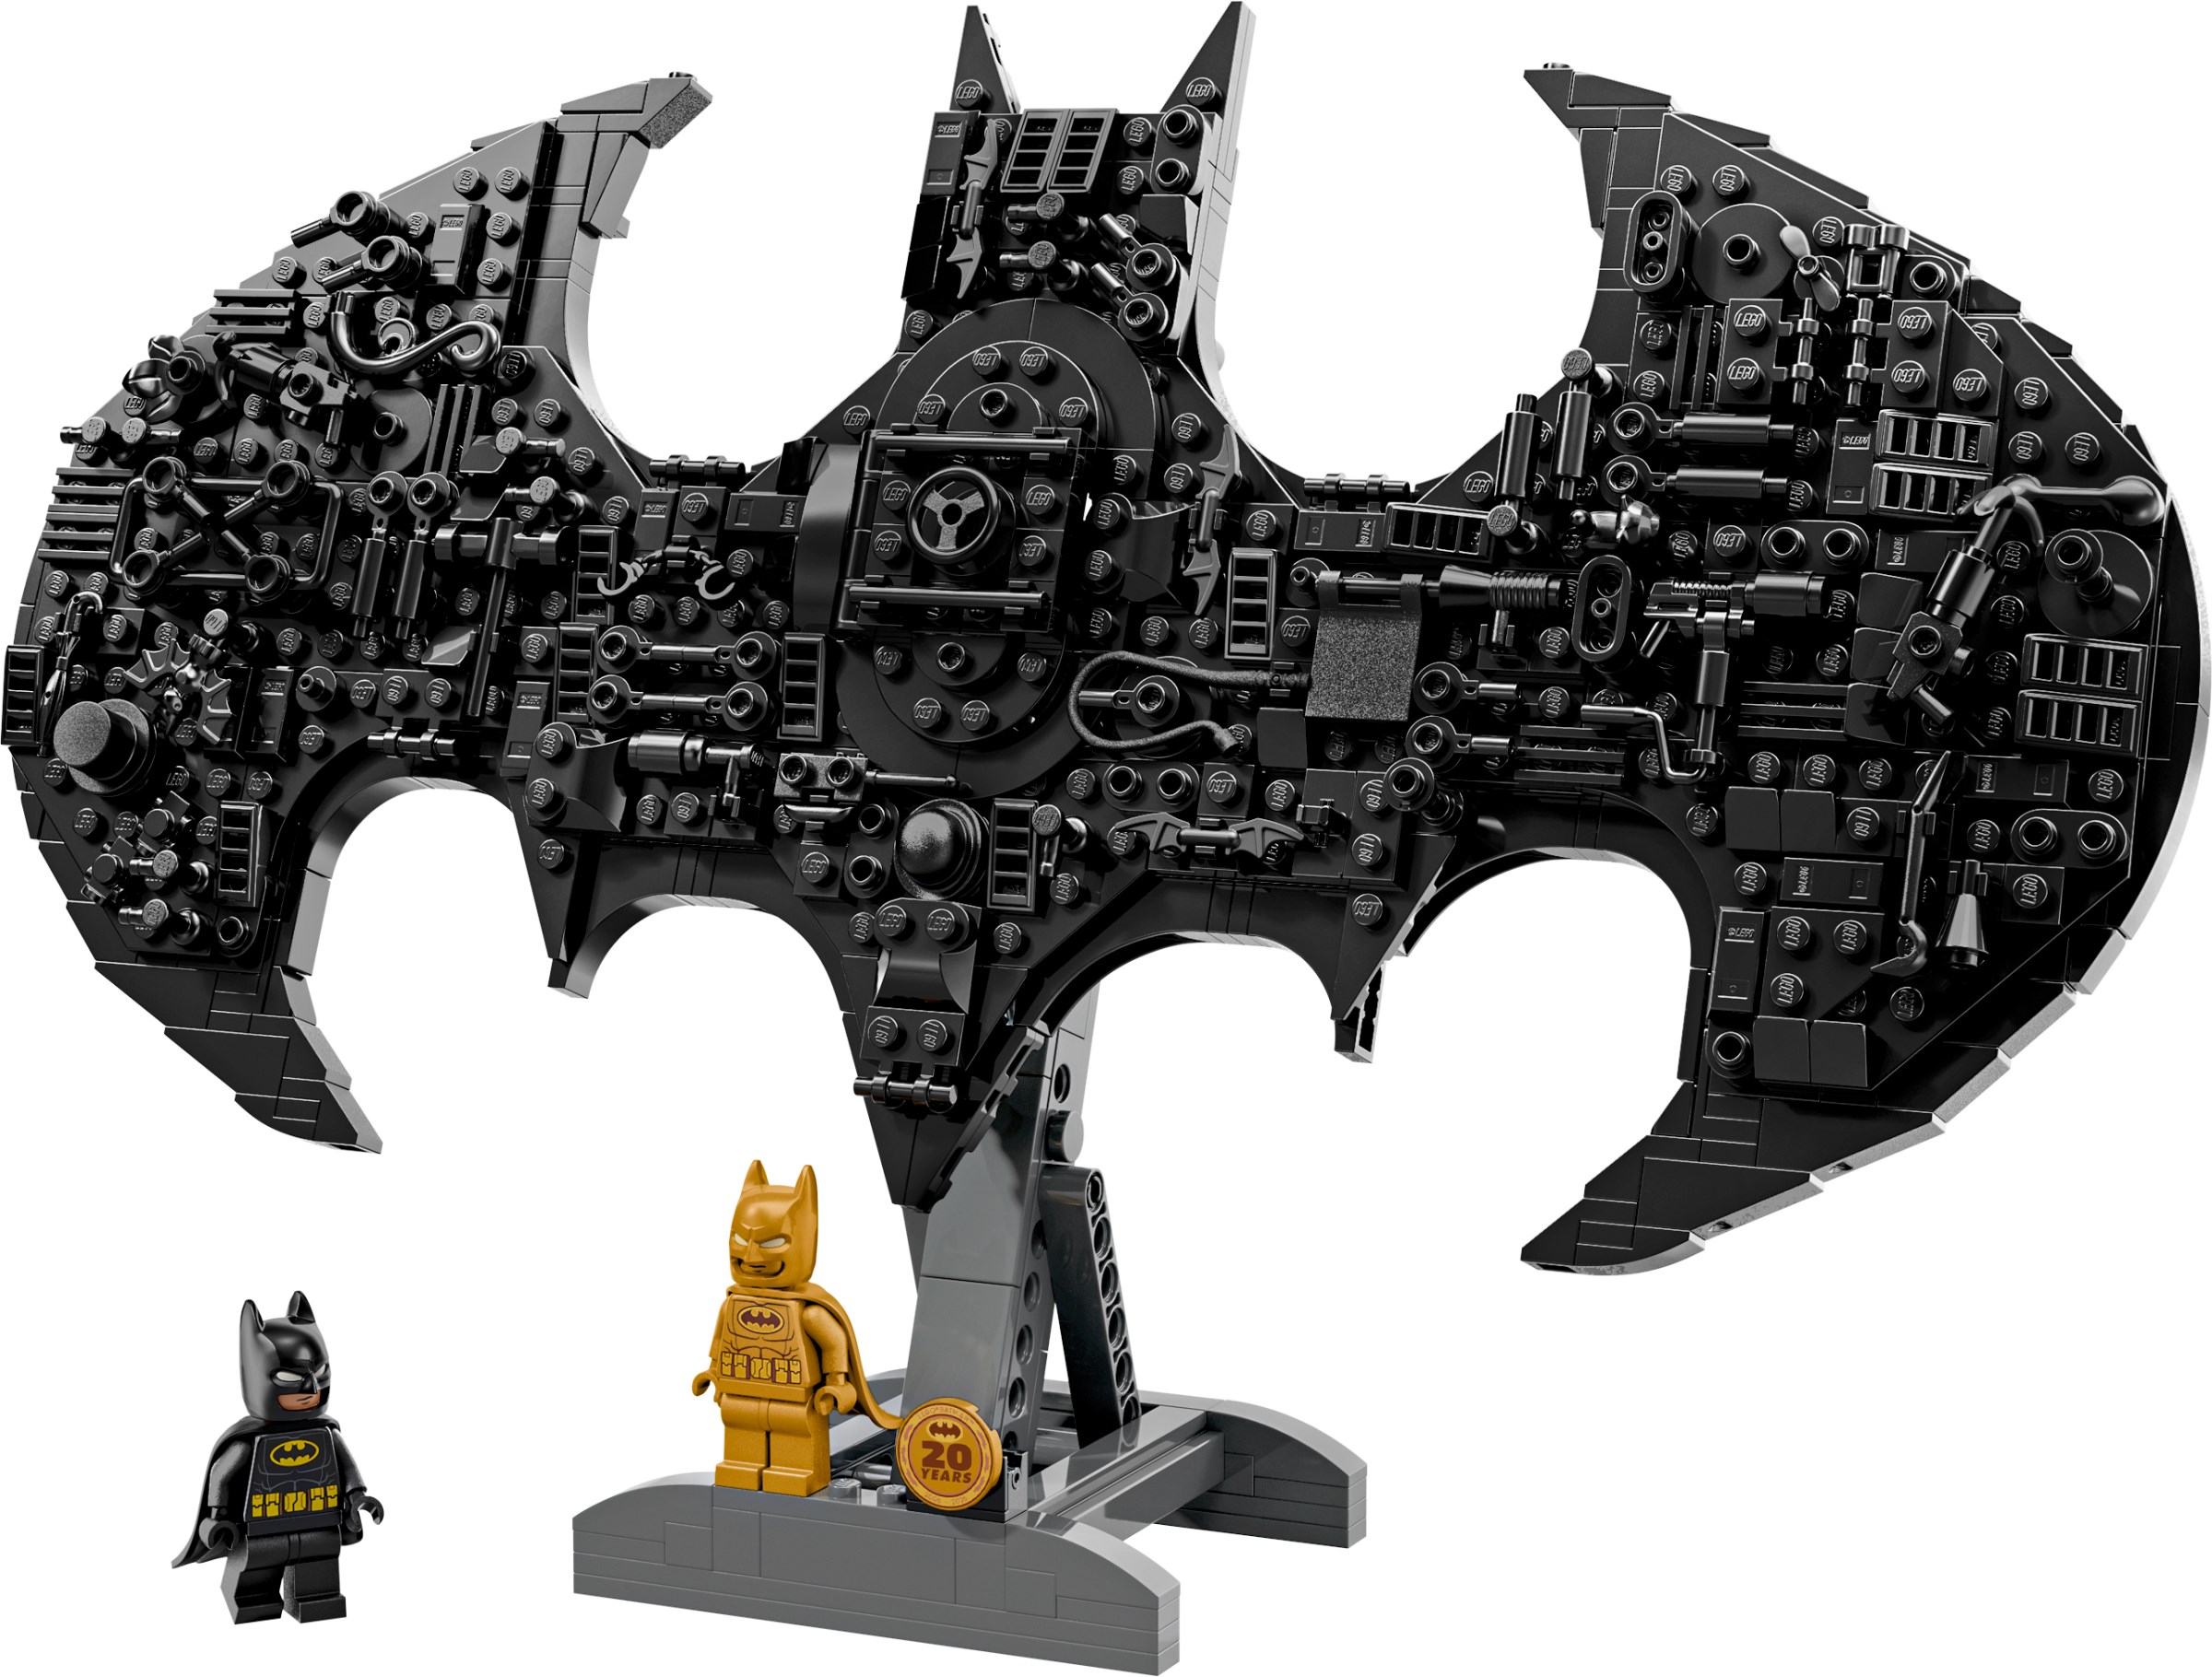
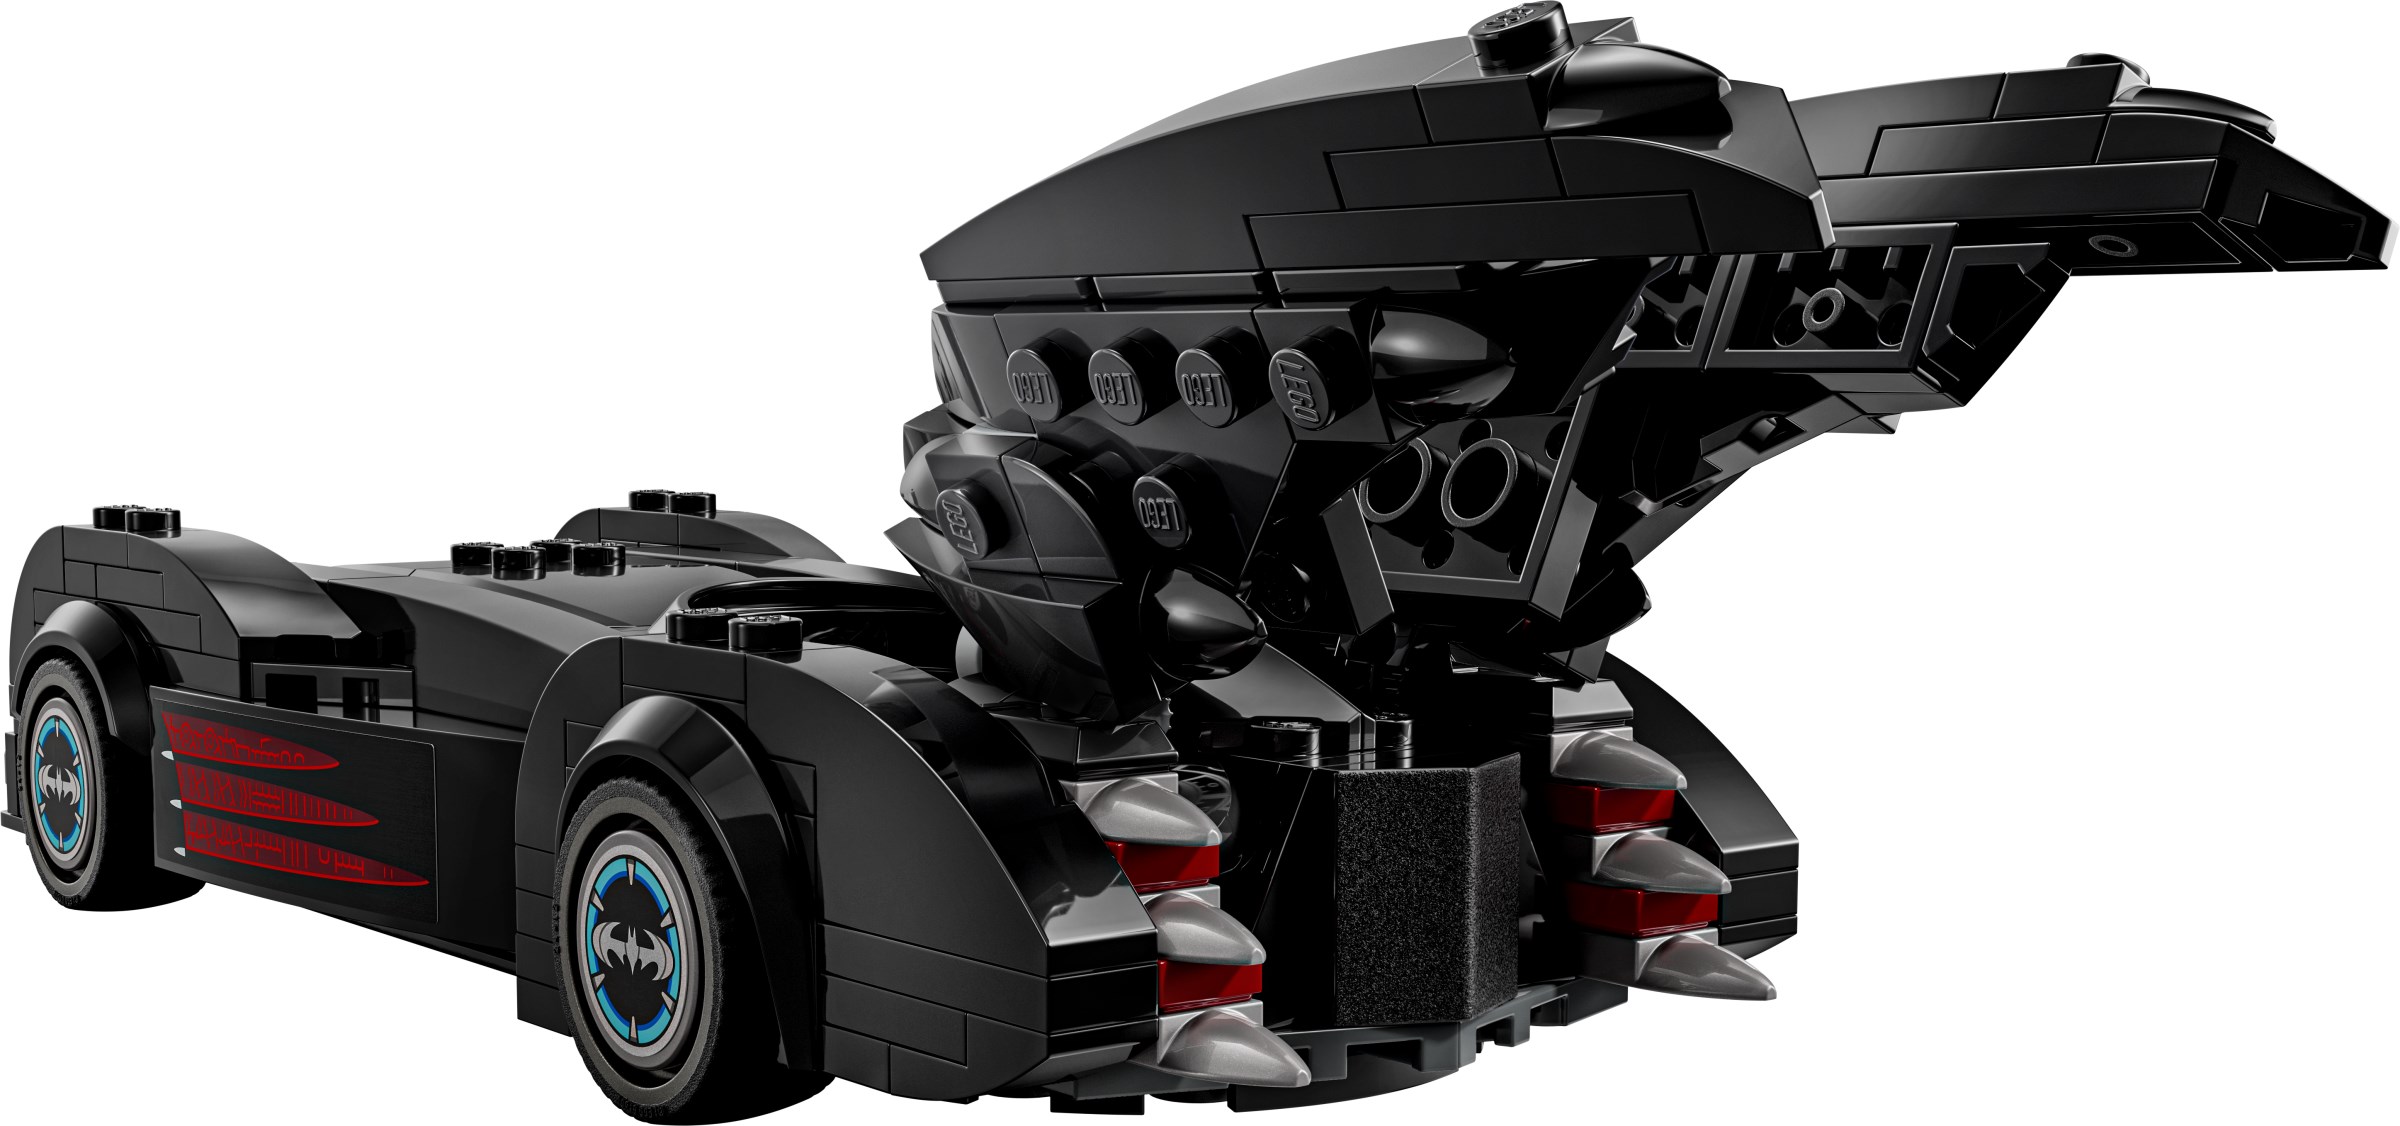
Four new LEGO DC sets have been announced, ahead of their release on March 1st, 2026!
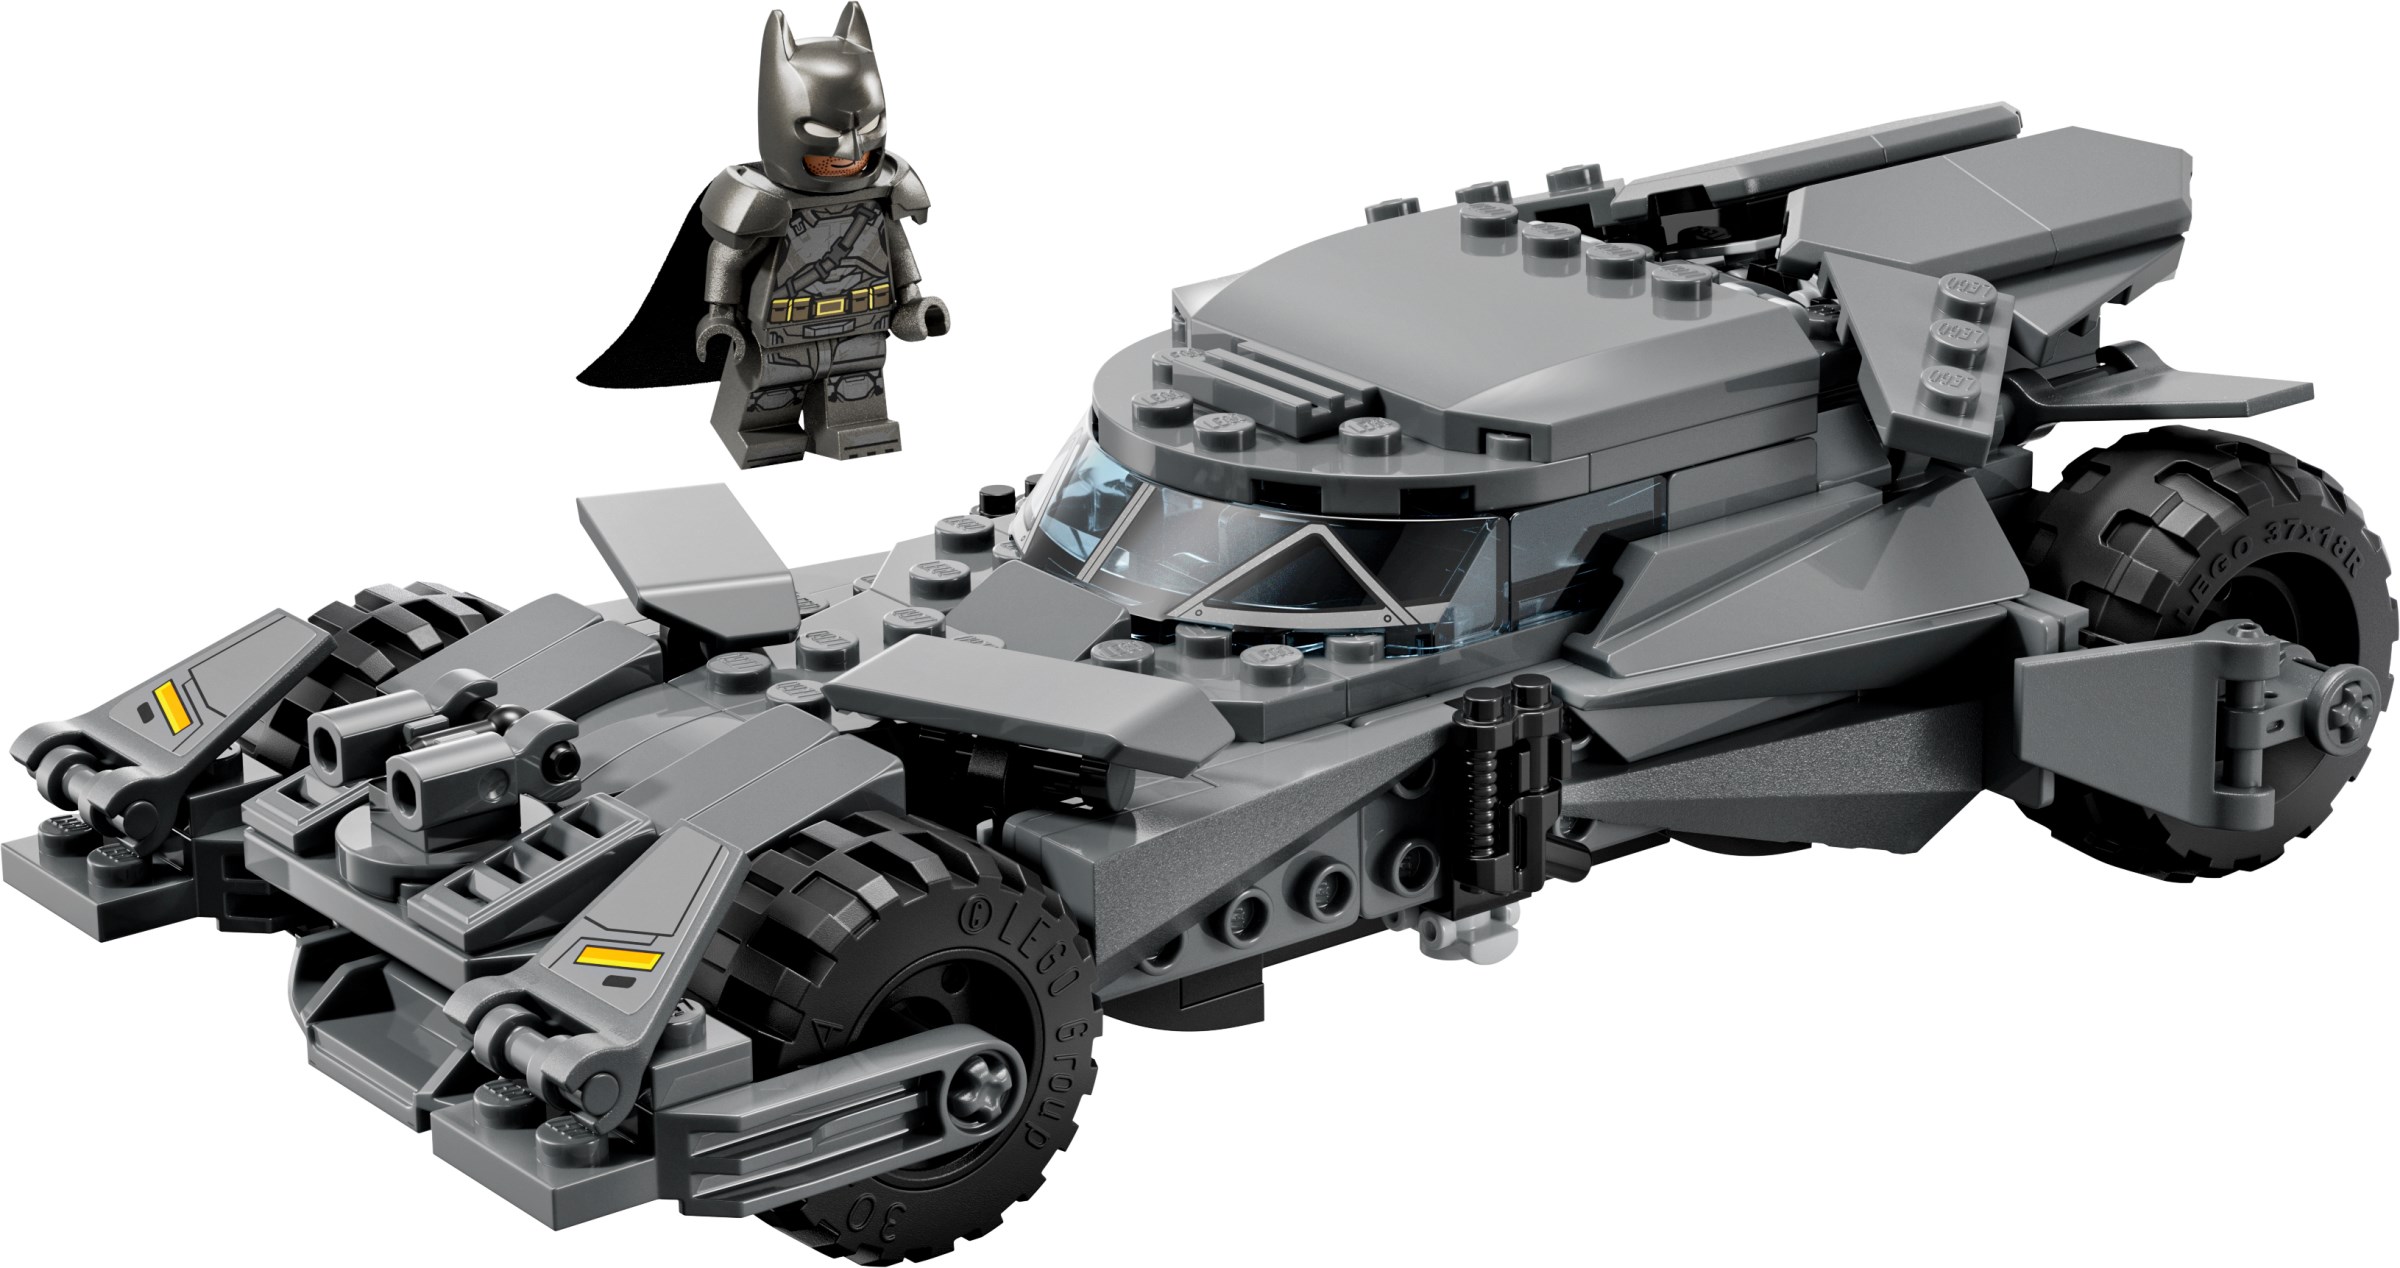
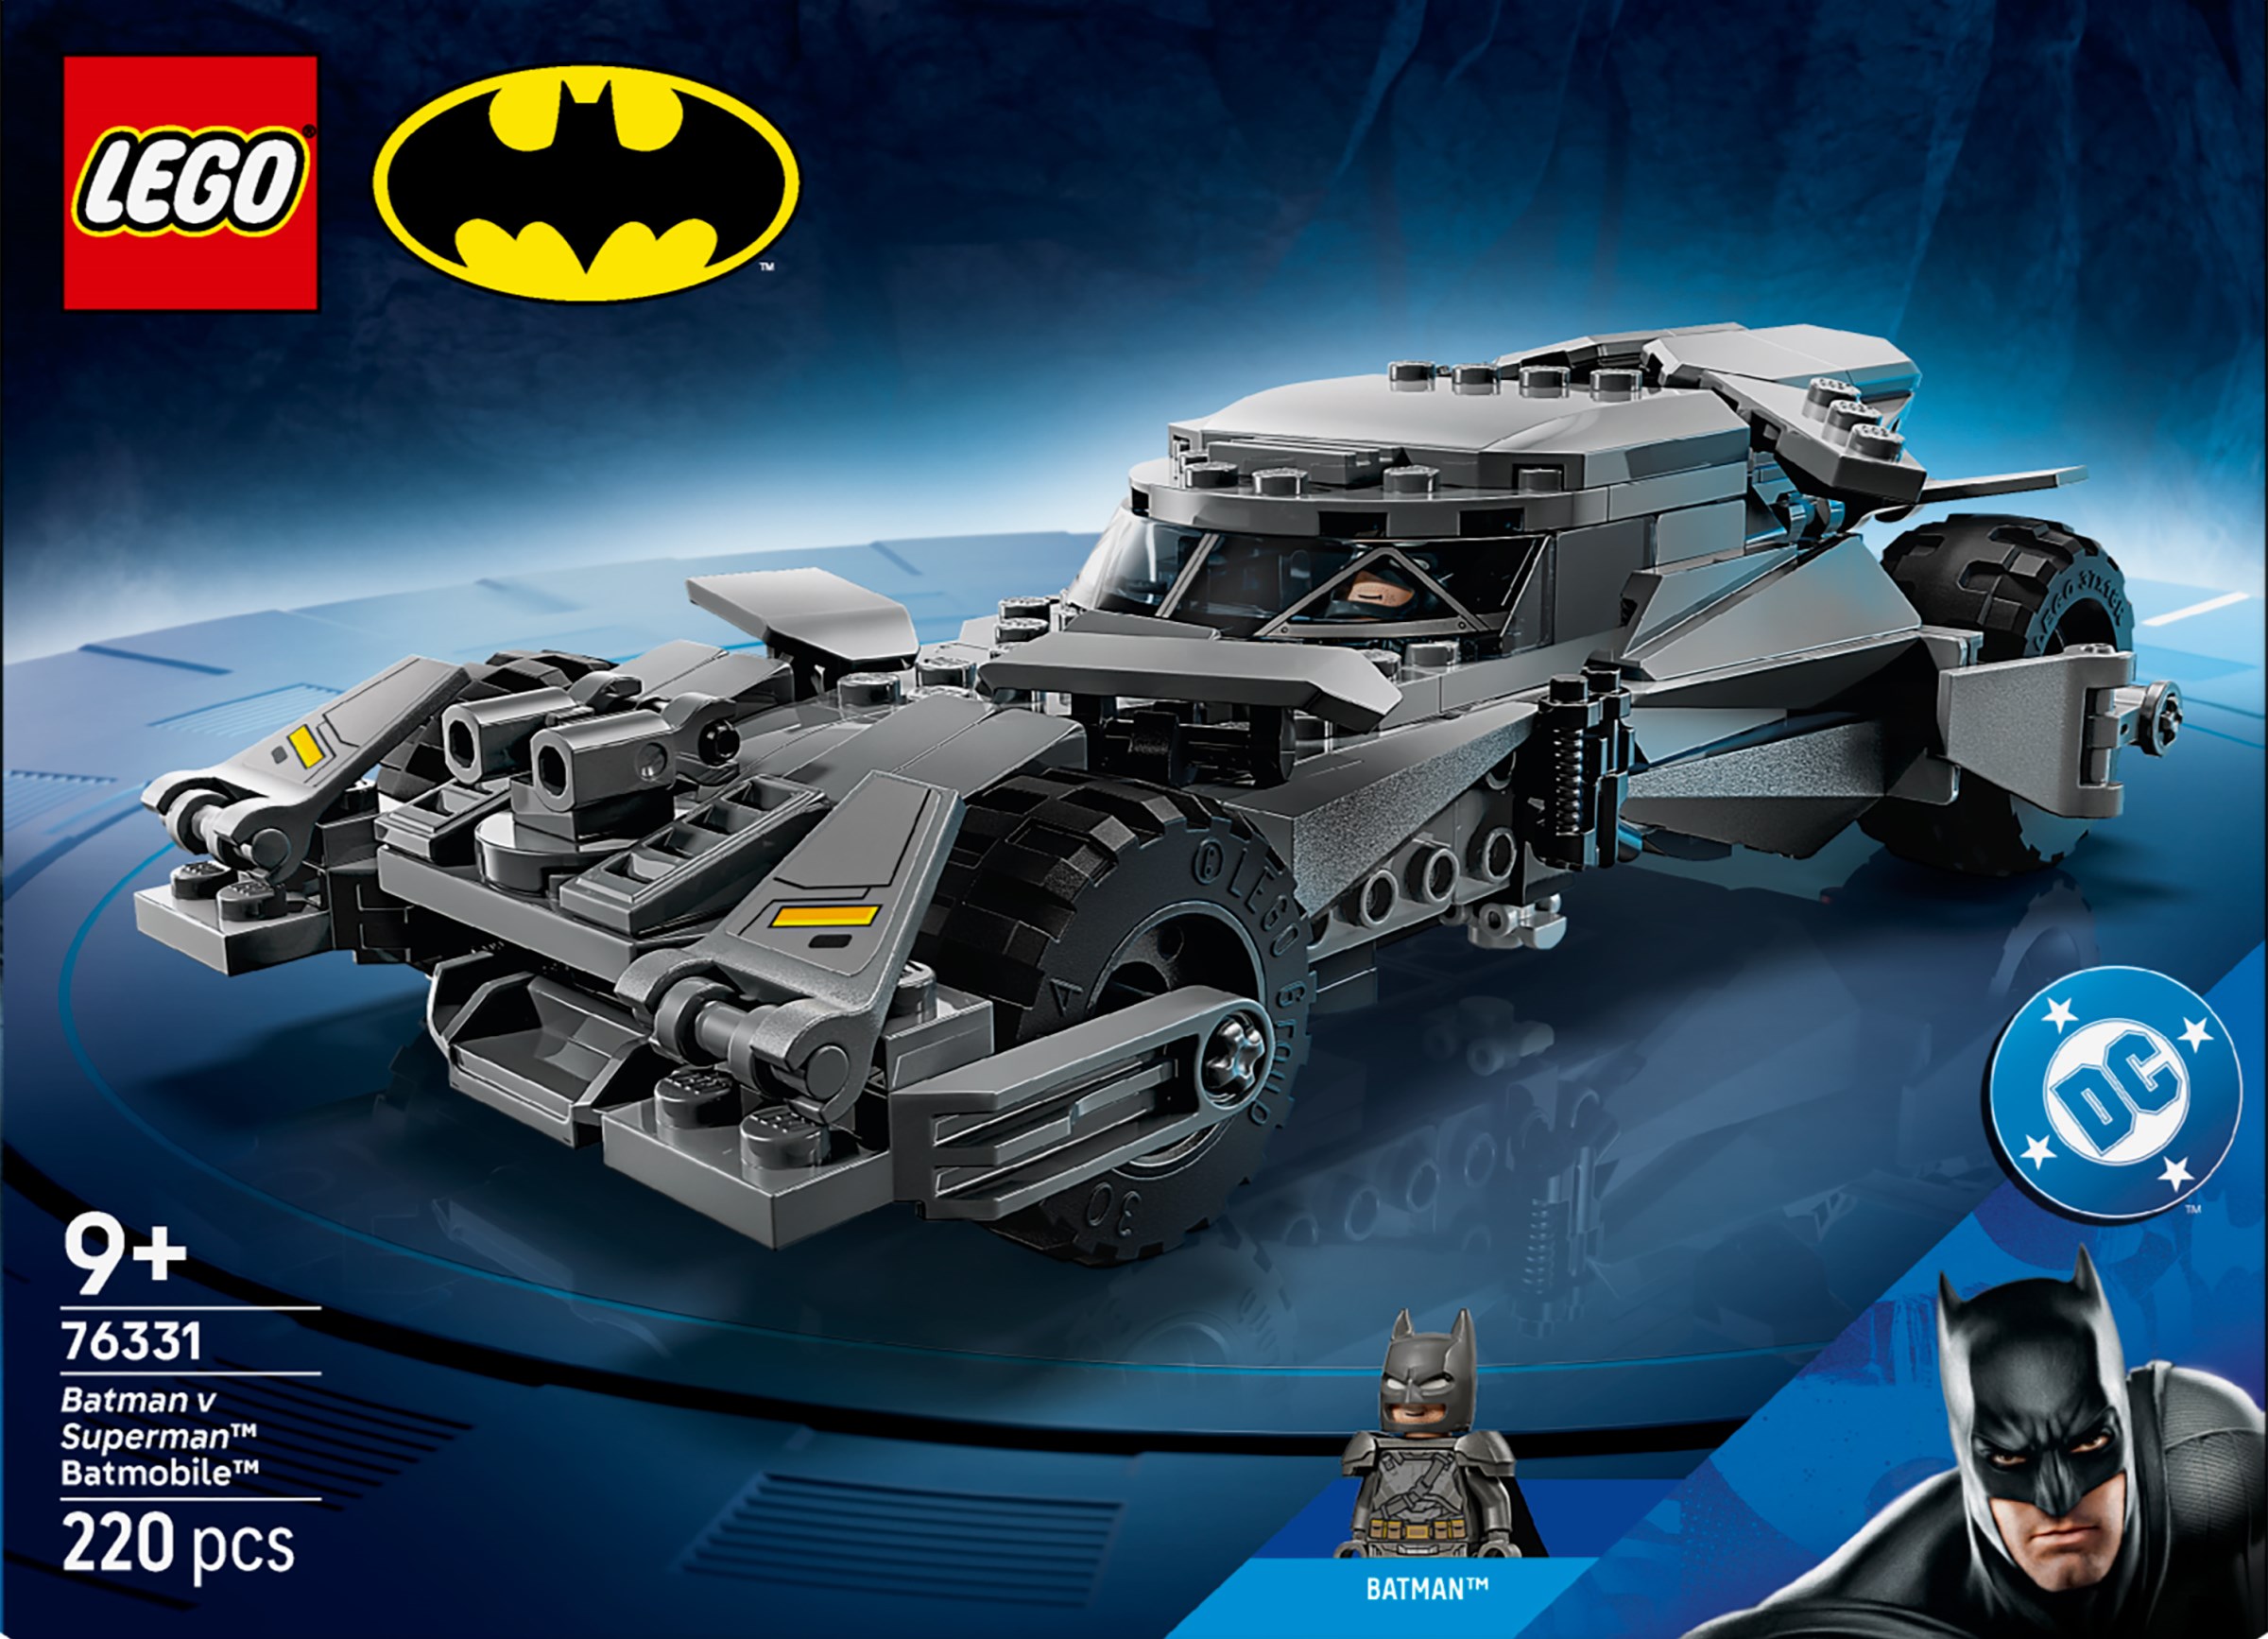
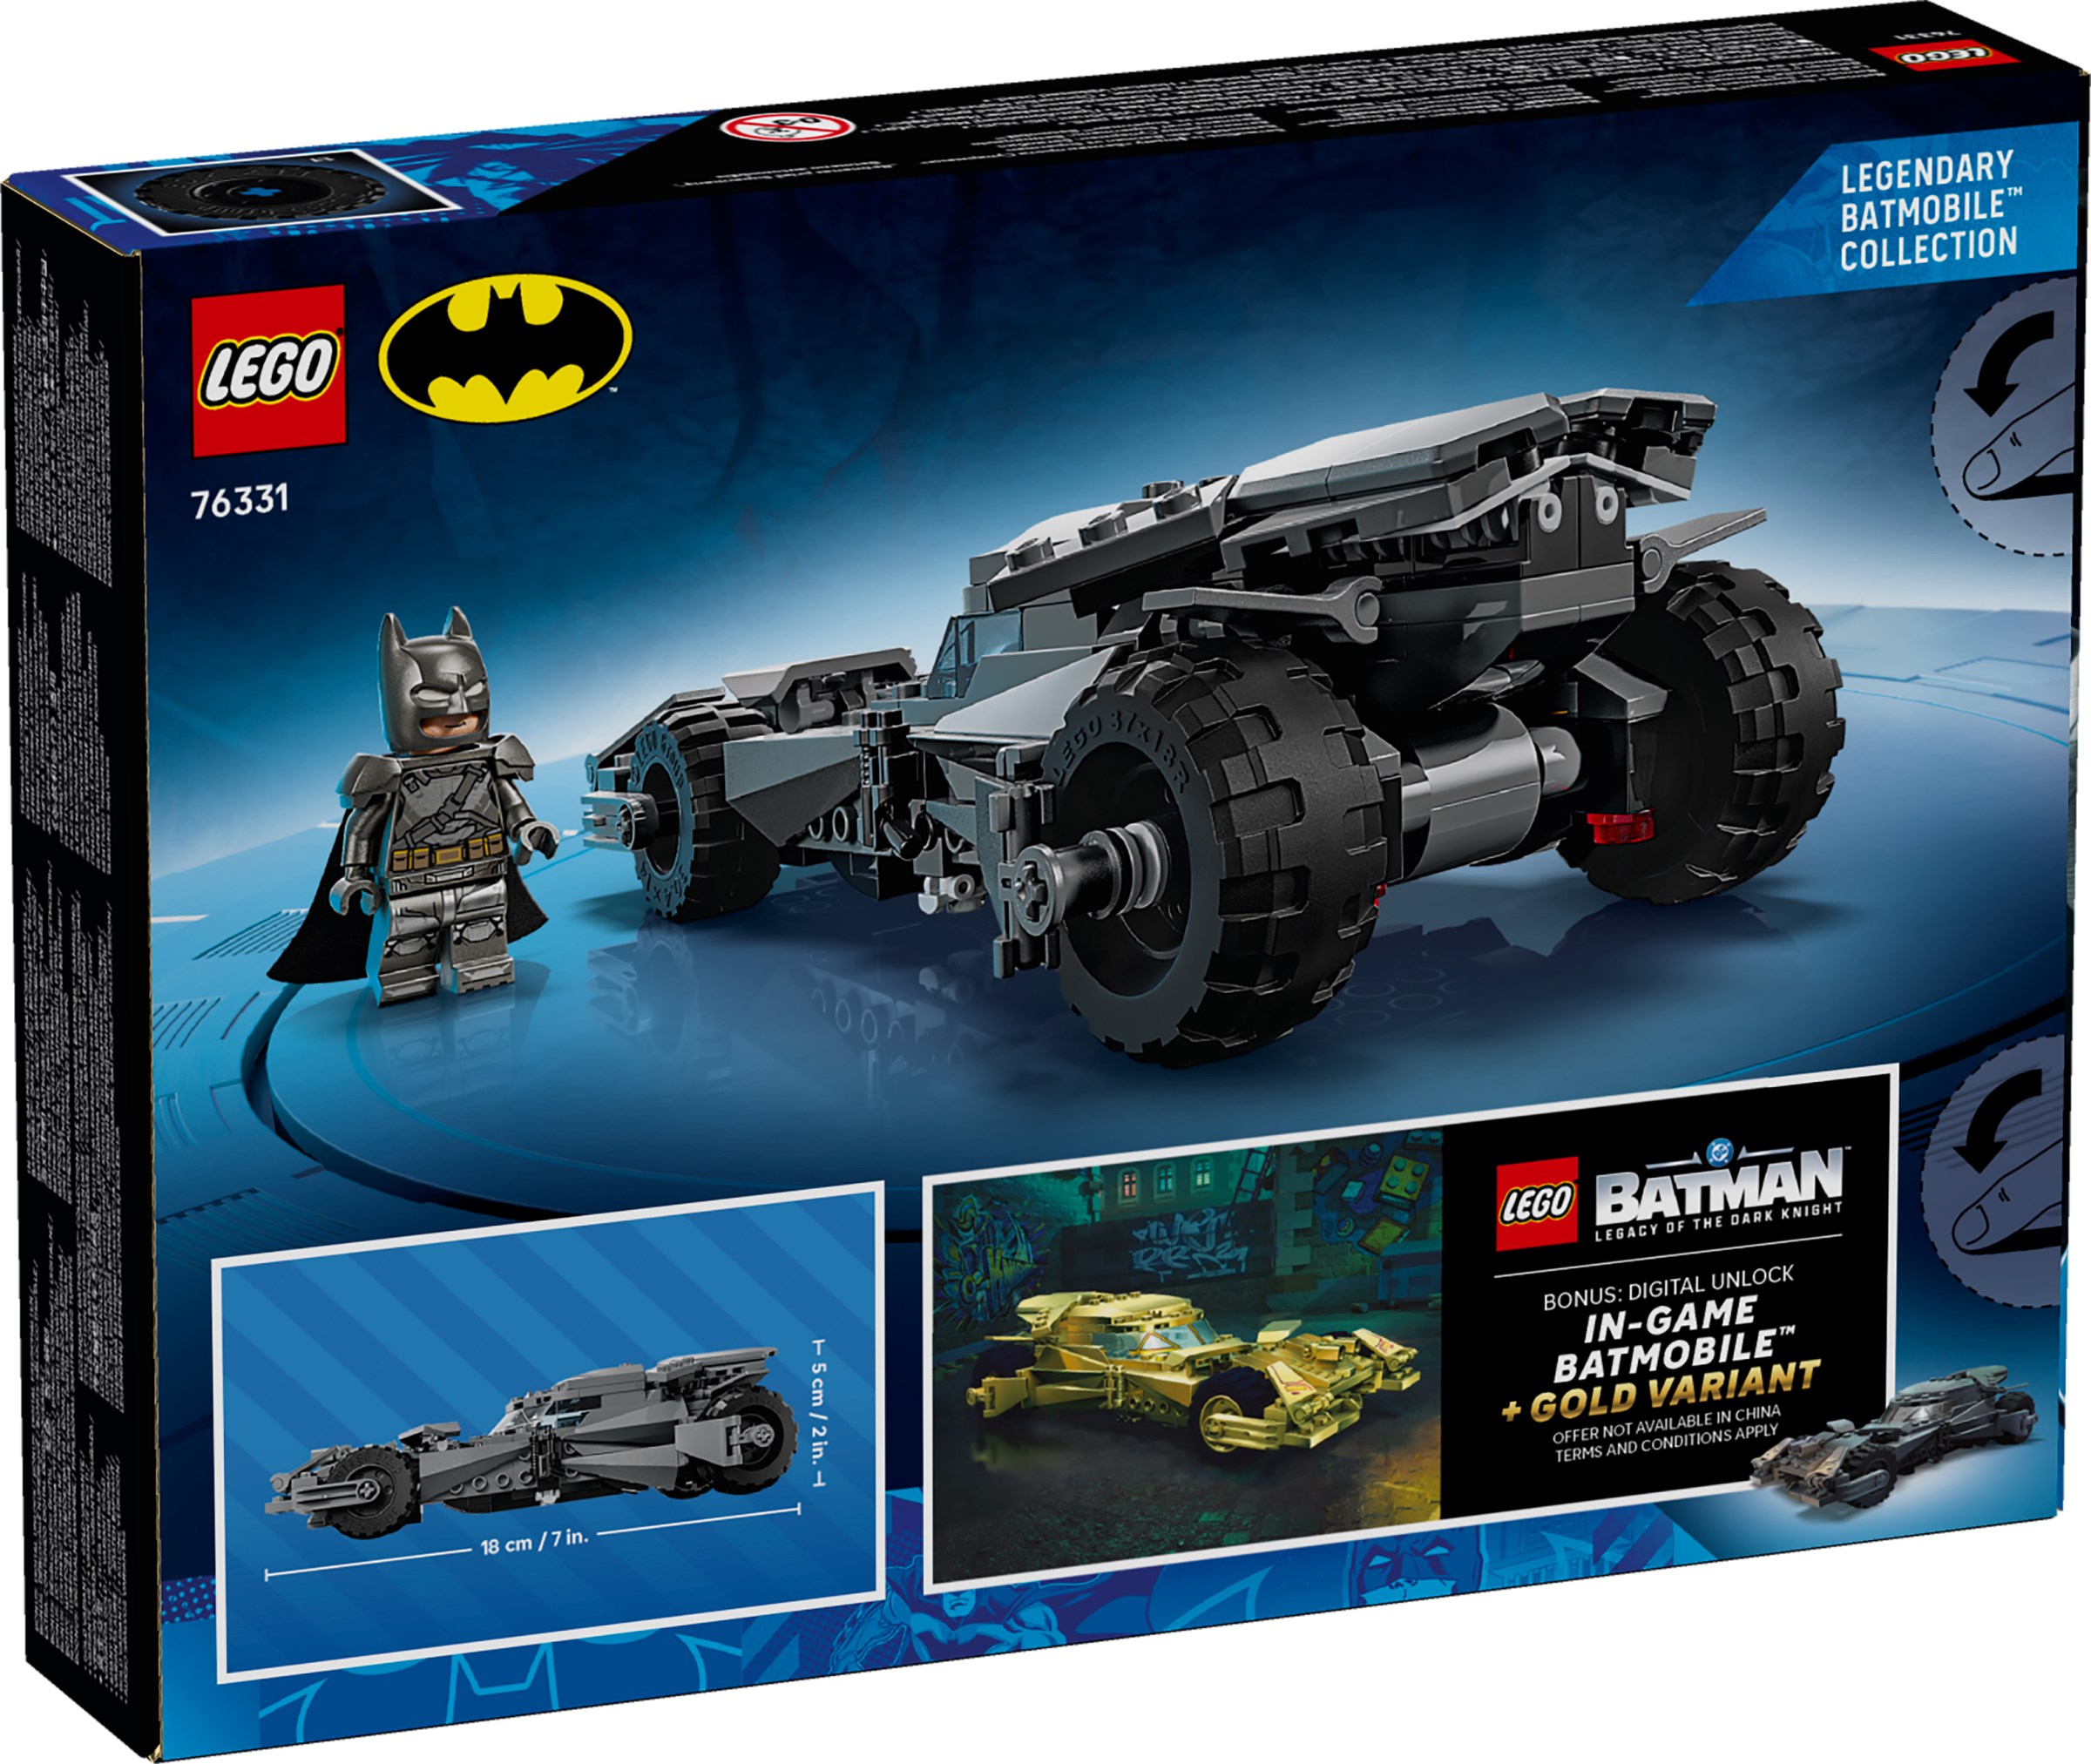
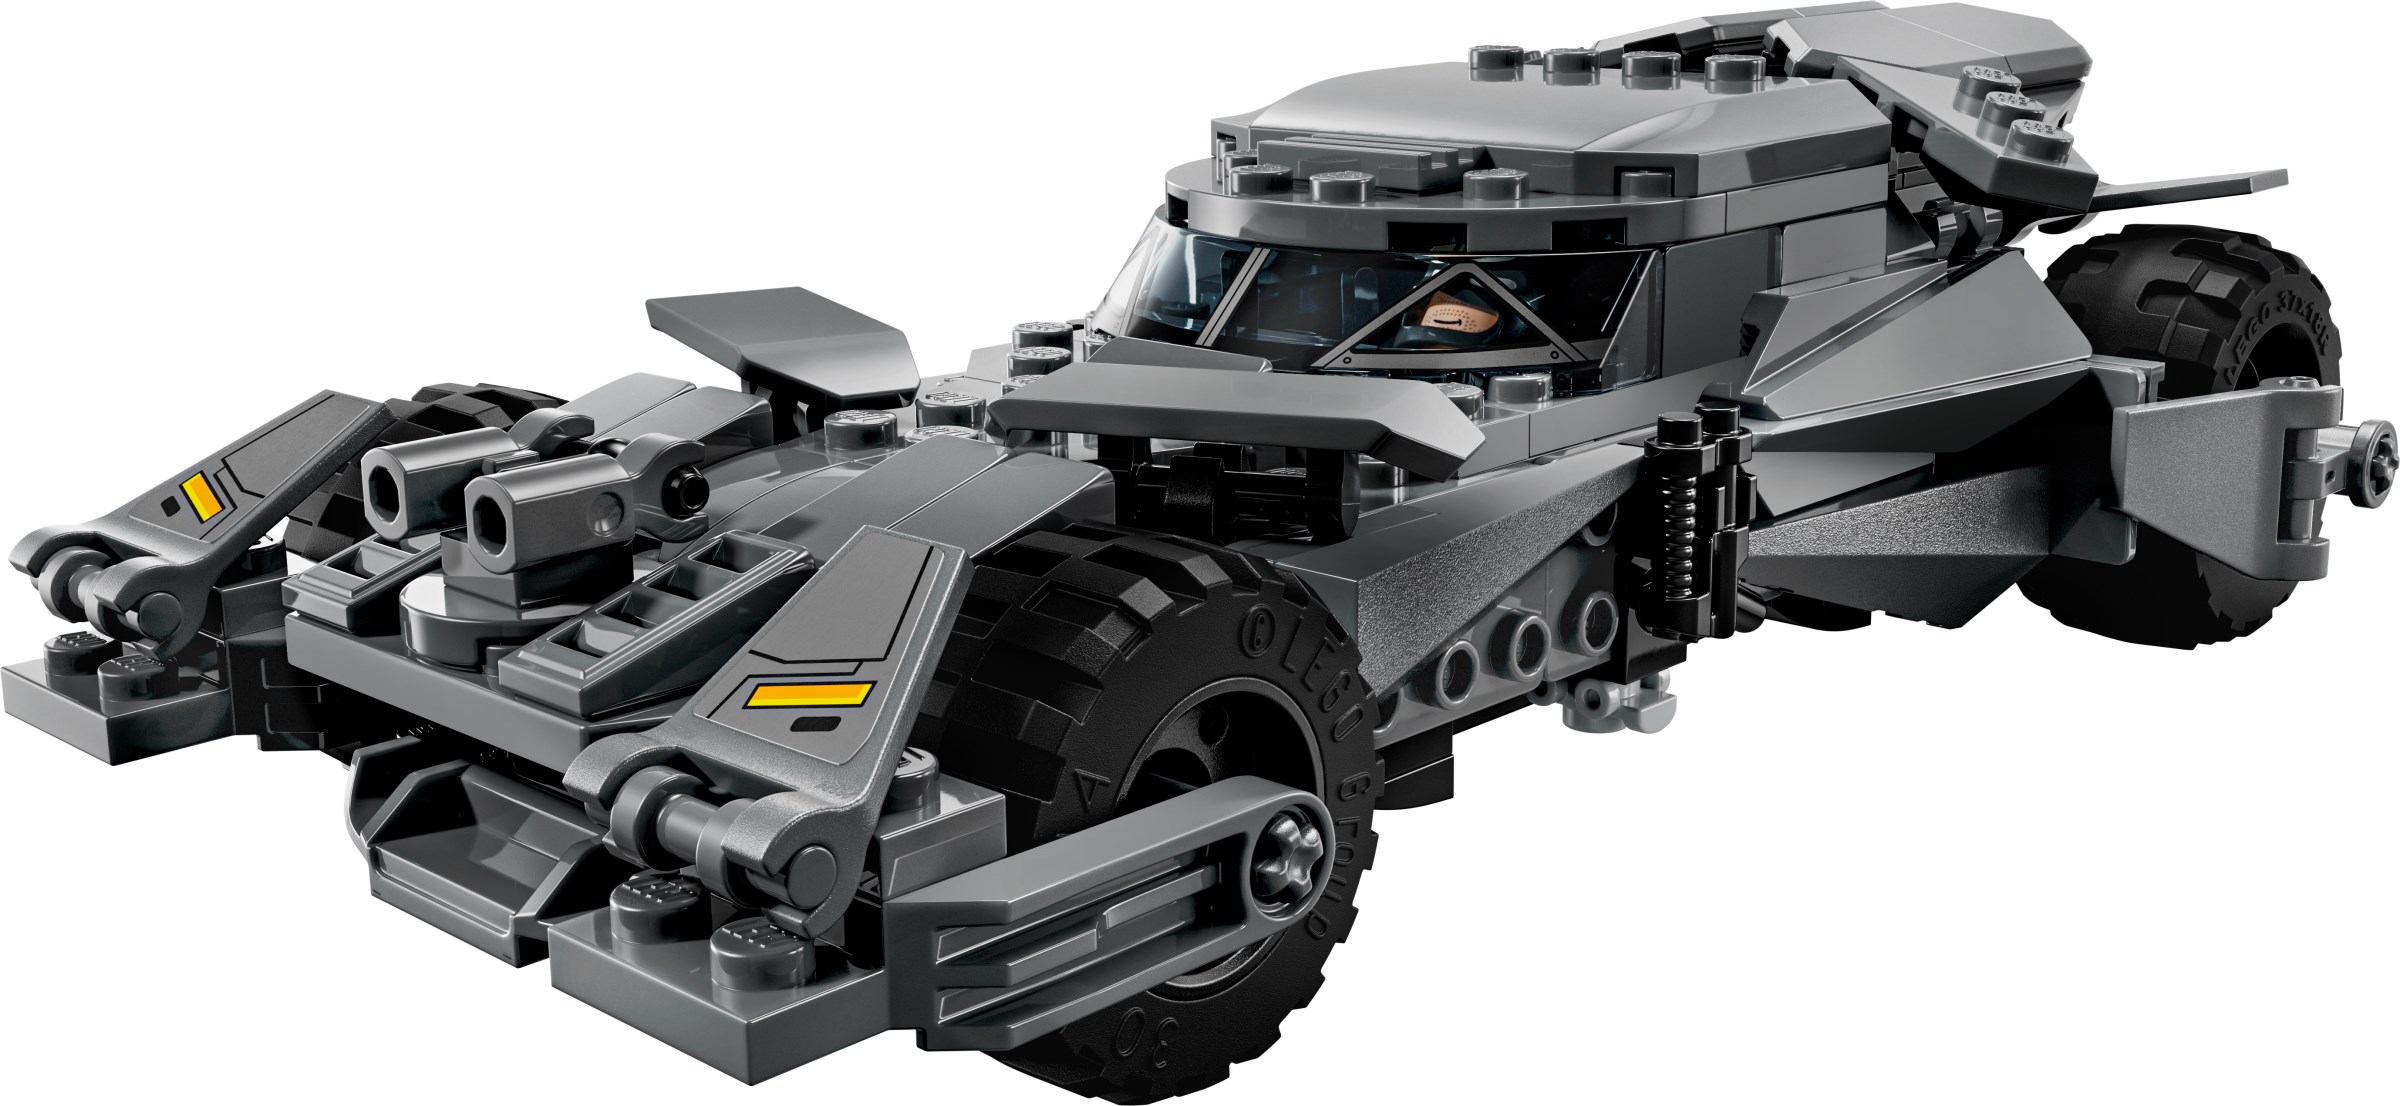
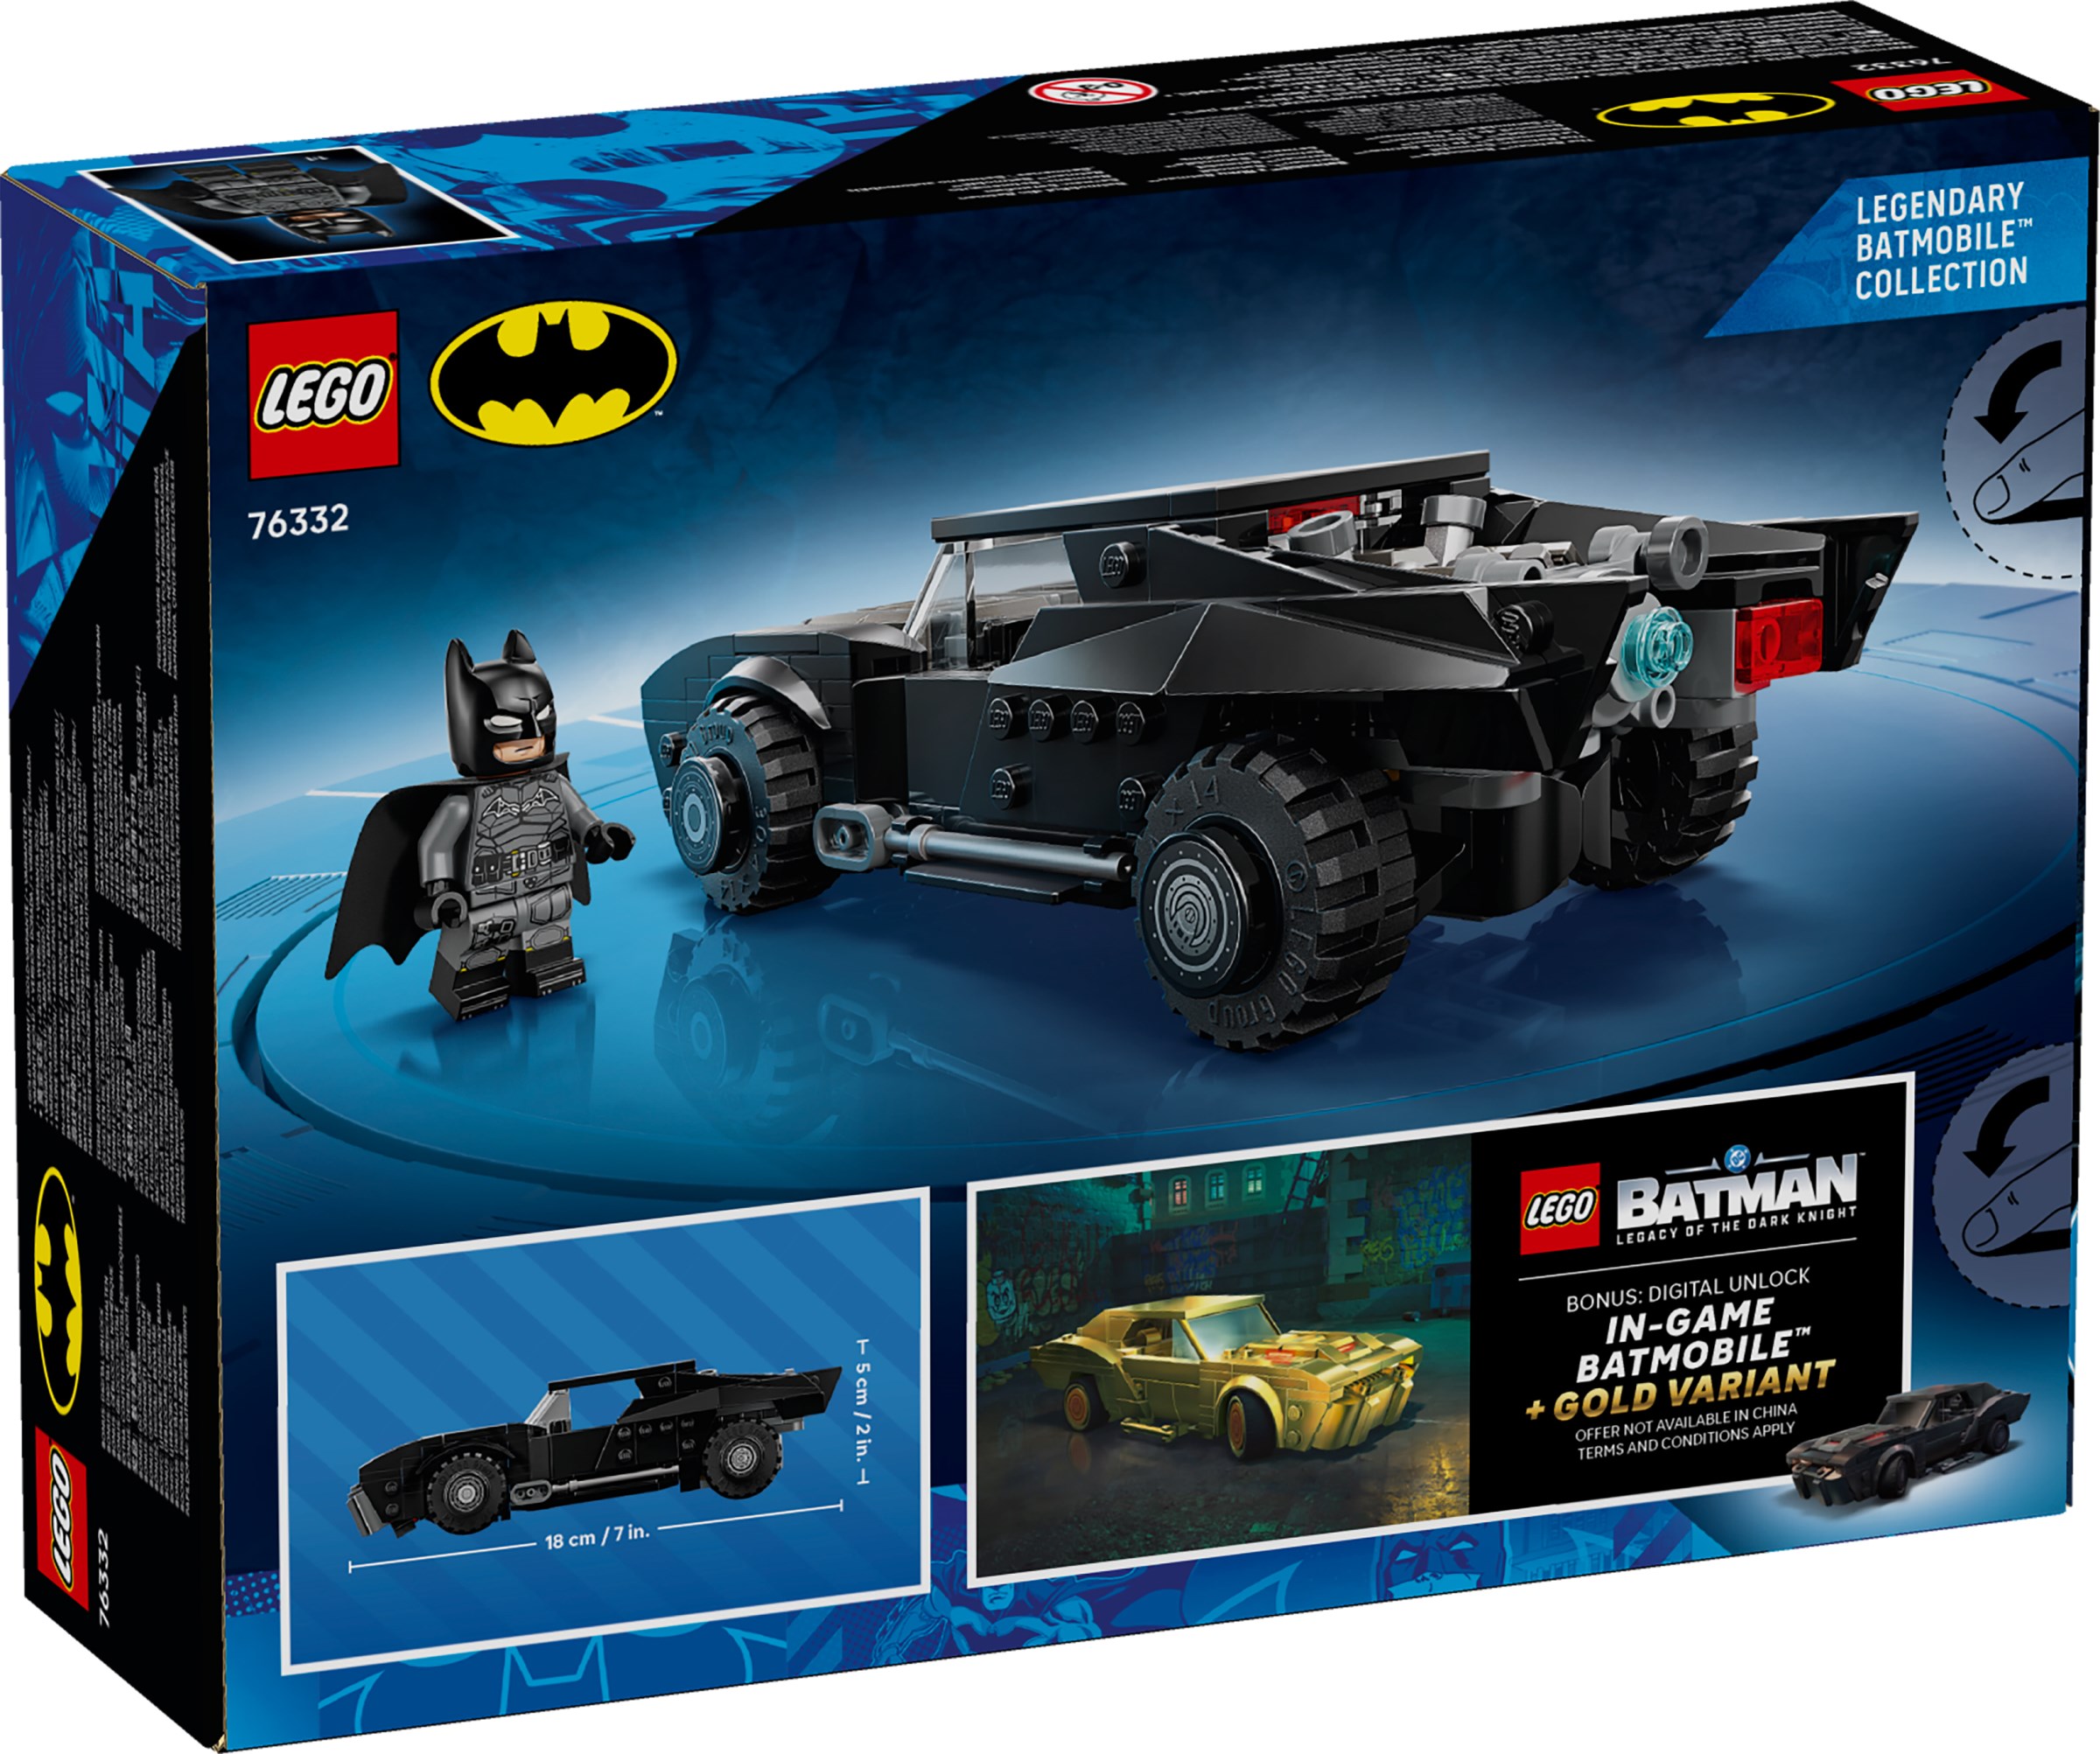
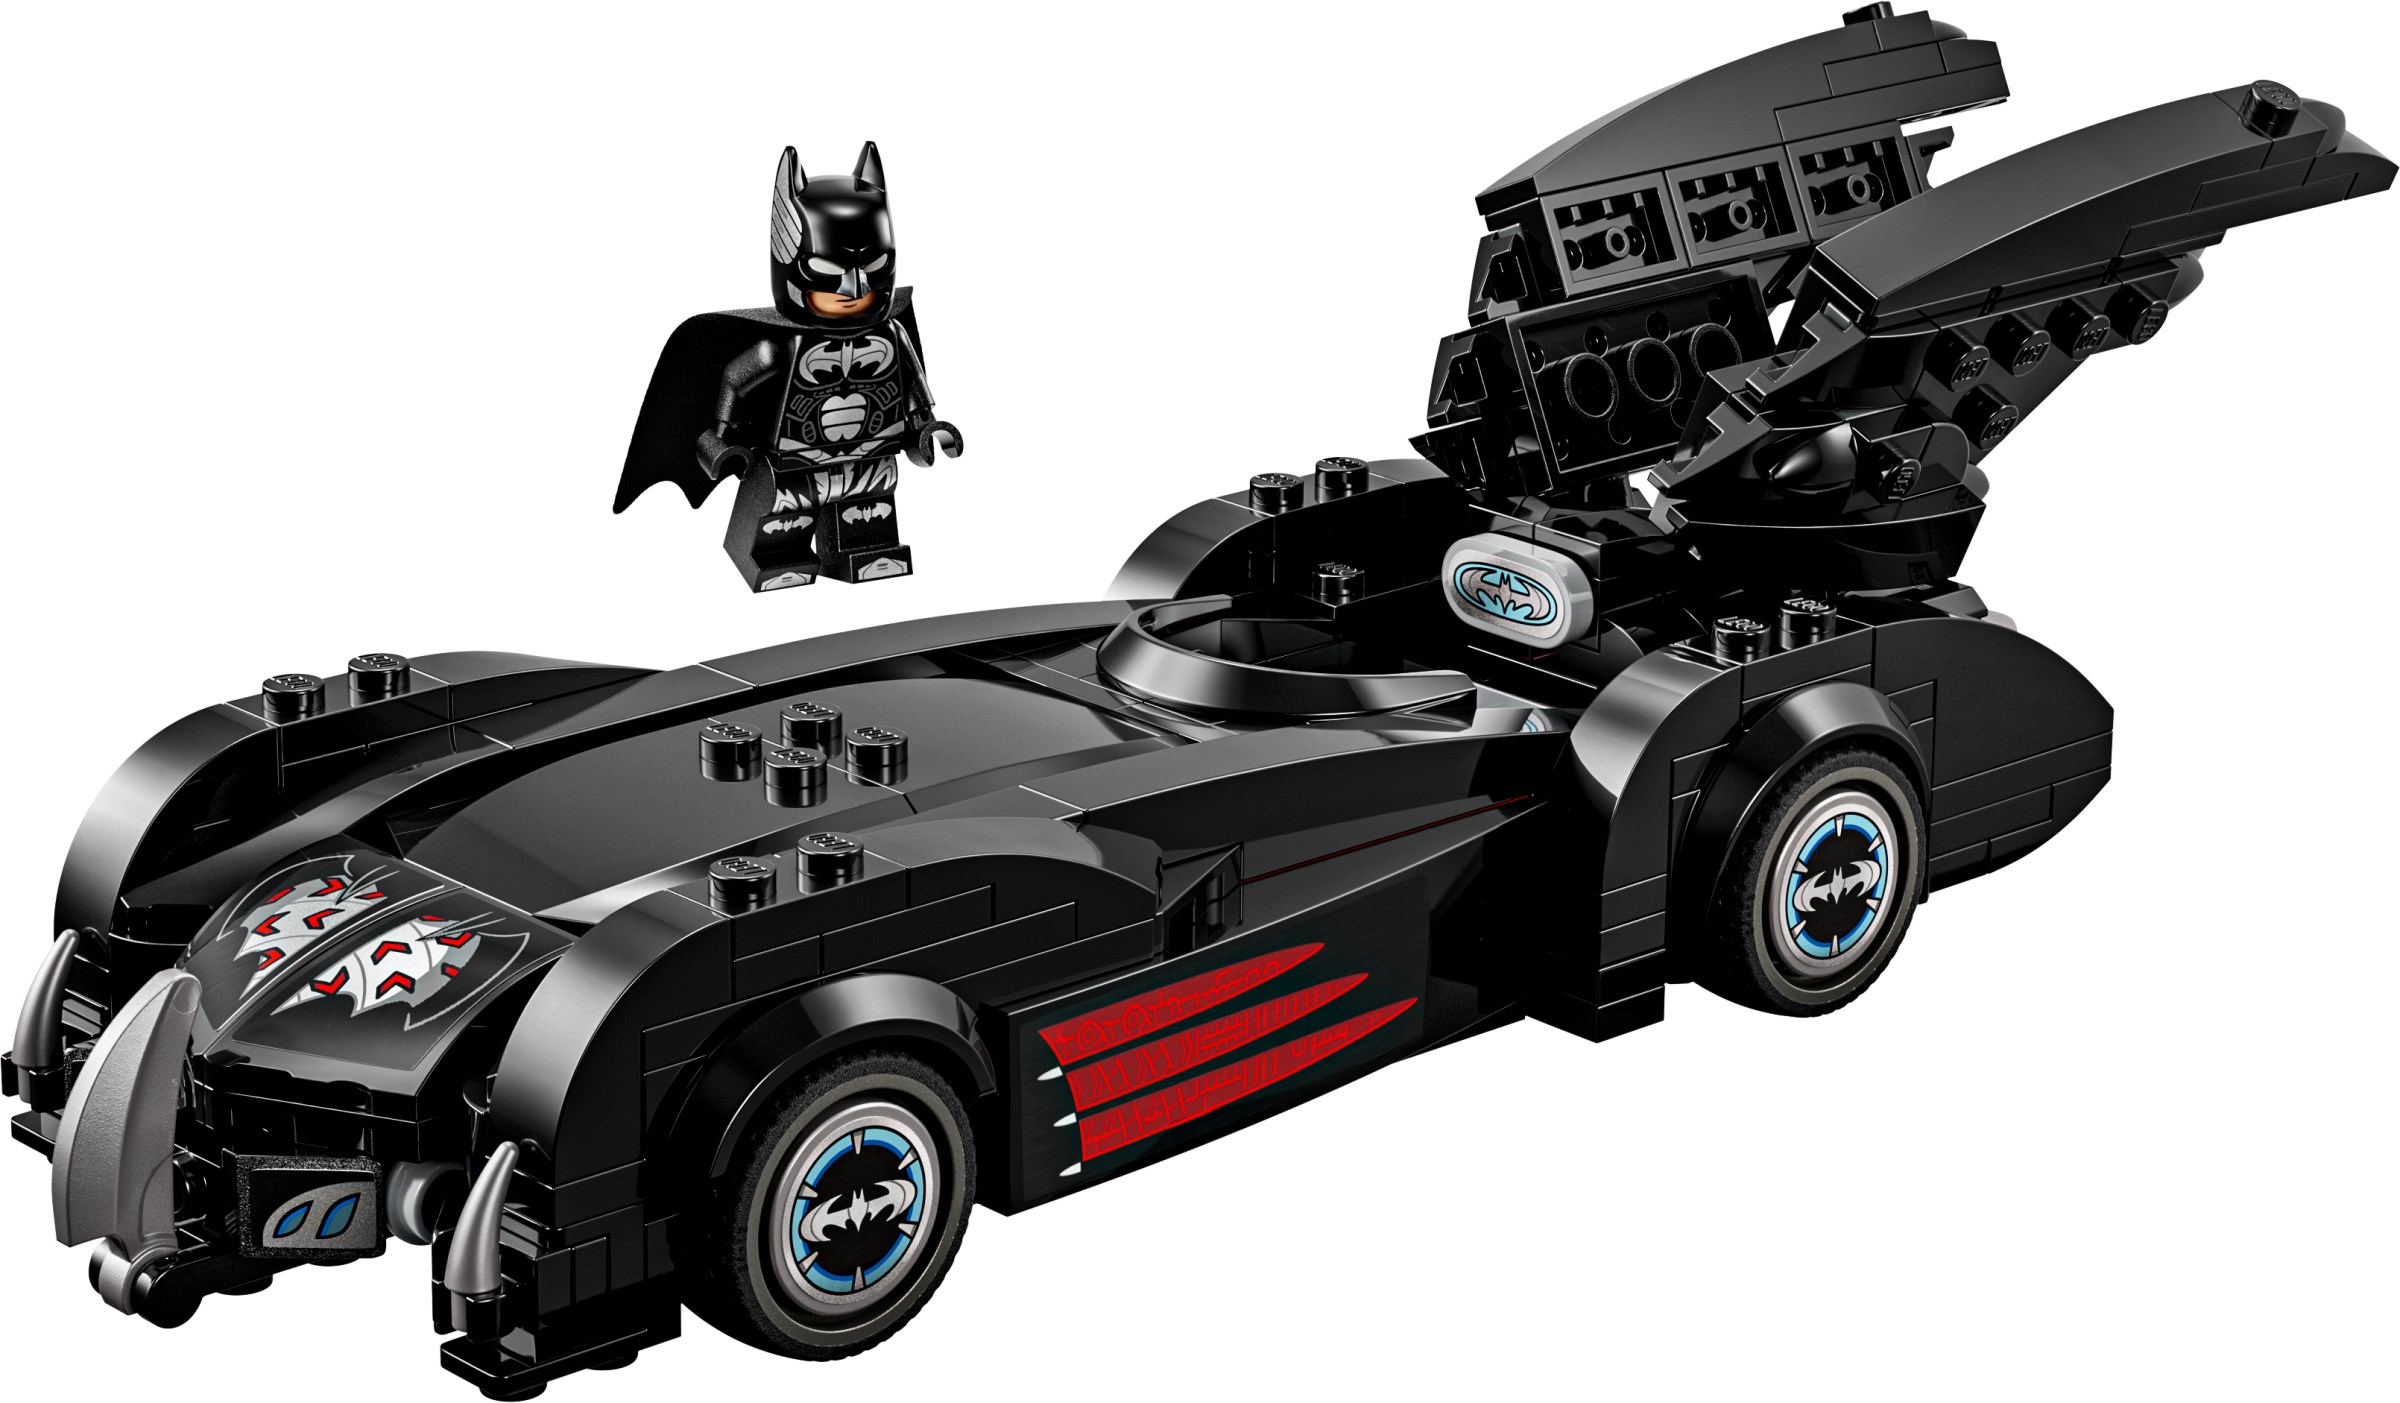
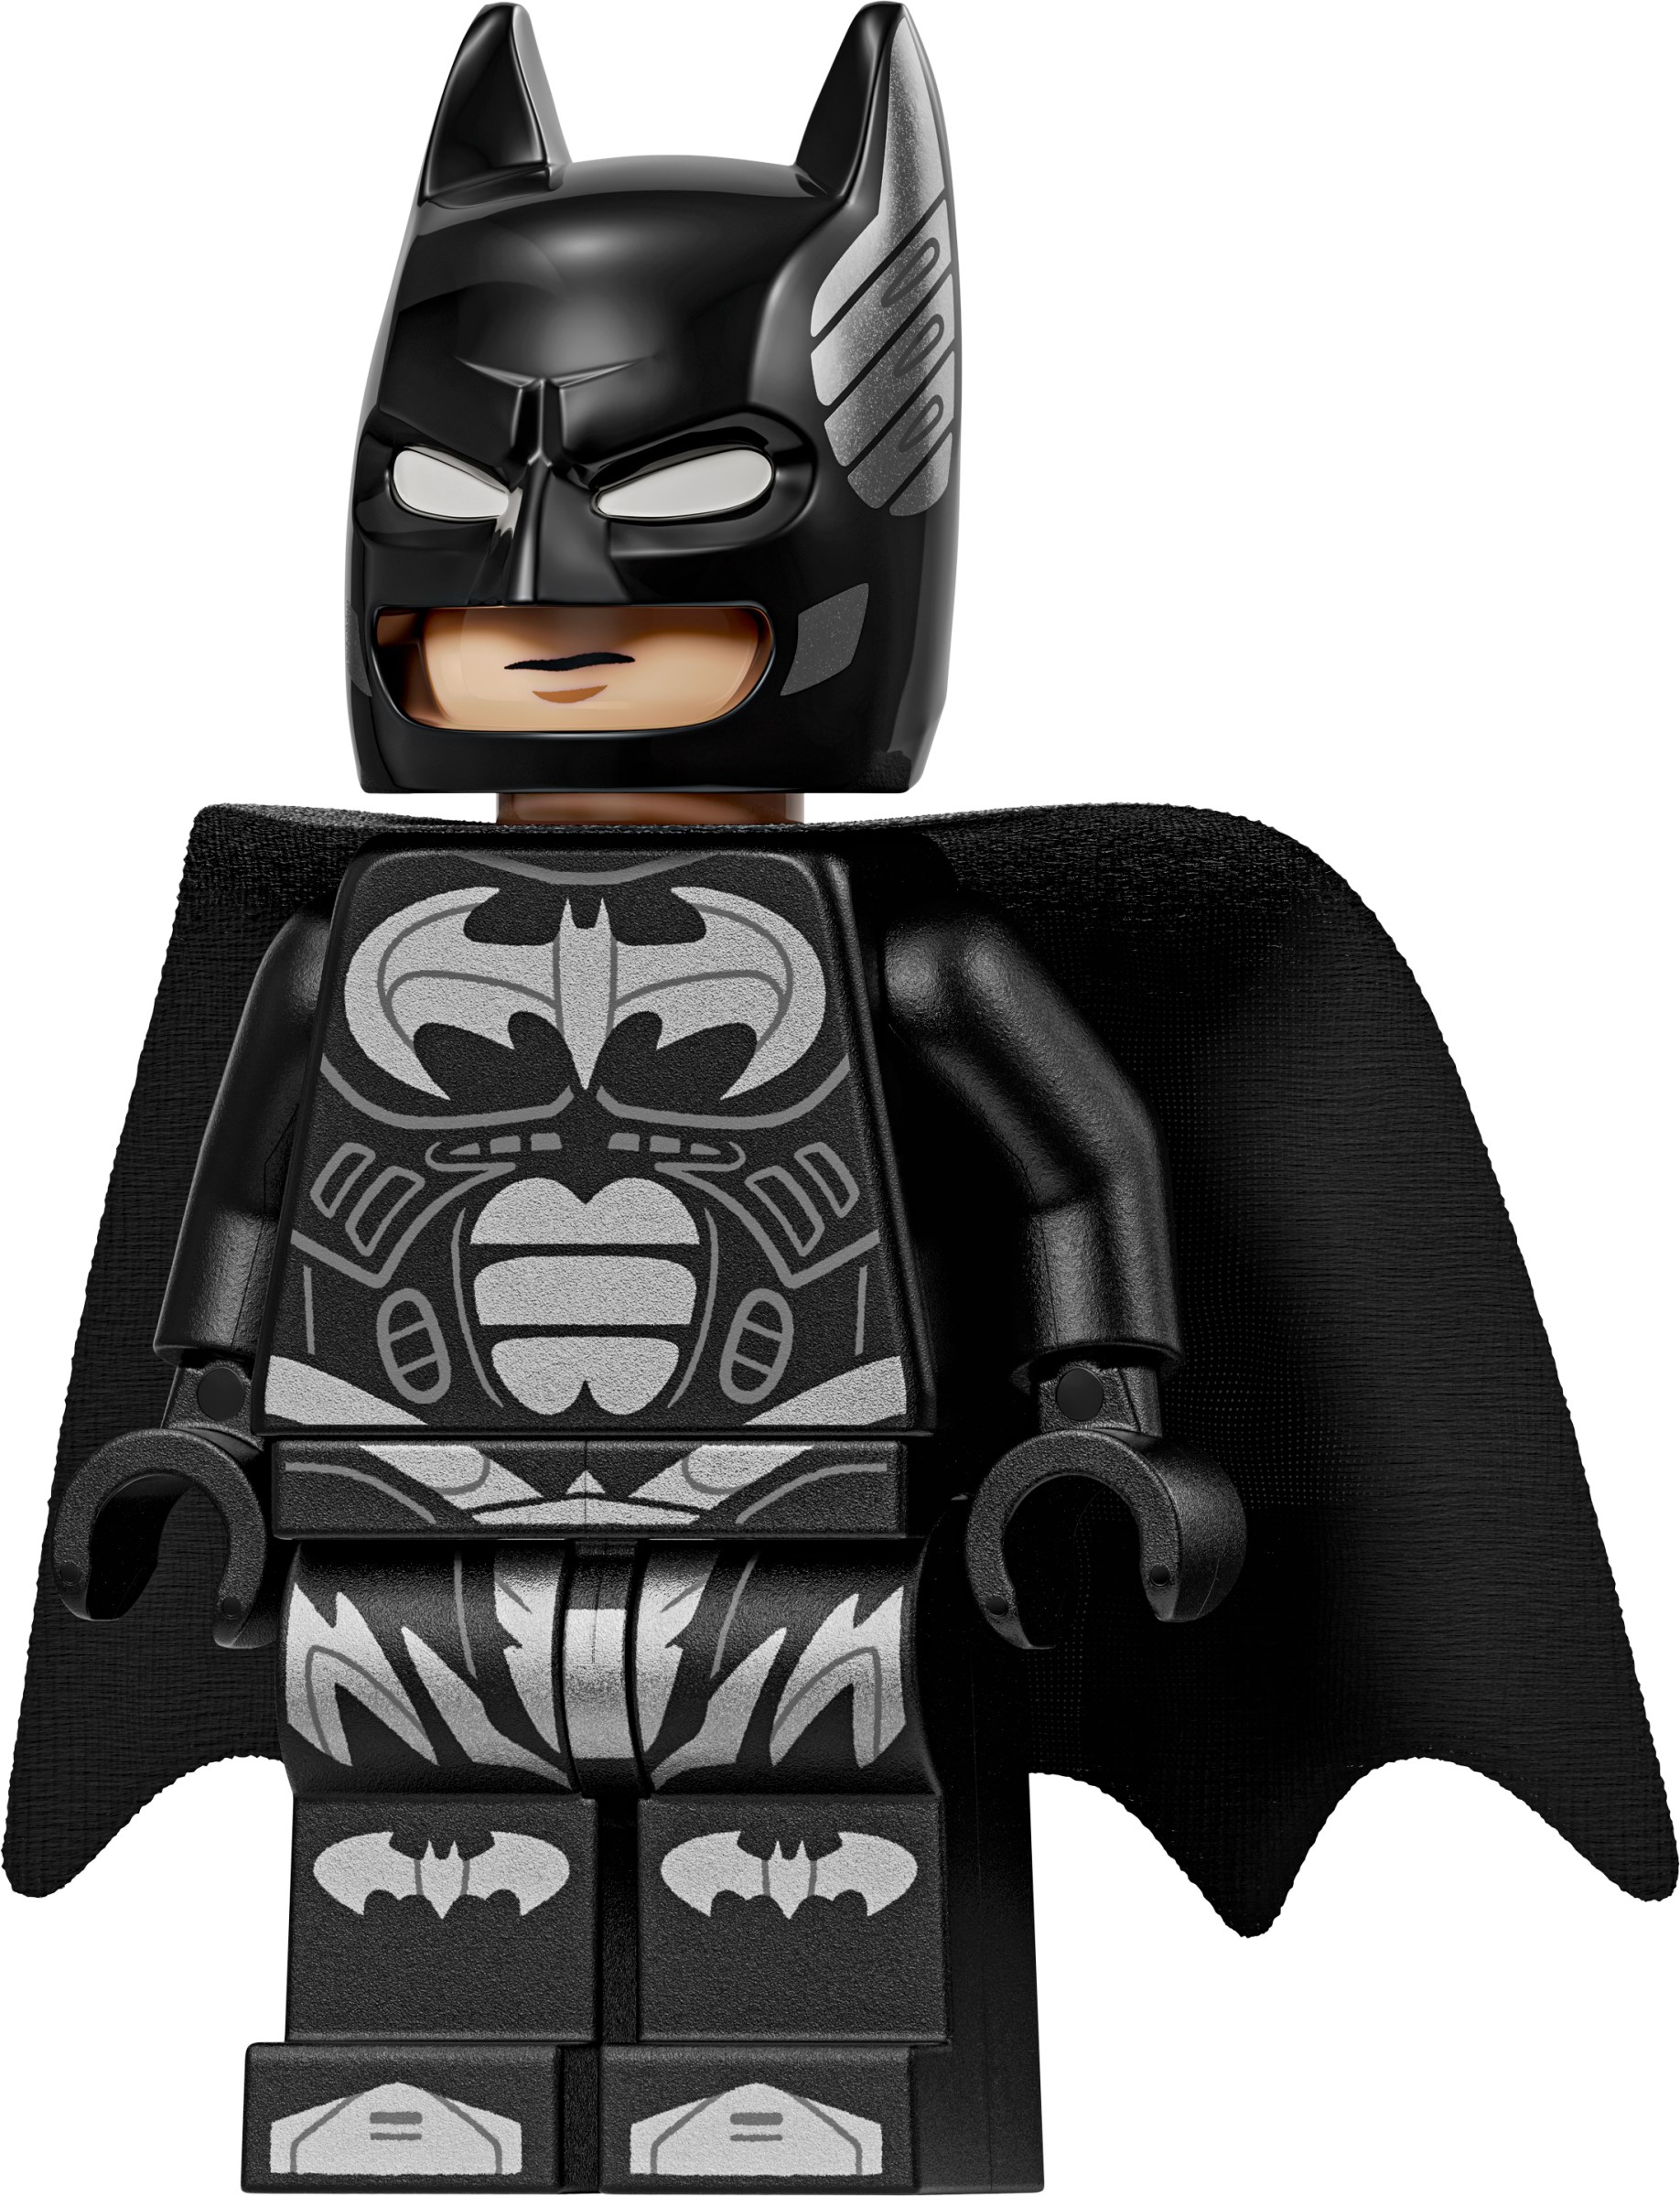
These sets are 76330 Batman Logo, 76331 Batman v Superman Batmobile, 76332 The Batman Batmobile and 76333 Batman & Robin Batmobile, launched to coincide with the 20th anniversary of the original LEGO Batman theme and the release of LEGO Batman: Legacy of the Dark Knight.
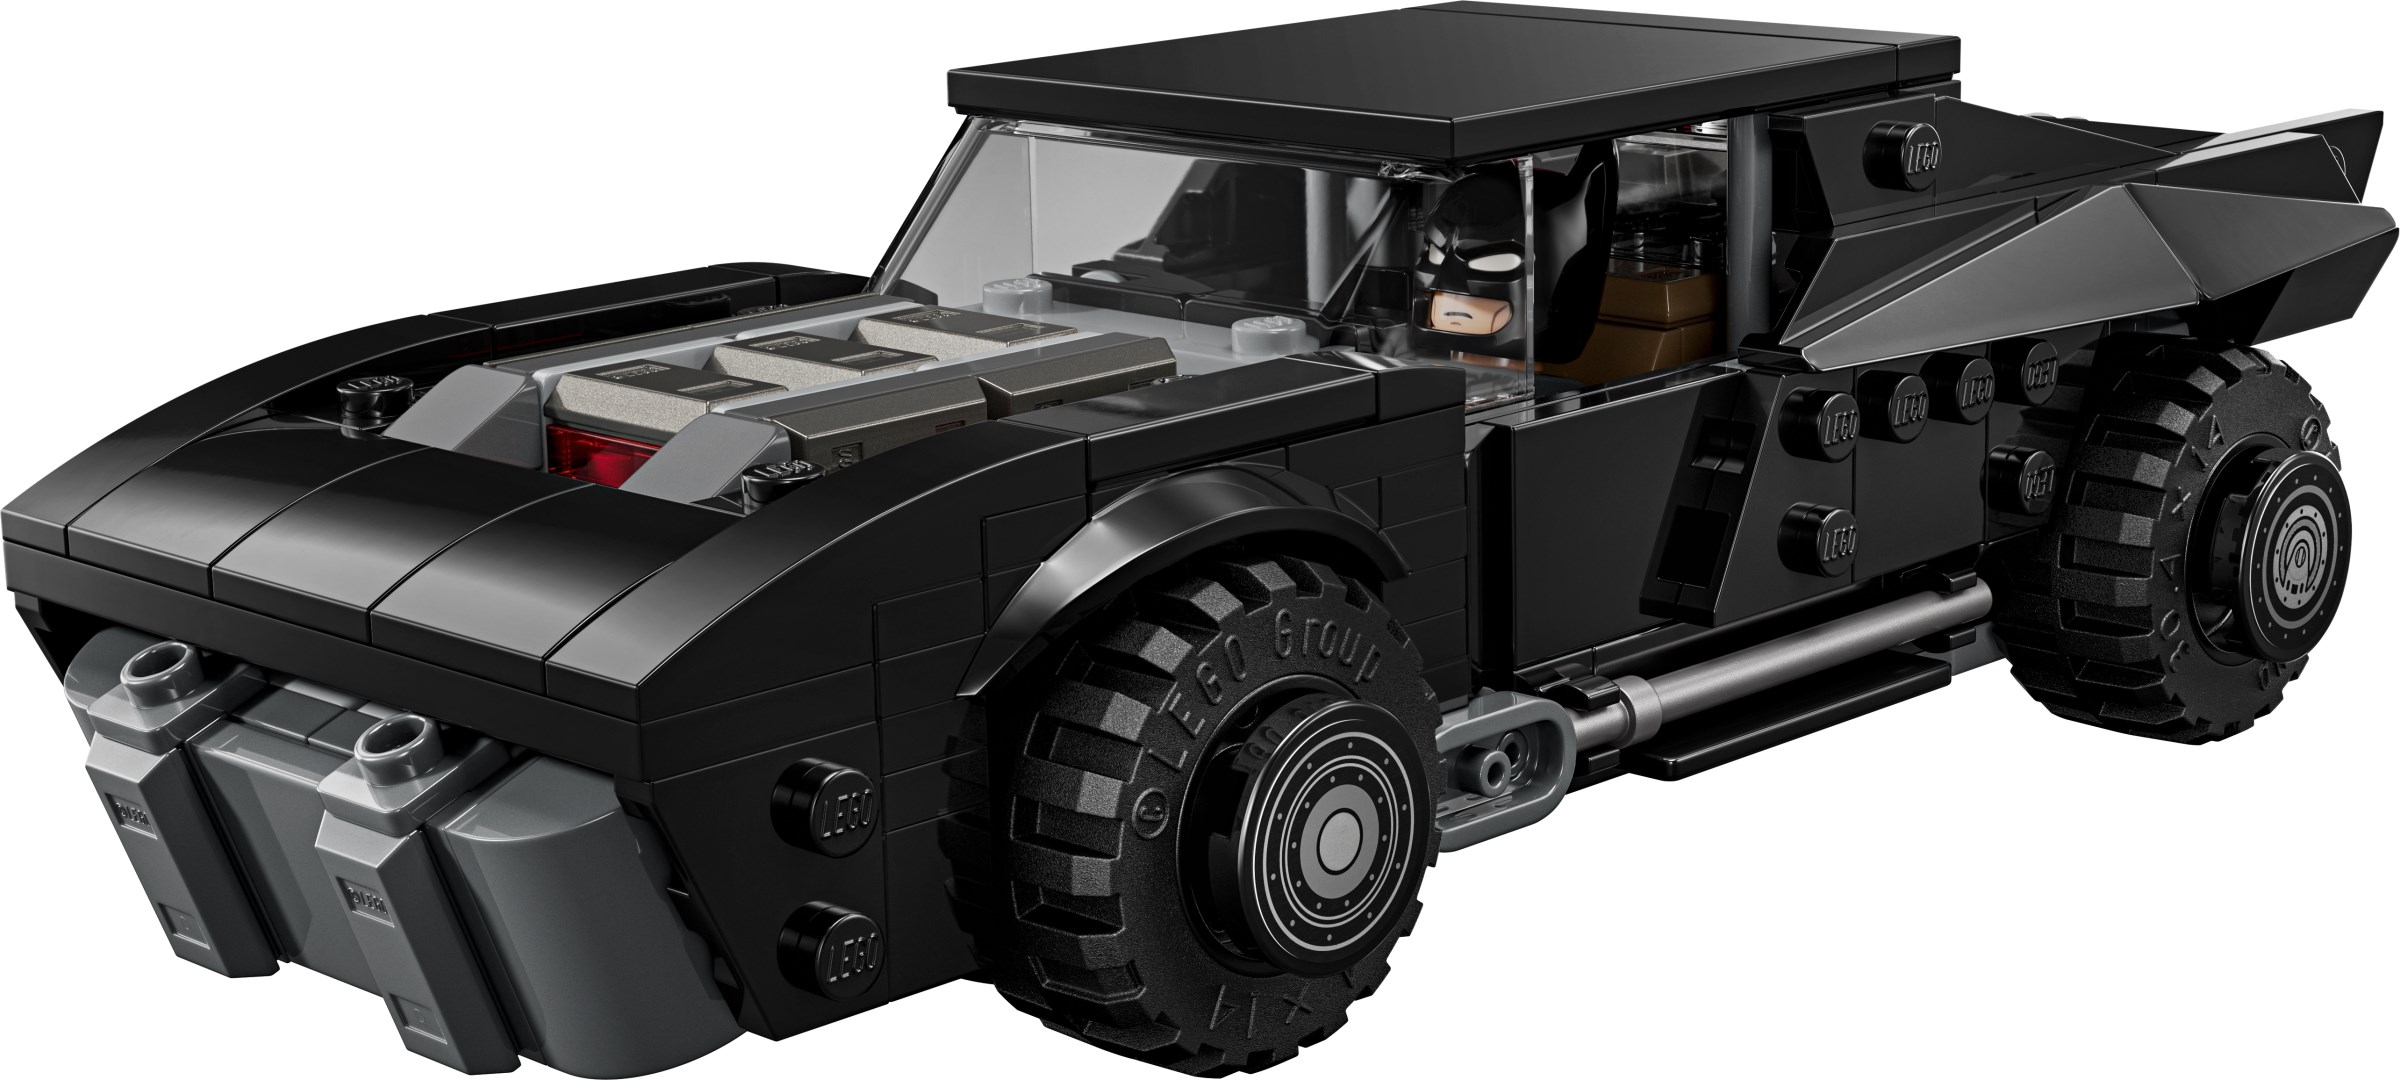
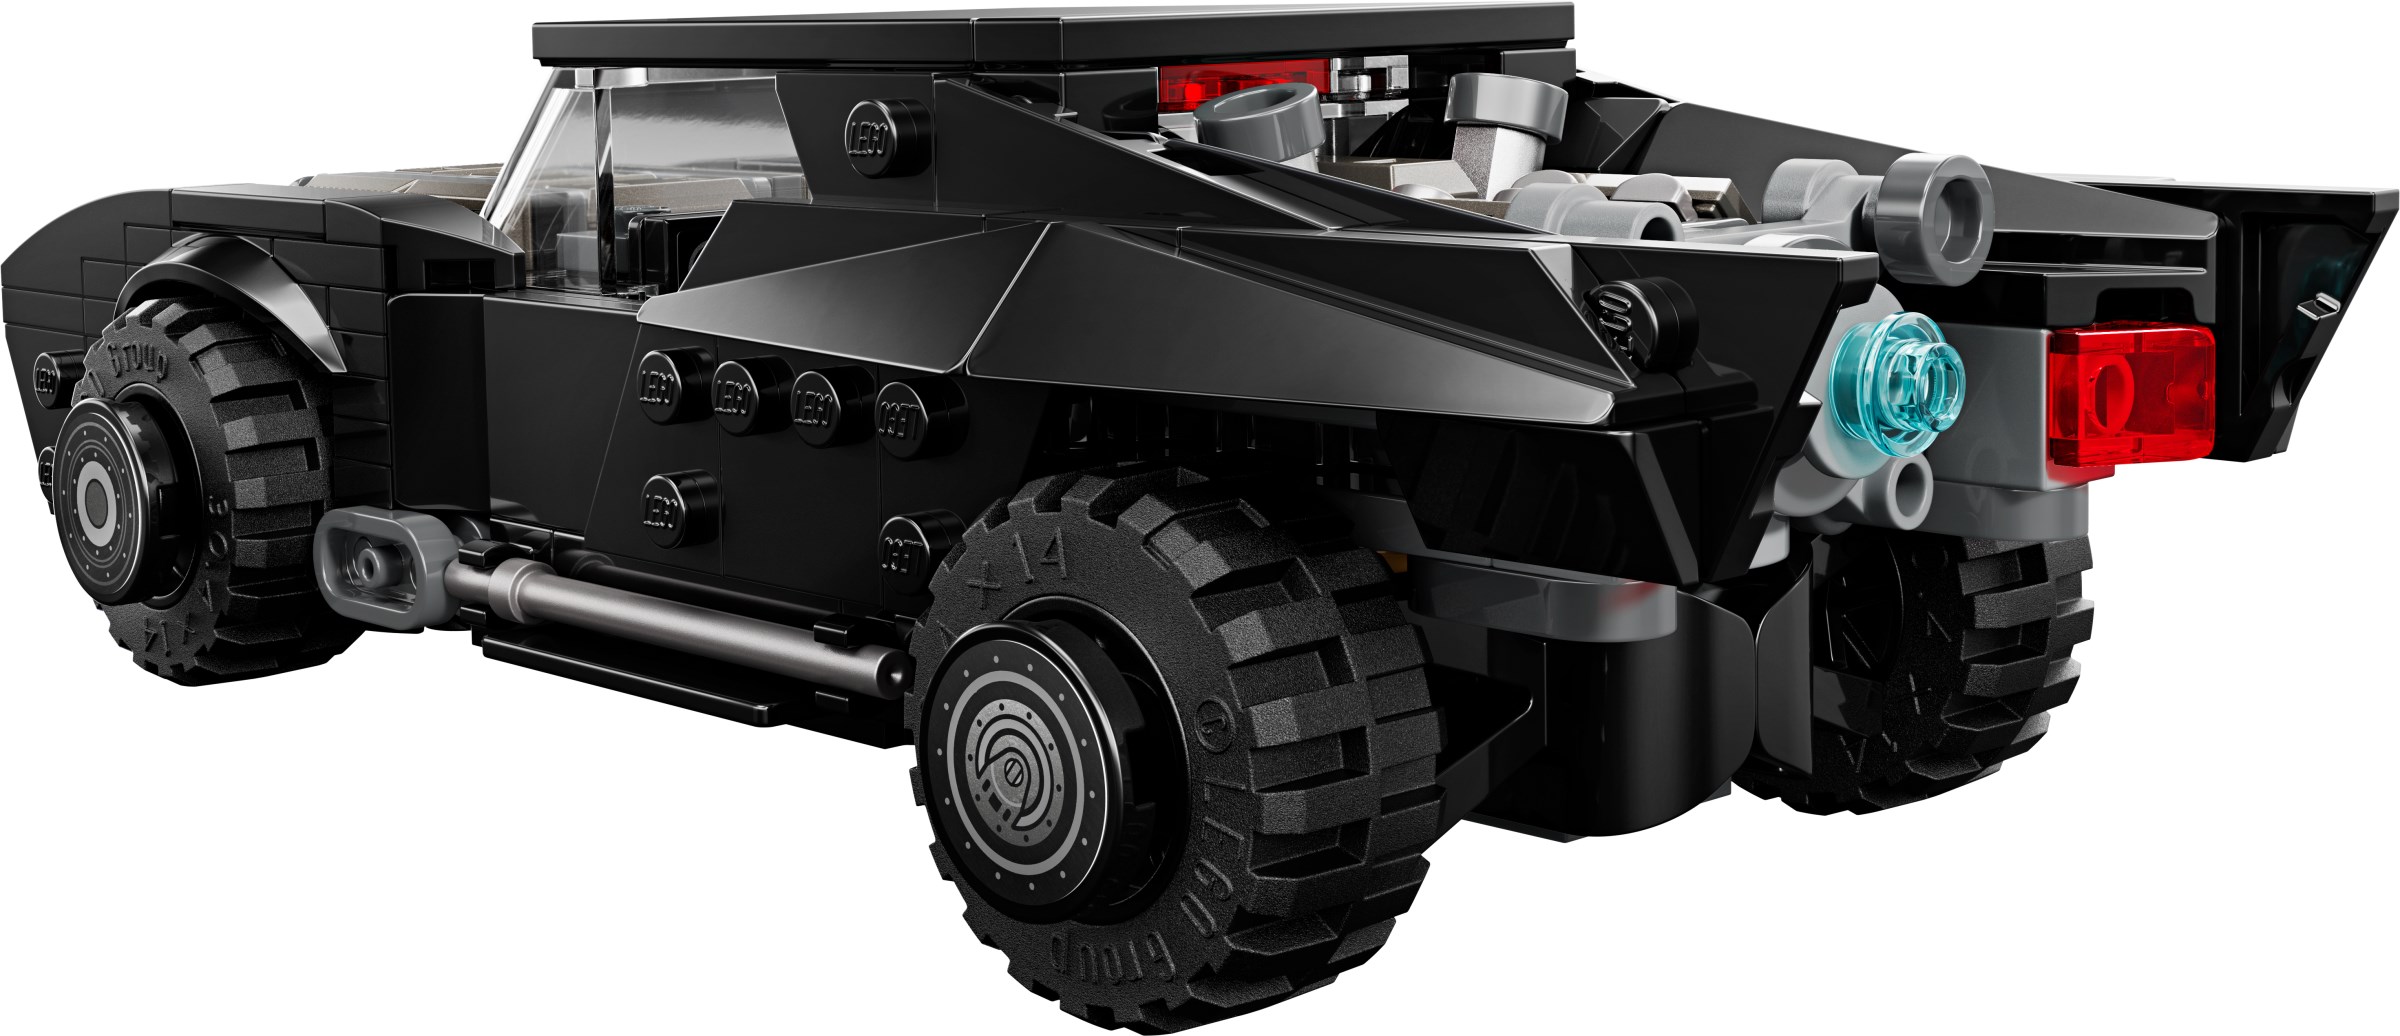
The three Batmobile sets include their respective versions of Batman and the cars have never looked better at this scale, in my opinion. I was particularly happy to see the Batman & Robin design making its LEGO debut!
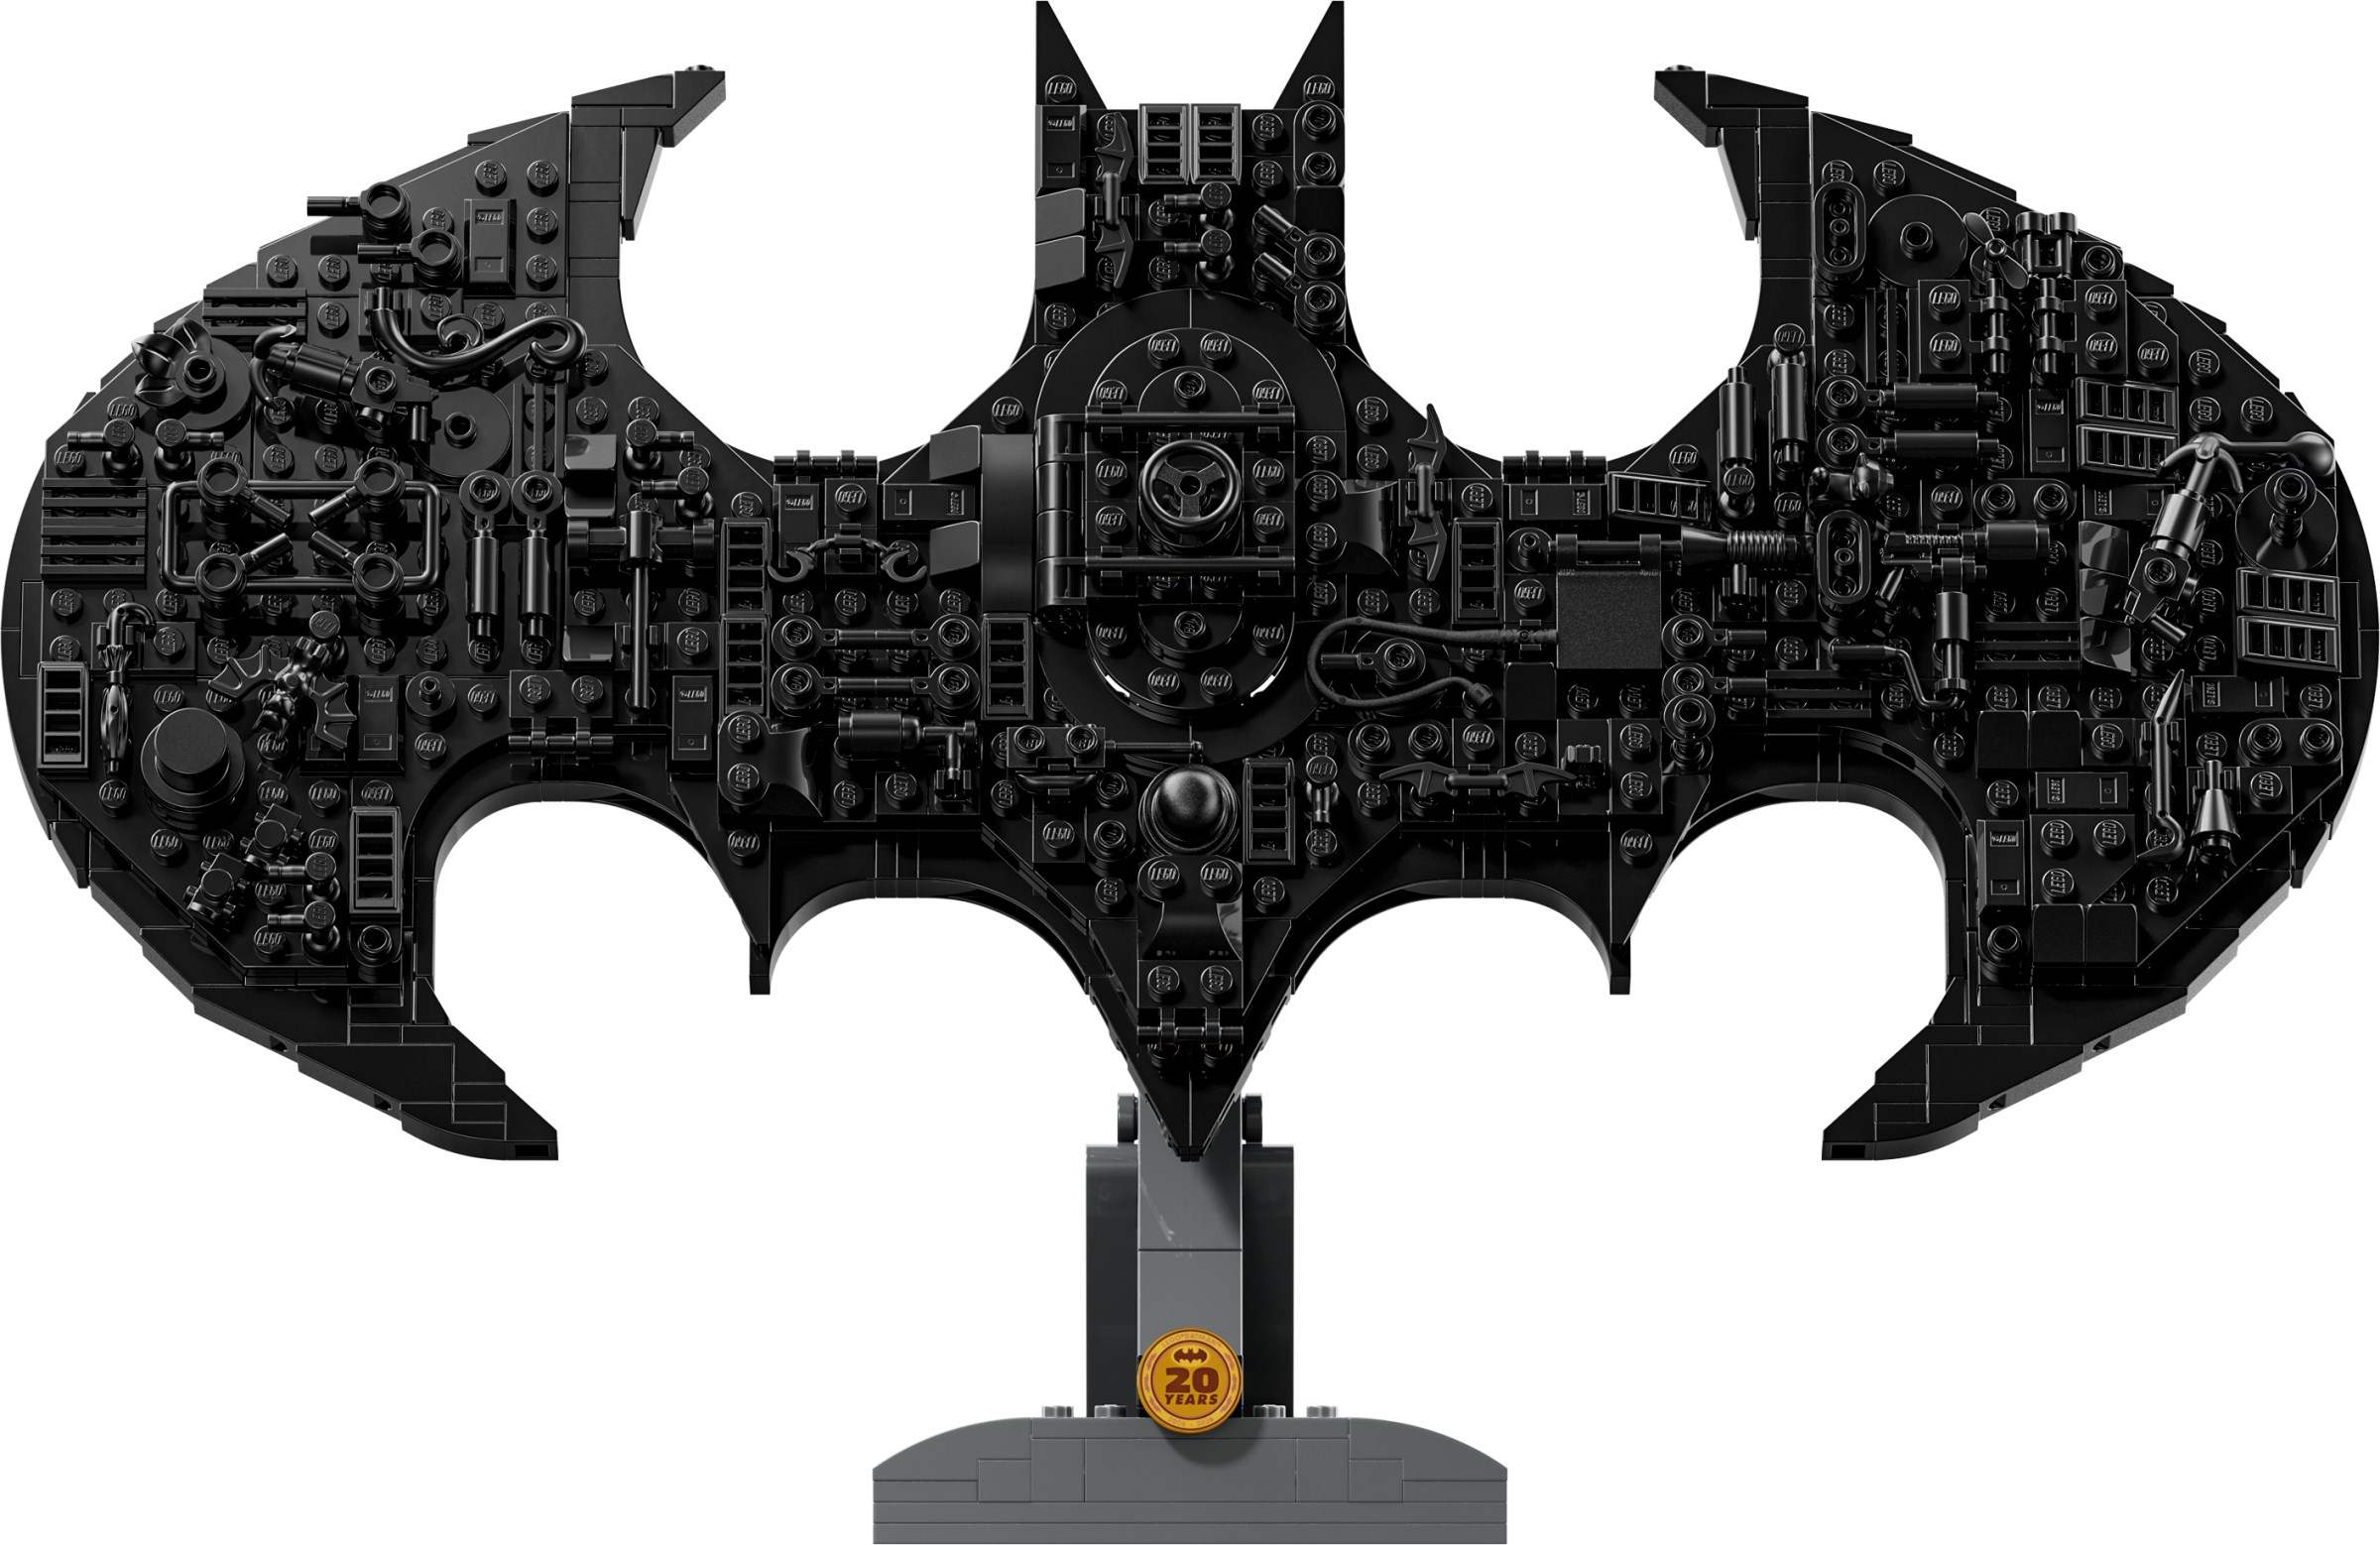
Send out the ultimate Bat-Signal with this LEGO DC Batman: Batman Logo (76330) building set gift for boys, girls and kids aged 12 and over. Celebrating the 20 years of LEGO DC Batman, this collectable piece of room decor features the iconic symbol with 2 minifigures and a host of accessories. Display the Batman signal on its stand or mounted on a wall using the built-in support. The model is decorated with well-known items from the DC Universe which can be detached and repositioned, including Batarangs and the Harley Quinn hammer.
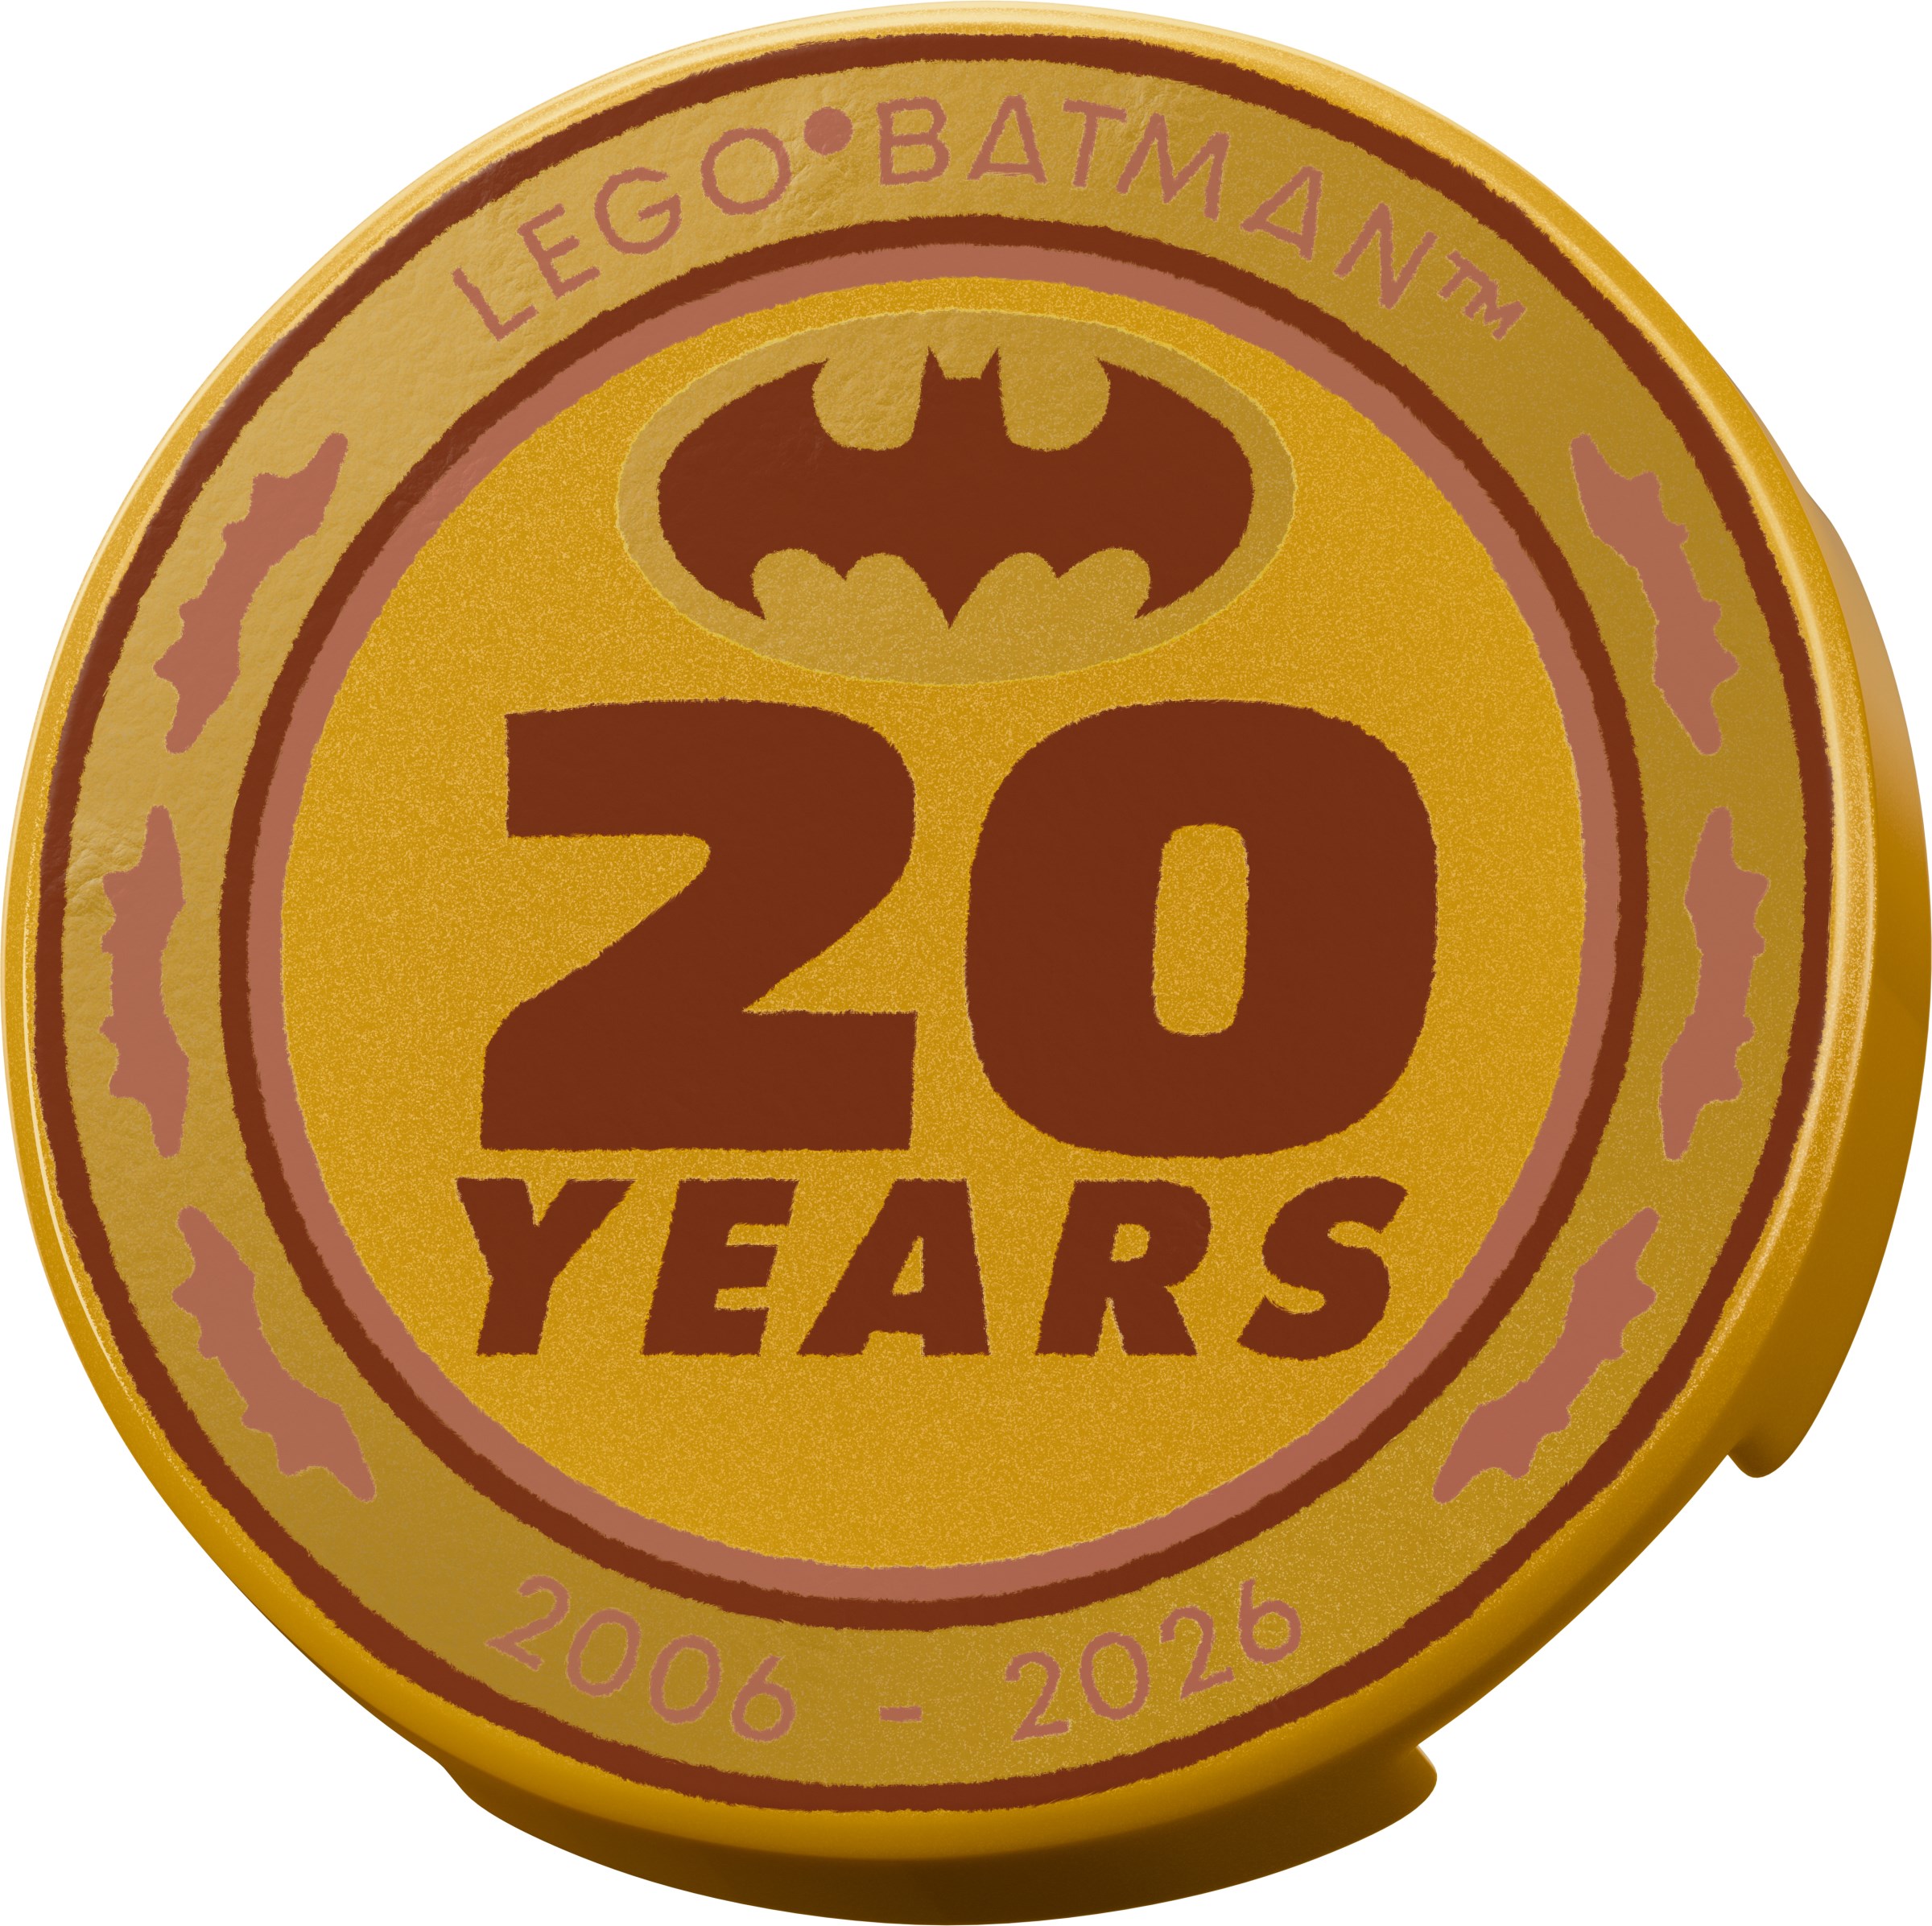
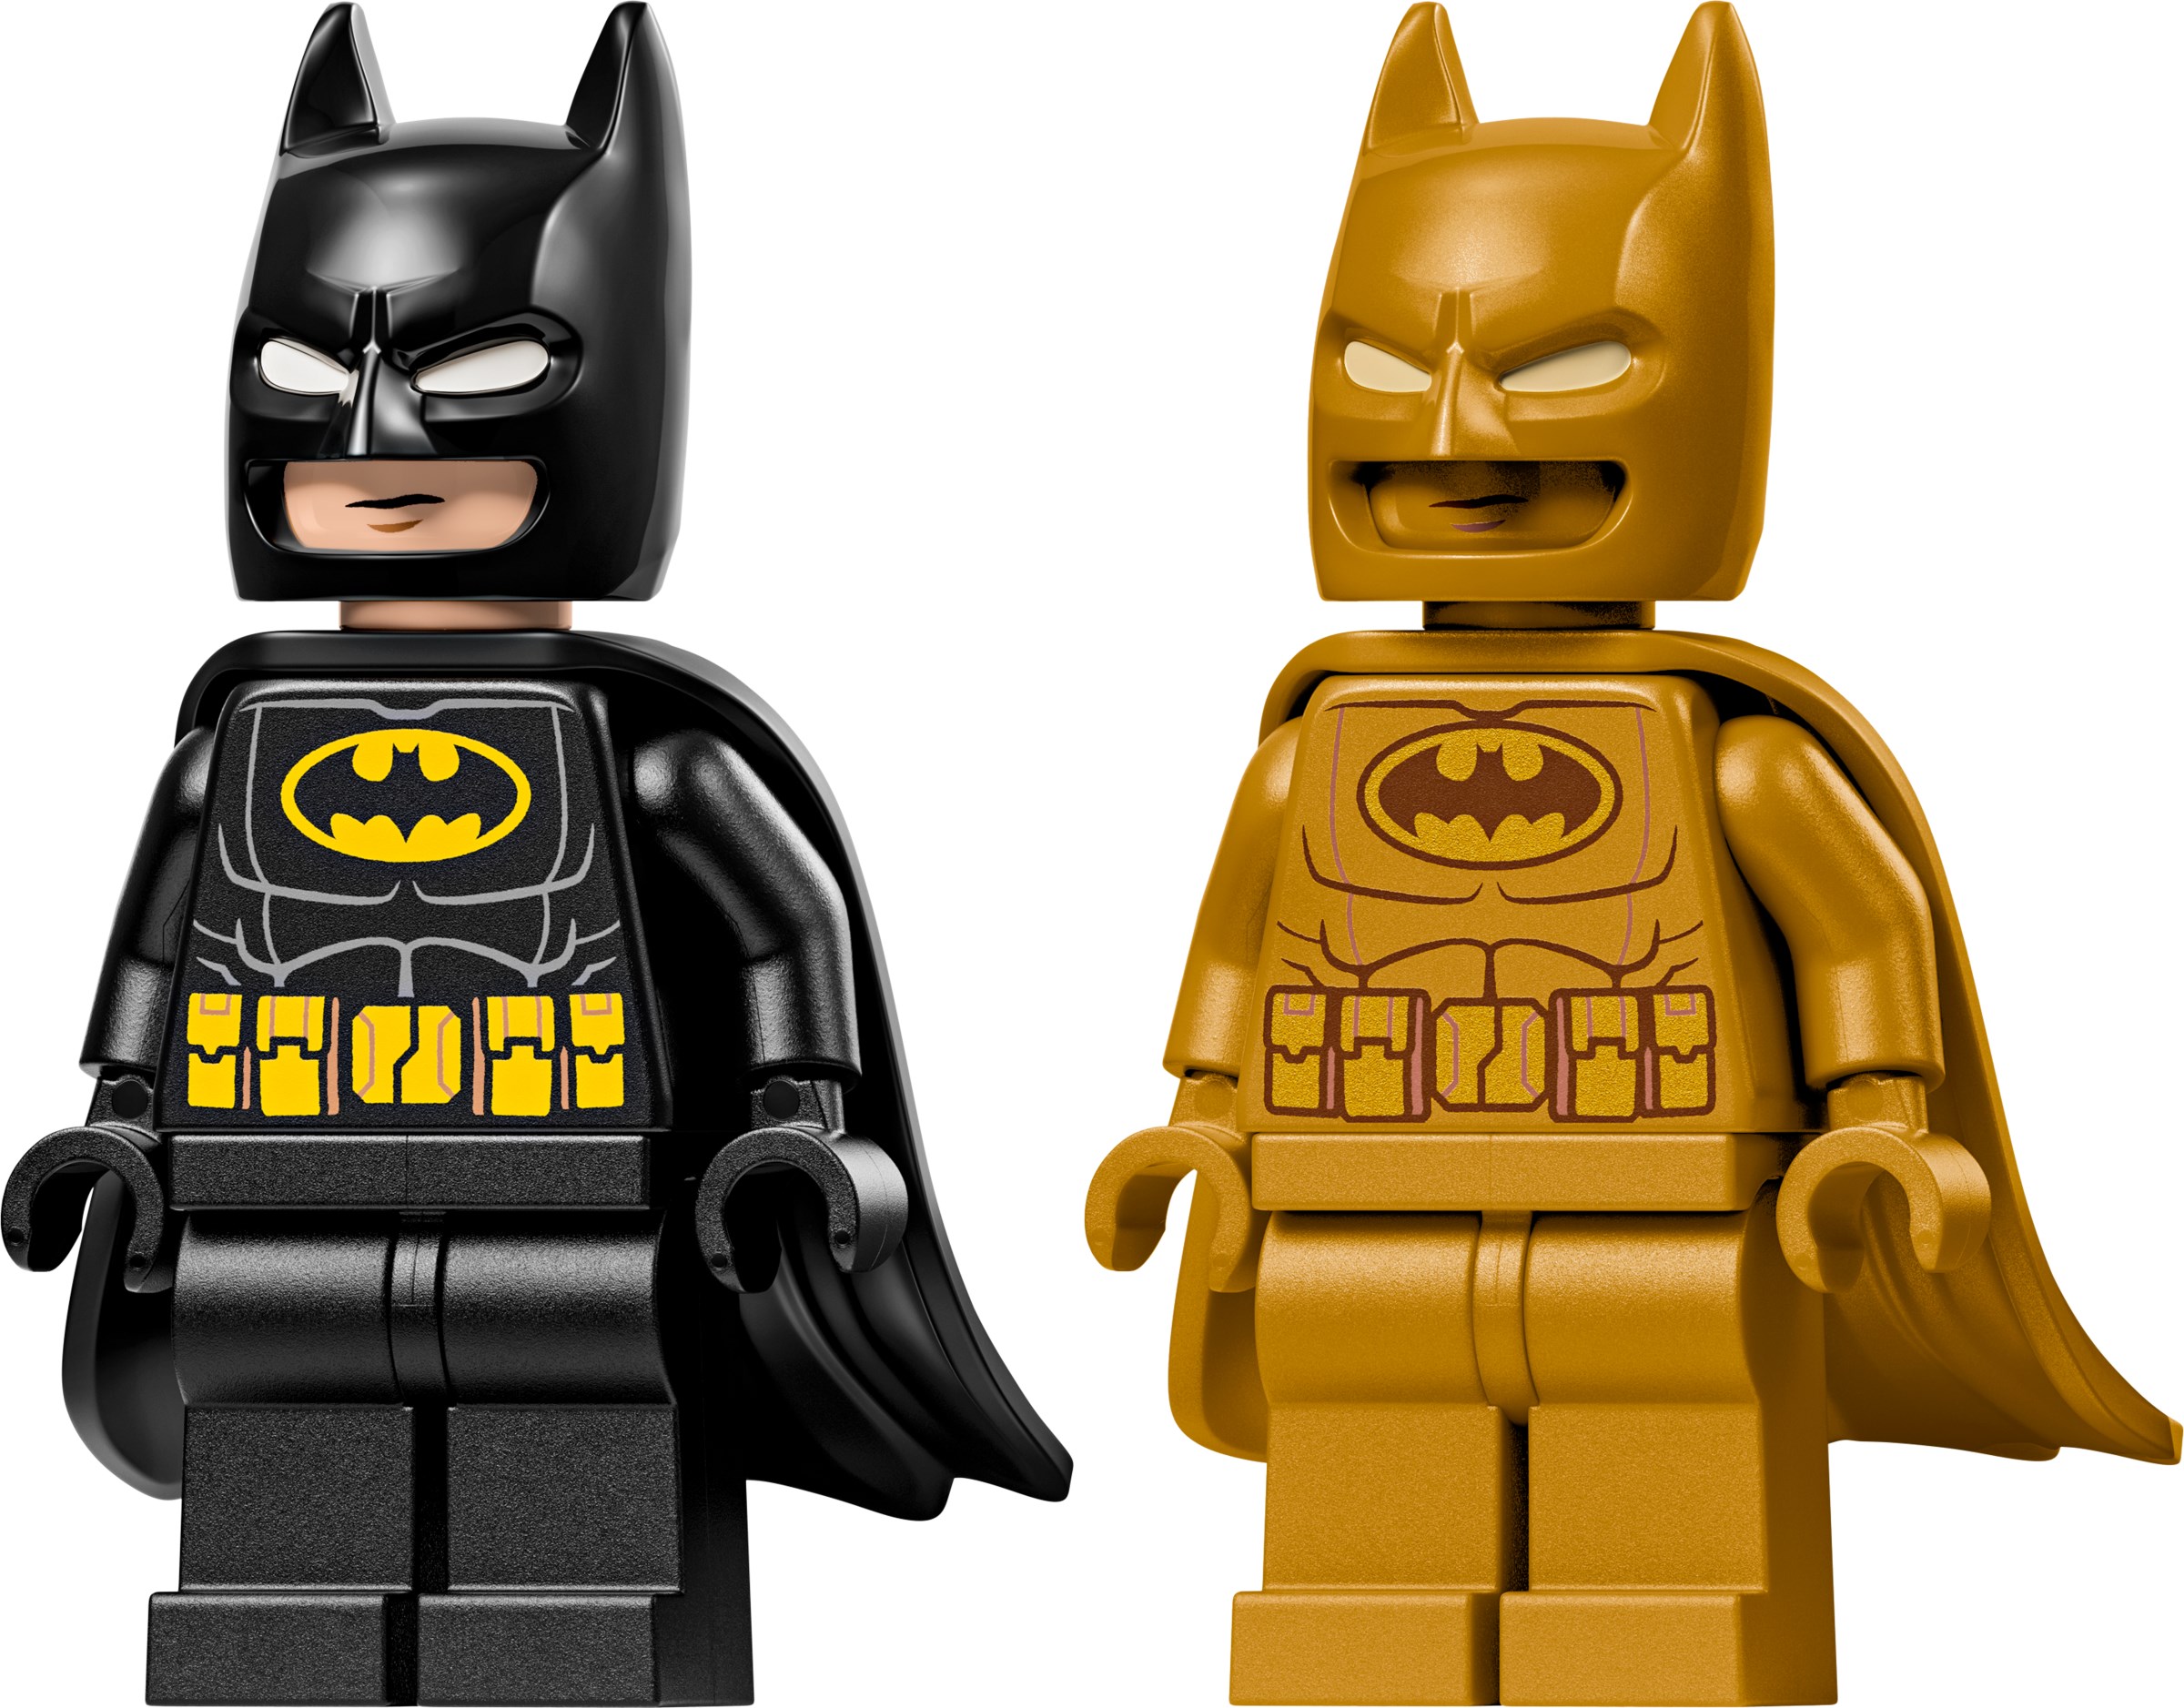
The set comes with a golden Batman minifigure and a golden anniversary coin, plus a traditional Batman minifigure which can fit into an opening hatch at the centre of the model designed to look like the Batcave Suit Vault door.
Bonus digital unlock feature: Redeem a golden character to play in the video game, LEGO Batman - Legacy of the Dark Knight. Scan the QR code on the building instructions and follow the directions.
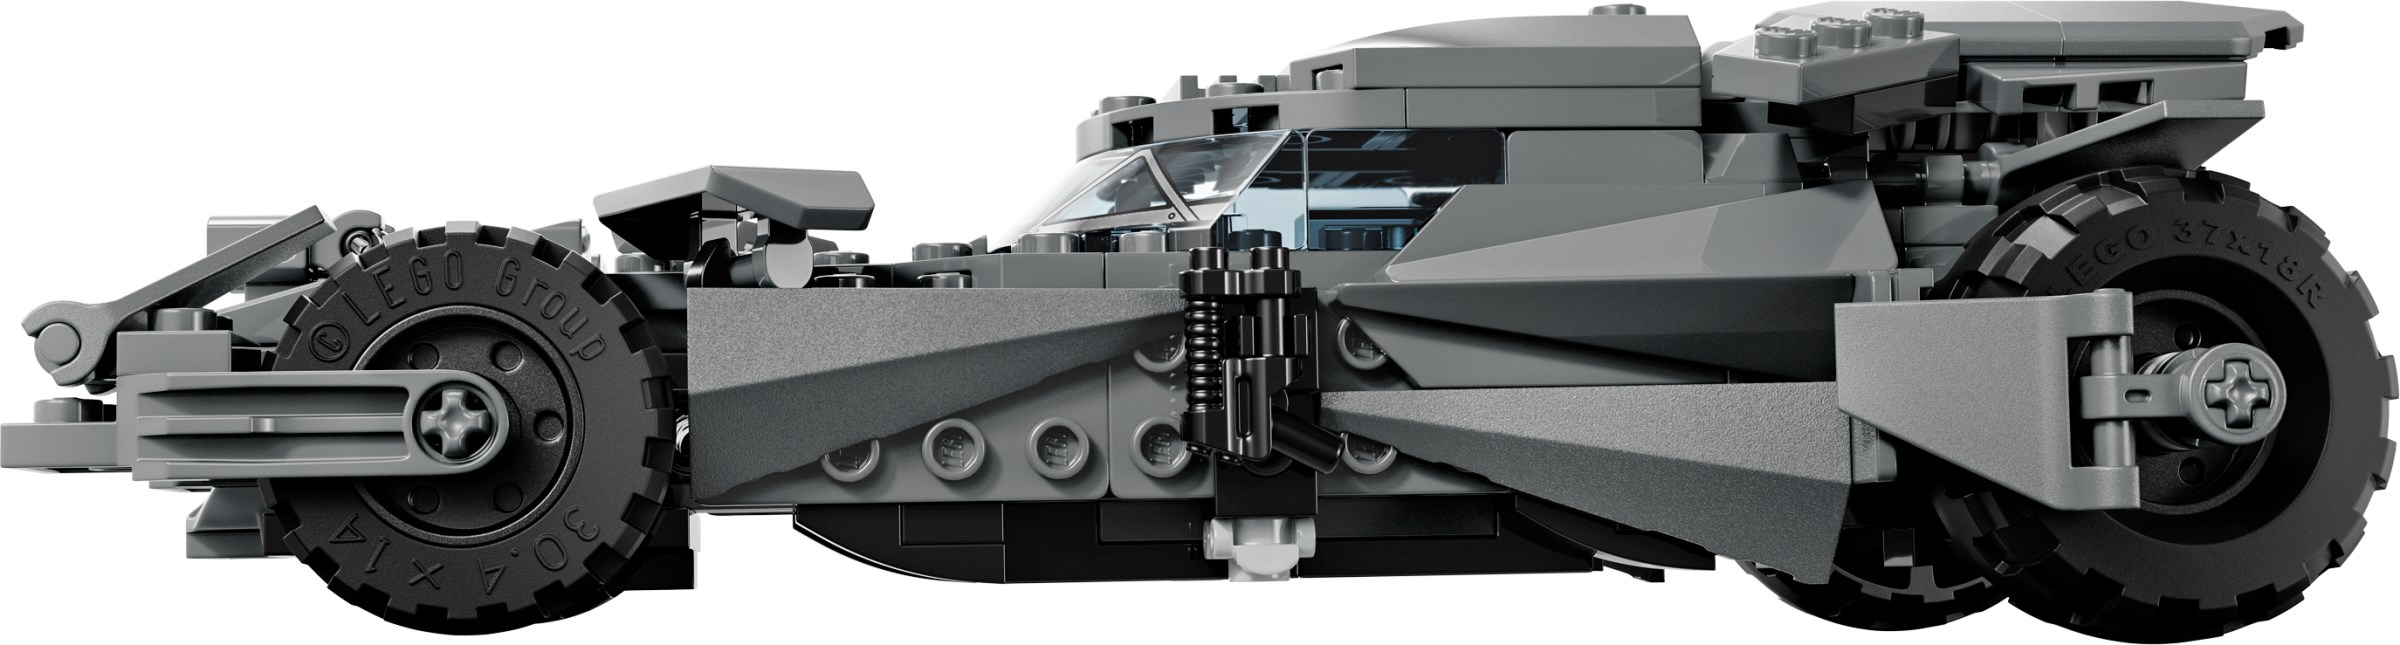
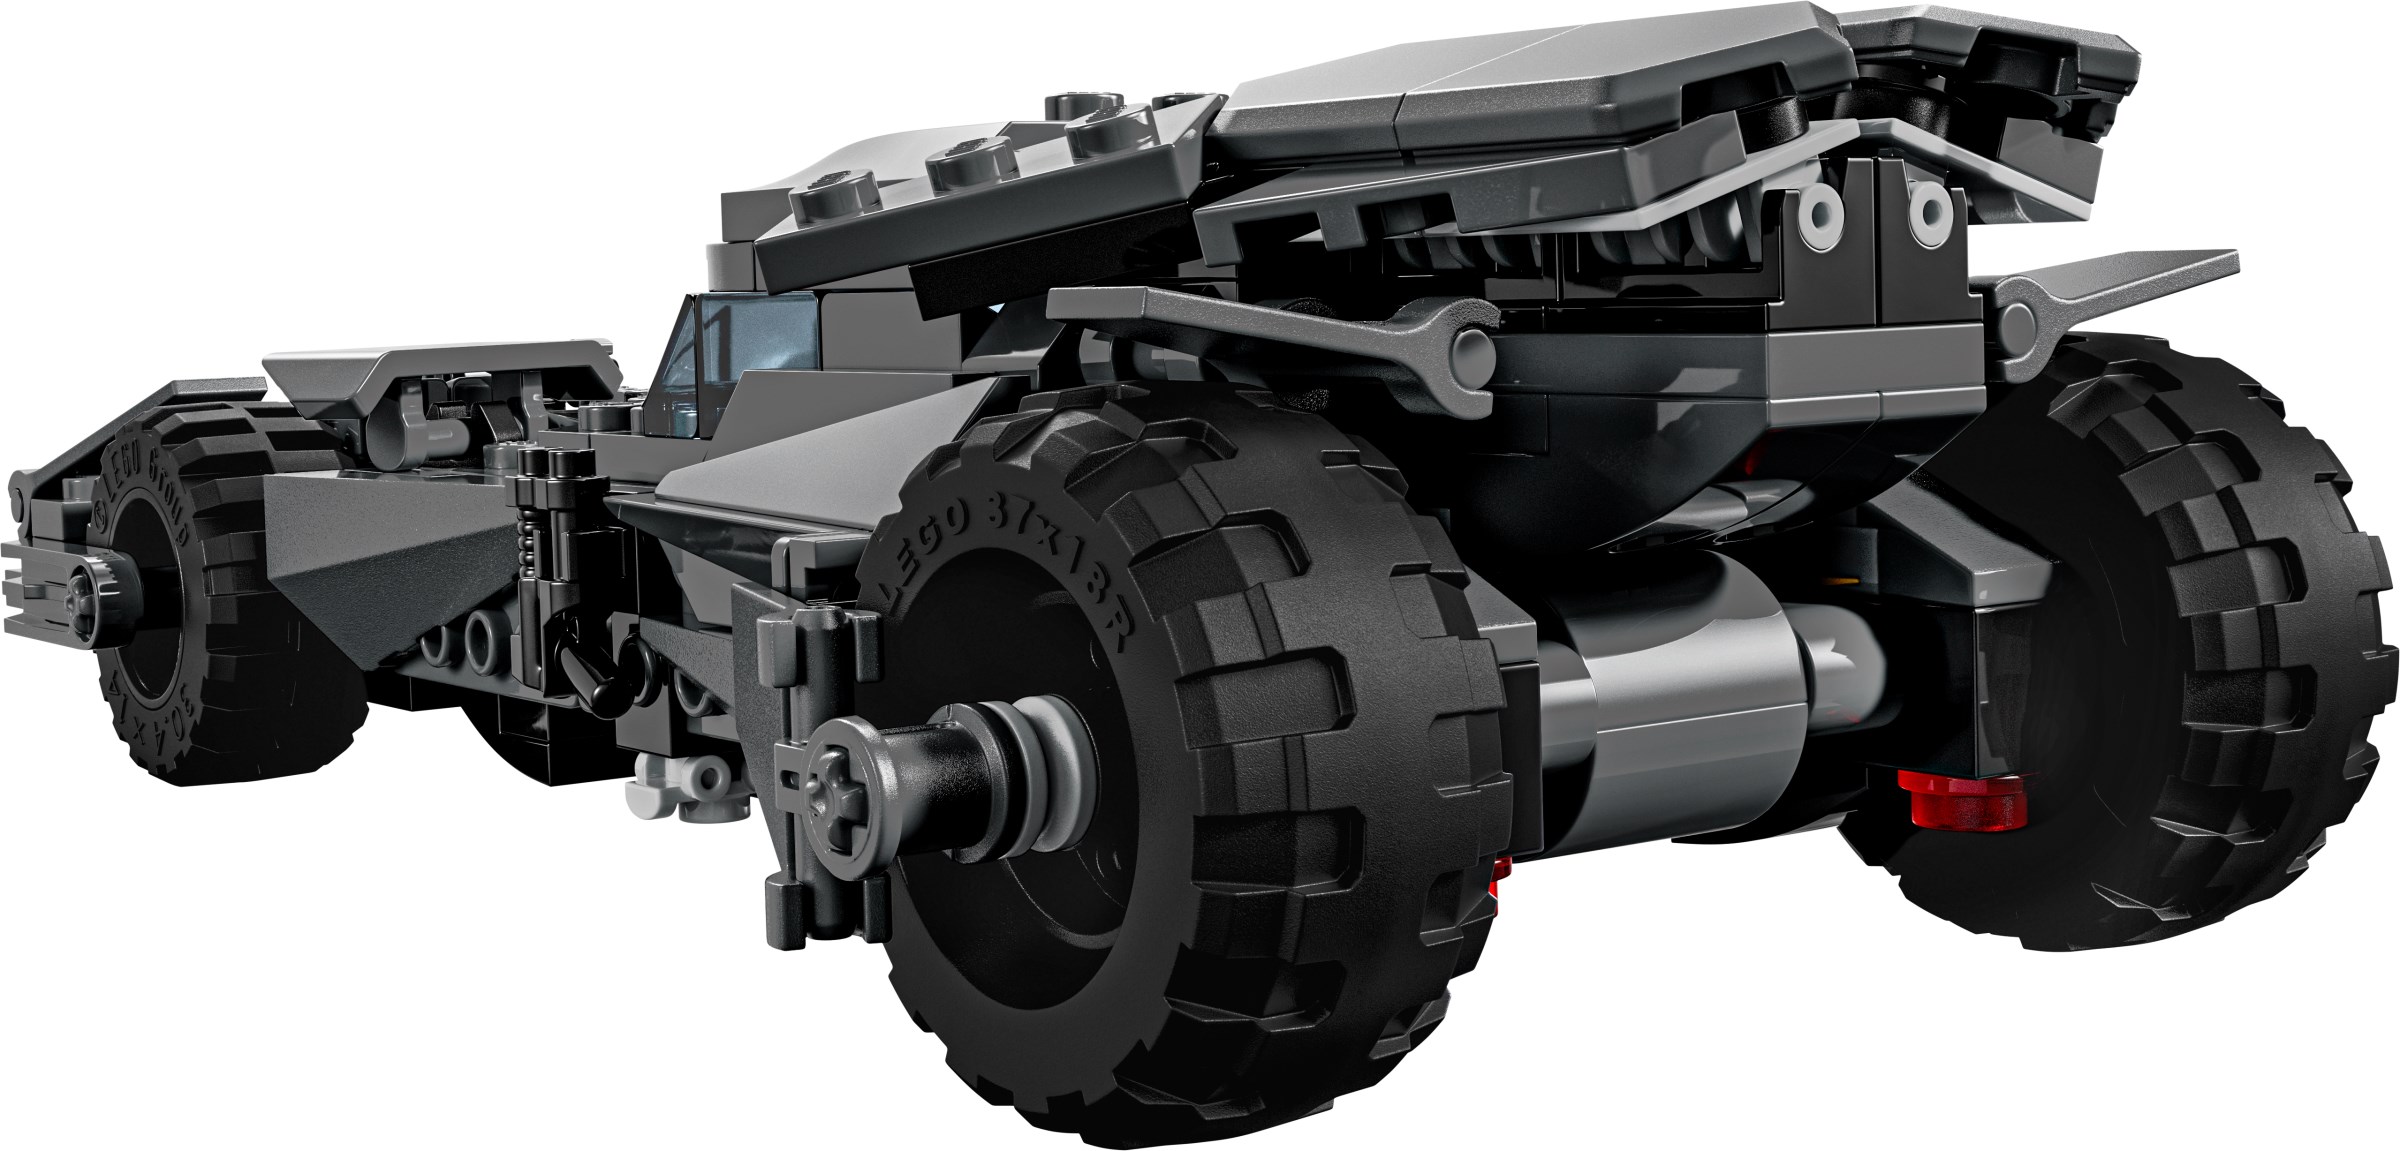
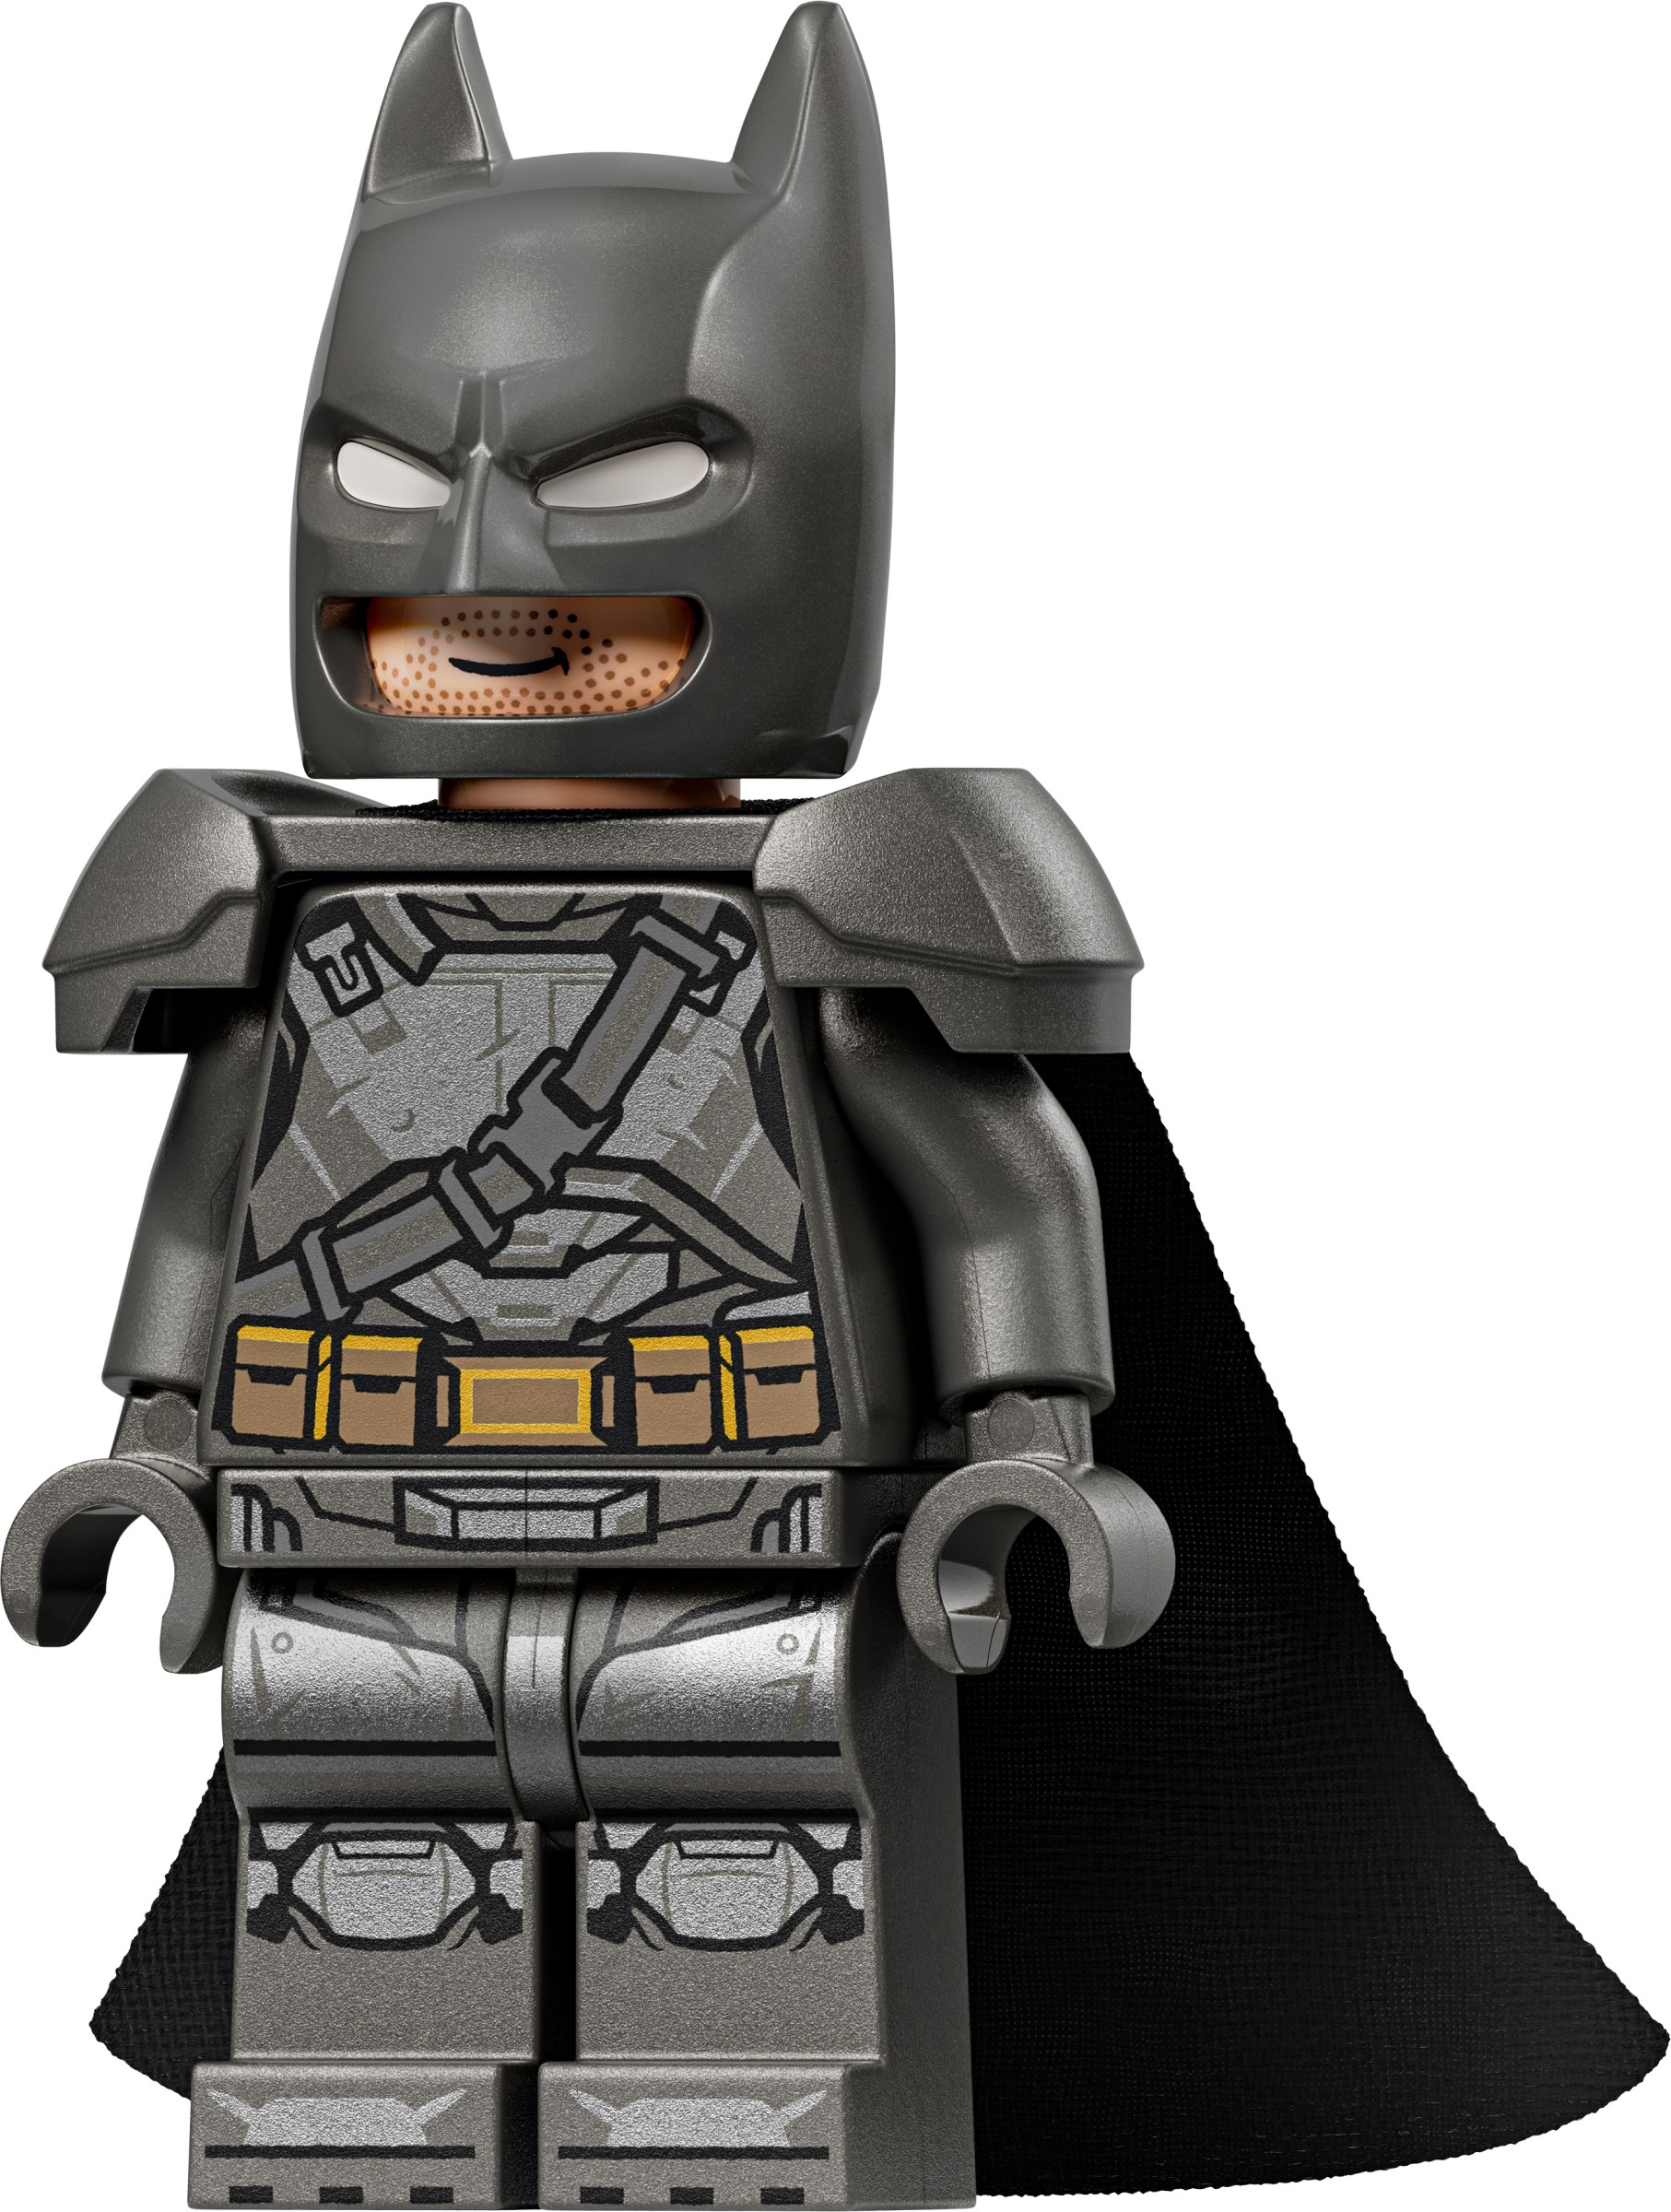
Join Batman for high speed super-hero adventures with the Batman v Superman Batmobile (76331) building set, a great gift for boys, girls and kids aged 9 and over. To celebrate the 20th anniversary of LEGO DC Batman, this collectable piece of Batman merch features the iconic car, plus a commemorative armoured Batman minifigure with a fabric cape. The Batman Batmobile model kit features a front-mounted, non-functioning shooter, opening cockpit and headlight details depicted with graphic stickers. A commemorative golden coin is built into the car’s interior. The Batman minifigure can be seated inside the vehicle’s cockpit.
Bonus digital unlock feature: Redeem the Batman v Superman Batmobile and a golden variant of the Batmobile in the video game LEGO Batman - Legacy of the Dark Knight. Scan the QR code on the building instructions and follow the directions.
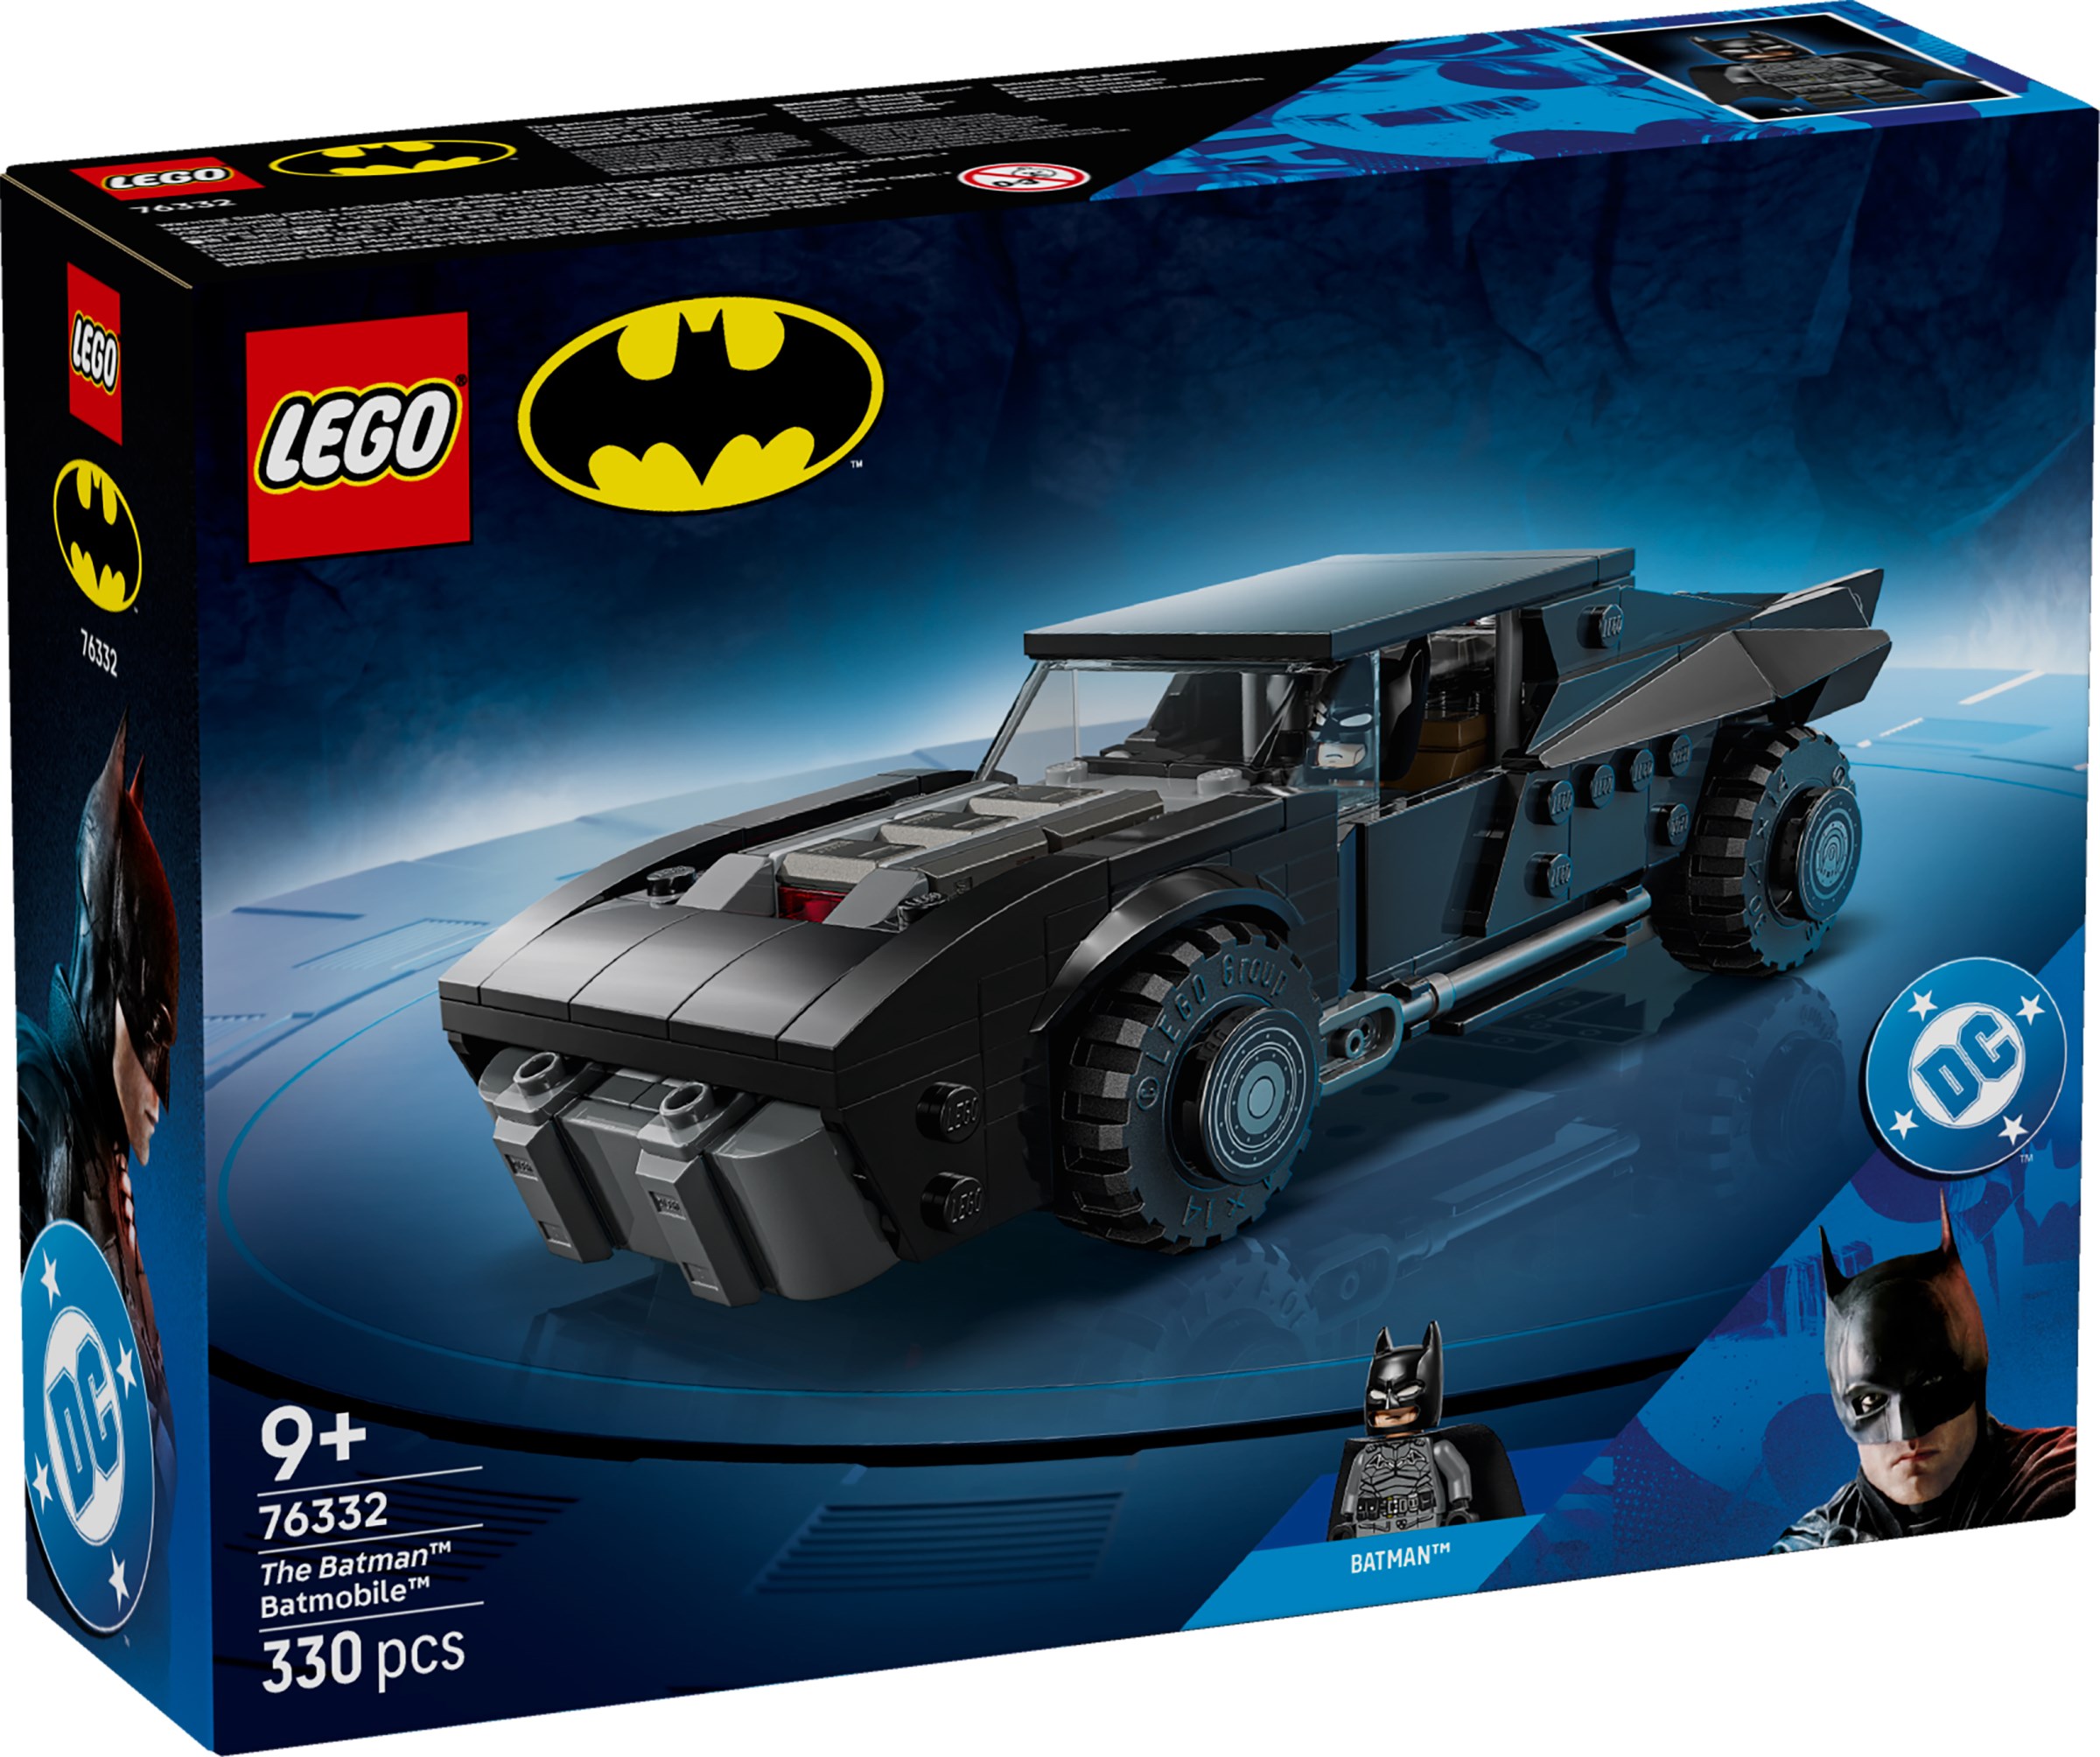
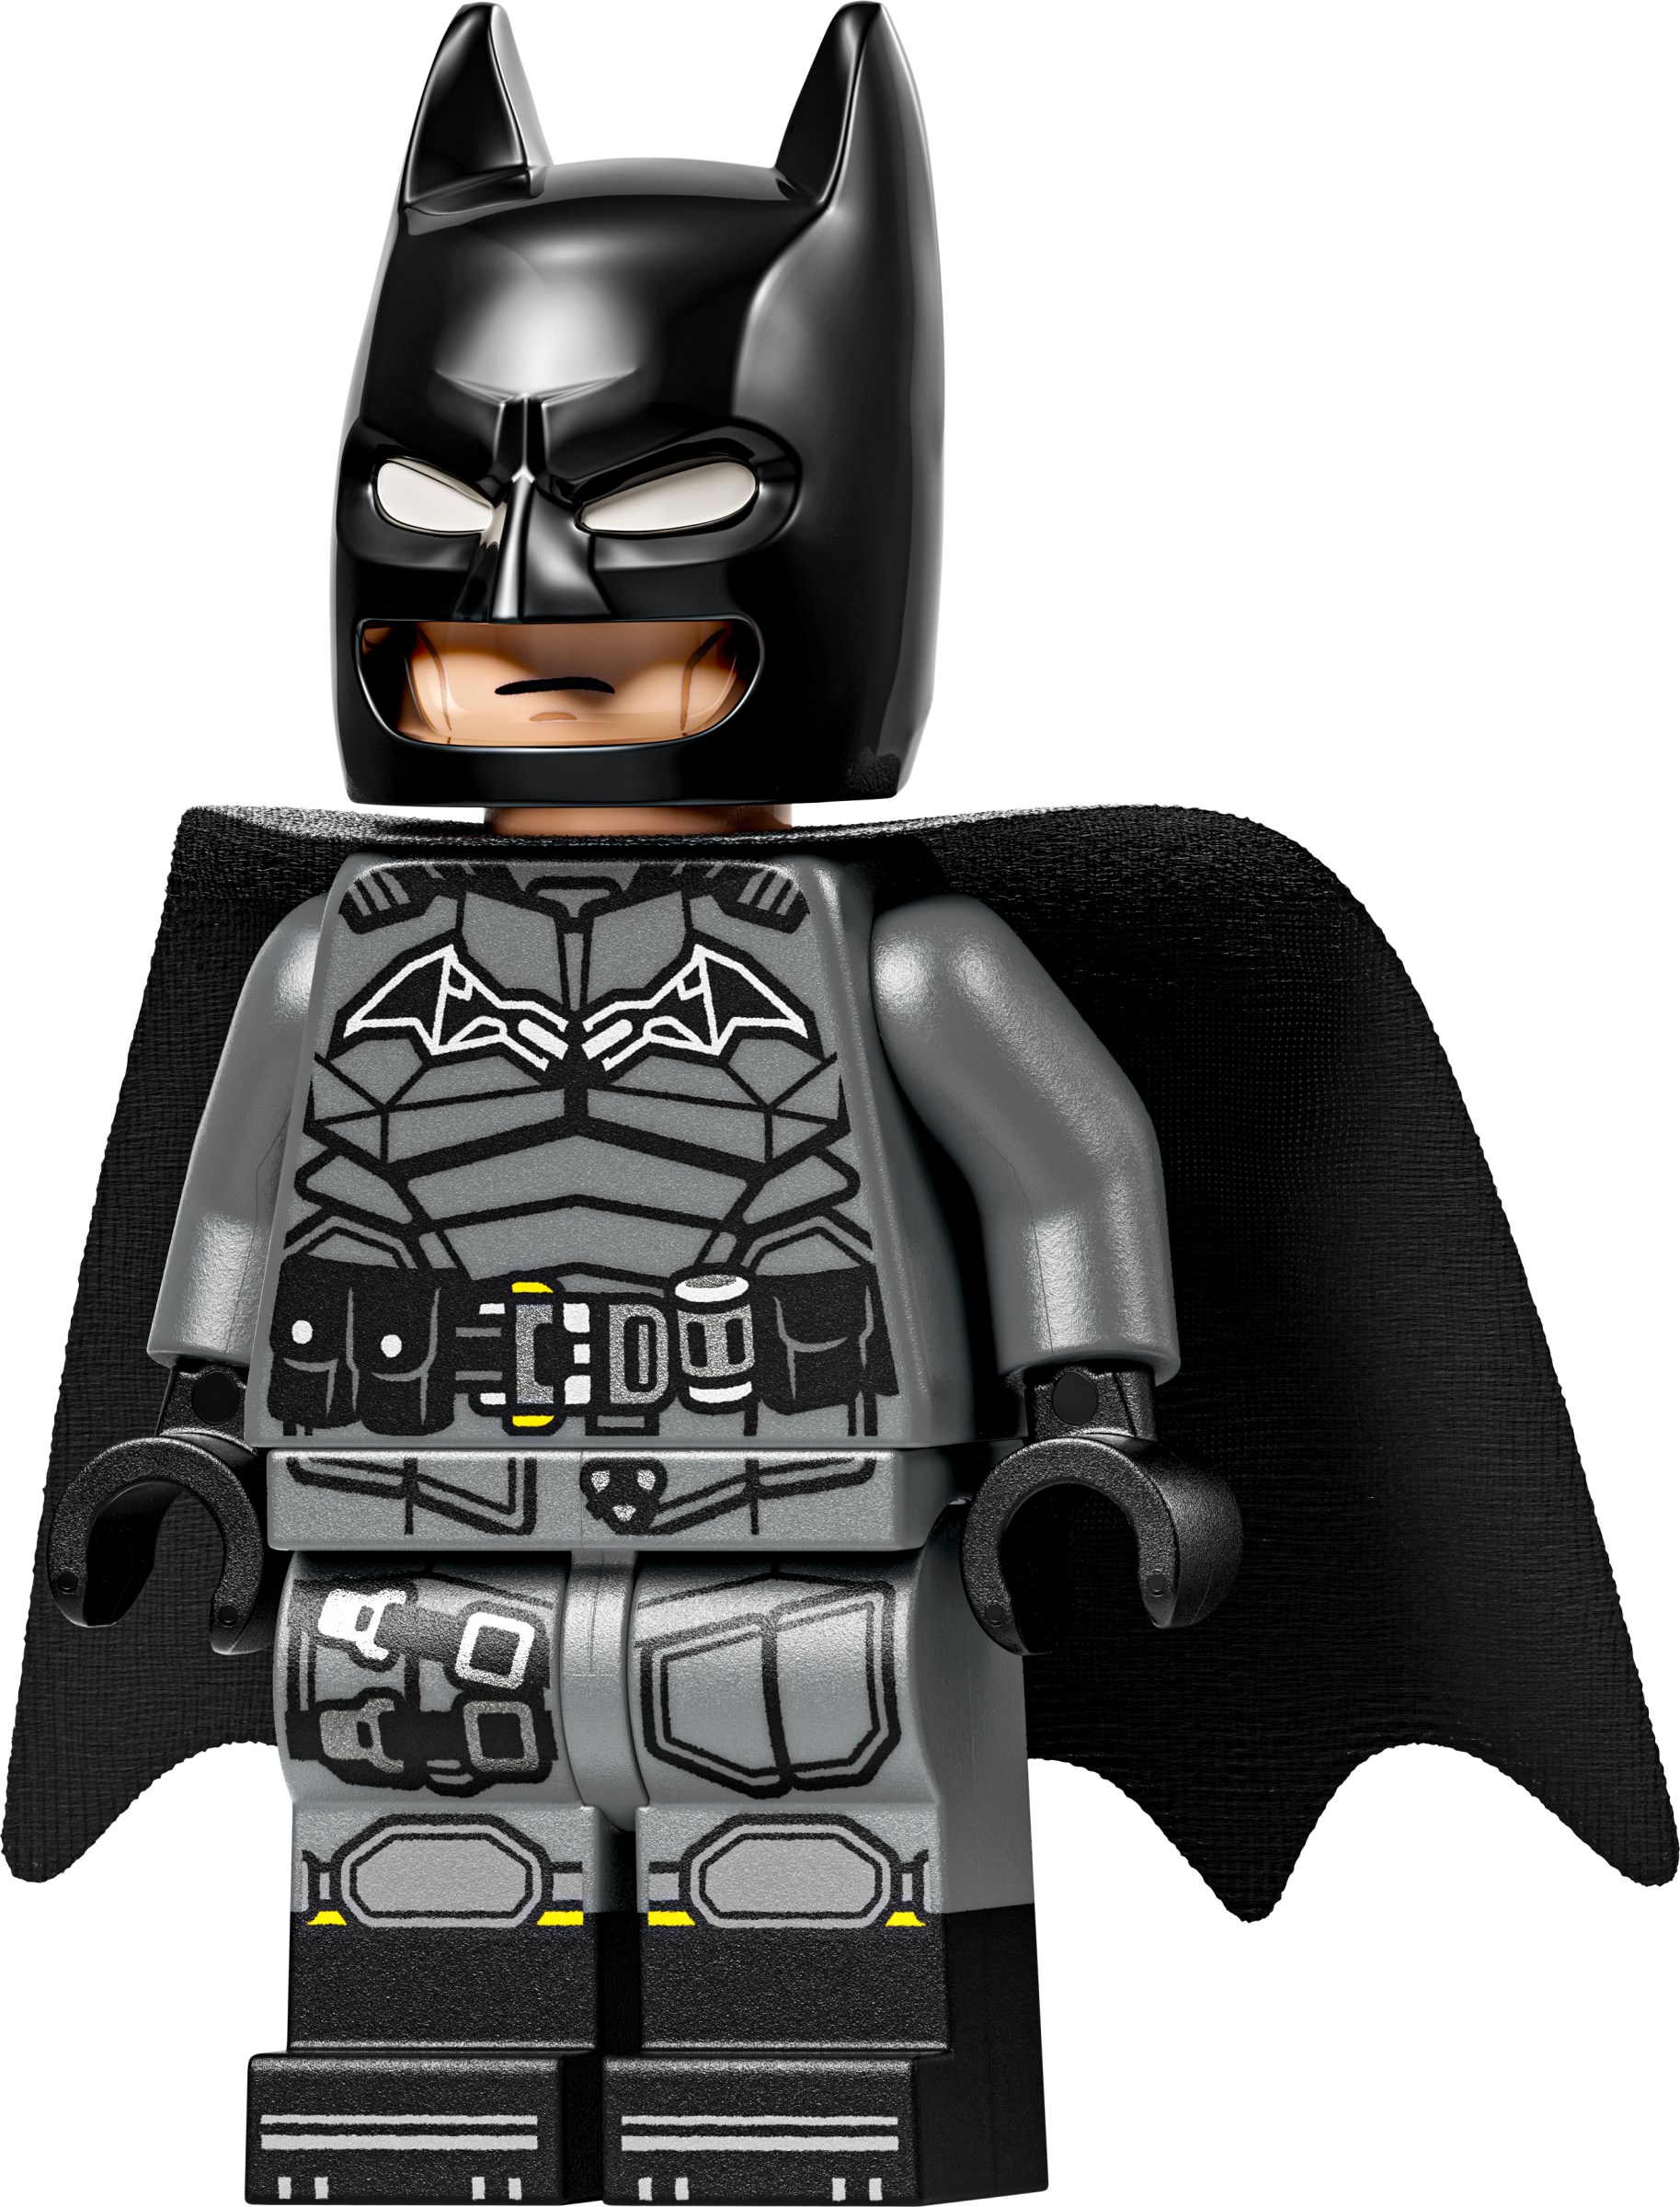
Batman fans can bring action from the 2022 movie to life with The Batman Batmobile (76332) toy, a model car building gift for boys, girls and kids aged 9 and over. Celebrate the 20th anniversary of LEGO DC Batman with this collectable merch featuring the iconic car and a Batman minifigure wearing a fabric cape. The play-and-display Batmobile toy is authentically detailed and features a removable roof, which provides access to the vehicle’s cockpit where the Batman minifigure can be seated. A commemorative 20th anniversary golden coin fits beneath the removable bonnet.
Bonus digital unlock feature: Redeem The Batman Batmobile and a golden variant of the Batmobile in the video game LEGO Batman - Legacy of the Dark Knight. Scan the QR code on the building instructions and follow the directions.
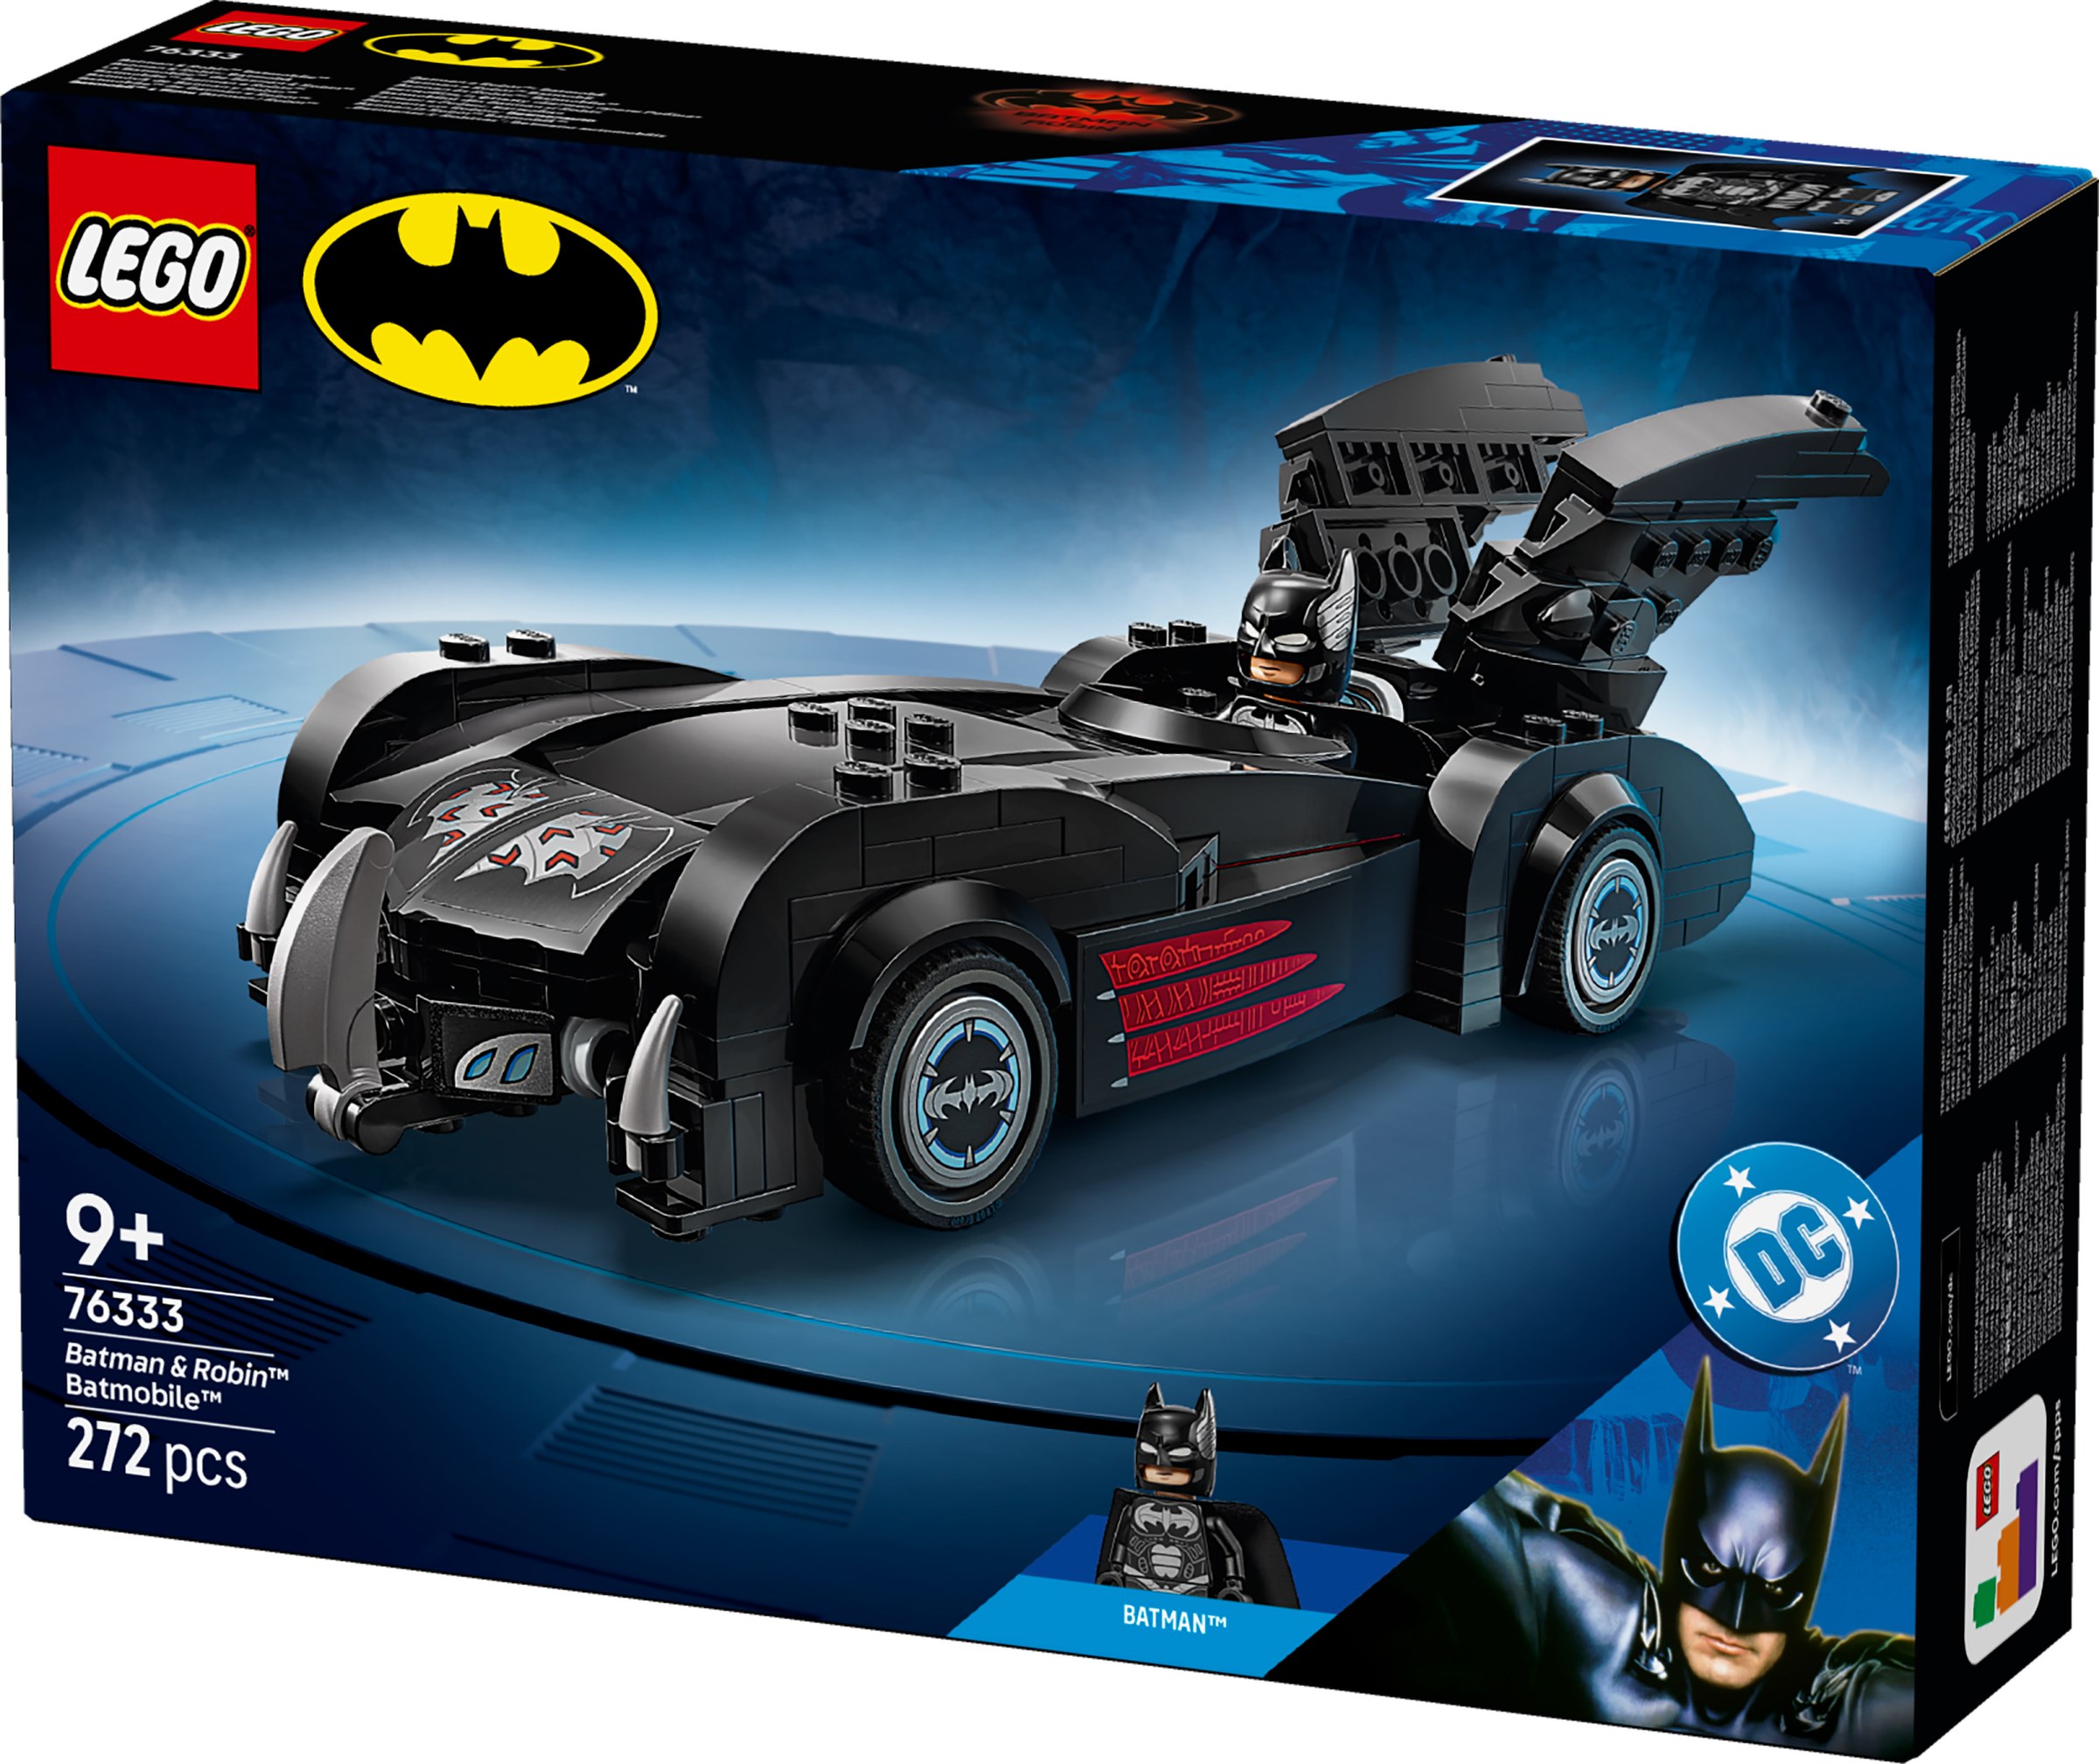
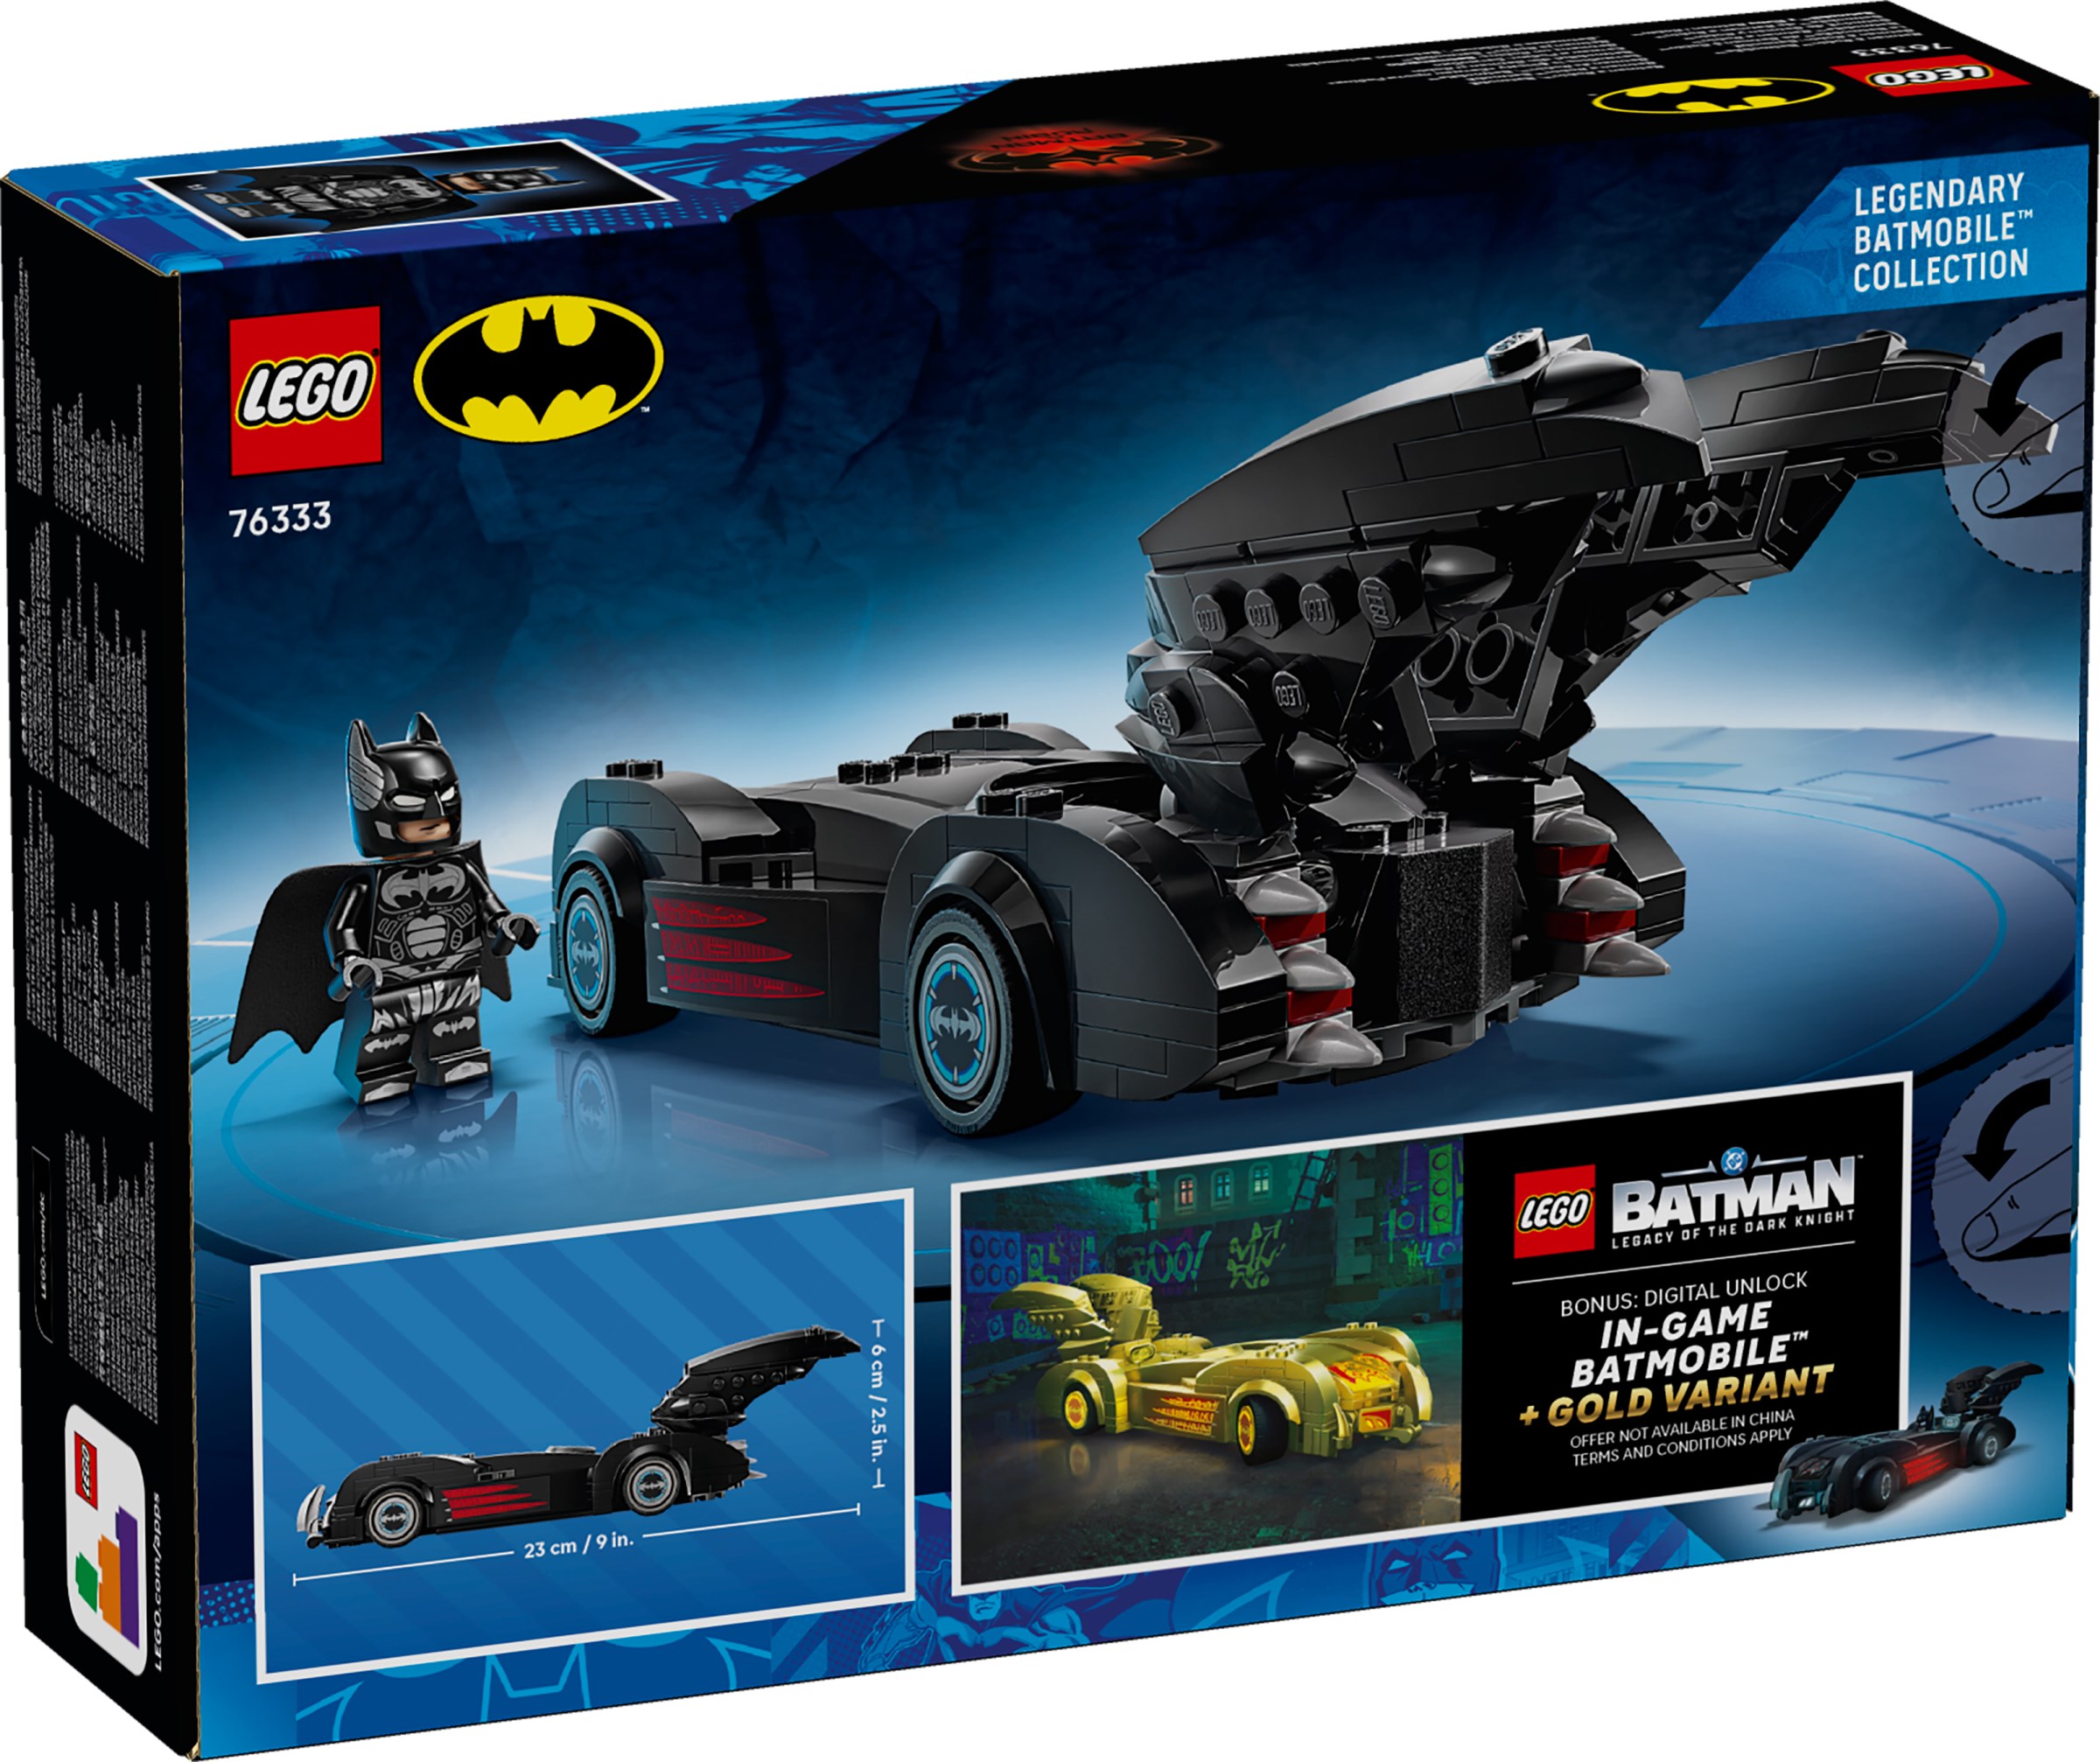
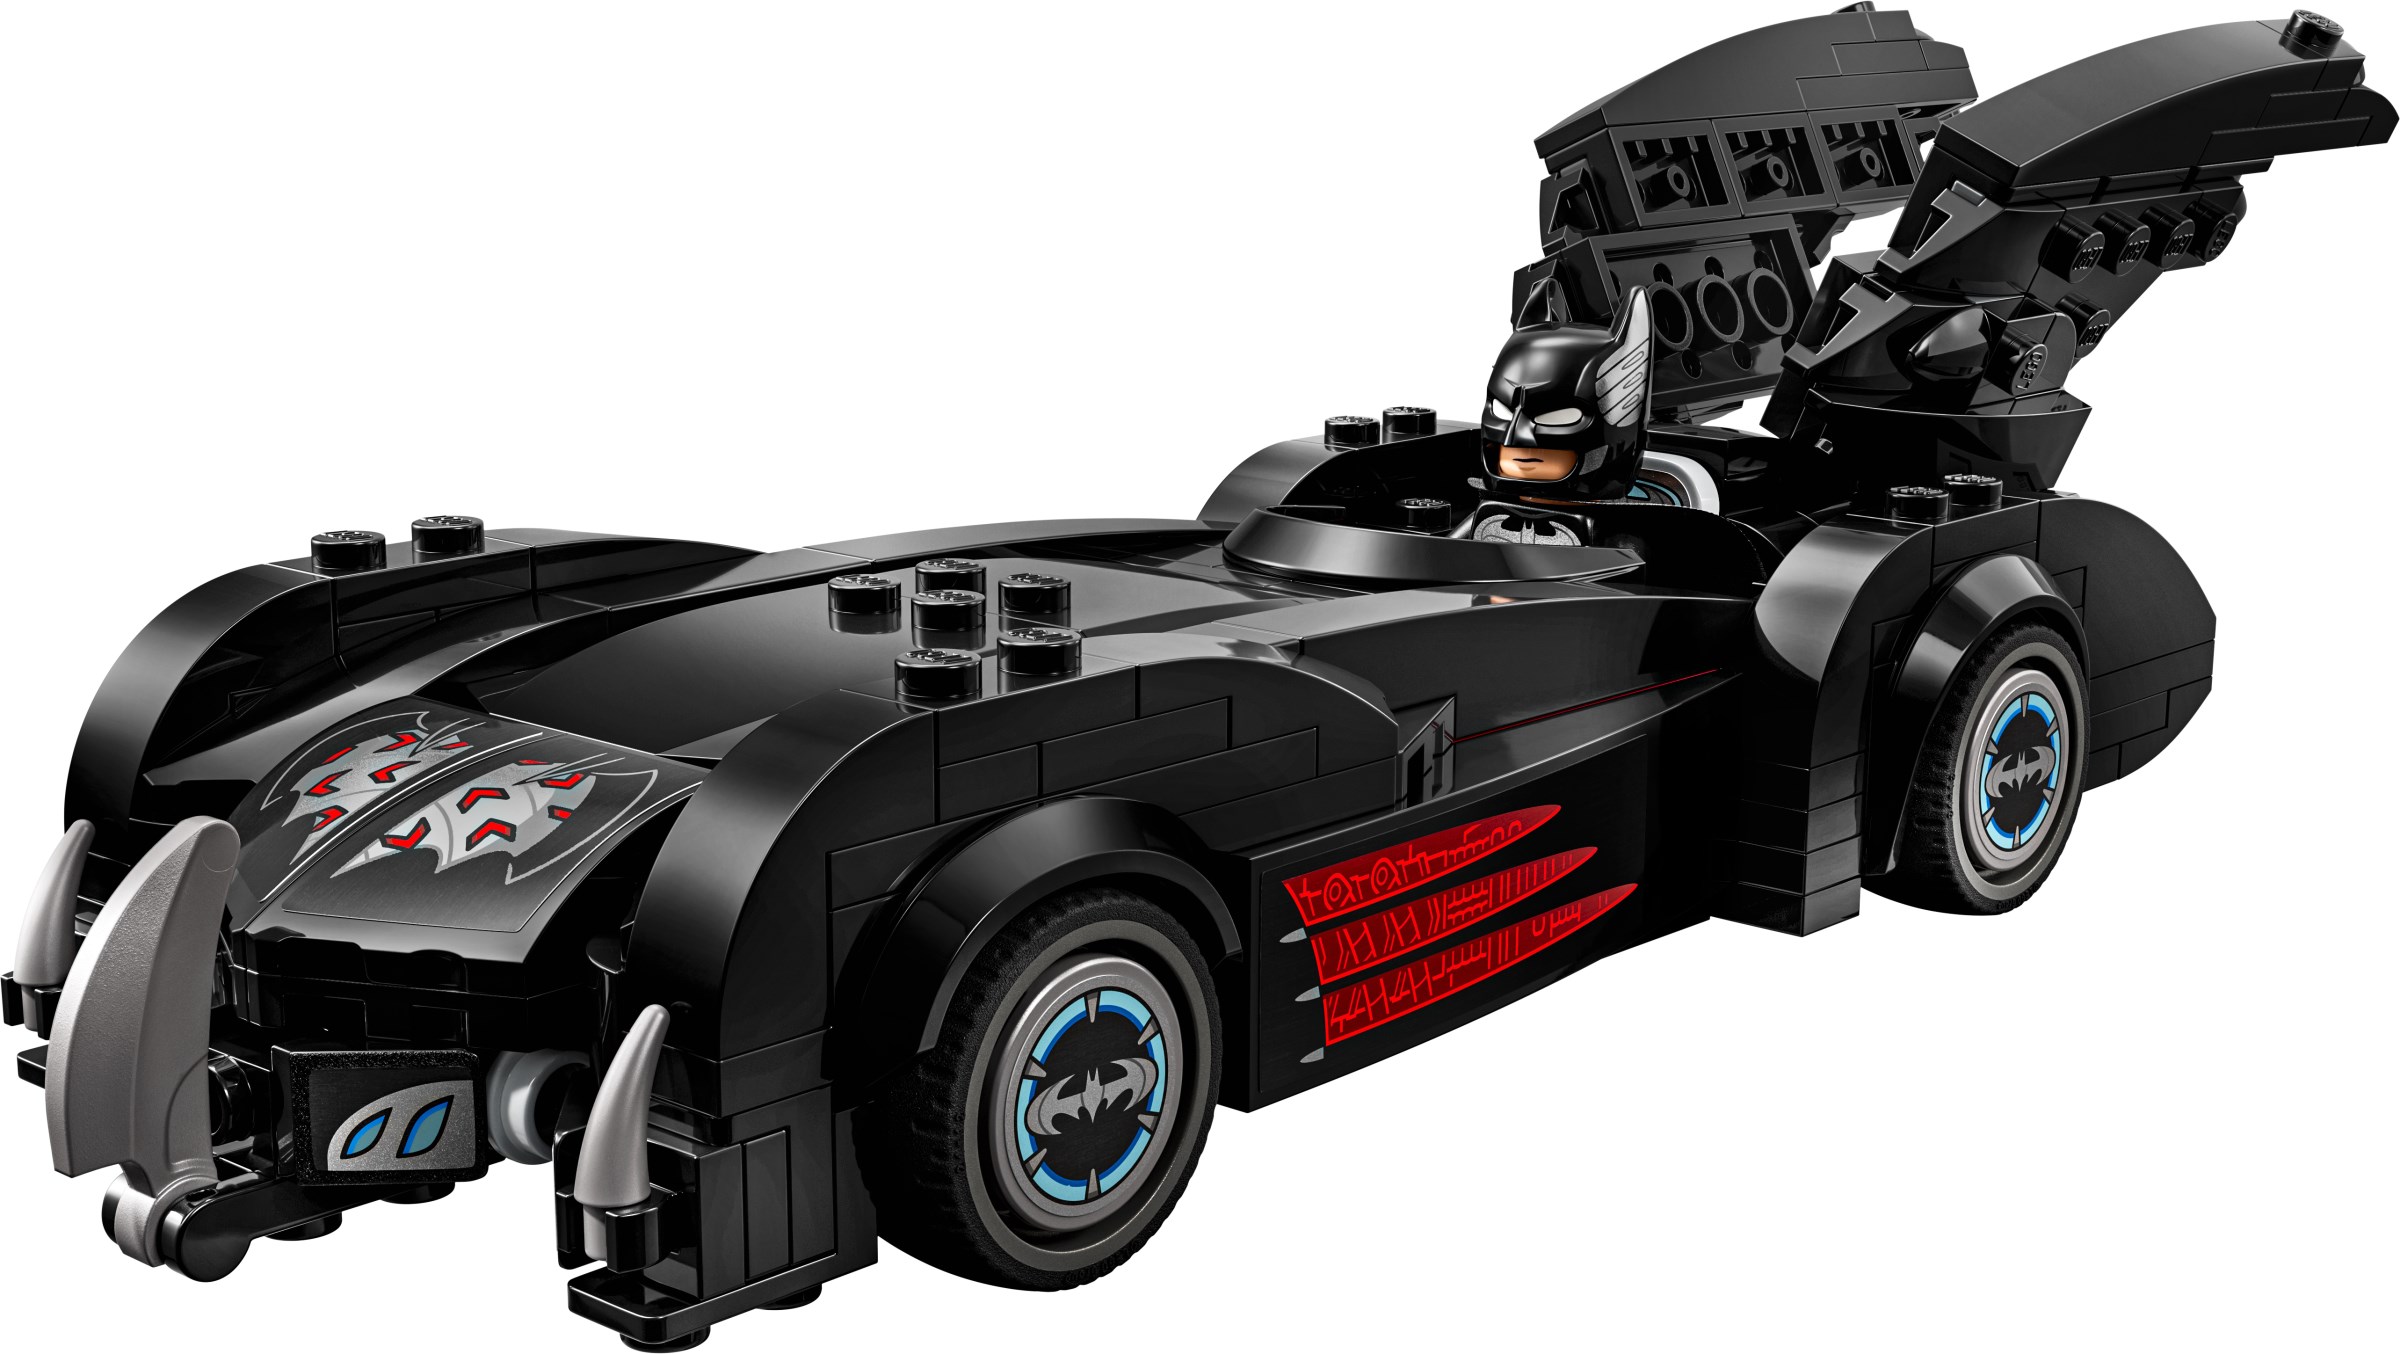
Play out iconic super-hero adventures or create and impressive display with this Batman & Robin Batmobile (76333), a building toy gift for boys, girls and kids aged 9 and over. Celebrating the 20th anniversary of LEGO DC Batman, this collectable merchandise features the iconic car, plus a Batman minifigure with a fabric cape and a commemorative 20th anniversary golden coin. This is an authentically detailed replica of the Batmobile from the Batman & Robin movie. The Batman minifigure can fit into the cockpit and the commemorative coin fits beneath the car’s removable bonnet.
Bonus digital unlock feature: Redeem the Batman & Robin Batmobile and a golden variant of the Batmobile in the video game LEGO Batman - Legacy of the Dark Knight. Scan the QR code on the building instructions and follow the directions.
What do you think of these Batman sets and what else are you hoping for from LEGO DC in 2026? Let us know in the comments.
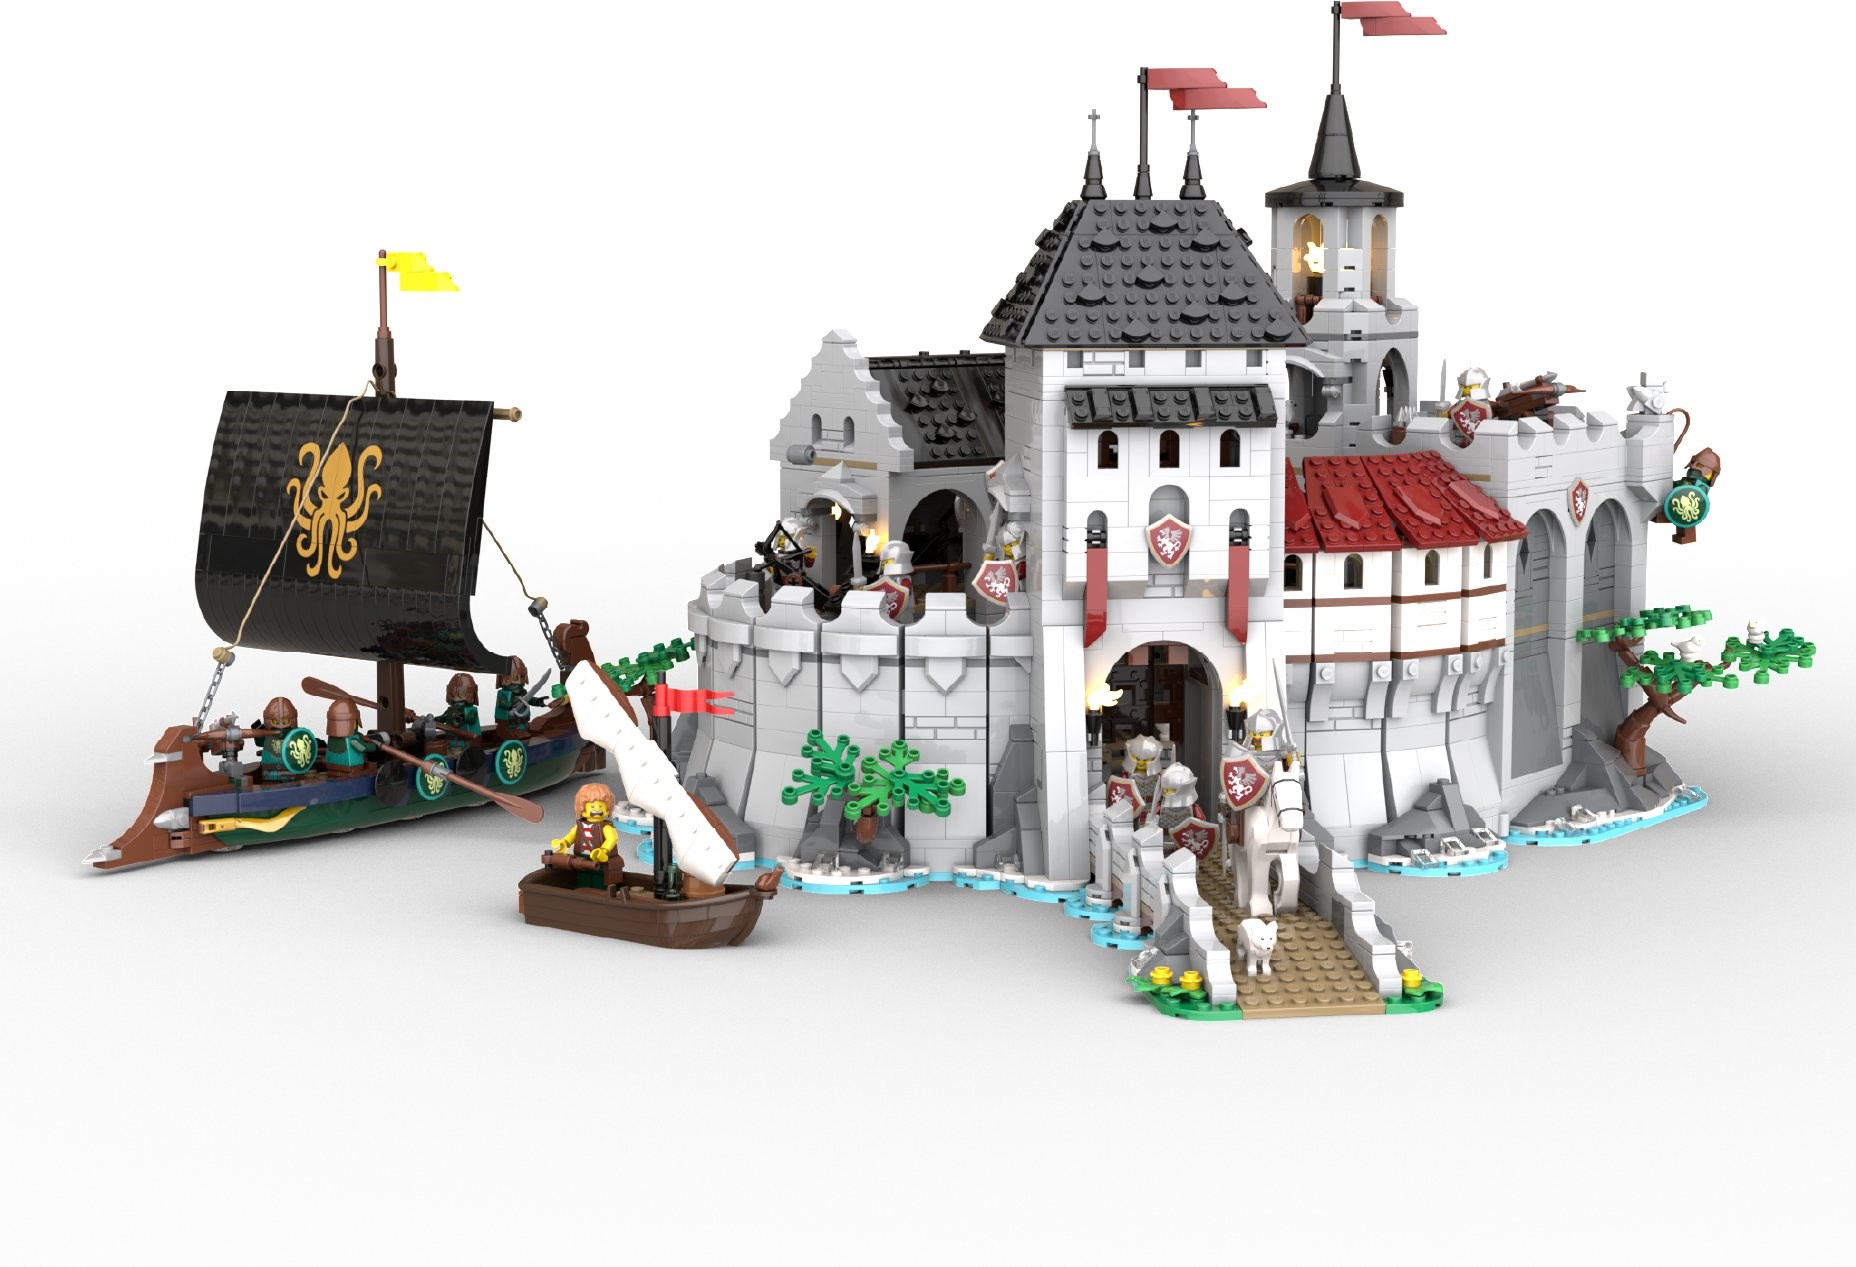
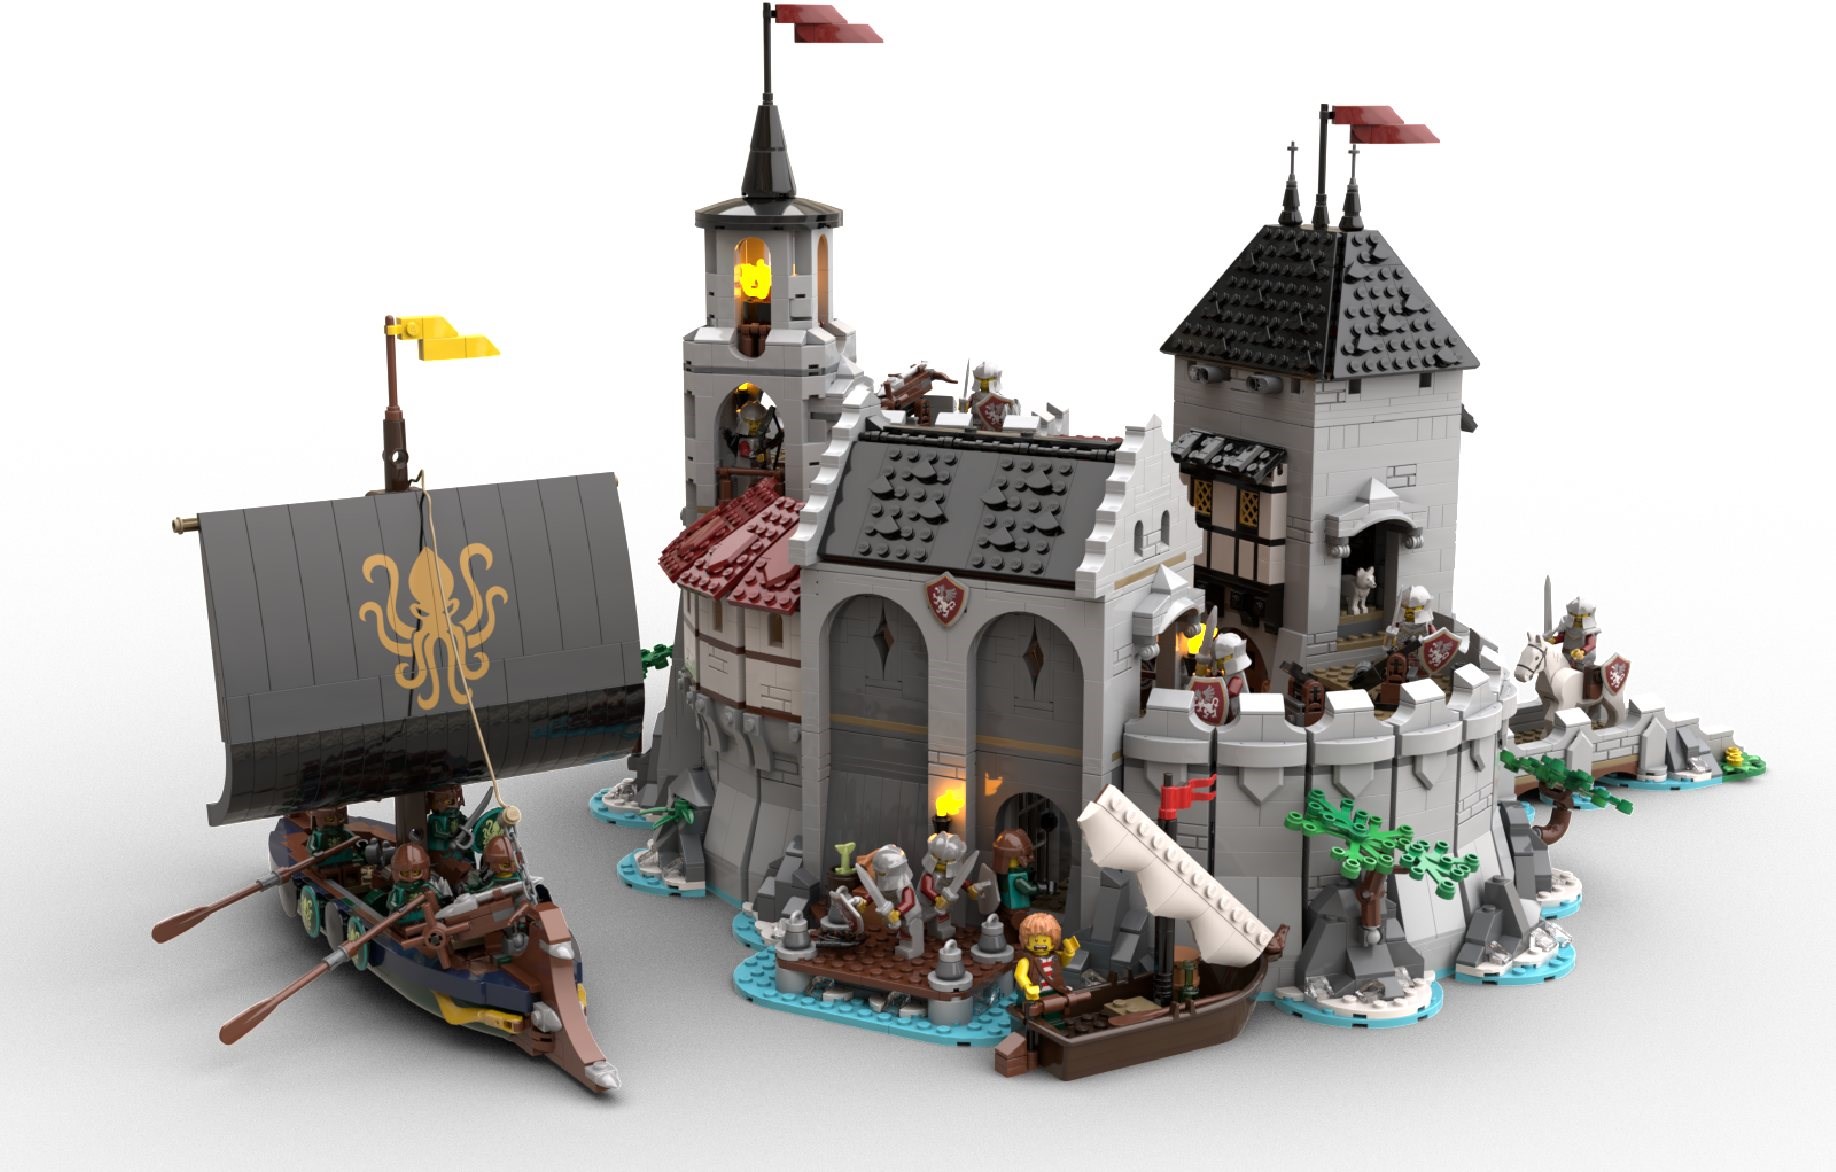
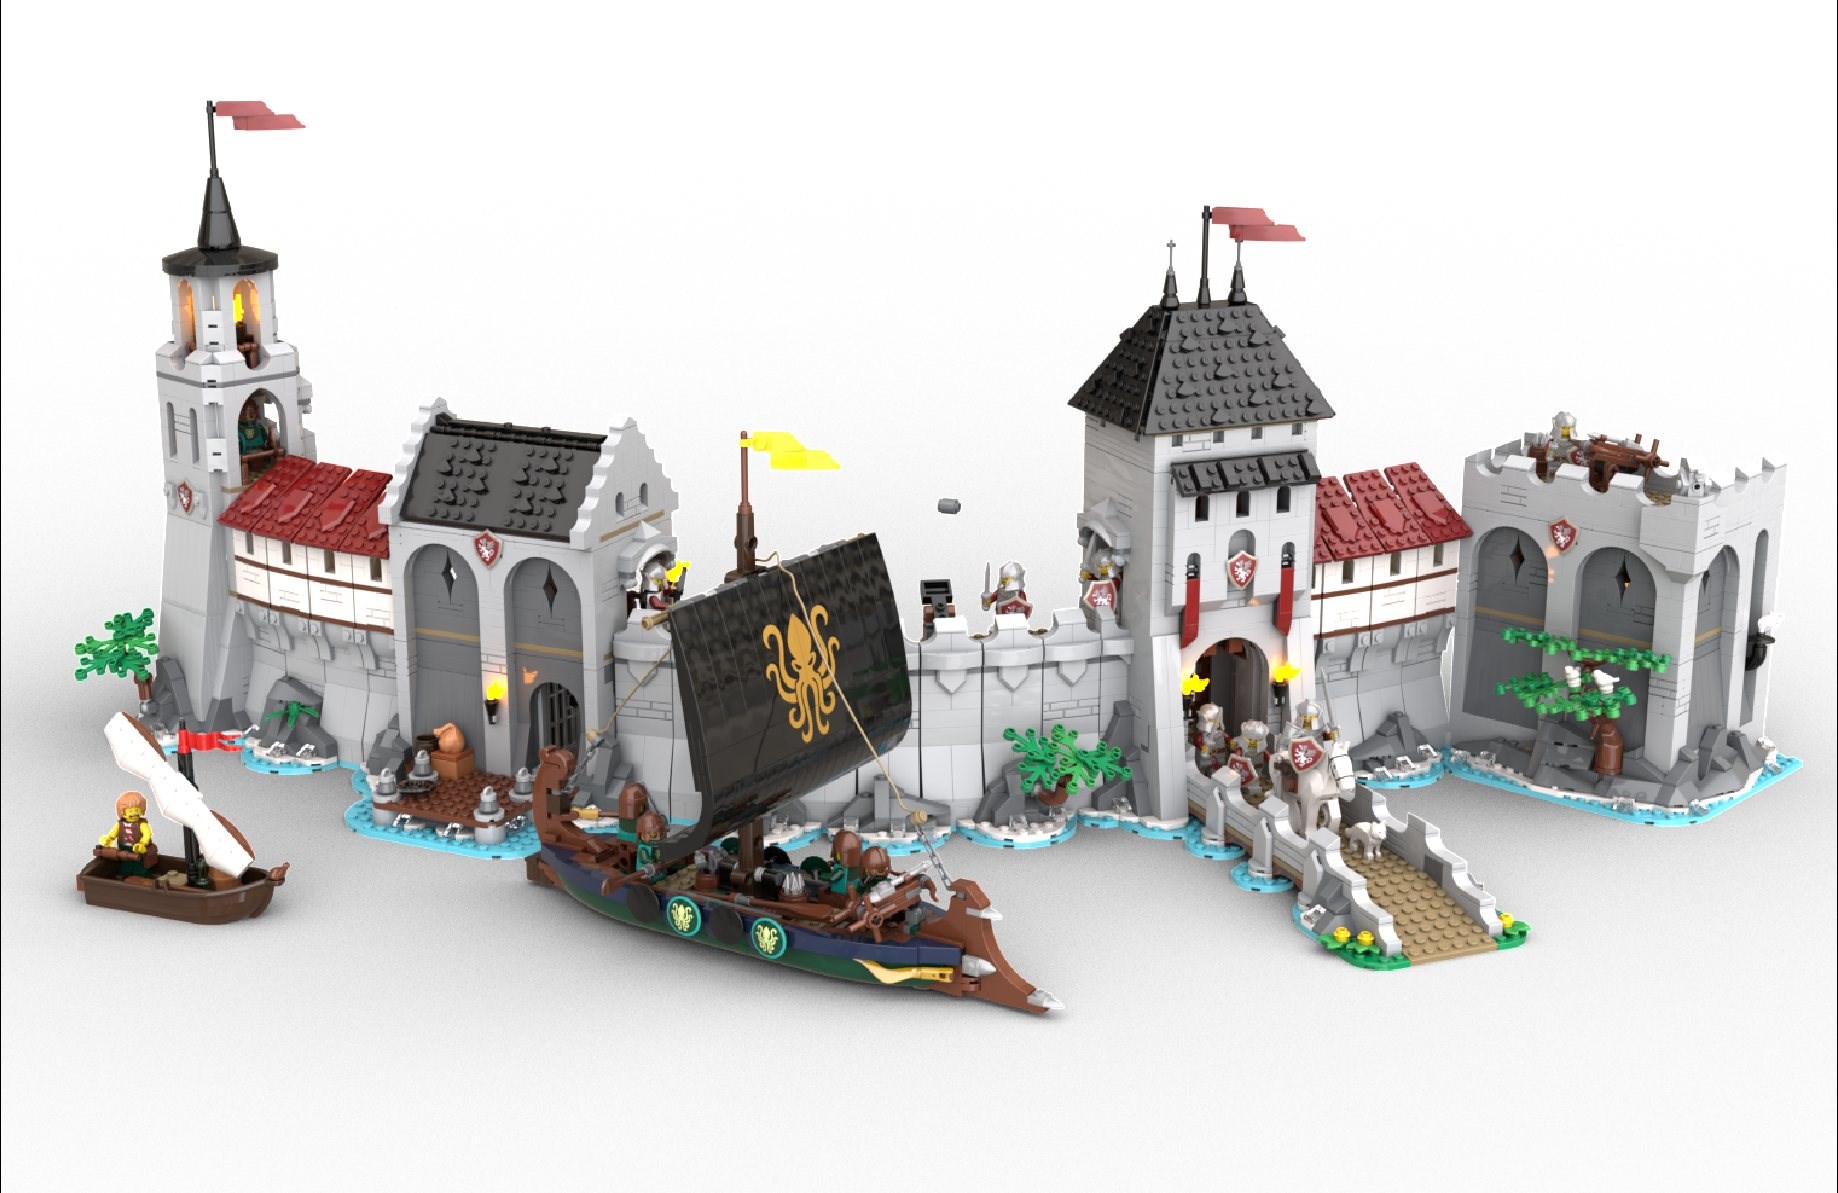
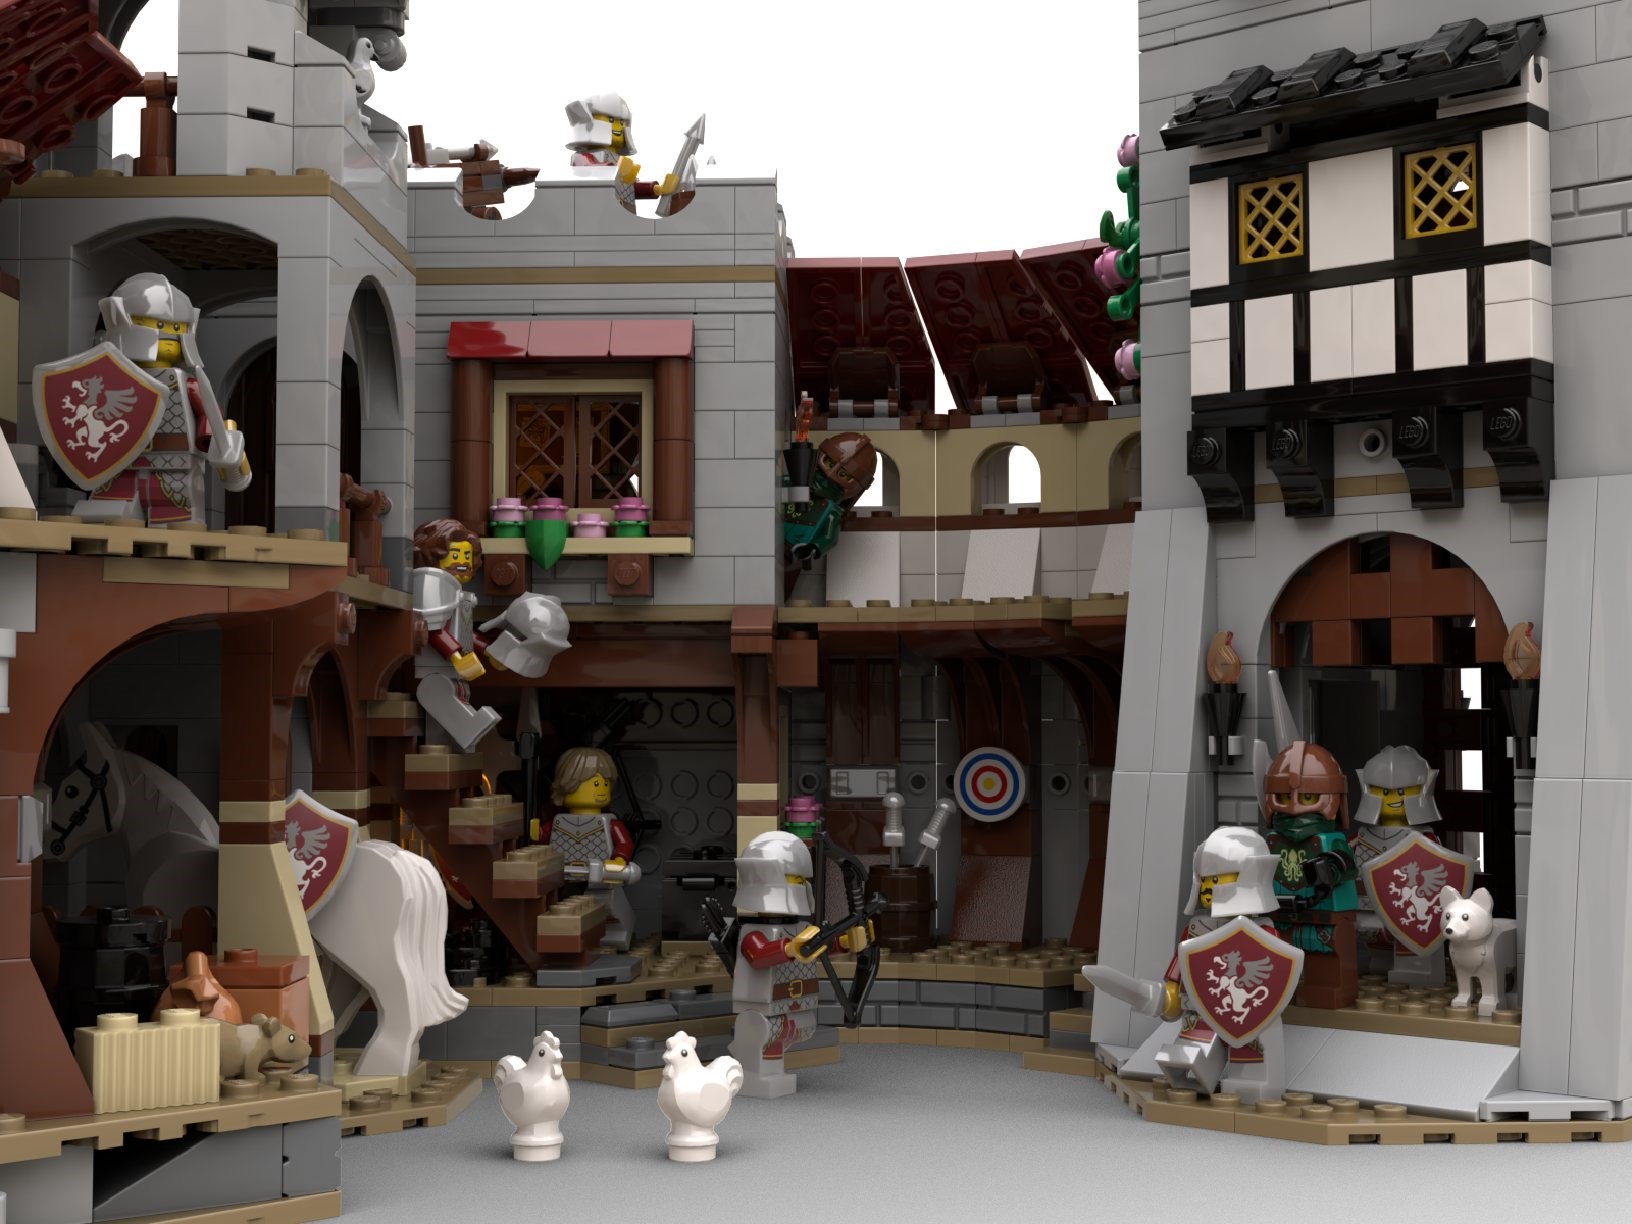
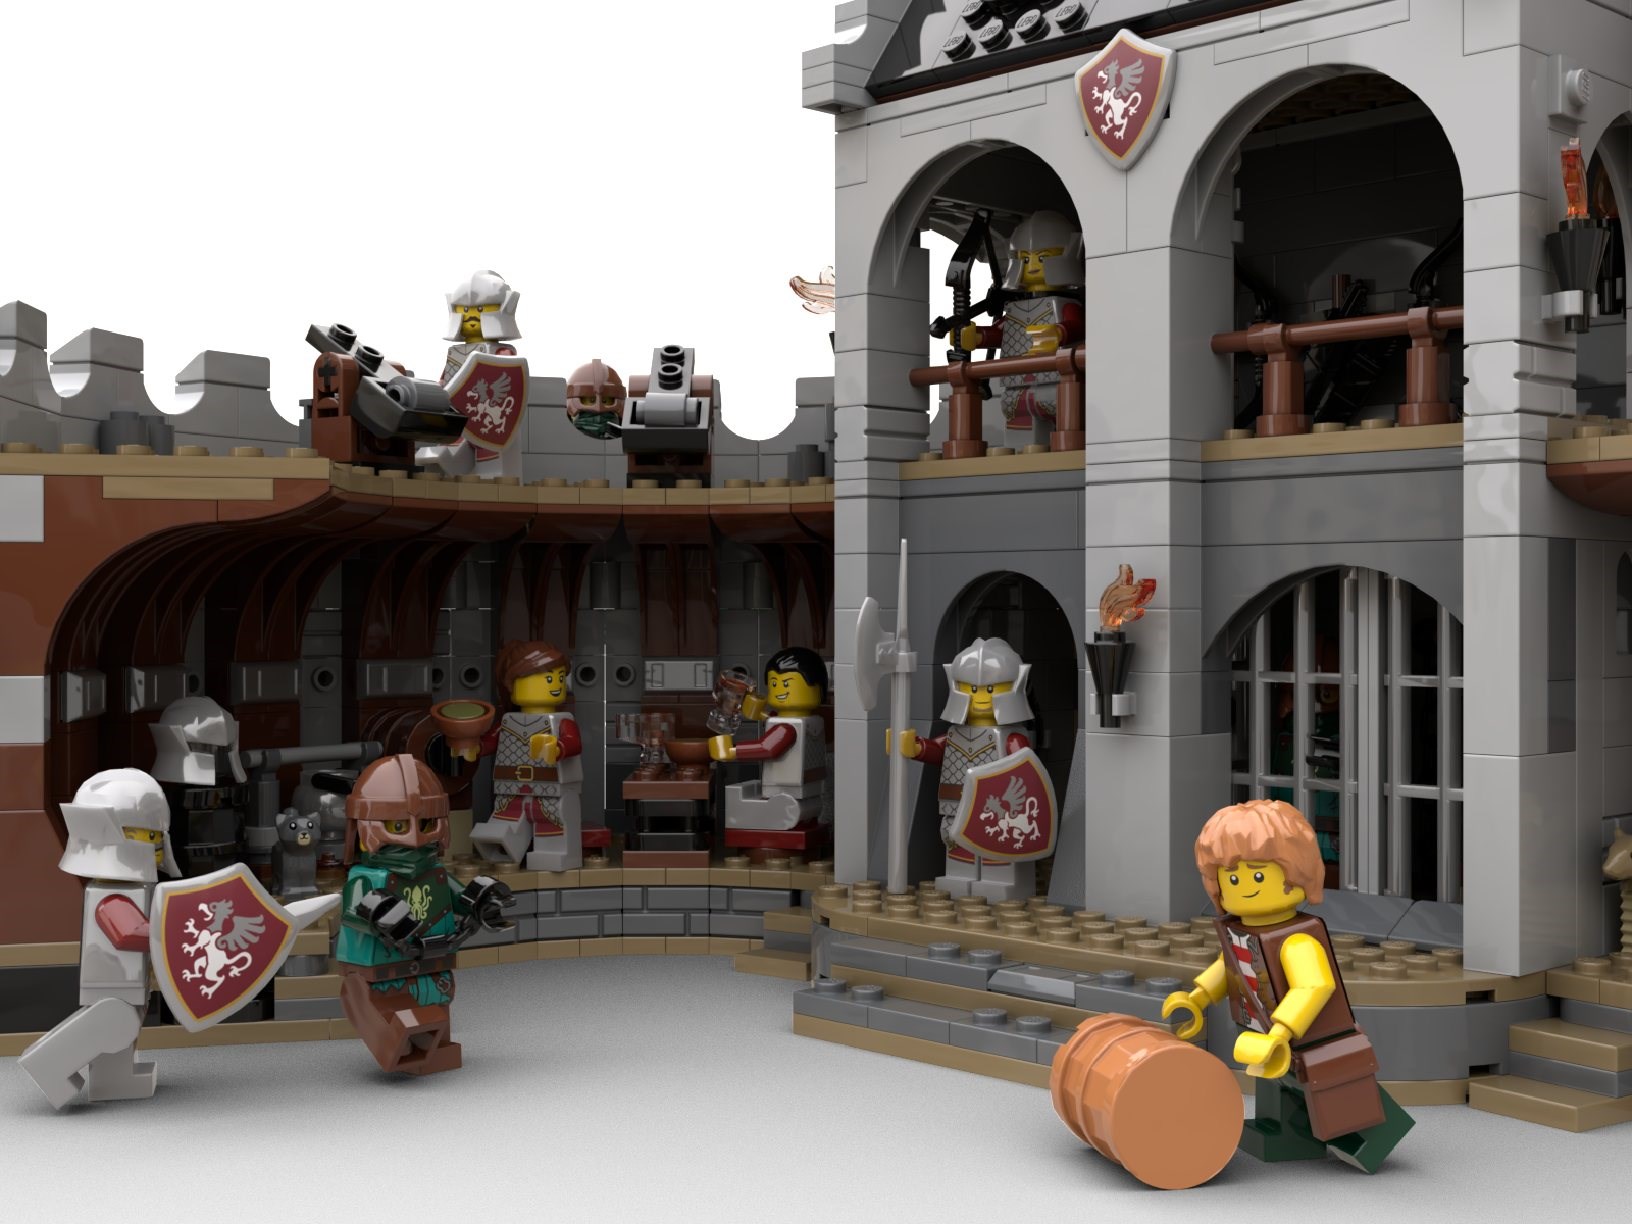
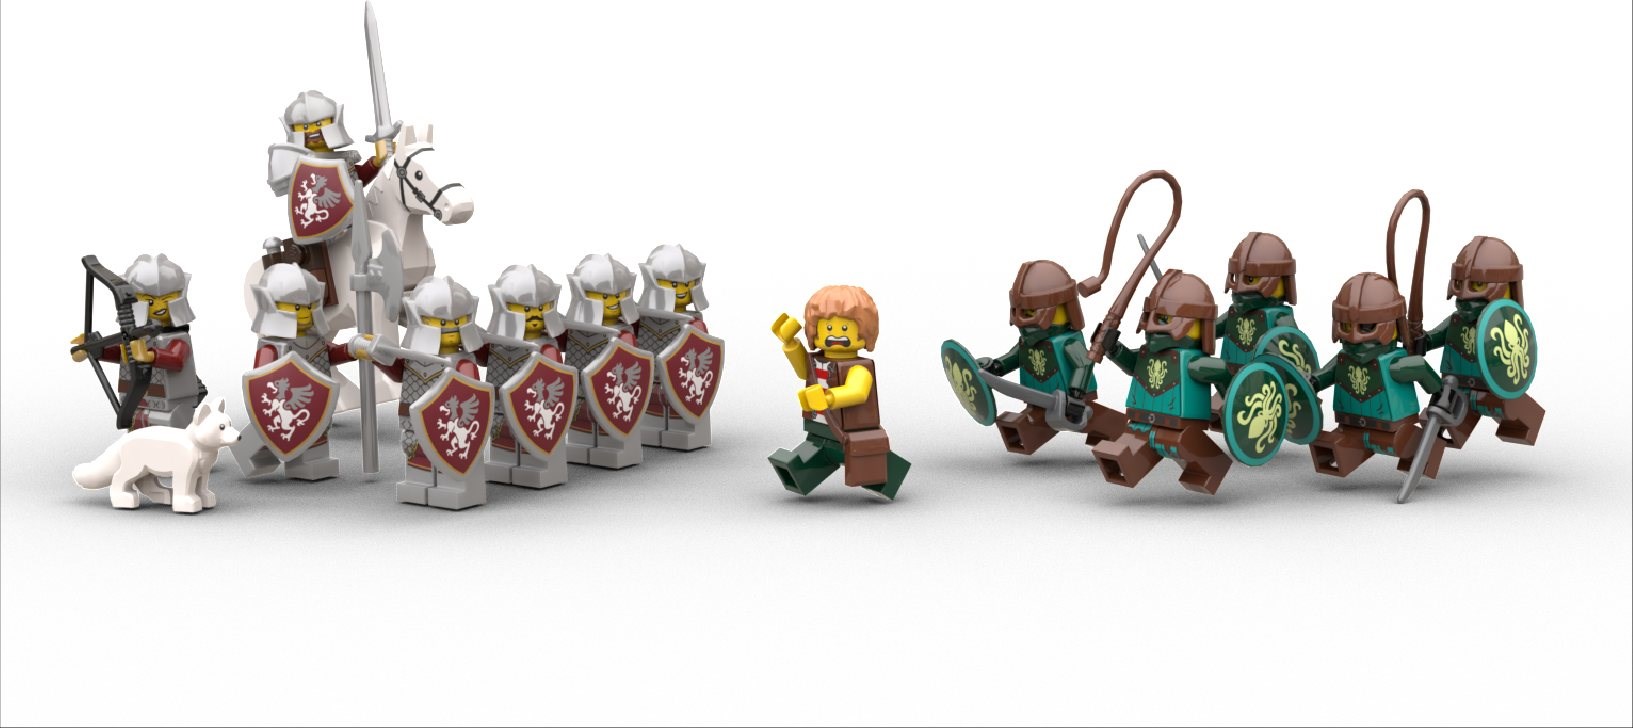
Our series of articles about BrickLink Designer Program 9 submissions continues with this one by Nate, aka @BrickDesignerNate, about his project Mistguard Castle.
I am a big fan of the Lego Castle theme and this round of the BrickLink Designer Program offered a unique opportunity to design a castle for a new faction. Whether it’s the Griffin Knights, Kraken Warriors, or the Serpent Knights, these factions have at most a color scheme and general vibe to base their lore off of. The imagination can run wild from there!
Mistguard Castle is my interpretation of a Griffin Knight stronghold. Since the Kraken Warriors were paired with them in 21358 Minifigure Vending Machine, I added them to my model in the form of a raiding party to help build the scene and round out the set. My vision of the Griffin knights is that they are a well-ordered faction with routine stronghold maintenance and training regiments. The Krakens strike me as a more chaotic group that is willing to take on a big fish for the big payout even if it’s risky.
The Inspiration
Castles have always fascinated me. During my years living abroad, I visited every castle I could. The history, the might, and the grandeur within their walls captivated me. It was difficult for me to walk the grounds of a castle and not imagine the guards whose ancient footsteps I followed along.
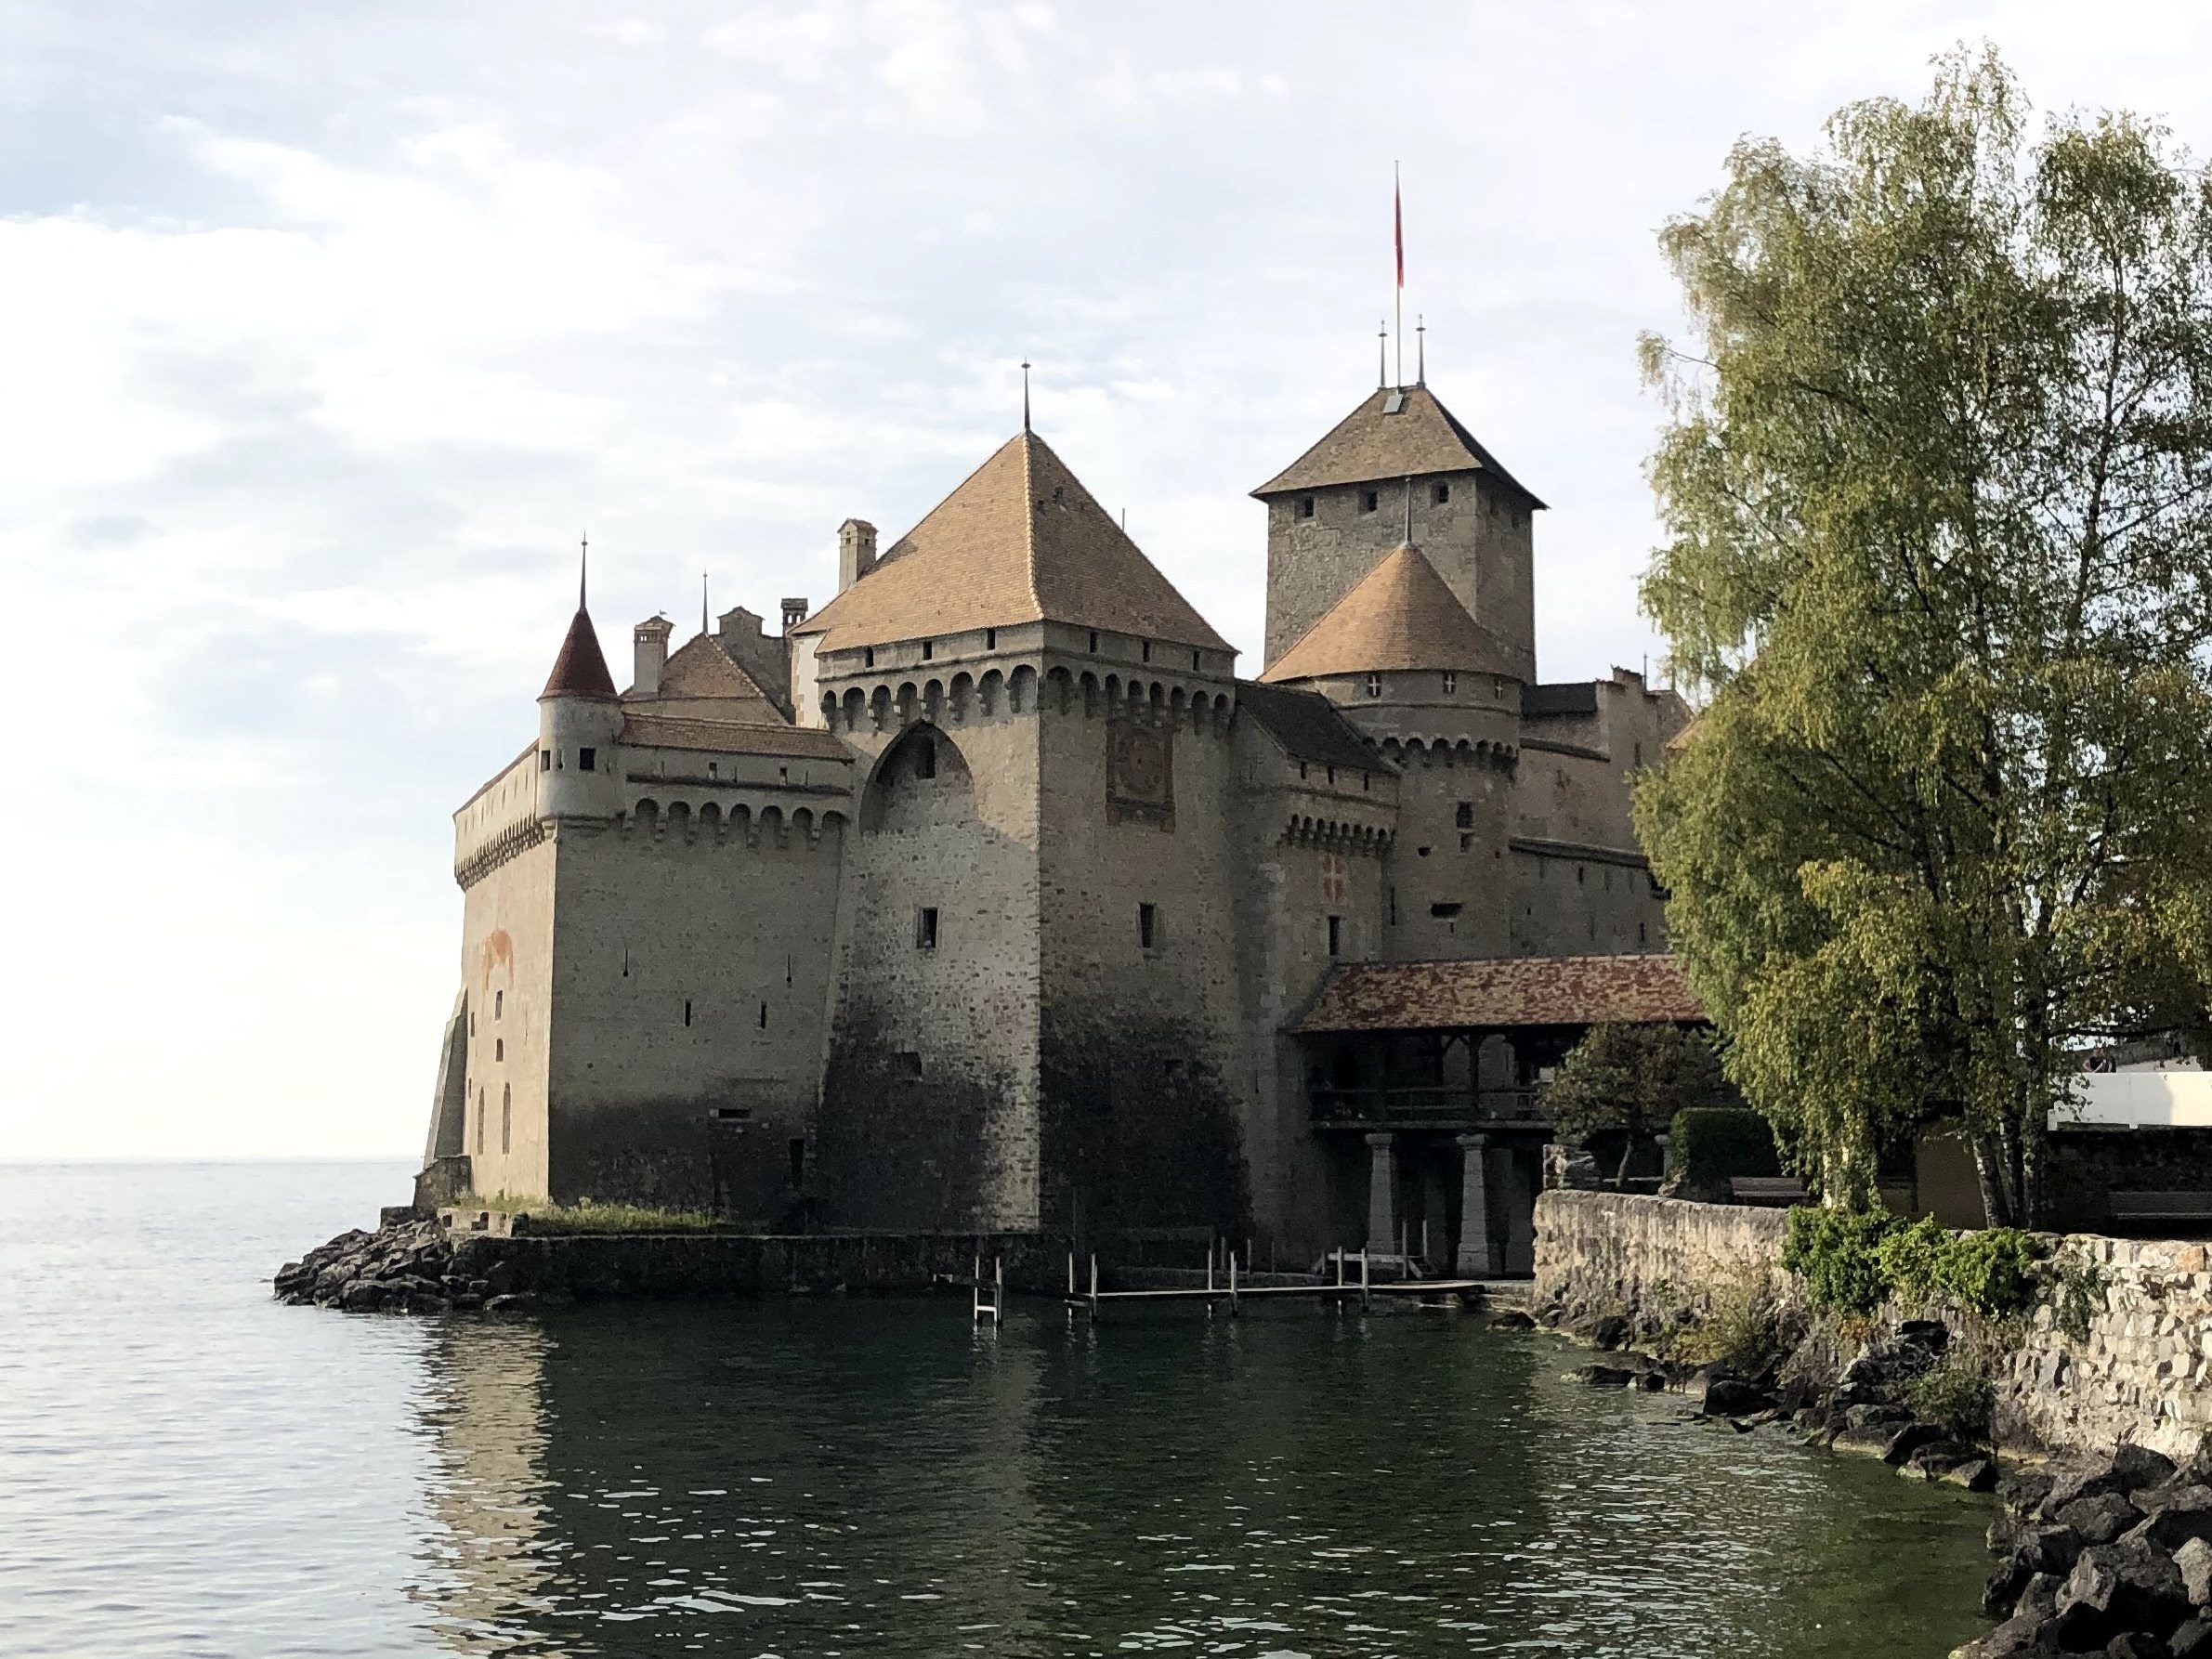
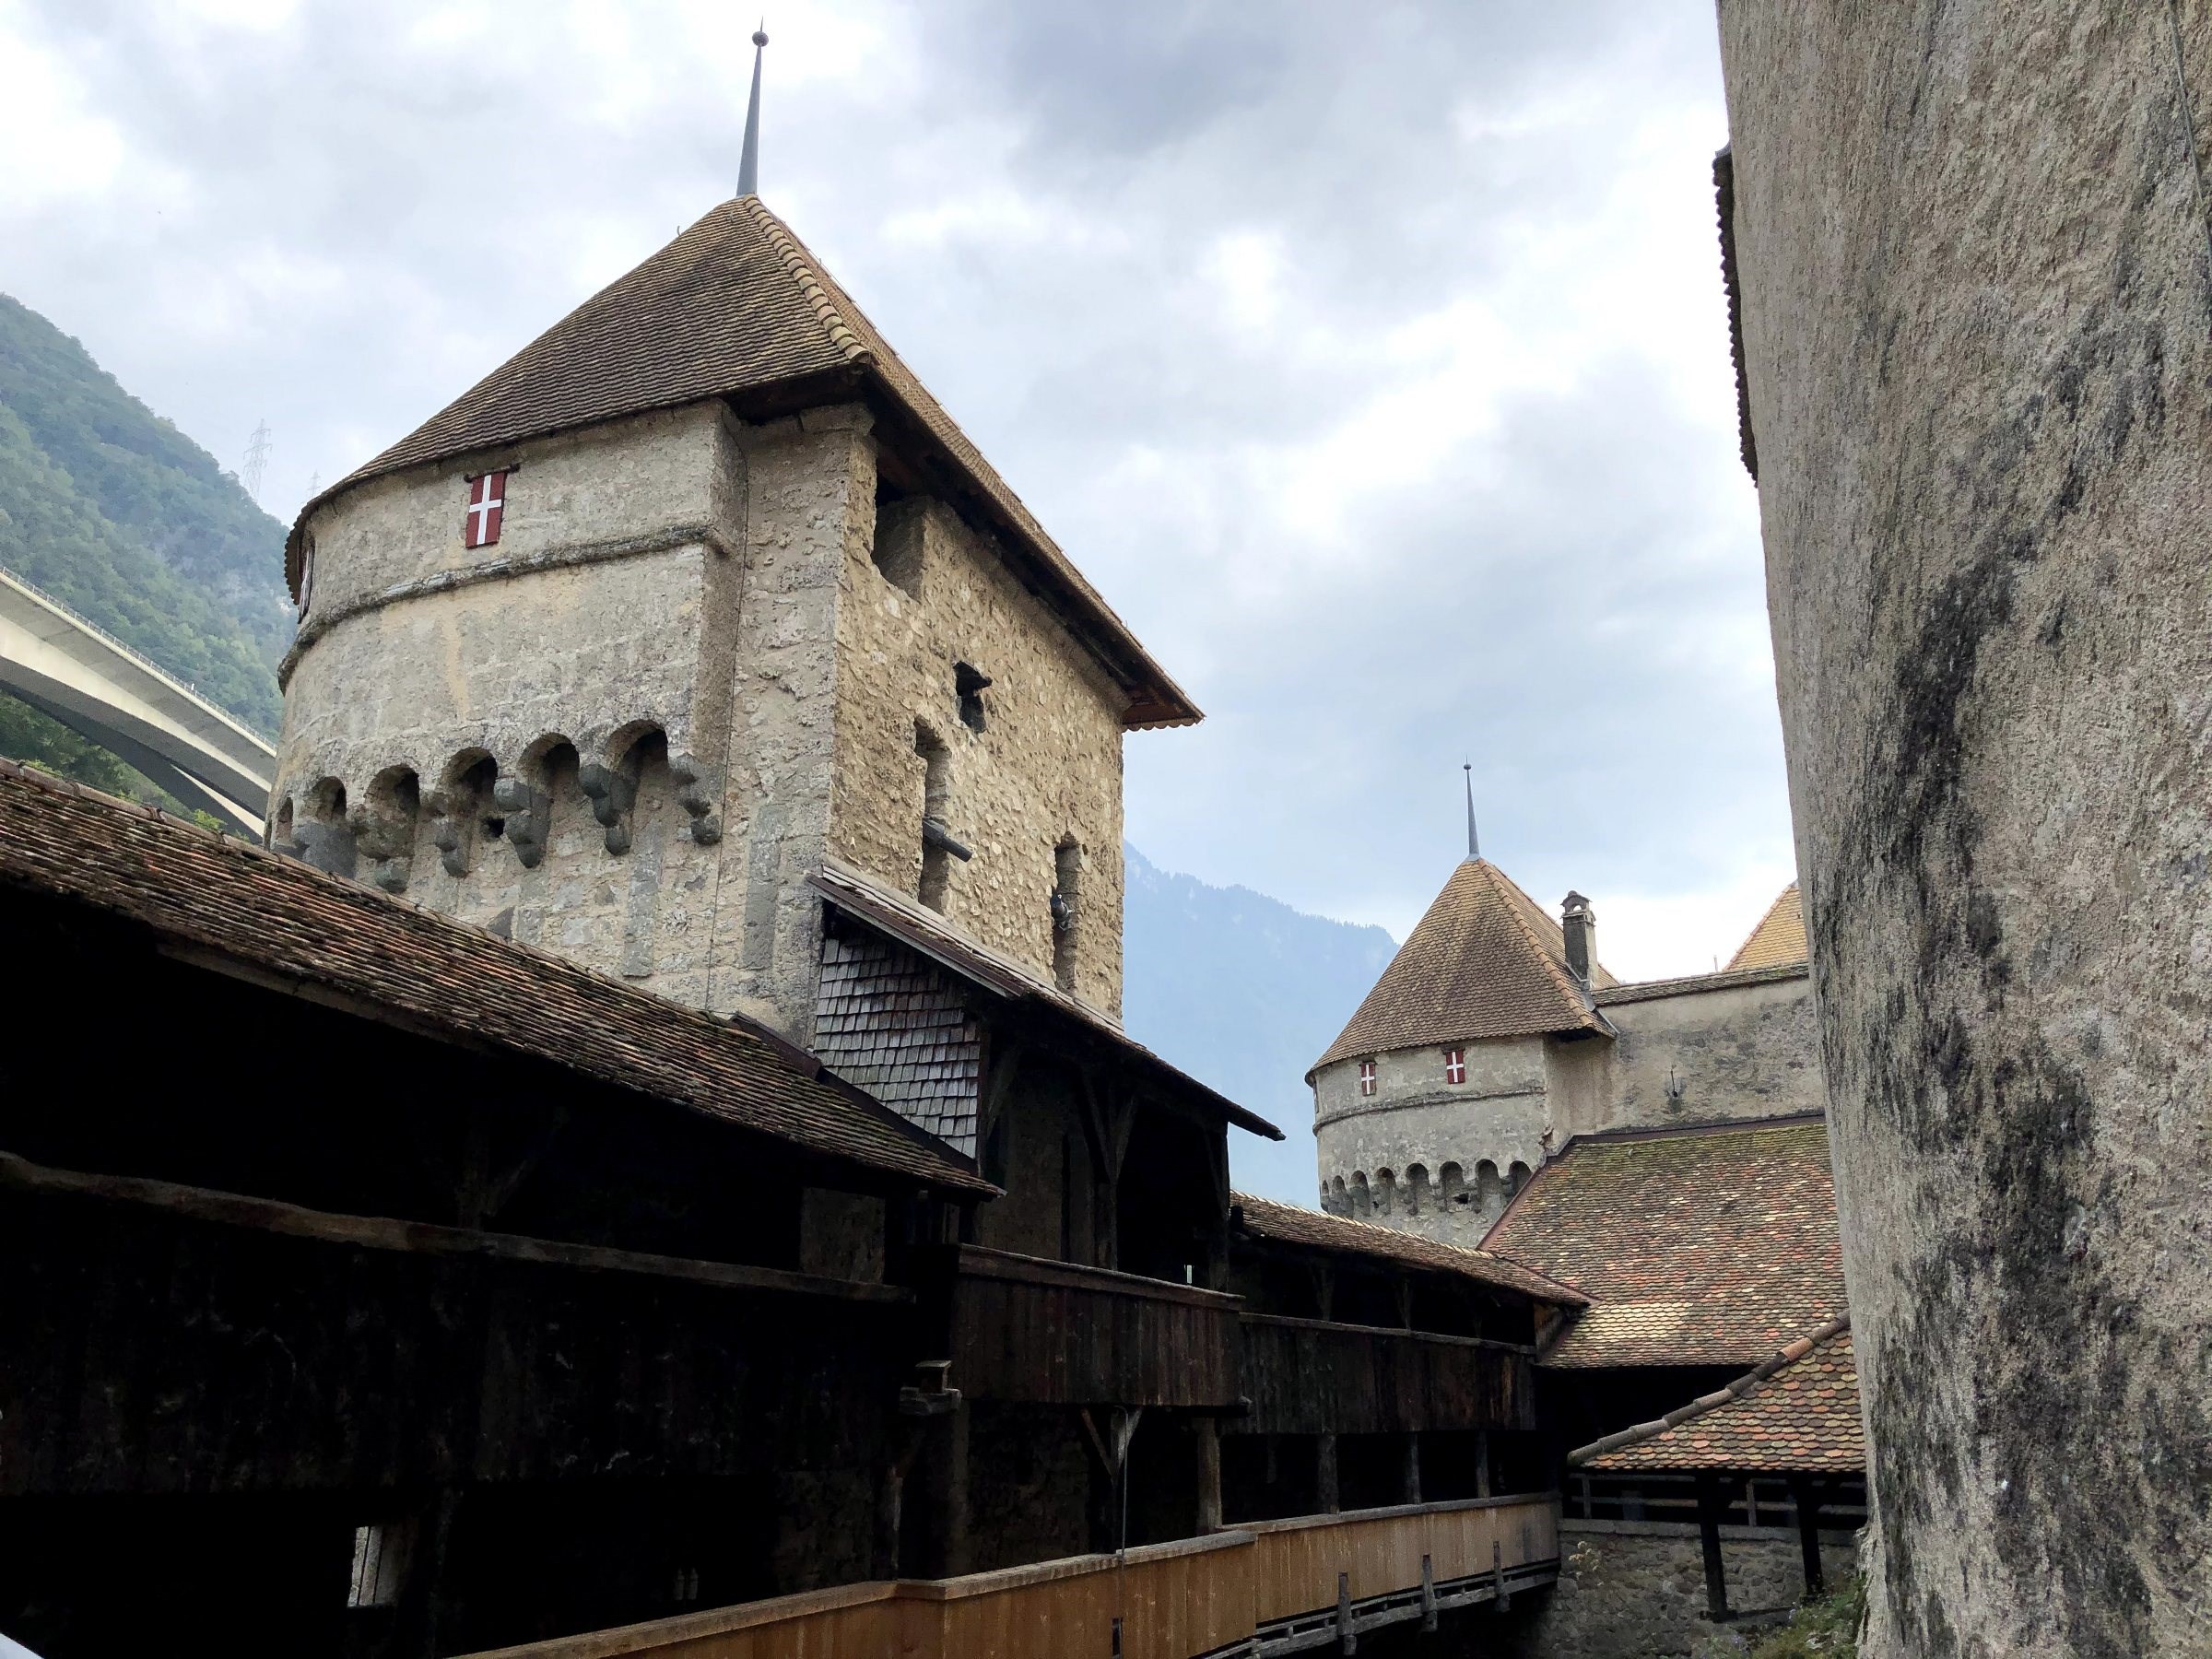
I pulled the most inspiration for my build from Chateau de Chillon or Chillon Castle in Switzerland. This castle on the water is an incredible fortress. Getting to see its defences, dungeon, and courtyard first hand placed it as one of my personal favourites. Its roofs, its covered walkways, and its gradual slope of its towers were all great looking details that I wanted to incorporate into my model.
Building the Model
My number one goal was to make a breathtaking debut castle for the Griffin Knights the LEGO fans would love. I had lots of ideas but the ones that stood out as imperative were a castle on the water as to tie in the Kraken Warriors’ ship. I also needed to make sure there was adequate height differentiation between my buildings to give the model depth. This would be a great reason to add a lighthouse. I wanted the model to have different buildings that the walls would connect to each other. These buildings would need to look different enough from each other to give them character but also maintain a cohesive look overall.
I really wanted to find a way to incorporate curved walls when I was making the layout of the model. I was able to make this happen with a combination of wedge plates and hinge bricks. An unplanned benefit of this technique is that it allows for the enclosed castle to be opened and displayed in a straight wall configuration. This will be beneficial for displaying purposes. Stretched out, this model reaches 38.4 inches (97.4 cm)!
One of my good friends and LEGO mastermind suggested that “if you wanted to make this castle really hot, you should have a double portcullis because no LEGO castle has had one yet.” I agreed and appreciated the suggestion for historical accuracy. I worked the two portcullises in and attached them to two levers so that they could be dropped separately. Above the entryway, a knight can drop stones through slots in the walkway on any invaders trapped between the portcullises.
Interior details include a blacksmith, a stable, a dungeon, a treasure room, a mess hall, a bunk room, and plenty of vantage points to watch the horizon. With the set at 3,985 pieces, I was allowed 13 minifigures via the BDP guidelines. So naturally I needed to make sure there was enough space inside and things for the minifigures to do when the model is on display.
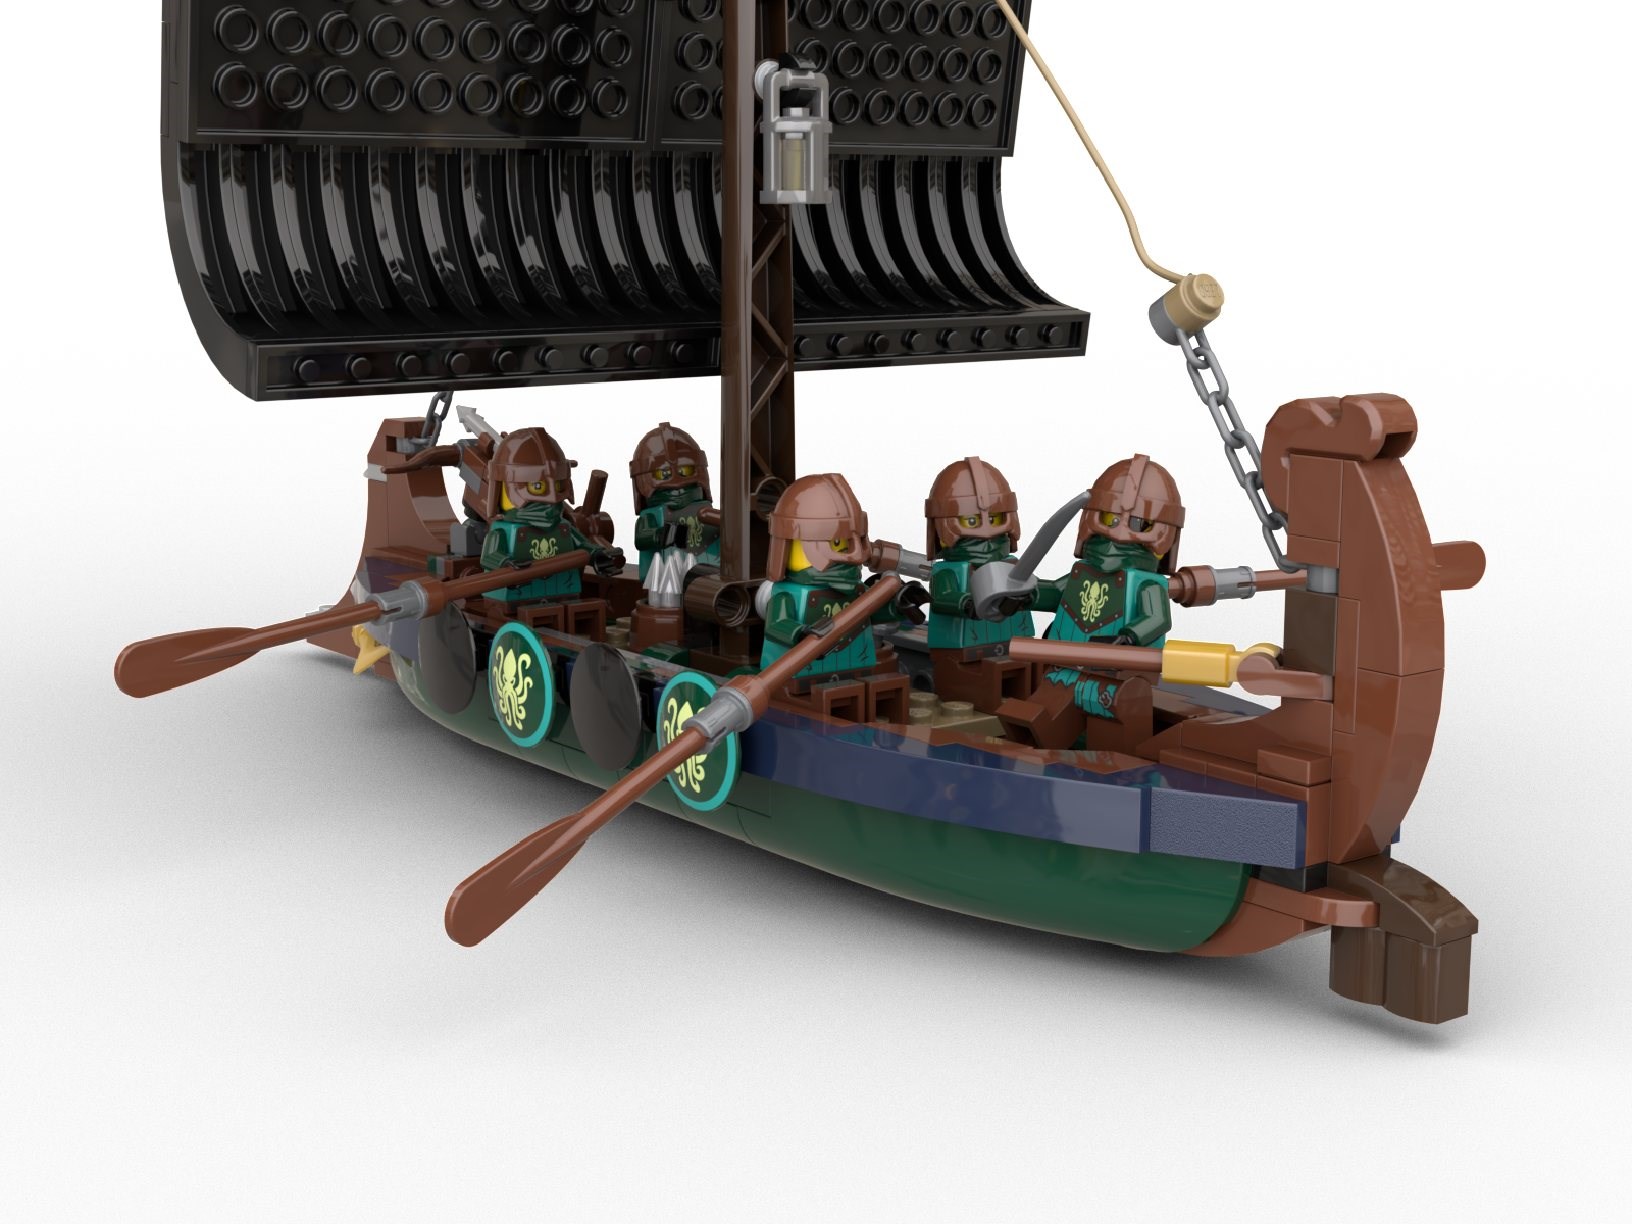
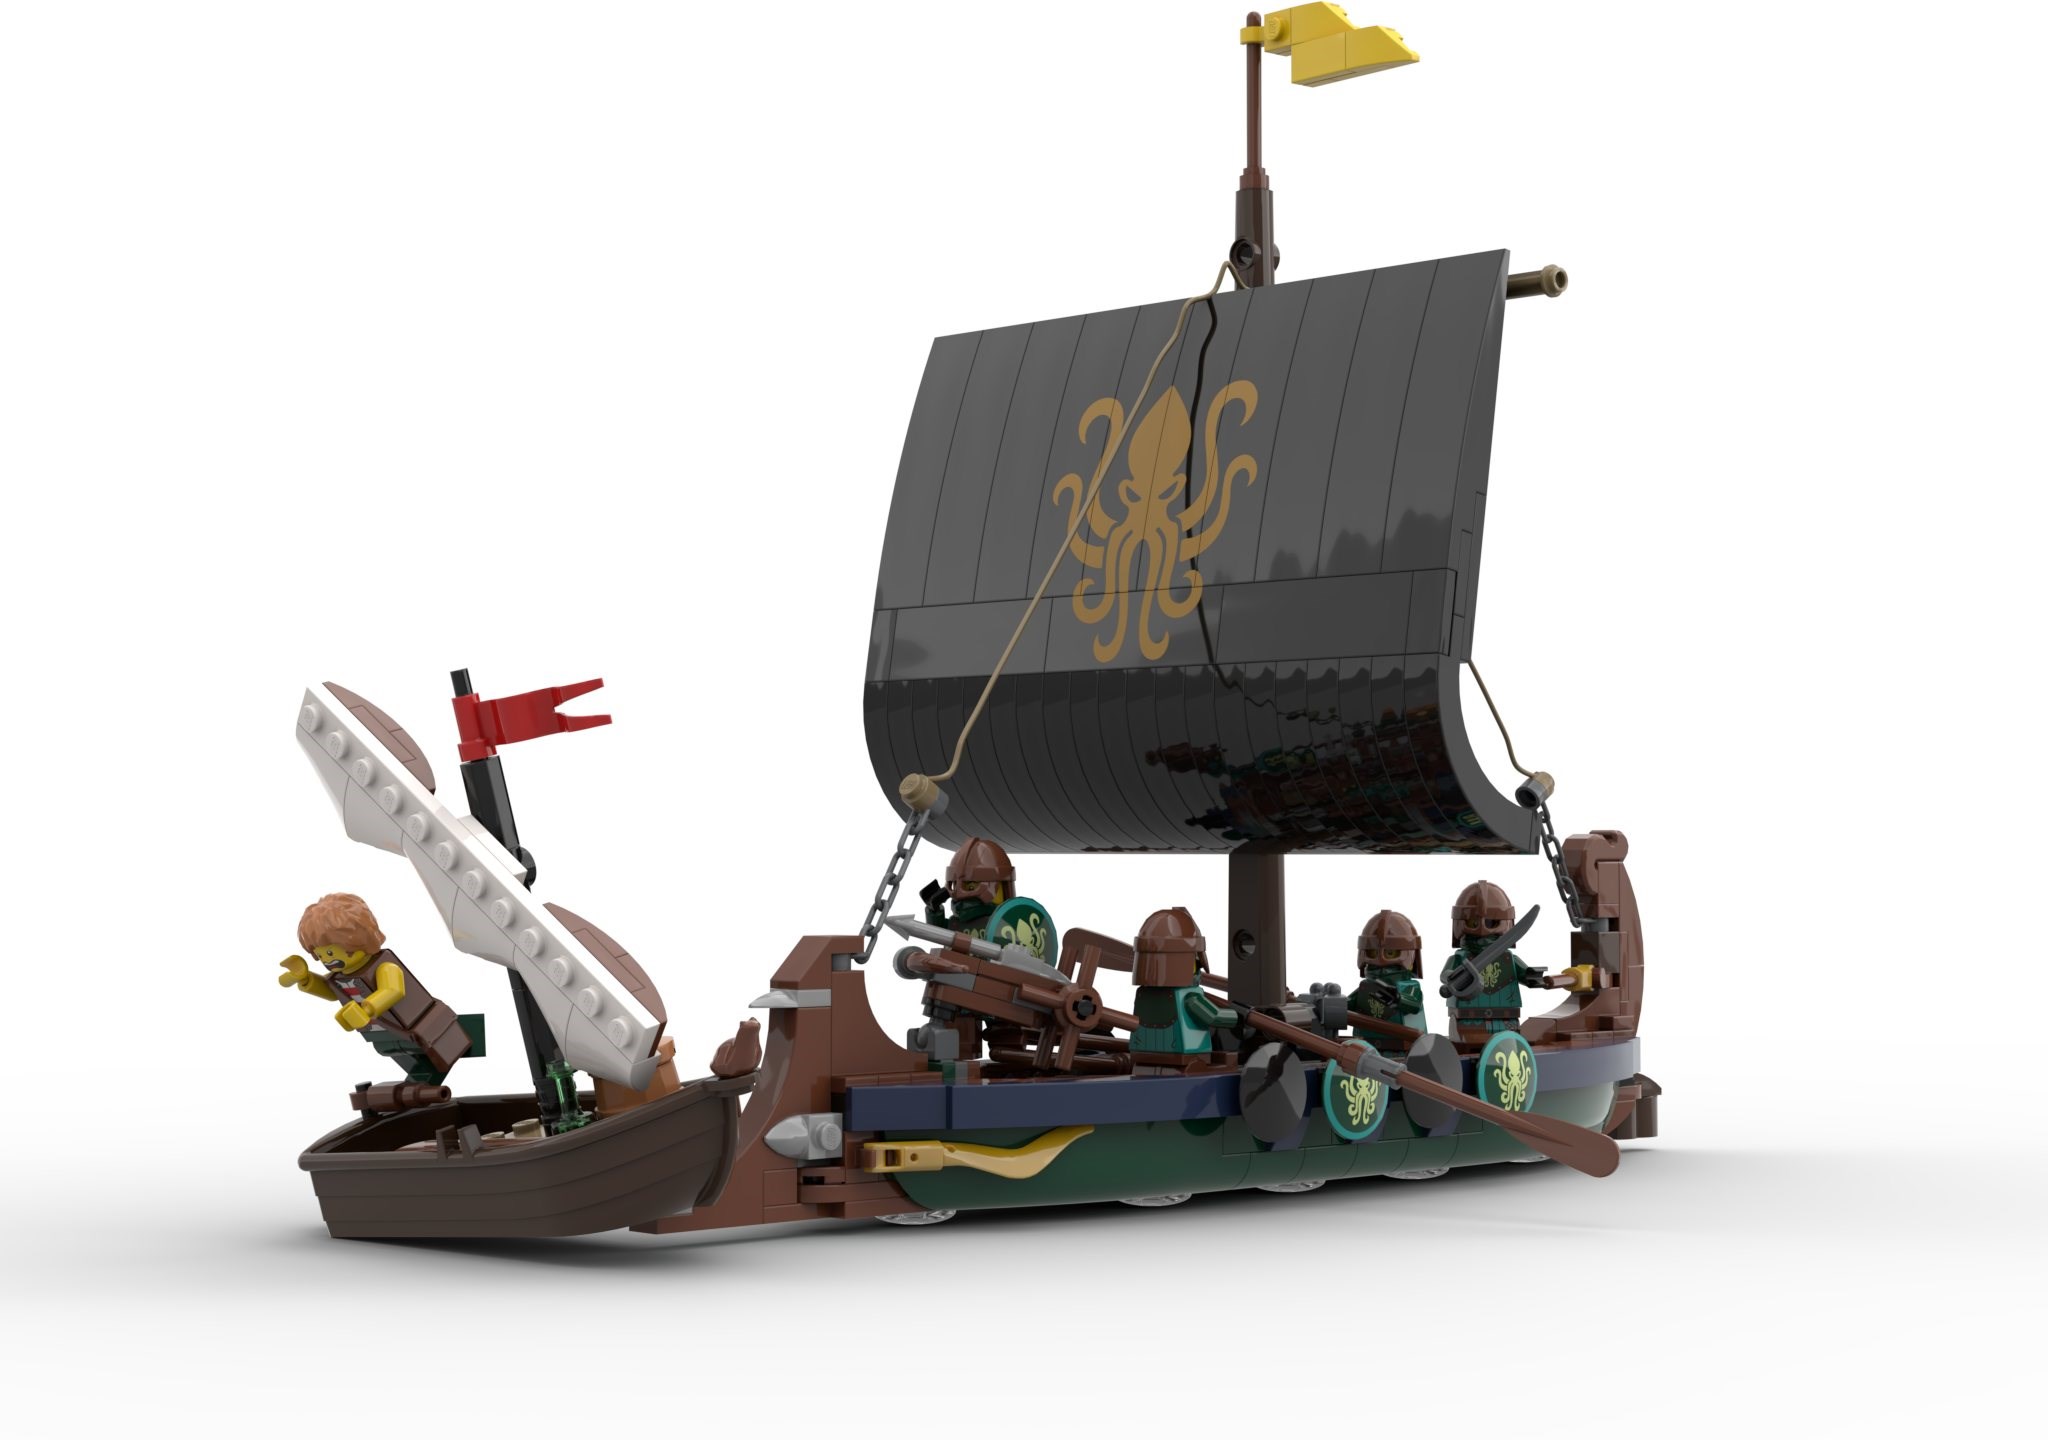
Build The Ships
I actually started my submission by designing the Kraken ship. I wanted to make sure there would be a substantial Kraken presence even though I didn’t initially know how many figures I would be including. Five felt like a sufficient amount of warriors. That way there could be four rowers and one commander of the vessel. This set the scope of my model. Meaning I would need to reach almost 3,000 pieces for the armies to be even.
The ship itself is a cross between a Roman trireme and a Viking warship. With a powerful ram in the front and ballista to sink unsuspecting merchants, I wanted their ship to make a statement that they weren’t a peaceful envoy. The Kraken emblem on a large black sail would strike fear into all, noting their mission to plunder your vessel and sink it. I built a small merchant ship to add to the story telling of the sea raiders. I was worried I would need to remove it due to my piece count being so high, but was just able to squeeze it in.
This model has been my biggest building challenge yet. I hope you can see the passion and effort to make it the best it can be! Please feel free to give me any feedback you may have or to ask questions about the model as well! I’ll keep a close eye on the comments. I’d really appreciate your support to make this a real set! Thank you.
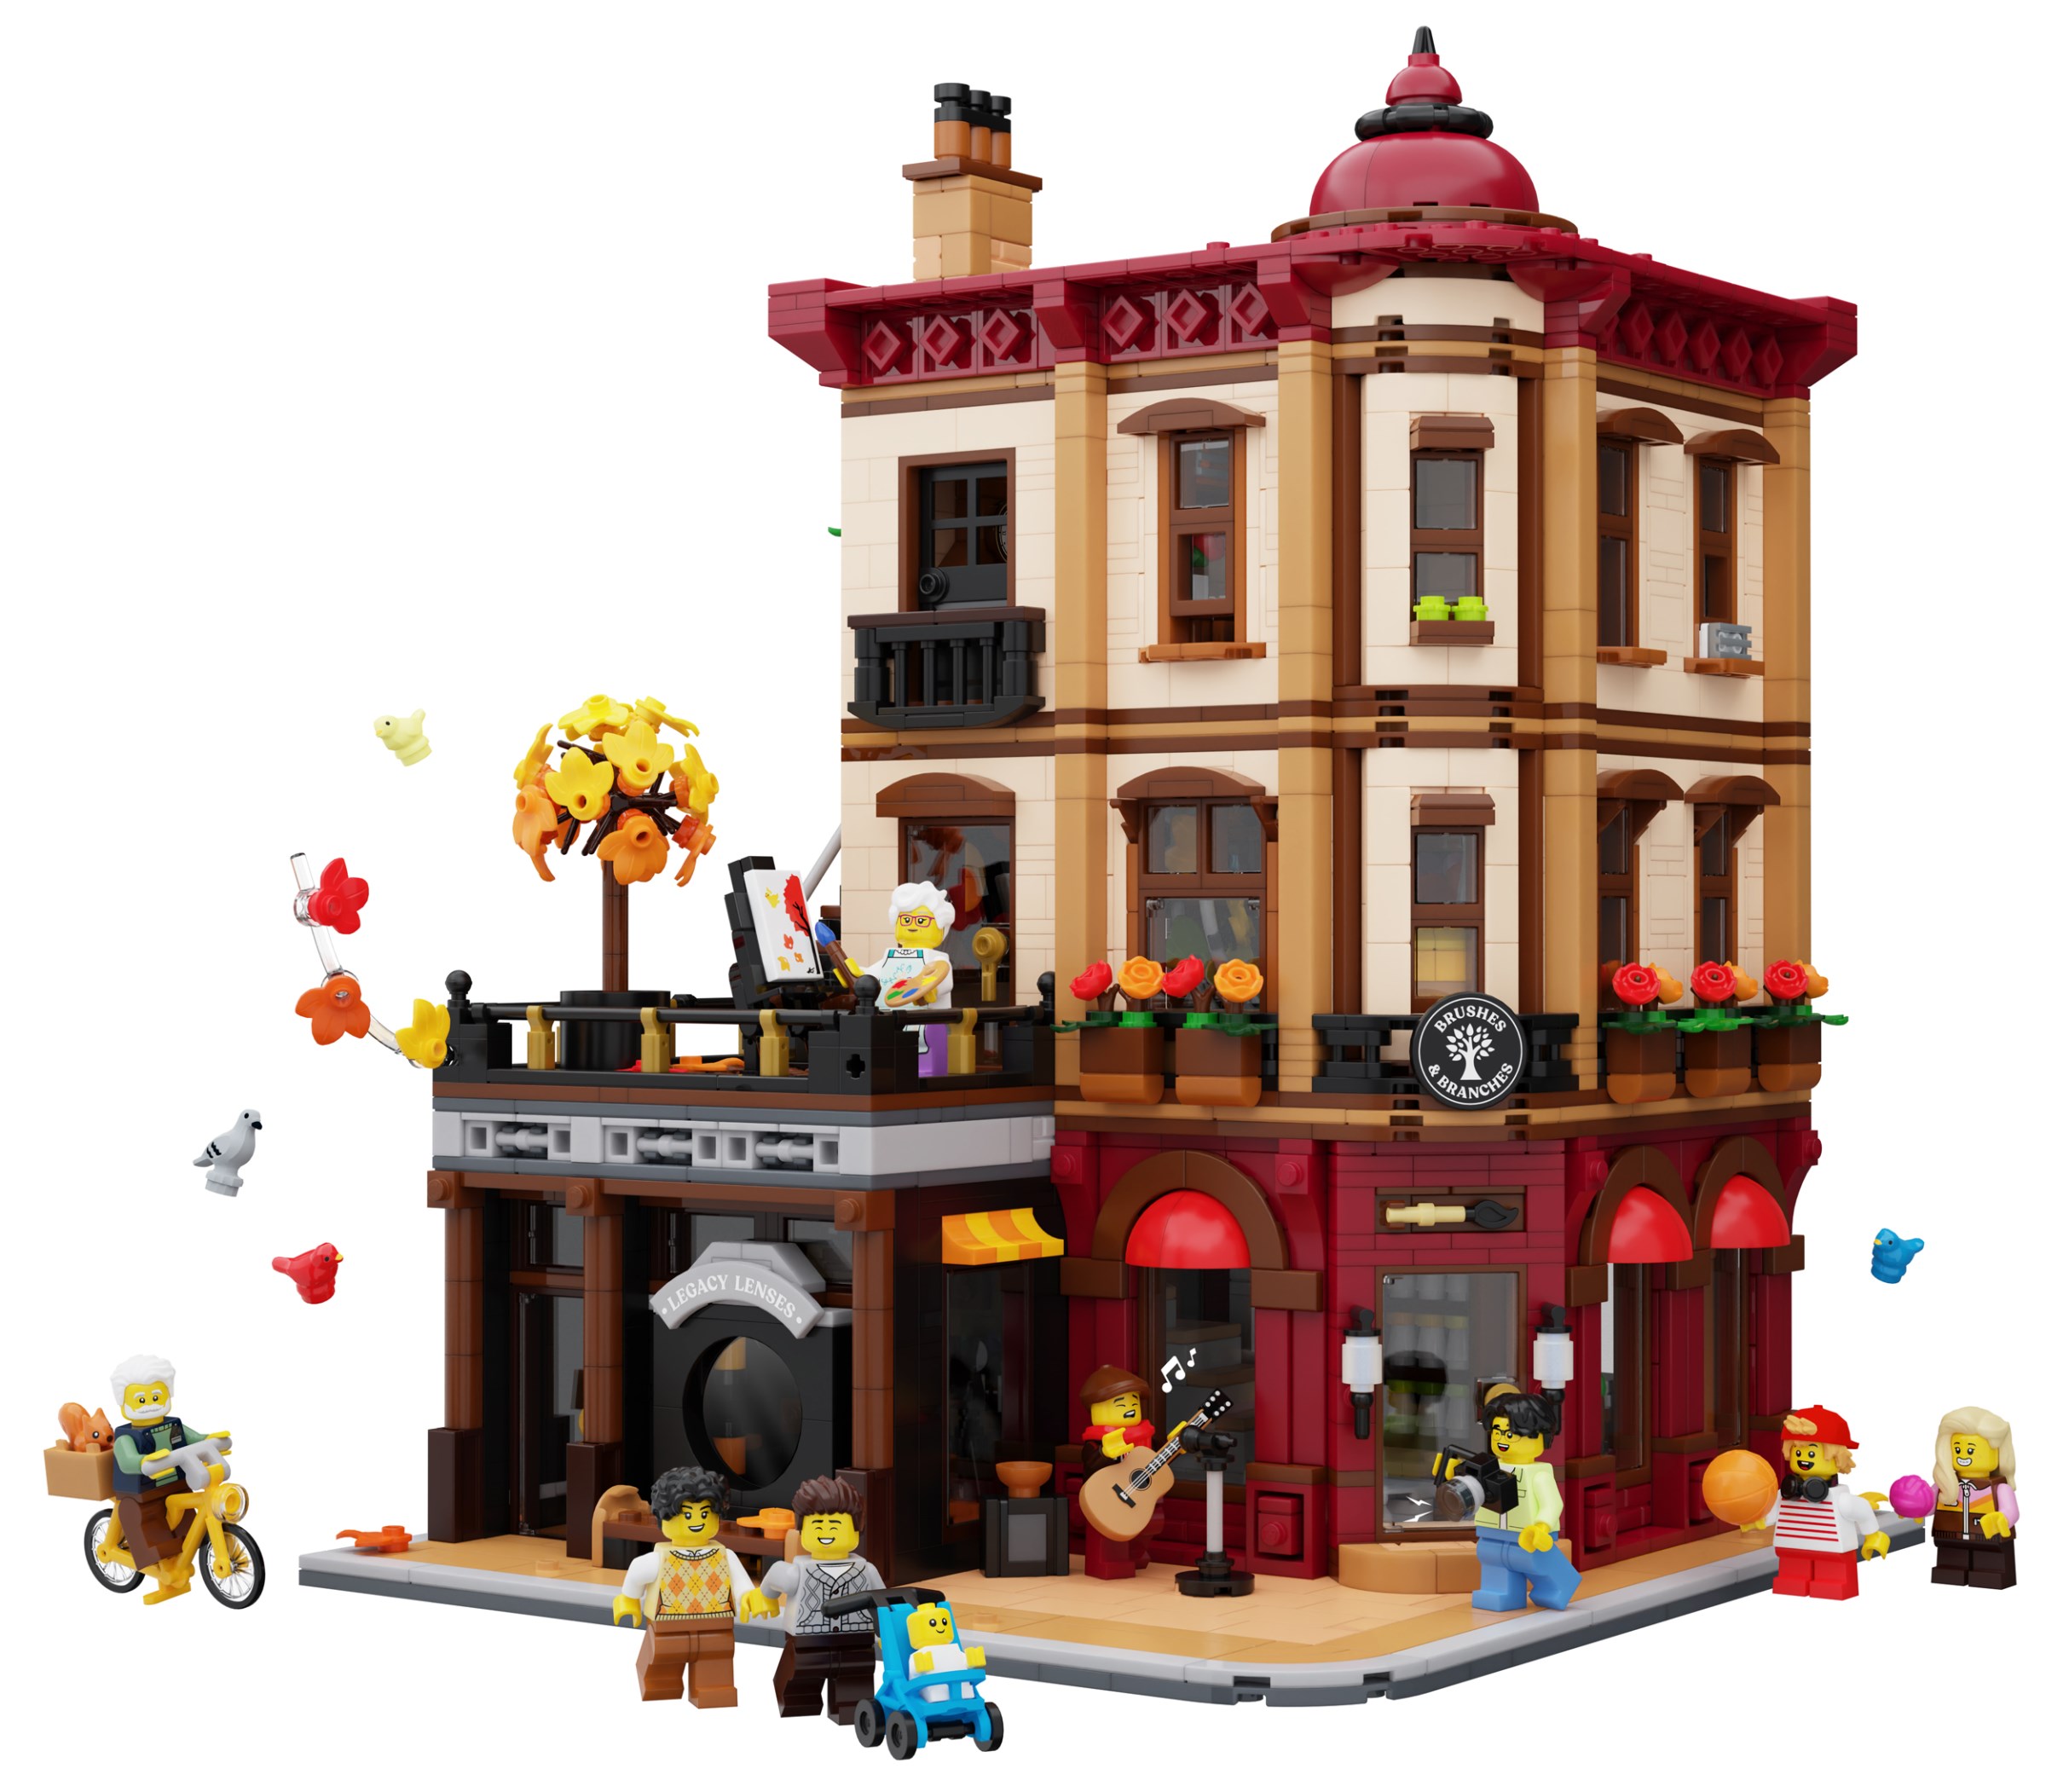
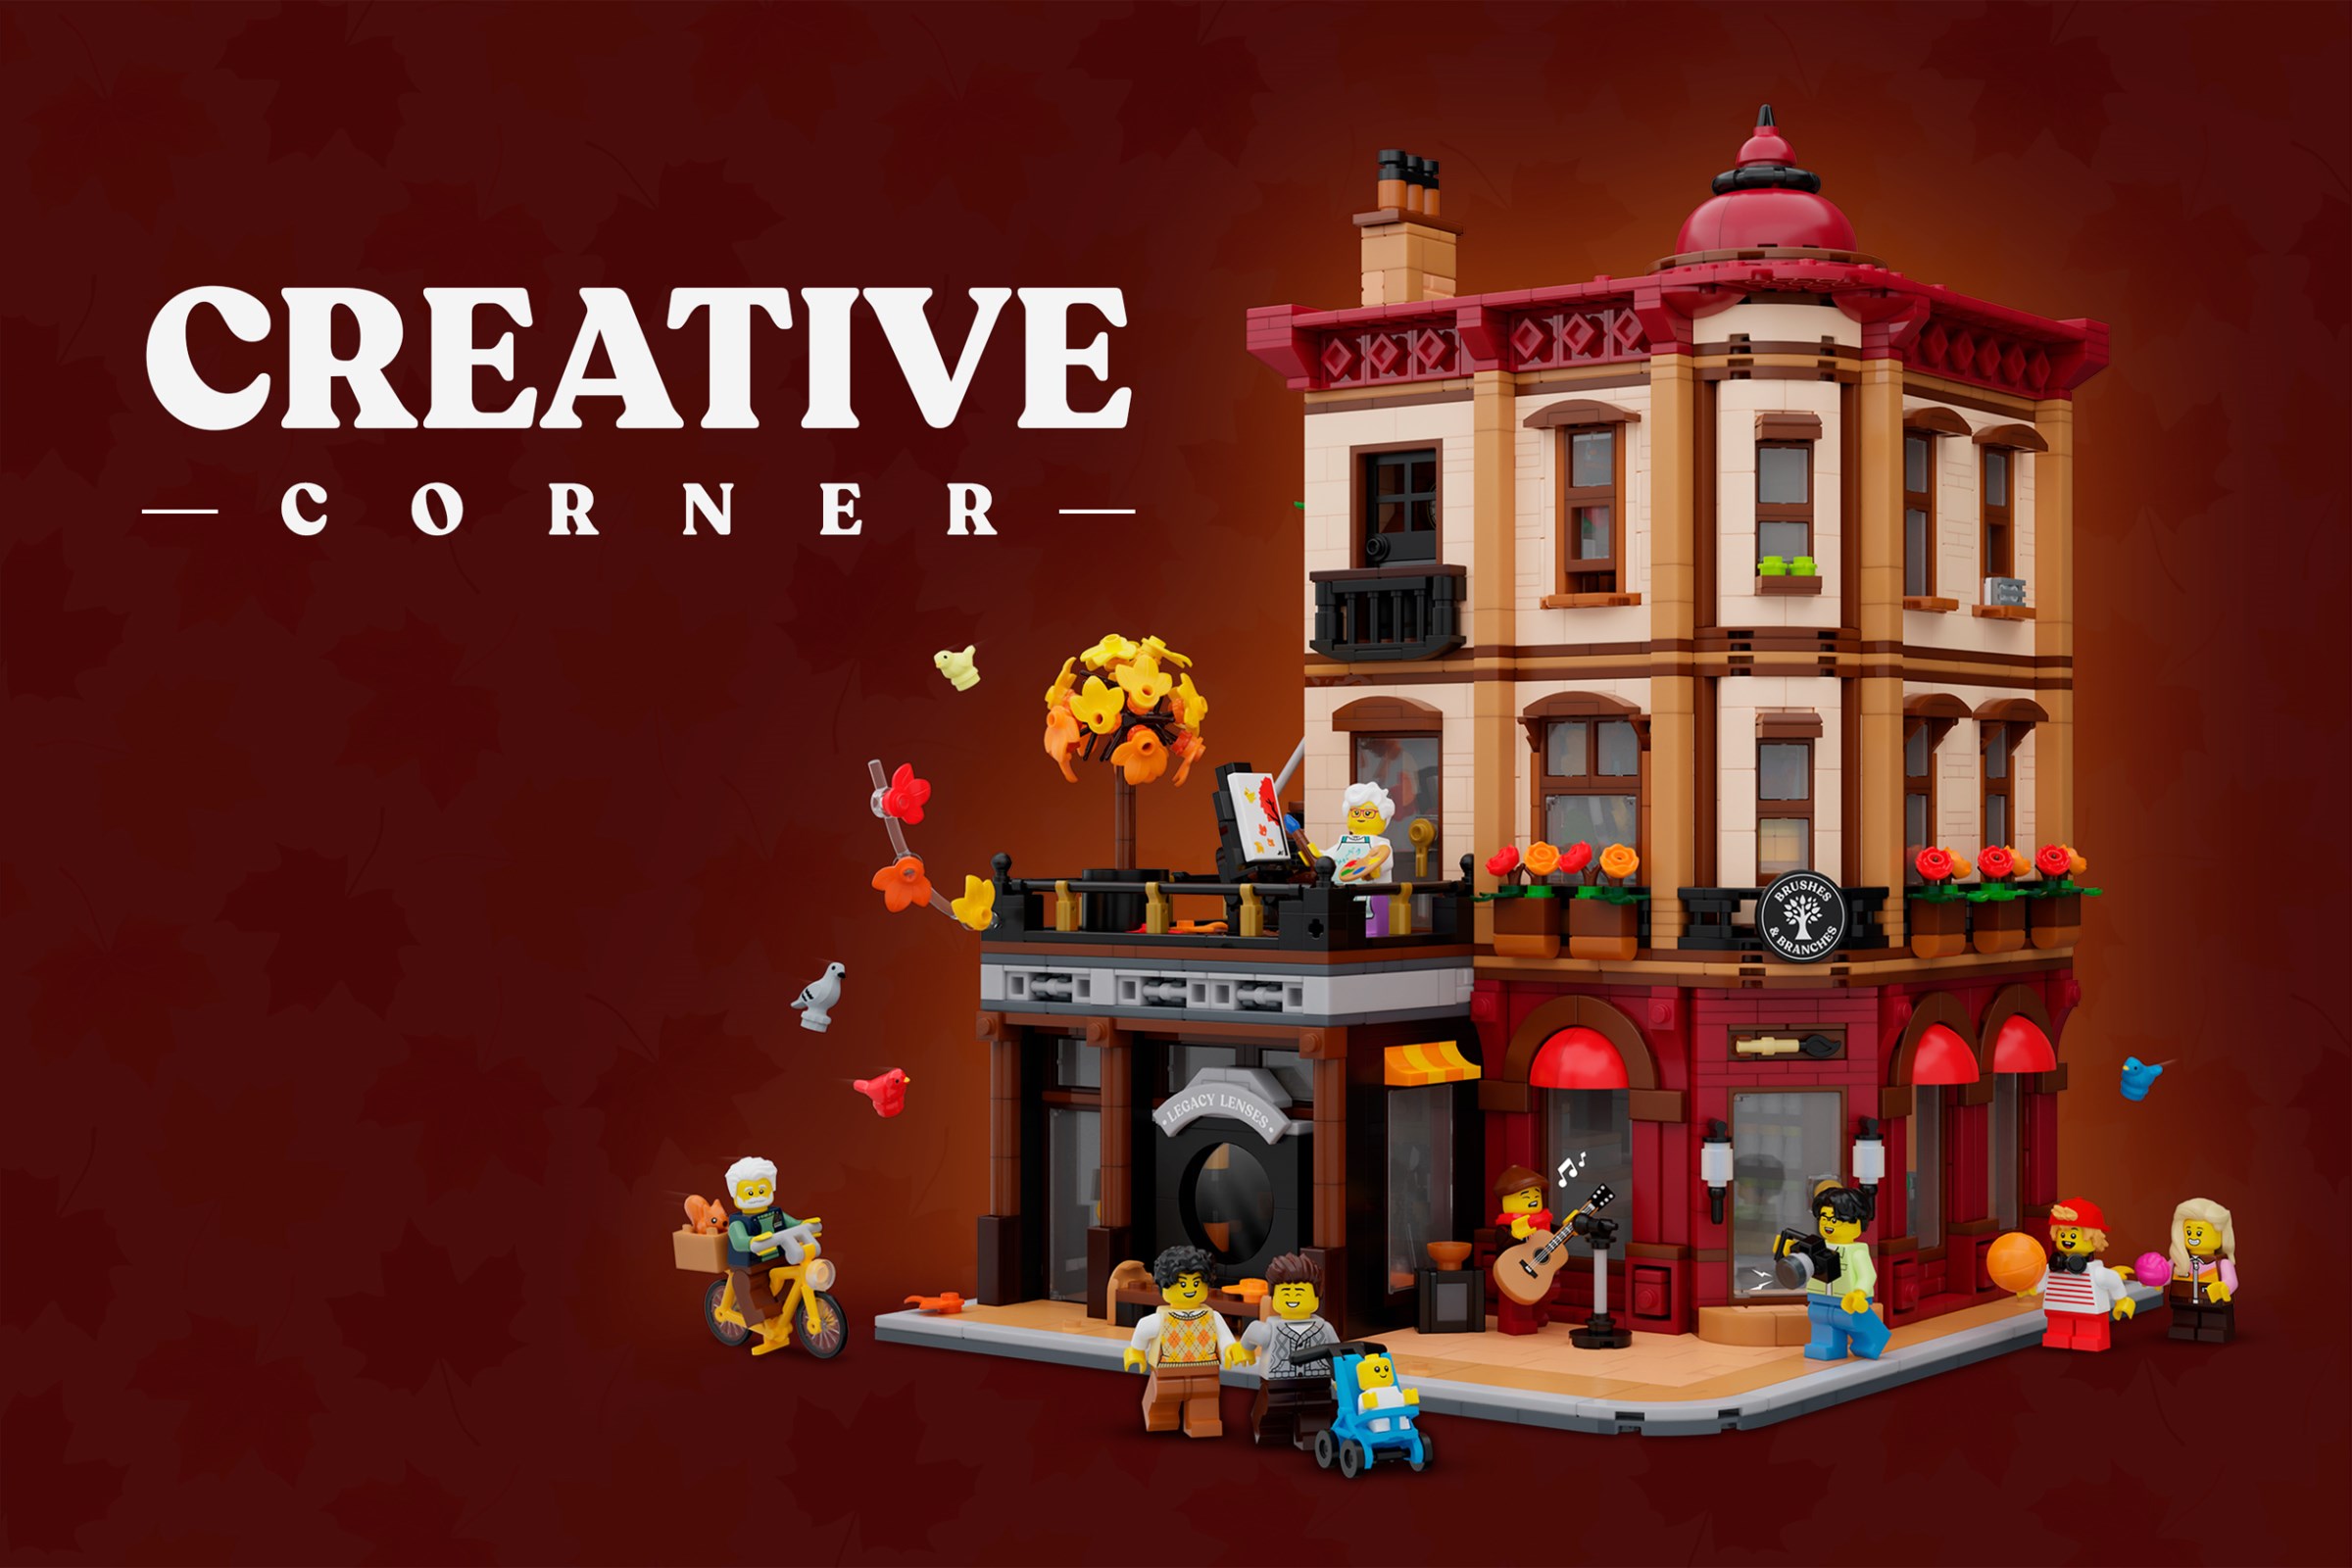
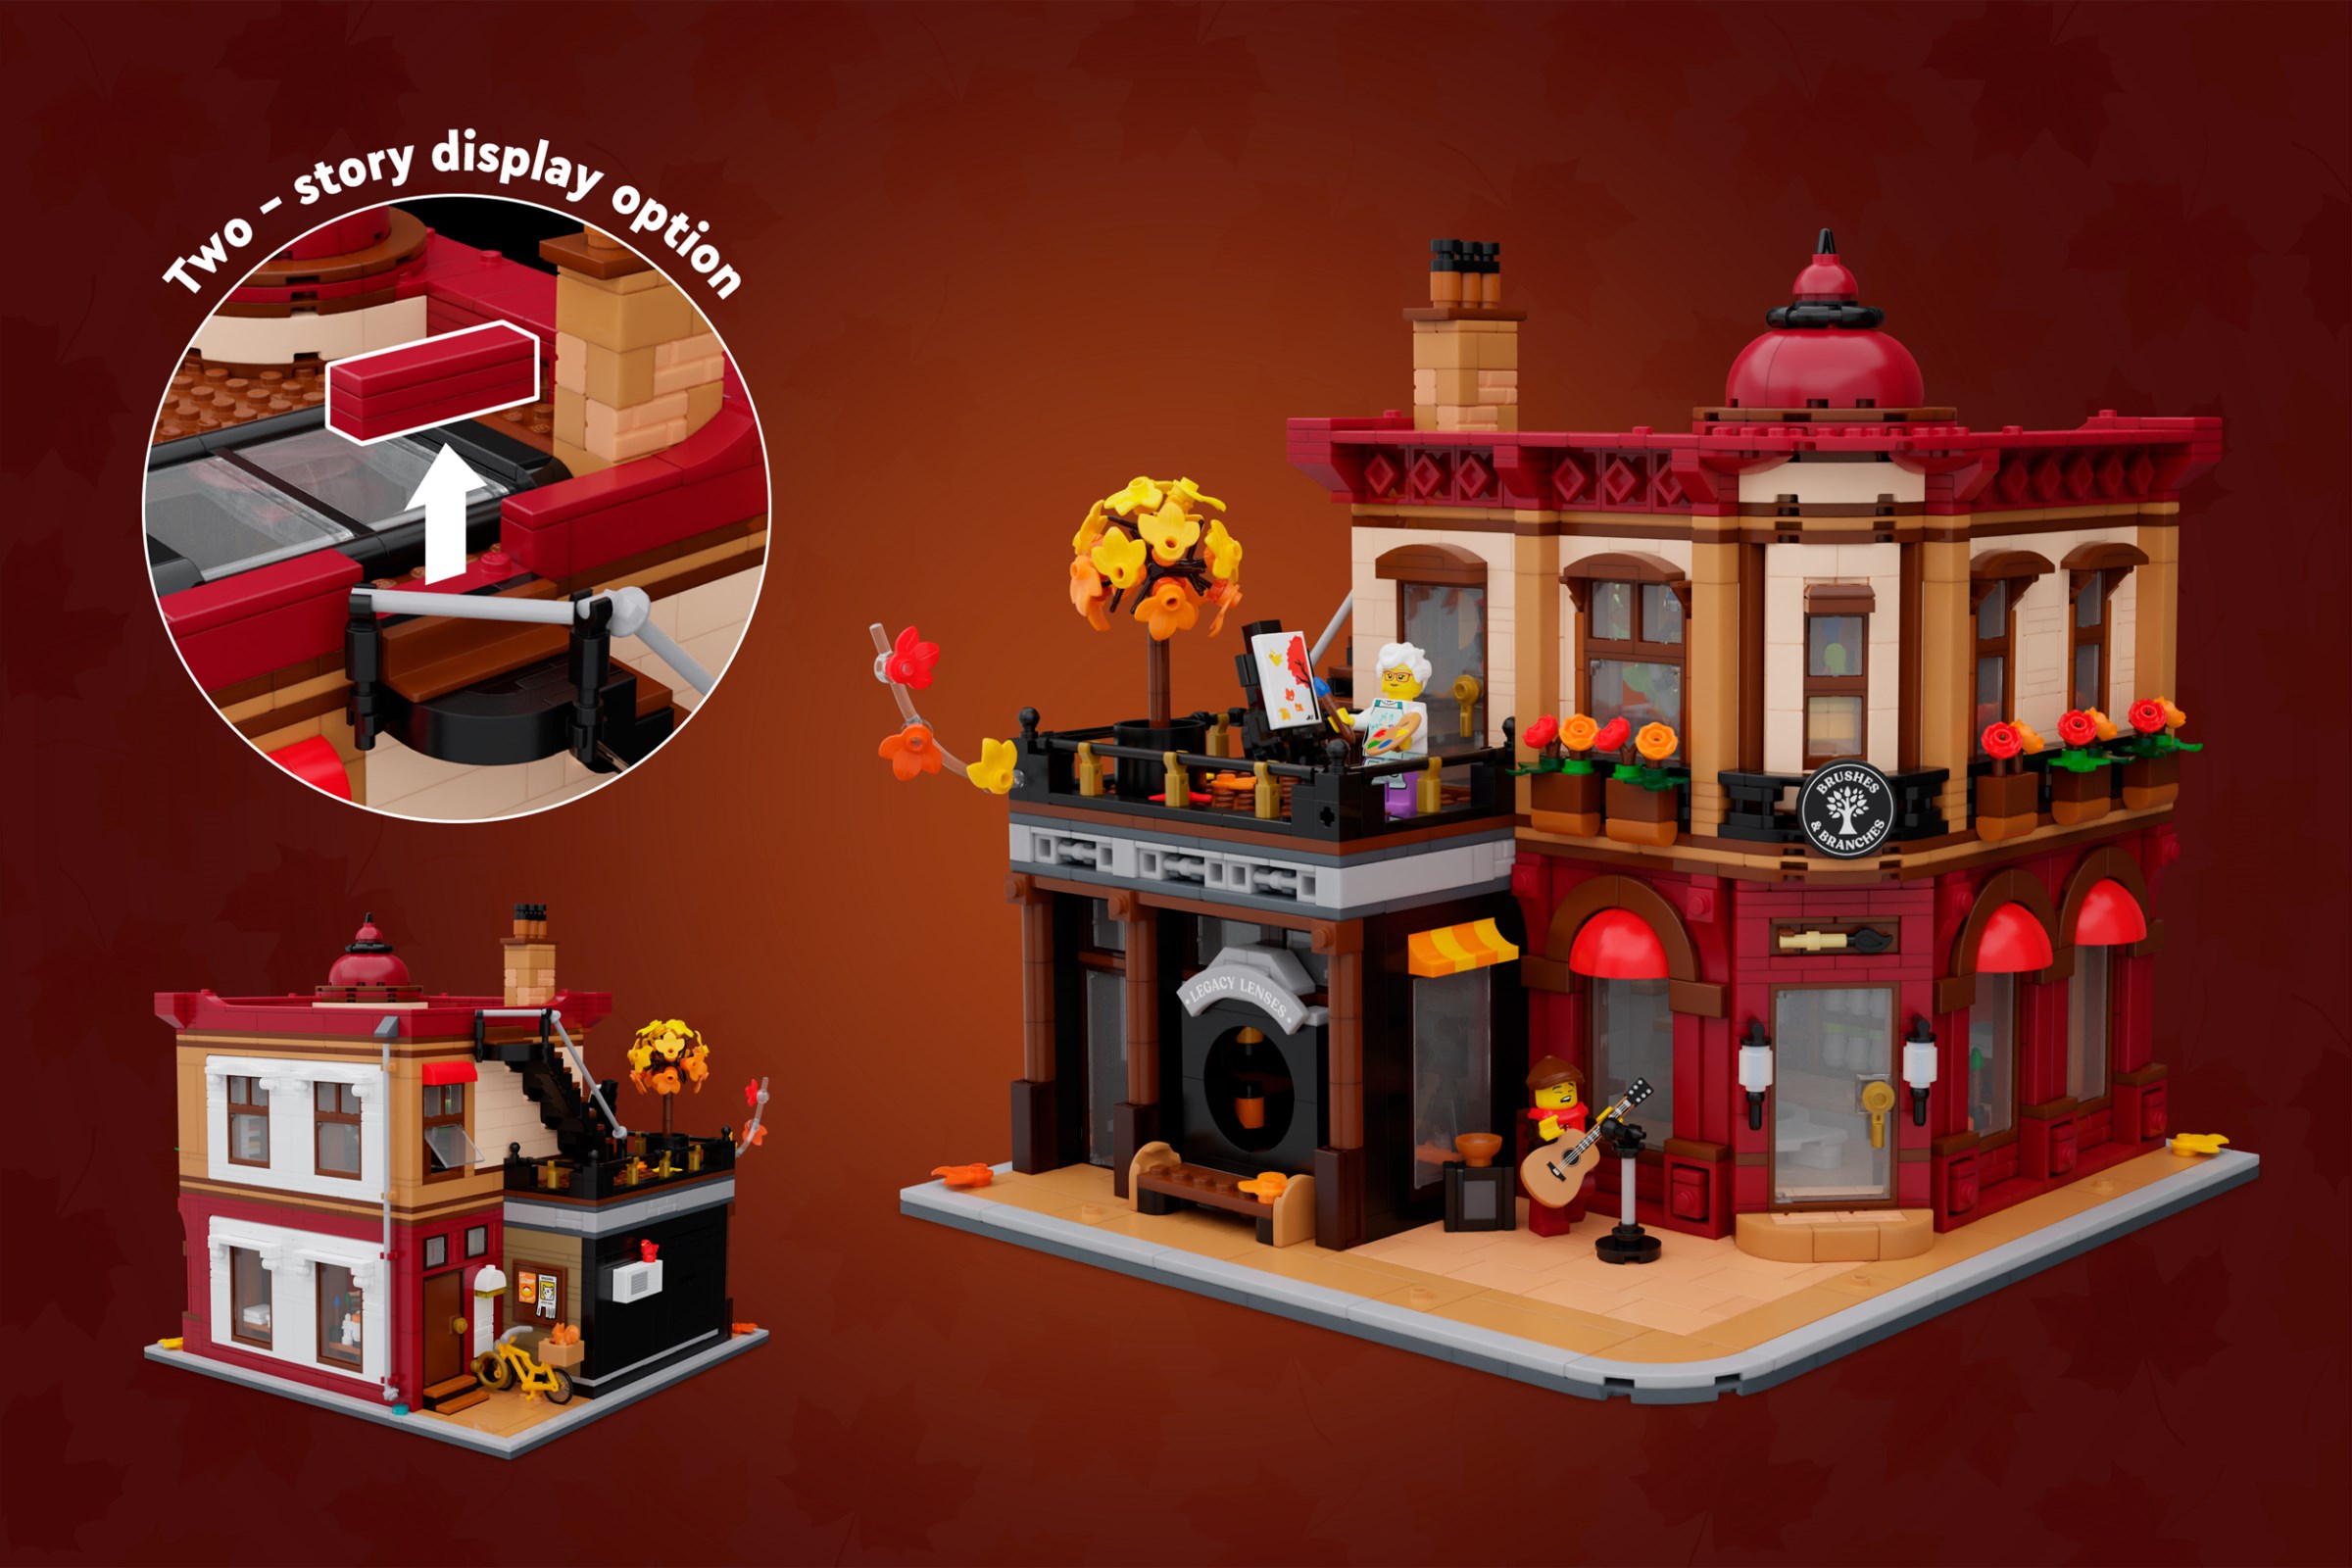
Our next article focused on a BrickLink Designer Program series 9 submission has been supplied by fourstud, discussing development of the autumnal Creative Corner:
Hi everyone!
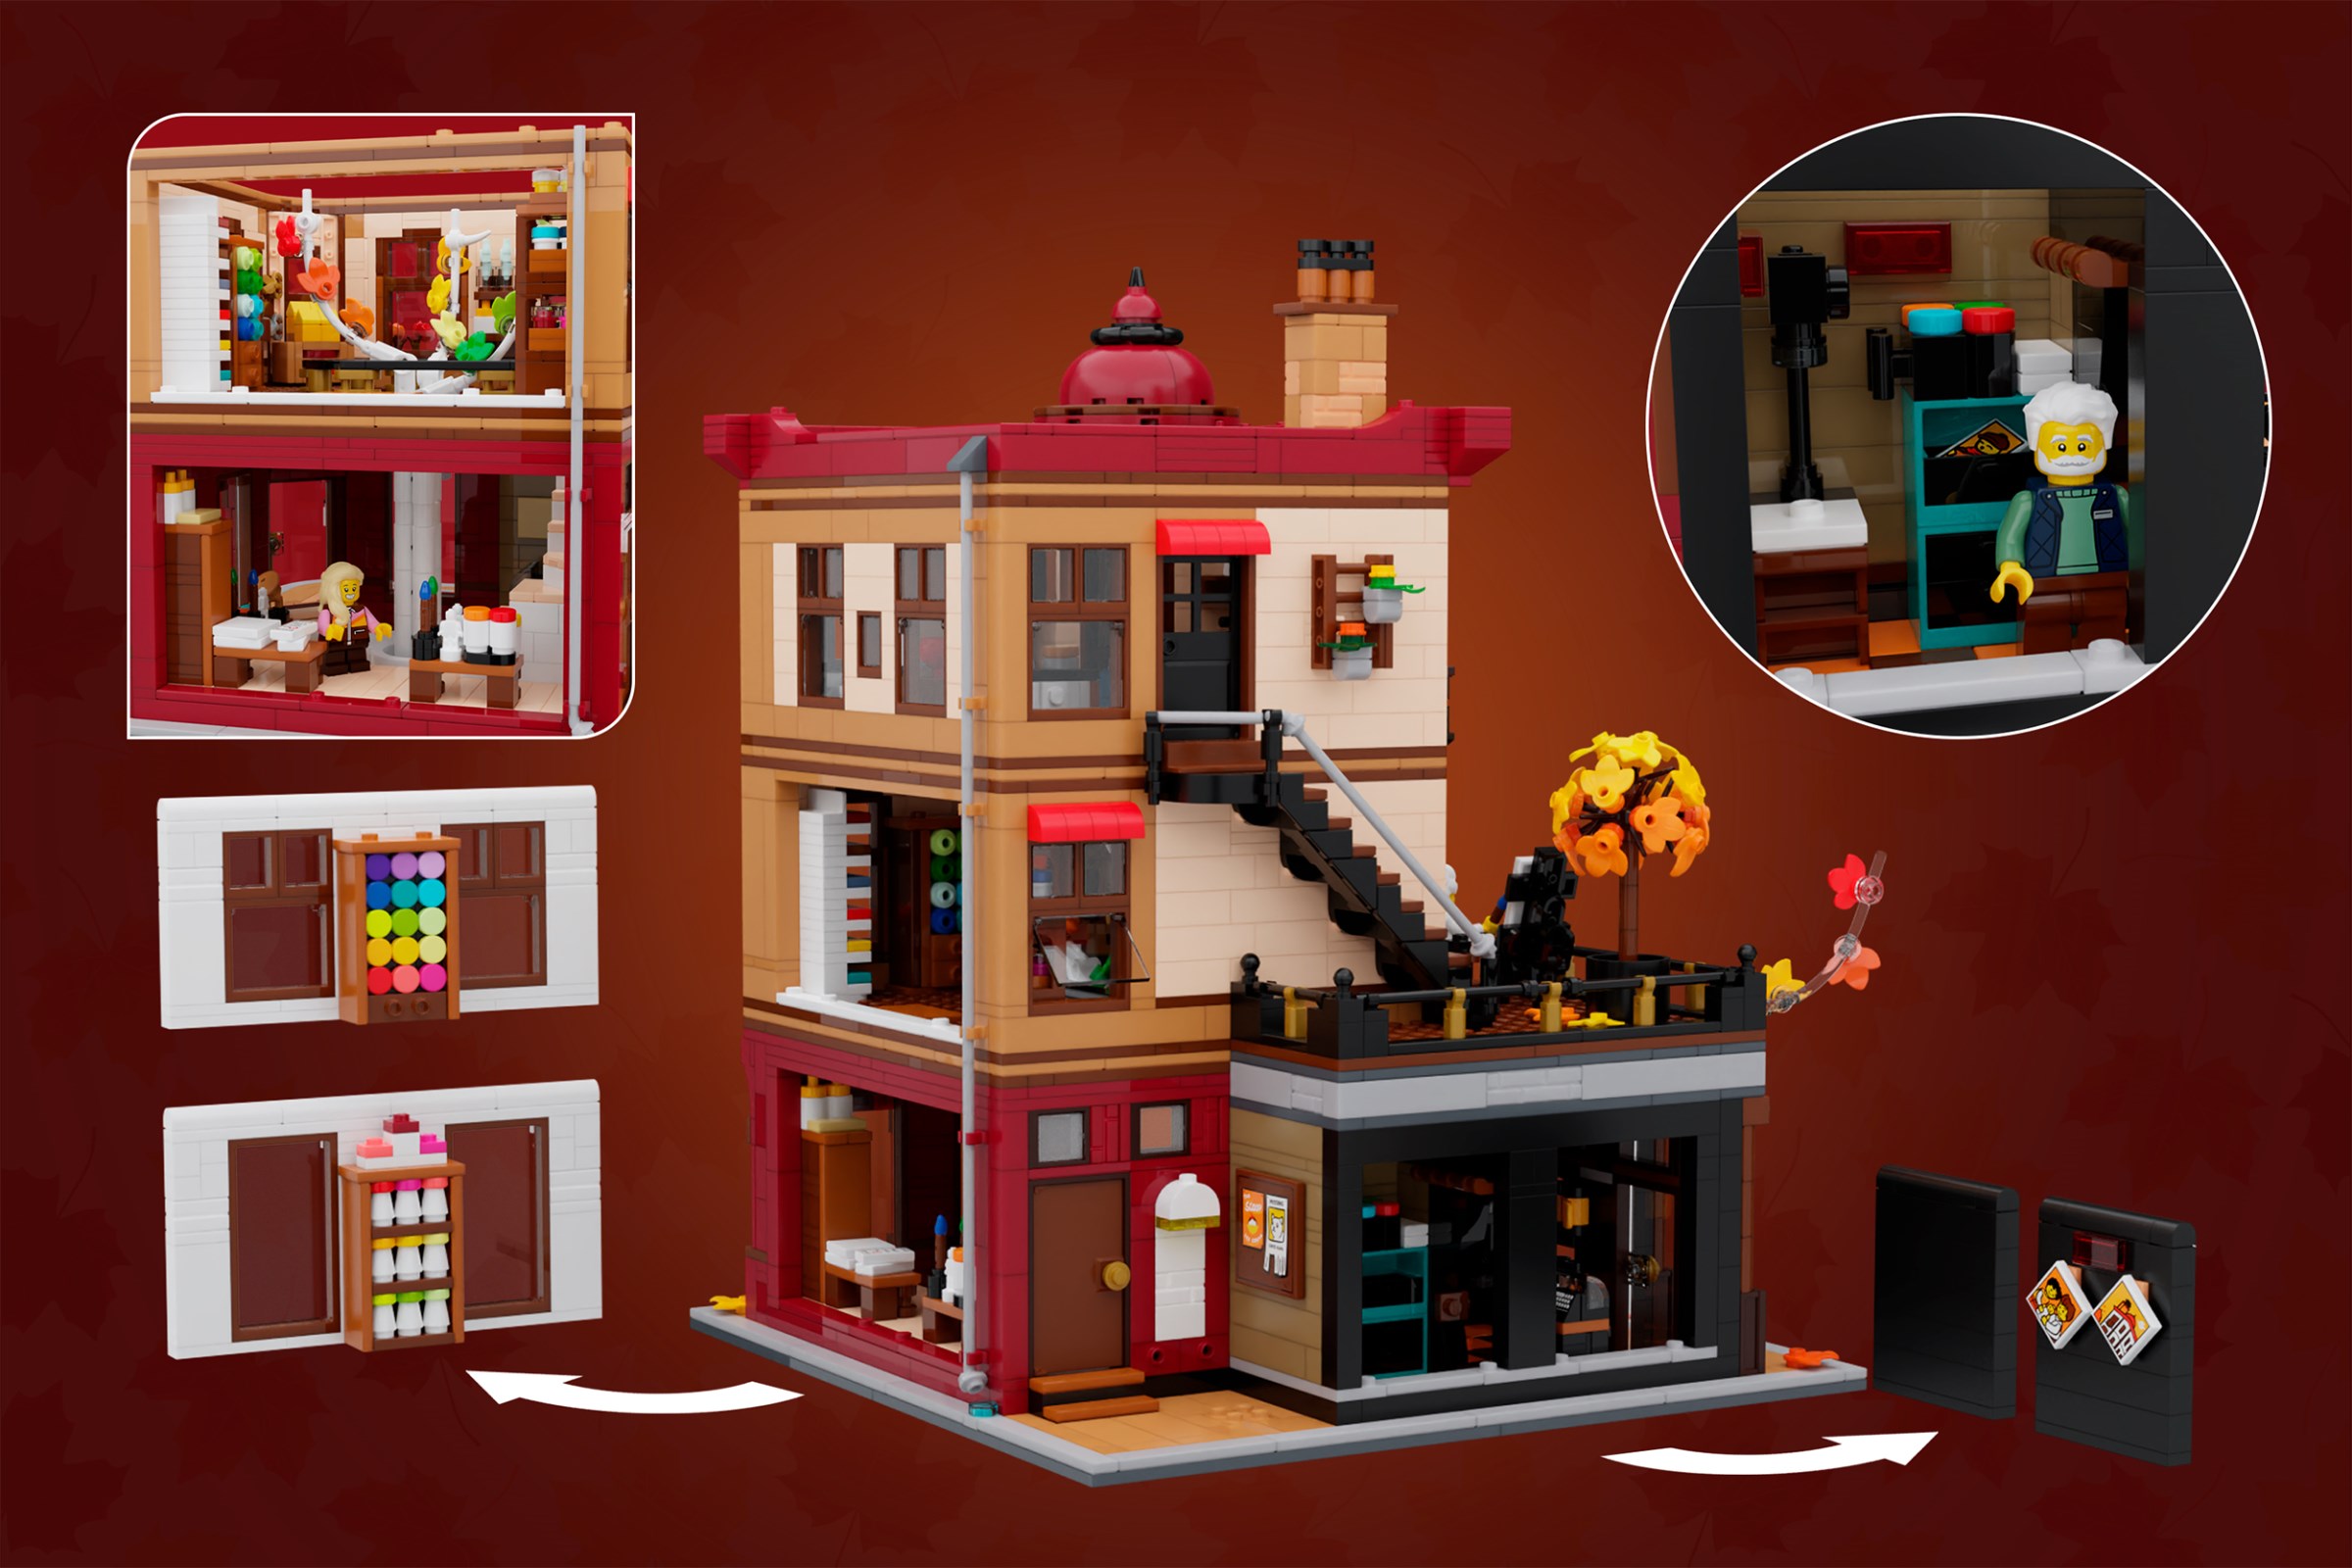
My name is fourstud and I am very excited to share my latest BrickLink model: Creative Corner!
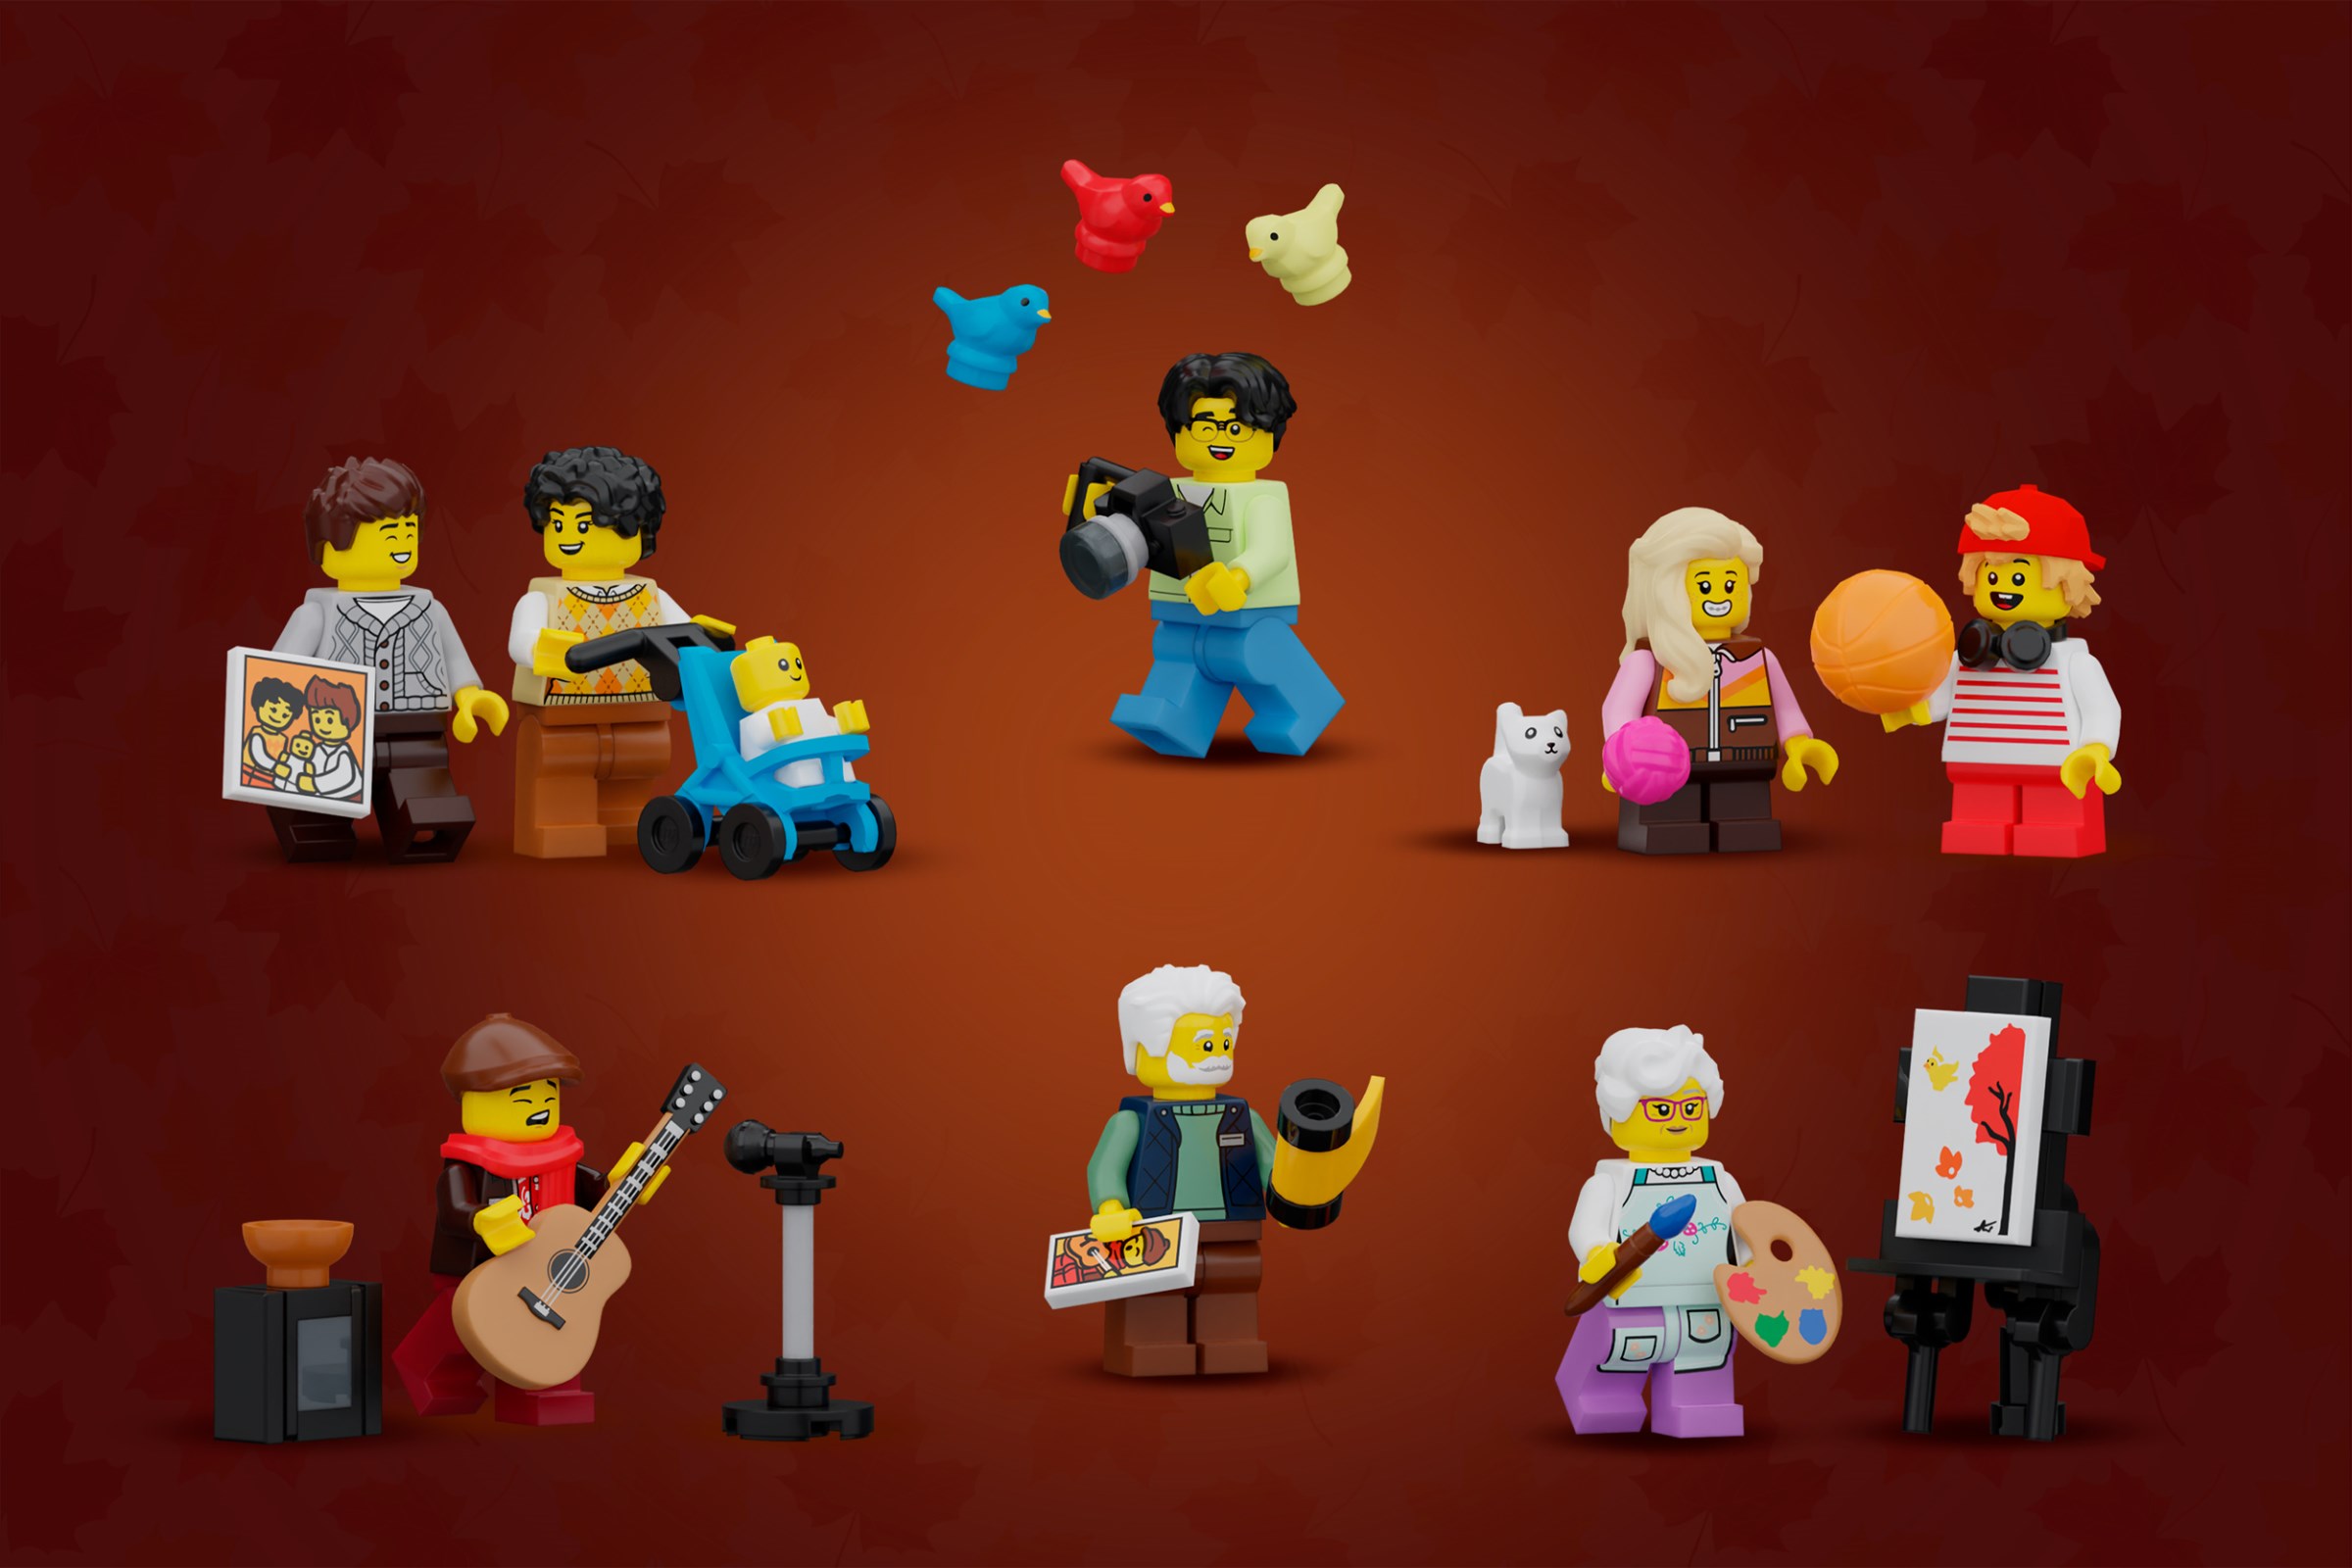
This warm and cozy city building depicts an autumn scene and two shops that celebrate two of my favorite creative hobbies - art and photography. The model includes 9 minifigures and is just shy of 3100 pieces. The footprint is 32x32 studs, so it fits in any traditional LEGO city. Besides having removable floors, all four sides are detailed and have removable wall panels for full access inside to see all of the detail.
Today, I’d like to go over my development process for this project, which I don’t usually showcase over on my Instagram @fourstud, but I feel so excited about the end result I felt it appropriate to document it this time.
Development for this model started in 2024 during a summer trip where I visited a stationery shop with a tree in the middle. Inspired by this and the colorful environment of the store, with a desire to do another modular-style building after my Ice Cream Parlor from Series 5, it felt like a good starting point. That winter, I drew several rough sketches of the layout and experimented with a navy blue building. I always start with LEGO Digital Designer, which has always been my preference for building software.
There was originally a café and a winter setting, which I had not seen the modular buildings do before. A rule change disallowed direct modular buildings from being submitted to BDP, and after some standstills, I dropped the project for a while until September 2025 when I started from scratch. This time, I picked warmer colors and an autumn setting, as the voting period would be at the start of what I’ve now realized is my favorite season!
Floor 1
The art supply store, Brushes & Branches, has large curved windows I framed with a subtle offset provided by brackets. I carried over the bottom detail of using window frames from 2024 and used new curved slopes for the bright red awnings. The corner door is a fun build that slides in perfectly between the walls. At some point, I had to rebuild the entire first level one brick lower to make the stairs, walls, and terrace from floor 2 all level. This allowed me to change some 1x8s to 1x16s and reduce my piece count as much as I could. I wanted to shoot for 2,750-3,000 pieces as recent modular-style buildings were increasing in piece count but keeping their price range at around $230. It’s very easy to go overboard and hit the 4,000 piece limit, but I try to keep the consumer in mind when designing my models. It’s nice to have offerings that aren’t super expensive but still have a high level of detail.
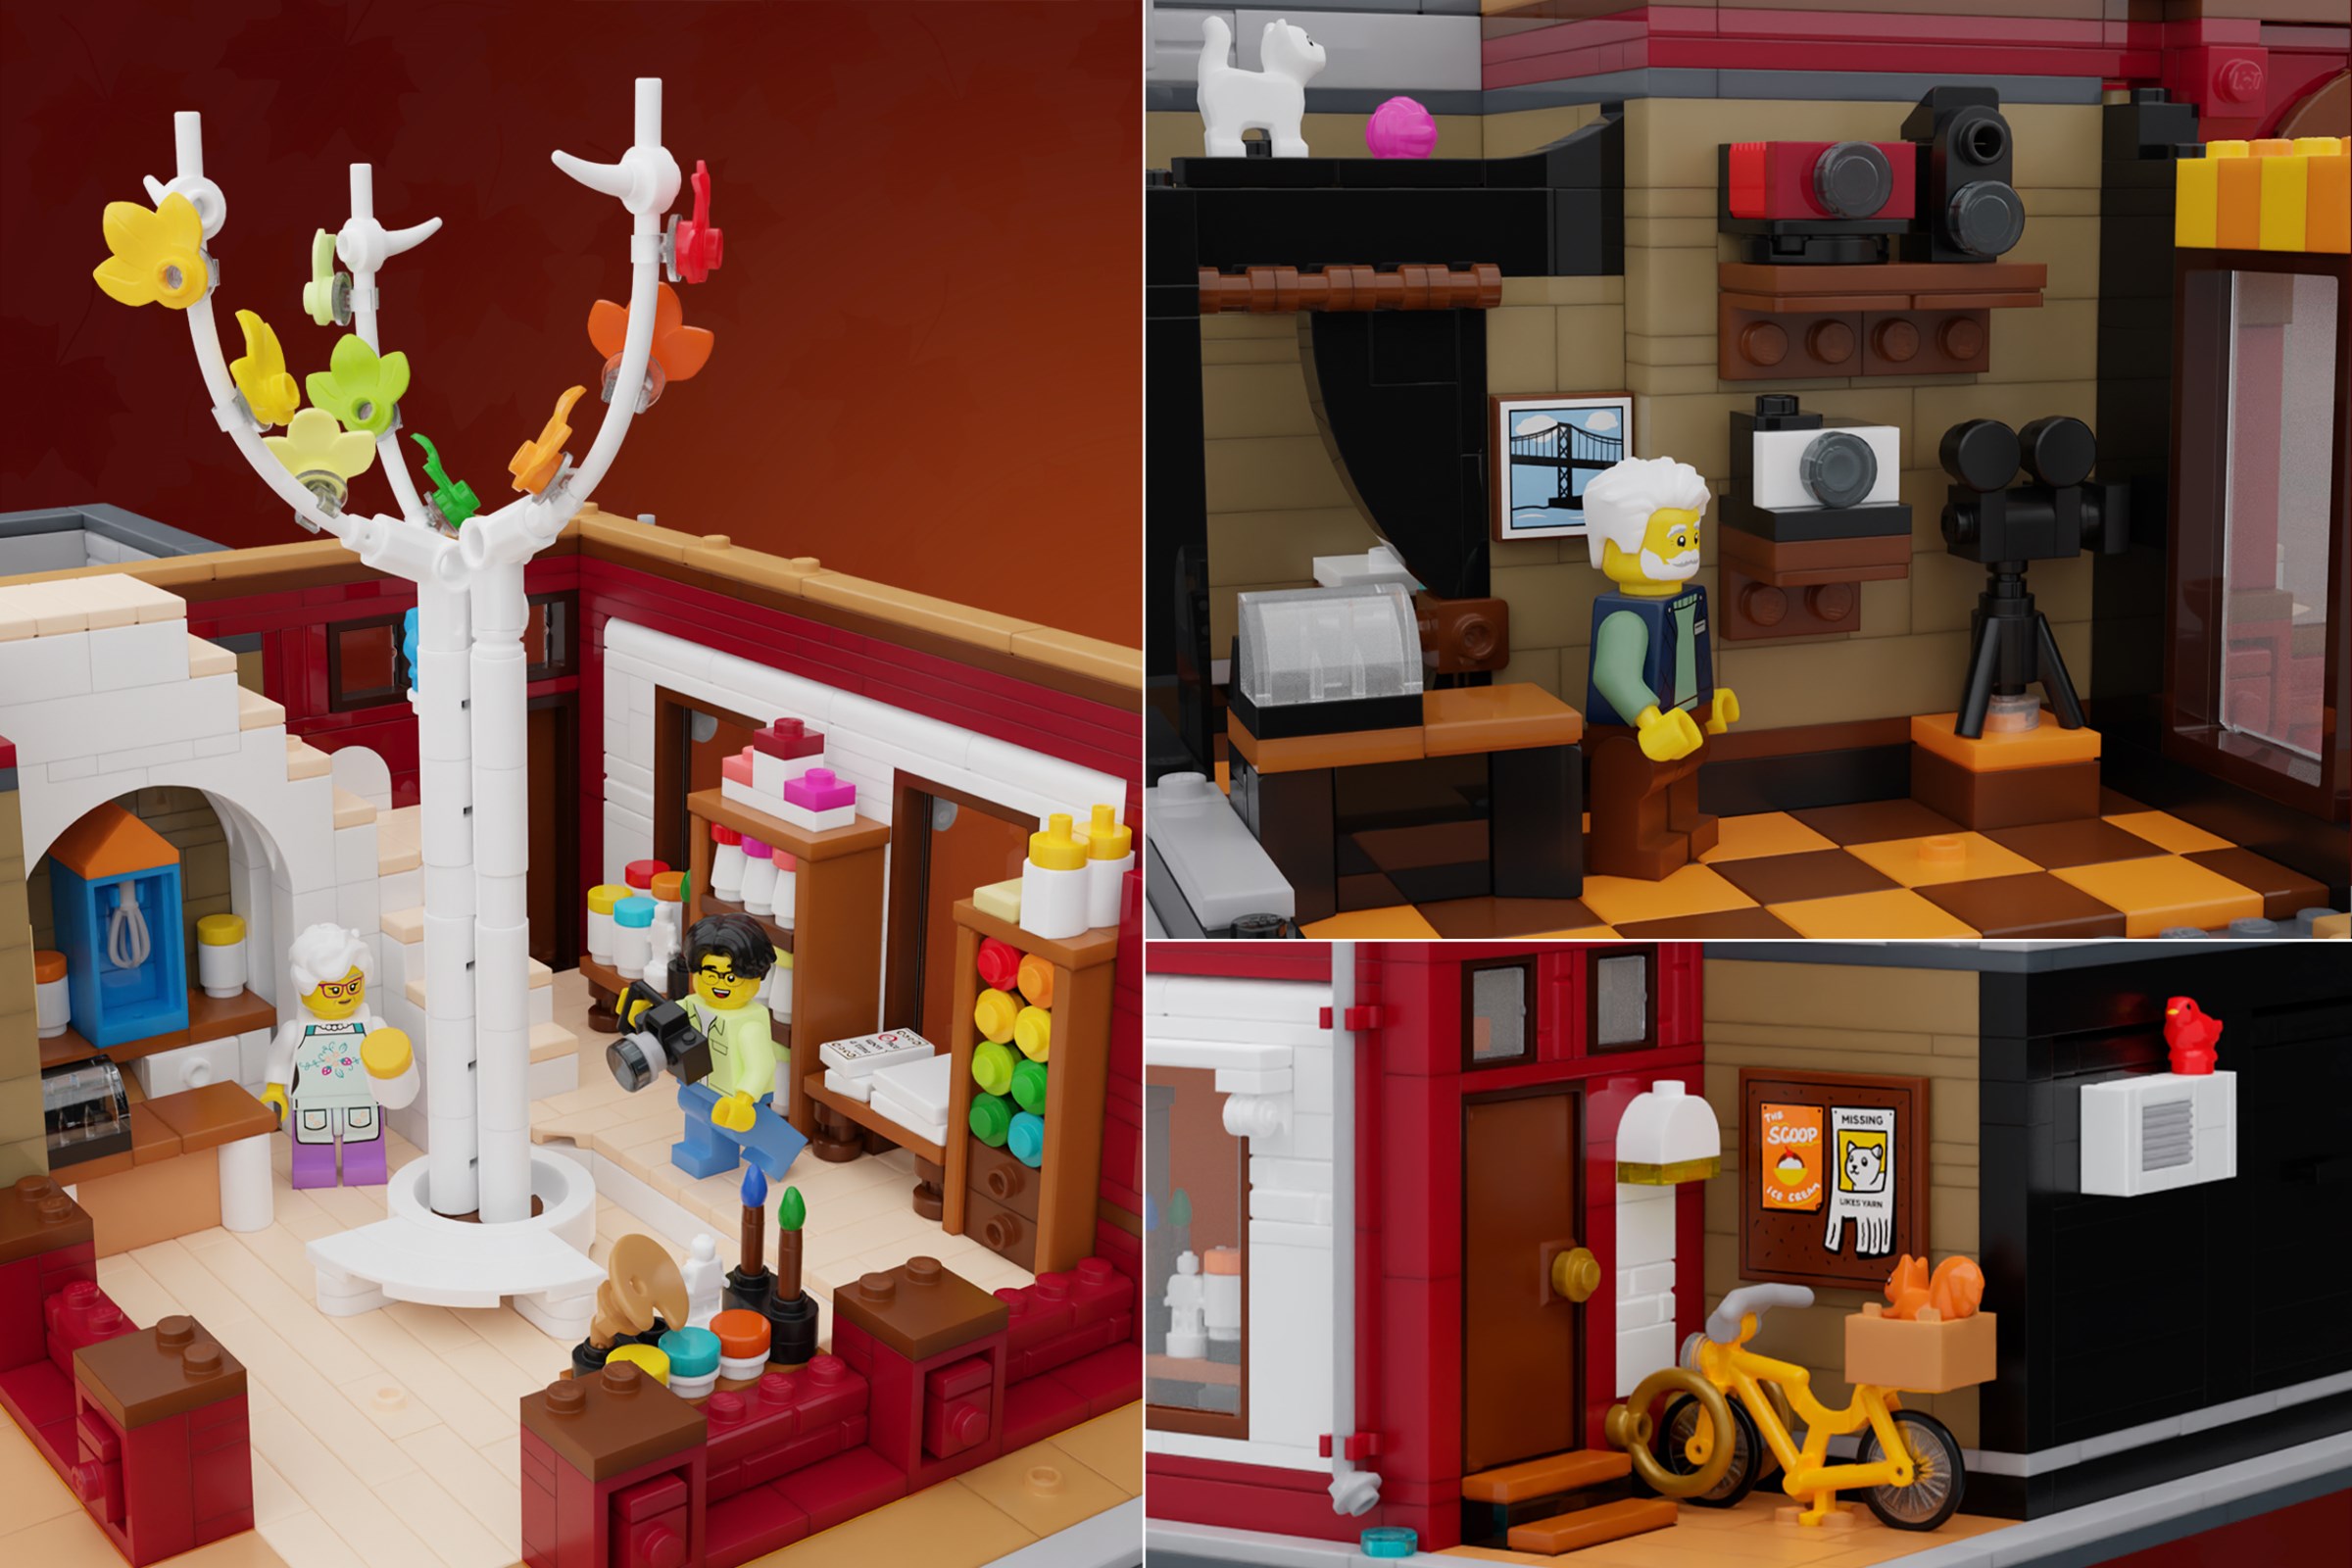
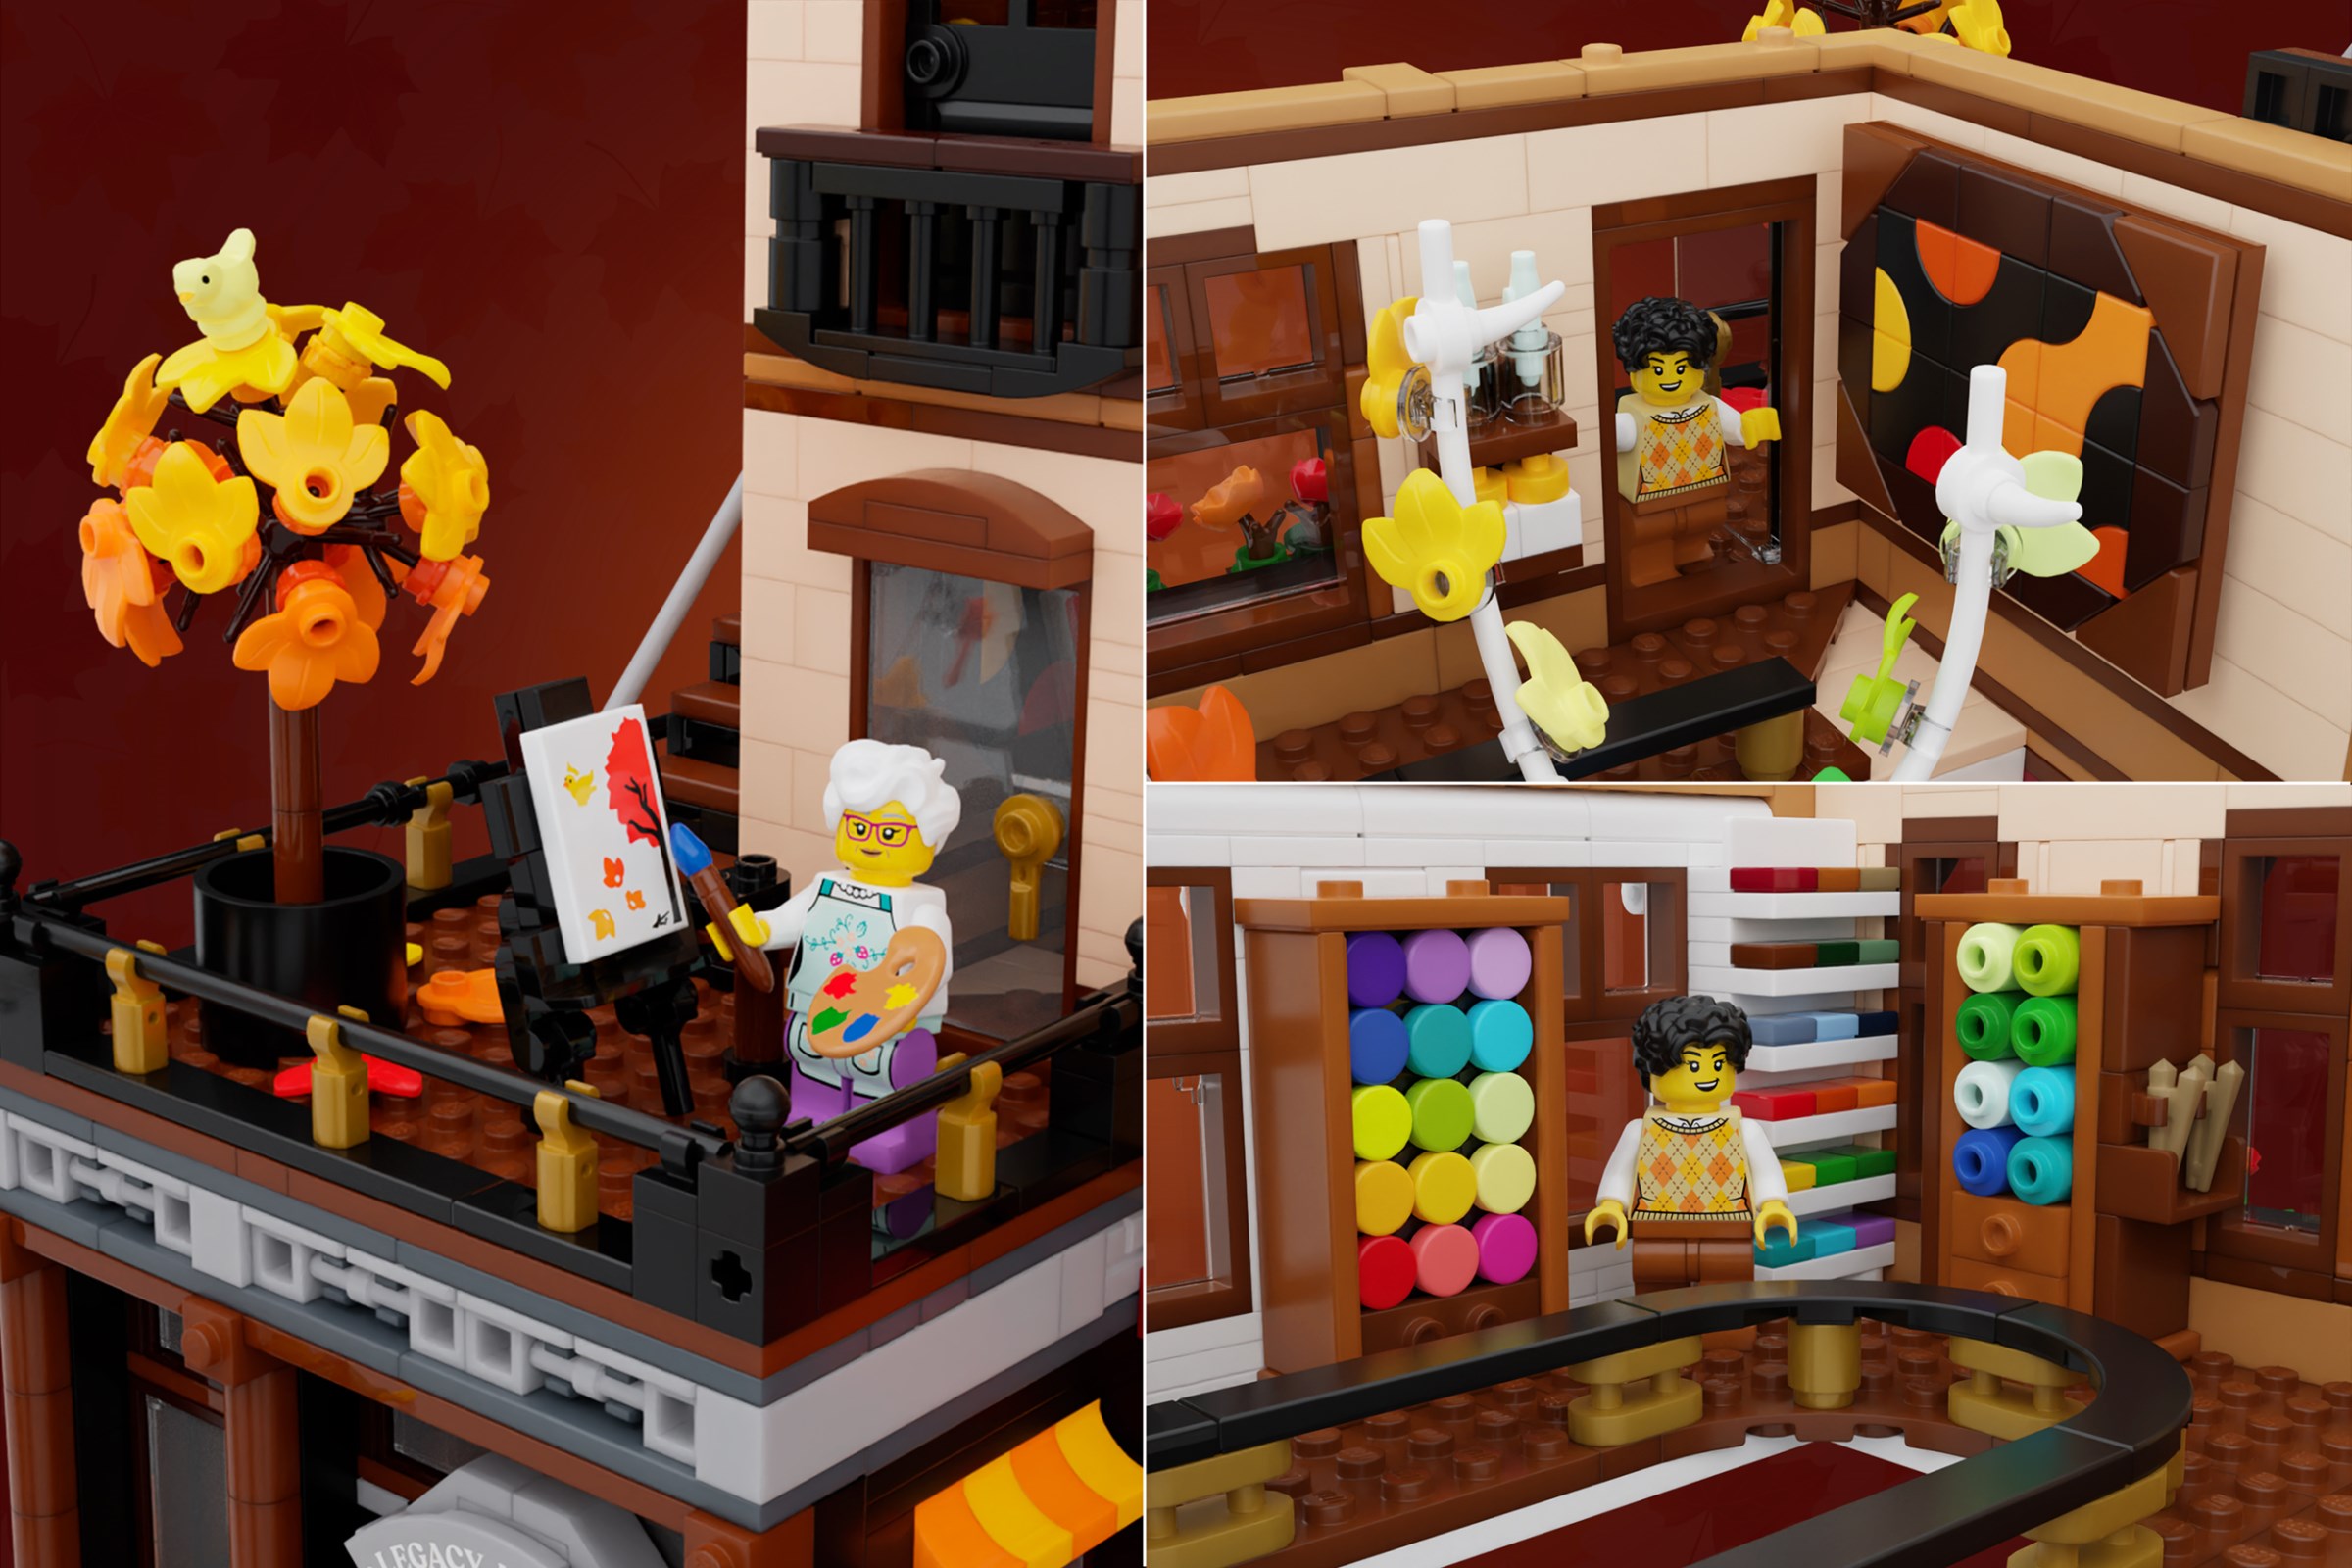
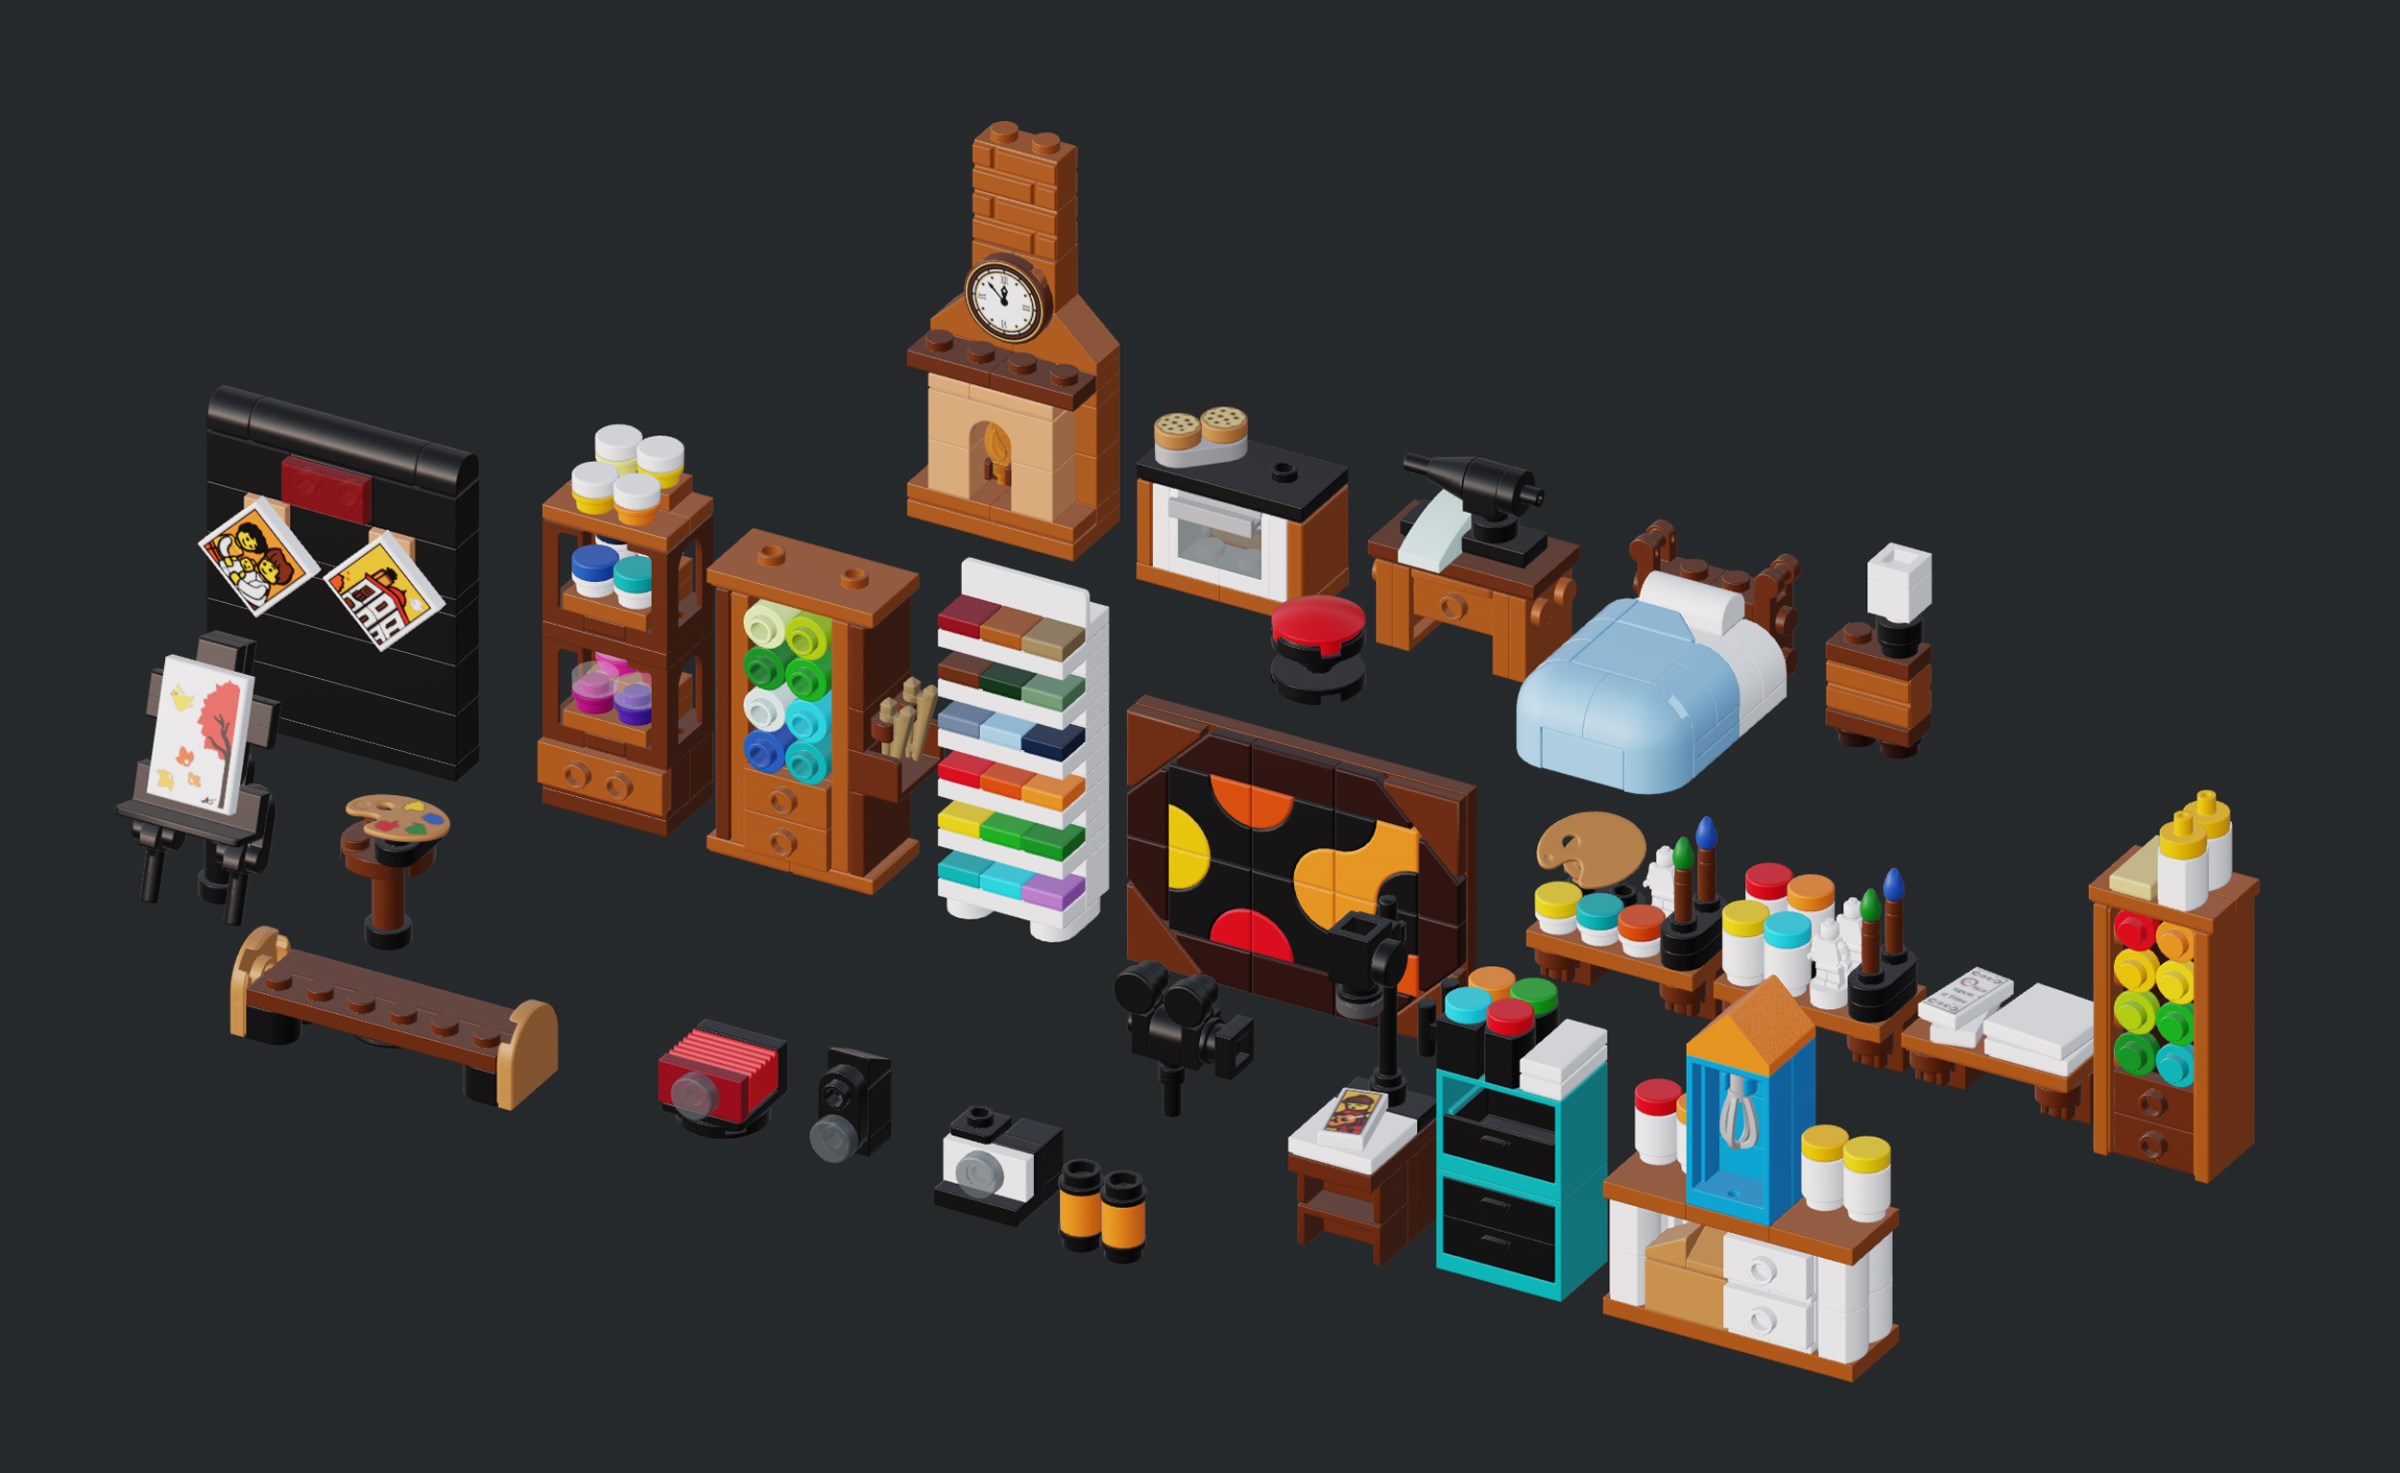
In this world, the camera shop Legacy Lenses specializes in vintage cameras. I enjoyed coming up with different builds for medium format, motion picture, and Polaroid cameras. There are photos of the included family and street performer being developed in trays alongside an enlarger. Outside, the camera window is a popular photo-op for people to sit beneath with the circle window framing them and the sign hanging above. It felt more fun than traditional windows. This shop is an homage to my time in film photography class in college, which I loved and have continued as a hobby since. Though I’m young and enjoy my phone, I miss my days in the darkroom.
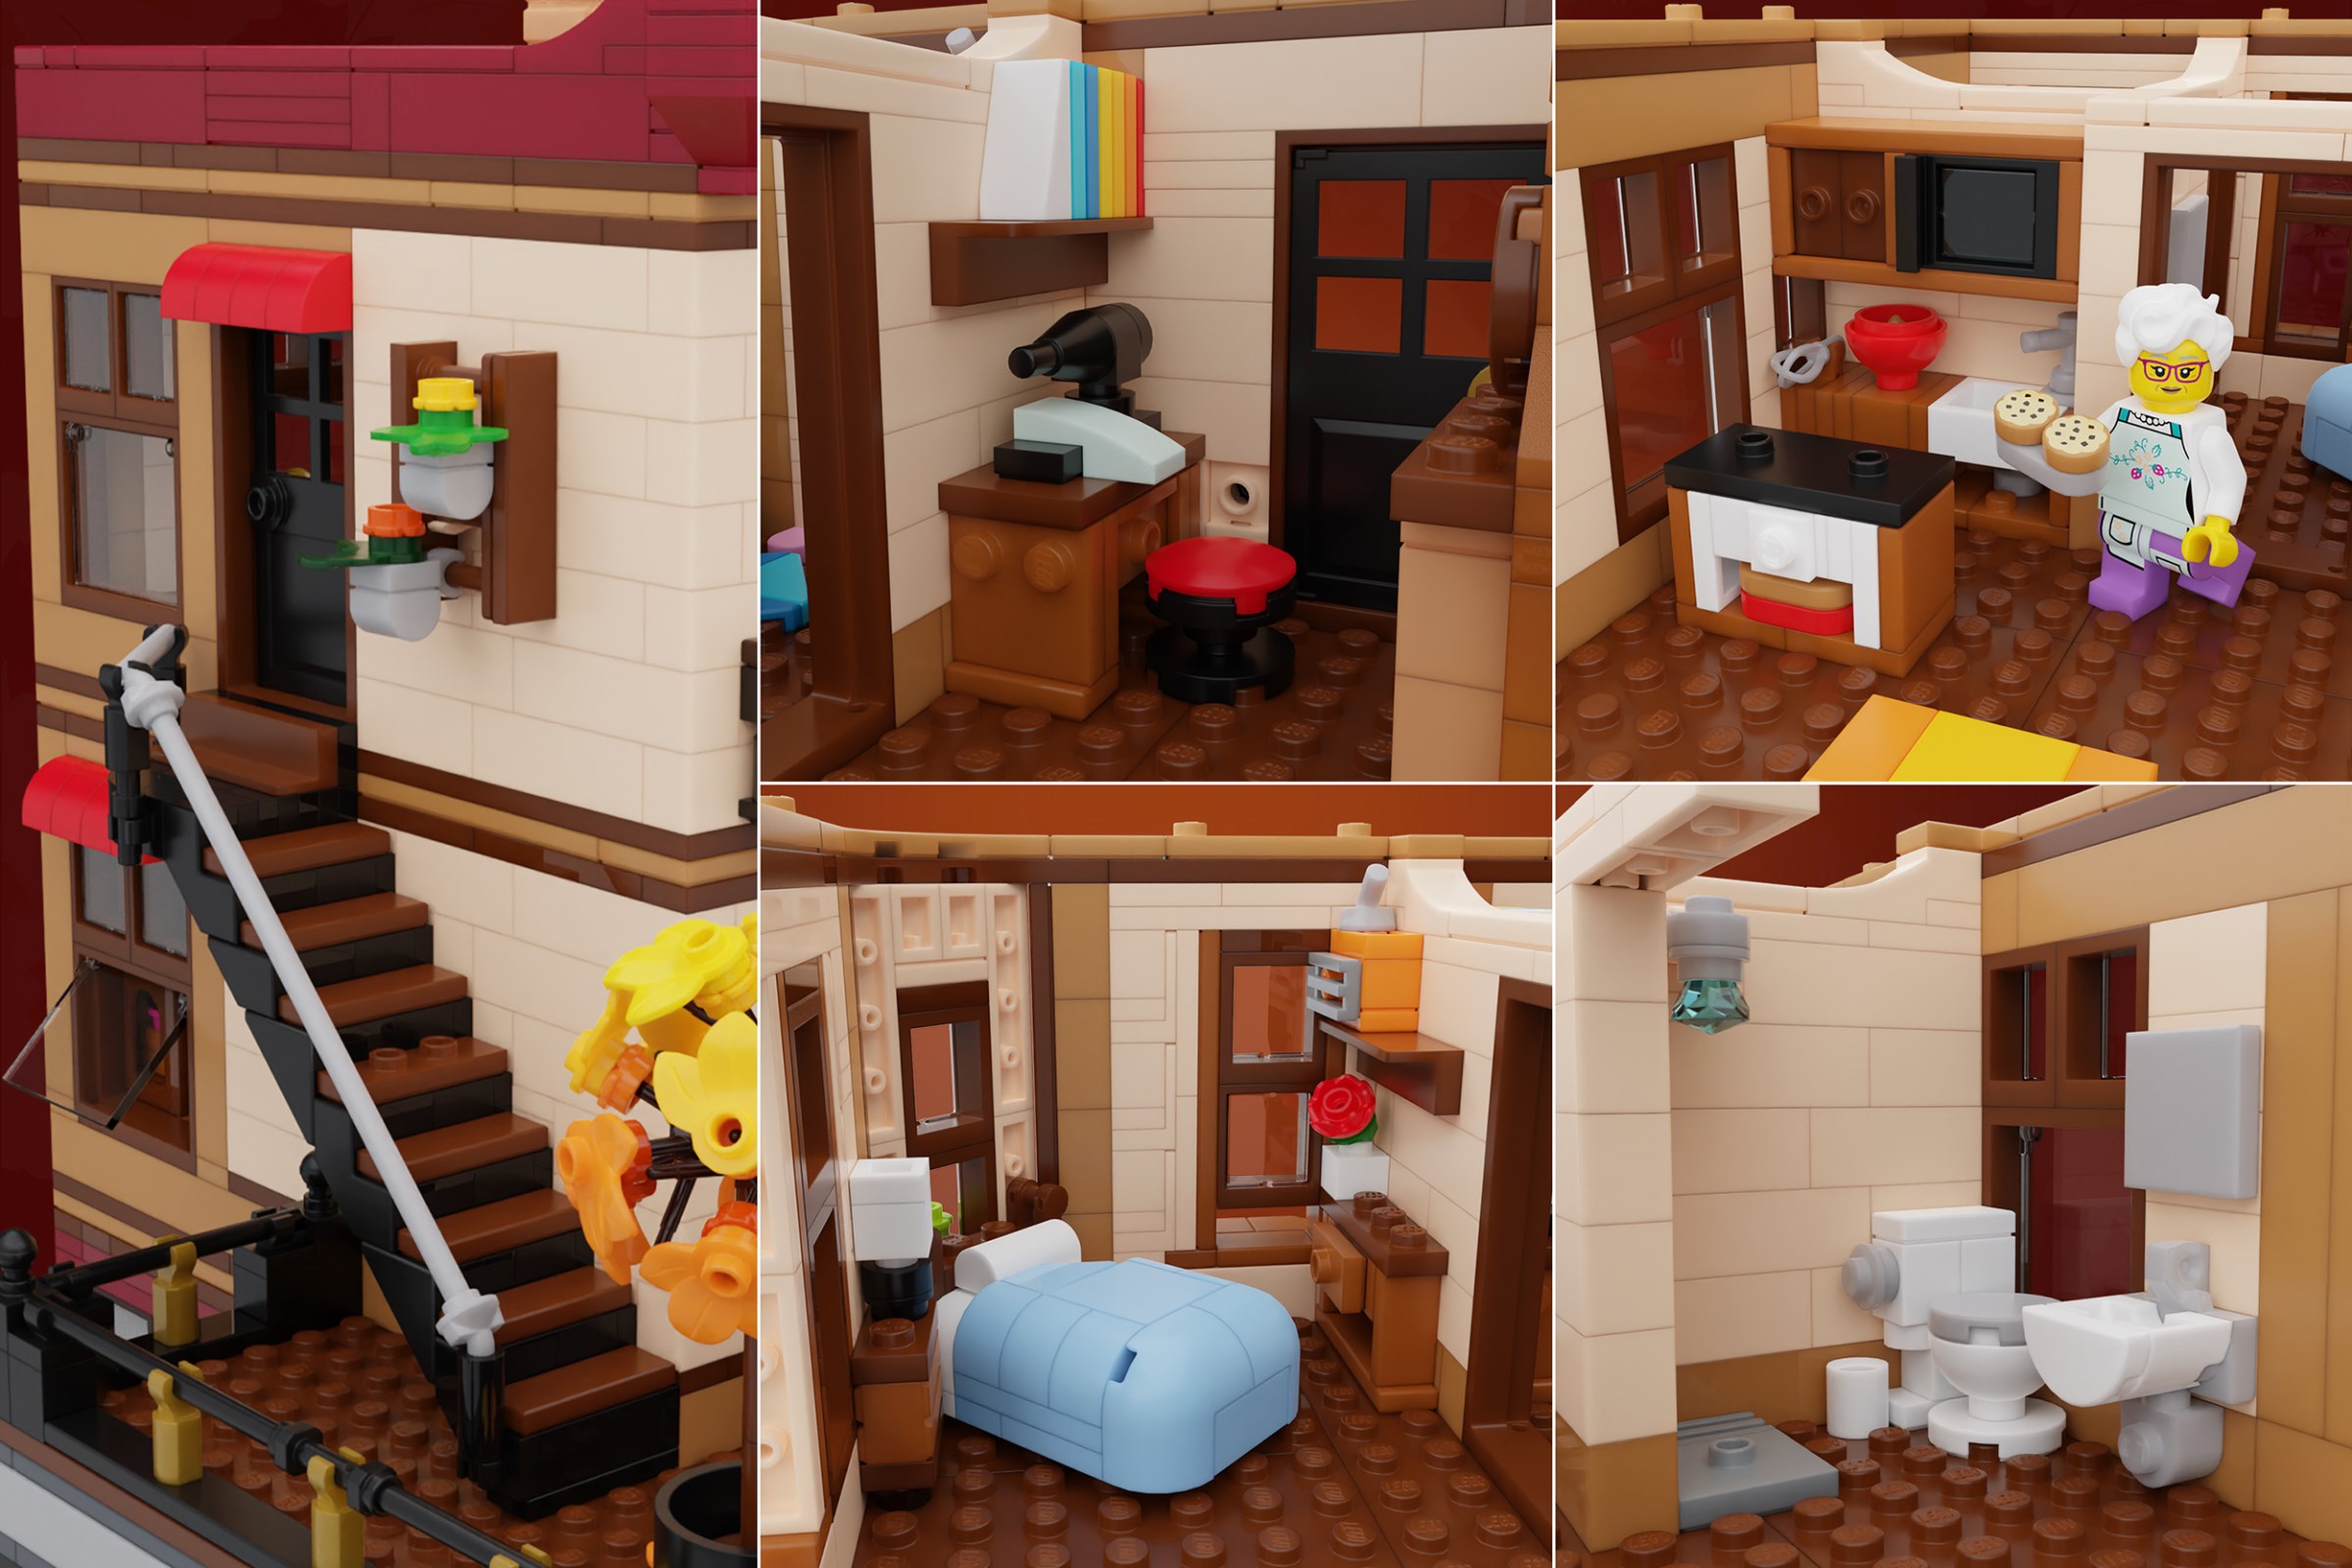
Brushes & Branches uses light nougat wood paneling on its floor with shelves full of paints and clays lining up the wall. The large shelf is attached to the back wall which is removable to look inside at what I’ve dubbed the Tree of Color, based on the aforementioned inspiration. This shop’s paint is made in-house with the paint mixer behind the register. The rear entrance of the building has a bike rack using Sonic the Hedgehog rings, and has a poster for a missing cat hidden somewhere in this model!
Floor 2
The Tree of Color grows through the floor and is protected by a railing. This floor has more paints, yarn, crayons, scissors, glue, and more. This window wall is also removable to show the Tree inside. Alongside a painting atop the staircase is an exit to the terrace where one can paint or just admire the falling leaves (using a Super Heroes pose element.)
Around the corner is a staircase that took me a while to figure out - I wanted it to be unique and simple, and is built entirely on its side with a railing that fit perfectly. I experimented with a lot of window techniques and realized I was probably overthinking their design and found a wonderful 1-brick thick solution using brackets and tiles. The outside railings are adorned with marigolds and chrysanthemums, commonly found in autumn.
Floor 3 and Roof
The third floor depicts the art shop owner’s apartment. There was originally a small white kitchen, but that eventually was relocated and redesigned, allowing me to include an island with a stovetop, oven, and drawer using brackets in just a 2x4 space. Figuring out how the corner window was going to be attached seamlessly was hard until I rotated the bed 45 degrees and used it to anchor the window. It all worked out so pleasantly. To add some variety to the exterior windows, I left one open so the cool autumn breeze could flow through the apartment.
The apartment has some of my favorite builds in the model. There are several mini-builds built entirely on their side, connected to the wall by headlight bricks on one side while other builds are connected using the back. I feel the BrickLink models should be a celebration of cool techniques and tried to put everything together in interesting ways. More details did push me closer to 3,000 pieces, though!
Something suggested to me I unintentionally encountered was that you could remove floor 3 entirely and have the roof work with the staircase from floor 2. After adding a 1x4 removable panel where the stairs ended, it worked. A complete coincidence was now a shorter display option, because not everybody has the same display space. The chimney/fireplace was originally in the back corner but became obscured in the renders, so I moved it forward for a more pleasing composition.
I really enjoy the BrickLink Designer Program because it has continually pushed me several times a year to go outside of my comfort zone and design original models I most likely otherwise would not have done. Not just that, but complex adult-focused models too that have since become great portfolio pieces. I think while the palette can be a bit restrictive, it offers a good challenge and forces digital builders like myself to think realistically when designing.
Something else that is important in LEGO products is story building, and I’ve tried to incorporate a few implied storylines in Creative Corner:
Photographer is looking for all 3 colored birds in the build (red/yellow/blue)
Legacy Lenses owner bikes to work and is responsible for developing the taken photos
The couple and their newborn have their photos taken - the father can’t stop blinking!
The children searching for the missing kitten
The street performer being photographed and enjoyed by the citizens
I’m very glad to have picked up a formerly abandoned project and developed it to the very end. I am pretty happy with the end result of Creative Corner, and I hope you guys enjoyed a little insight into my process. I do want to give a special shoutout to Stefan (DistractedBuilder) who was a very big help with this project, who also has an article up for his entry this series!
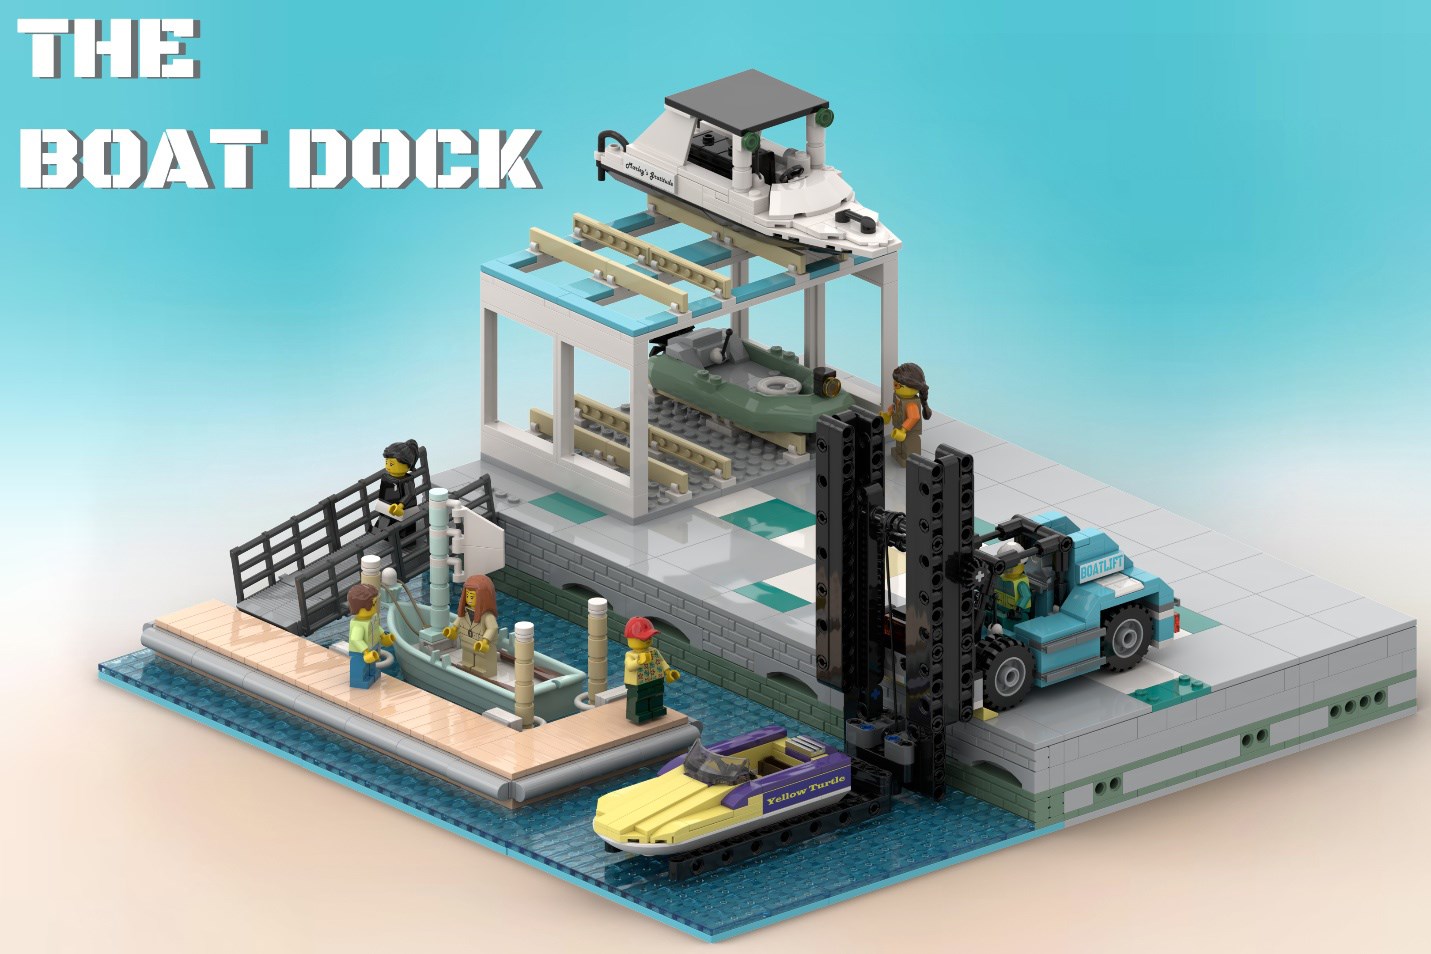
This article in our series of those those written by designers of projects in BrickLink Designer Program series 9 has been contributed by HeavyLobster:
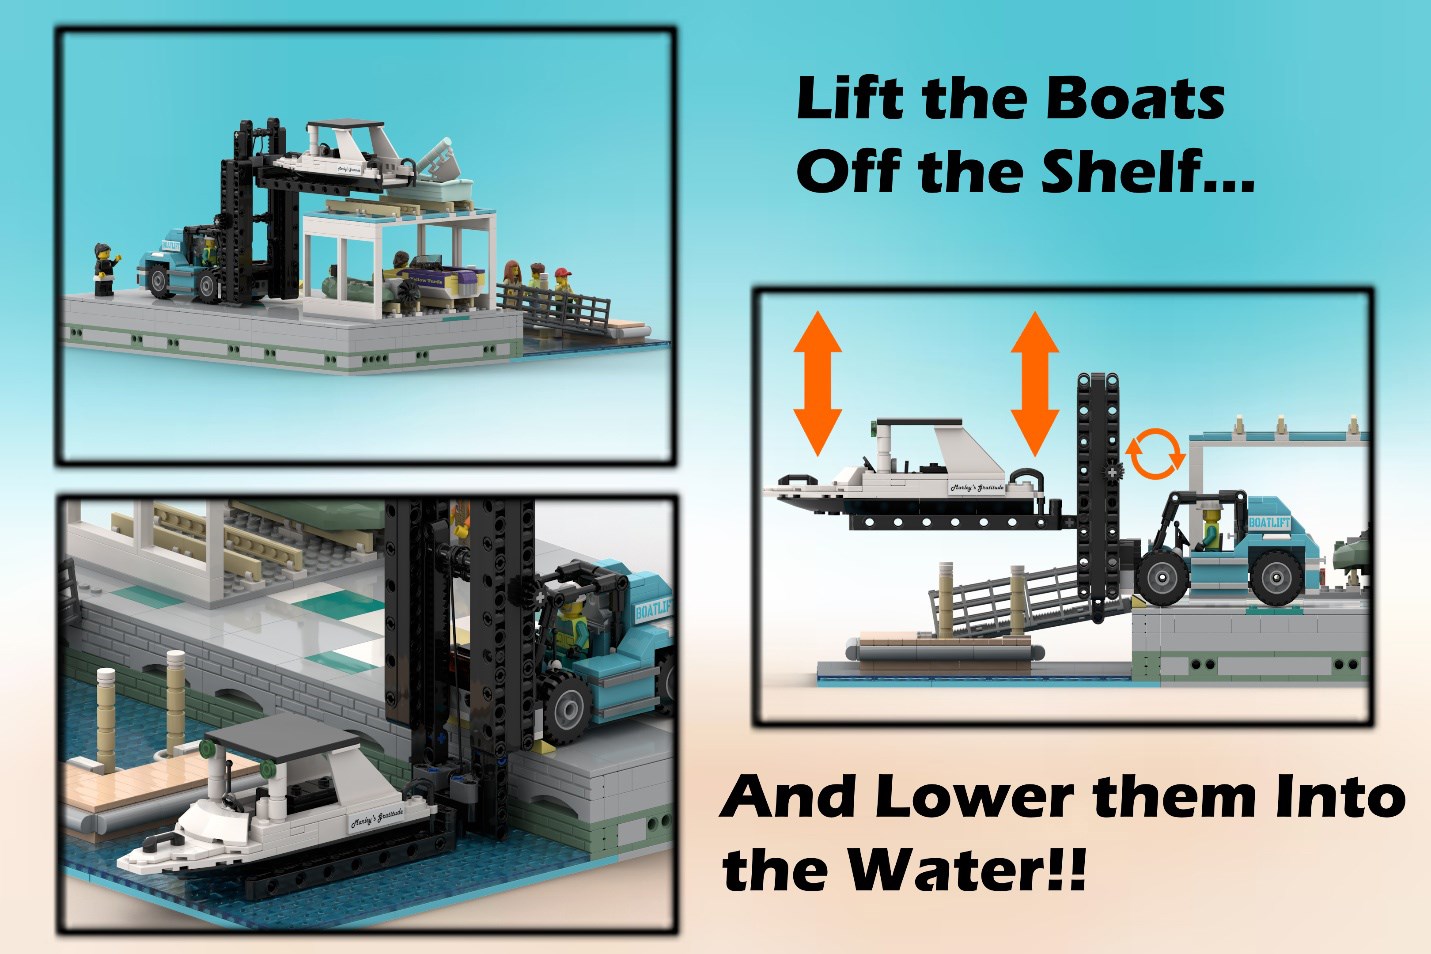
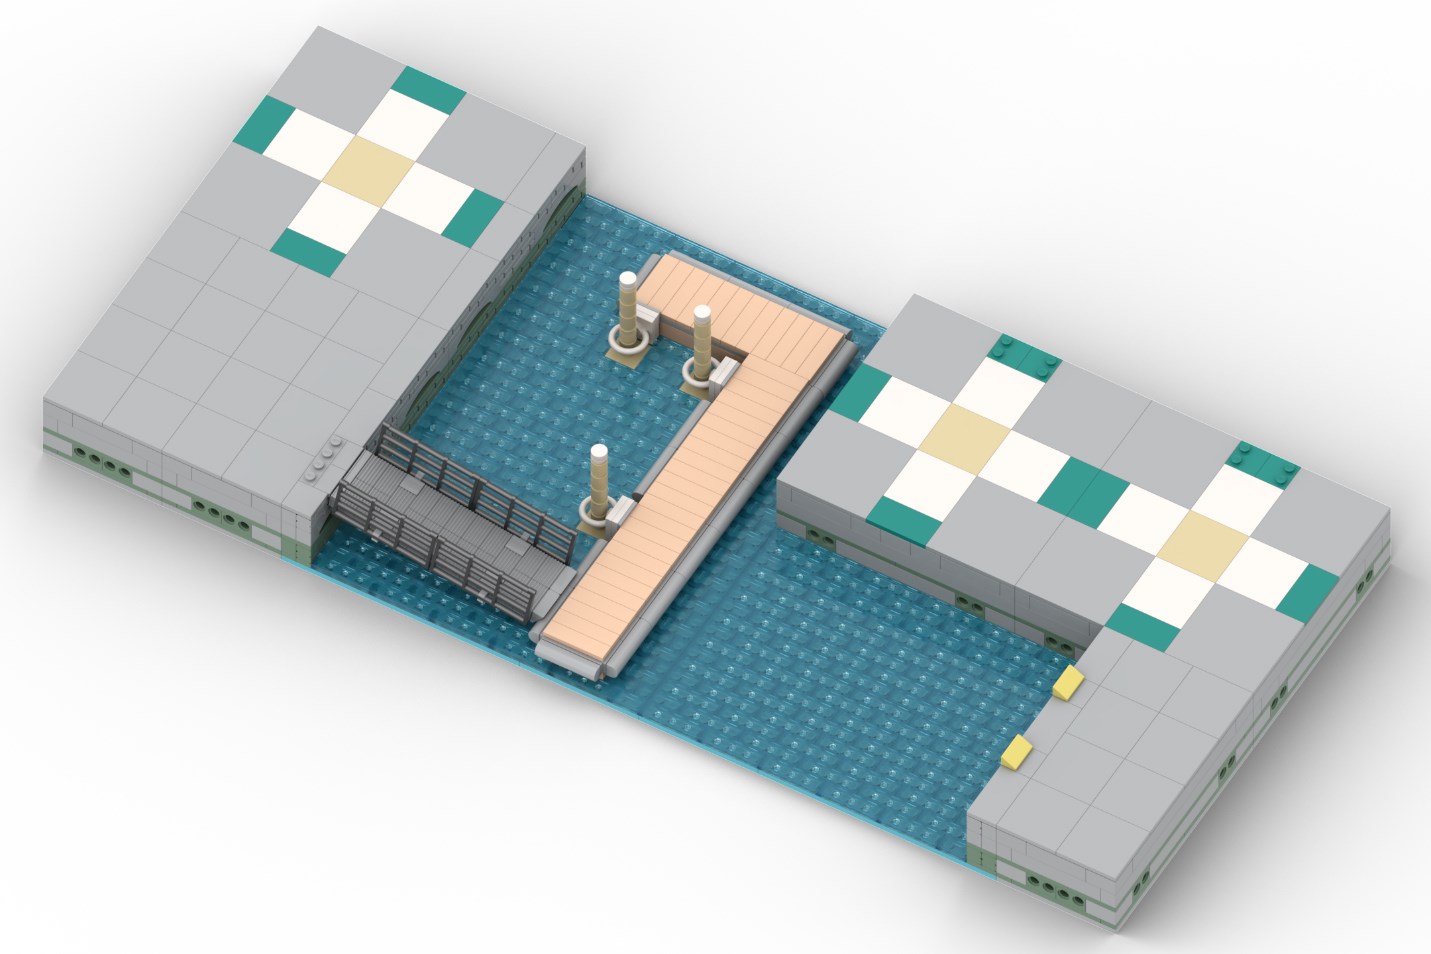
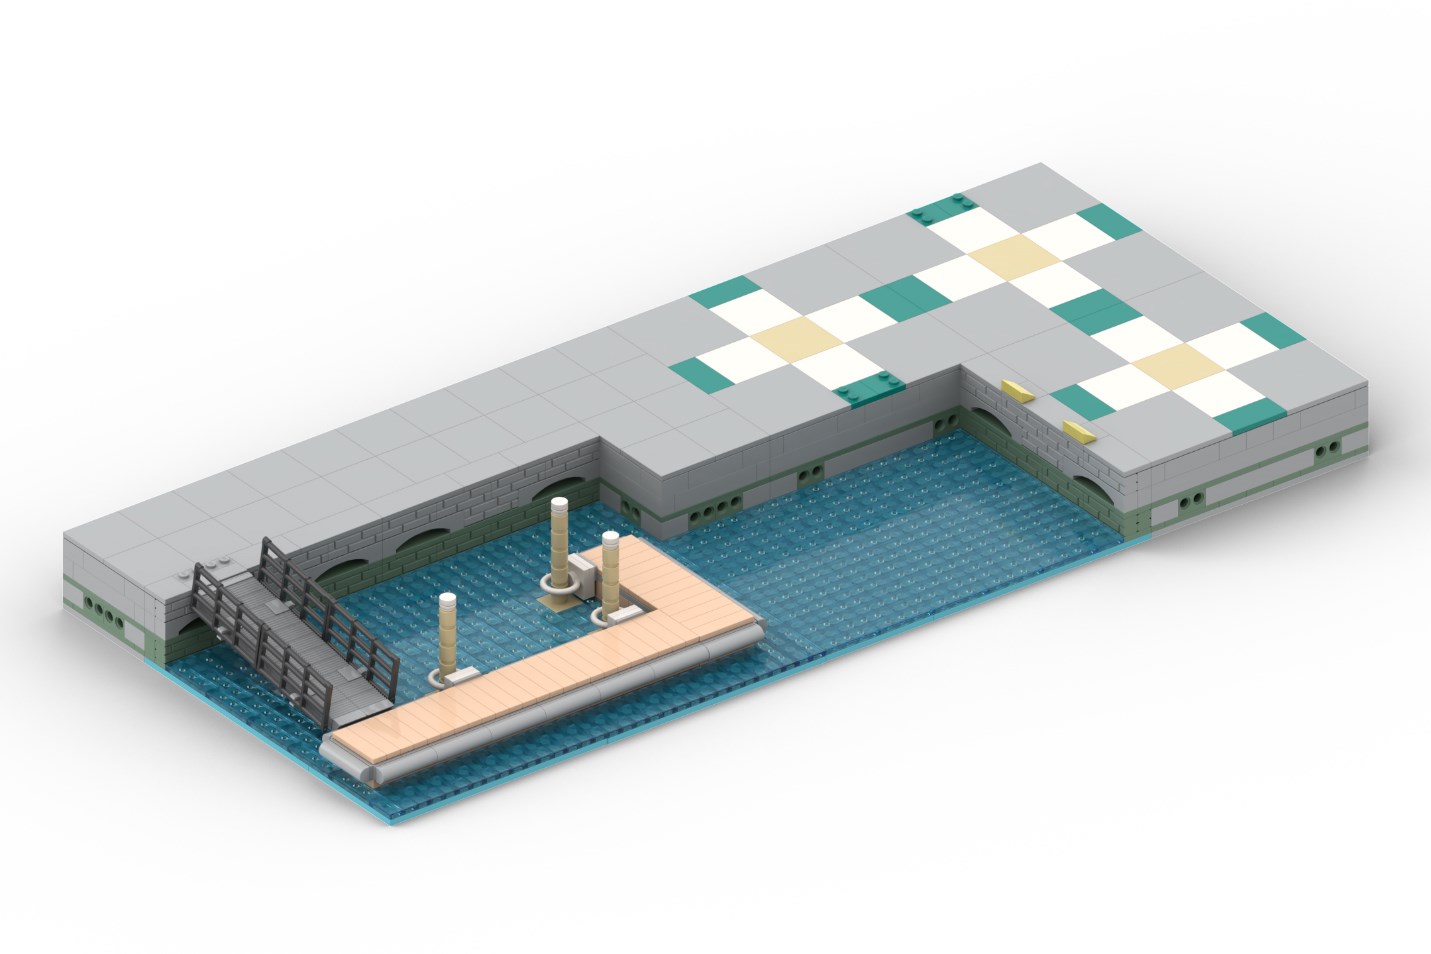
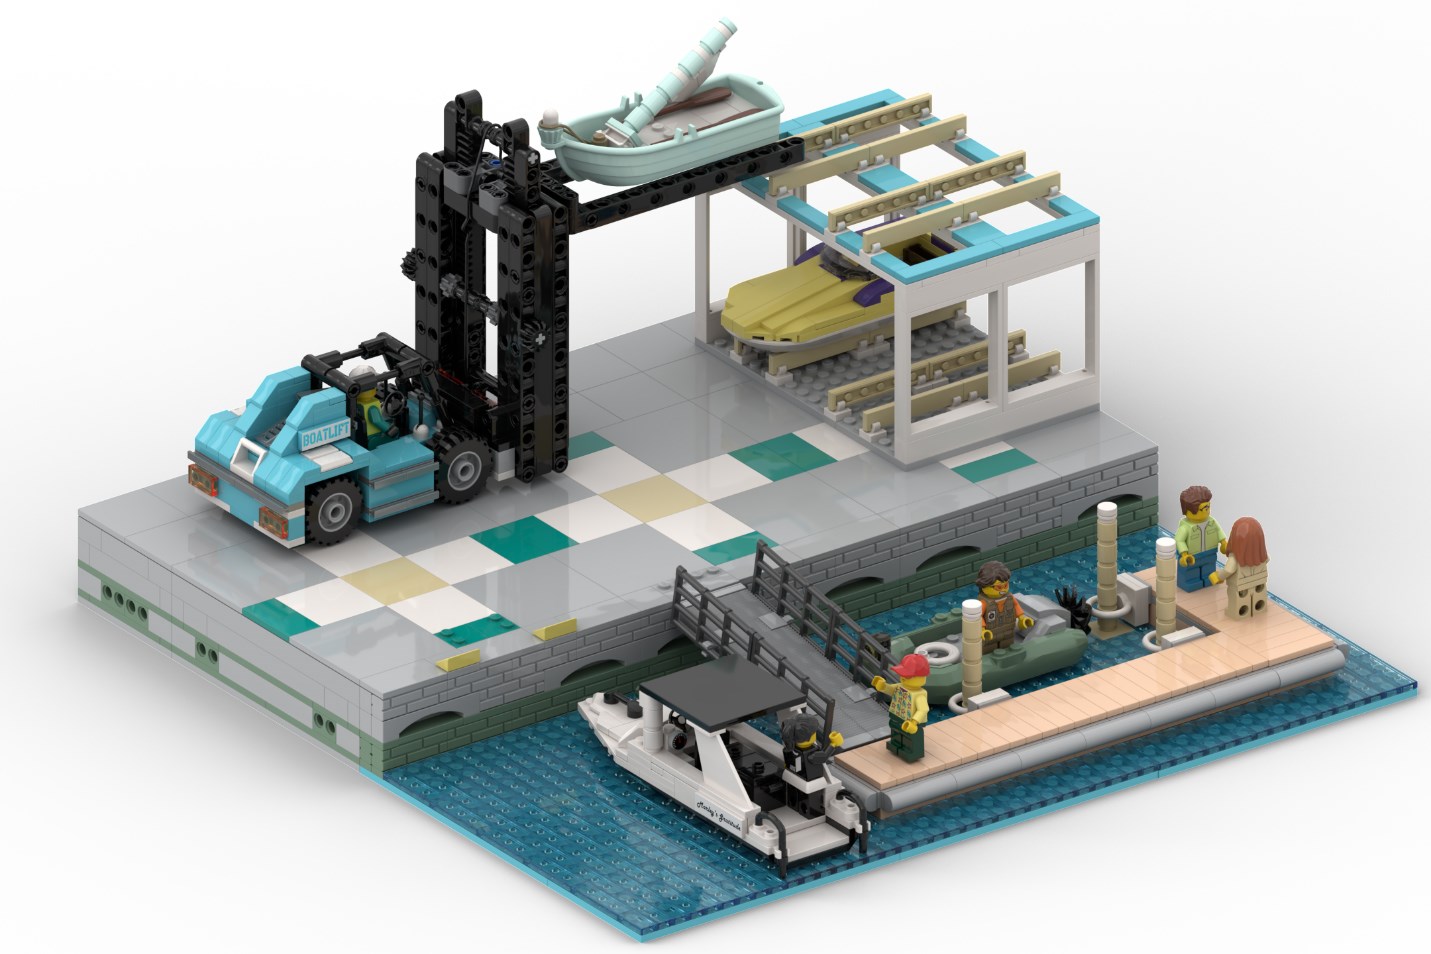
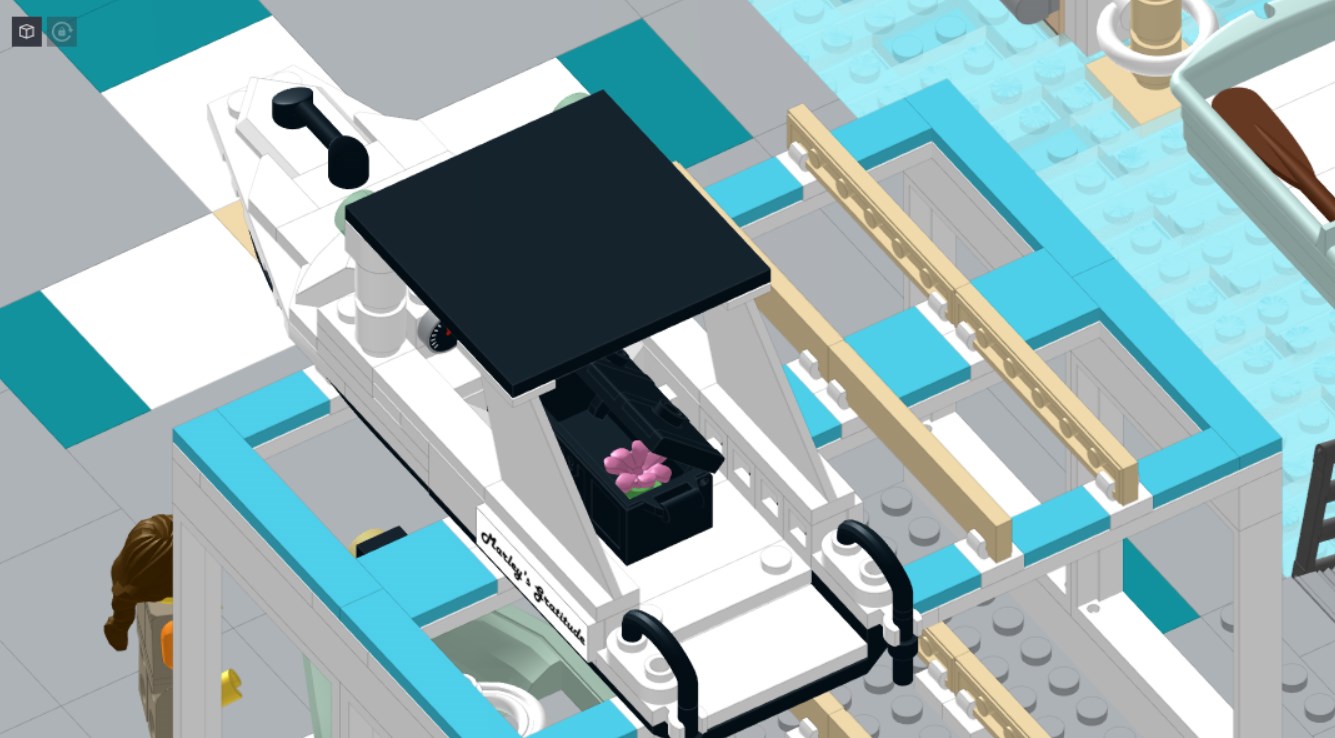
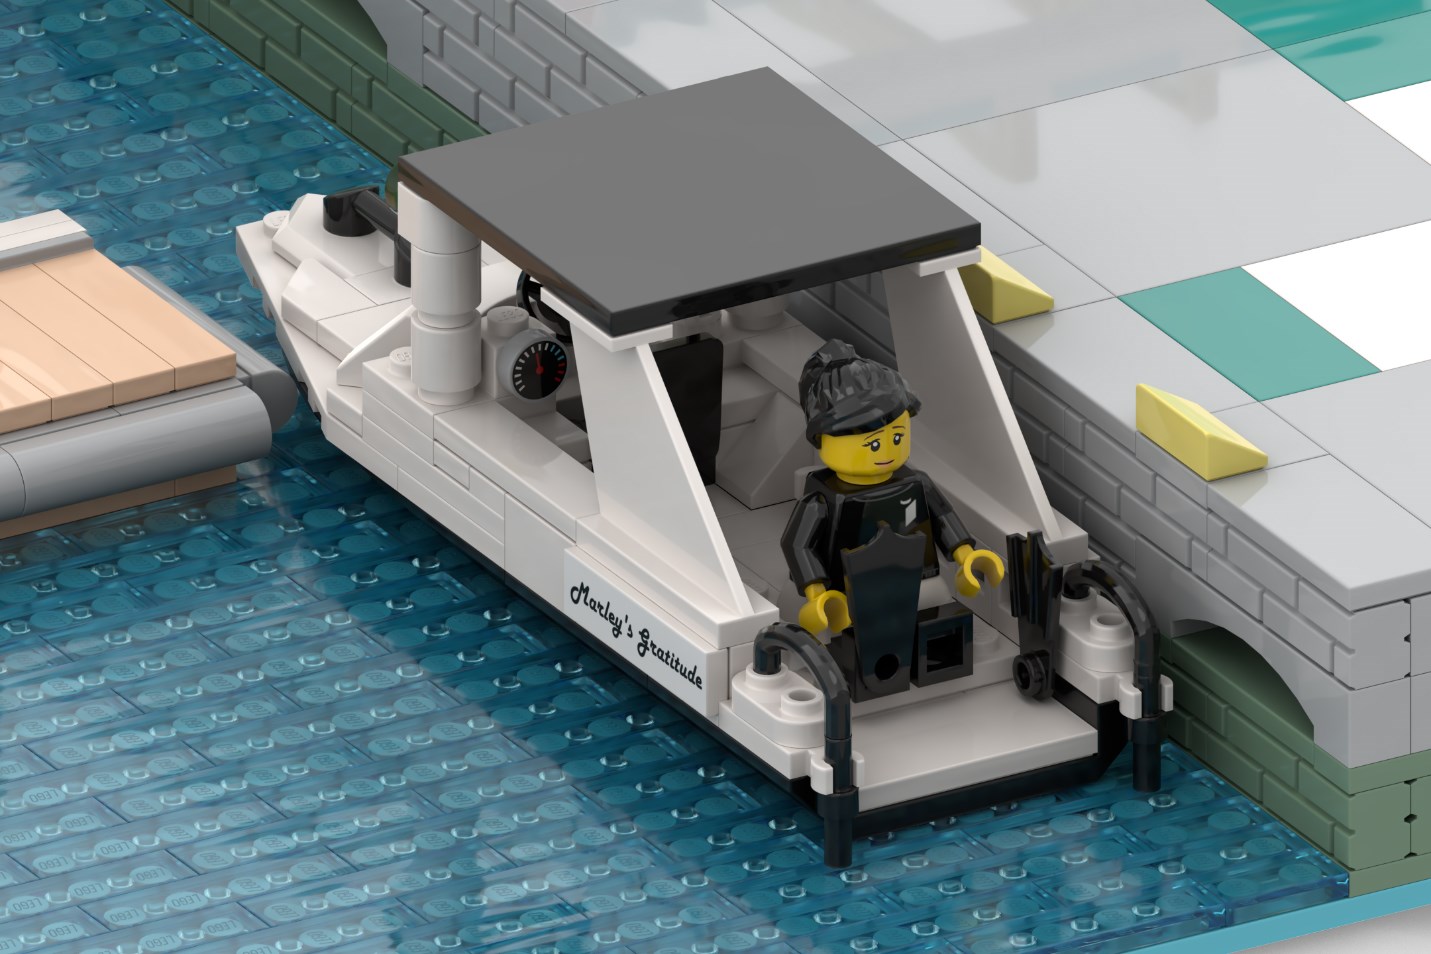
For this round of the Bricklink Designer Program, I wanted to build something that I would want for my own city, and something that would help others build their cities: a boat dock.
The Inspiration
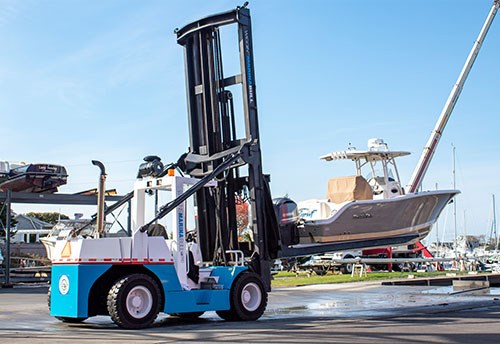
Some of my favourite designs from the BDP have been those that are things LEGO normally would not make, especially infrastructure. I thought to myself, “What’s something I’ve seen around me that I haven’t seen in LEGO form?” I remembered a time when I went to a dock at Cape Cod, and saw that the boats were stacked on shelves, where a forklift would move them into the water. I found that incredibly cool, especially as my own city has a heavy emphasis on the waterfront. So, I decided to give it a try!
The Build
The central feature of the build is the forklift that has a working boom. It is able to lift boats off of the shelf, and place them into the water. This “double arm” technique was the most challenging part of the build to engineer, but the end result is excellent! The boom is now able to move below ground level, and above the forklift itself!
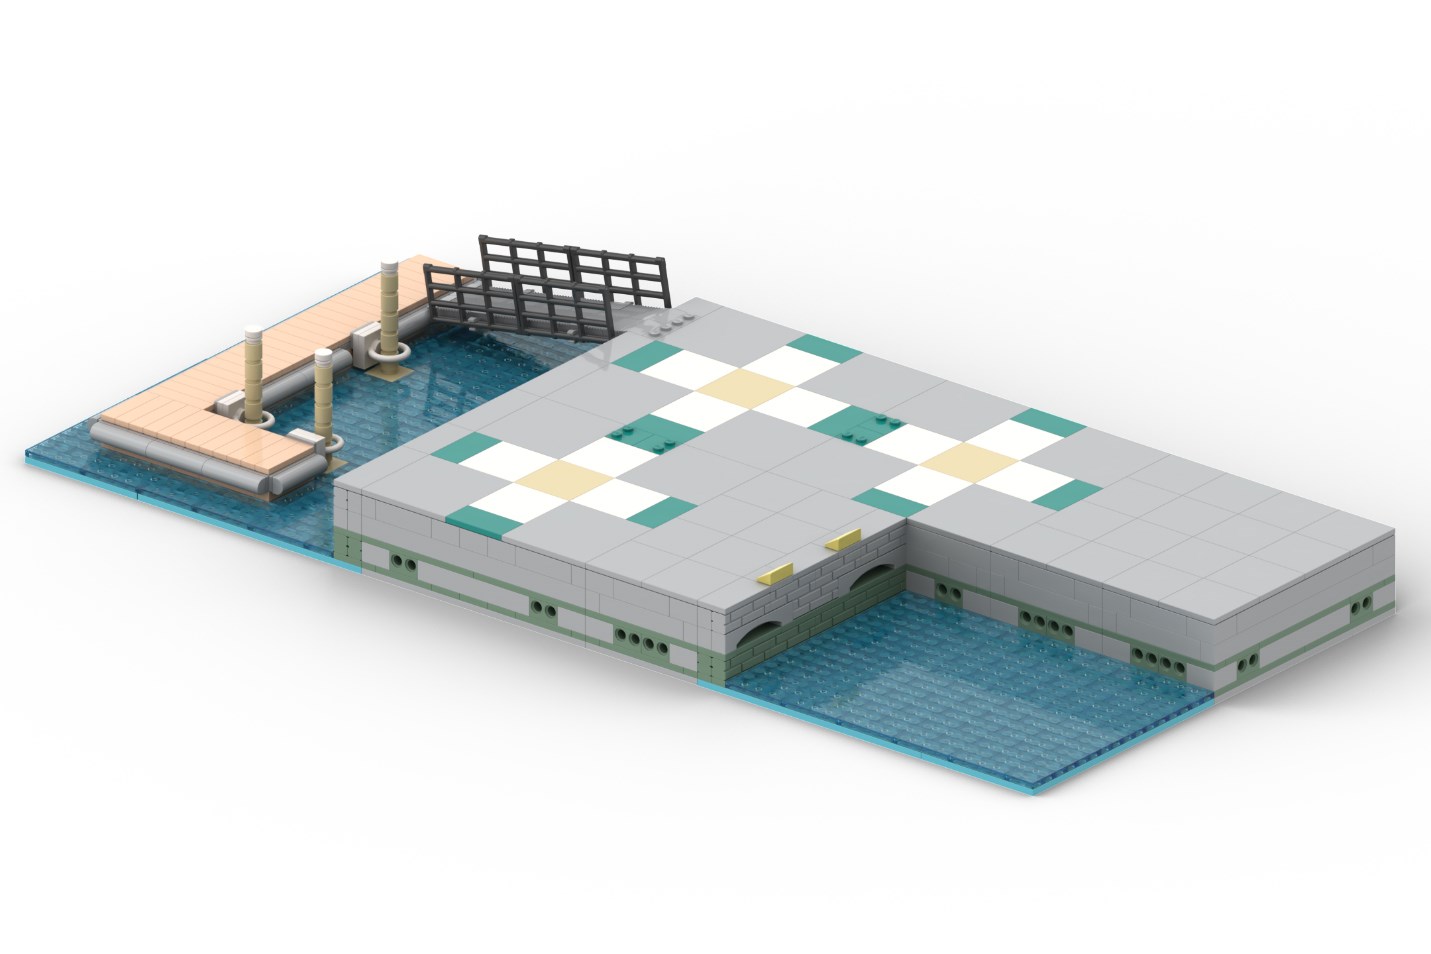
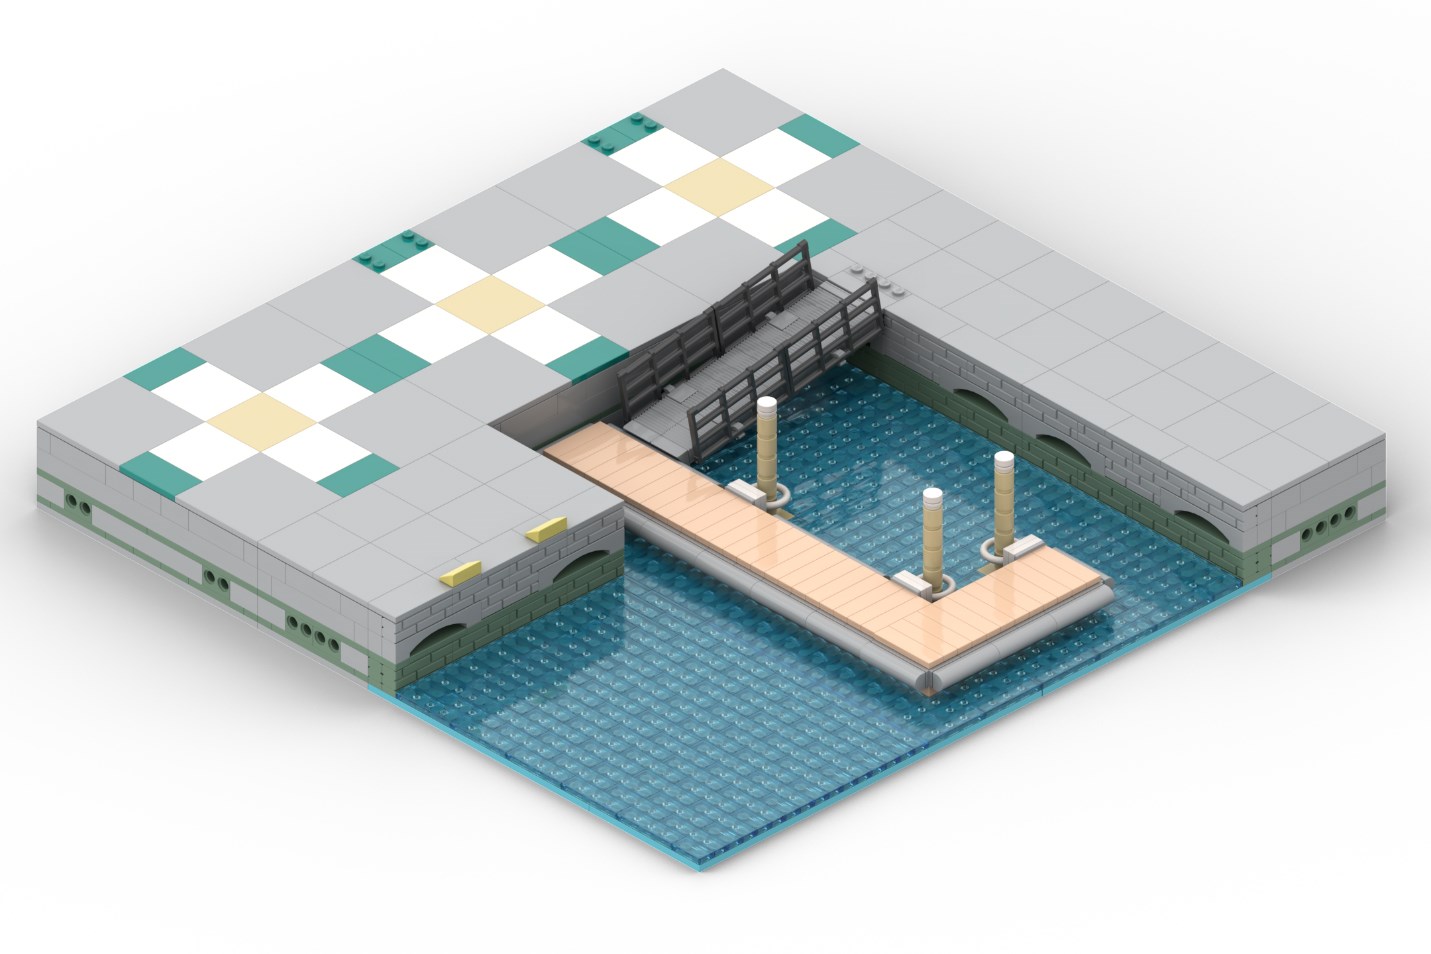
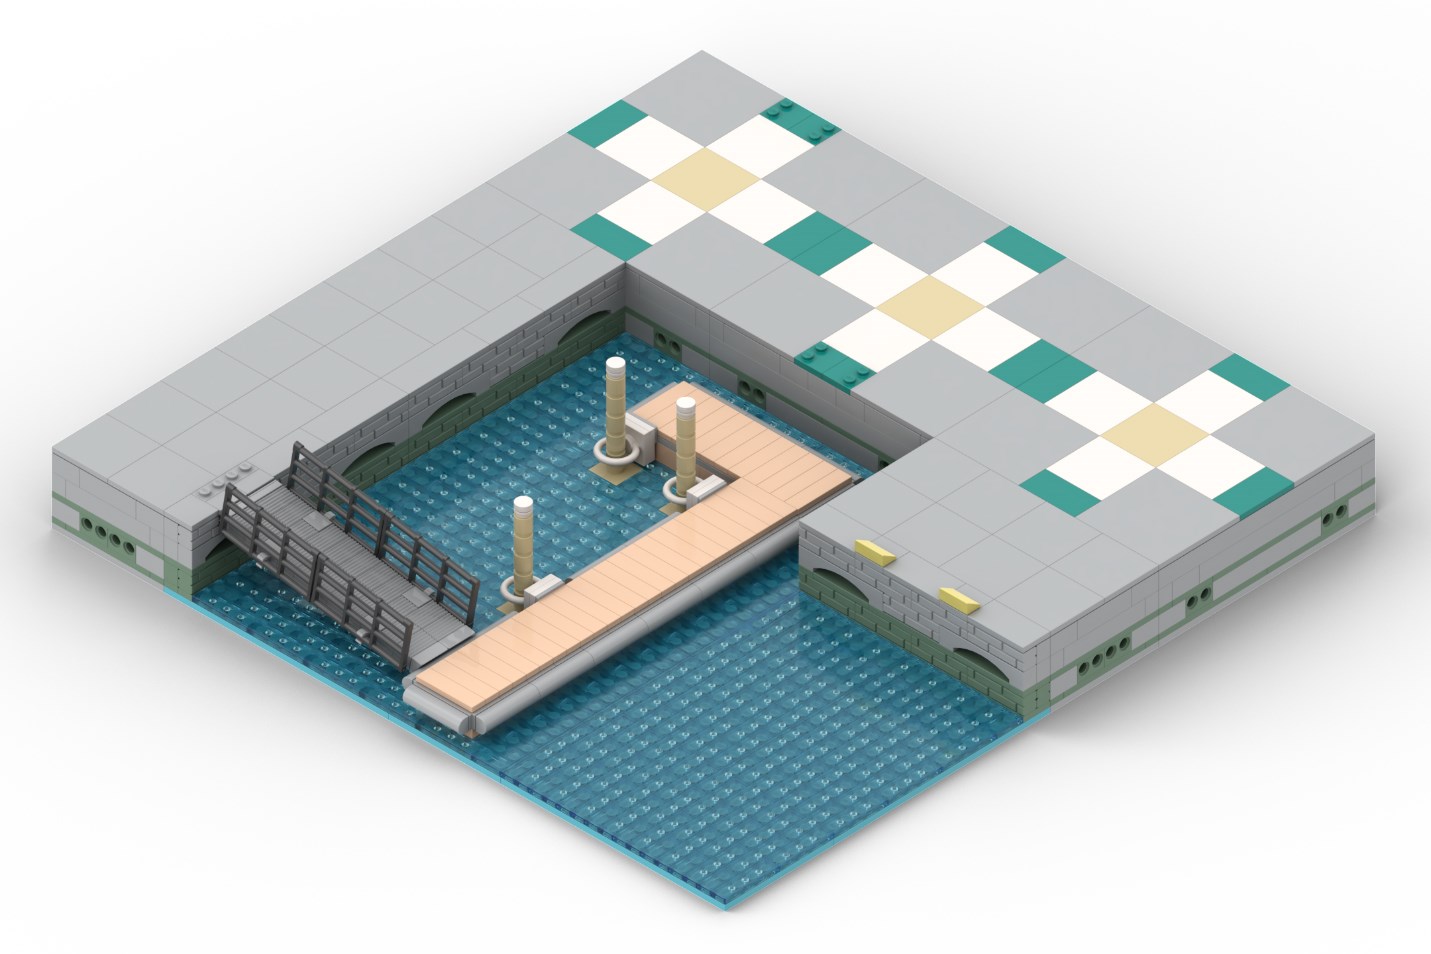
In order to give the forklift enough room to manoeuvre around, I built a dock raised above the water. Eventually, I had the idea to make the platforms modular. This allows for dozens of different combinations! (and even more if you move a few tiles to reposition the dock platforms).
Check out a few of my favourites:
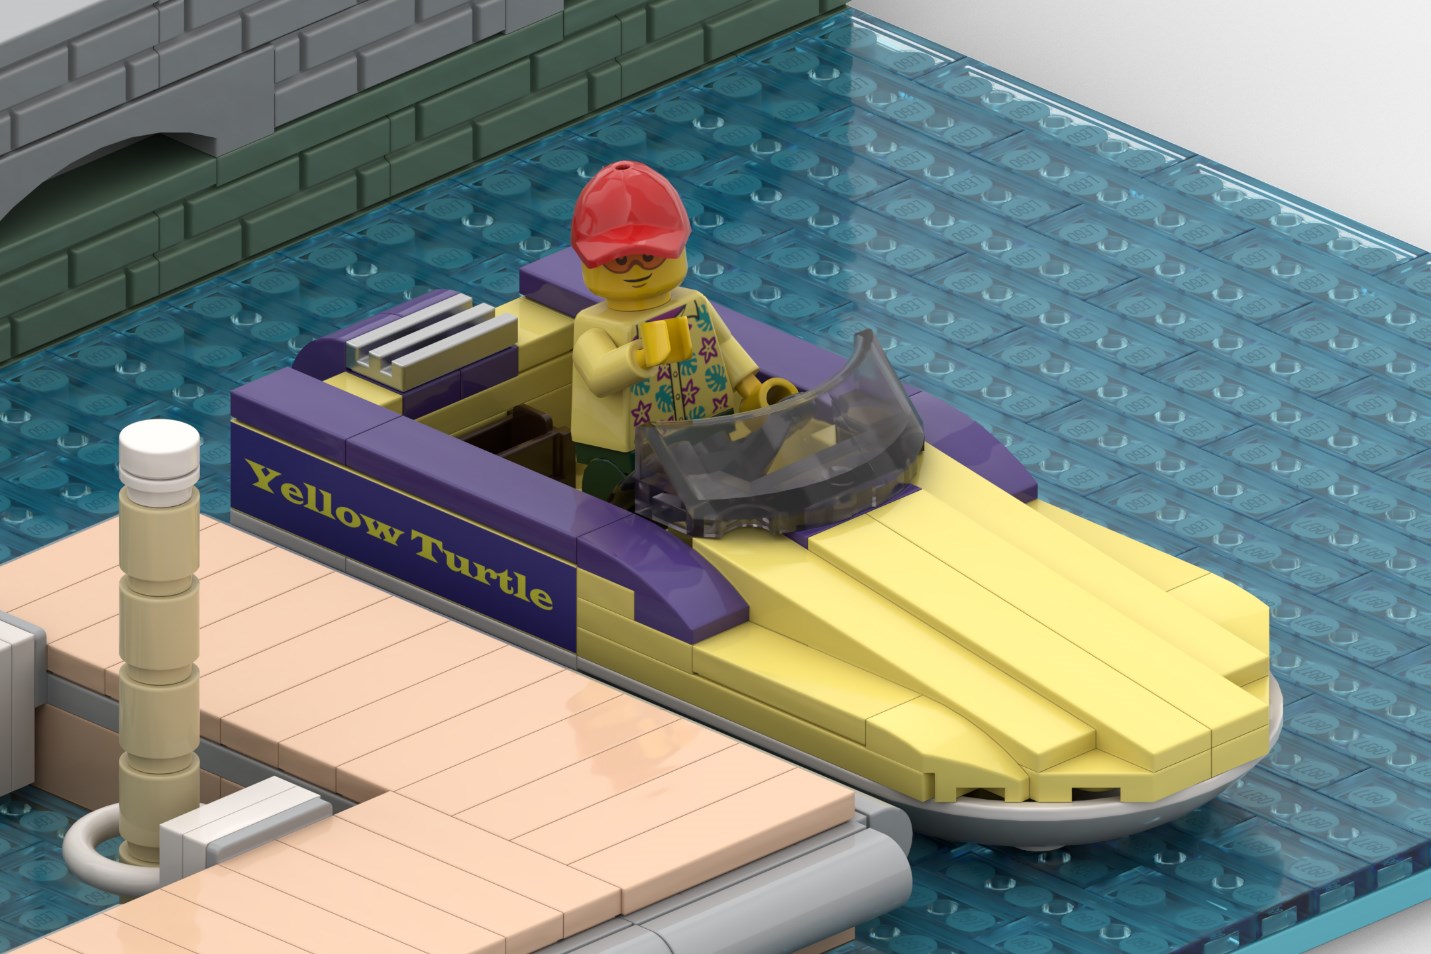
The boats were inspired by the parts I had available. I wanted each to feel distinct, with unique colours and purposes. I also tried to put a few niche homages into the two bigger boats. I wonder if anyone will notice.
The end design sits at just 1,702 pieces, but a couple hundred of those pieces are tiles for the water, so I assume the price would be more generous than a set usually at that price range.
I hope you all enjoy my design! I welcome any feedback you may have, as well. You can vote for it here. Voting is from now until the 17th, so you’ve got until then to help make this design an official LEGO set!
Not all discounts are available in all regions and there is some variation between them, such as 25% off 10332 Medieval Town Square in Australia, but it is worth checking the discounts wherever you are:
Today is the last day to secure the essential companion set to 75419 Death Star, 40771 TIE Fighter with Imperial Hangar Rack, as a gift with purchase at LEGO.com.
The orbital battle station is on back order in North America, so you may have to wait a week or two before you get your hands on it, but if you order it now, at least you'll have the imperial starfighter to fill the gap in the hangar bay when it does arrive.
It's the last day for the other current GWP, 40772 Celebration Series: Luminous Ghost, too, so best get your order in ASAP.
I discovered the Bricklink Designer Program (BDP) about a year and a half ago when my local group of LEGO friends told me that crowdfunding was under way for Series 1. These were fan-designed models and people could purchase them? I was intrigued.
I had just come out of my Dark Age the previous summer with the purchase of Ninjago City Gardens. It was late August (2024) when I began work on my first BDP project. My intent for this article is to show the evolution of my design over the course of 3 submissions and discuss the feedback I have received (both from Bricklink and the fan community) and how I have incorporated it.
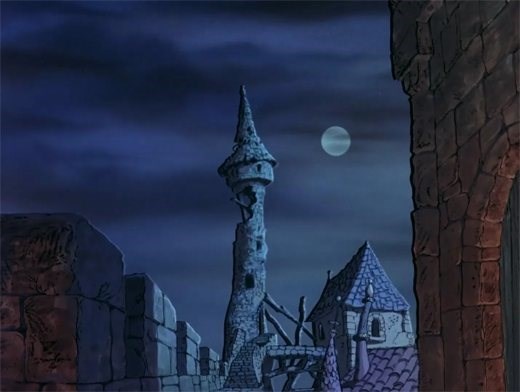
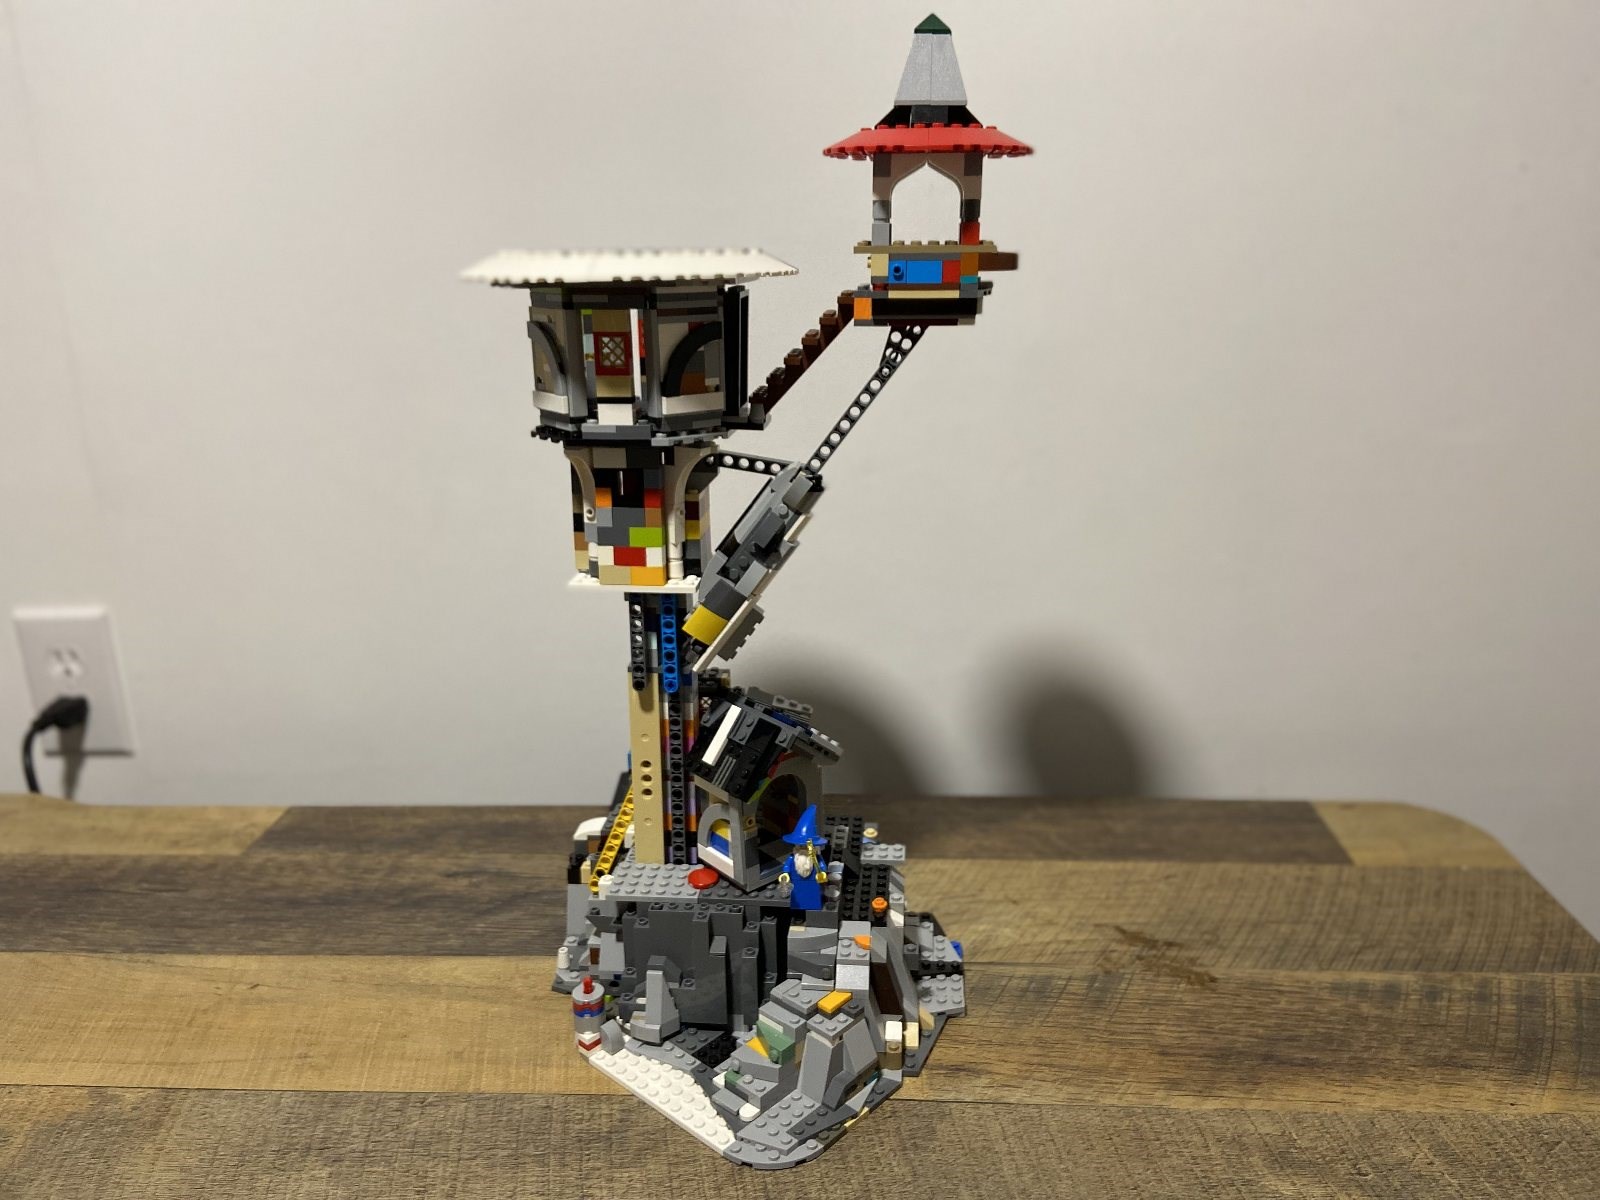
Growing up in the 90s, classic castle and pirates will always be my first love. I surveyed the upcoming finalists for BDP Series 2 through 5, as well as submissions that were not selected, and realised there have been very few Wizard dwellings. I decided a Tower might be a welcome addition to the program. I had only just started working in Studio for a couple of months. As a trained Architect who works in a digital 3D medium, the learning curve was probably not as steep as it could have been. Since LEGO re-released Majisto’s Workshop recently as a GWP, I figured a “Tower” would be a better approach than a house.
Merlin’s crumbling tower from the classic Disney film, The Sword in the Stone was the start of my inspiration
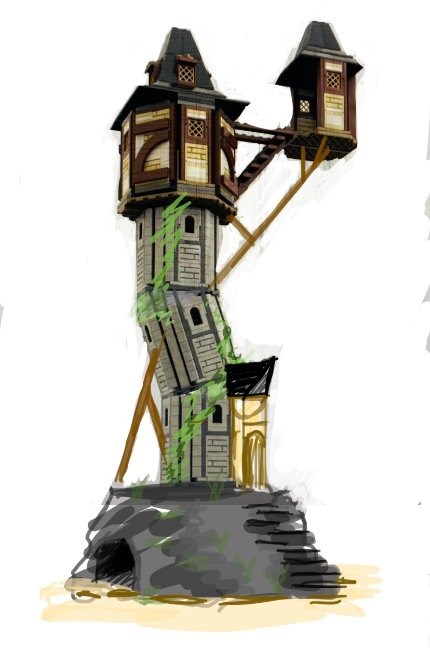
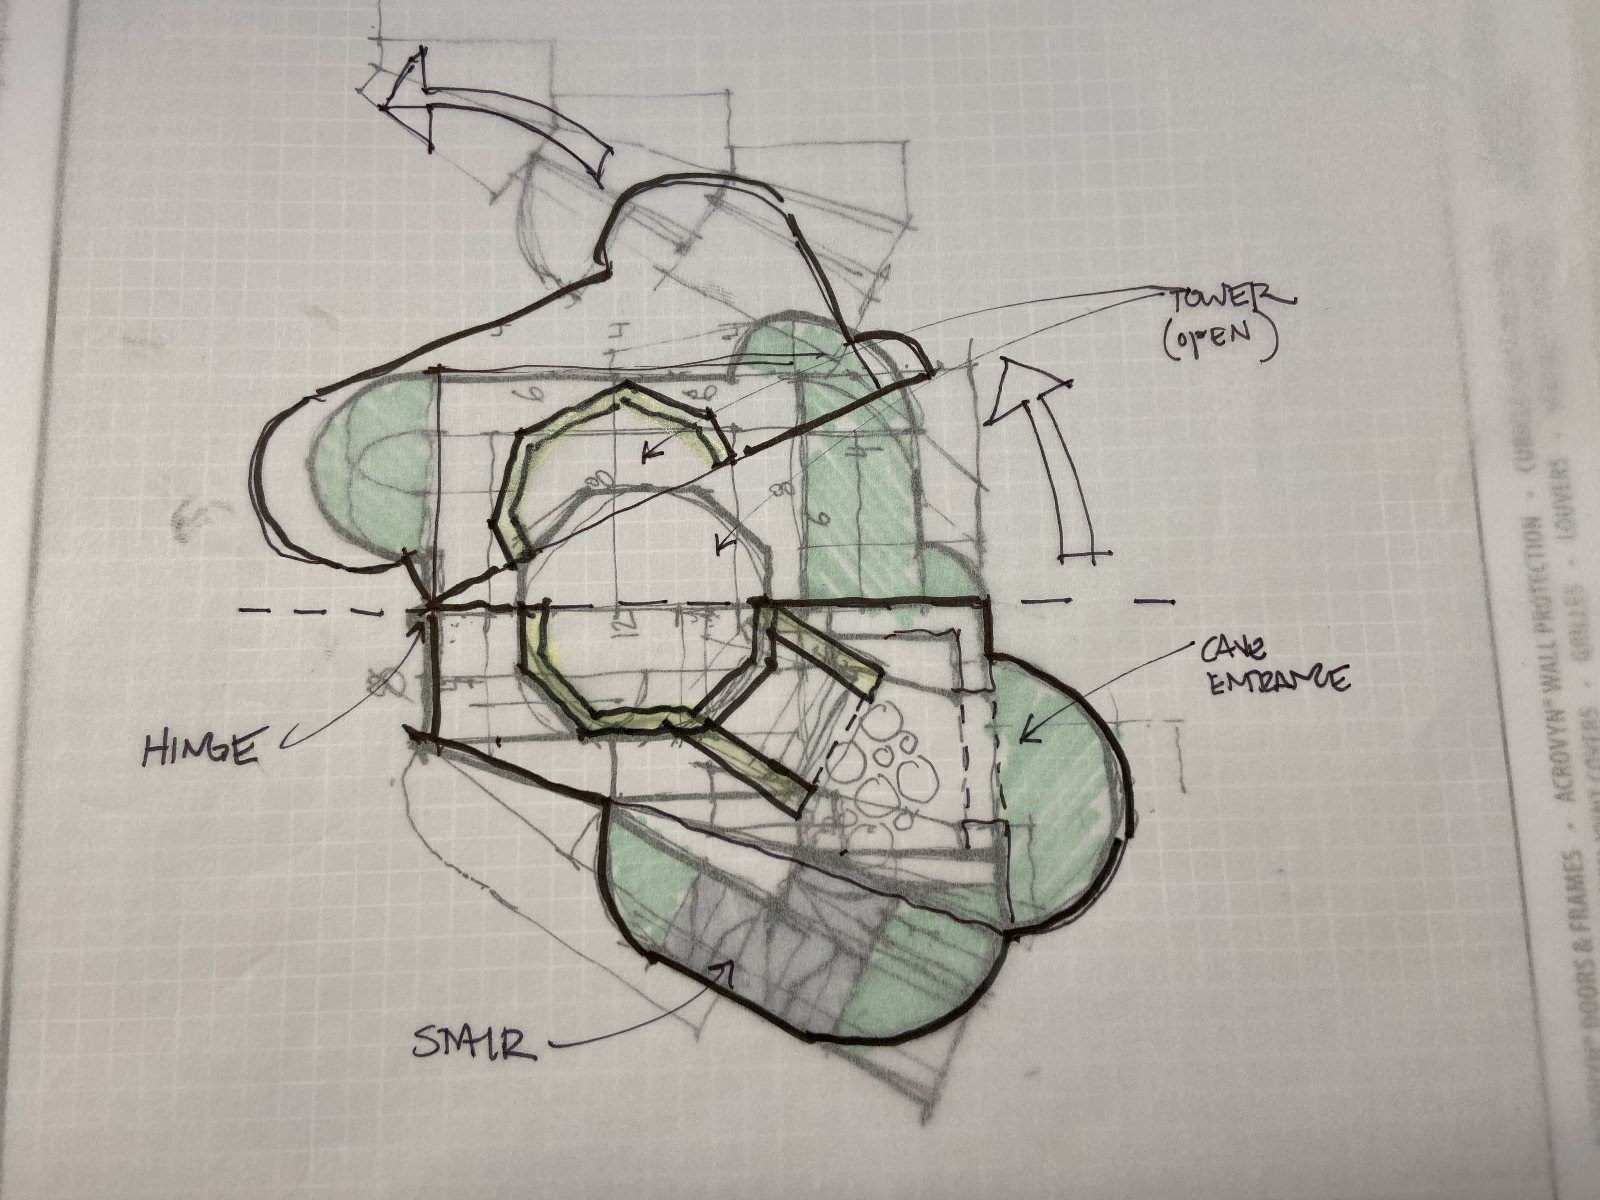
My process began with blocking out the massing and shape of the tower. Since this tower is meant to be crooked, I figured I would get the angles first and deal with the structure later, a decision that proved to be almost fatal (more on that later).
In this sketch you will see some of the massing and shape blocked out and rendered in Studio. I then overlaid the rocky base, entrance, wood supports, and foliage, with other digital means to get a better sense of where the design needed to go. This is similar to how I work professionally. It helps to get an initial idea massed out digitally to the correct scale and then overlay by hand more detail to flesh out design direction and concept.
I decided that I did not want the base to be square but rather angled with wedge plates. And as you can see from the sketch, I also wanted the entire thing to fold open like a dollhouse (like the Lion Knights Castle). This was rather difficult to do digitally and required looking at many articles and reference sets to figure it out.
Series 6 submission
After Series 6 I went back to the drawing board. I reached out to the Bricklink team as well as the LEGO community for feedback. The two main takeaways were to connect the minifigures to castle lore (factions, named people etc.) and to do something about the wooden supports under the observatory.
I came up with this sketch of a tree going through the tower and supporting the observatory. Rather than redesigning all the angles, I added black tiled slopes and other pieces onto the Technic beams. The structural support remained the same, but the curves of the tree trunk itself make a big difference.
Series 7 Submission
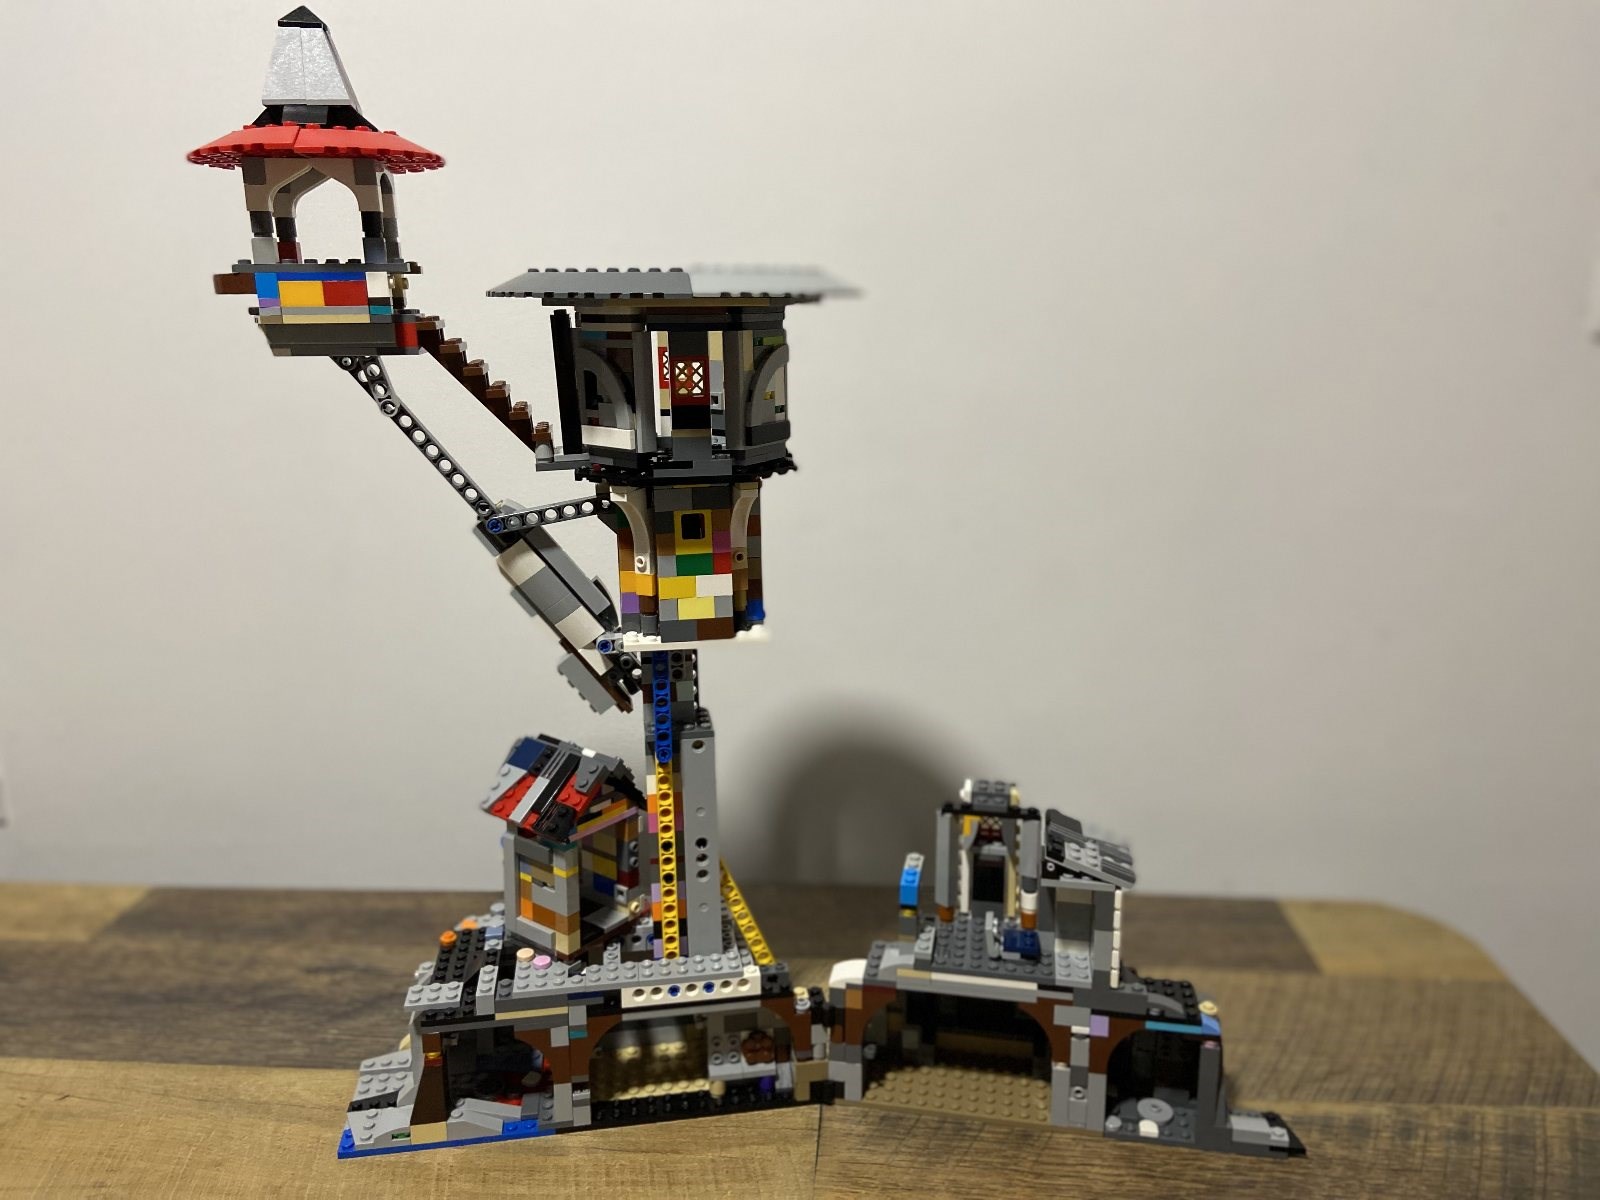
The most substantial update was the tree support underneath the observatory. This gives the effect that a tree has started to grow through the tower. The other change was the introduction of the wizard Majisto as the central character and adding Dragon Master and Wolfpack minifigures. This model was apparently well received during the voting. I was told by the Bricklink team that they built a test model, but there were significant stability issues. They said a physical test build on my part would be worth it to determine how to improve stability.
I decided to skip series 8 and spend the summer working on a physical model. With the help my friends, I was able to gather enough pieces to do a test build of previous Series model and determine where the stability issues were. I moved the entire to the front portion of the base. This allows for a 4x4 structural core composed of Technic beams and columns reinforced together with pin connections.
Series 9 Design
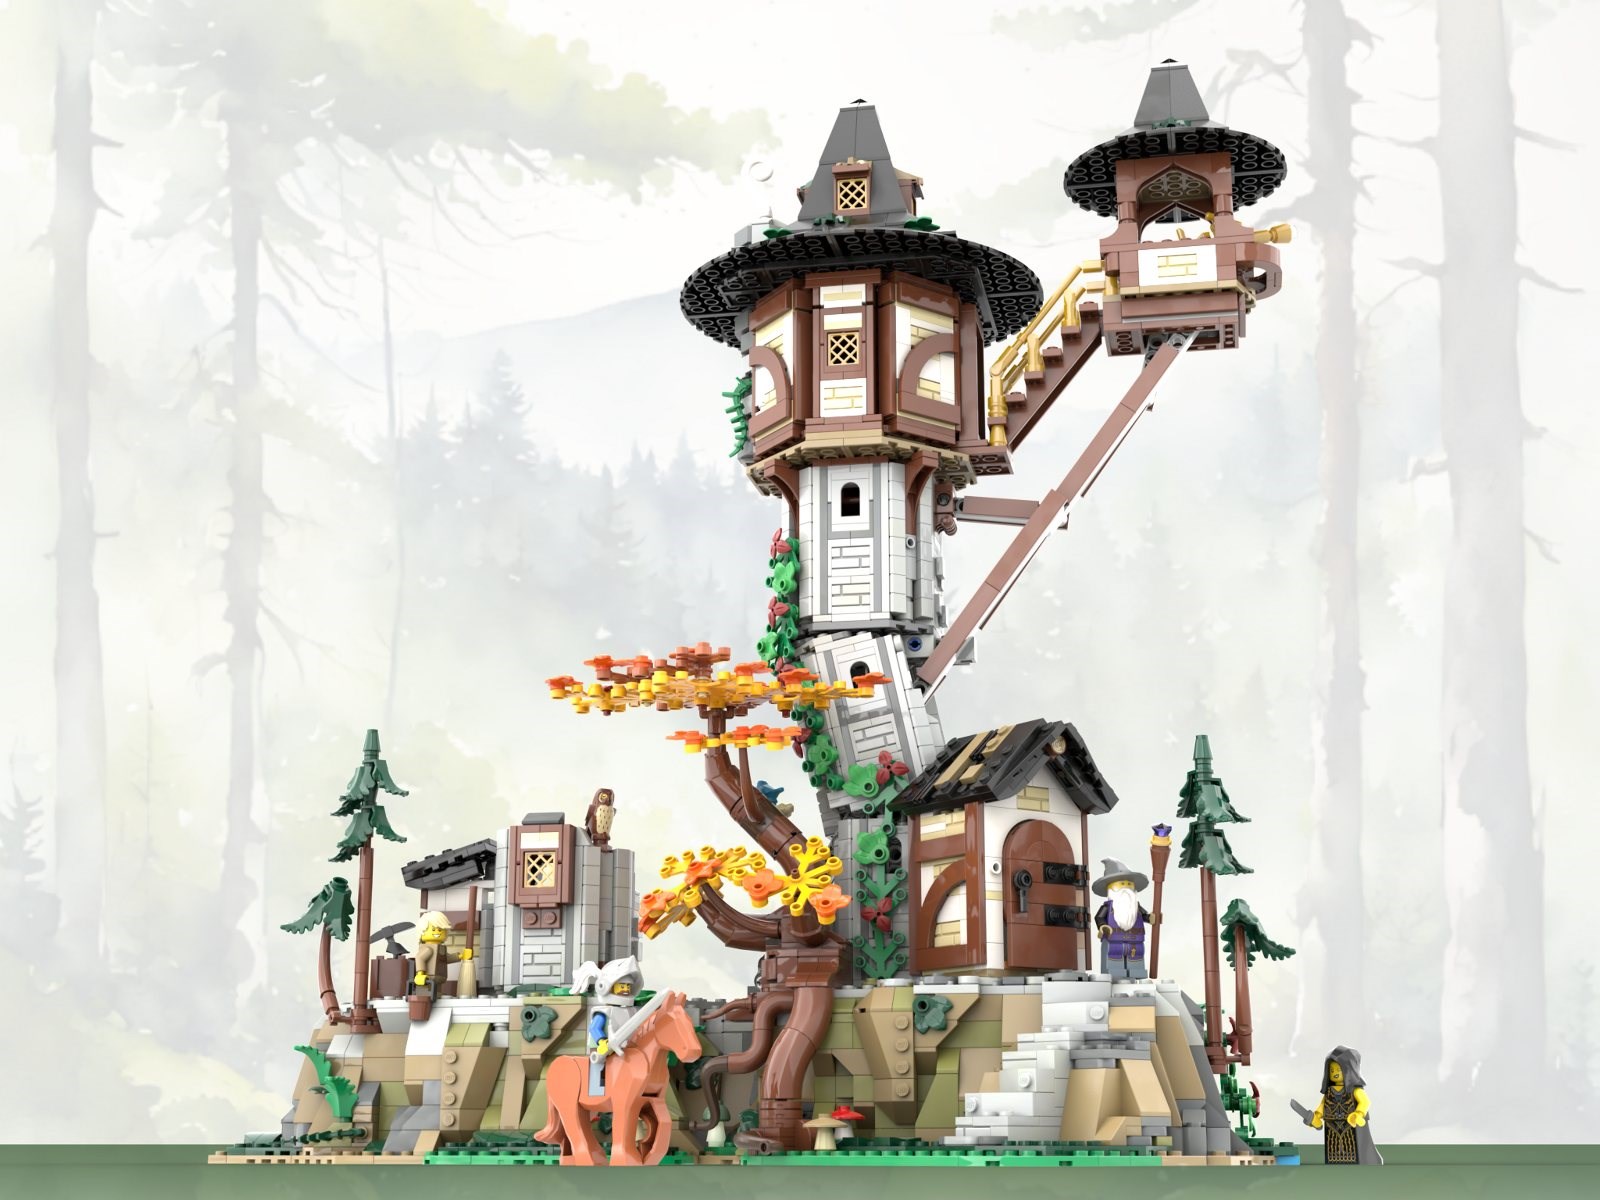
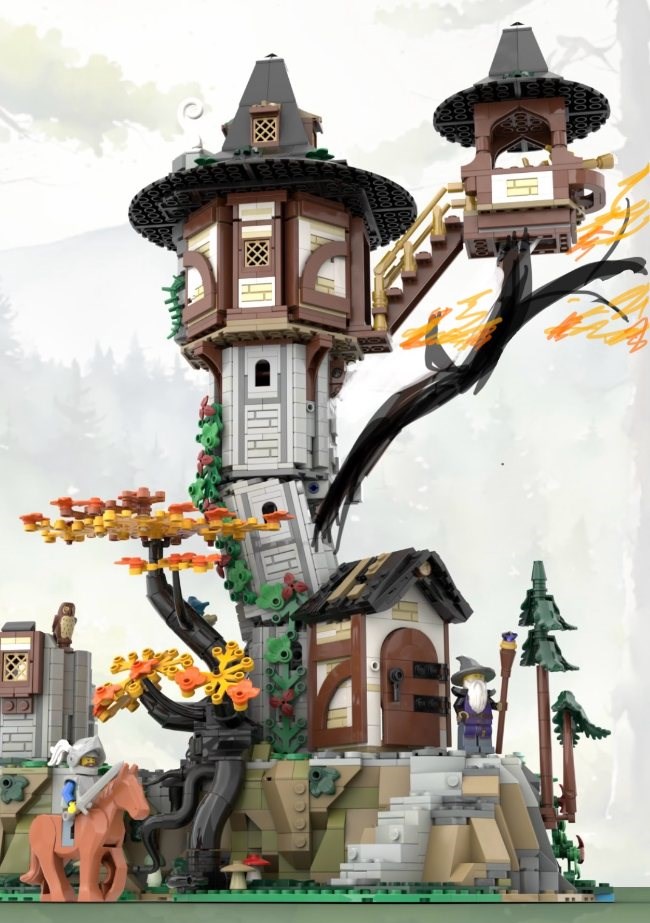
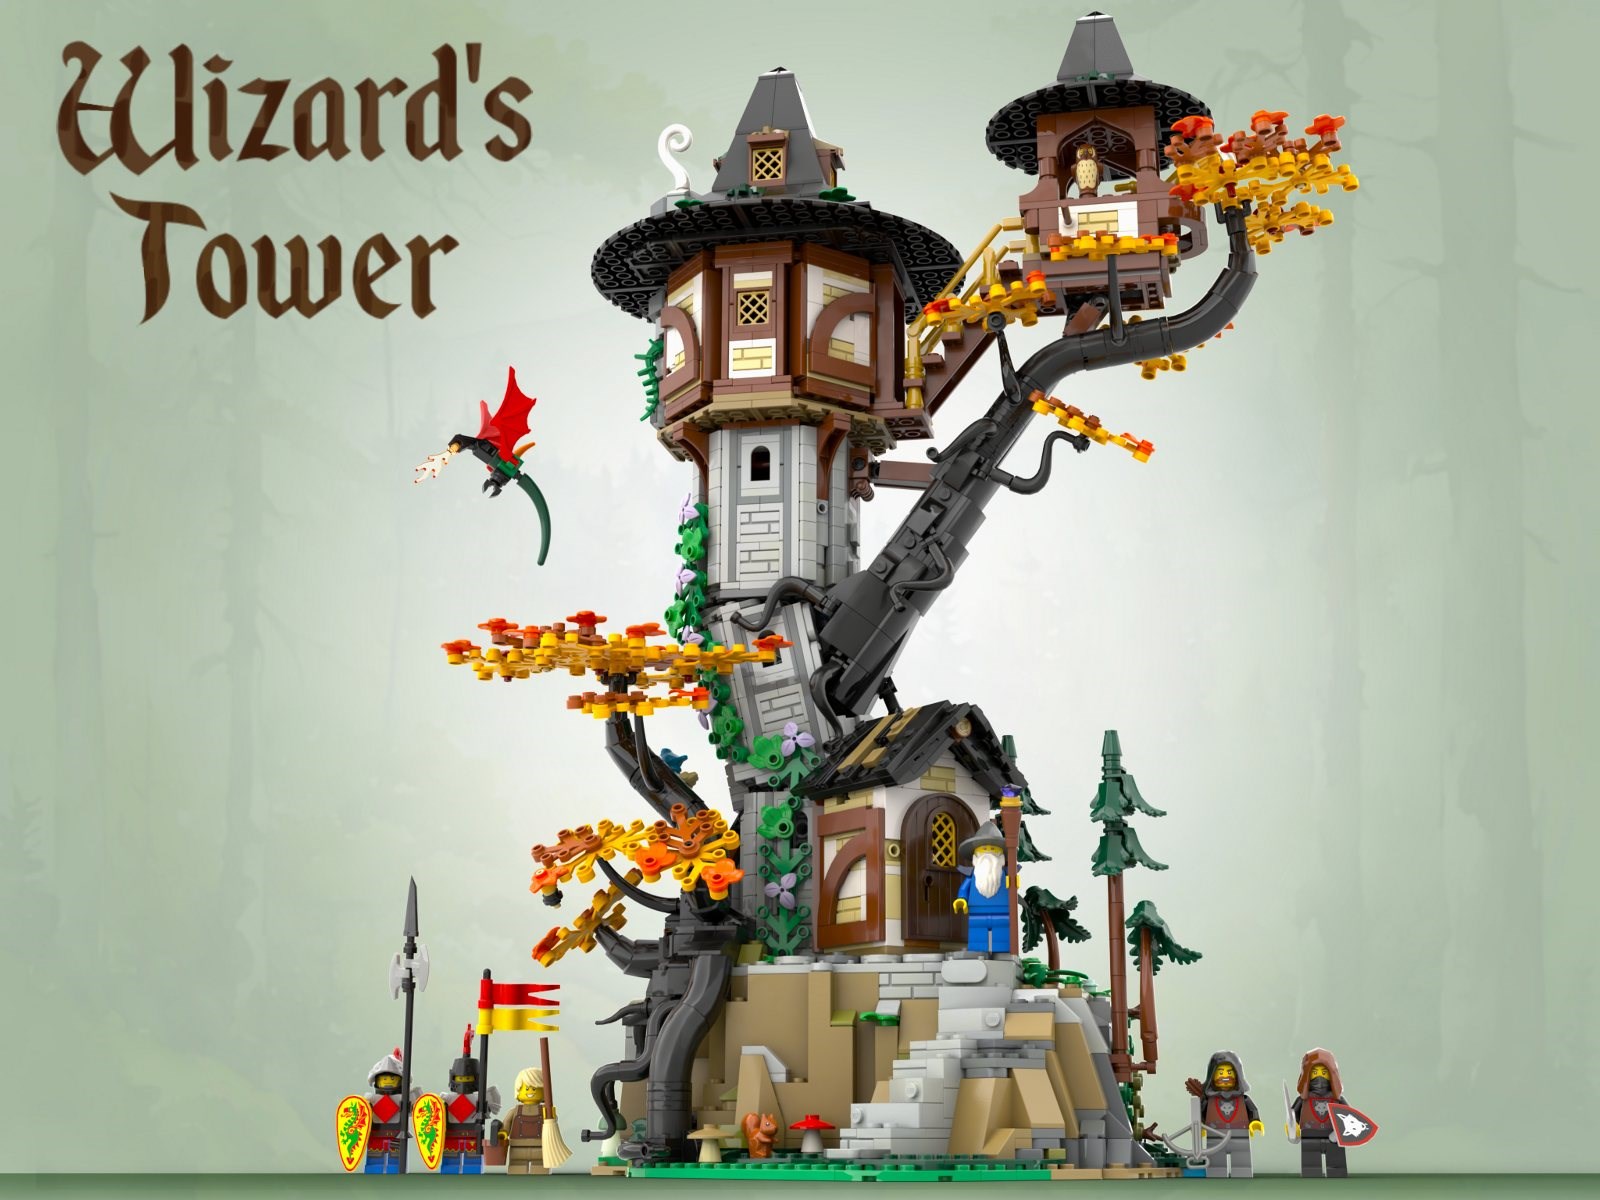
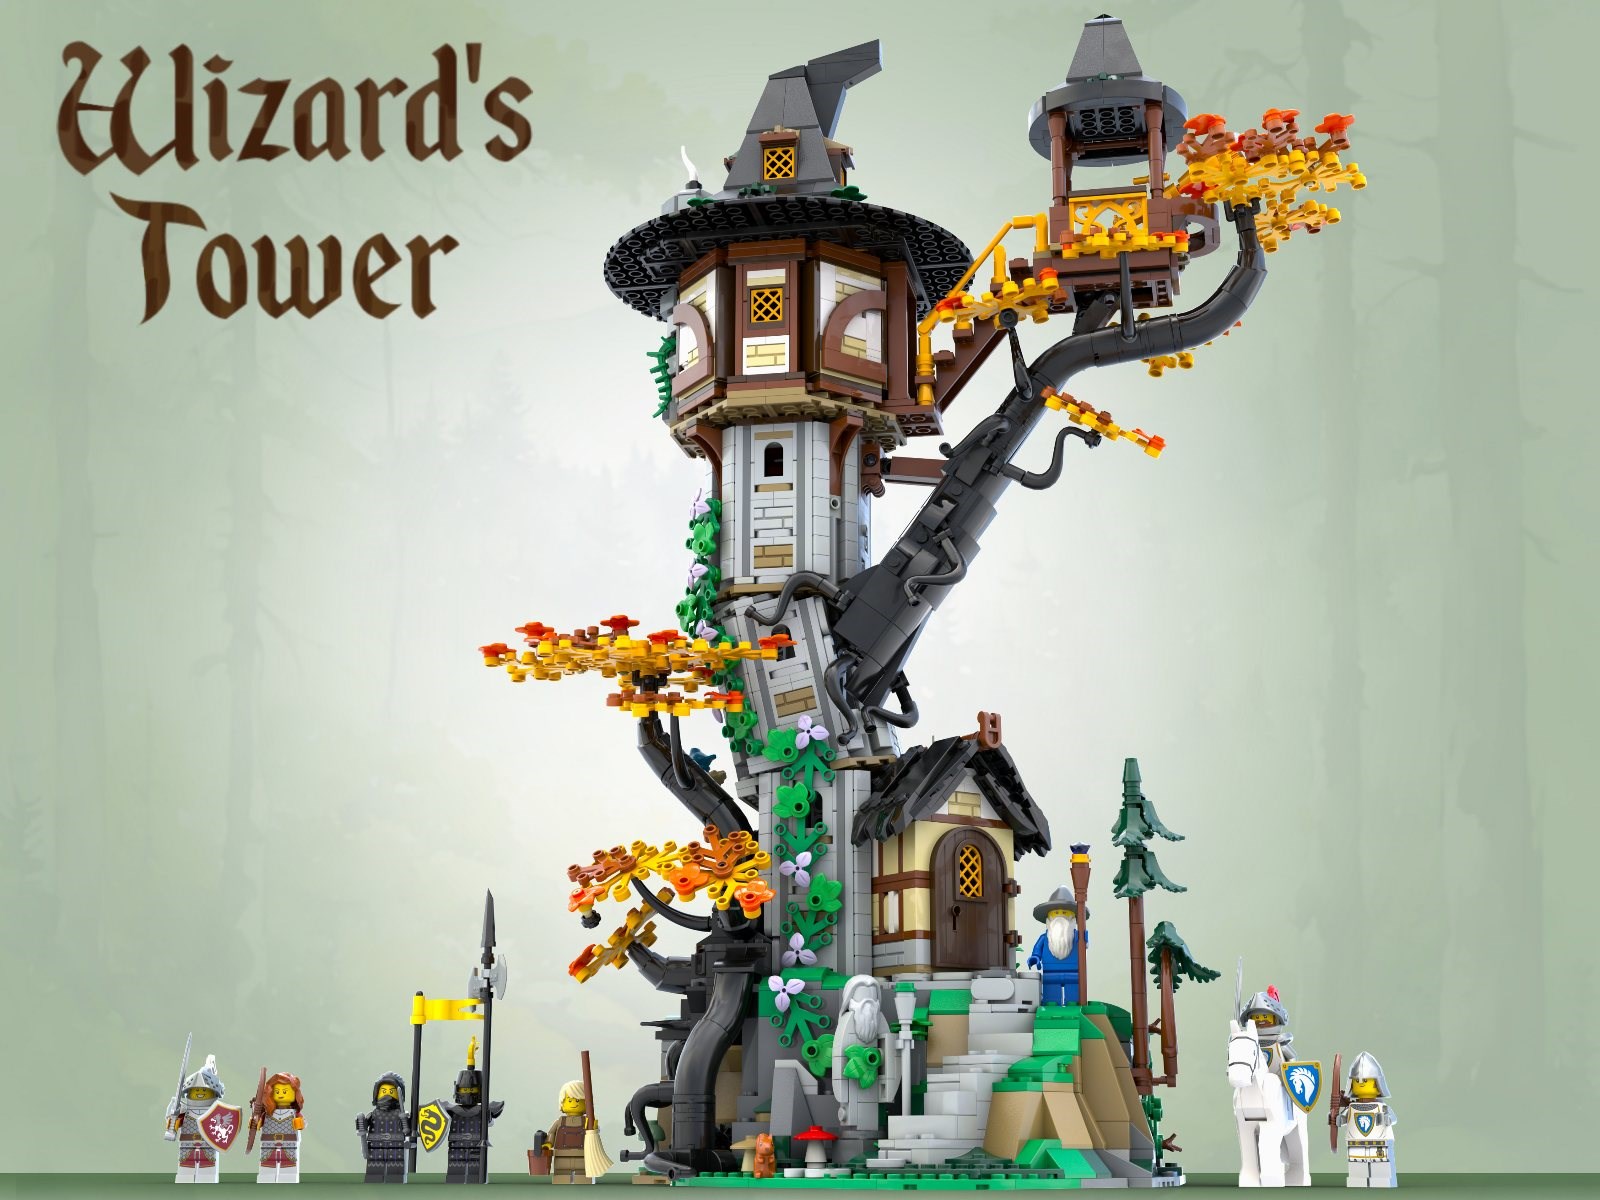
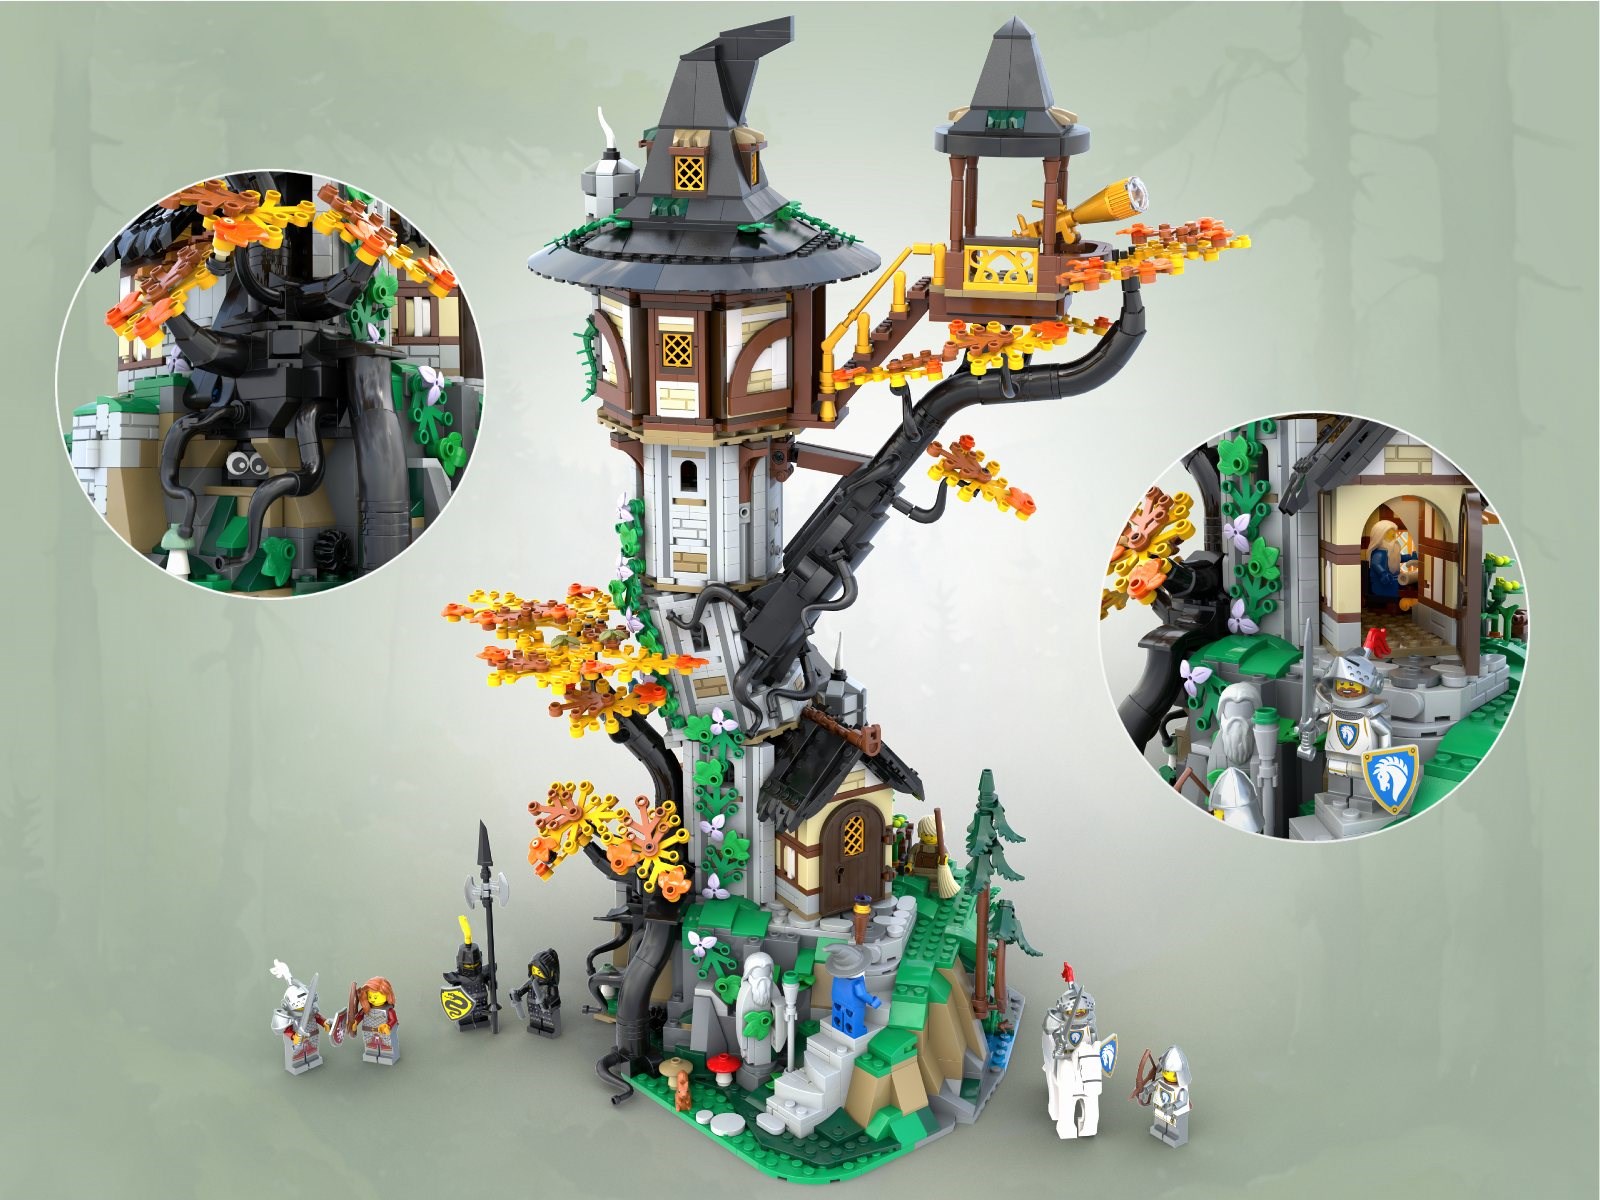
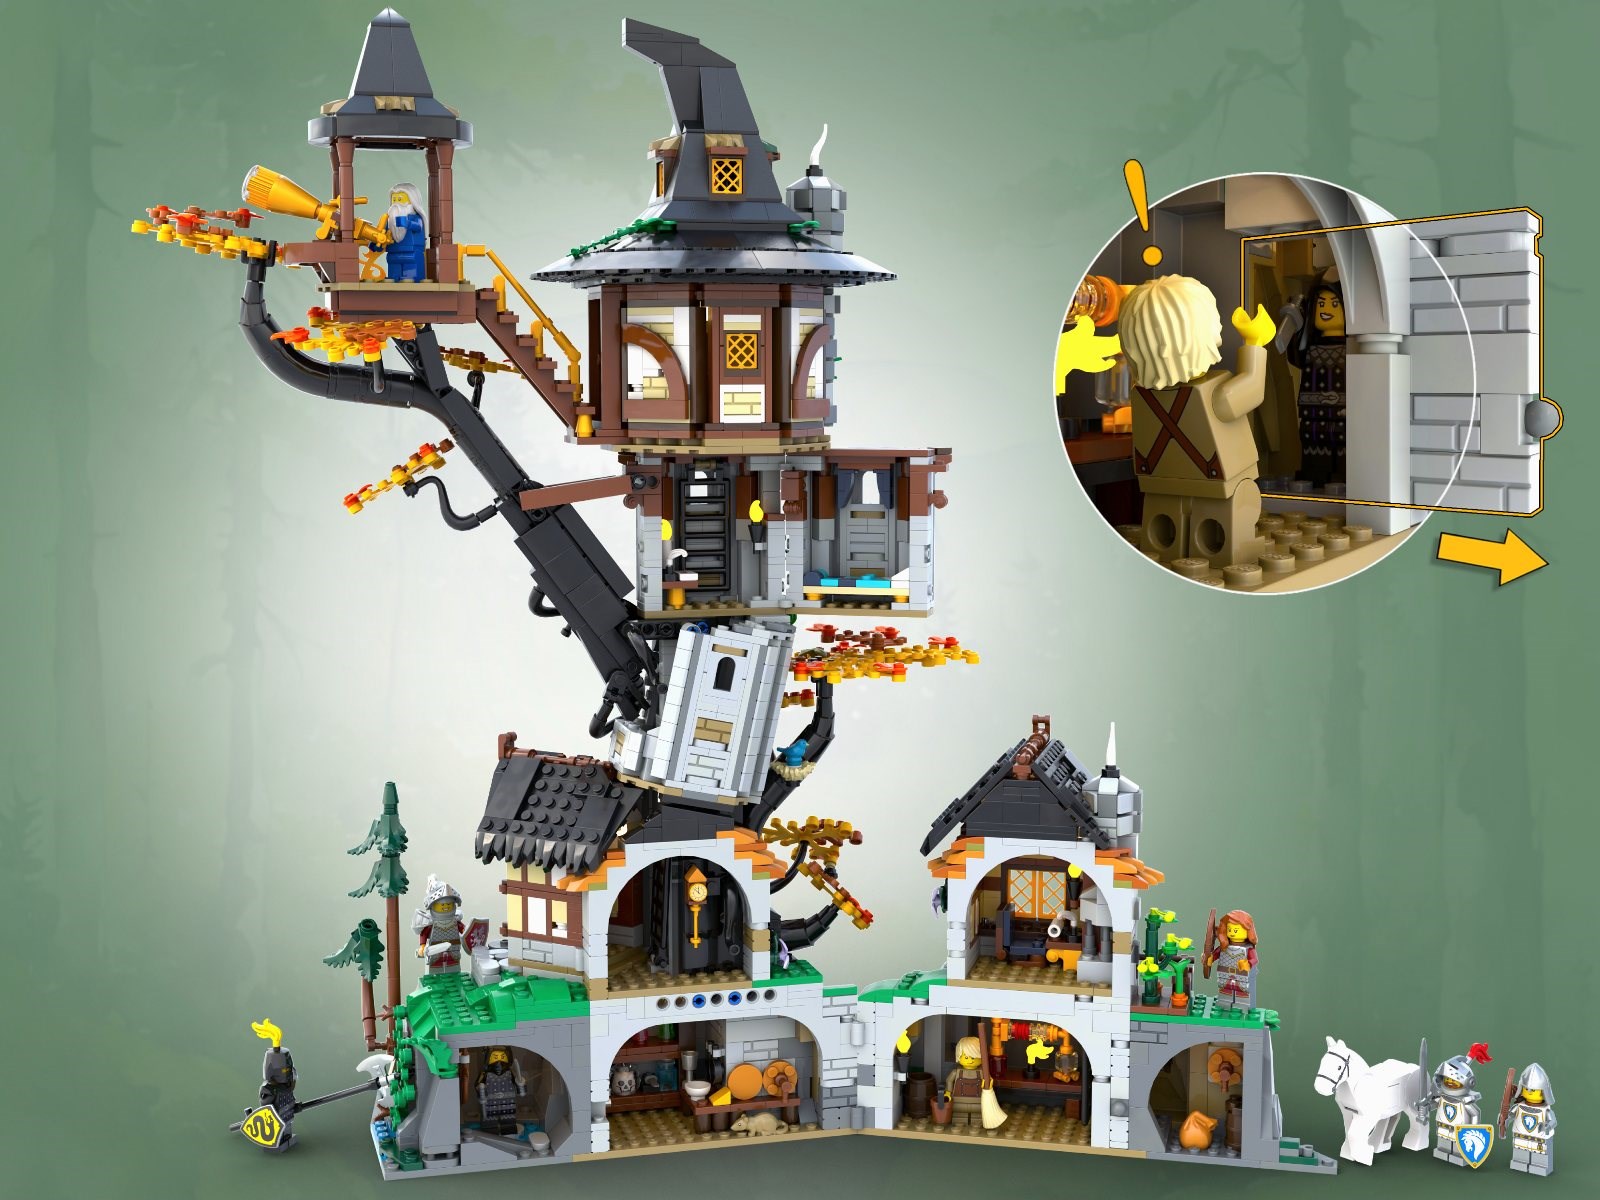
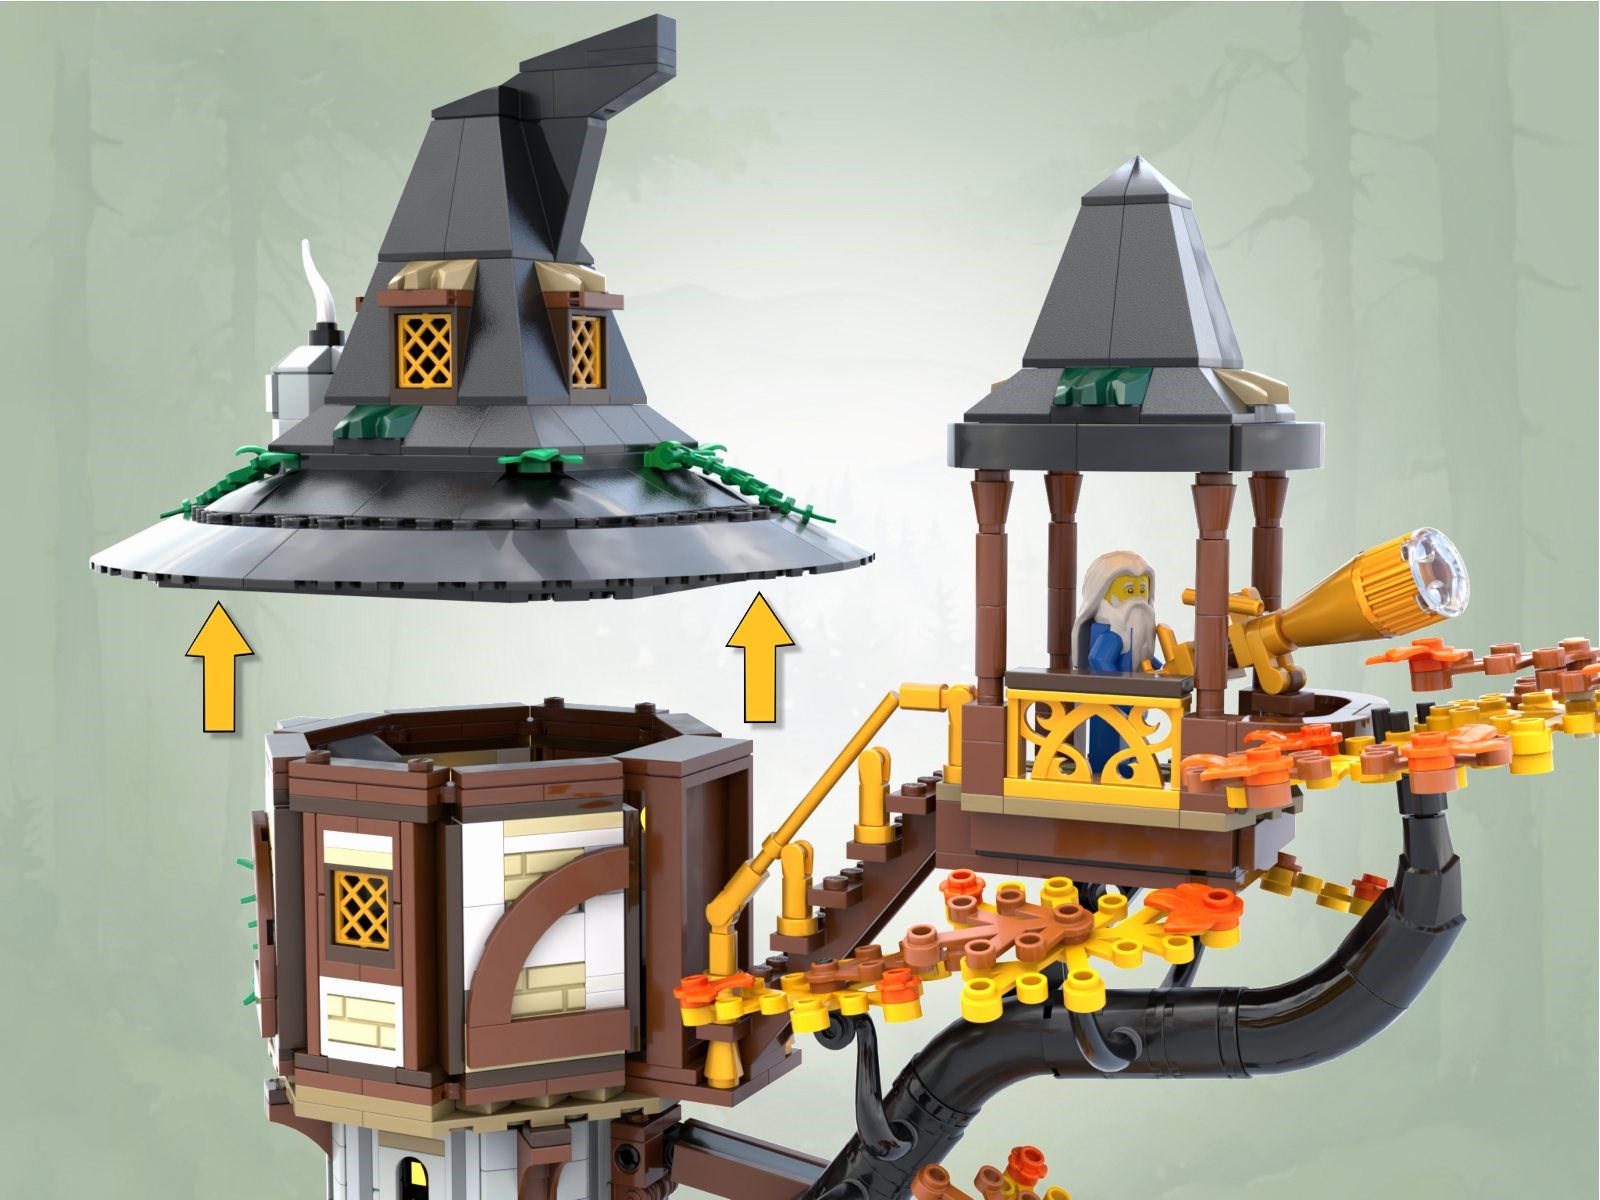
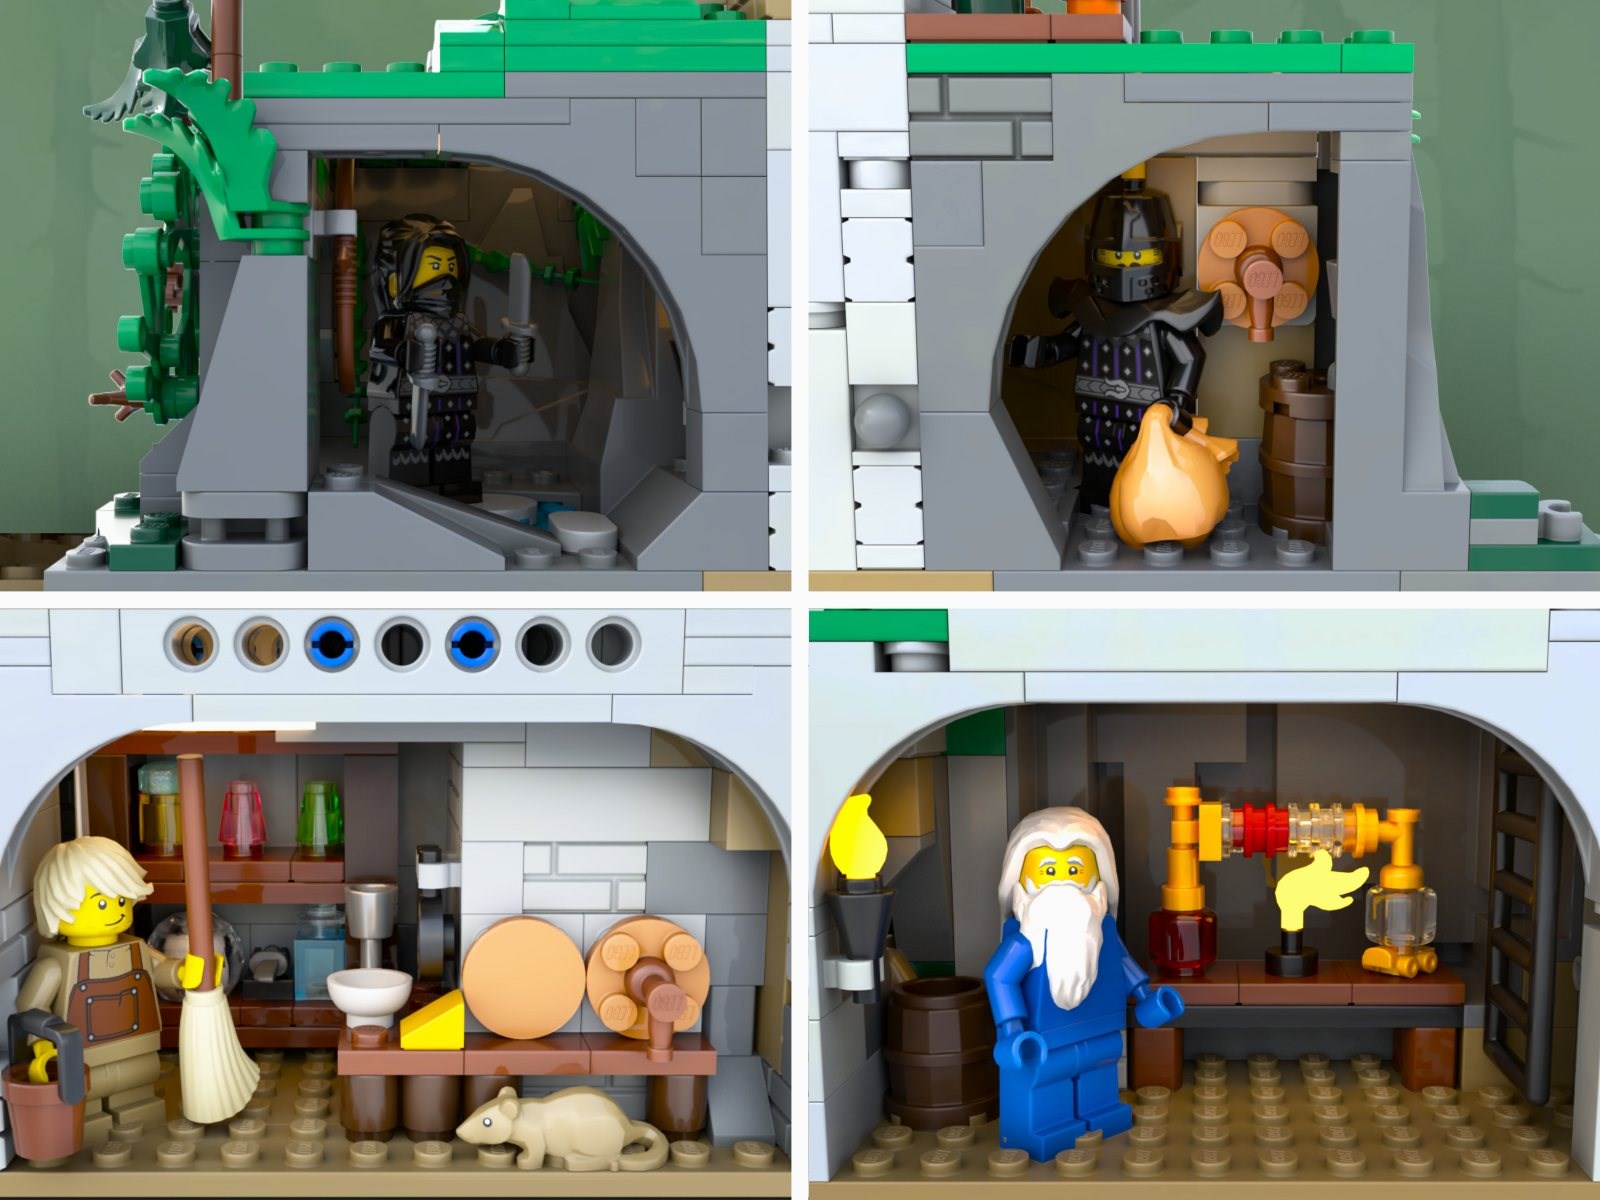
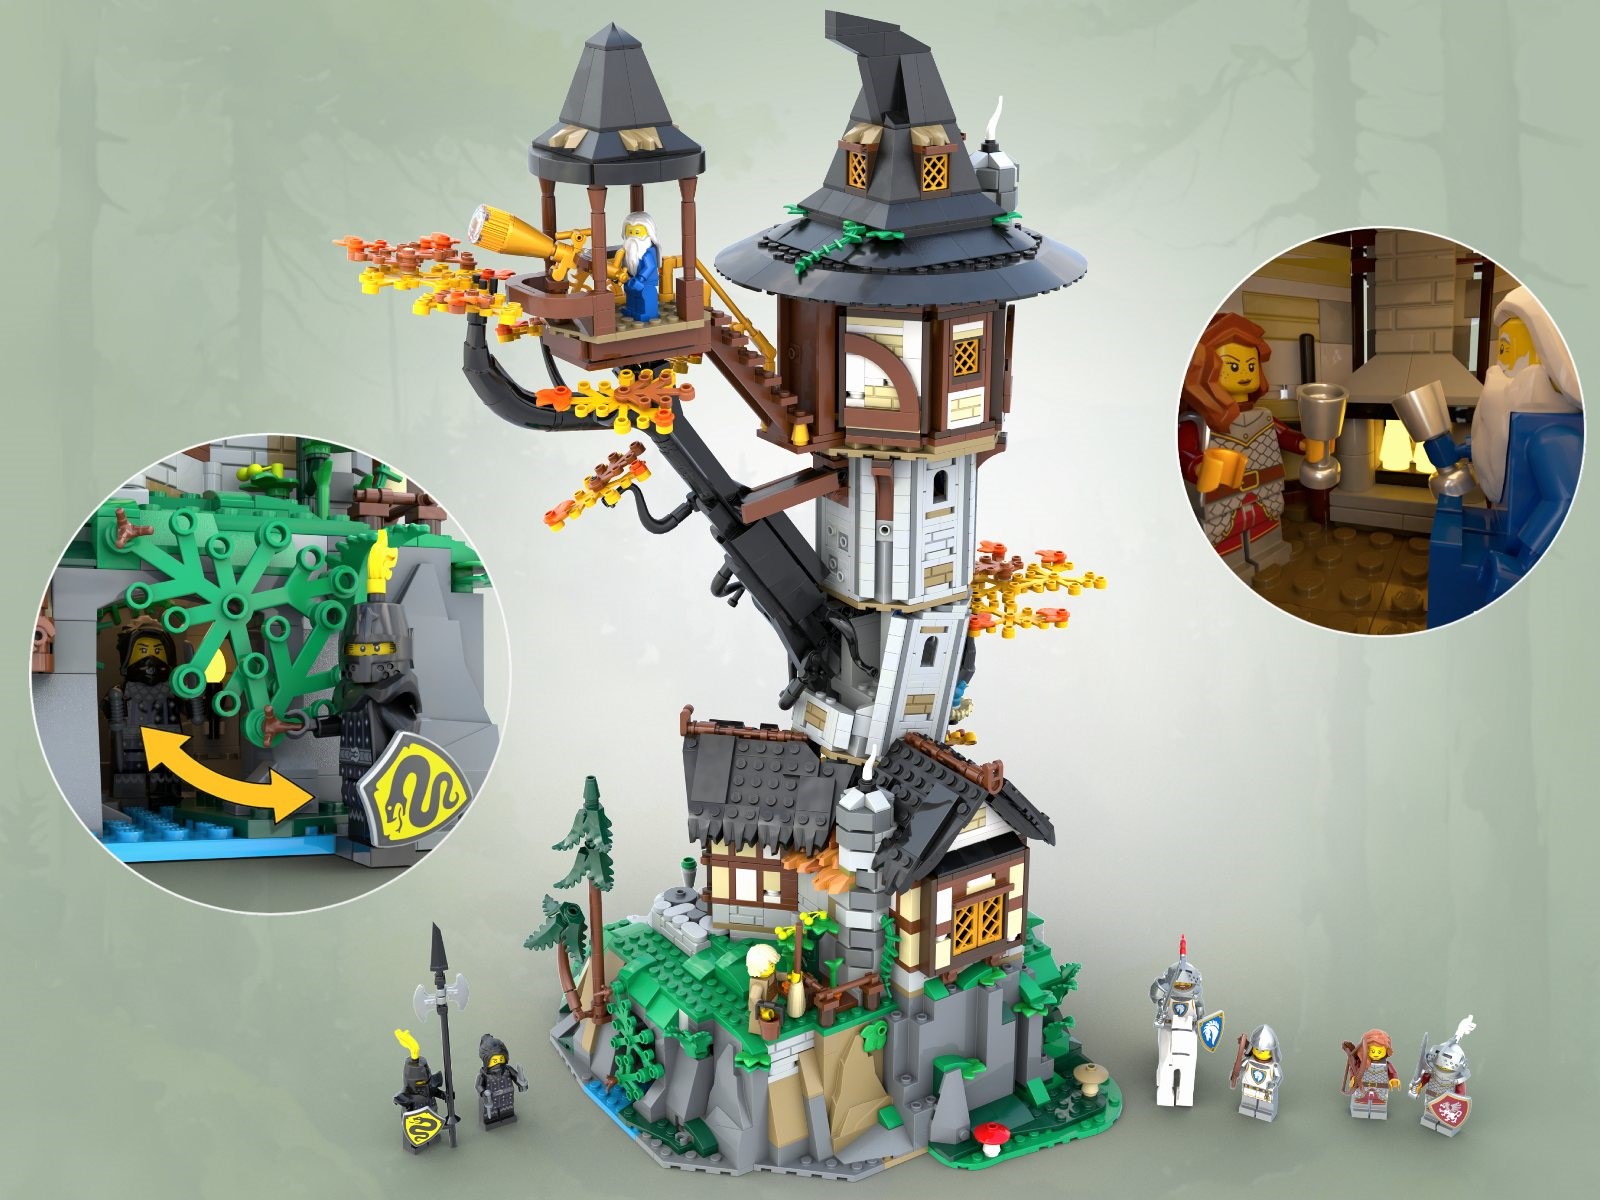
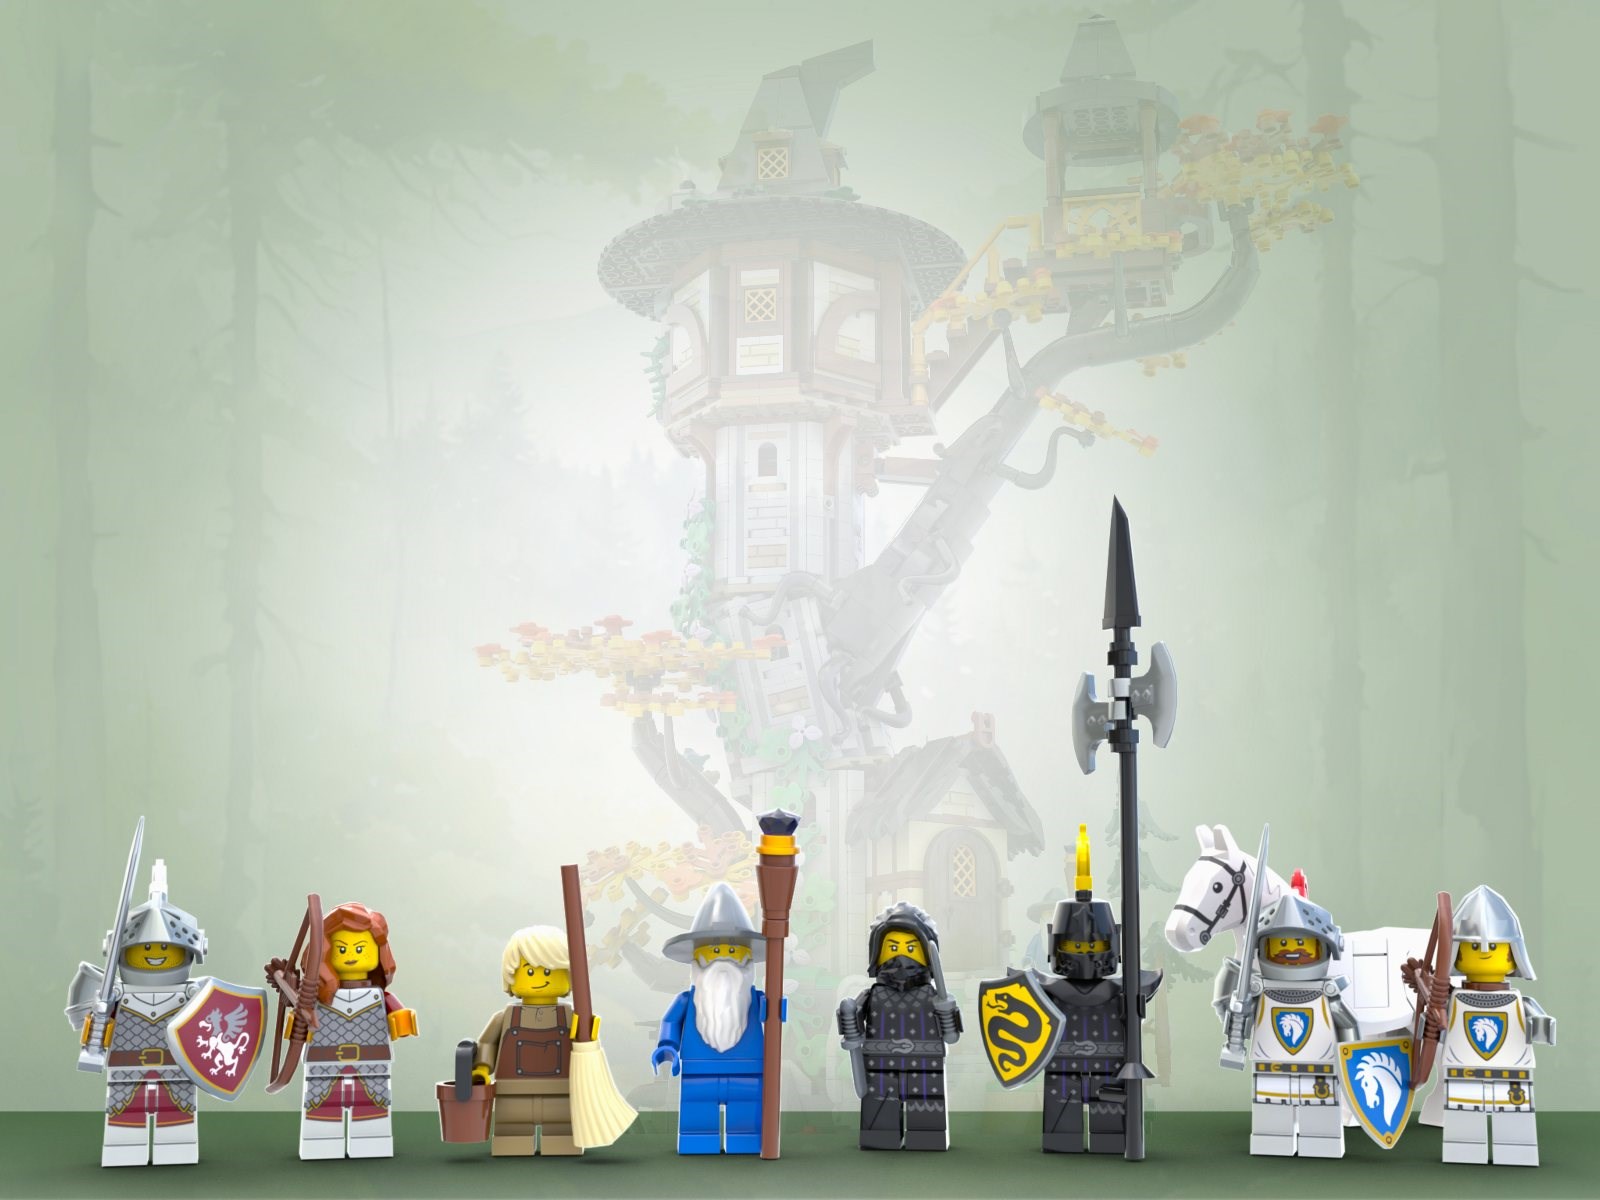
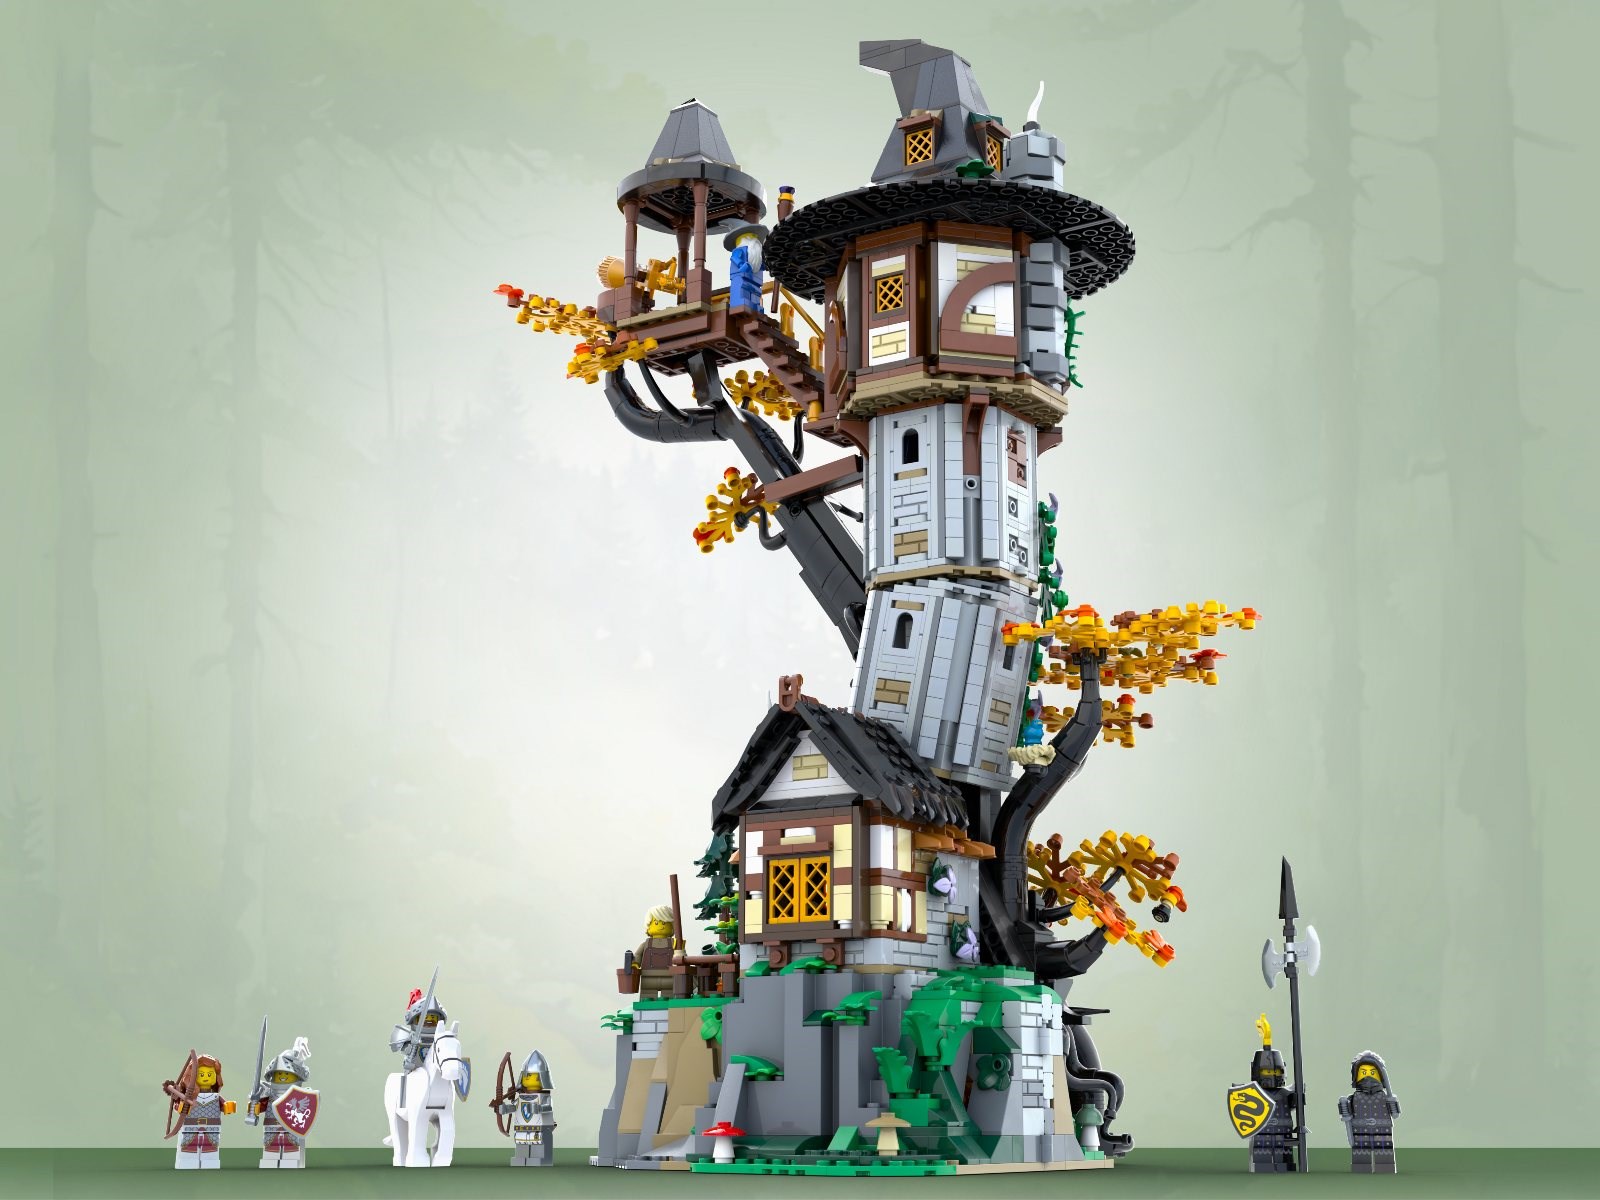
Below is my submission for Series 9. Besides the structural redesign, many of the updates were due to changes in the parts available in the material palette. But I especially like the improvements to the roof (shout-out to BrickPerfection (designer of Privateer Frigate Fortuna) who suggested I make the roof look like a wizard’s hat) and the stone guardian statue. But the most significant updates are the minifigures. The wolfpack torsos are no longer available because the Medieval Town Square is retiring at the end of this year and neither were the dragon wings. I decided to incorporate this into the storytelling with the introduction of new factions into the castle kingdom. The narrative below describes the tower in more detail and how these newcomers enter the realm and the role they hope that Majisto can play.
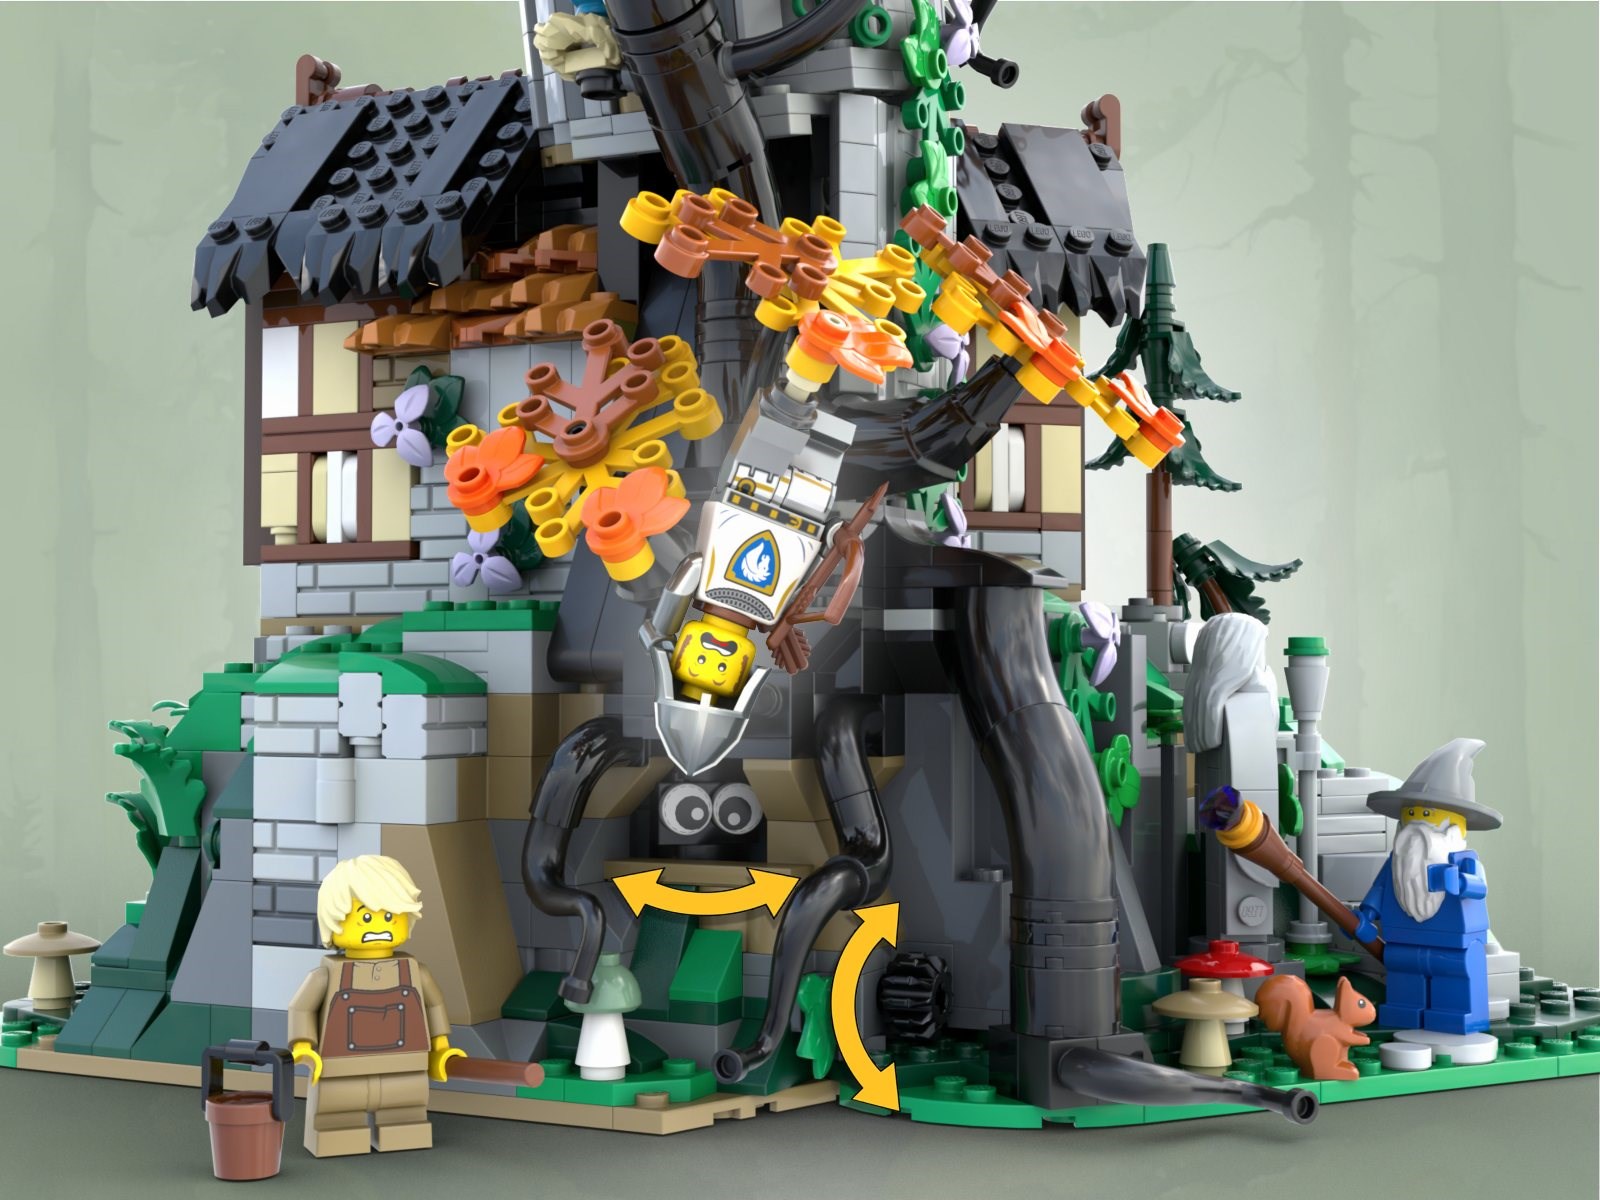
Nestled in a quiet corner of a mossy forest stands the Wizard’s Tower, home to the old wizard Majisto. The structure lies atop a small knoll, surrounded by trees and tangled vines.
Time has taken its toll on the tower—its stones are weathered, and a large tree has grown through part of it, splitting the walls and roof as nature slowly reclaims the storied setting.
At the base of the tree, a small knob releases an enchantment that brings the tree to life, a protective spell Majisto placed long ago. Travellers who unknowingly stumble into its presence - or maliciously trespass – often find themselves caught in its branches.
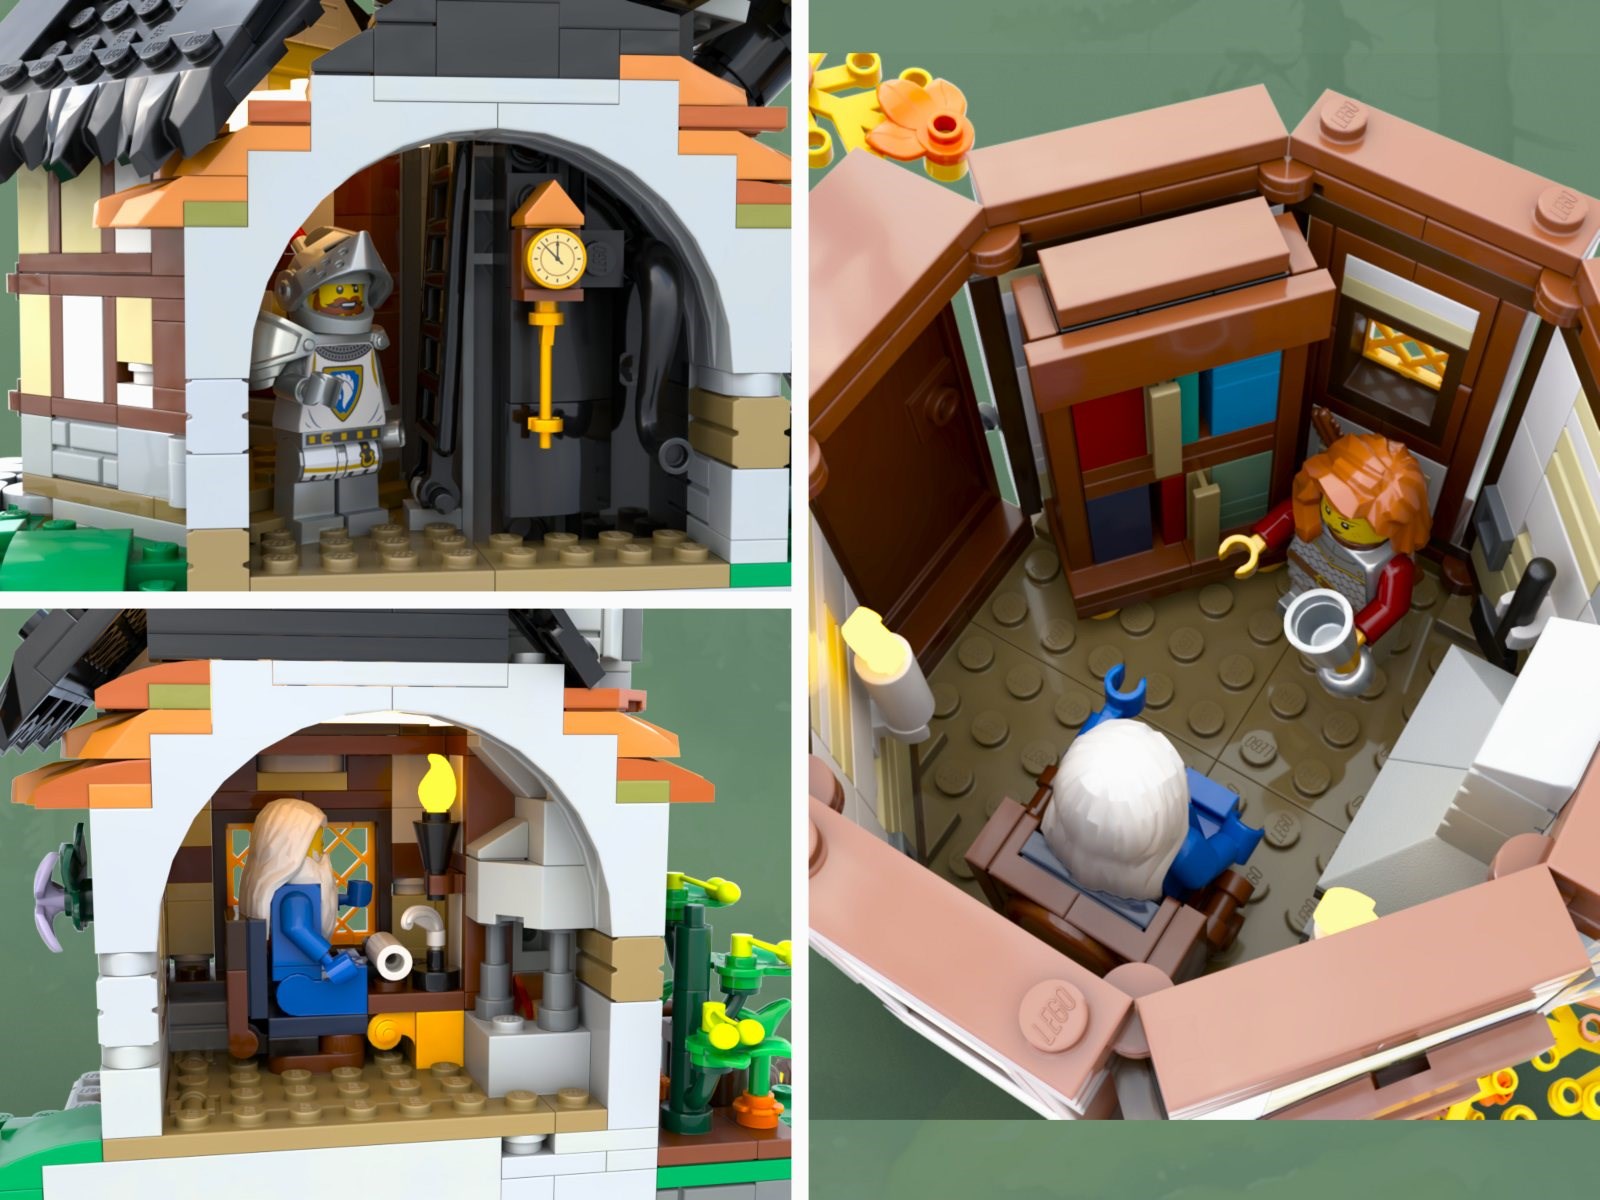
The tower itself is cleverly built, with a foldable design and a removable roof that reveals its interior rooms. On the first level is Majisto’s study, filled with scrolls, books, and maps. It’s a quiet space where he spends most of his time reading and writing. A ladder leads up to the bedroom, a simple room with a small bed, a nightstand, and a window that looks out over the forest canopy.
At the top of the tower are the living quarters. A fireplace provides warmth during colder months with a nearby chair and bookshelf for reading and reflection.
A door leads to a staircase that winds up to the observatory, where Majisto often spends evenings watching the stars and tracking celestial events.
Beneath the tower, a trapdoor in the study opens to a cellar. Down there is a kitchen, potion storage, and a worktable for mixing ingredients. A wall conceals a cave that once served as a hideout for the Wolfpack. The lair still contains old supplies and weapons, and a sliding wall connects it back to the cellar. Though the Wolfpack are no longer active in the region, their presence lingers in the shadows of the tower.
But alas, the ruling parties of the land have changed. The Lion Knights, Black Falcons, and Wolfpack have faded from power. New factions have emerged - the Griffin, Serpent and Horse Knights.
The Griffin Knights are proud and orderly, hoping to bring structure and fairness to the realm. The Serpent Knights are secretive, drawn to the tower’s magical history and eager to learn its deeper mysteries. The Horse Knights are practical and swift, focused on building alliances and keeping peace across the land. Each group has come to Majisto not with demands, but with questions. They seek his advice as they try to understand the land they’ve inherited and the stories that came before them.
The tower stands as a silent witness to this changing age. Its stones remember the footsteps of old warriors, and its walls echo with the voices of those who once ruled. Now, it opens its doors to a new generation, and the wizard within must decide who among them is worthy of the truth he guards.
Thank you for taking the time to read. If you are interested in voting I would greatly appreciate it! Any comments and feedback are welcome, I’ll try to respond to any questions you might have.
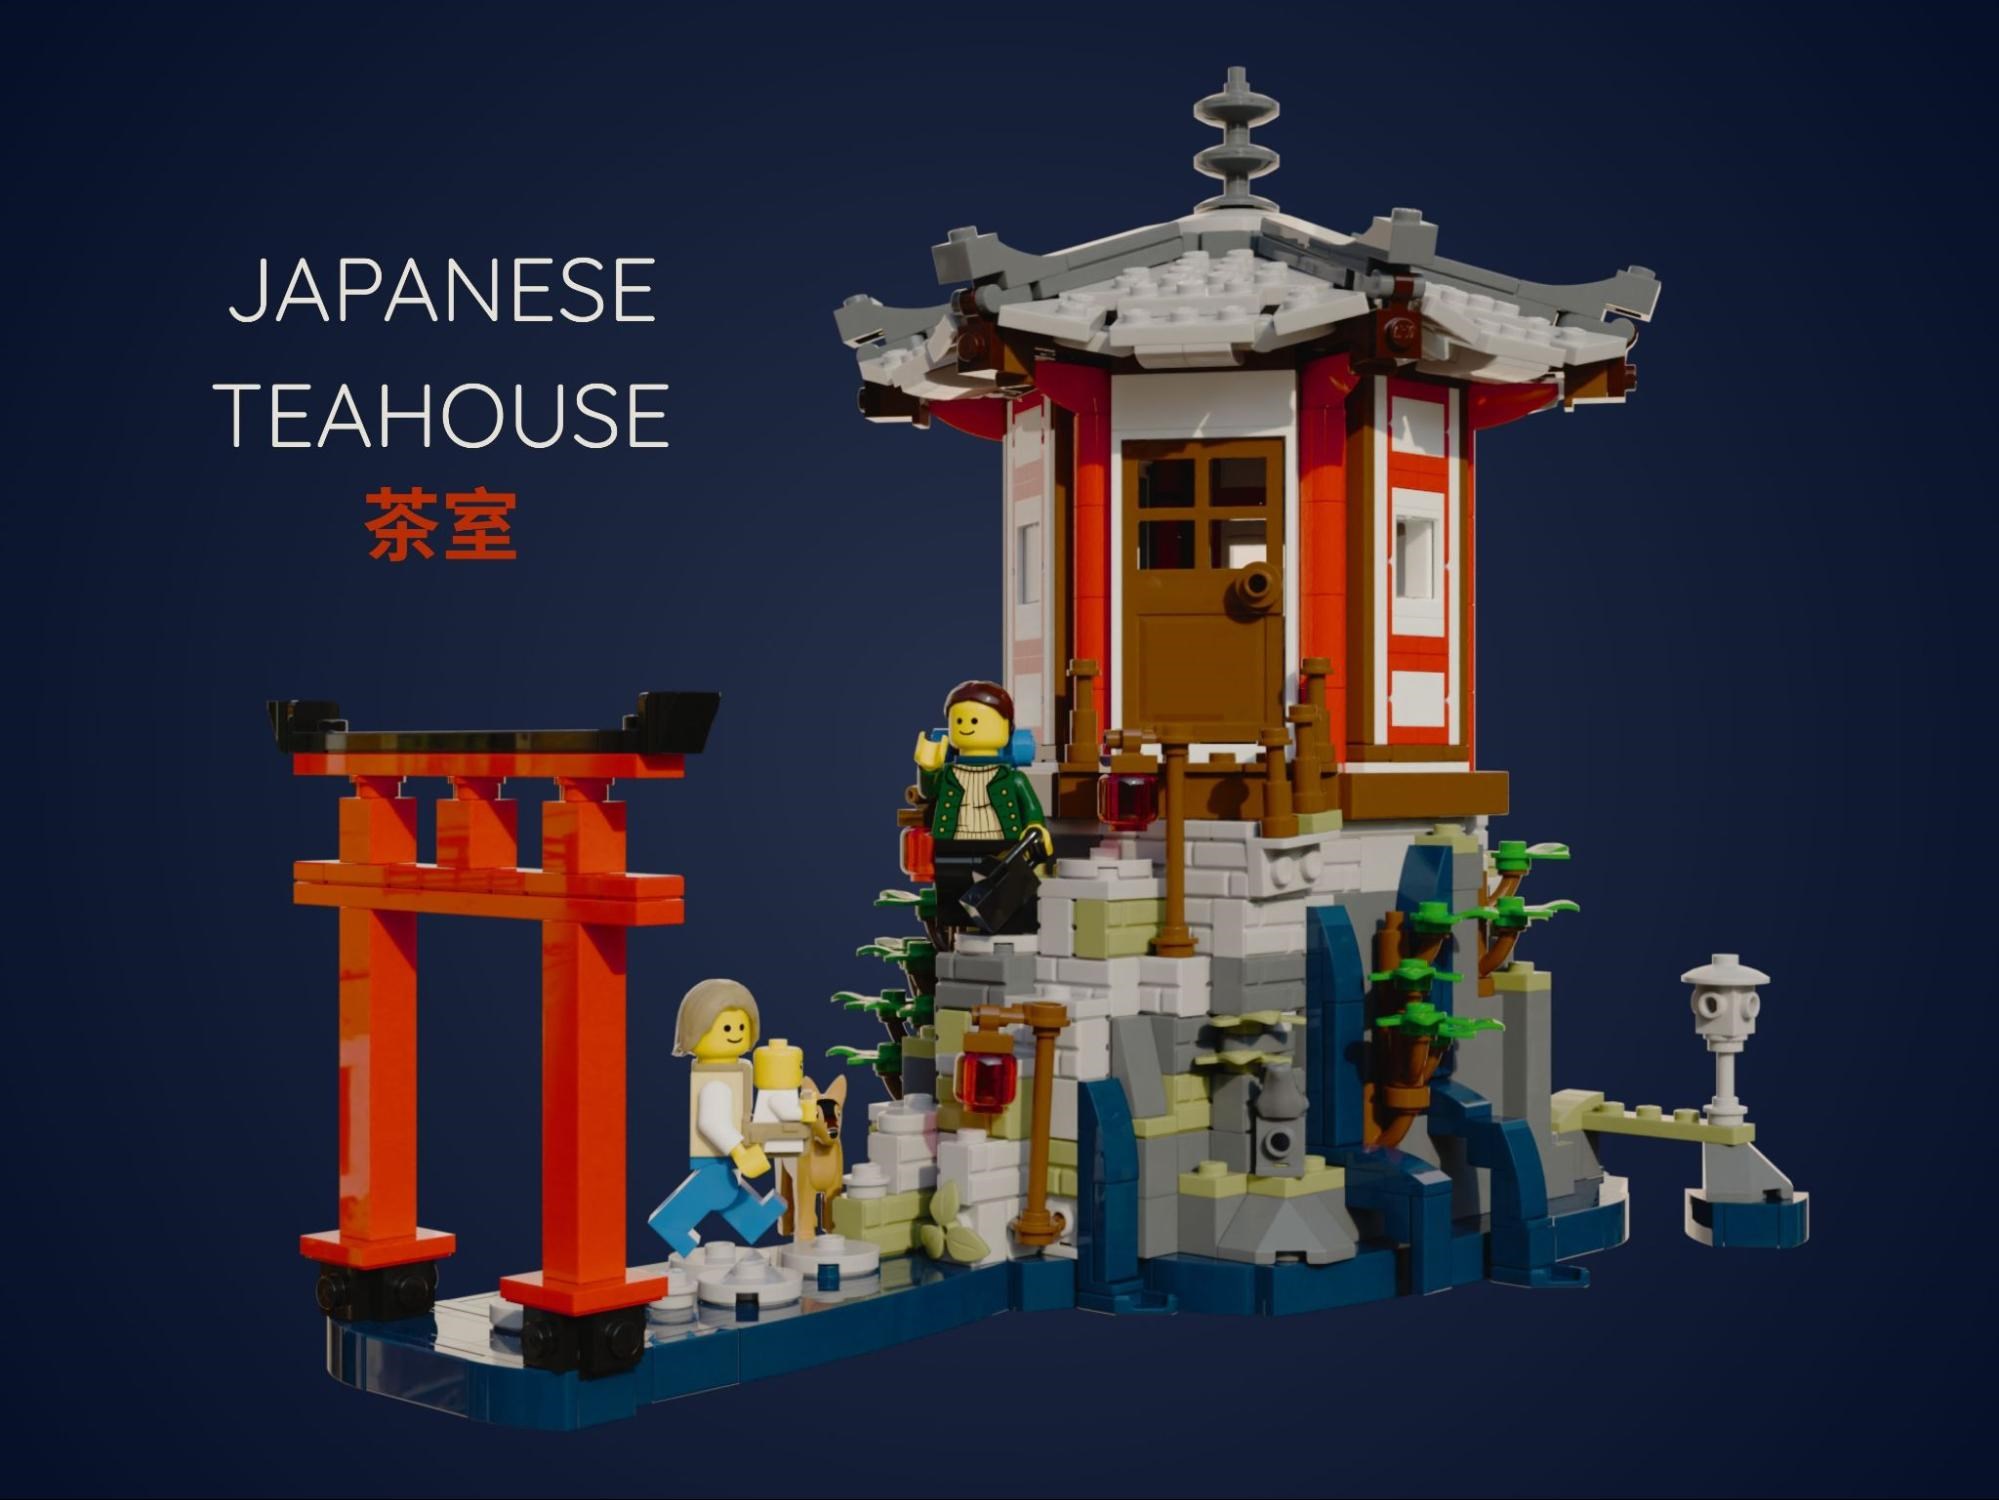
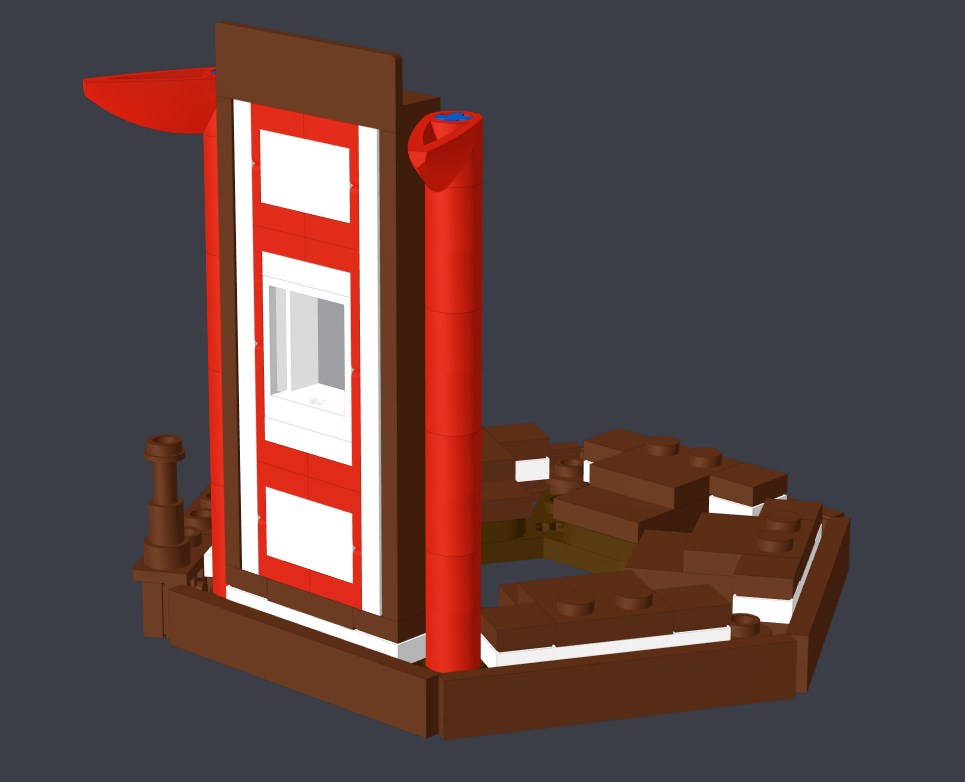
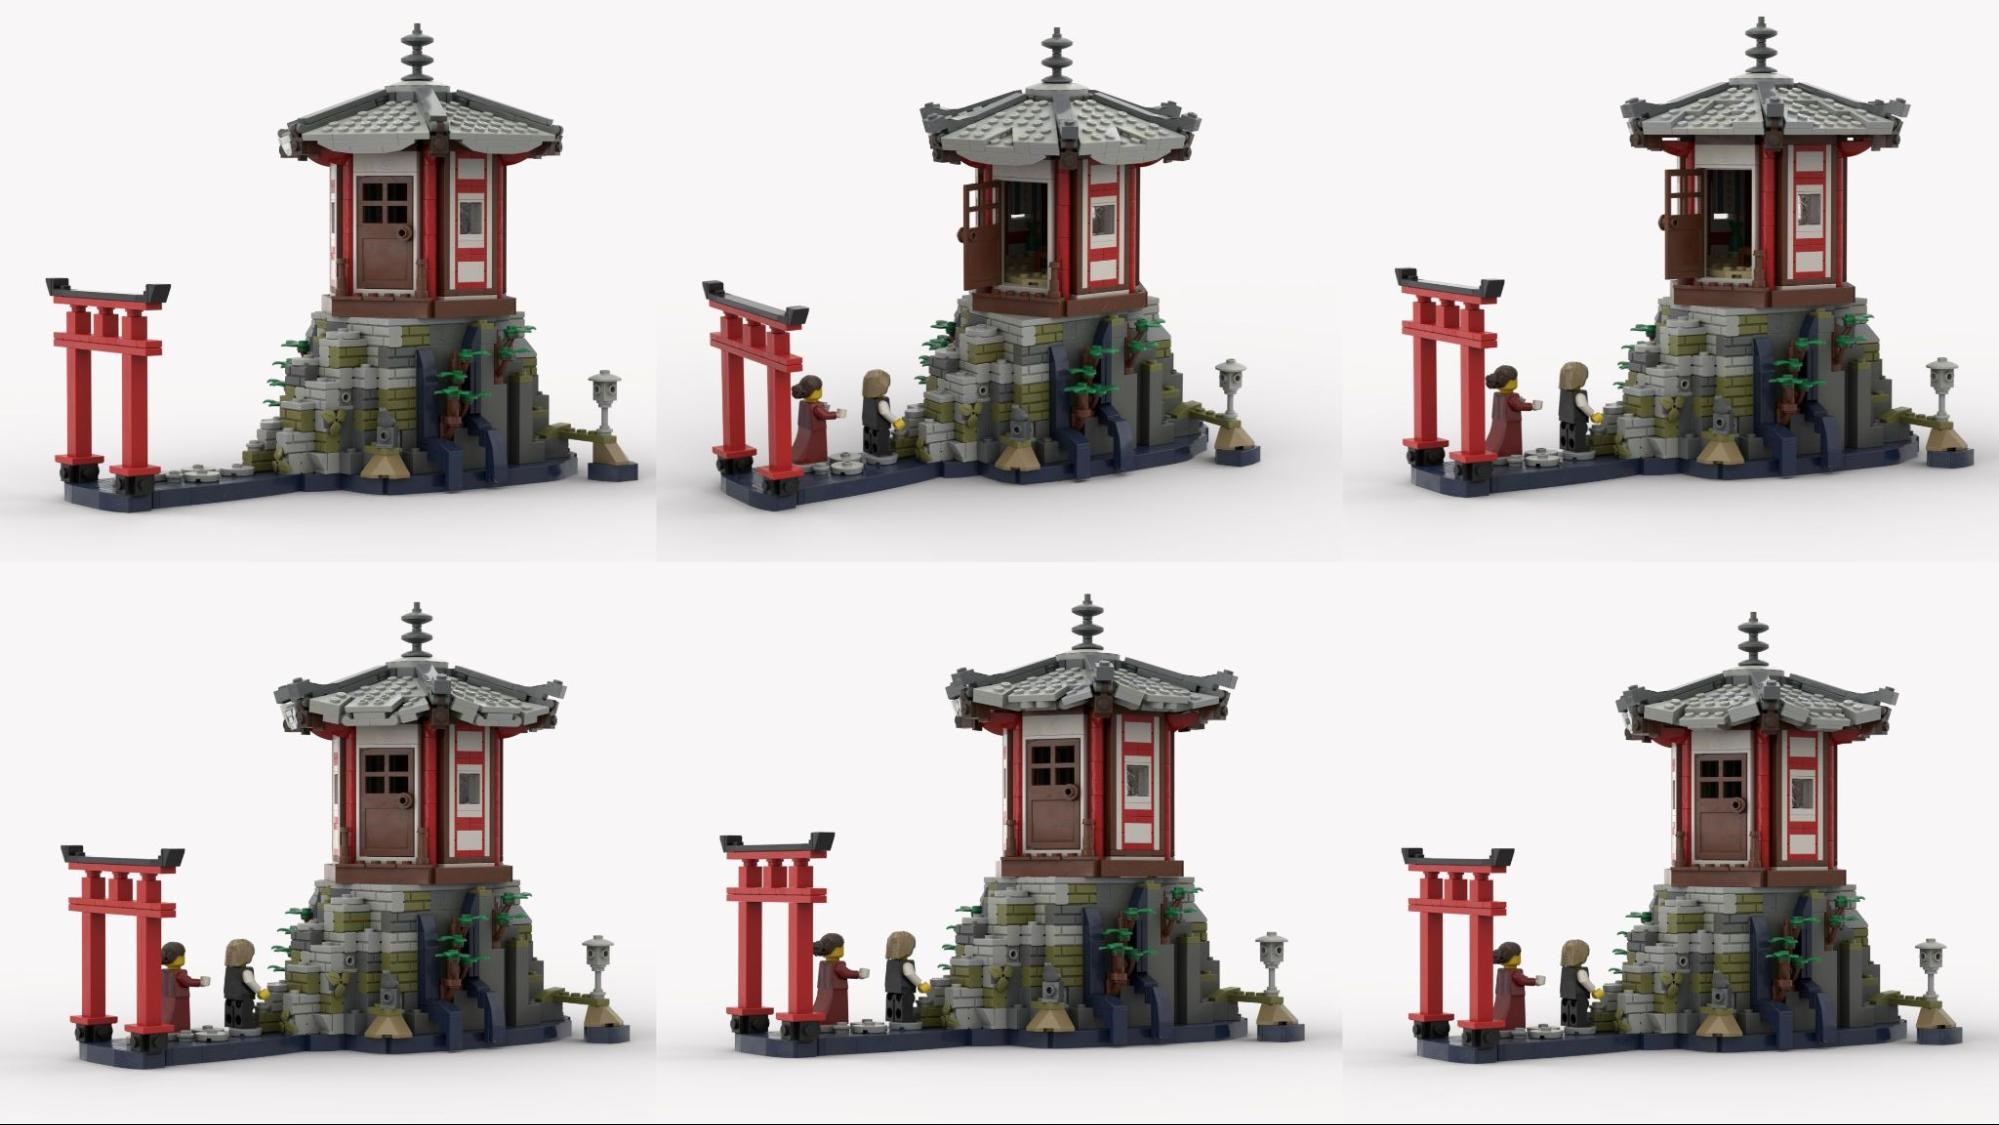
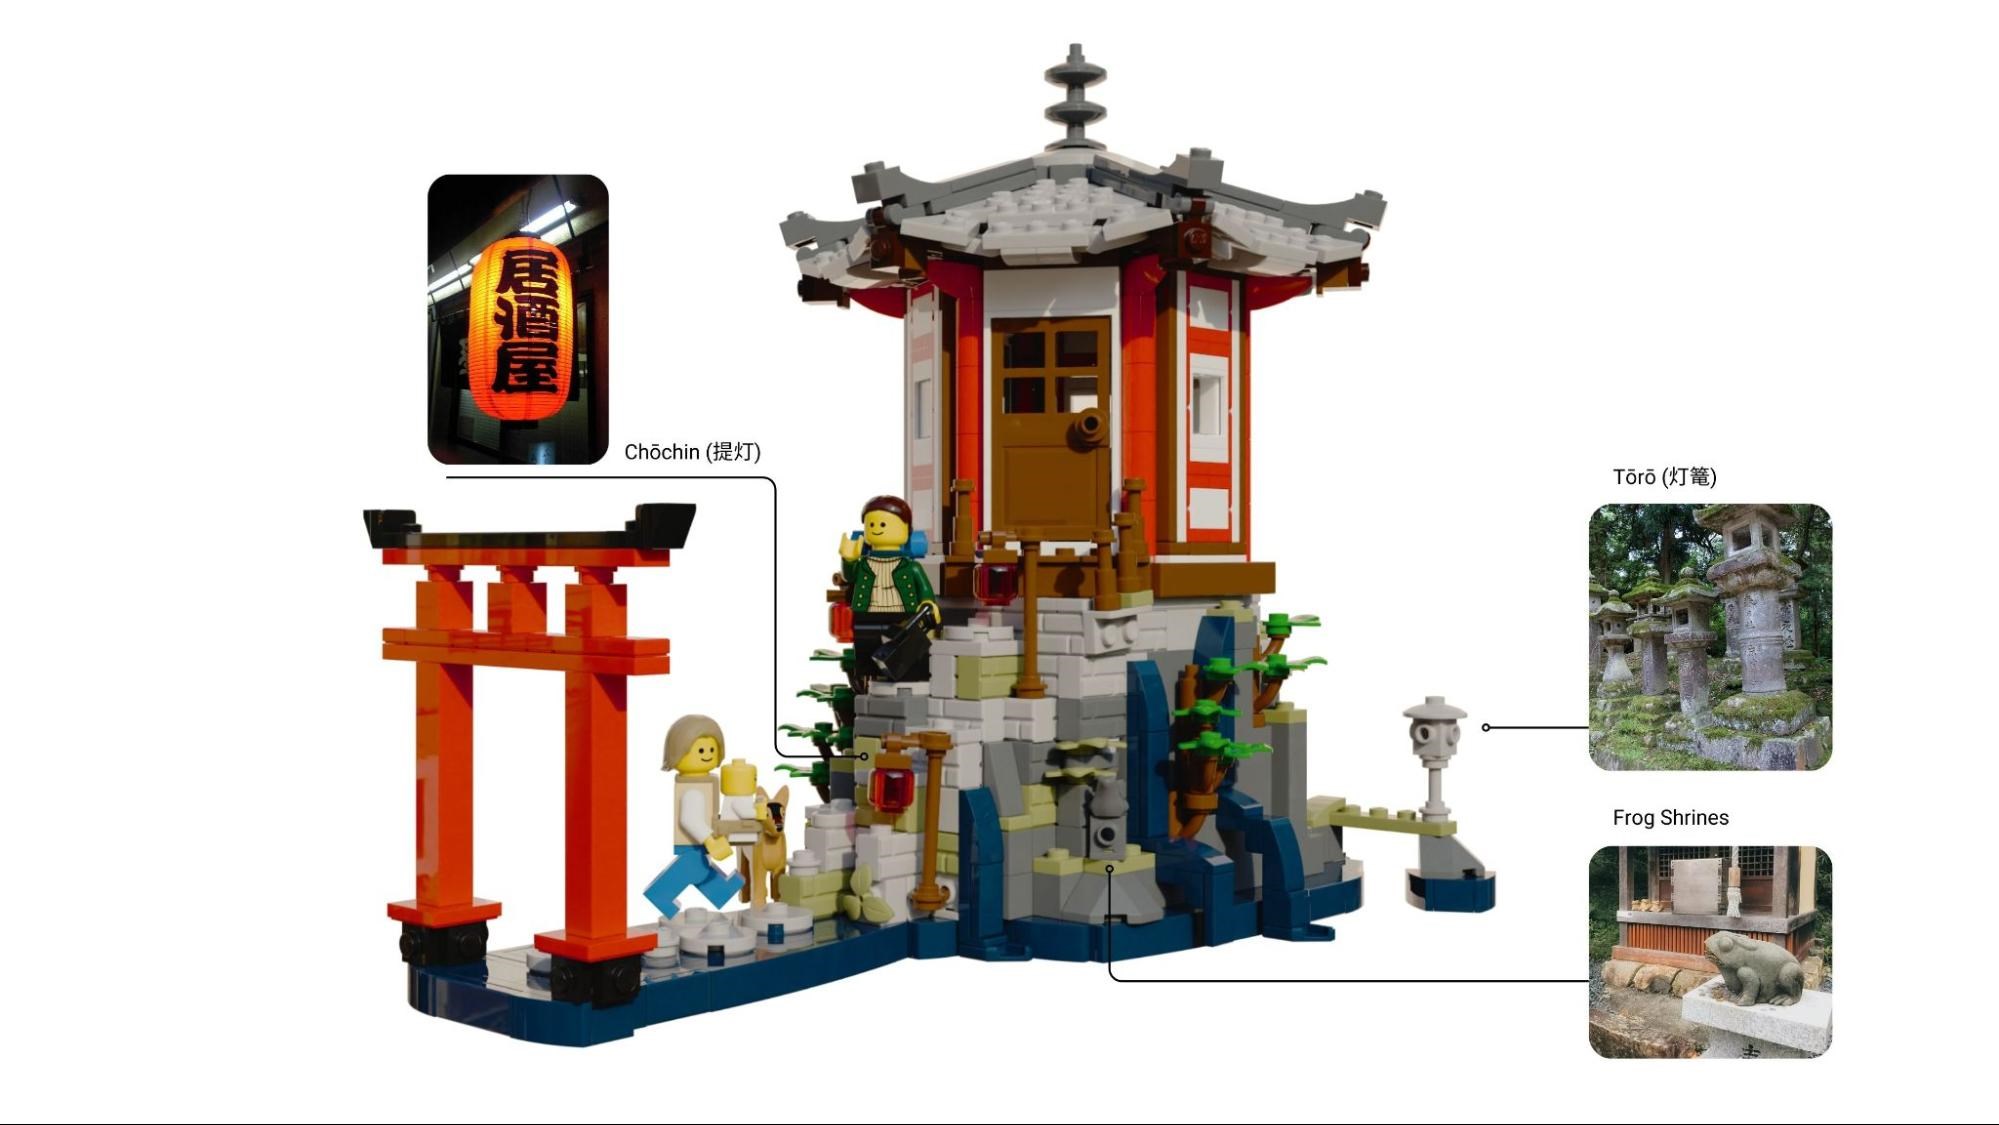
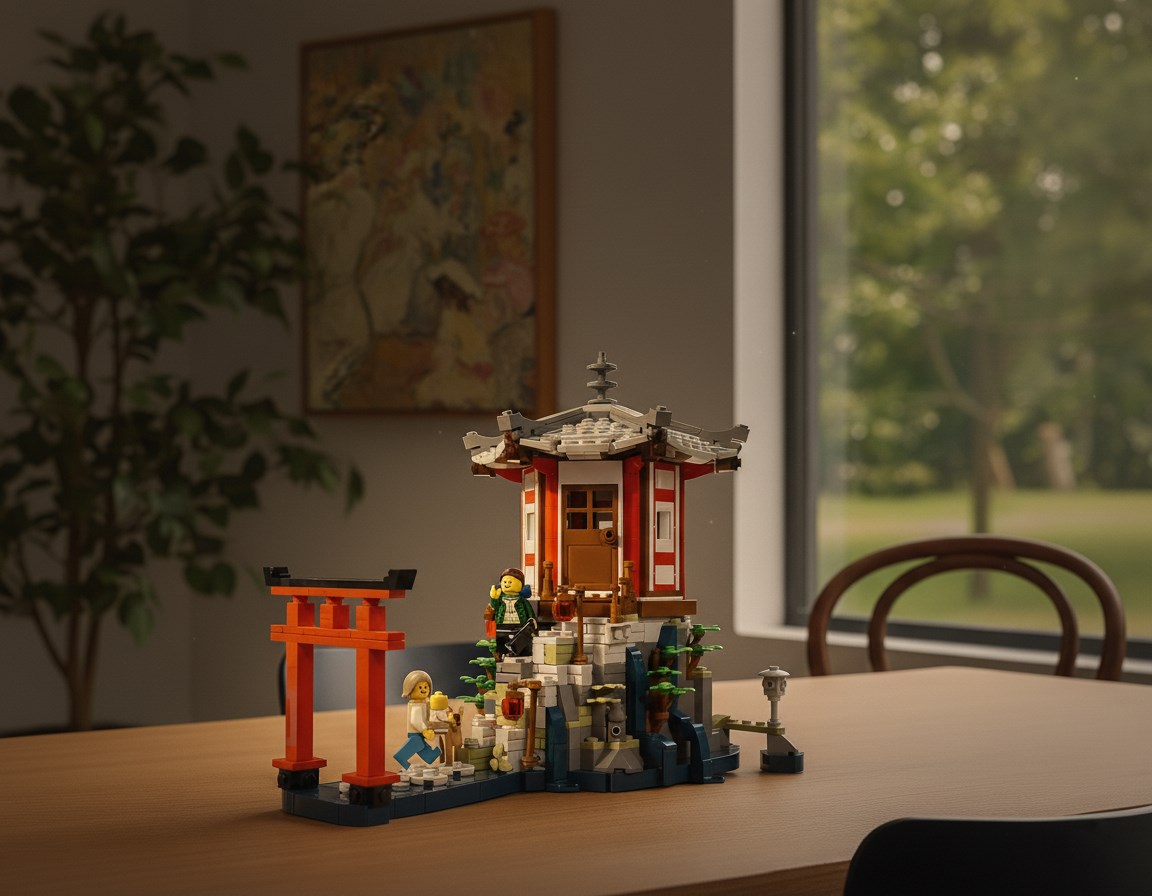
Hello readers! I’m Pau and I have been building MOCs for about a decade. The wonderful folks at Brickset have allowed me to write a couple of articles through the years. Two about modular buildings (1 | 2) and one about my (admittedly failed) Bricklink Designer Program model based on the Ishtar Gate. The articles have been very positively received so far, so here is another one about my latest model for the Bricklink Designer Program, the Japanese Teahouse!
After completing many larger builds in recent times, I wanted to challenge myself to design something compact with a lot of character and a reasonable piece count (and therefore, price!). As I’m sure many fellow MOC builders, I have lots of started and abandoned projects. This one started when Lego released 80107 Spring Lantern Festival in 2021. The technique for the hexagonal open air shrine using the Technic rotor piece was particularly inspiring. I wanted to build a similar structure, but fully enclosed. Not long after starting, I felt an itch to do a new modular using similarly funky techniques (which resulted in the Florentine Palazzo, which I have free instructions for if you want to build it). Therefore, the project sat abandoned for about three years, until about six months ago when I decided to pick it back up again with a revised plan in mind.
That’s when I usually go into deep research mode. This time, the model was not a direct interpretation of something real, but an amalgamation of a series of real temples and teahouses, allowing me extra freedom to manoeuvre.
The main inspirations for this model were the Rokkakudo Hall in northern Ibaraki Prefecture near Iwaki, a gorgeous little hexagonal building structure perched on top of a rock (top left); Kamikura-jinja shrine in Wakayama Prefecture, located at the foot of a large rock (top right) and the famous Itsukushima Shrine, in the island of Itsukushima, near Hiroshima, famous for its Torii gate in the middle of the sea (bottom).
Starting the model
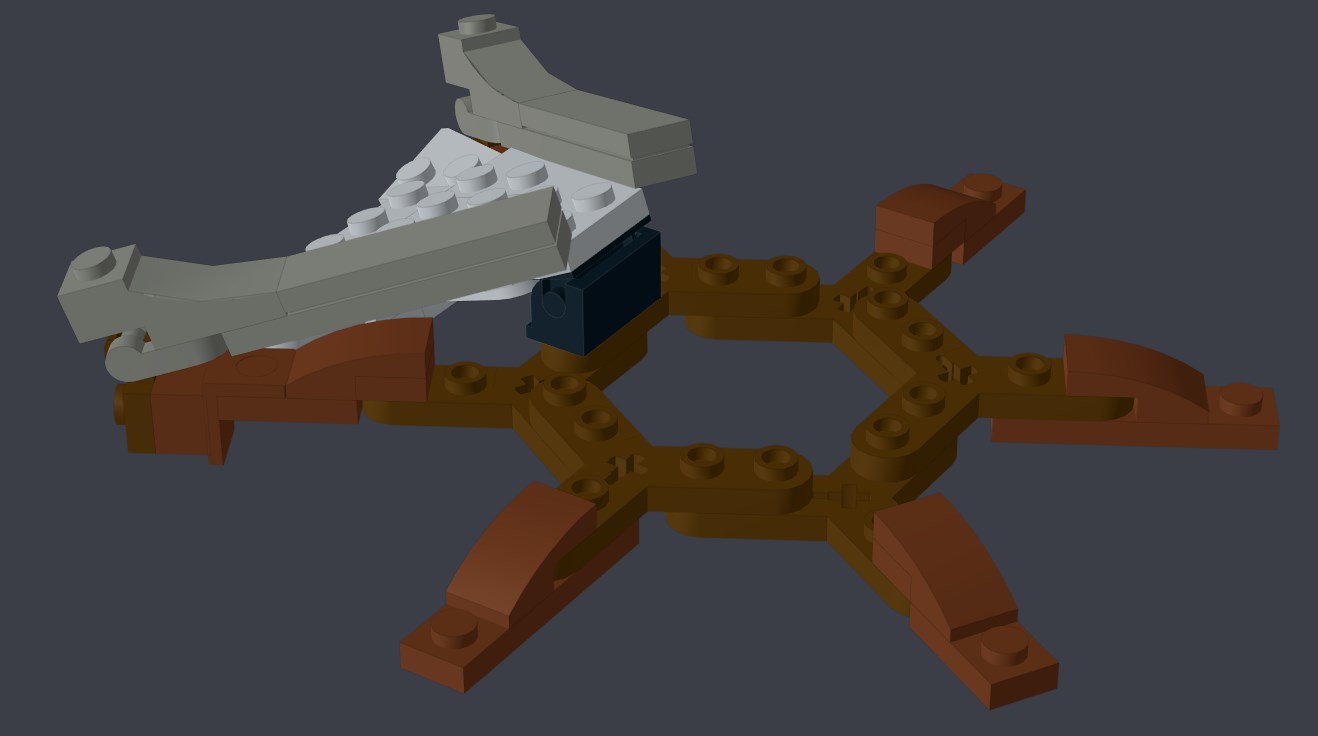
As already stated, the model did not start from scratch. Because I was basing myself off the temple in the Spring Lantern Festival, the proportions and overall scale were set from the start. It was clear that I wanted to place the temple in a stunning location. With a bit of trial and error, I came to the solution adopted, by mixing the three temples previously mentioned into a single model. The torii in the sea from Itsukushima, the building on top of a rock surrounded by the sea from Rokkakudo and the pathway up the mountain from Kamijura-jinja.
I wanted the model to have a certain sleekness, hence why I decided to make the sea monochrome and use SNOT from a central core. A fully studless look for the sea around the model meant reversing the alignment of the central core under the mountain, using perhaps the most rudimentary of techniques to achieve it, a pair of lamp holder parts on their side. It is also fairly easy to add more SNOT bricks to go back to a studded finish to attach detail such as the skipping stones using this technique.
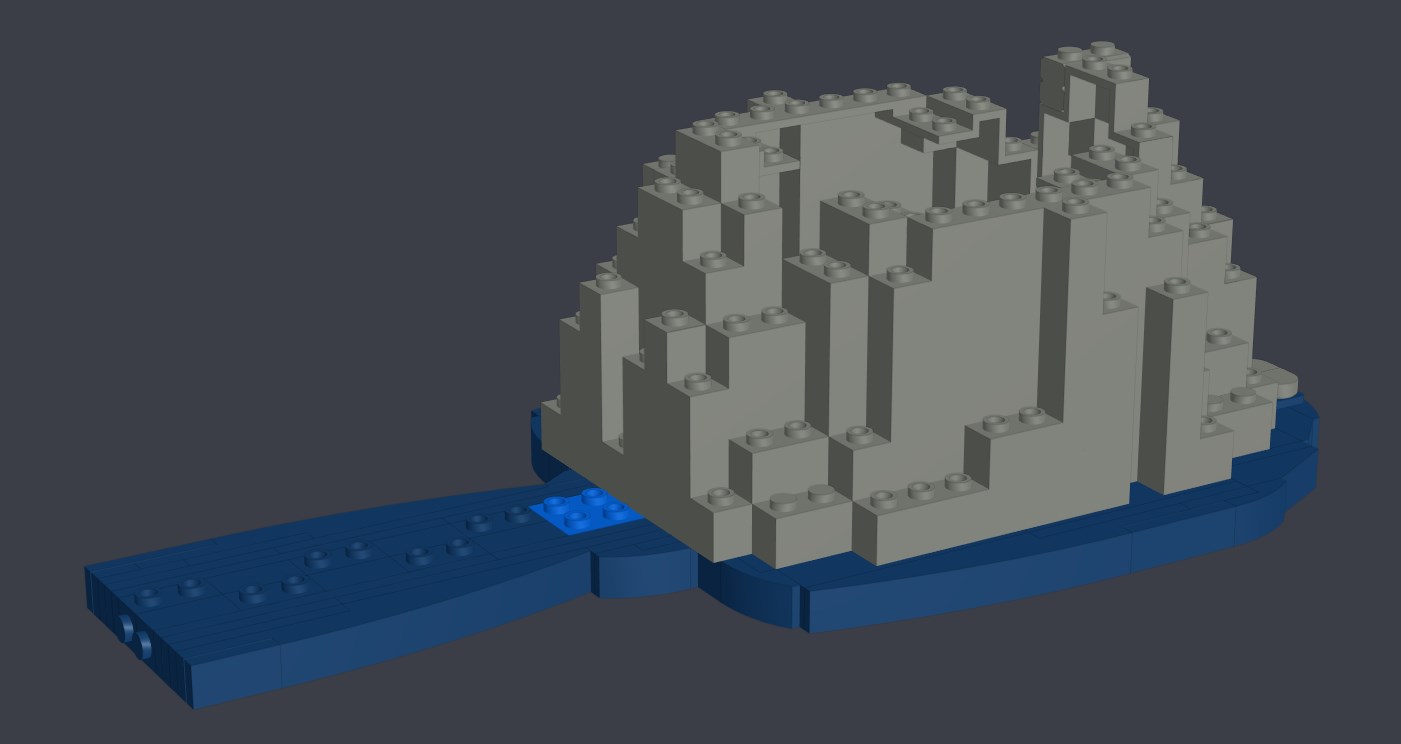
I know LURPs get a lot of hate, but there aren’t many ways of building mountains that are as structurally sound and piece-efficient. I think they make a wonderful base to then fill to the brim with detail. I wanted to keep the piece count under a thousand pieces, so being efficient where necessary was key.
The next step was placing the footprint of the temple in the mountain. I wanted to have a relatively small island, so the temple would extend over retaining stone walls built on the cliffside, similar to what happens in the Kamijura-jinja shrine.
Once the structural elements of the base were set, I moved to the focal point of the build: the teahouse.
The Teahouse
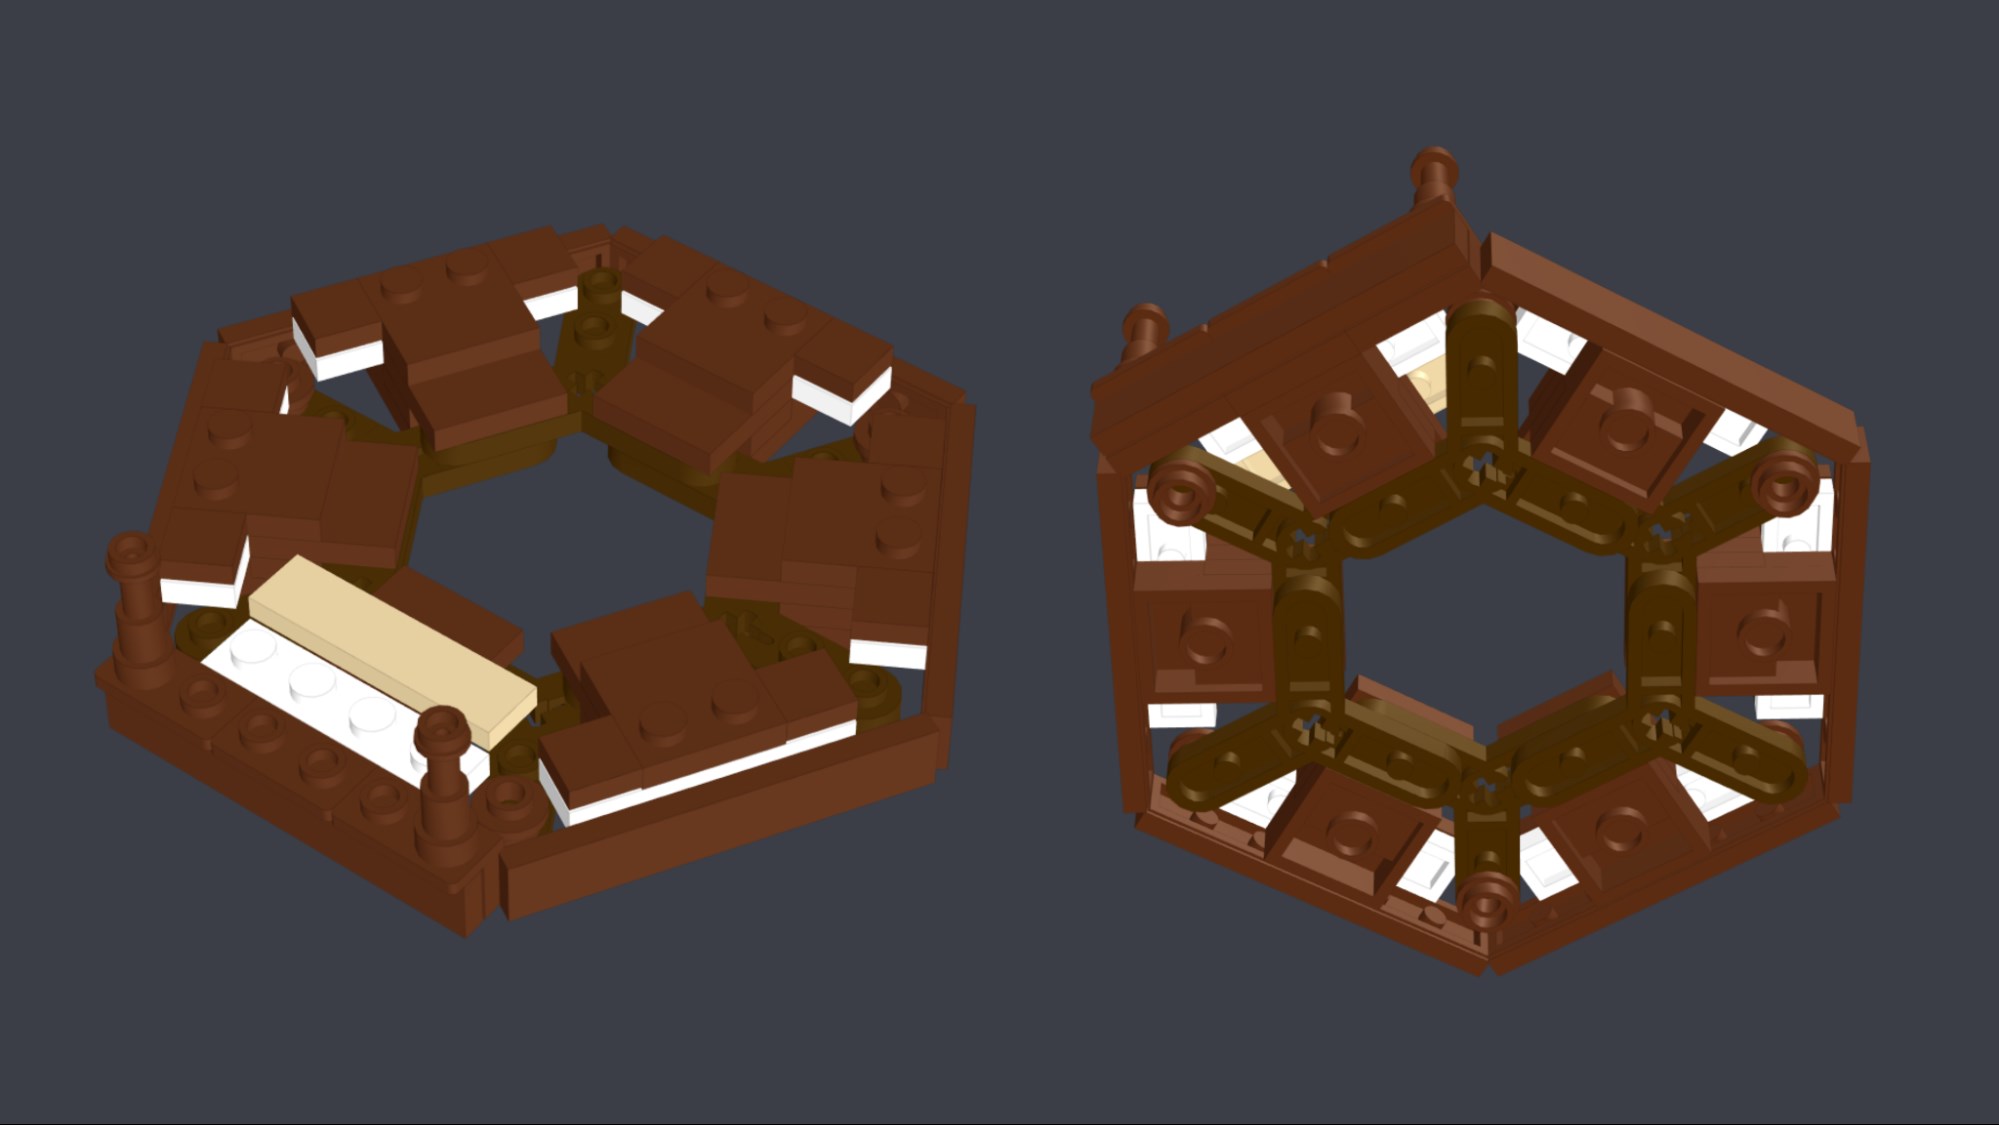
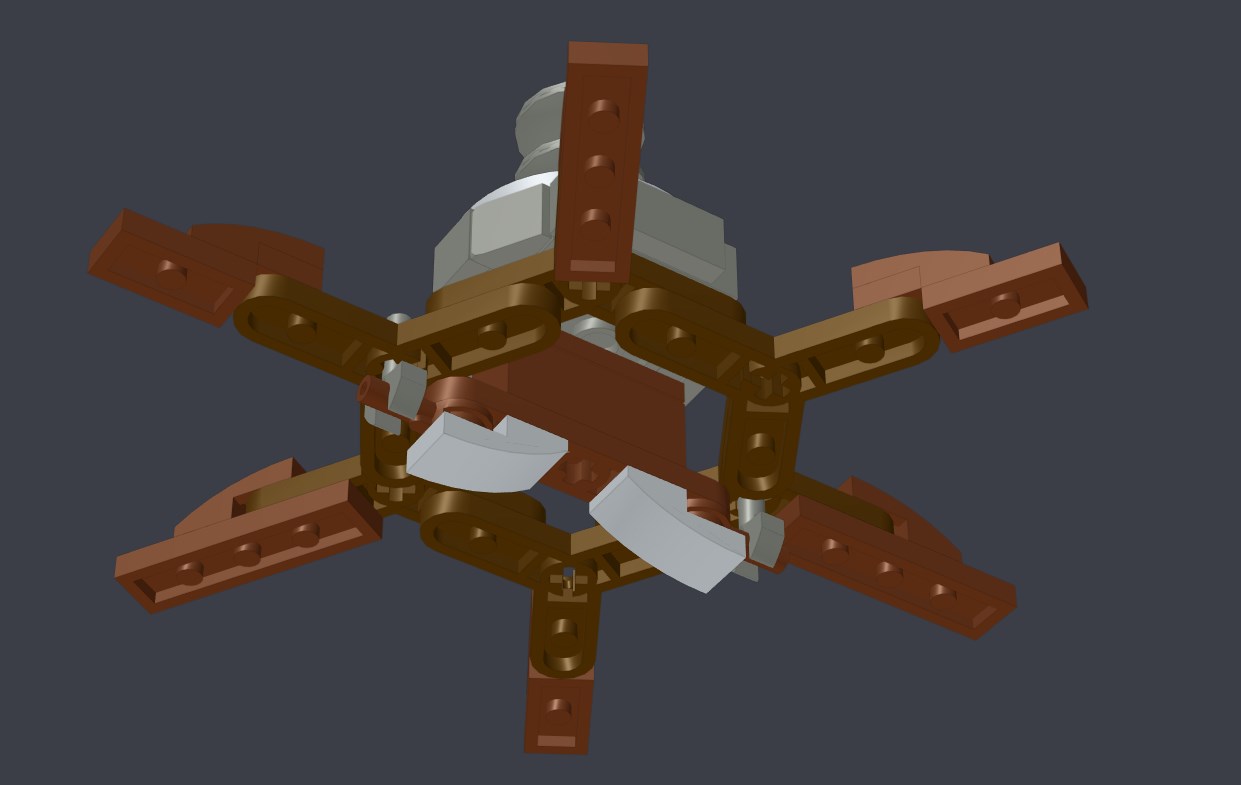
Starting from the hexagonal base, the first thing I had to figure out is how to attach it on the base. Using this set-up, only opposing sides are actually in-system, forcing the connection to be done at these points. The relatively weak connection does have the benefit of being fully removable.
The columns of the building sitting in the points of the base is quite a natural solution, and identical to what the designers did in the Spring Festival set. The columns have one of my favourite NPU of the build with Bionicle tooth pieces as beams holding the roof, capping the columns. Between the columns, the walls slot just in place. These walls are attached from the straight sides of the hexagonal core. In order to leave minimal gaps, the wall is built using brackets, which (beside creating a very fitting painted wood beam look) allow it to sit flush to the columns.
The internal structure of the roof is very similar to the whole building, using the same Technic rotor core. In the case of the roof, the columns become the hip of the roof, in dark grey; and the walls, the main roof, in light grey.
The weirdest technique of the whole build is the one between the structural core of the roof and the central spire, using the spanner piece to suspend the subassembly in mid air. I had to do it this way because the panels of the roof itself got in the way if I did it on the upper part of the hexagonal core.
The roof was the part of the whole model that saw the biggest iteration. As you can probably imagine, getting all the internal attachments done without collisions between them was very tricky. But besides technical challenges, I also changed the visual appearance of the roof many times. At first, I went for a simpler approach, leaving the edge as a straight line. I even went as far as rendering it in that state, and that’s precisely when I realised it was not conveying the character of the building well. I then spent months building variants of all kinds until I finally settled on the one you see, which was both curvy and gapless enough. You’ll have to tell me if I made the right choice!
The Landscape
In parallel to advancing the building, I carried on work on the island. Whenever I got frustrated with how to build the little temple, I relaxed for a bit by landscaping the island and adding fun easter eggs around. The torii greets visitors to this former shrine. The build for the torii is comparatively simple. The key here was to get the proportions right and to not overdo it. For instance the top part had a lot of iteration, but I ended up settling for a simple bracket and a cheese slope, as that suggested the shaping very elegantly. At one point I did consider adding the four extra masts the one in Itsukushima has, but felt it would take too much protagonism away from the temple and the main island.
As for the island, I mostly kept a rule of dark grey for natural rock and light grey for manmade walls and moss in olive green sprinkled around to create a harmonious effect. Taller trees, bushes and natural water springs keep alternating around the model to create a varied look.
There are also a few fun easter eggs around. Little frog shrines hide in the rockface. These are surprisingly common. A little peek behind the model will unveil a sign reading ????? “be careful!”, because kappas, a turtle-shaped mythical creature might be roaming around! I must admit I made the graphic design for my Lego-ised kappa way too cute. Around the back there are also a few lotus flowers, symbols of purity. A particularly nerdy easter egg is that around the model there are two kinds of traditional lighting fixtures: toro (??), the stone lantern, in this case a kasuga-doro (????), sitting on top of a rock in a little side island; and chochin (??), the red paper lights, which are lighting the main steps.
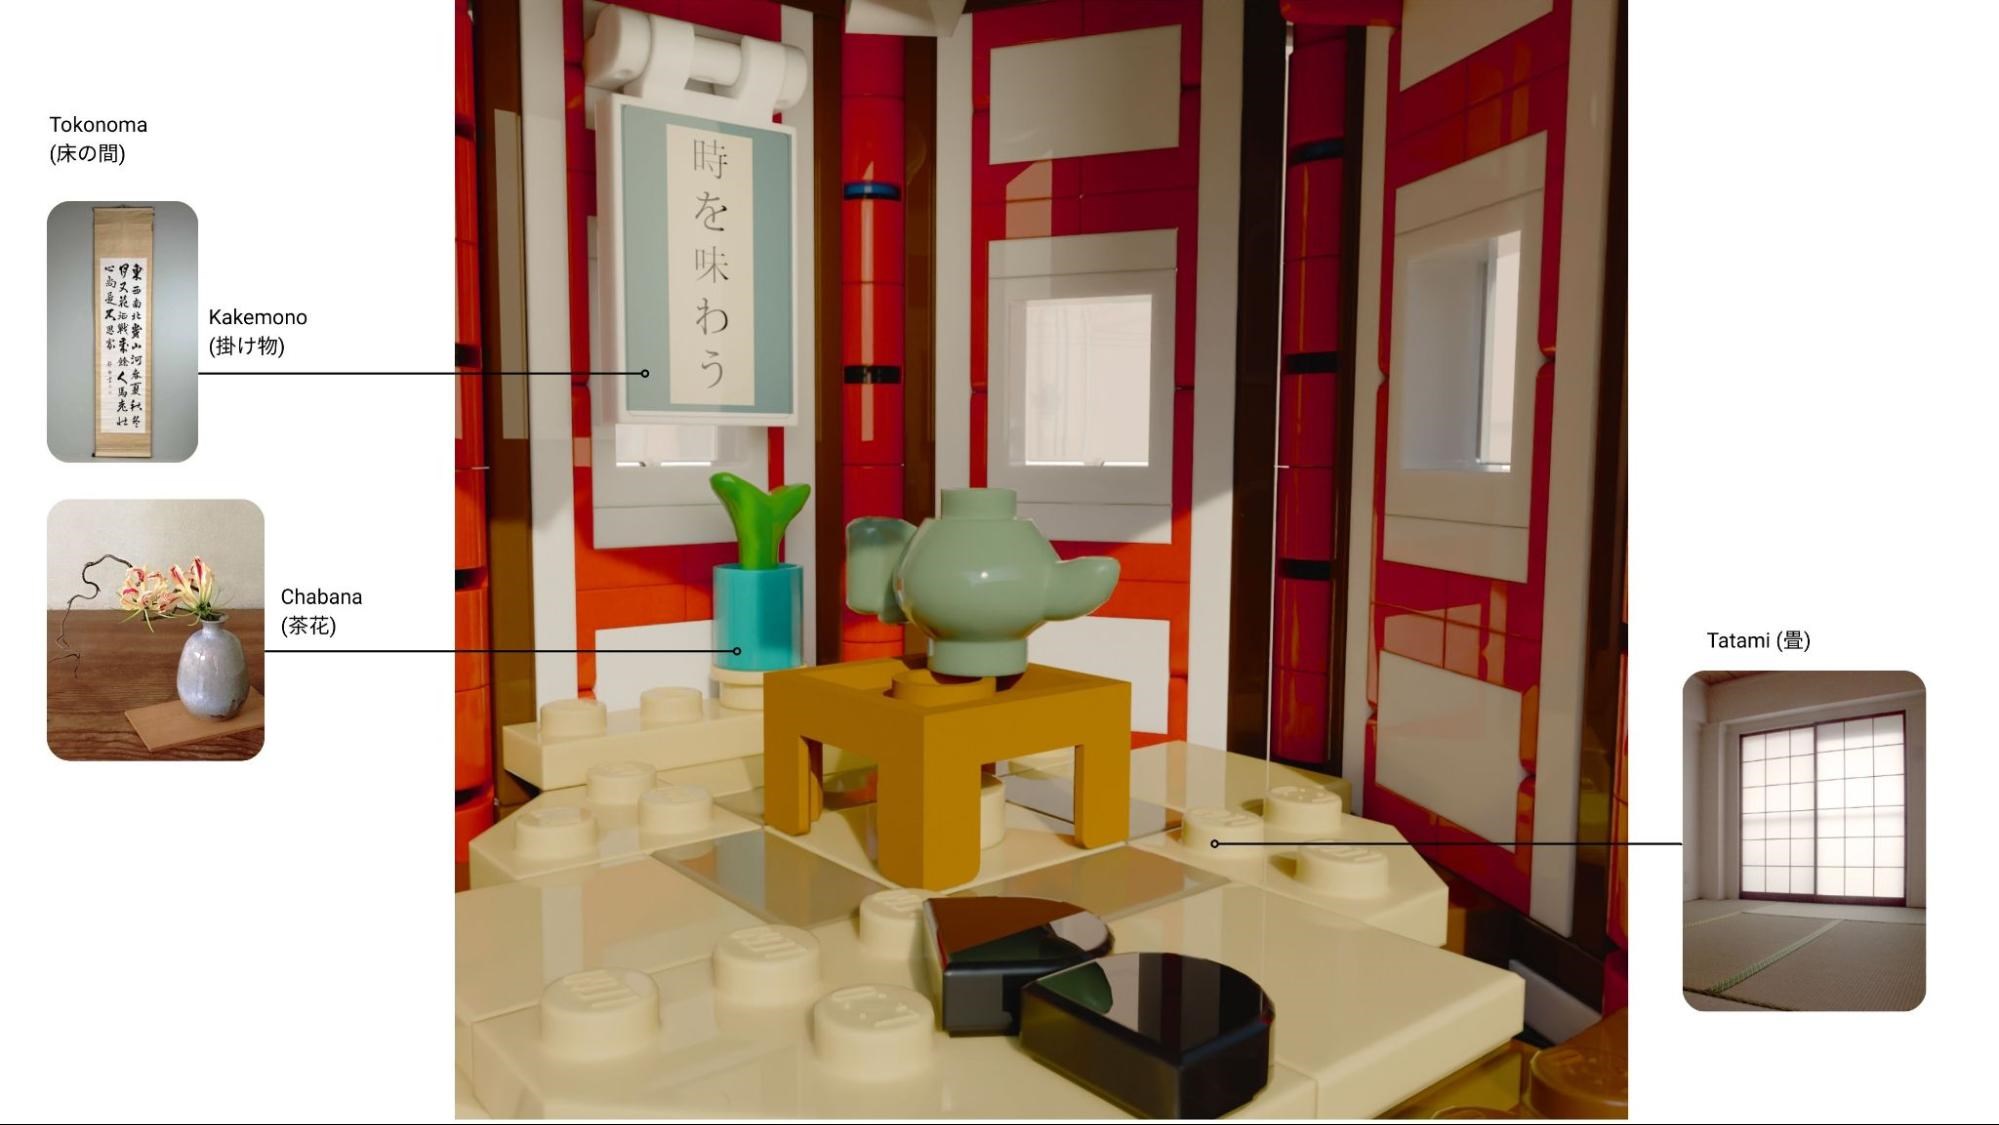
The Tearoom
The walls of the model are also removable, allowing full access to the interior. The chashitsu or tea room is the space specifically designed for the tea ceremony. Its elements and their respective positioning are carefully crafted. In the centre of the room, there is a low table. That is because tea is drunk whilst kneeling on the tatami floors, here represented with tan and dark tan tiles. Presiding the room, there is the tokonoma, the alcove, with a hanging scroll or kakemono, which translates to “enjoy the time”. Right under the scroll there is a vase of tea flowers, or chabana.
And that’s it! I hope you like the model and have enjoyed reading all the little stories and struggles behind it! If you wish, you can give it a vote for it on the Bricklink Designer Program Series 9. Please leave your comments, I’d love to read and answer them.
Crowd support for BrickLink Designer Program series 9 has begun and we have quite a few more articles to share about projects designed by Brickset members. This one is by enowicki:
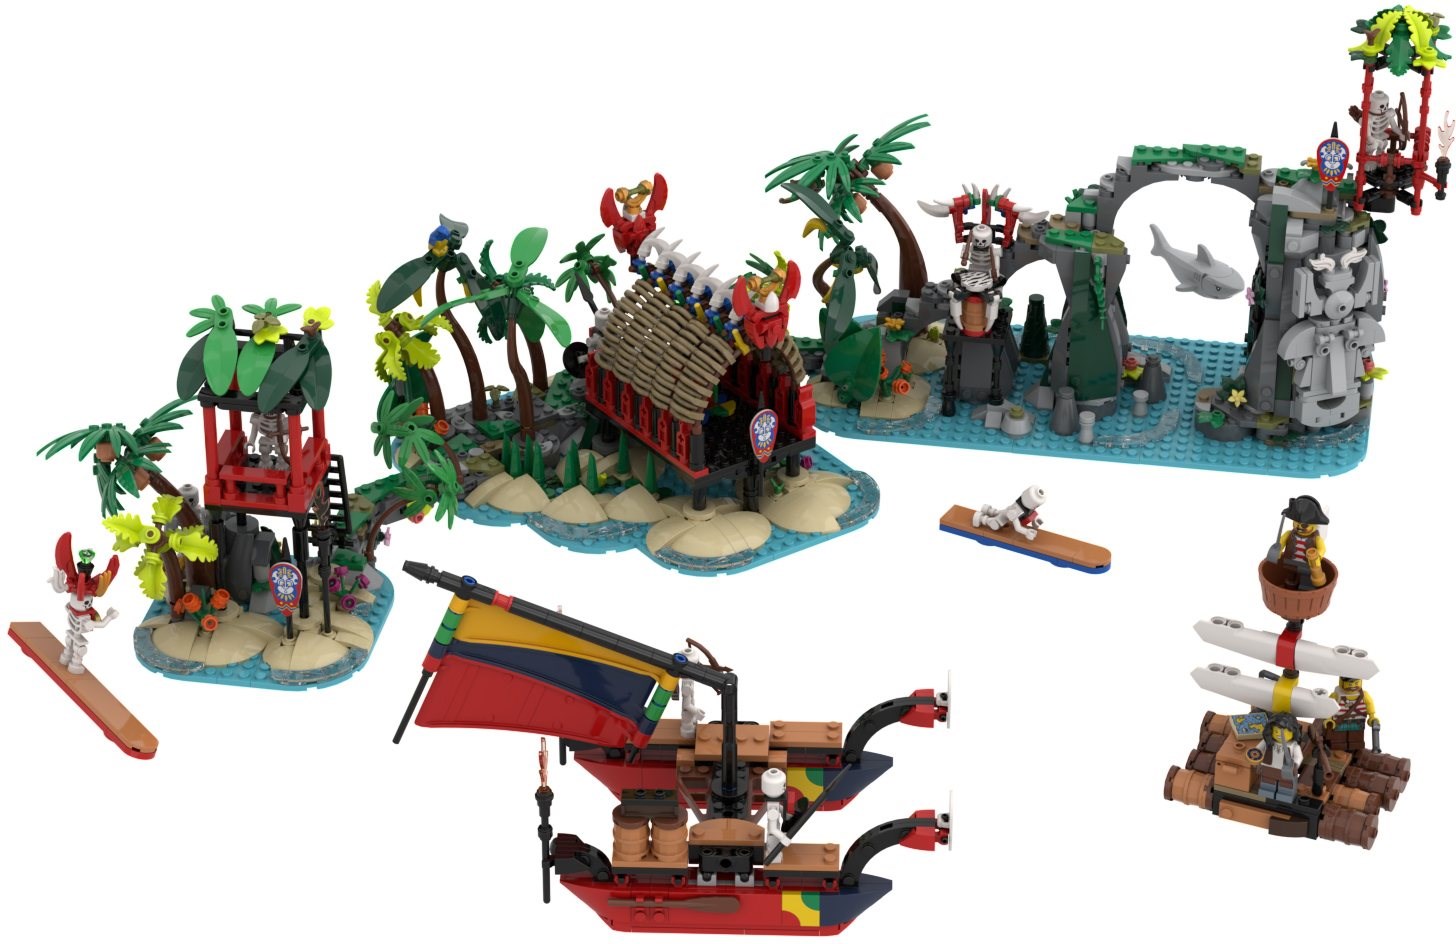
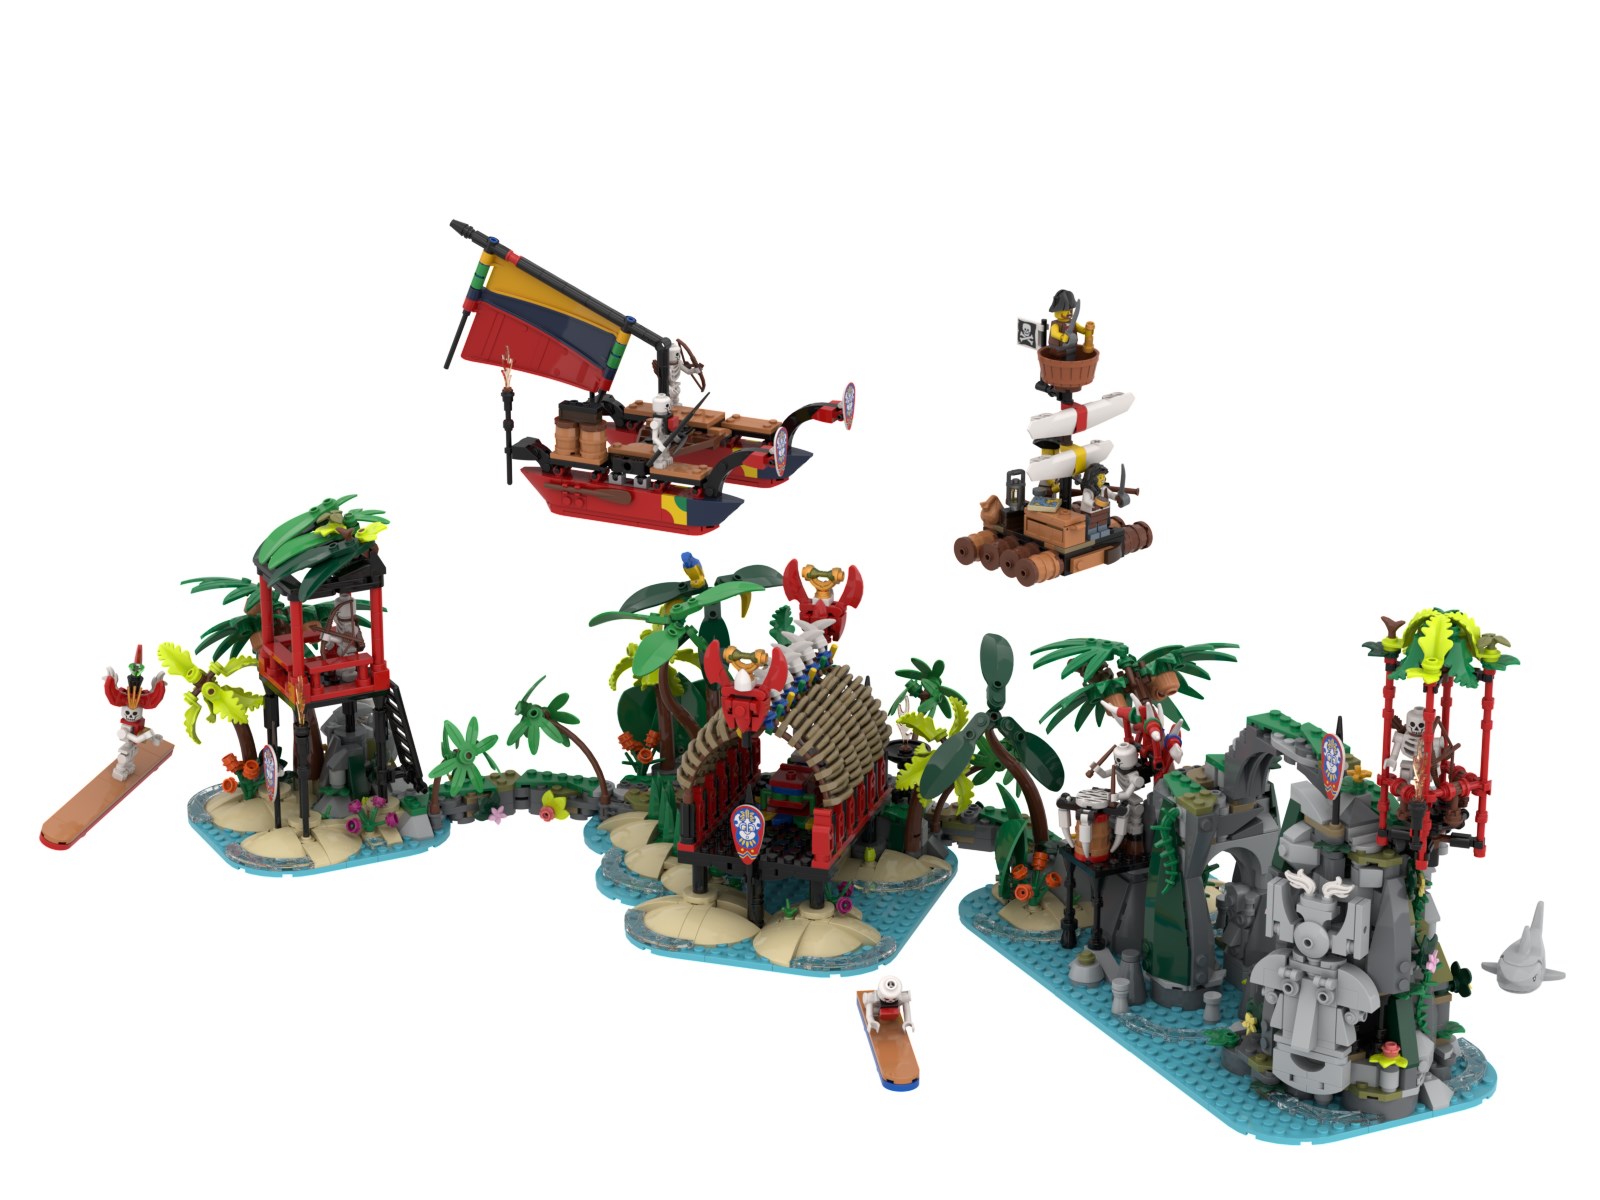
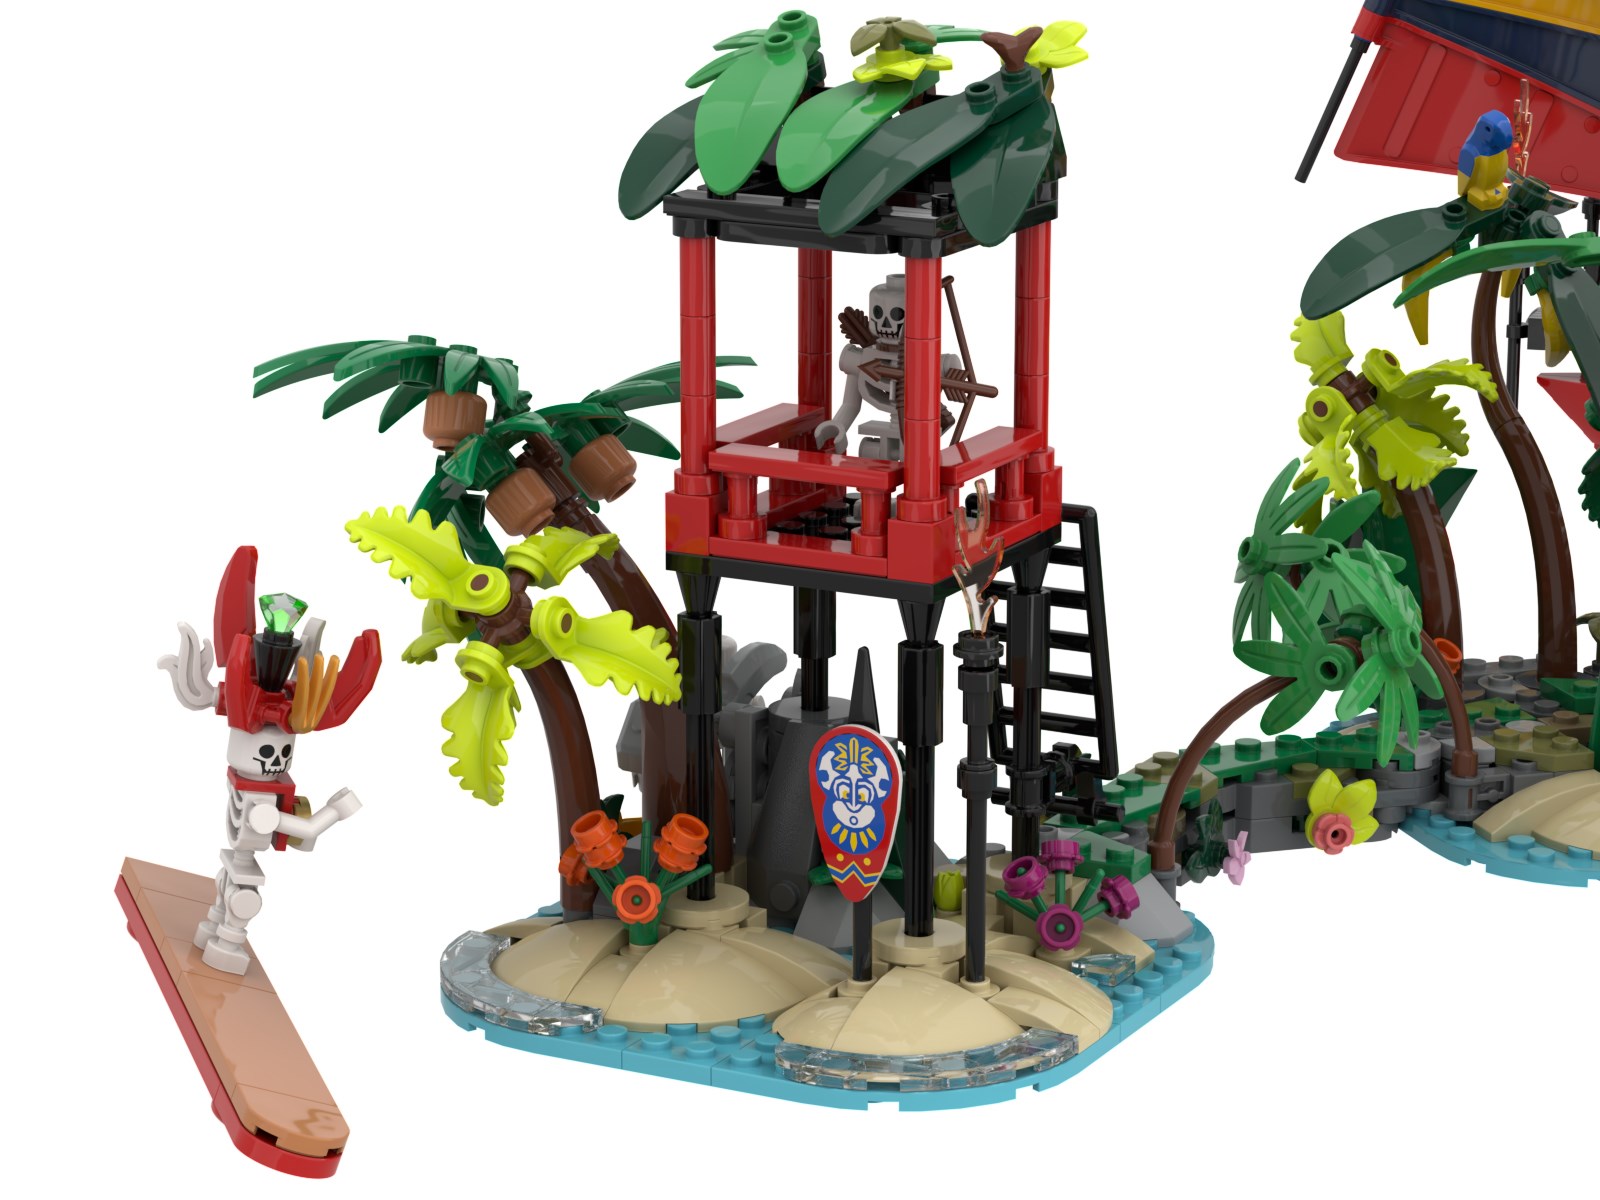
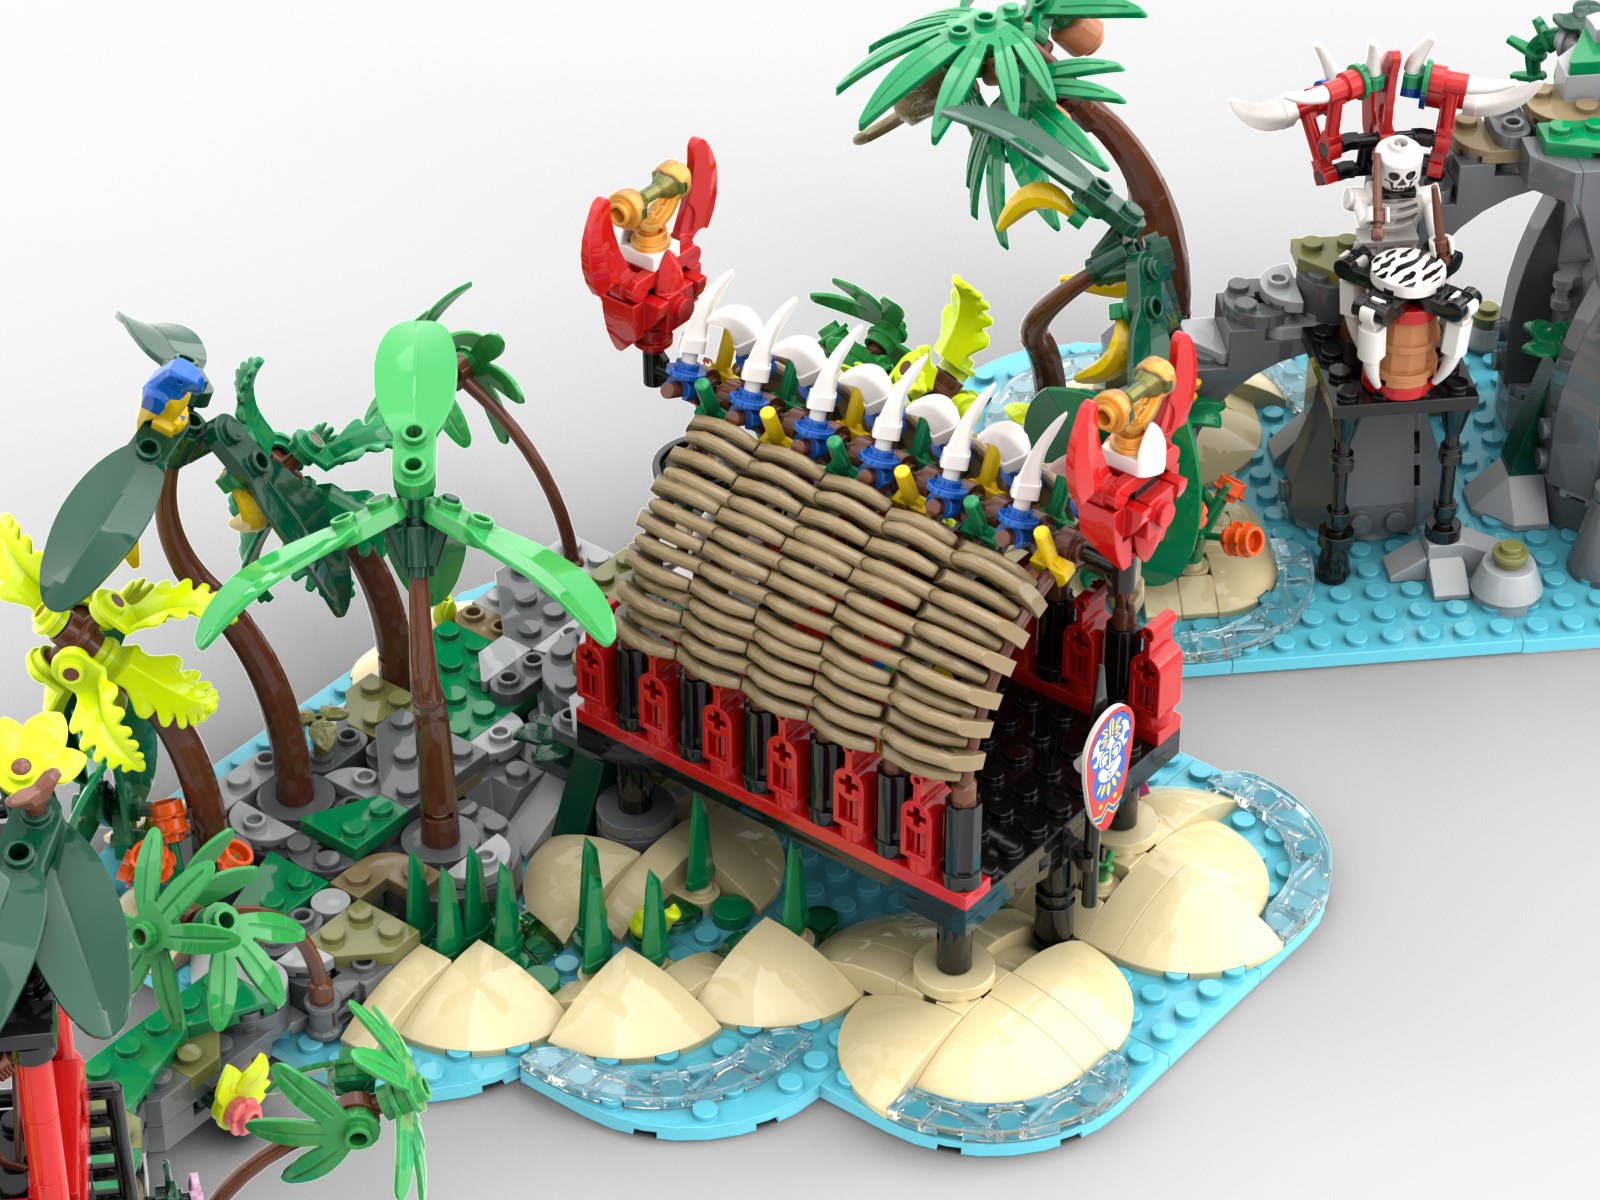
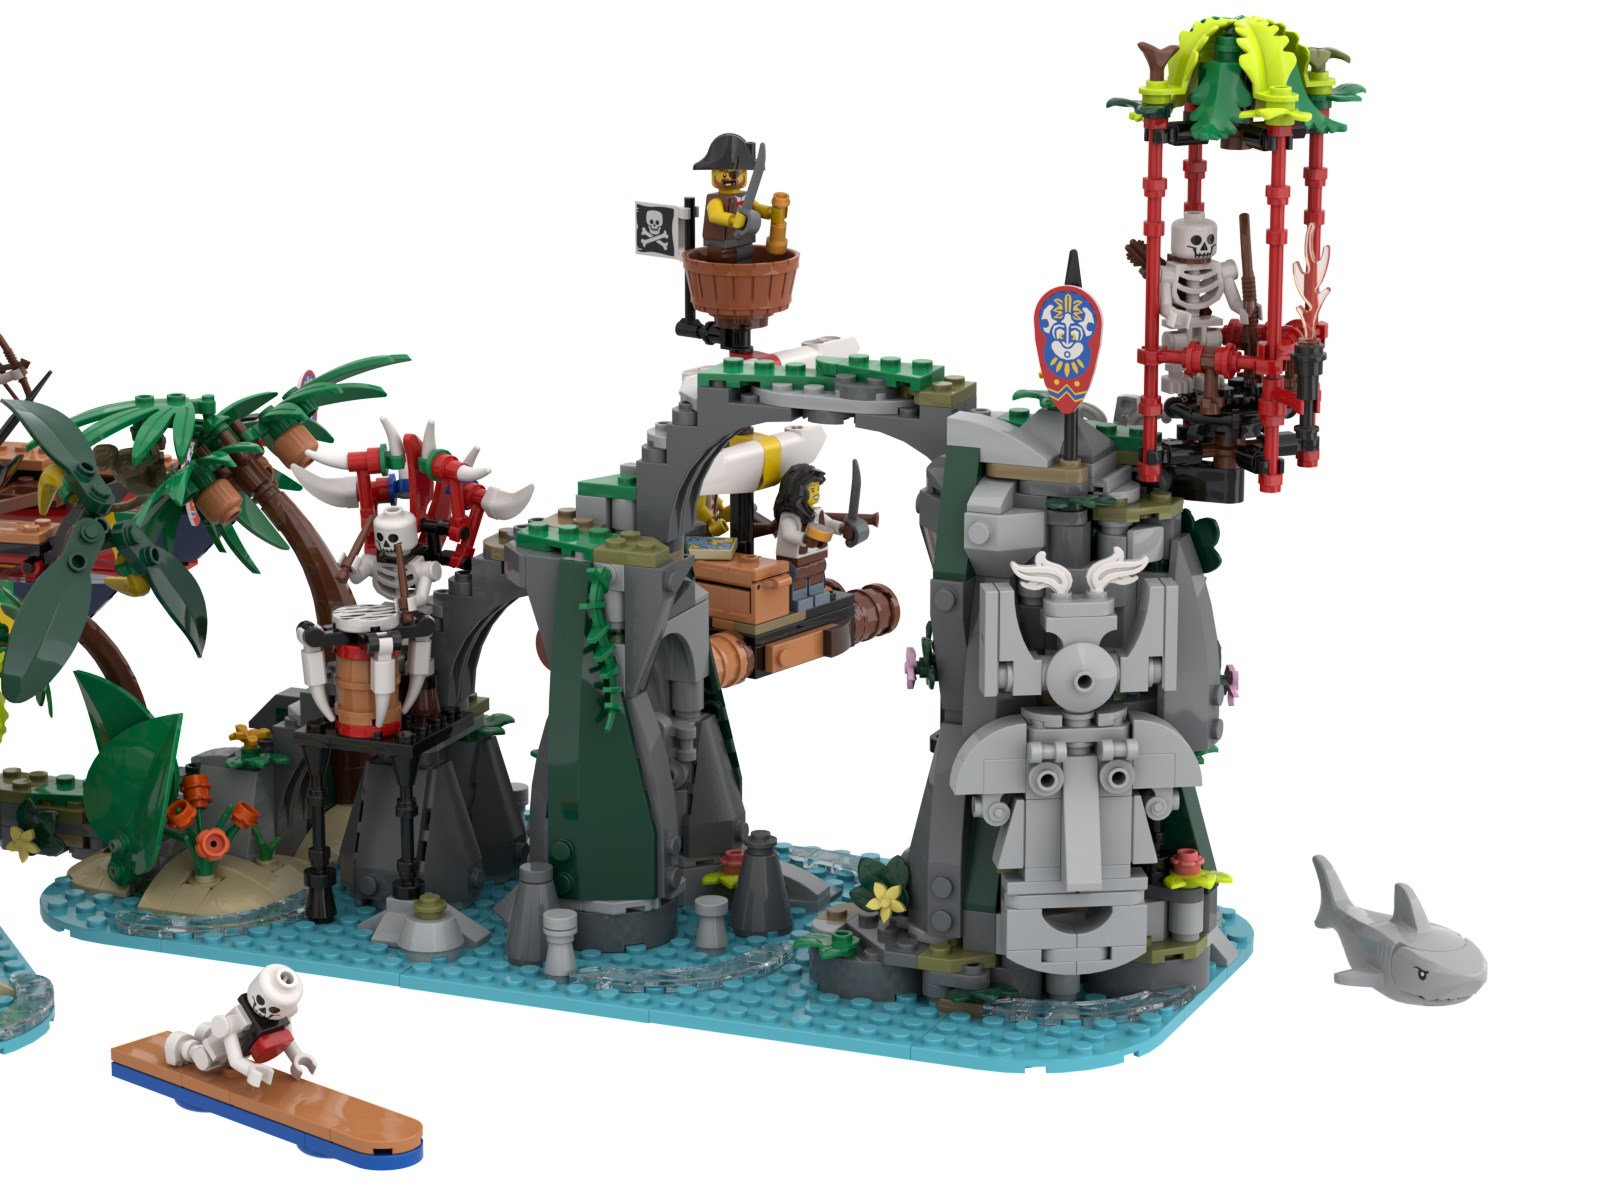
I am thrilled to share with you my latest entry into the BrickLink Designer Program, Azure Islands. For this design, I waded into the Pirate theme with a slightly different take on the original Islanders sub-theme from 1994.
The Lore
On a chain of islands lost to history, we find King Kahuka’s lost expedition, led by his brother.
The expedition set sail from Enchanted (Indigo) Island, with the task of charting new sea lanes. Unbeknown to the crew, a storm was forming in their path. The fleet was forced to run aground on the nearest island.
When the storm finally passed, the crew began to look around and discovered the glow of the island’s most prized treasure, Bricktonium! These strange energy crystals were pretty, rare and hid a secret the crew would quickly discover.
The large concentration of Bricktonium created an energy field that prevented the fleet from leaving the island’s immediate area, trapping the crew forever.
After this discovery, the crew decided to make the best of a bad situation and they set out to build an island paradise! Here they would enjoy the pristine waters by surfing and occasionally trapping wandering pirates and Imperials who ventured a little too close to the Azure Islands.
Inspiration
Growing up, my older brother and I would dump out our loose bricks and build as many kids did, sometimes city, sometimes castles and sometimes pirates. We were lucky to have a variety of minifigs to populate the worlds we created.
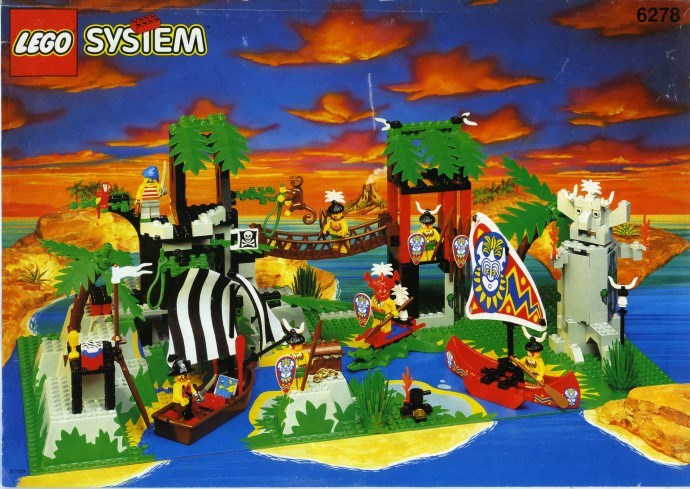
Then, in 1994, the Islanders sets were released and we laid our eyes on 6278 Enchanted Island in one of the small inserts that LEGO used to put in sets. From that point on we were hooked. The bright colours, new (to us) tropical elements such as the palm leaves, alligators and bright red canoes had us begging our parents for anything they could find. We never did receive Enchanted Island, although we did get to play with it at a friend’s house, but I did get 6256 Islander Catamaran and a few other smaller sets which were all welcome additions and helped inspire us at the time to explore with pirates in a whole new direction.
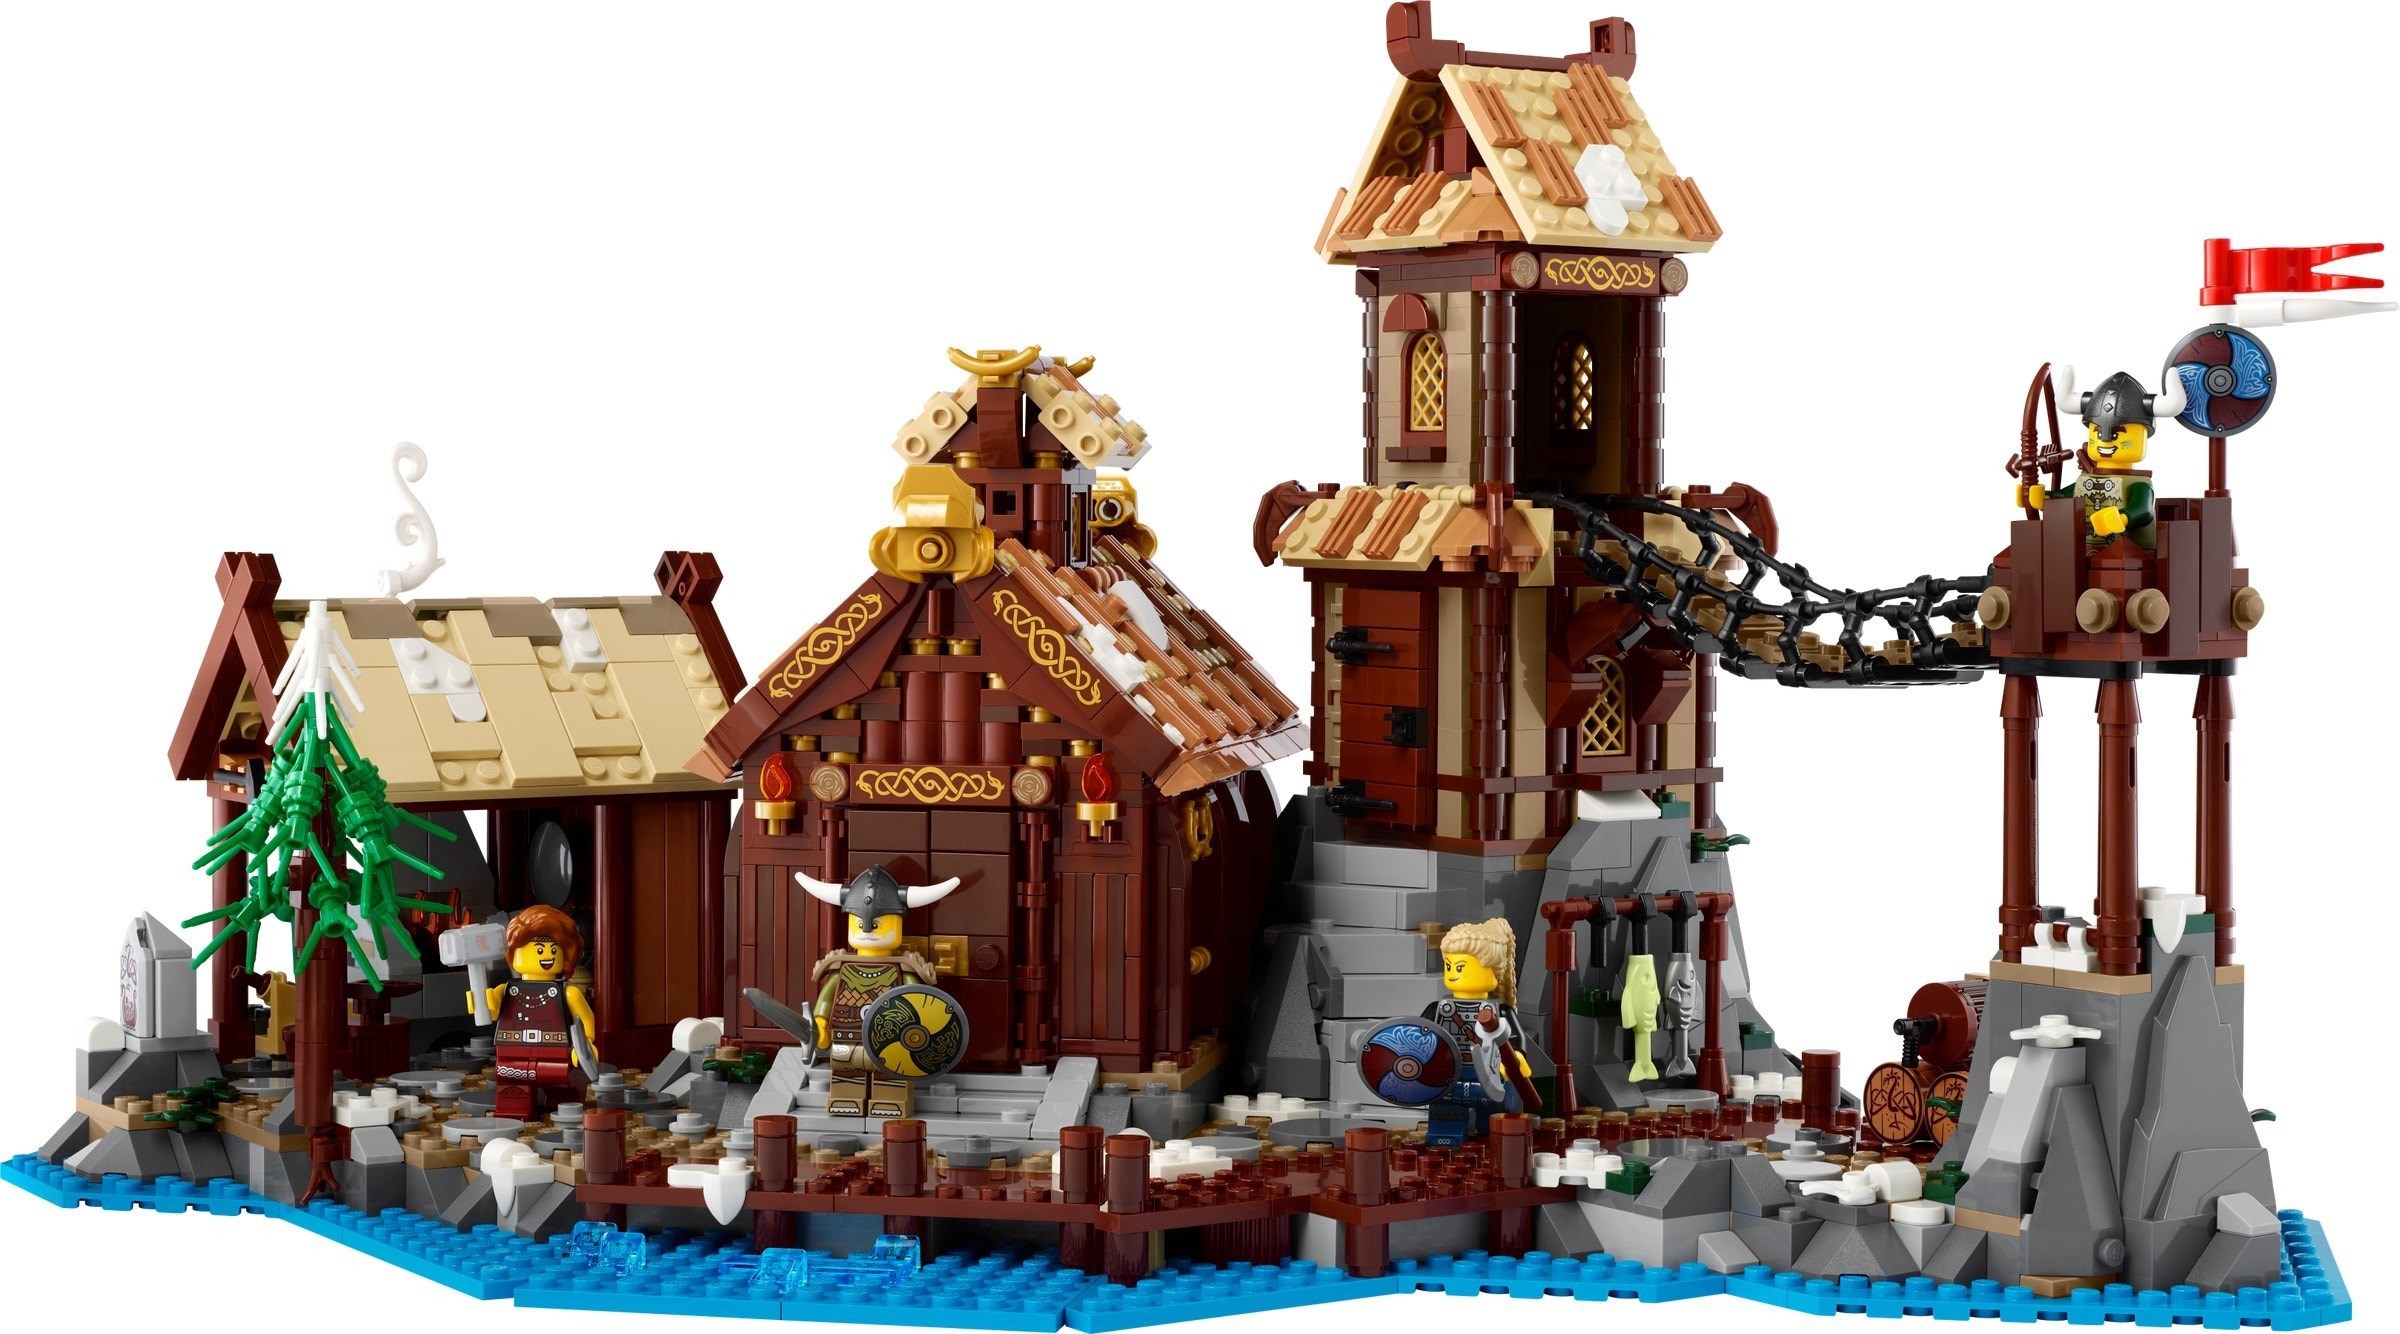
A newer source of inspiration came from 21343 Viking Village. I have this set on display in my house and just walking by it constantly after having built it with my six-year-old son got me really thinking on layout, structure angles and rock work.
The Build
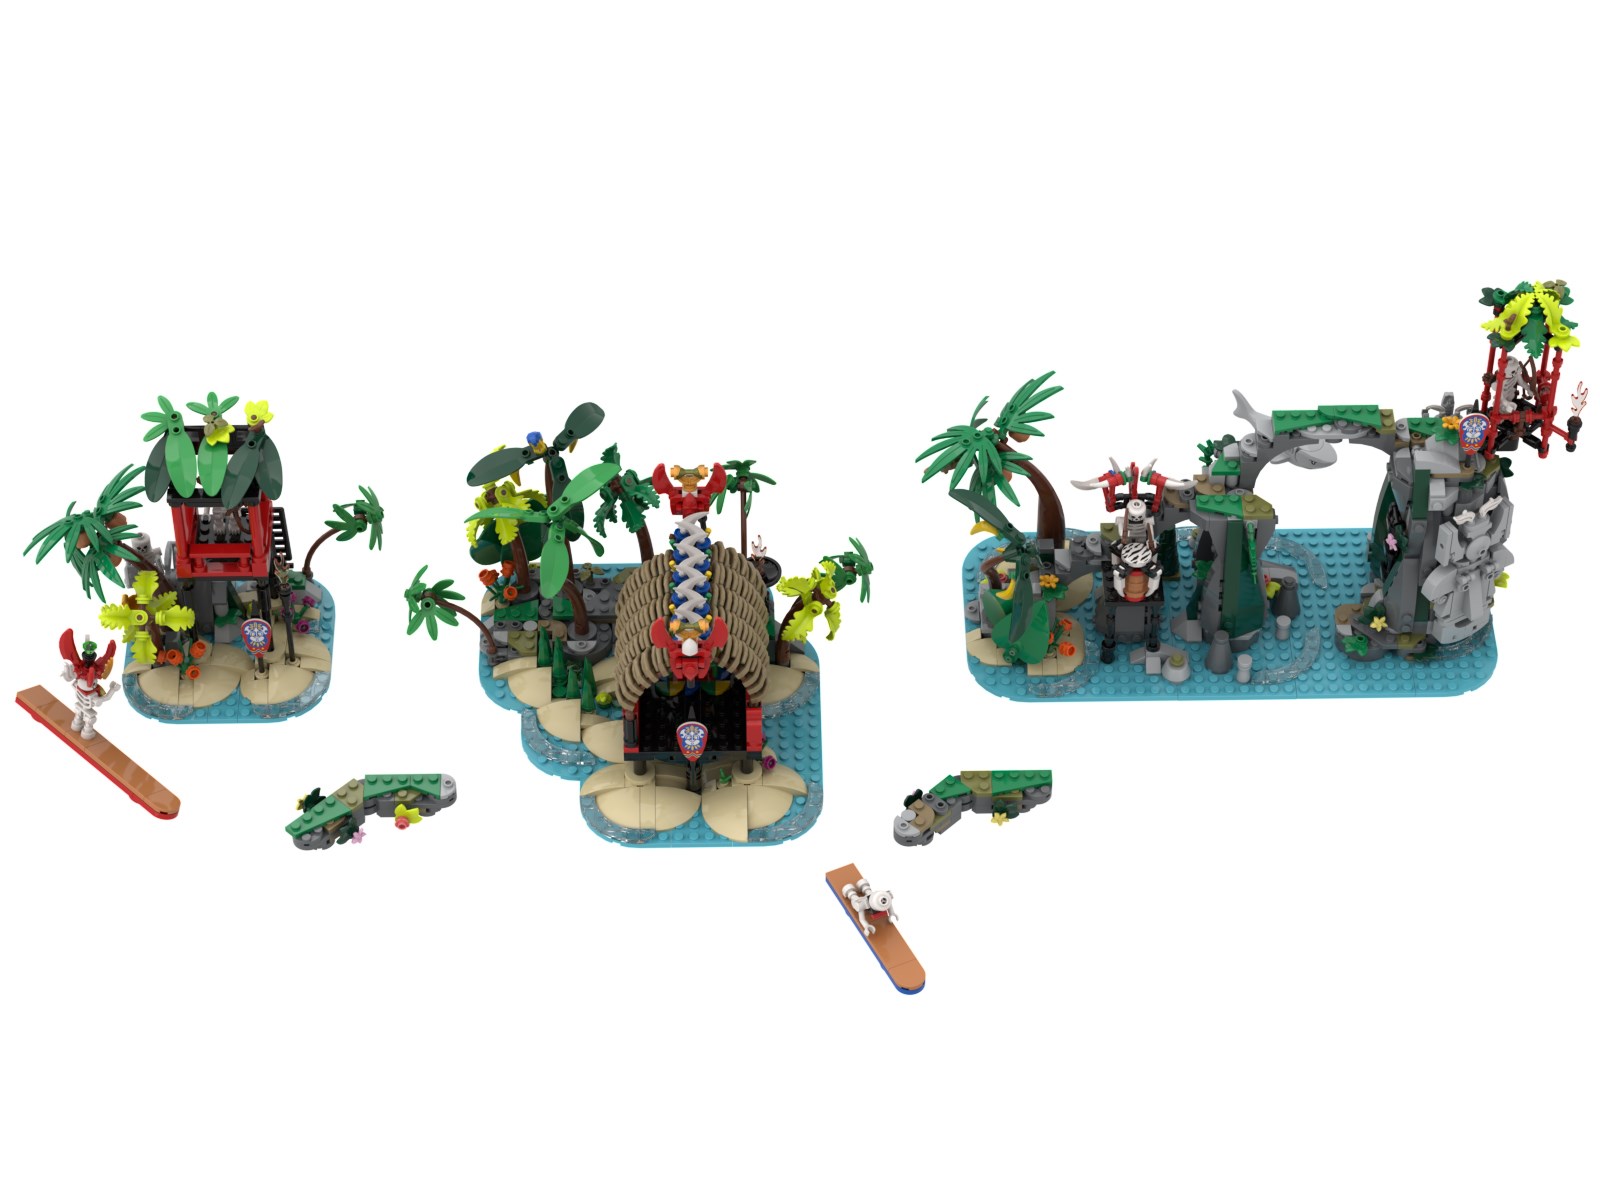
The entire set consists of 3 islands that are connected with a total of 2 stone walkways. These can be rearranged and reconnected to create your own set of islands or a single connected island.
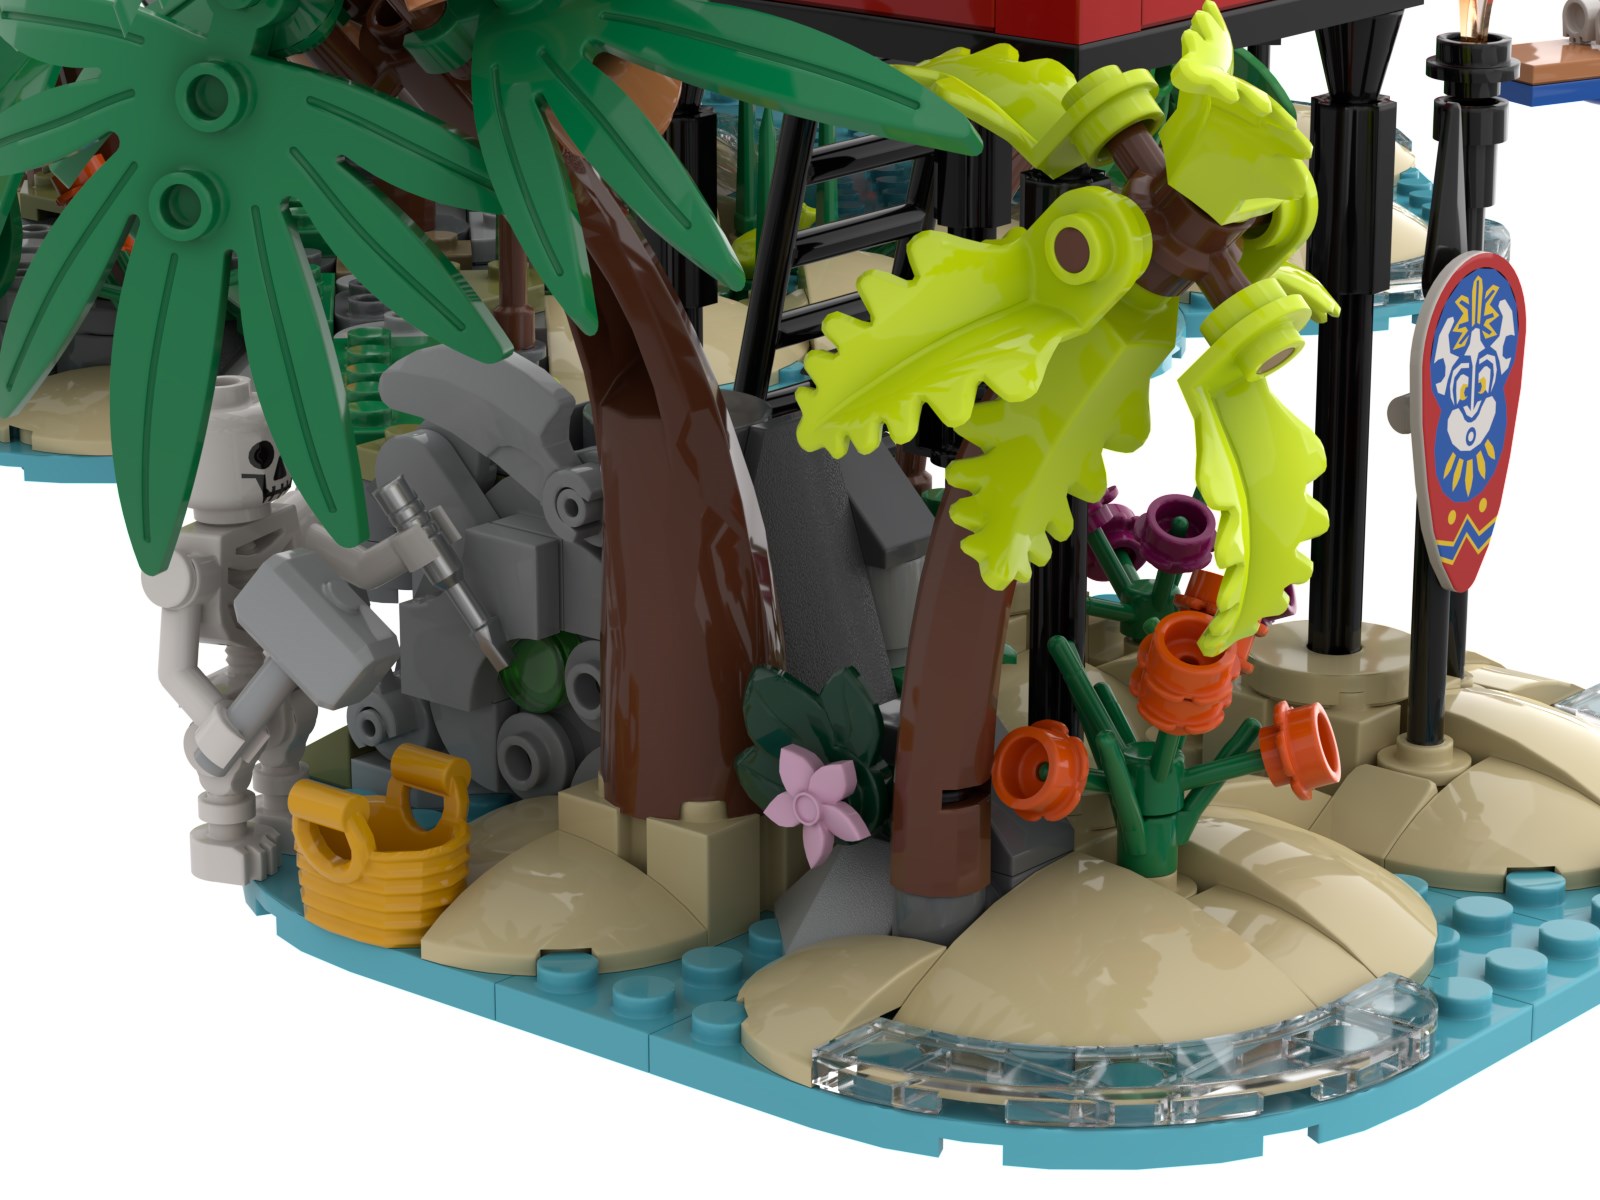
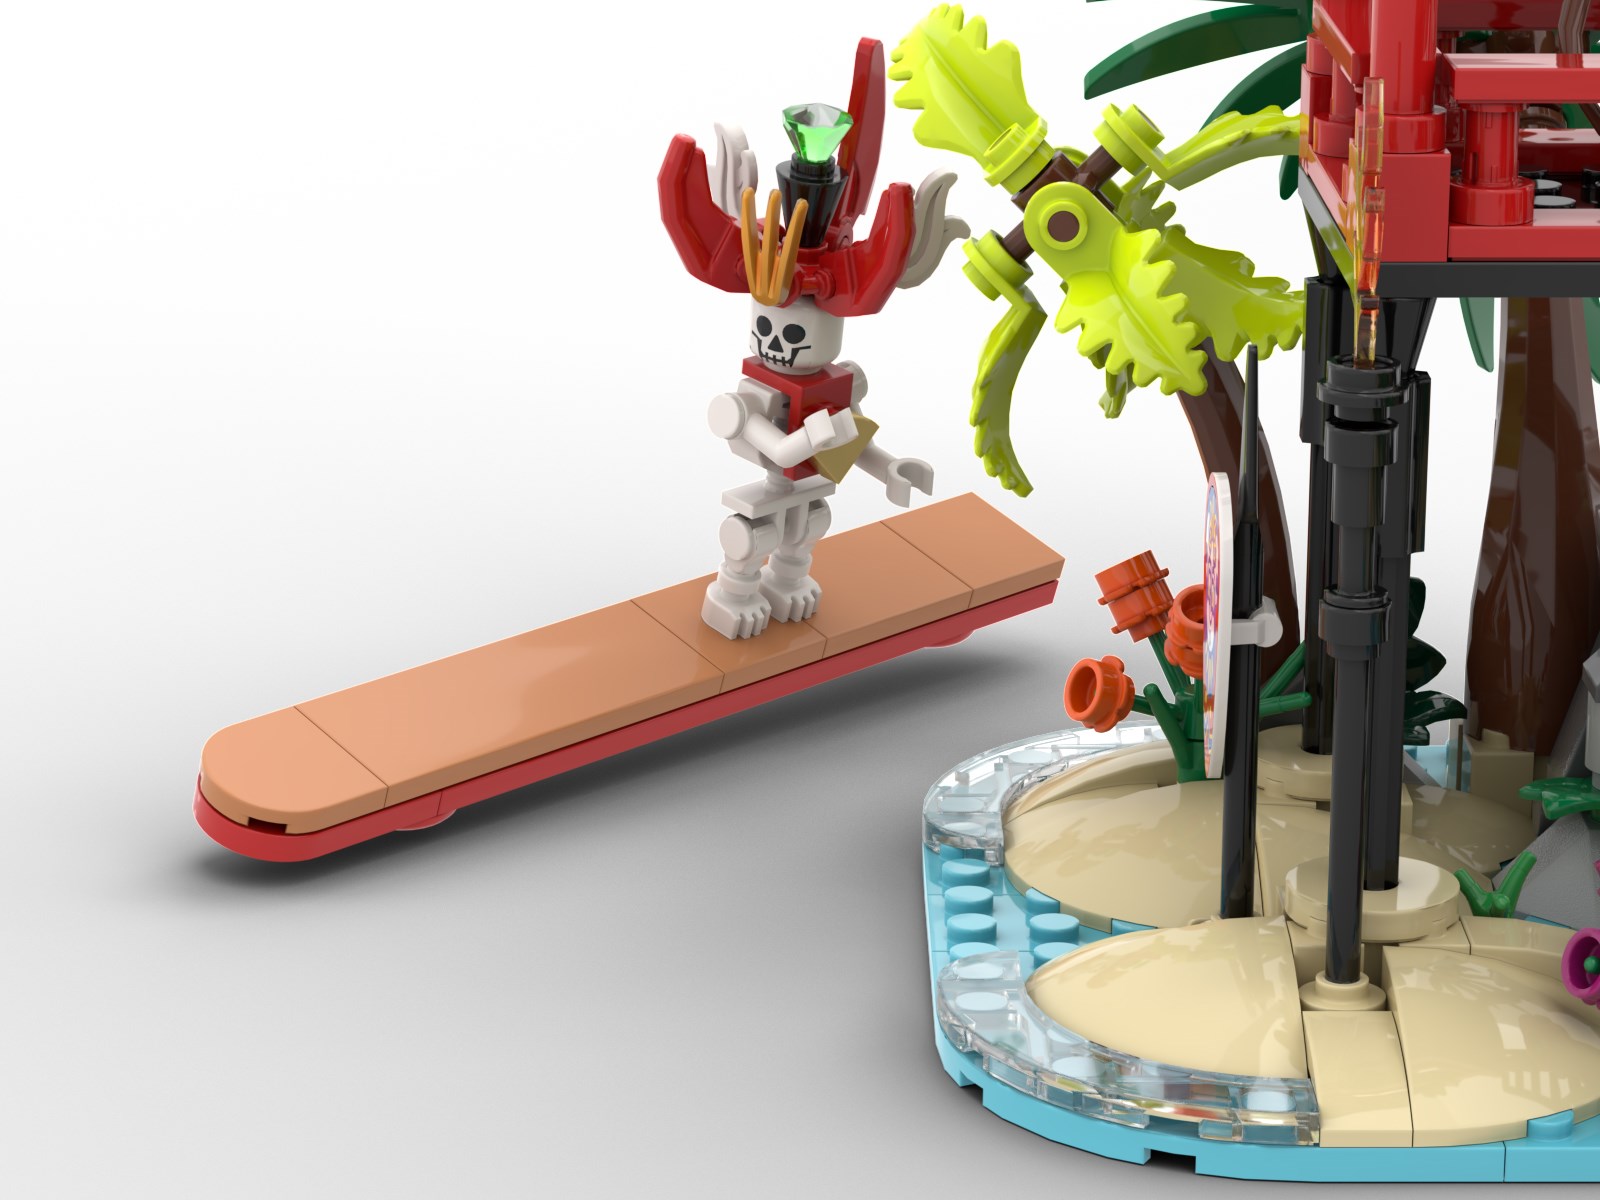
Each island section has its own secrets. From left to right, the first island consists of a main tower situated on a beach with a unique sculpture being carved into the rock foundation. You can also see King Kahuka’s brother riding the waves on his surfboard (notice his is the largest of the two, as the largest are reserved for royalty)
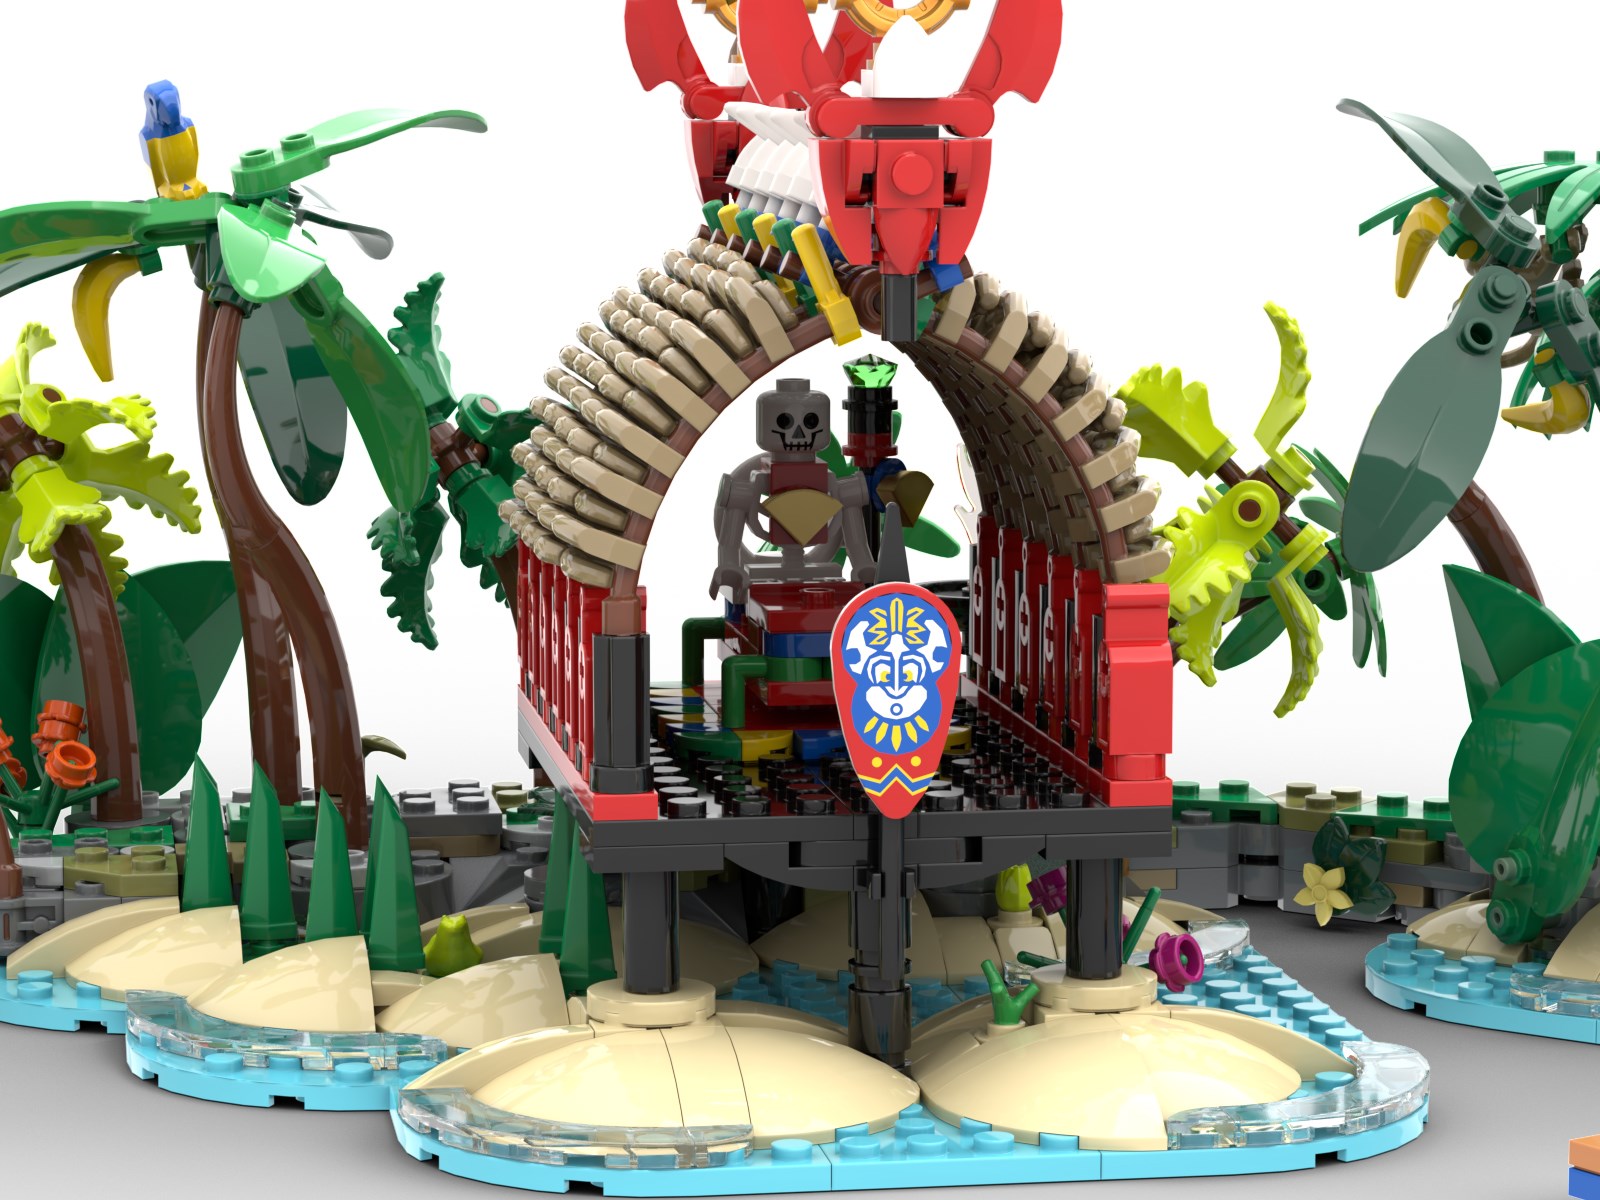
The middle island is where King Kahuka’s brother has setup shop and rules the Azure Islands. Here, you will find a throne that can be removed from the thatched roof meeting hall. For this build I tried to use a different technique for the roofing utilizing part 6516553 in Reddish Brown for the arched supports and part 6496672 in Dark Tan for the roofing.
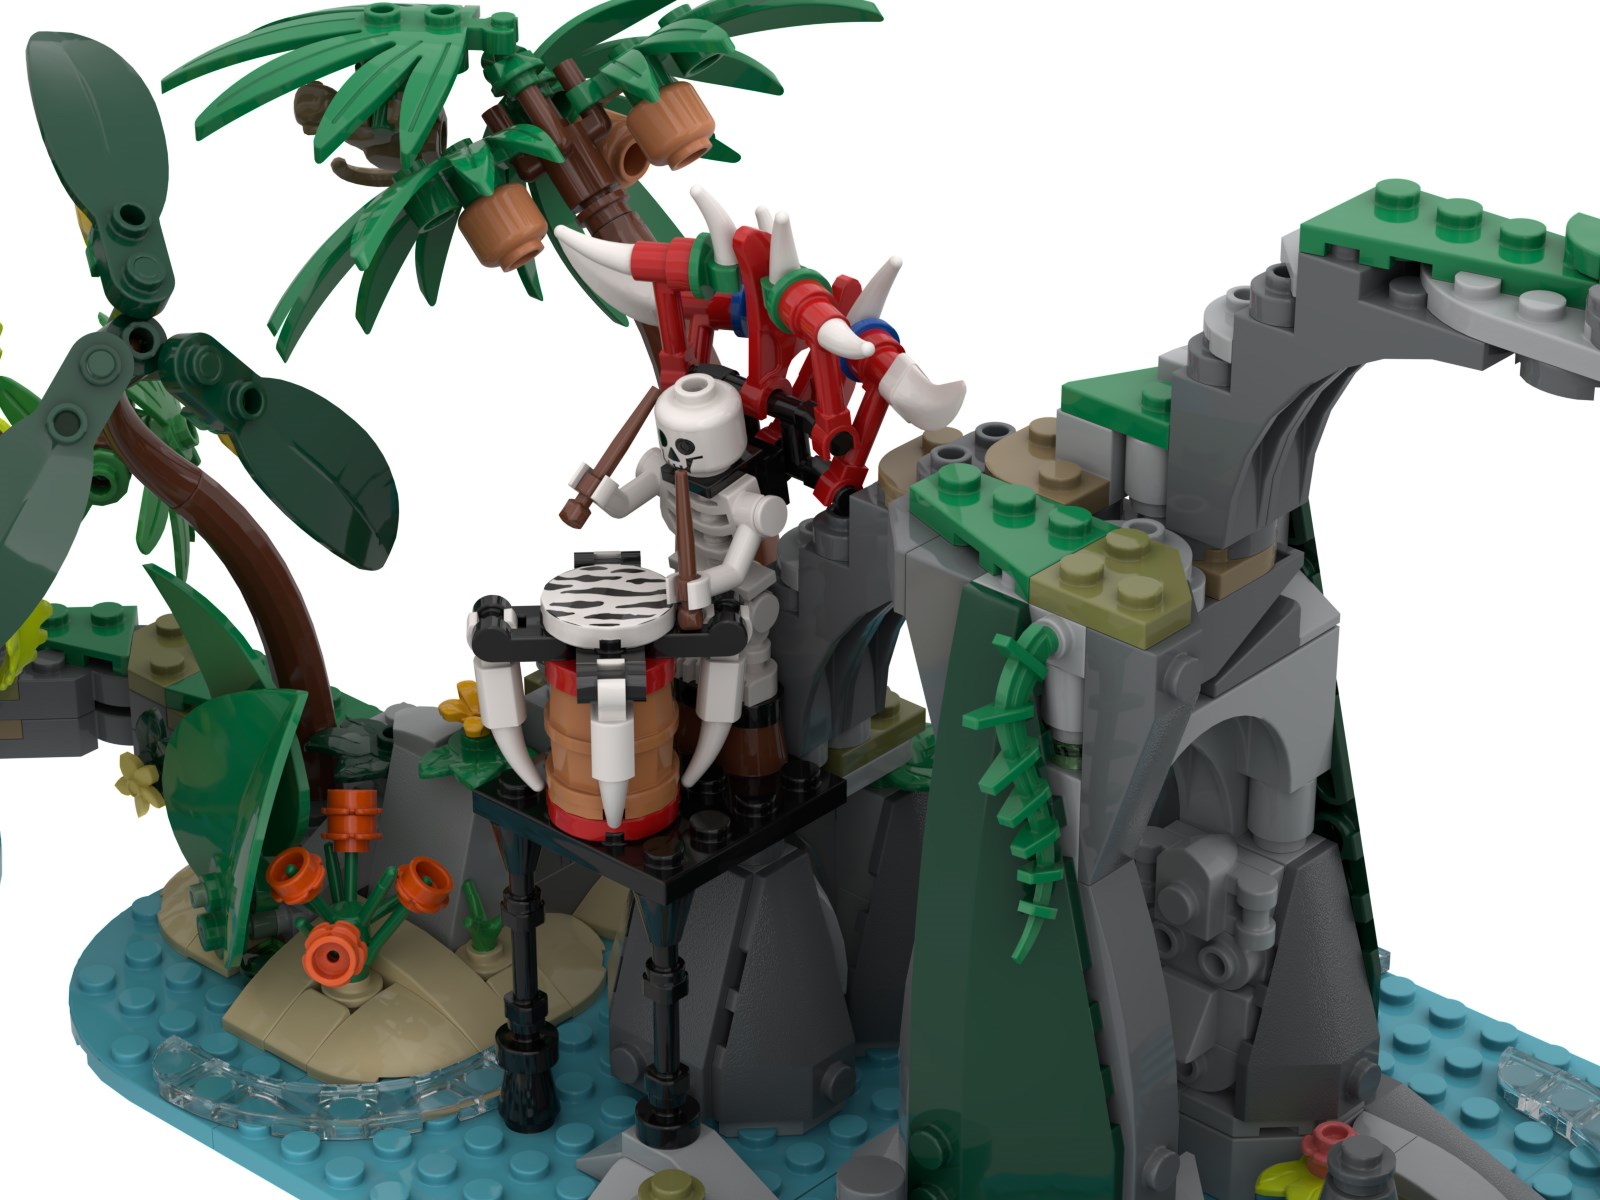
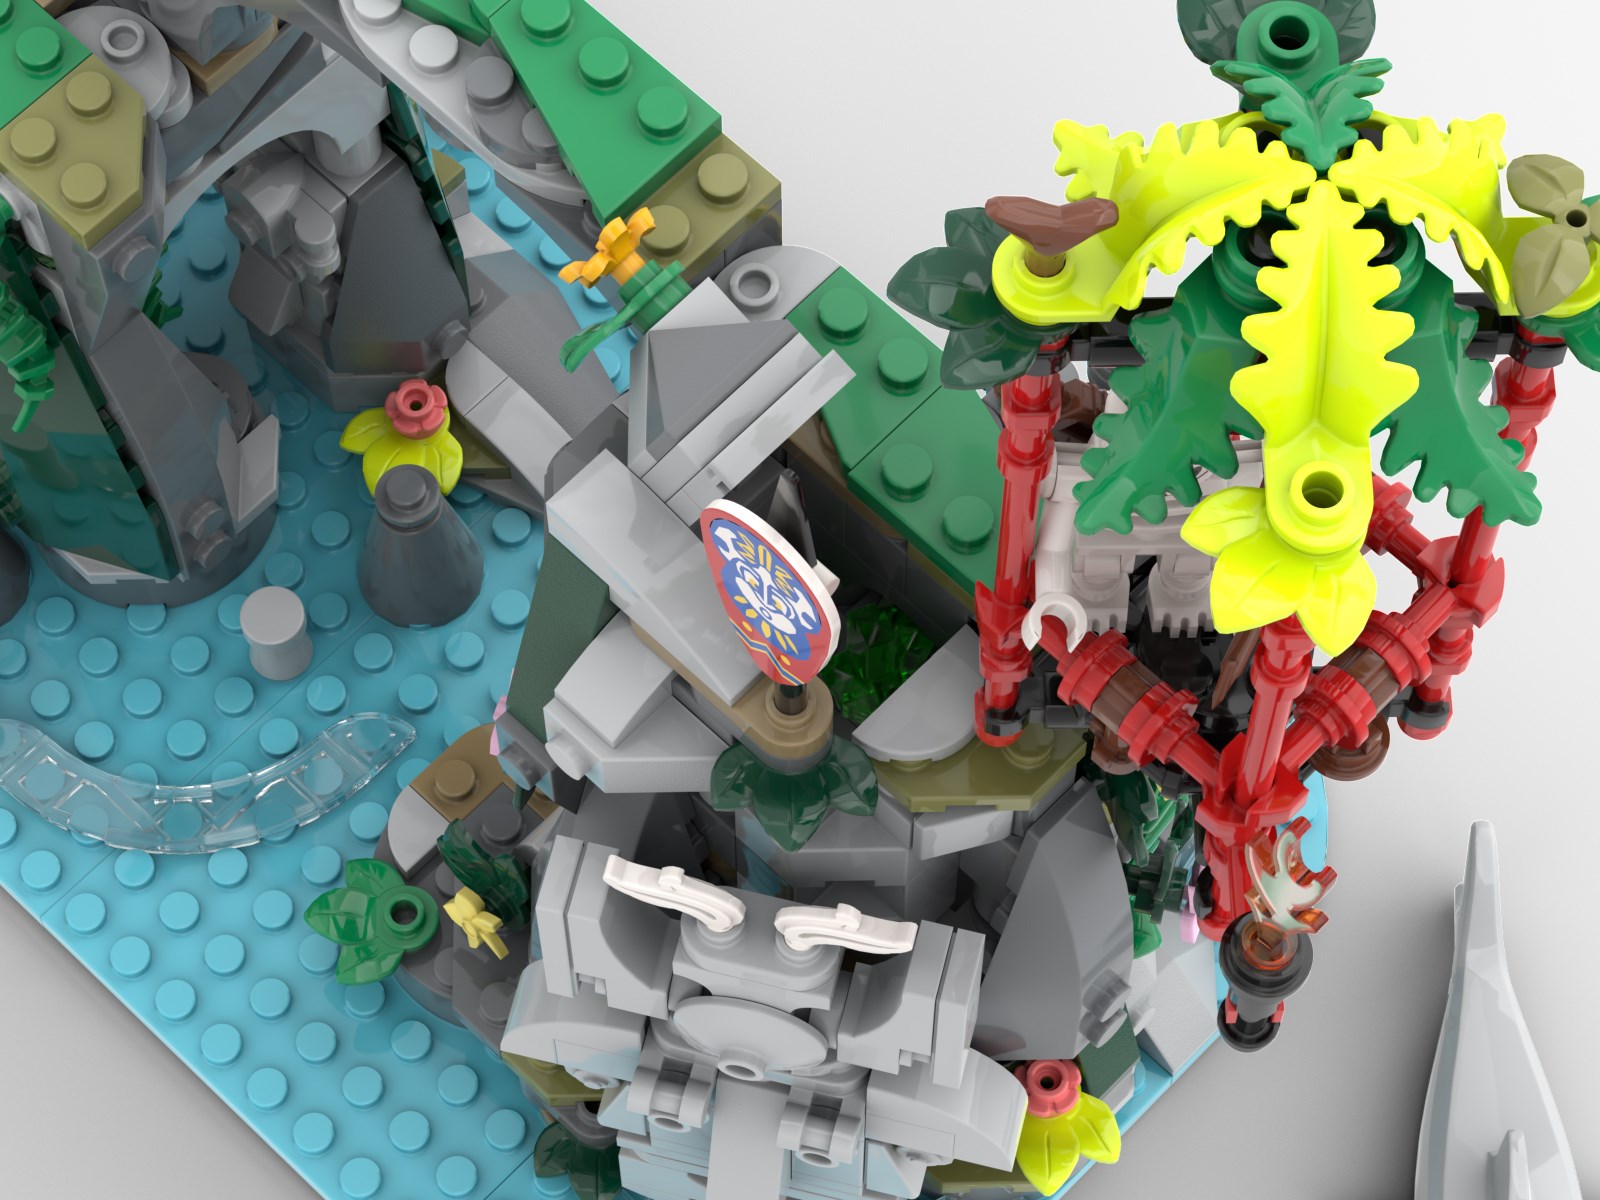
The third island is where most of the Bricktonium that has trapped the Islander crew can be found. The first stop is the drummer’s station. Moving further up there is a secret compartment for the largest crystals next to the highest point, the lookout, with a domed roof made primarily from part 2682 in both Lime and Green. For the roof elements I wanted to include the same parts that are used in the trees that are scattered around the islands.
There is also a prison cell with a wall section that can be removed, located behind the largest carving on the island. This is where the crew can hold any pirates or Imperials that wander too close to the islands.
For the foliage, I wanted to create a variety of different trees that were simple to put together and not too part intensive. My hope is that the islands look full of life, so I included a parrot and monkey and put some bananas. If you’re in the water watch out for the shark!
In addition to the island section, there is a catamaran with brick-built hauls inspired by Islander Catamaran.
A foil for the catamaran is a brick-built raft crewed by pirates and inspired by various raft designs for the early Pirate theme.
The Cast
Here is where the story comes together. I have included 3 pirates for the raft but the Azure Islands are inhabited by what remains of the crew. Unfortunately for them, the Bricktonium on the islands keeps them alive forever but also keeps them trapped. Meaning they can play on the islands and in the water along the coast, but they can never leave the general vicinity of the islands.
You can see my full interview with Steve at The Imagination Brickshop in which I go into even more detail about Azure Islands and the actual model using the Studio design program. Please note there was a minor change to one design of the trees from when the video was done and the project was submitted and approved.
I hope you will consider supporting Azure Islands. If you have any comments, please leave them here or on the Bricklink project page.
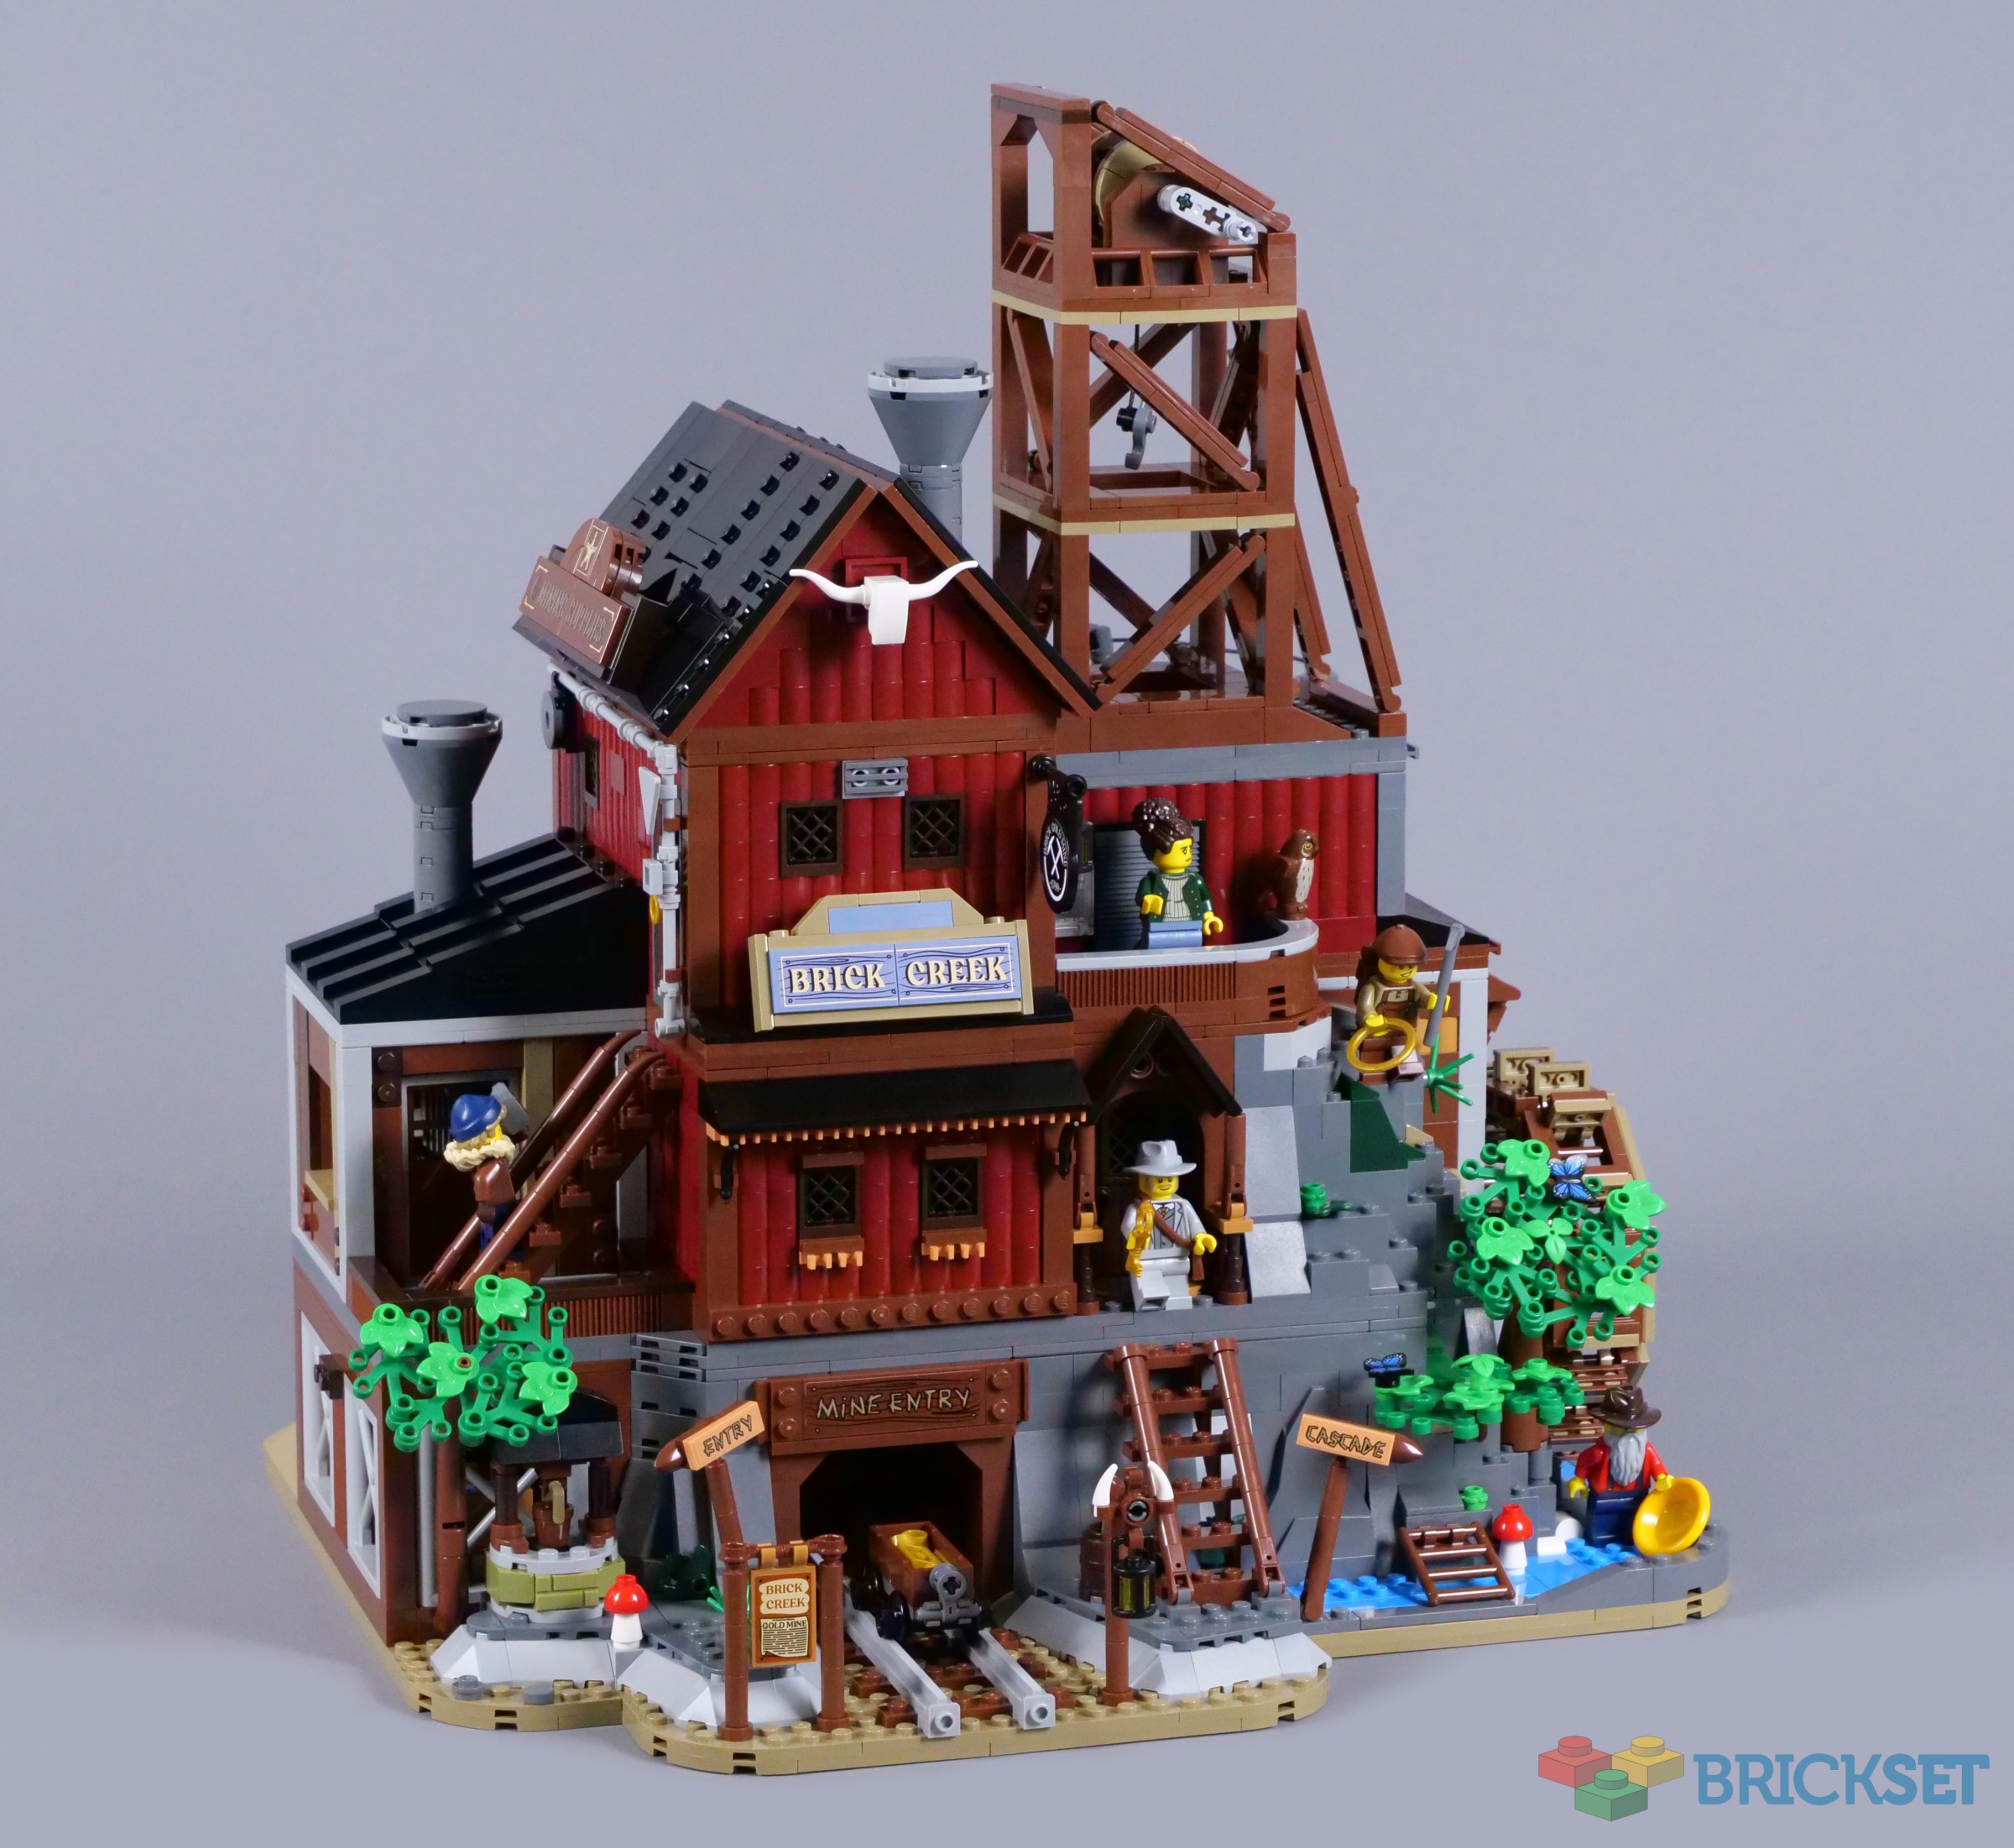
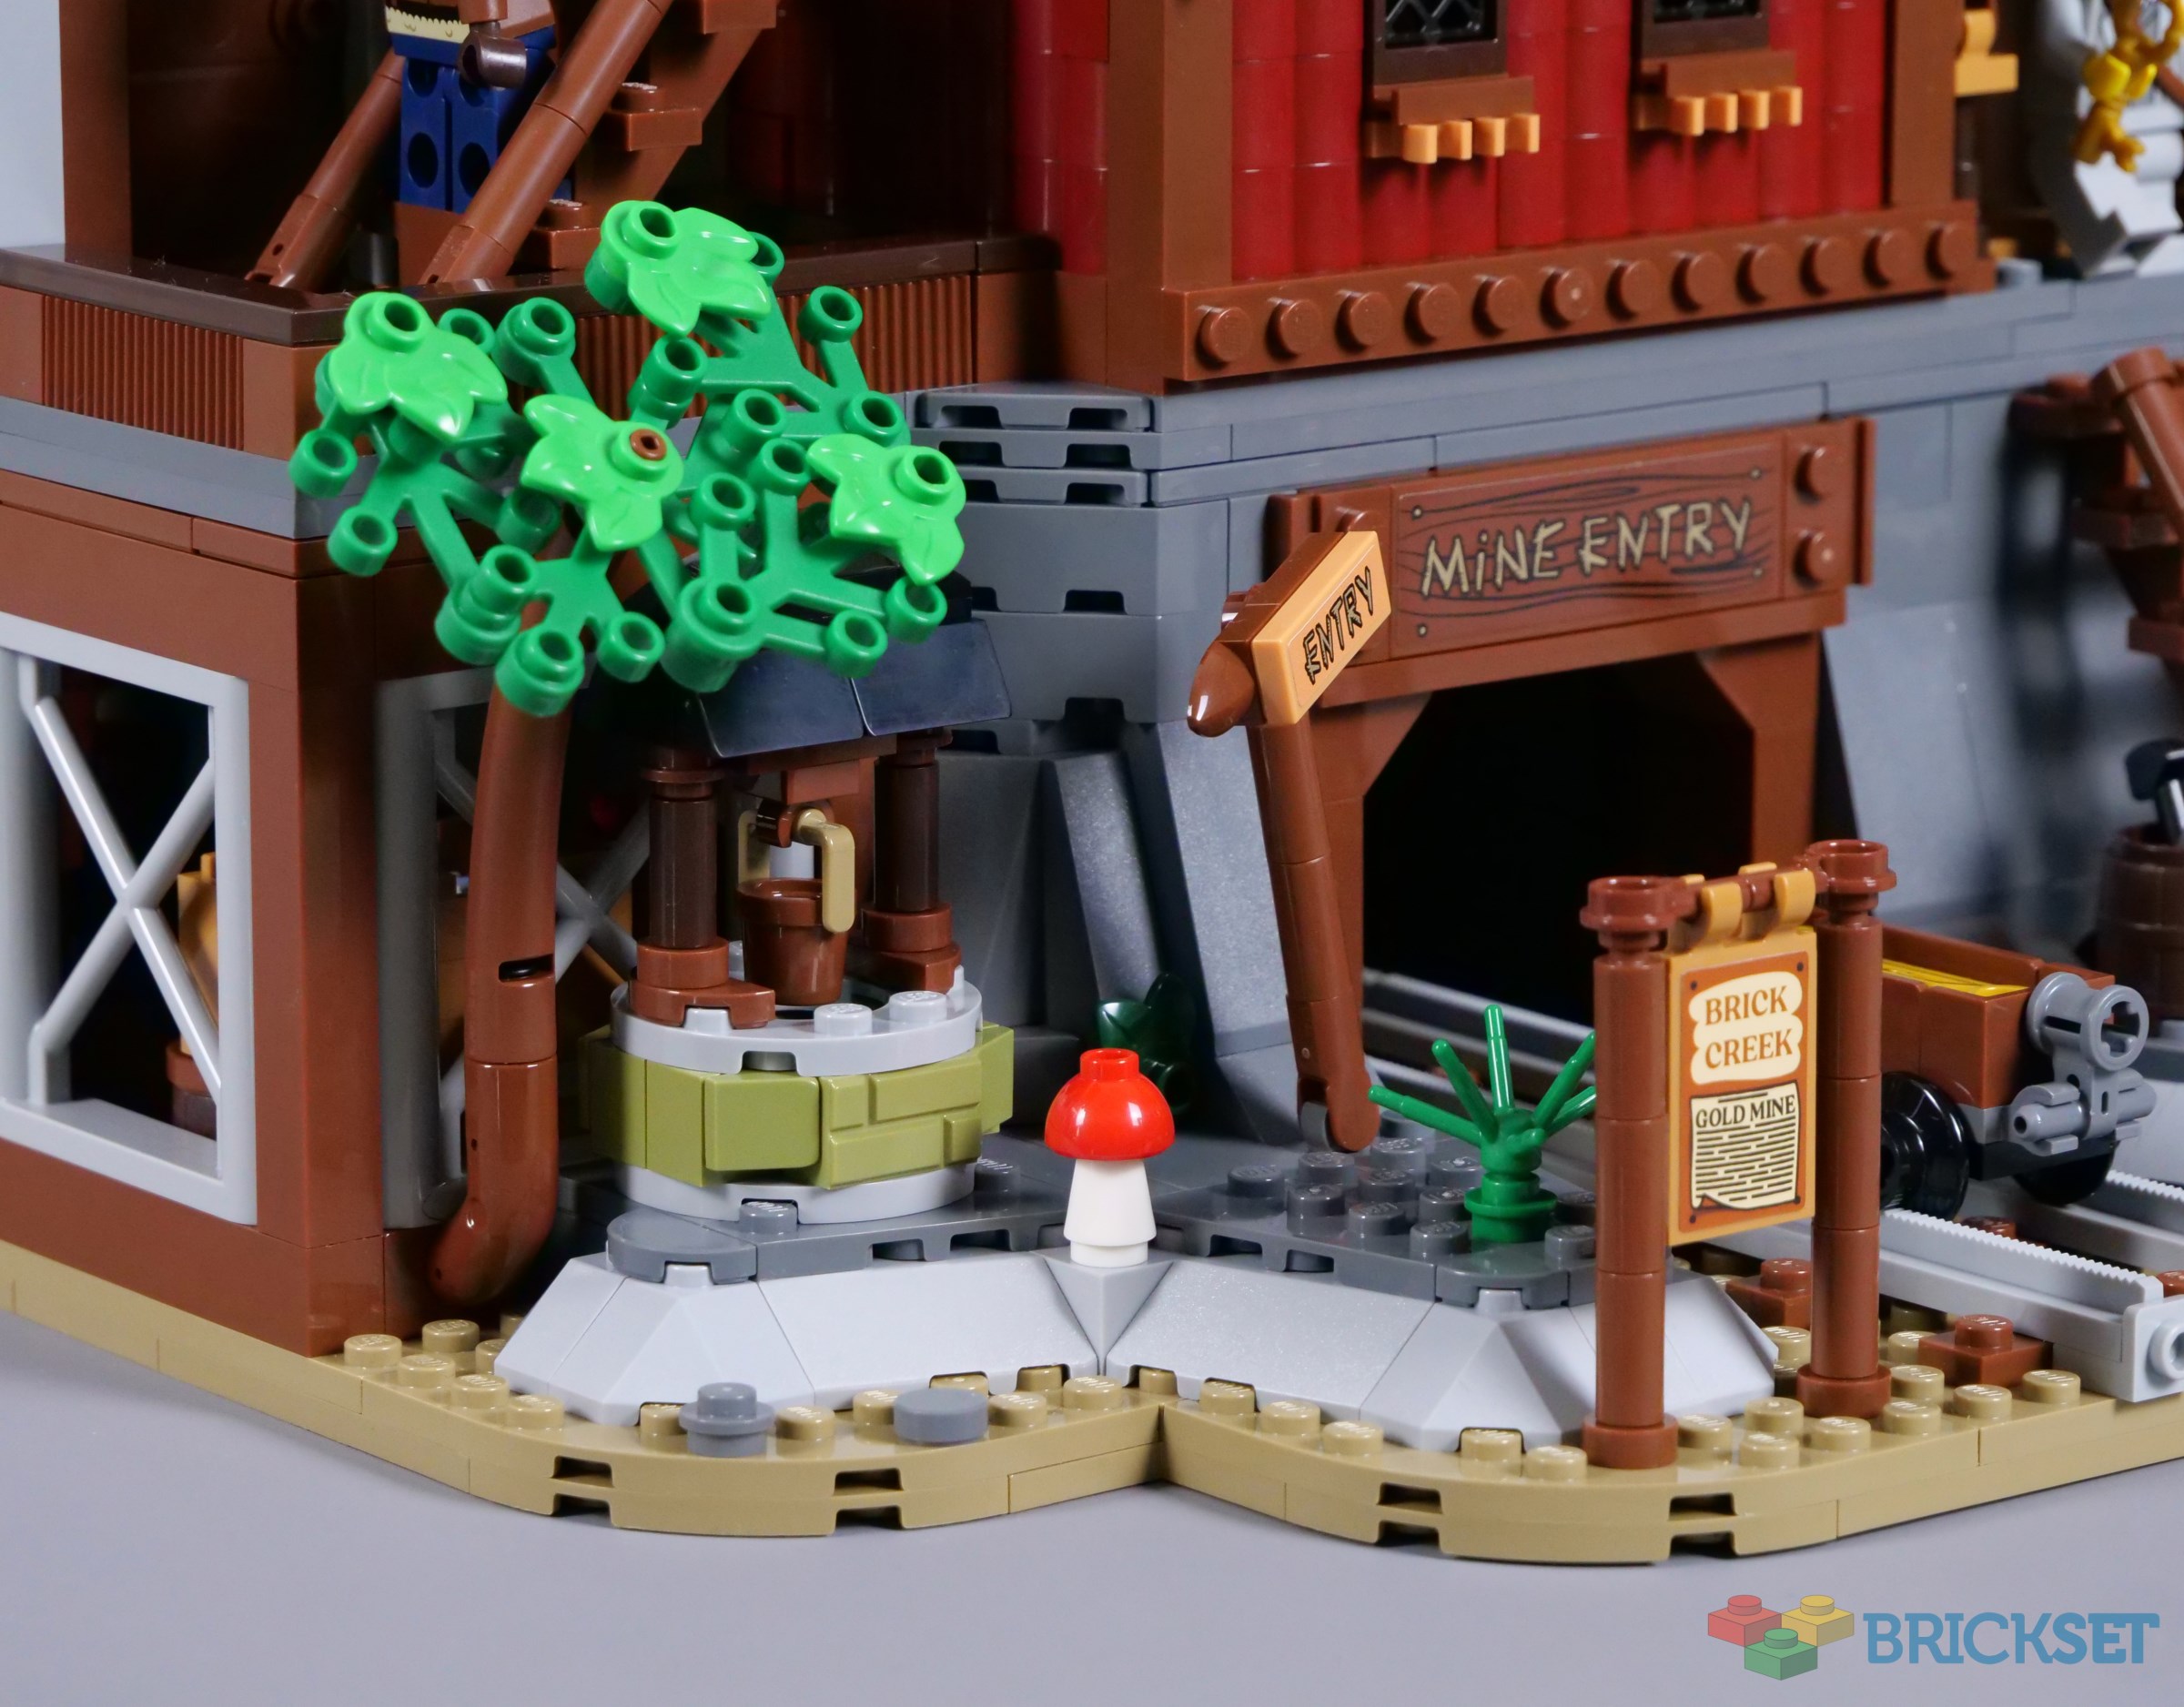
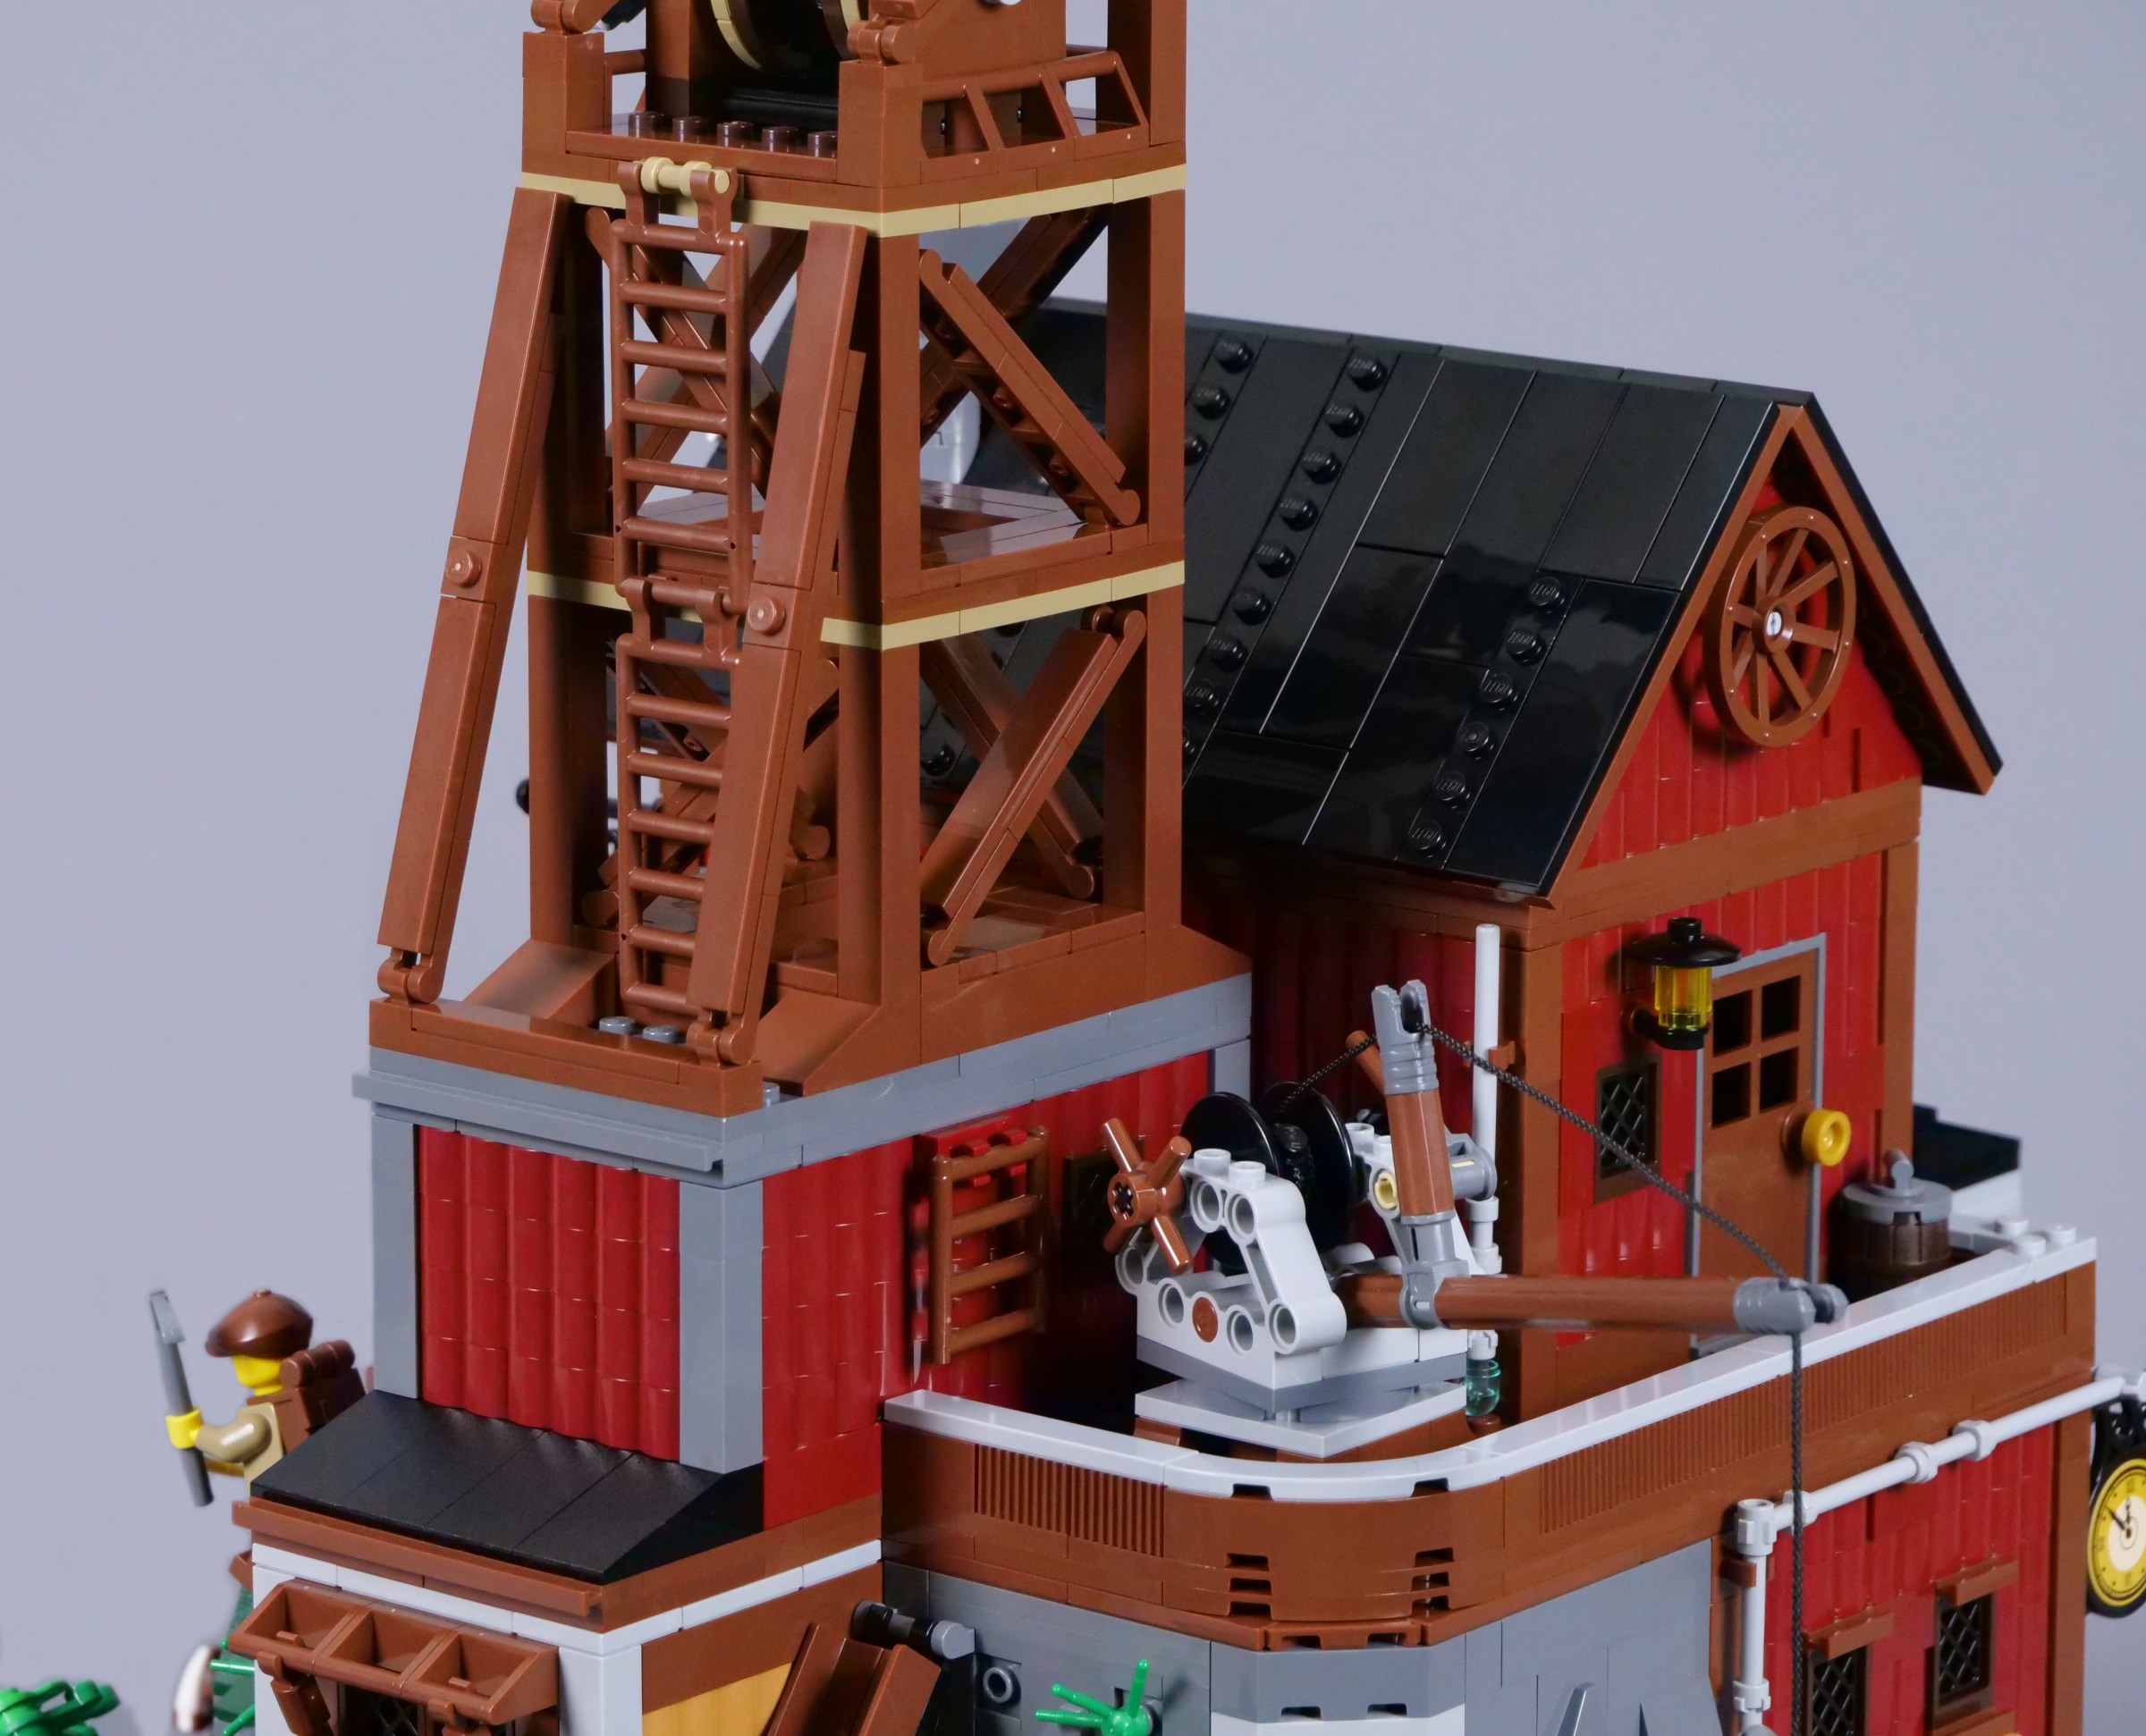
Since its introduction, the BrickLink Designer Program has included some excellent Western models. Another arrives with series six: 910055 Gold Mine Expedition. This structure is certainly substantial and captures all the details expected of frontier mines.
However, this mine invites comparison with the wonderful 7036 Dwarves' Mine, which remains among my favourite play sets. There is an opportunity for even more functionality here, plus detailed interiors, perhaps matching 910031 General Store and the other BrickLink Designer Program entries.
I expected more of 910055 Gold Mine Expedition, but it is still quite enjoyable
Strong presence on display
Attractive colours
Lovely details, particularly inside
Good minifigures, considering the parts available
Bland functions
A few questionable building techniques
The set was provided for review by LEGO. All opinions expressed are those of the author.
The Completed Model
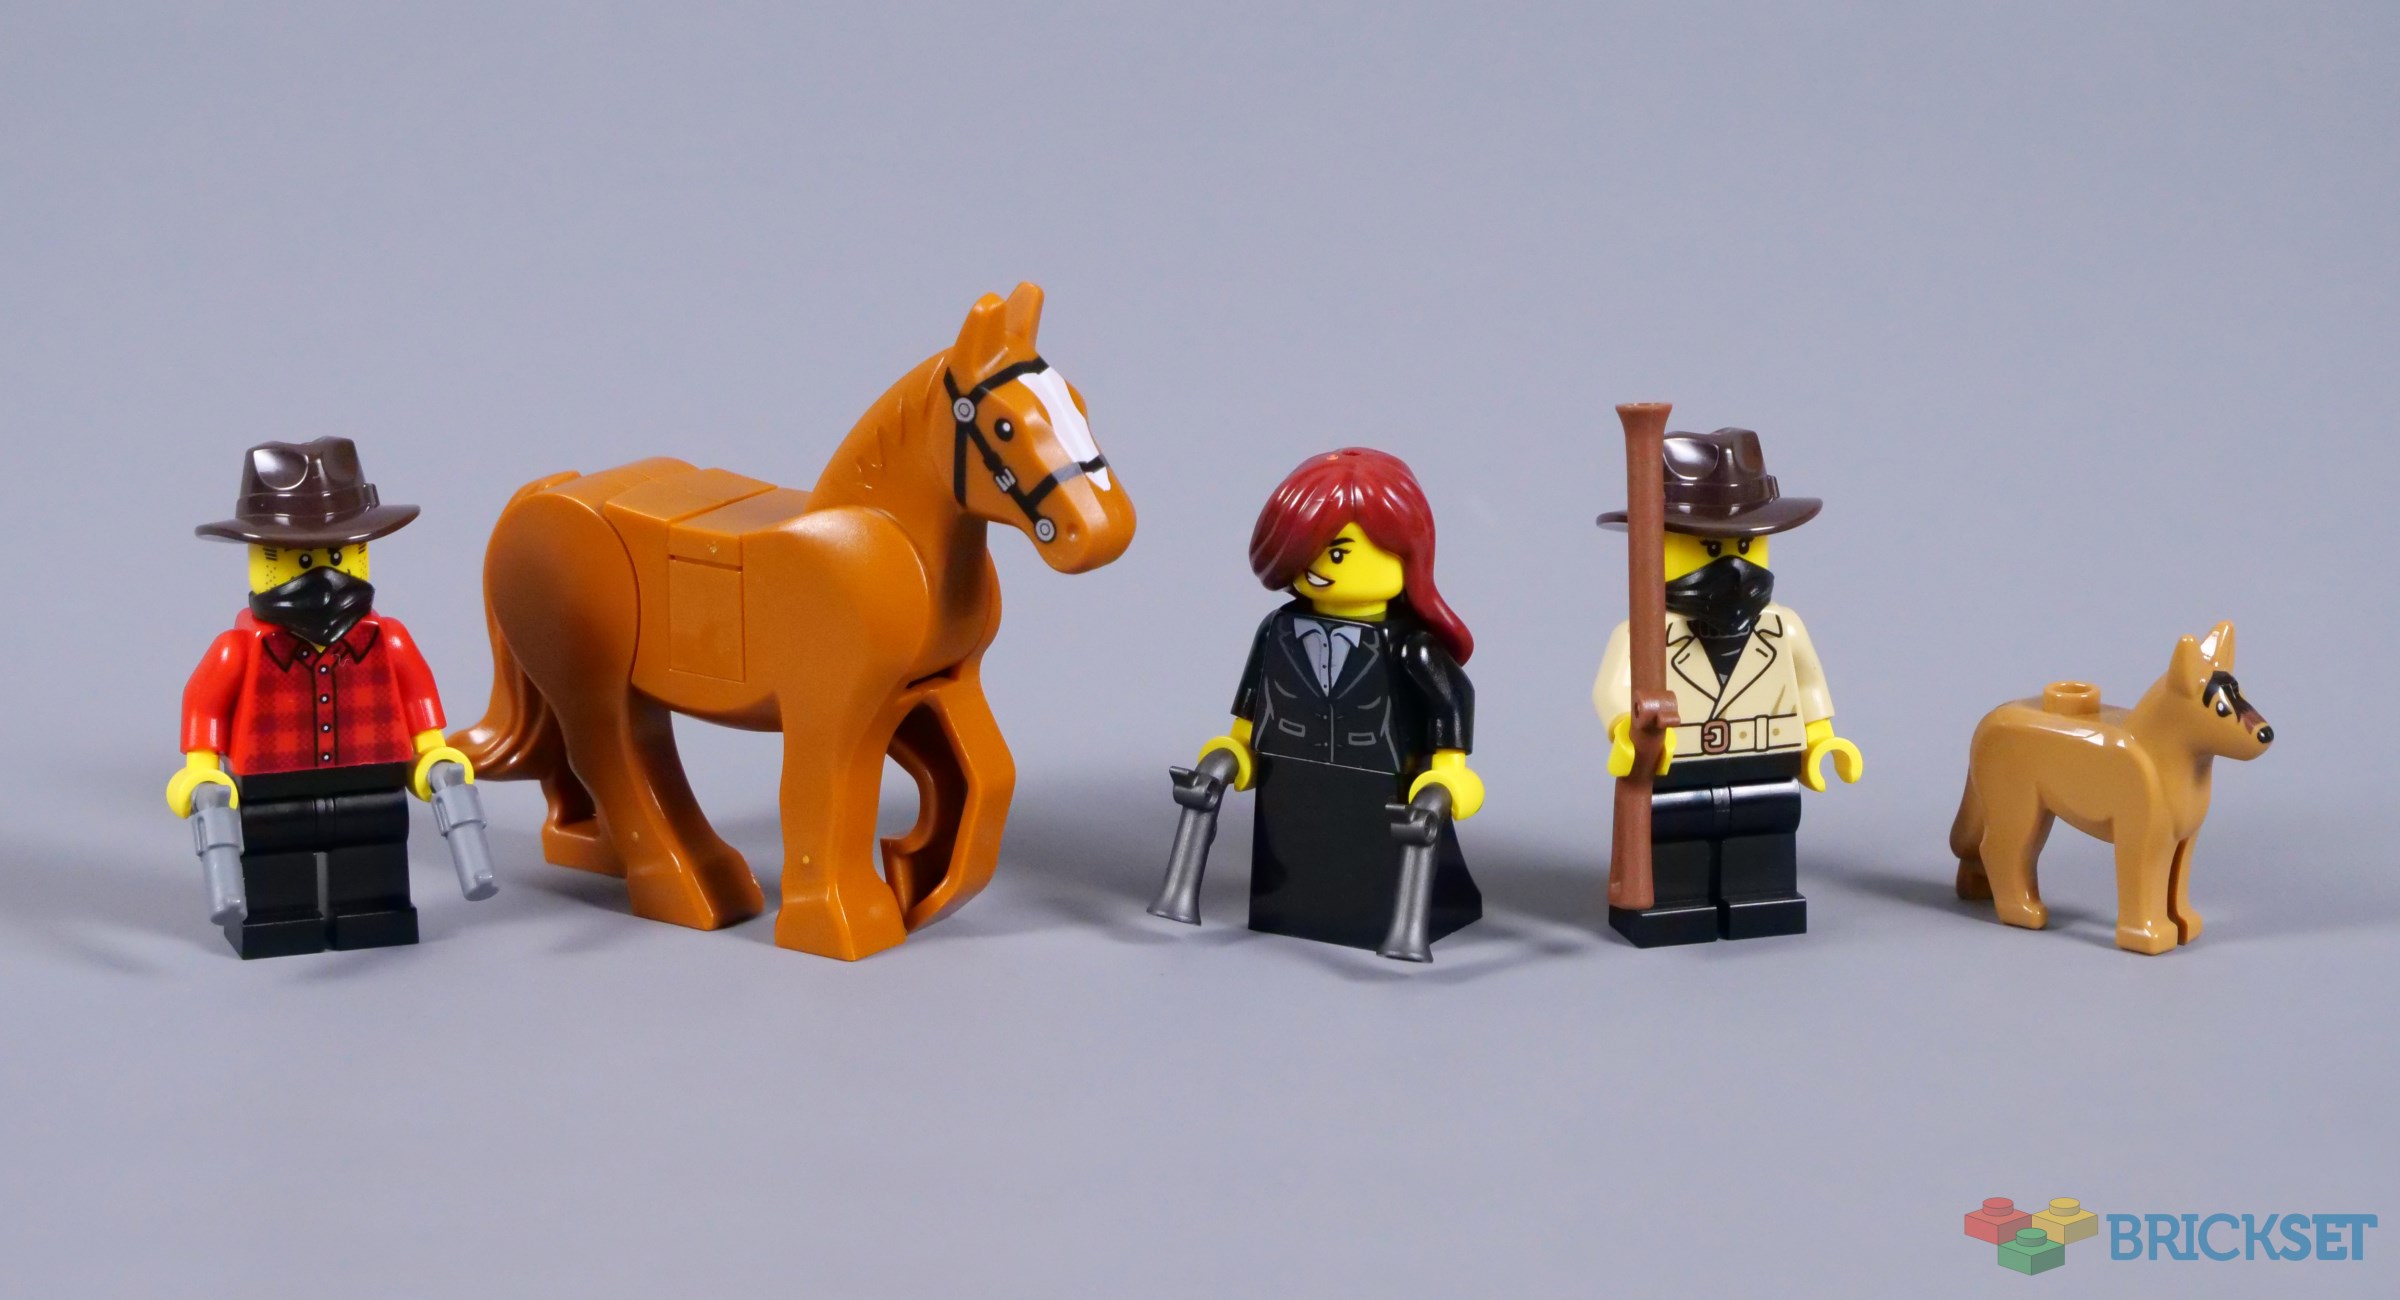
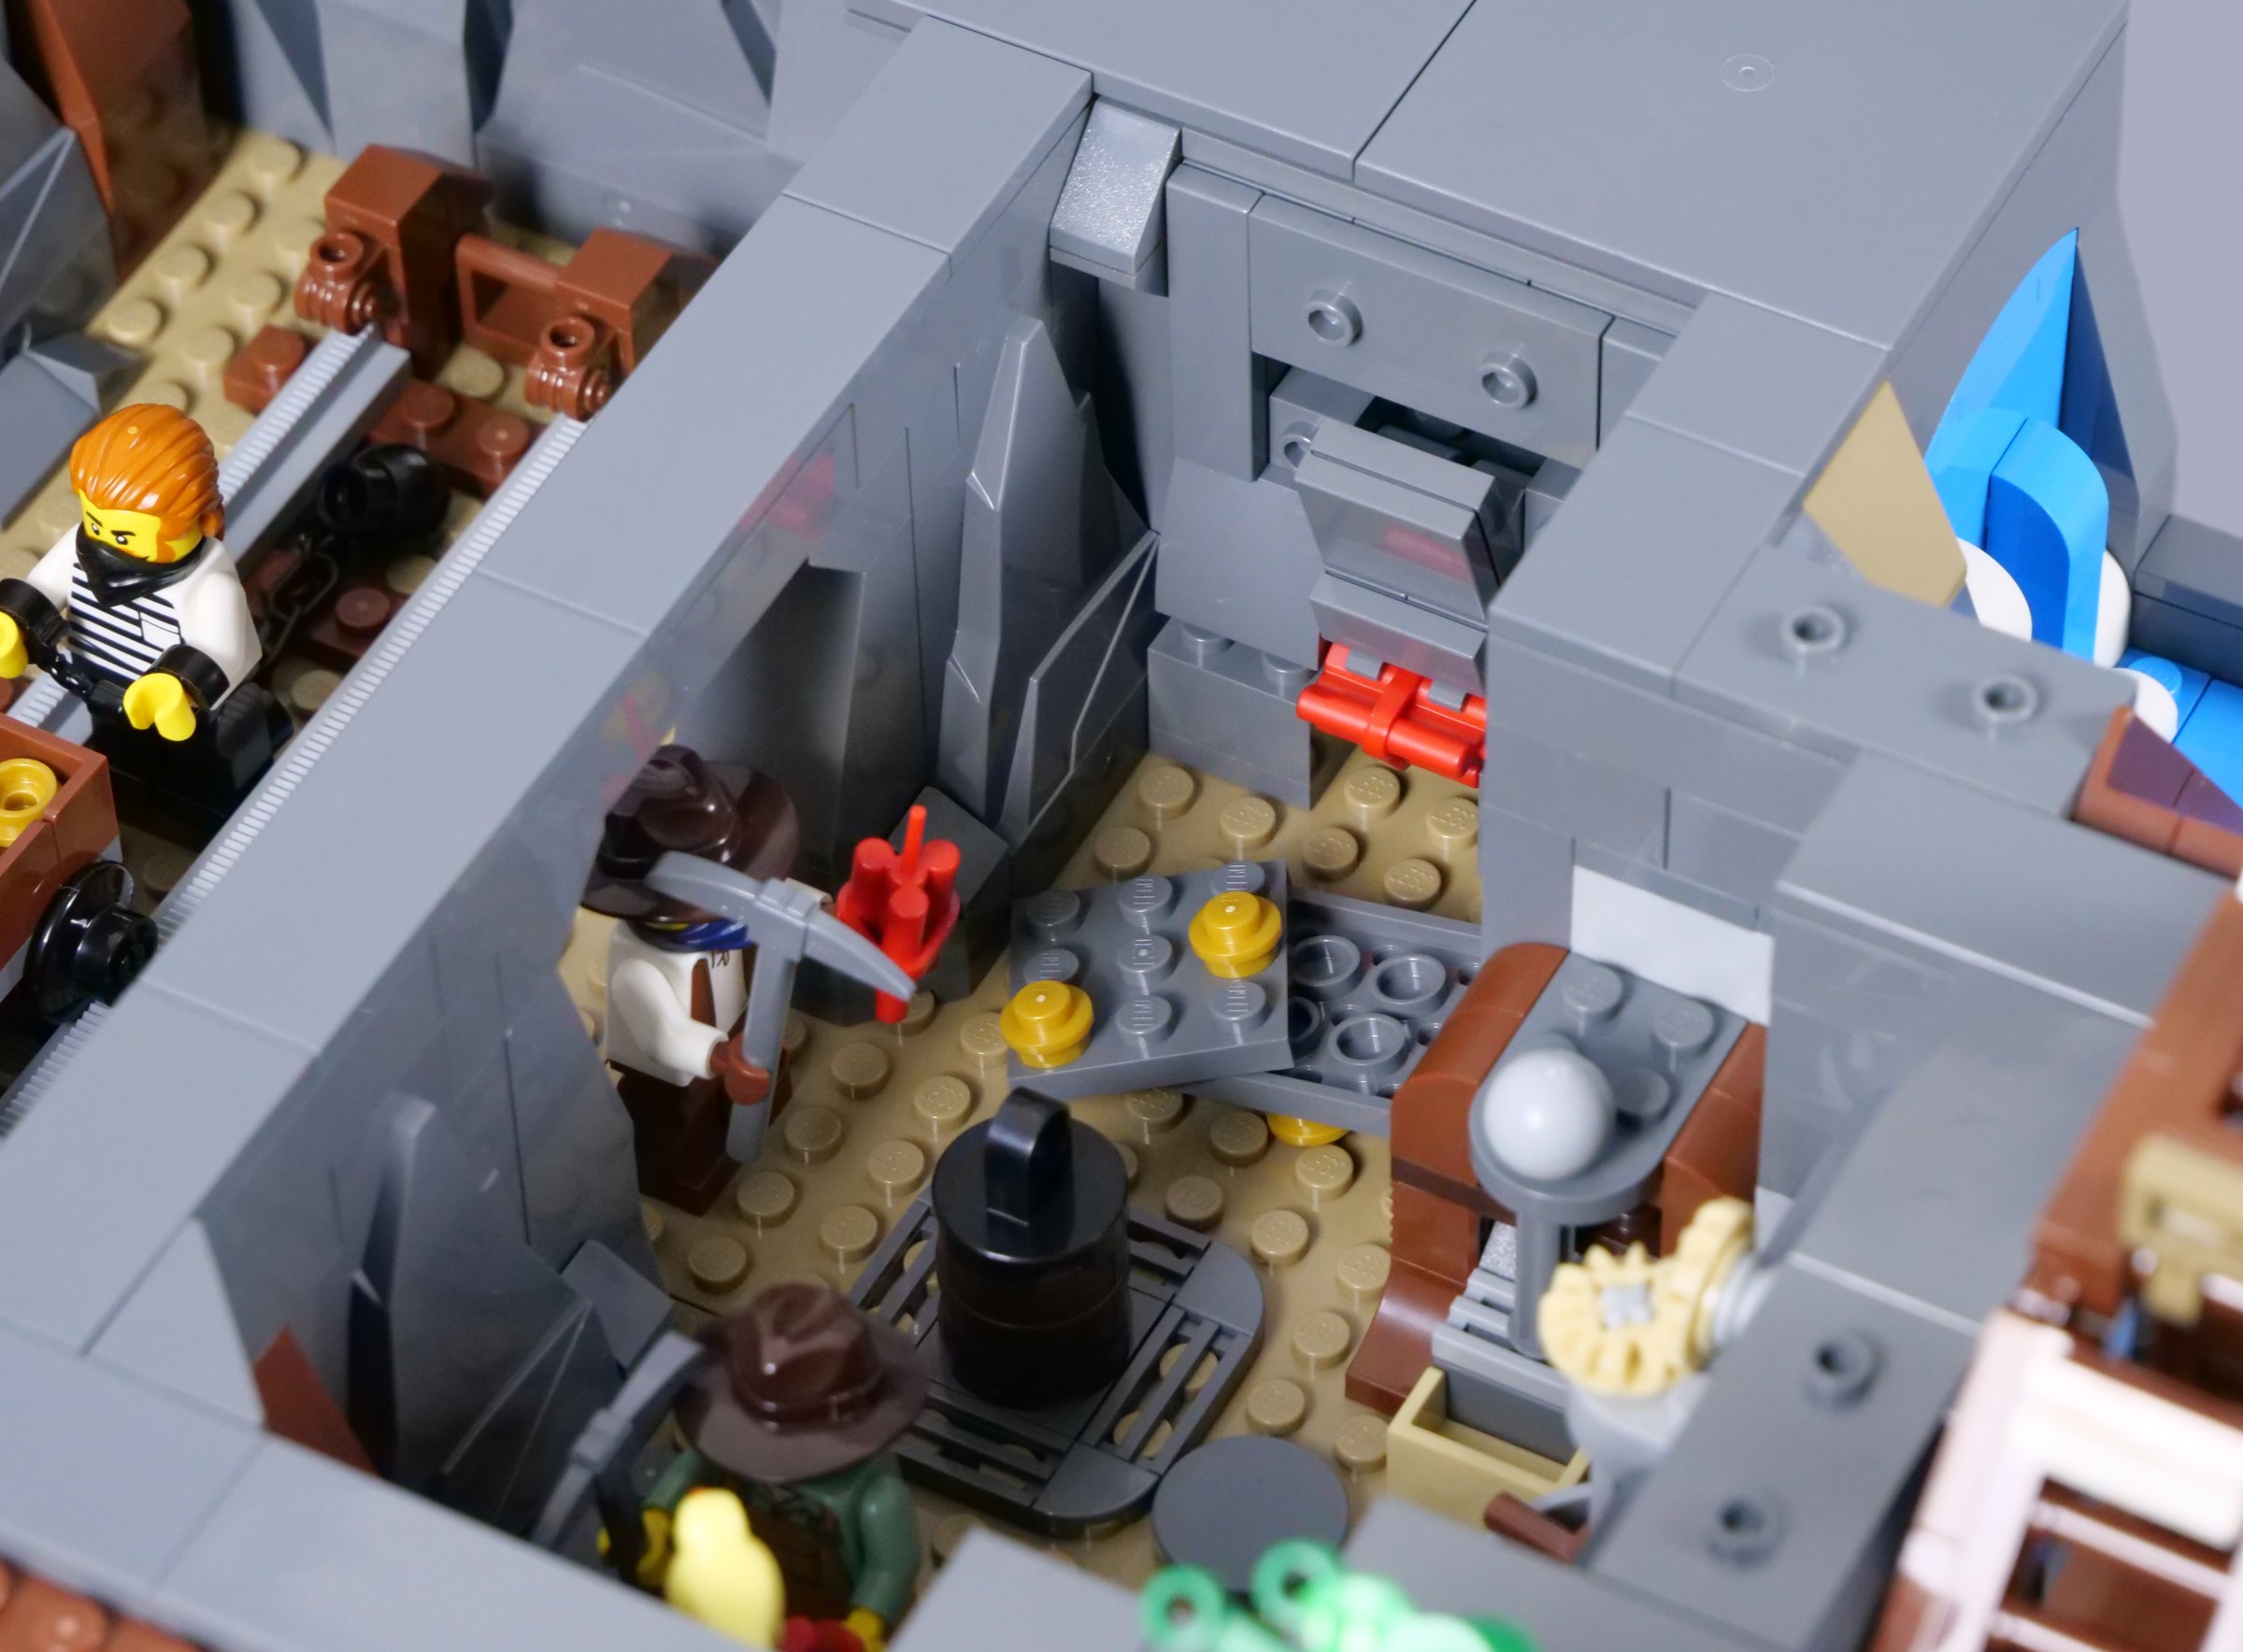
Though this set's focus is obviously the titular mine, there are plenty of minifigures supplied to populate the surrounding area, including the traditional group of bandits with their dark orange horse, plus a dog. All the characters are identified by name on BrickLink and the gang's leader, Red Ruby, is a particular standout, re-using Paisley's hair from LEGO Friends.
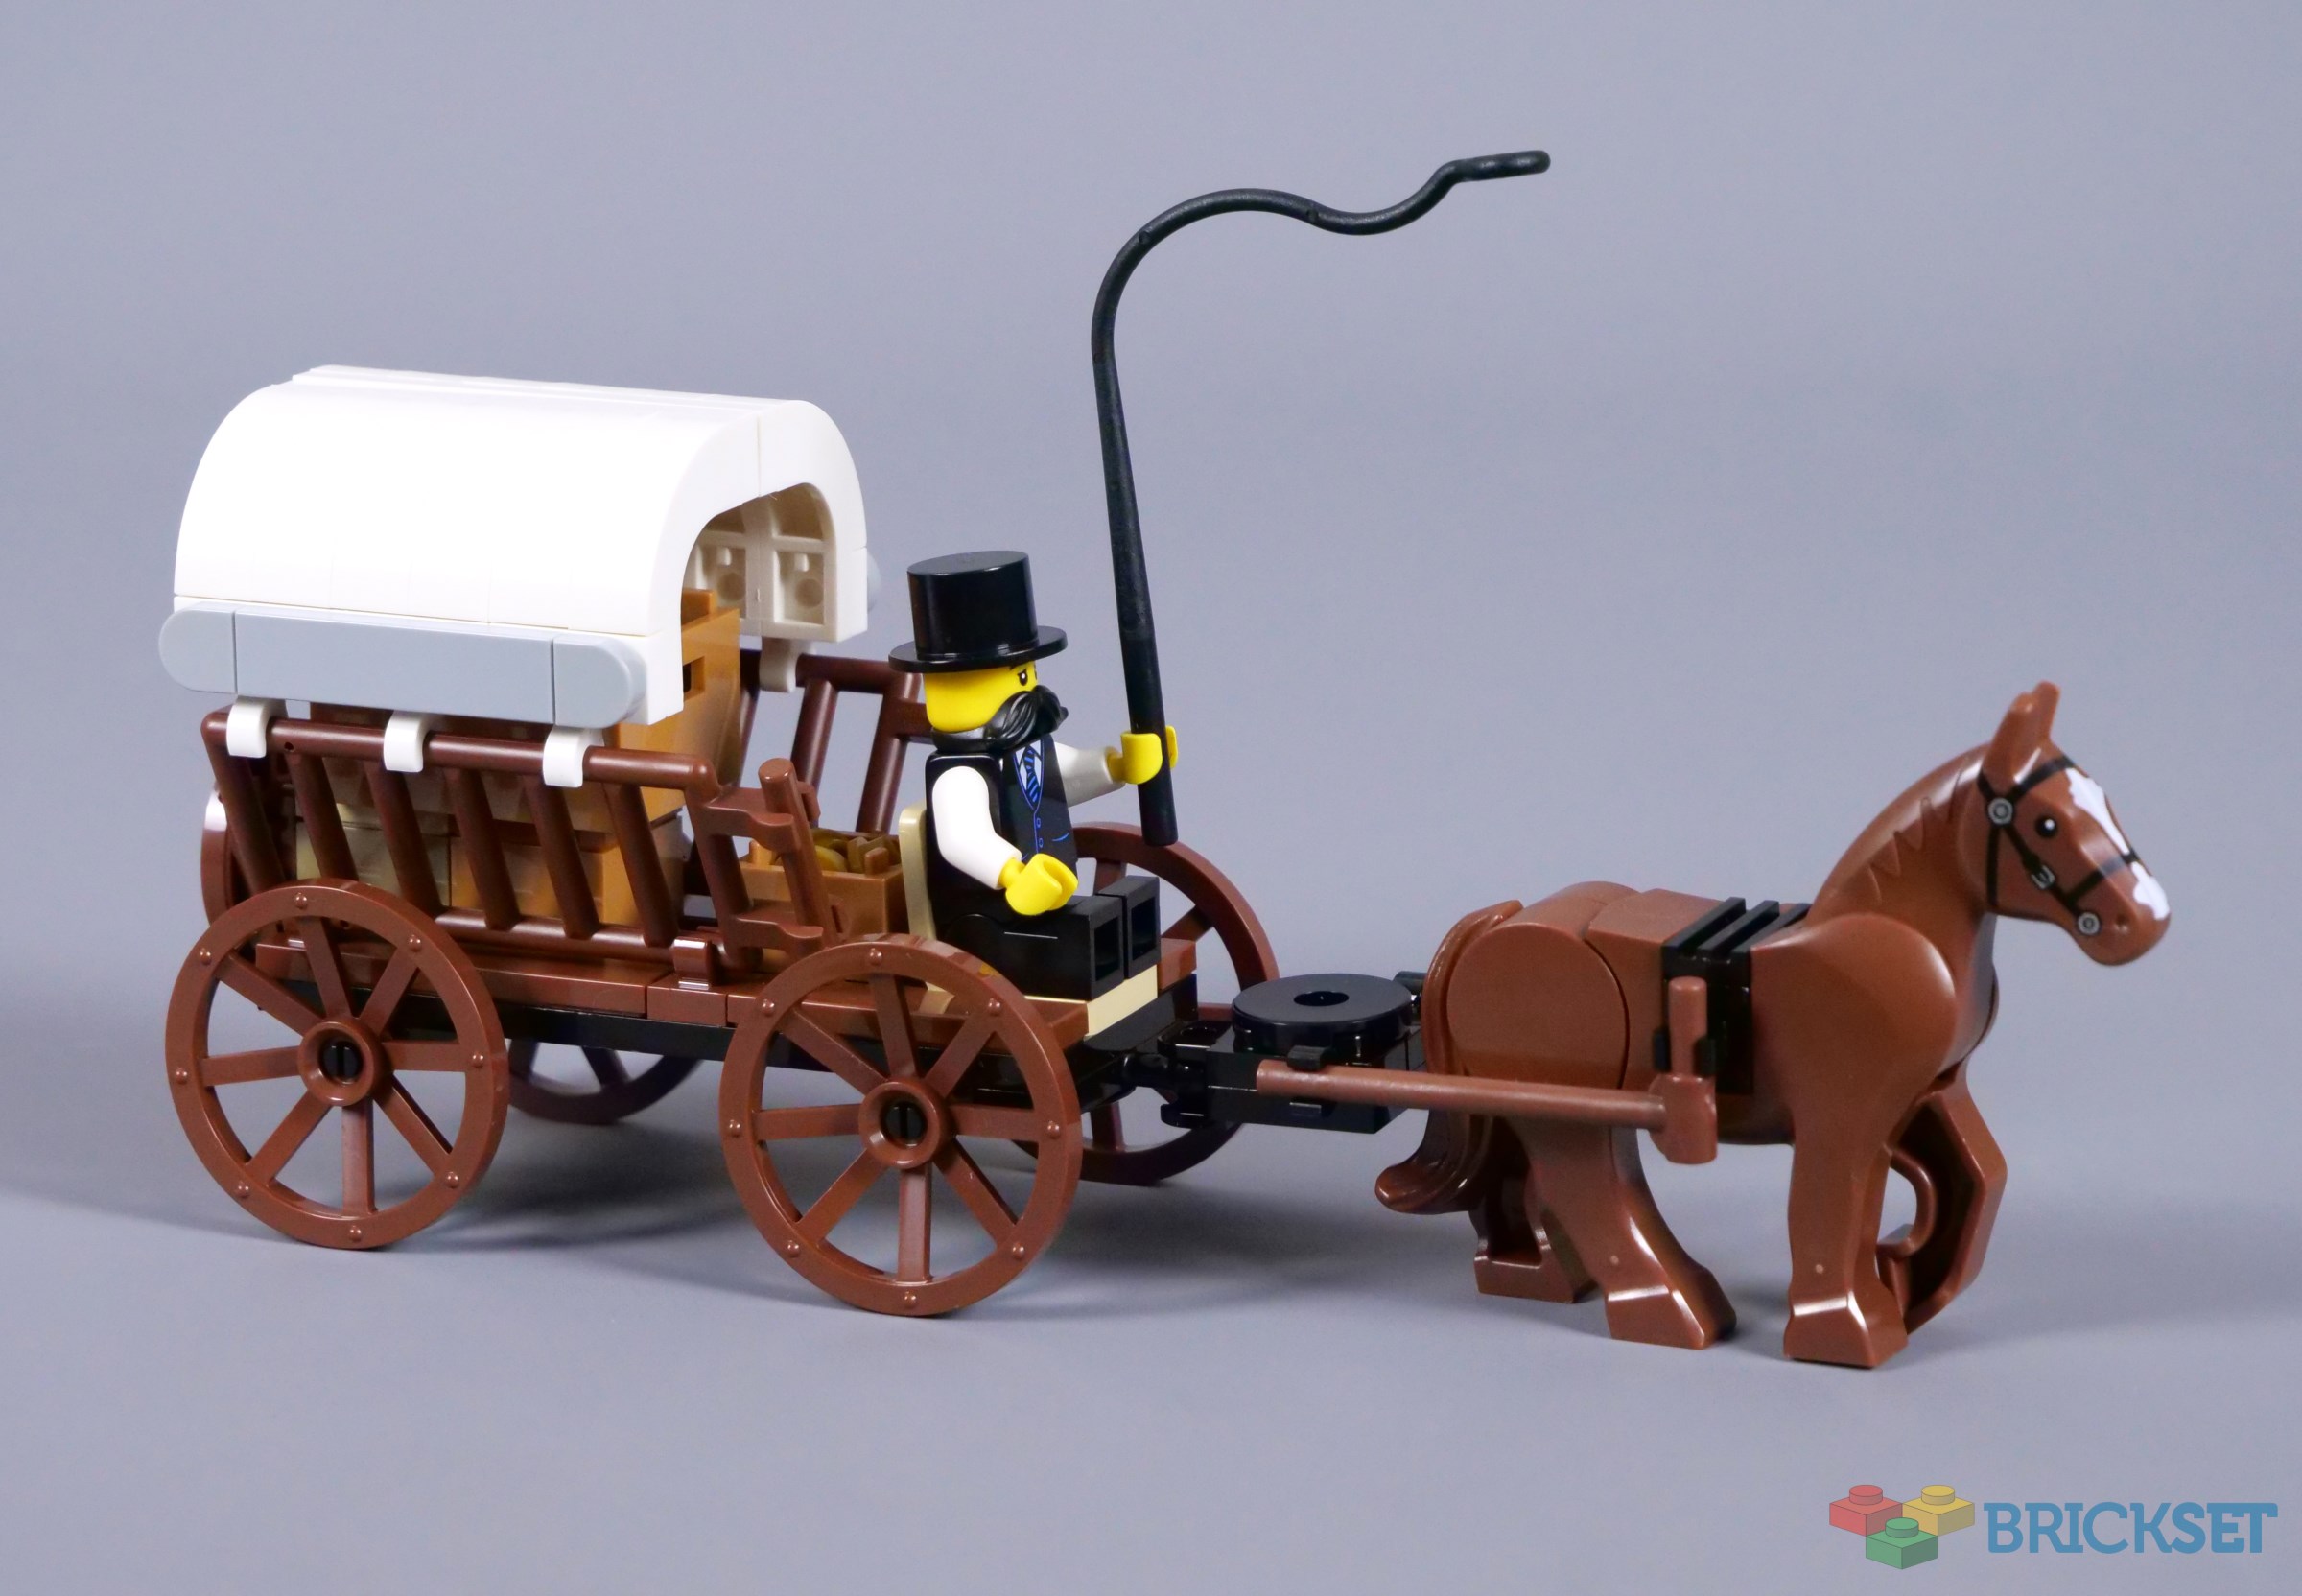
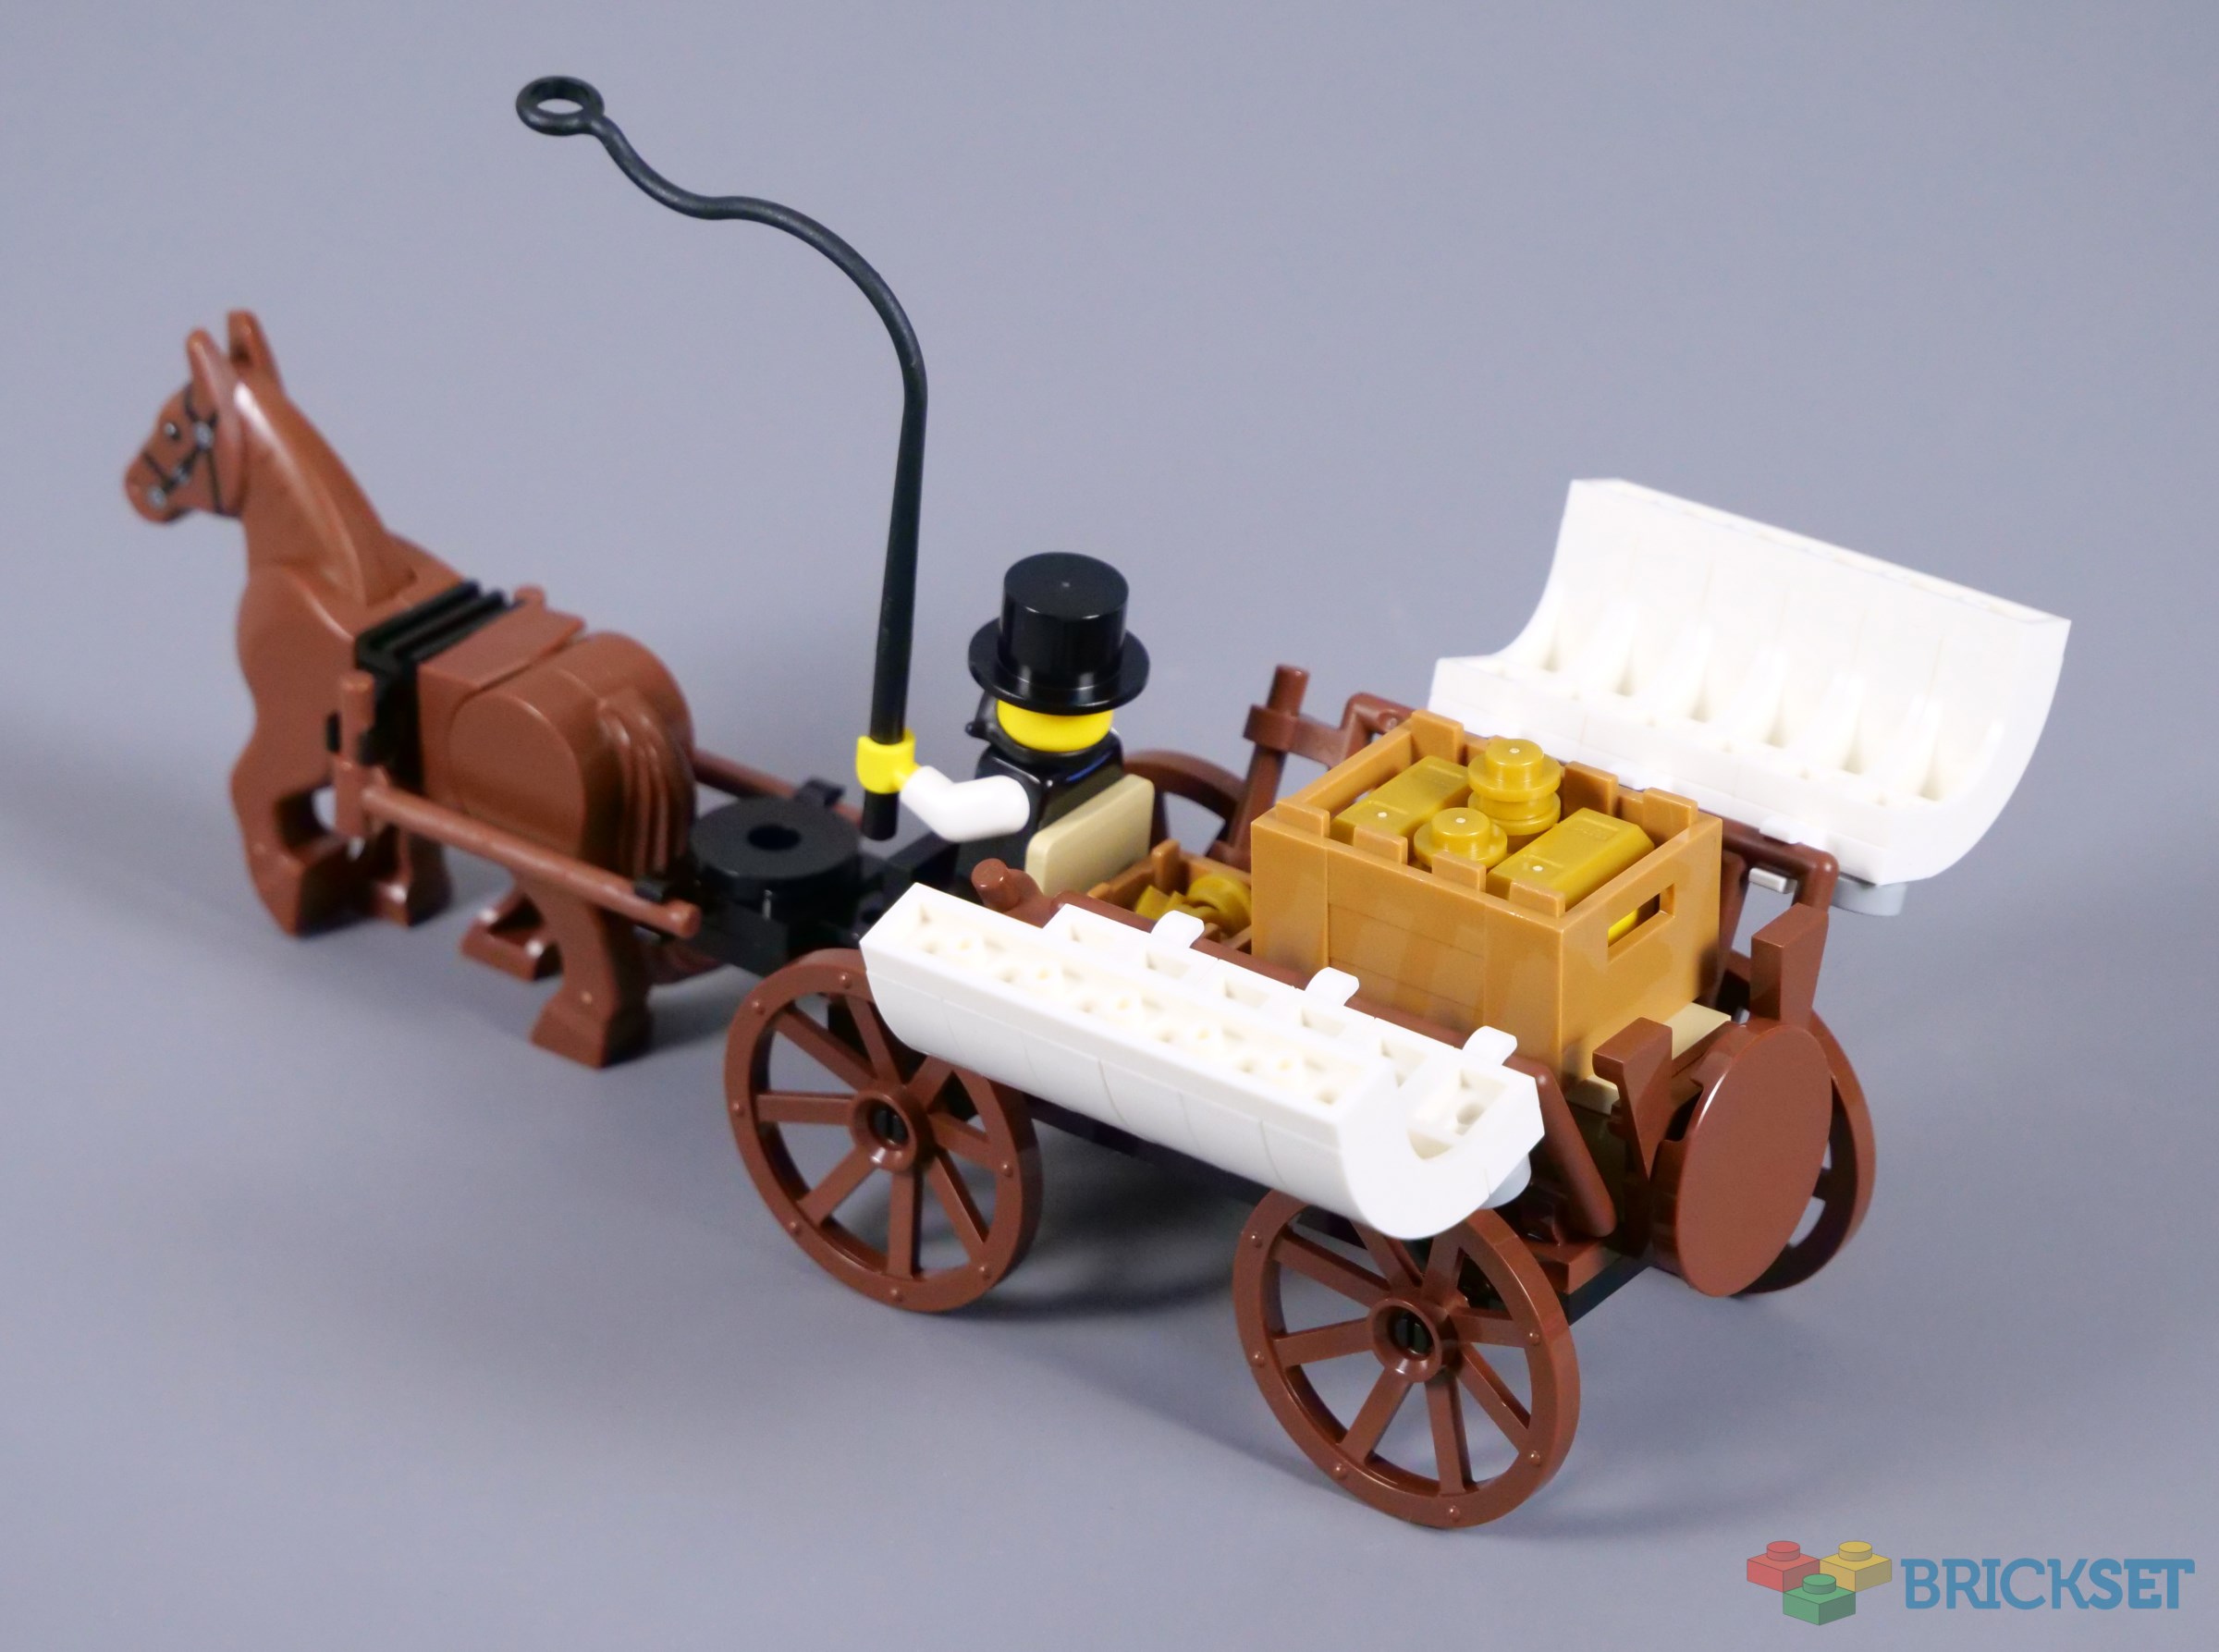
The gold mine is doubtless defended, so perhaps this wagon would be an easier target for the bandits. This vehicle is quite small and therefore complements the bigger version from 910031 General Store, featuring a similar cover on the back and making clever use of ladders on either side. There is a seat for the wagon driver, of course.
Despite their disparate subjects, bigger sets in the BrickLink Designer Program are commonly about the same size. 910055 Gold Mine Expedition looks fairly similar to 910049 Adventure in Transylvania, for instance, measuring 35cm across, 30cm deep and 39cm in height. Moreover, the model looks remarkably vibrant on display, thanks partly to the liberal use of dark red bricks for buildings.
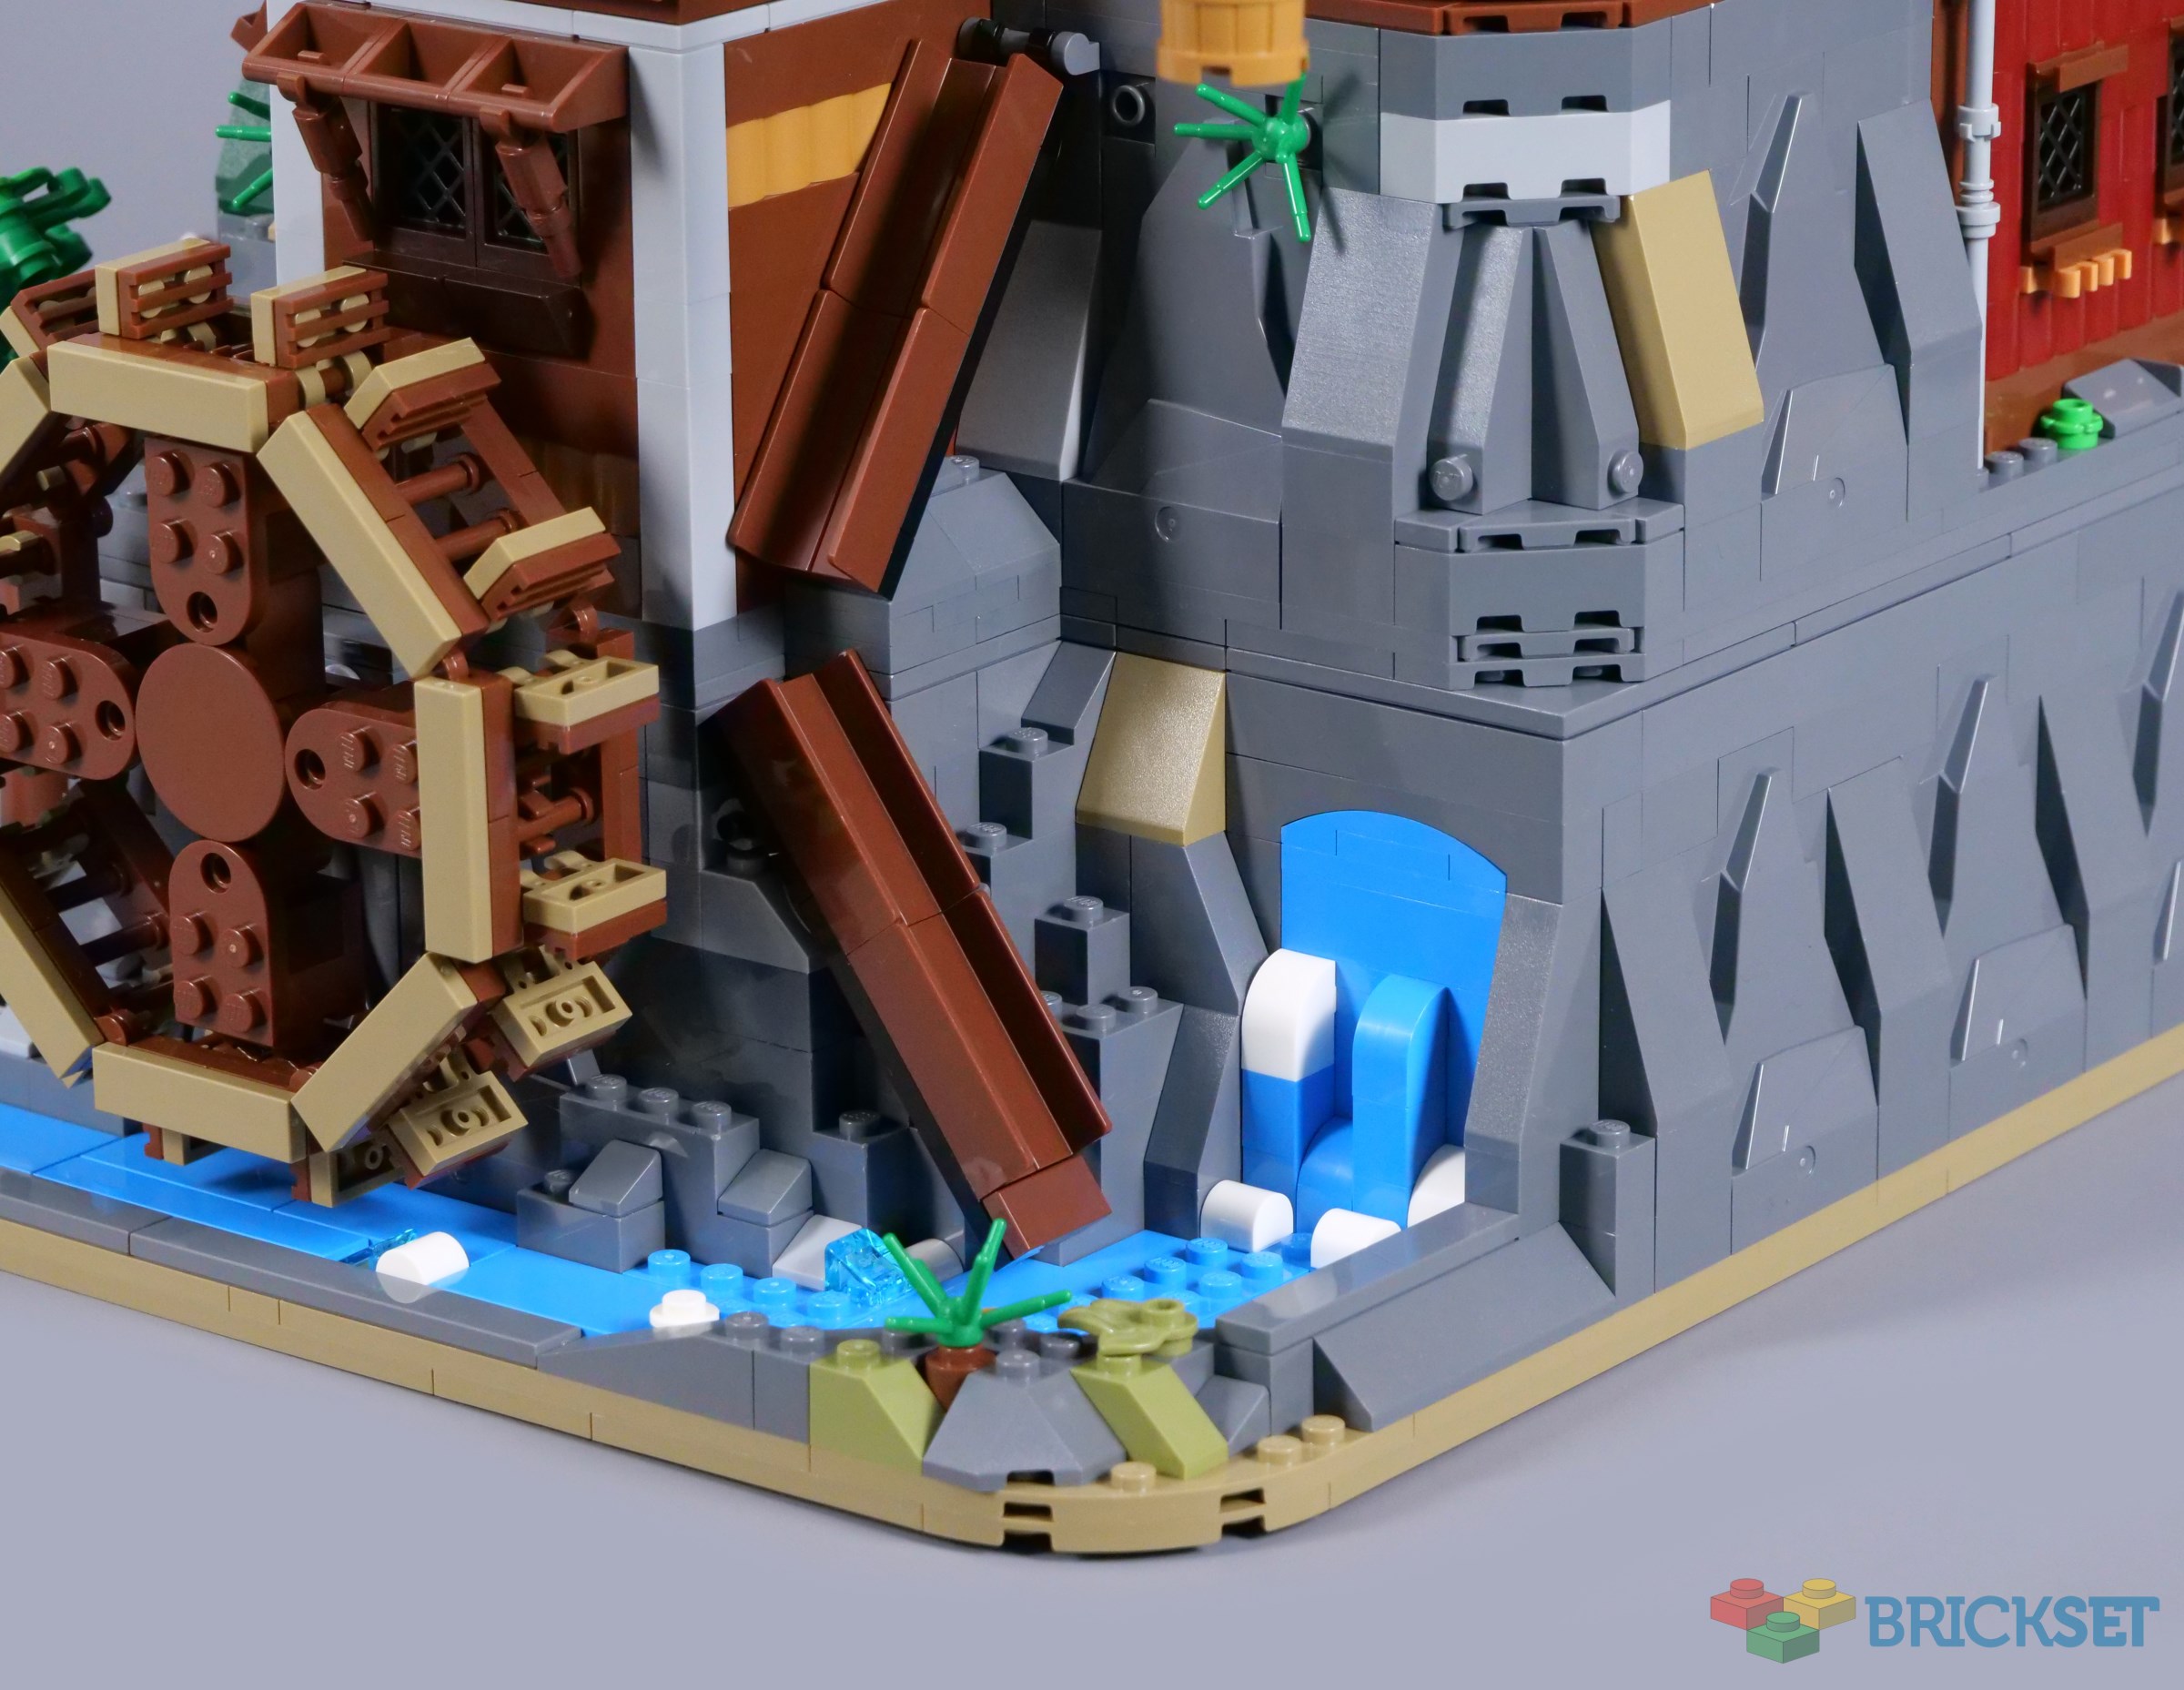
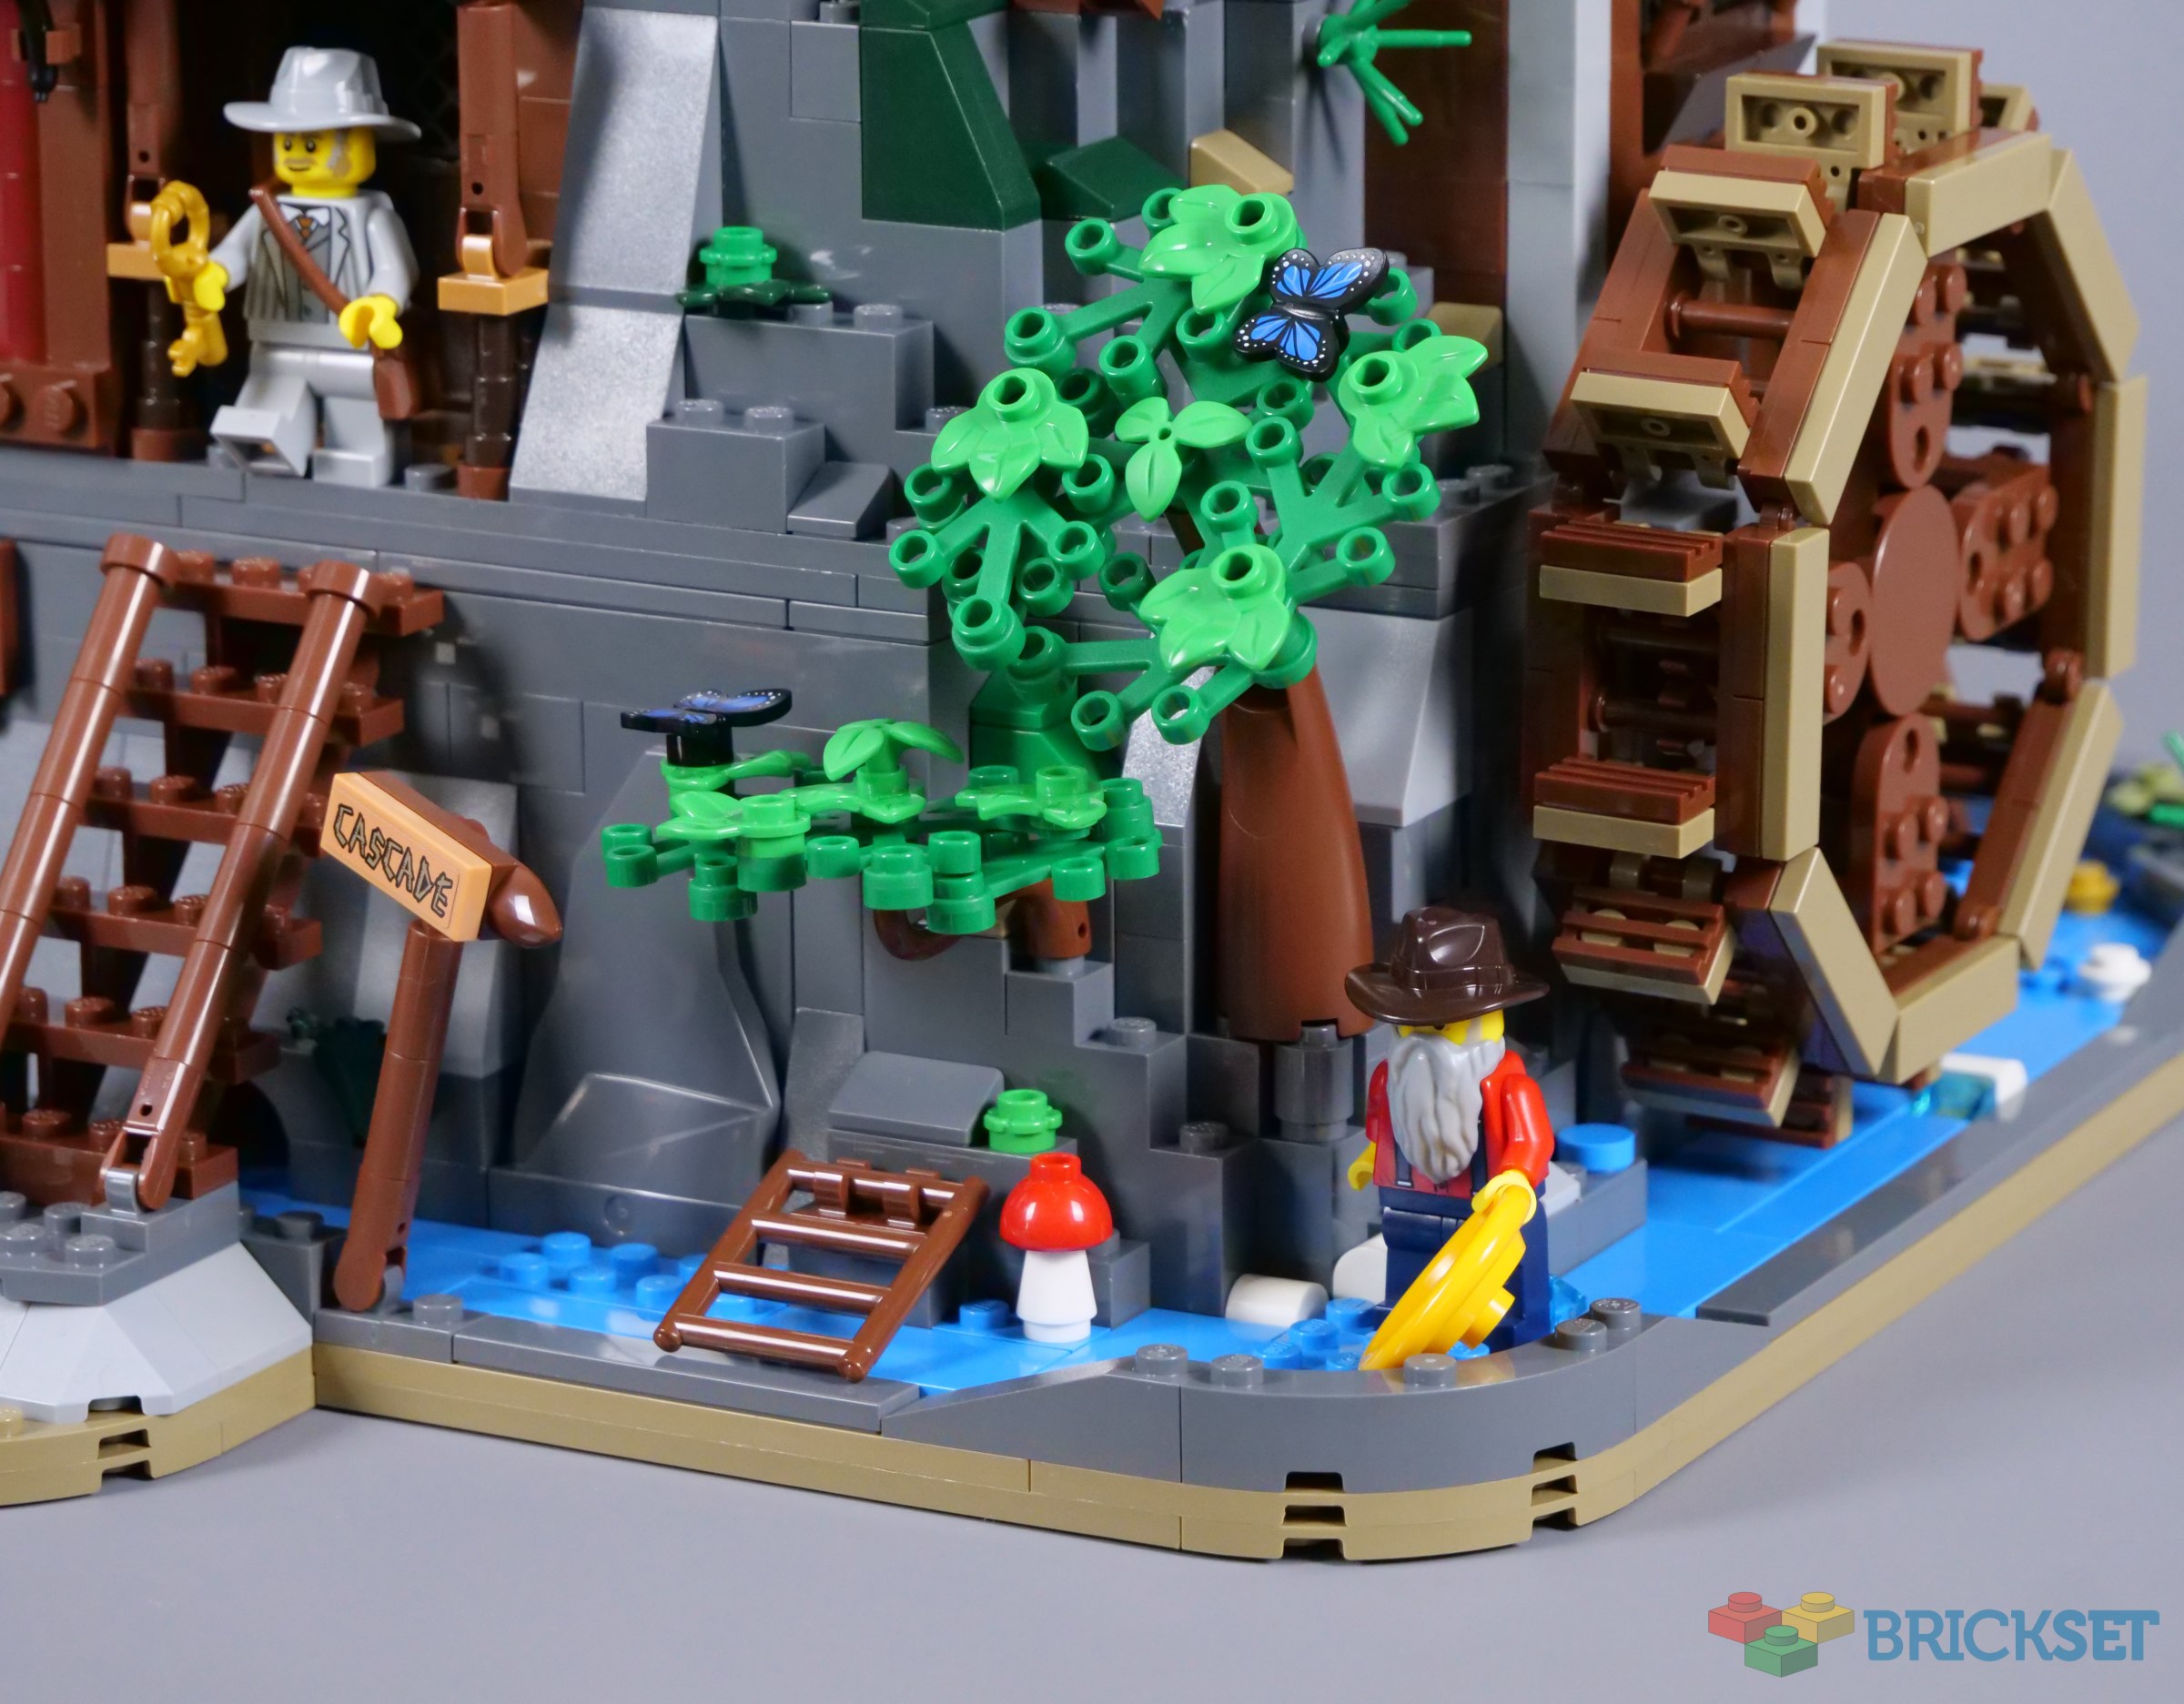
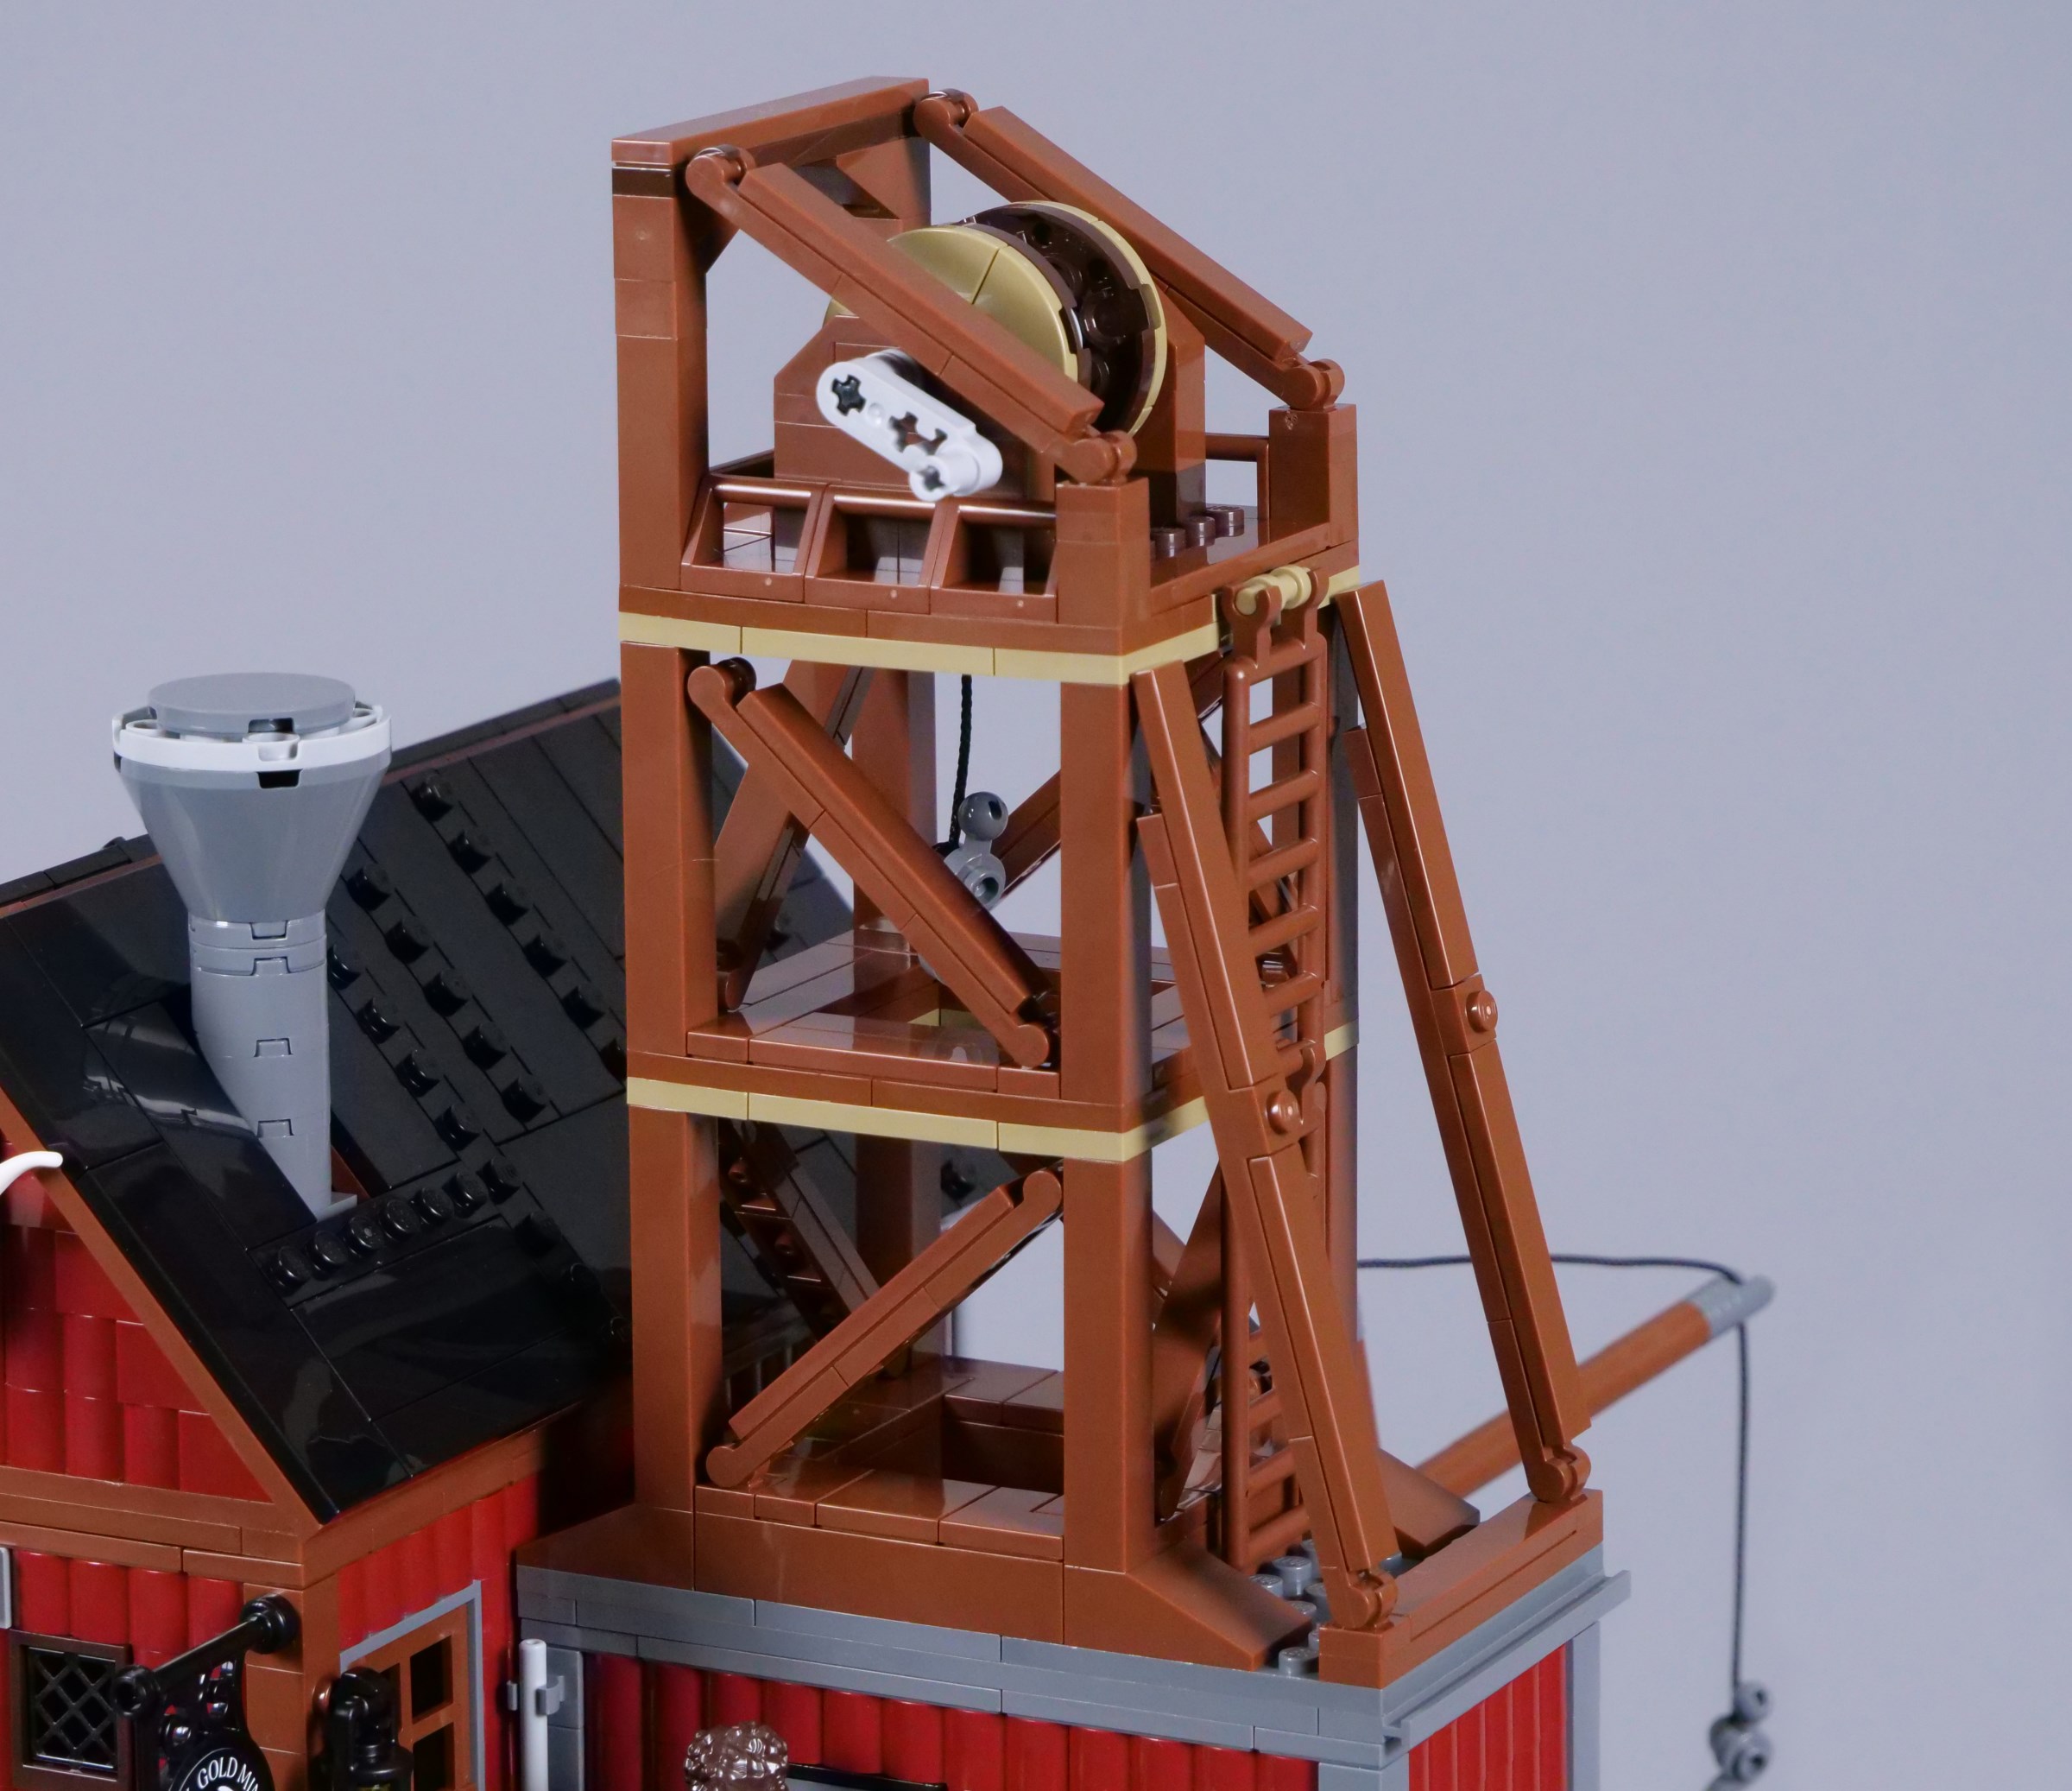
The mine is seemingly constructed near an underground spring, which could cause problems in the future! For now, however, the stream passing outside looks lovely and drives a water wheel linked to machinery in the mine. I think the structure of the water wheel puts its elements under stress though, which is disappointing, even in BrickLink Designer Program models.
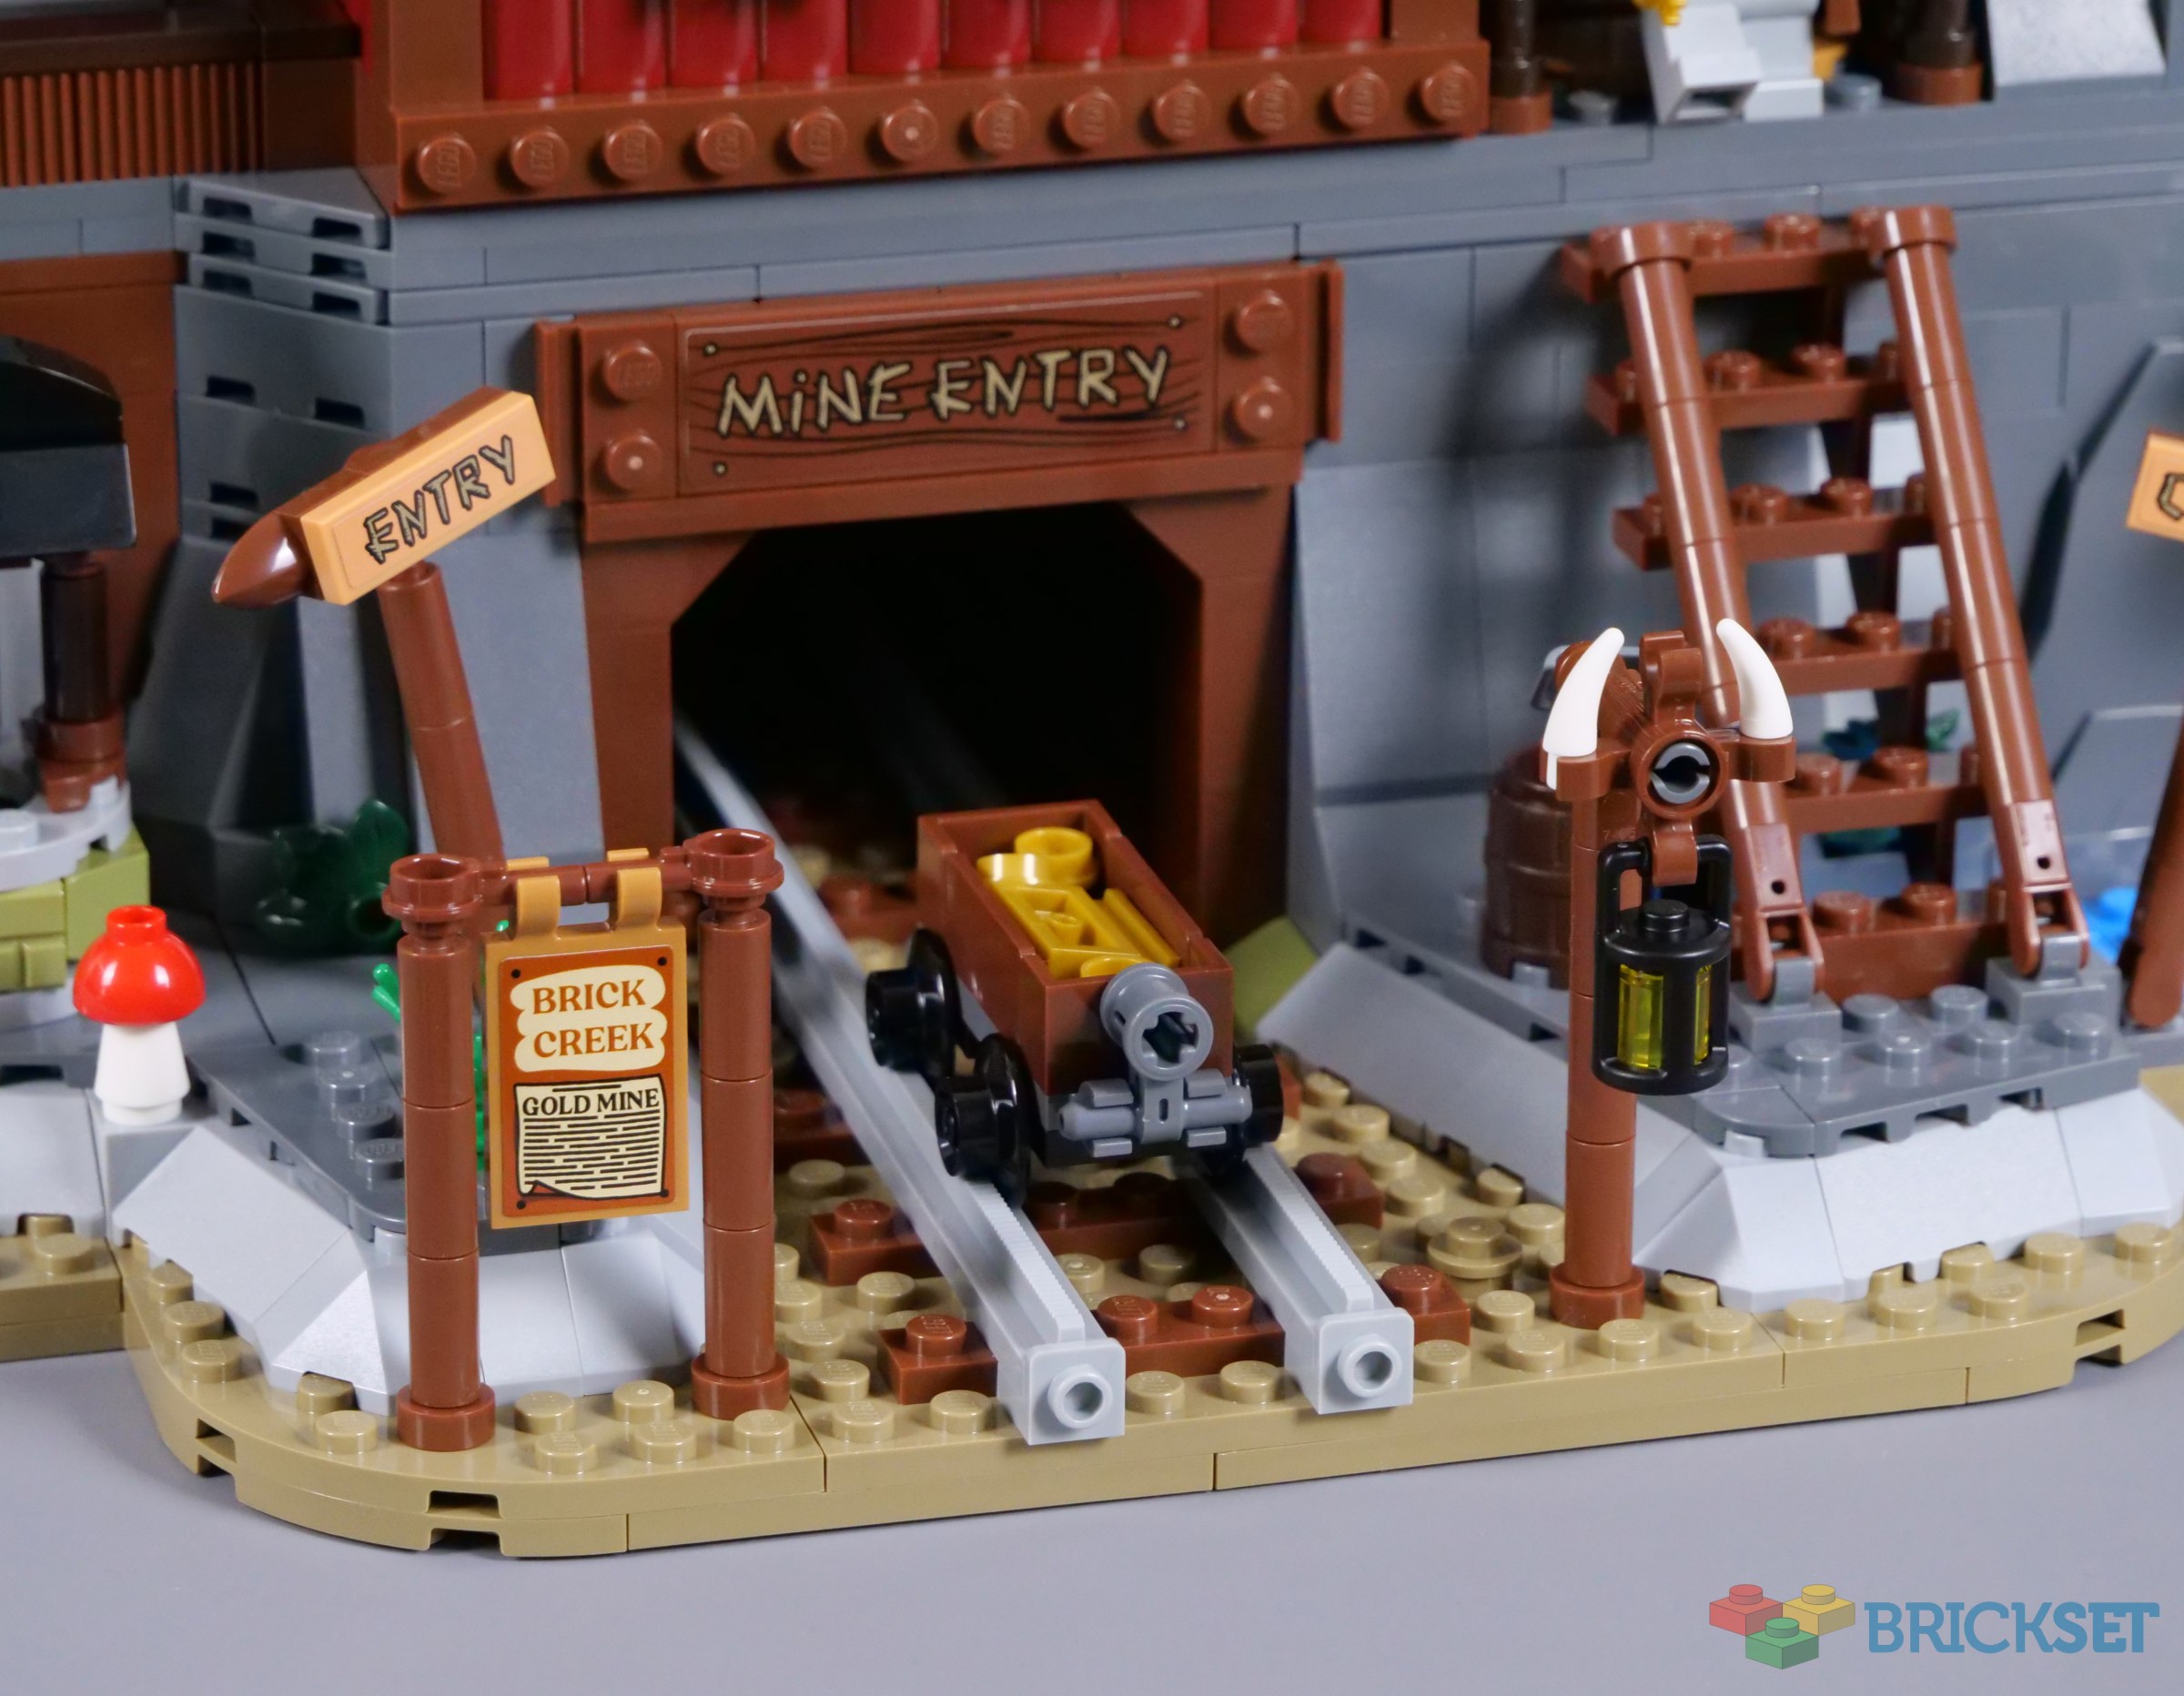
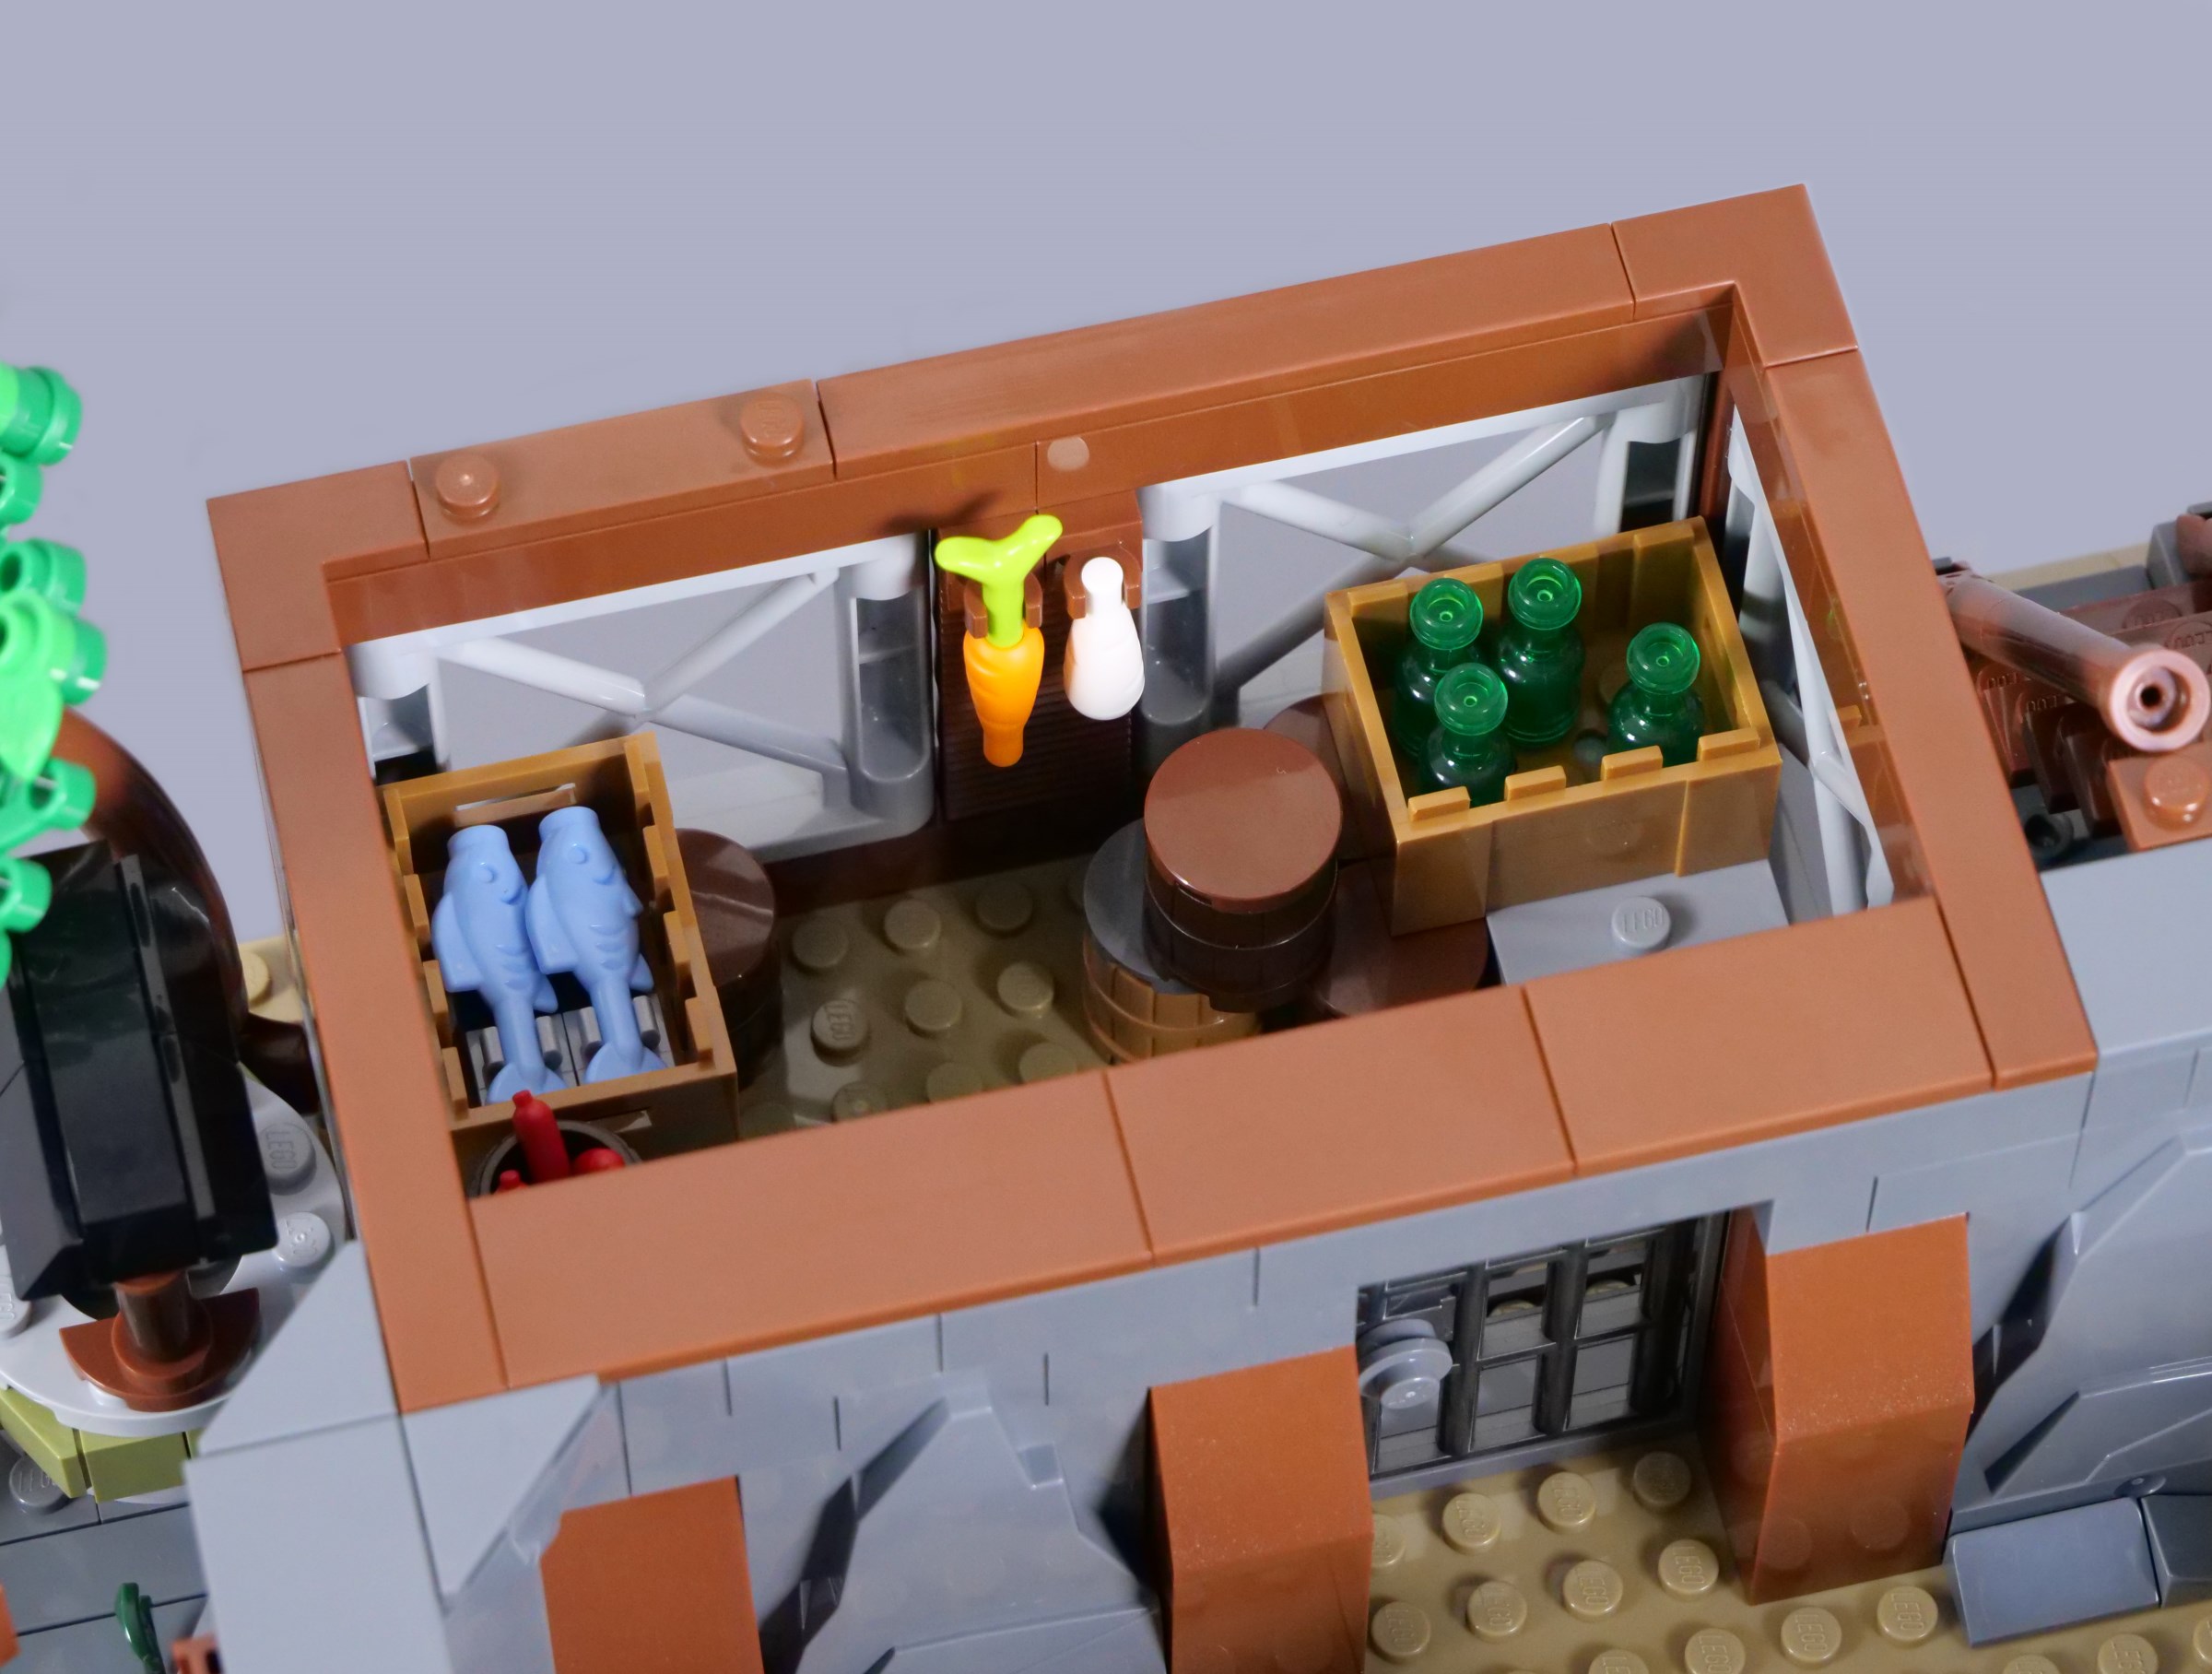
On the other hand, I love the minifigure panning for gold in the stream and the exterior is highly detailed, between some nice foliage and wooden signs. Sixteen stickers are applied across the mine and I like the rough aesthetic of those near the mine entrance, plus the eye-catching olive green well.
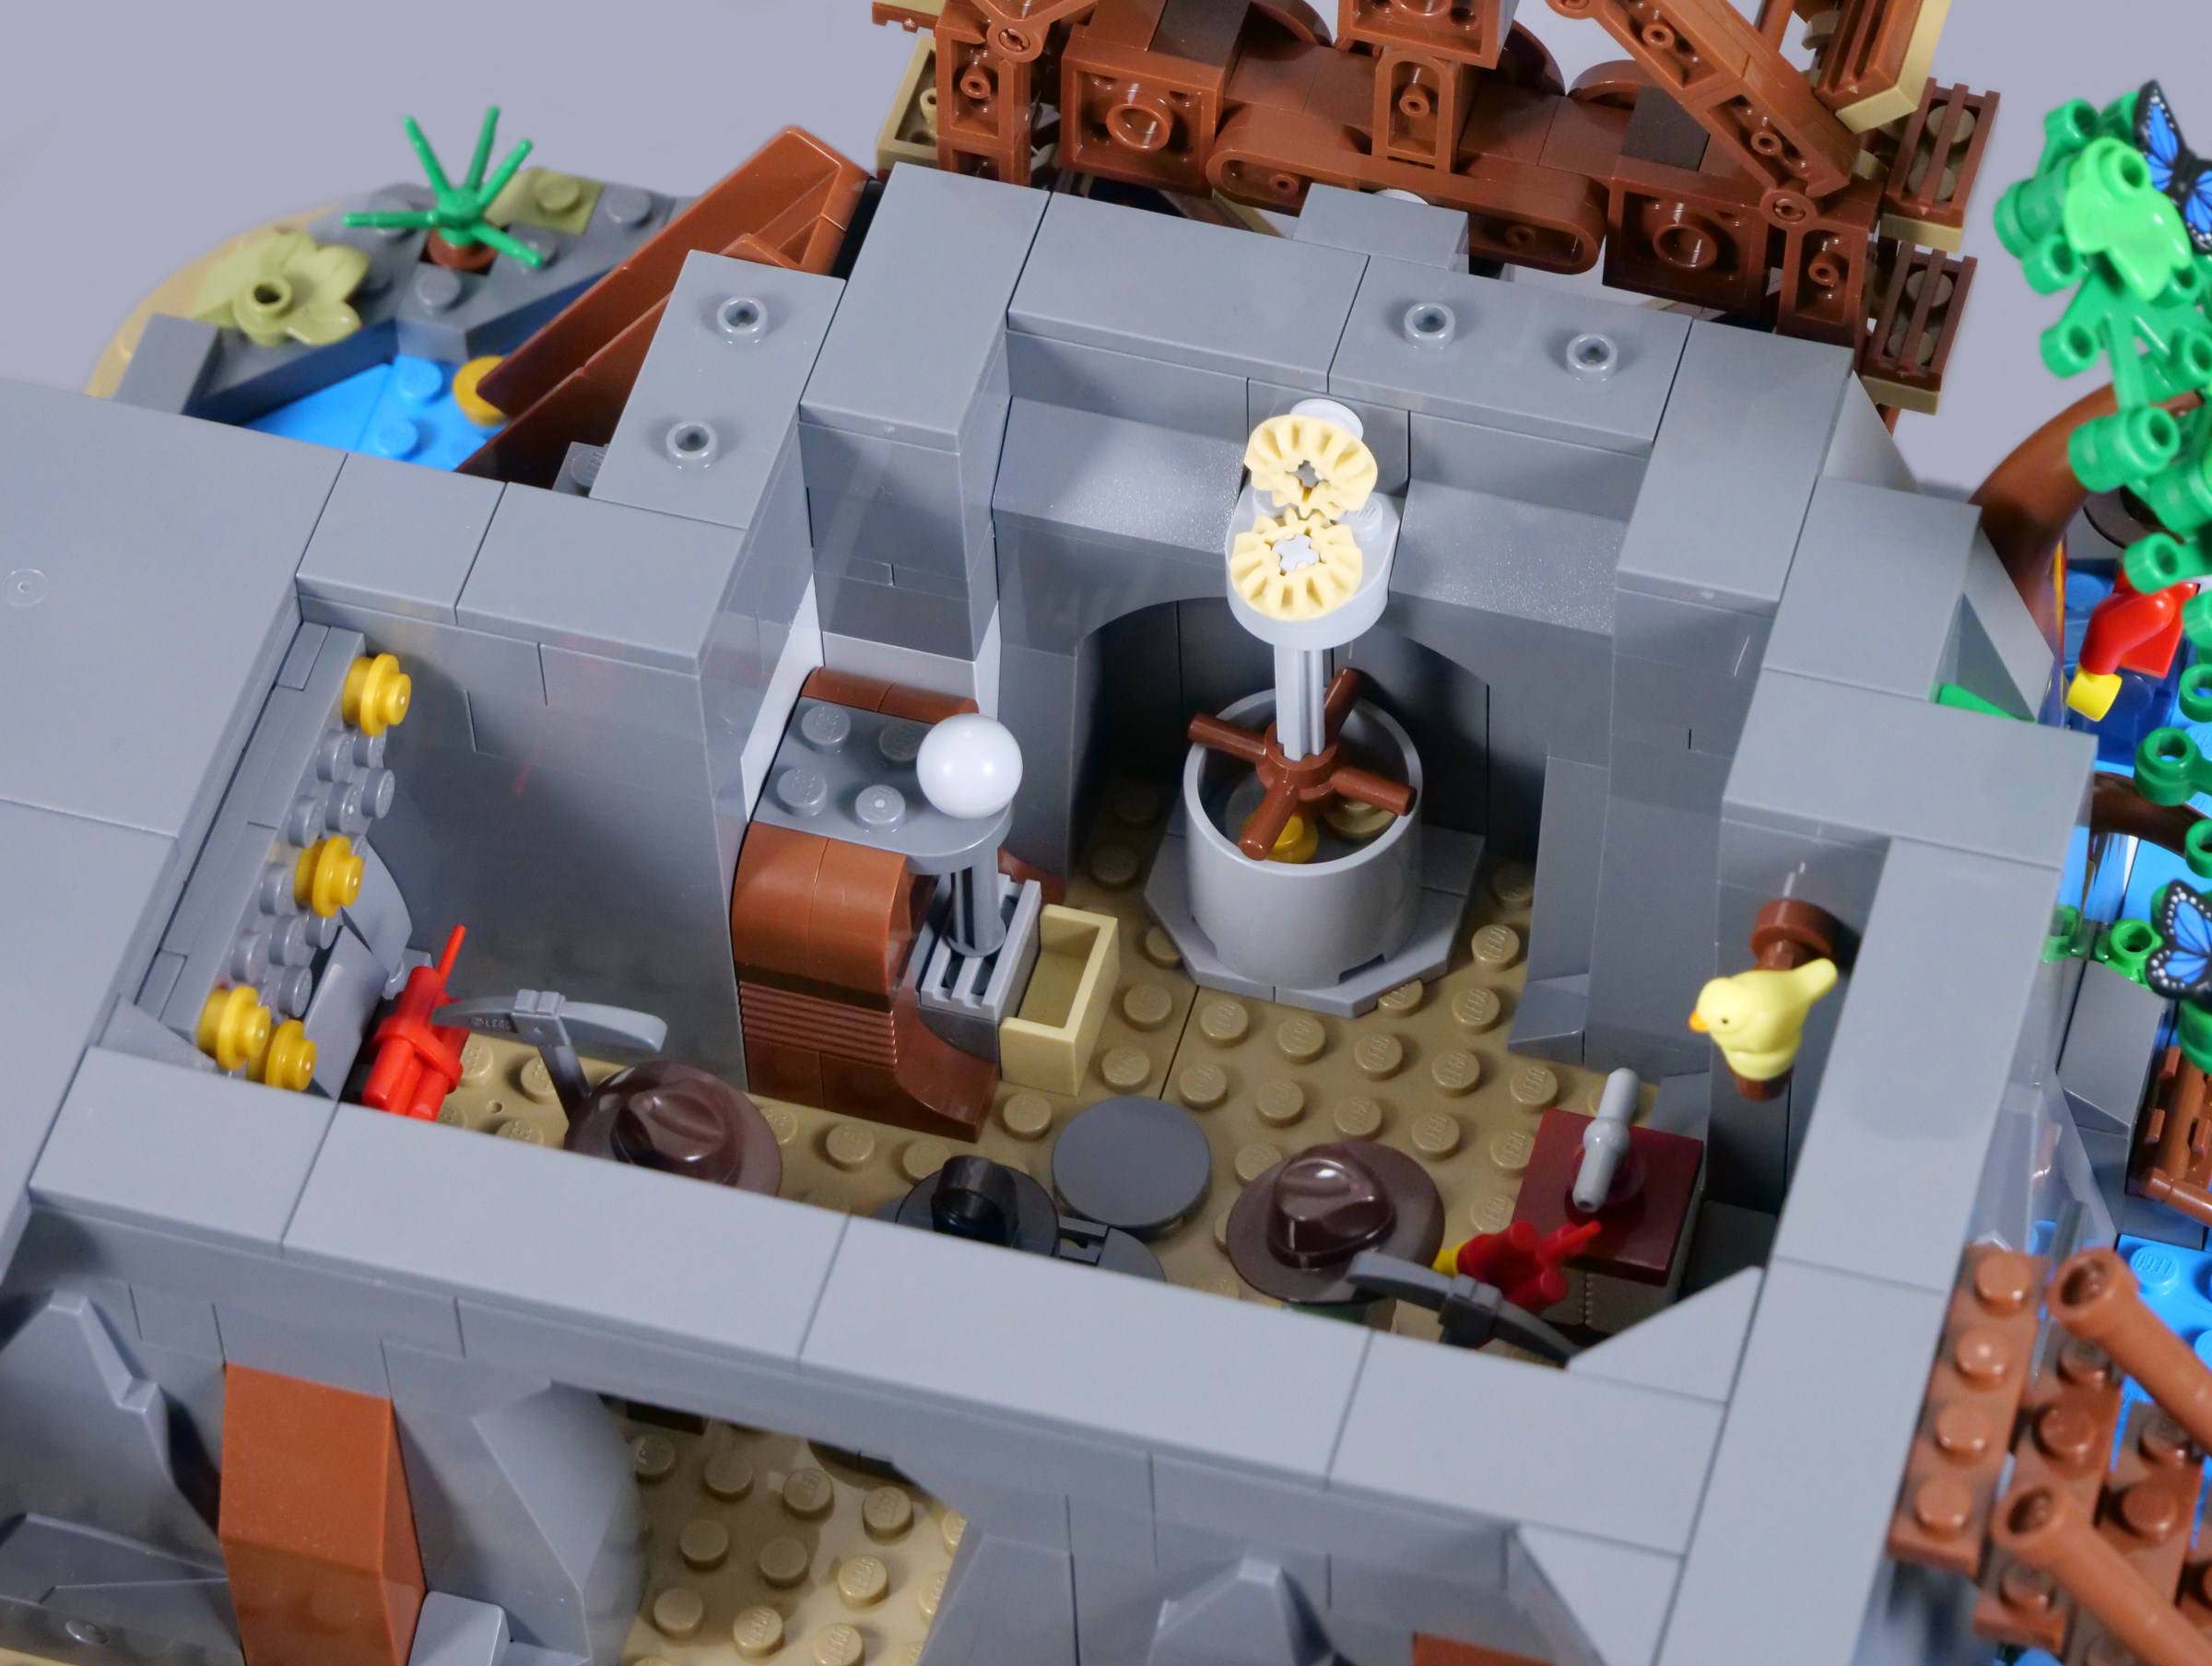
A short mine cart track transports gold from within the mountain. While I am glad this feature is included, I cannot help thinking it could be far more elaborate and interesting, particularly given the precedent of the aforementioned 7036 Dwarves' Mine, which offered amazing functions.
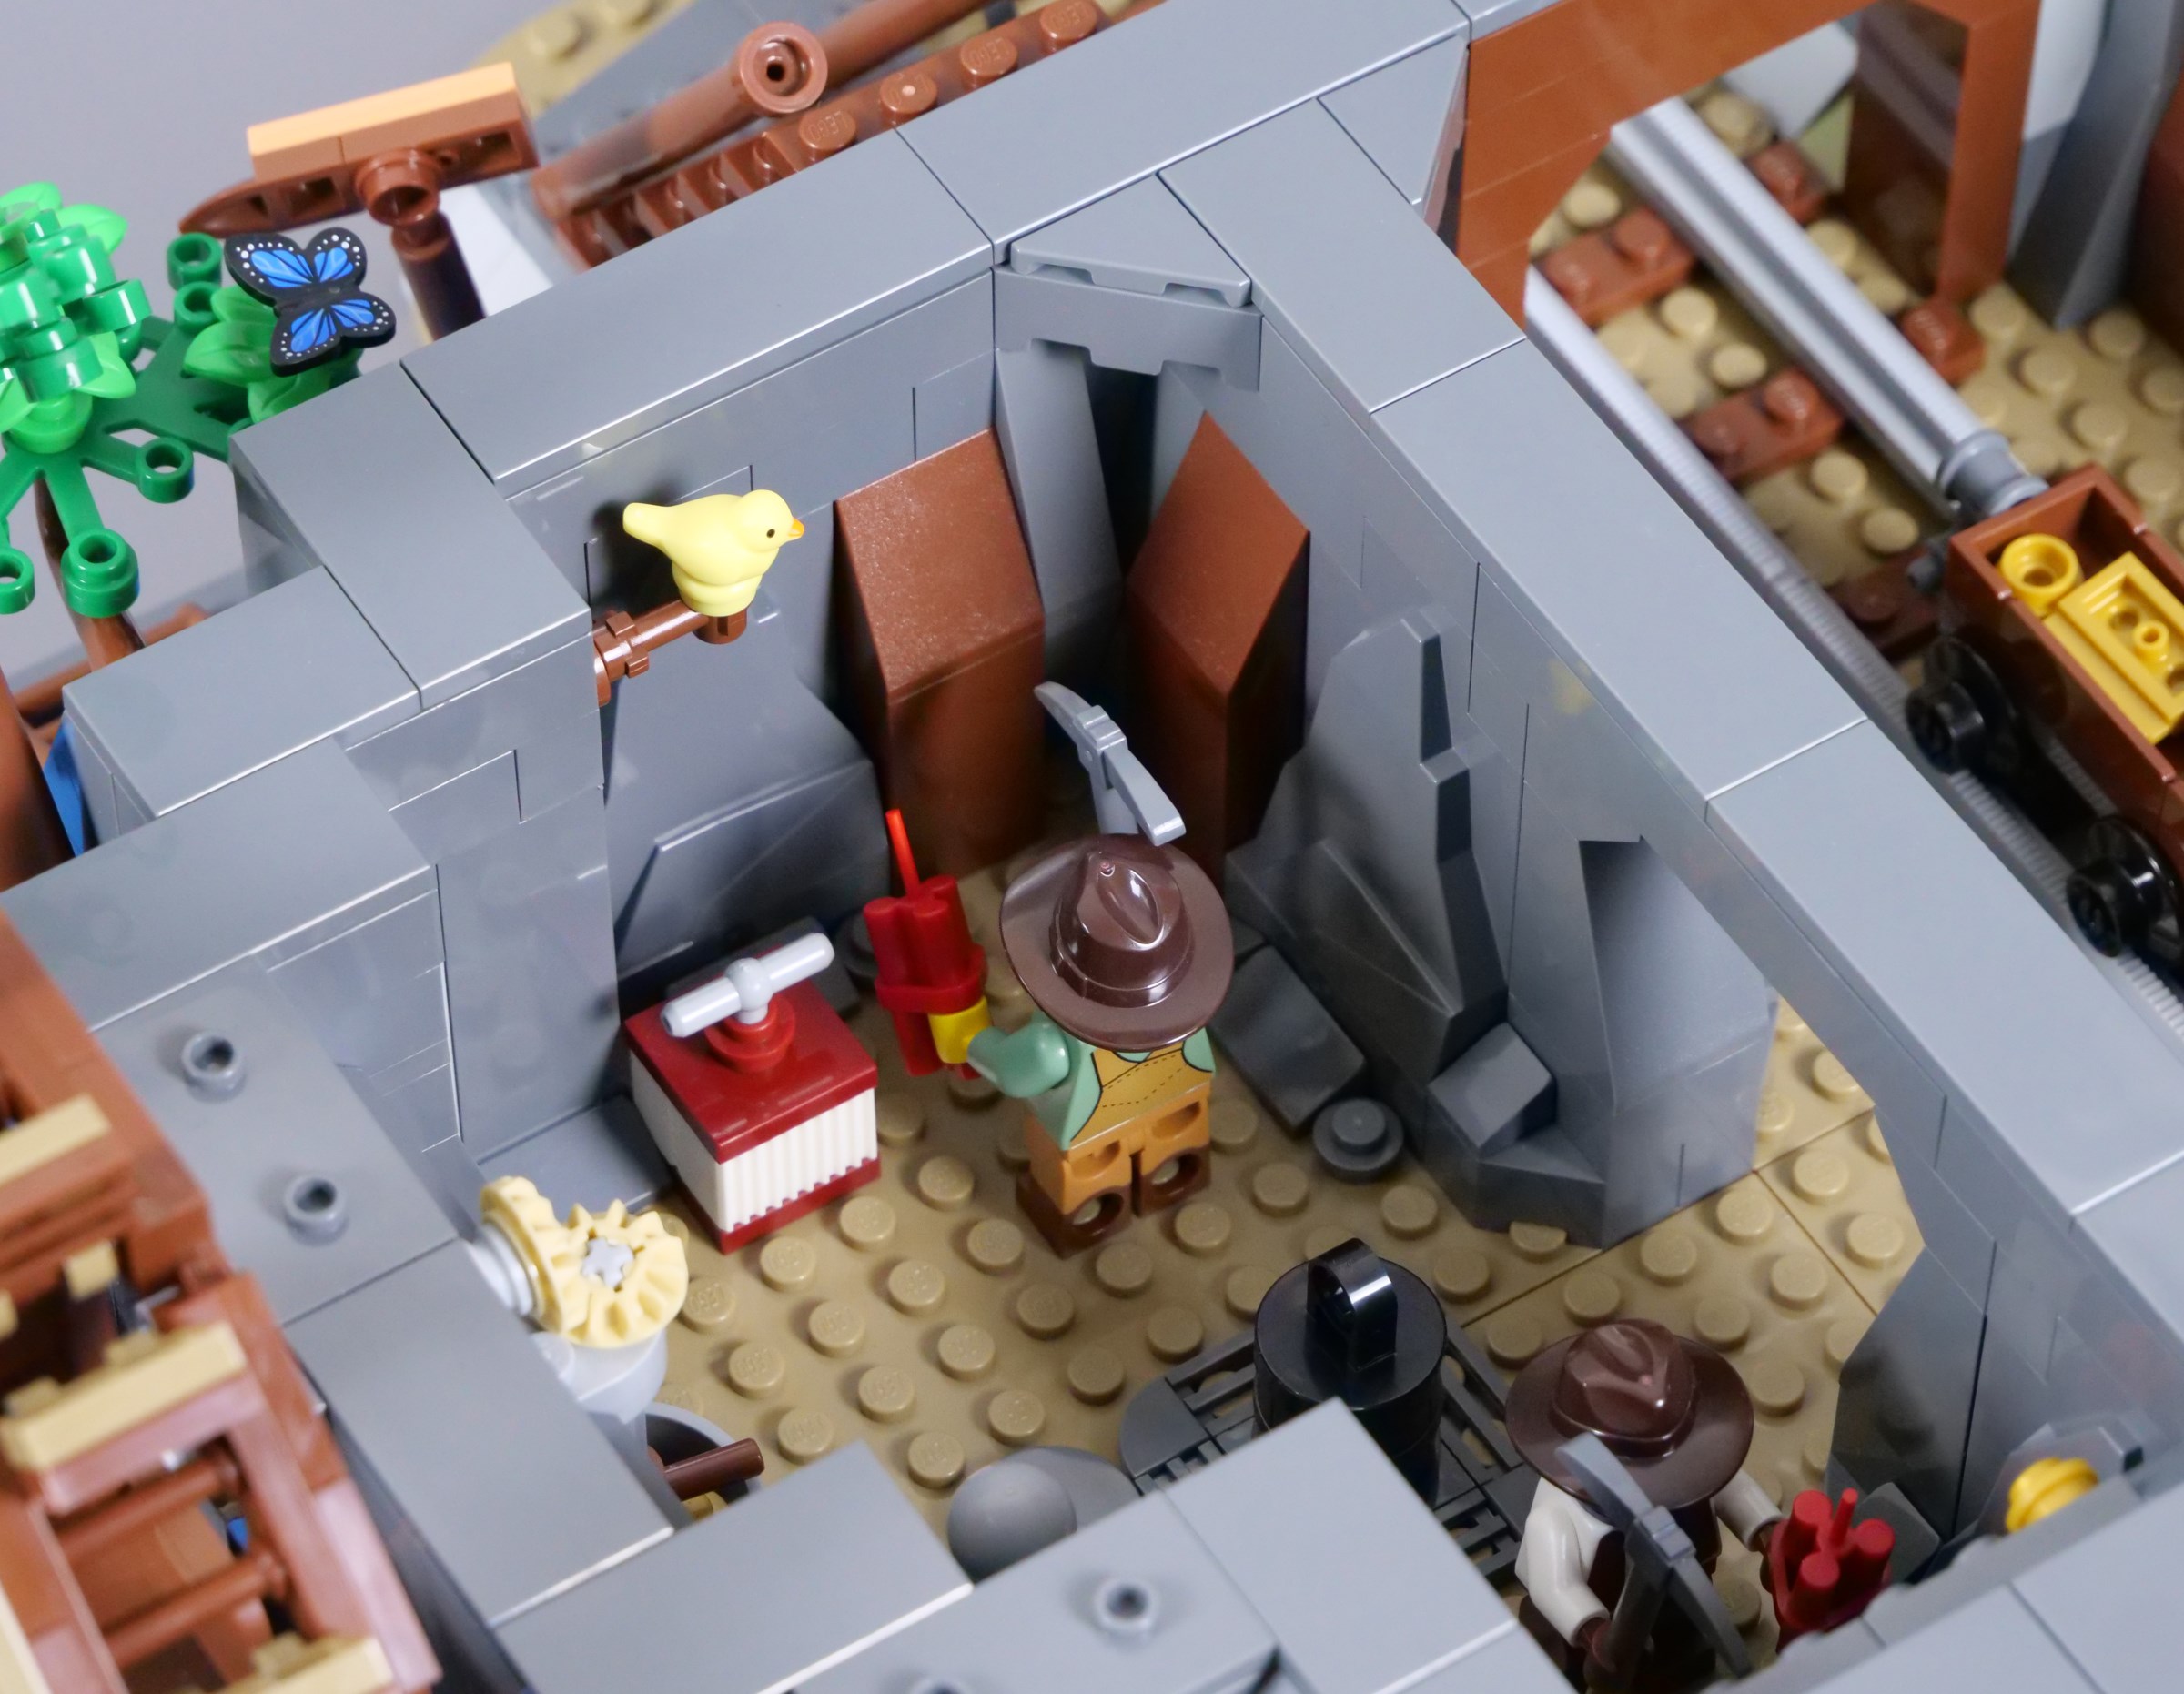
I think the same about the functions deeper underground. The rock crusher connected to the water wheel and the exploding wall are reasonable, but I somehow expected more, even in a display model. Similarly, the rock walls appear rather plain, but some of the smaller details are impressive, such as the delightful canary and the provisions stored in their own room.
Returning to the exterior, there are two staircases to access the buildings above the mine. The front entrance is flanked by wooden pillars and I love the nougat clips used for detail under the windows, as well as along the edge of the roof.
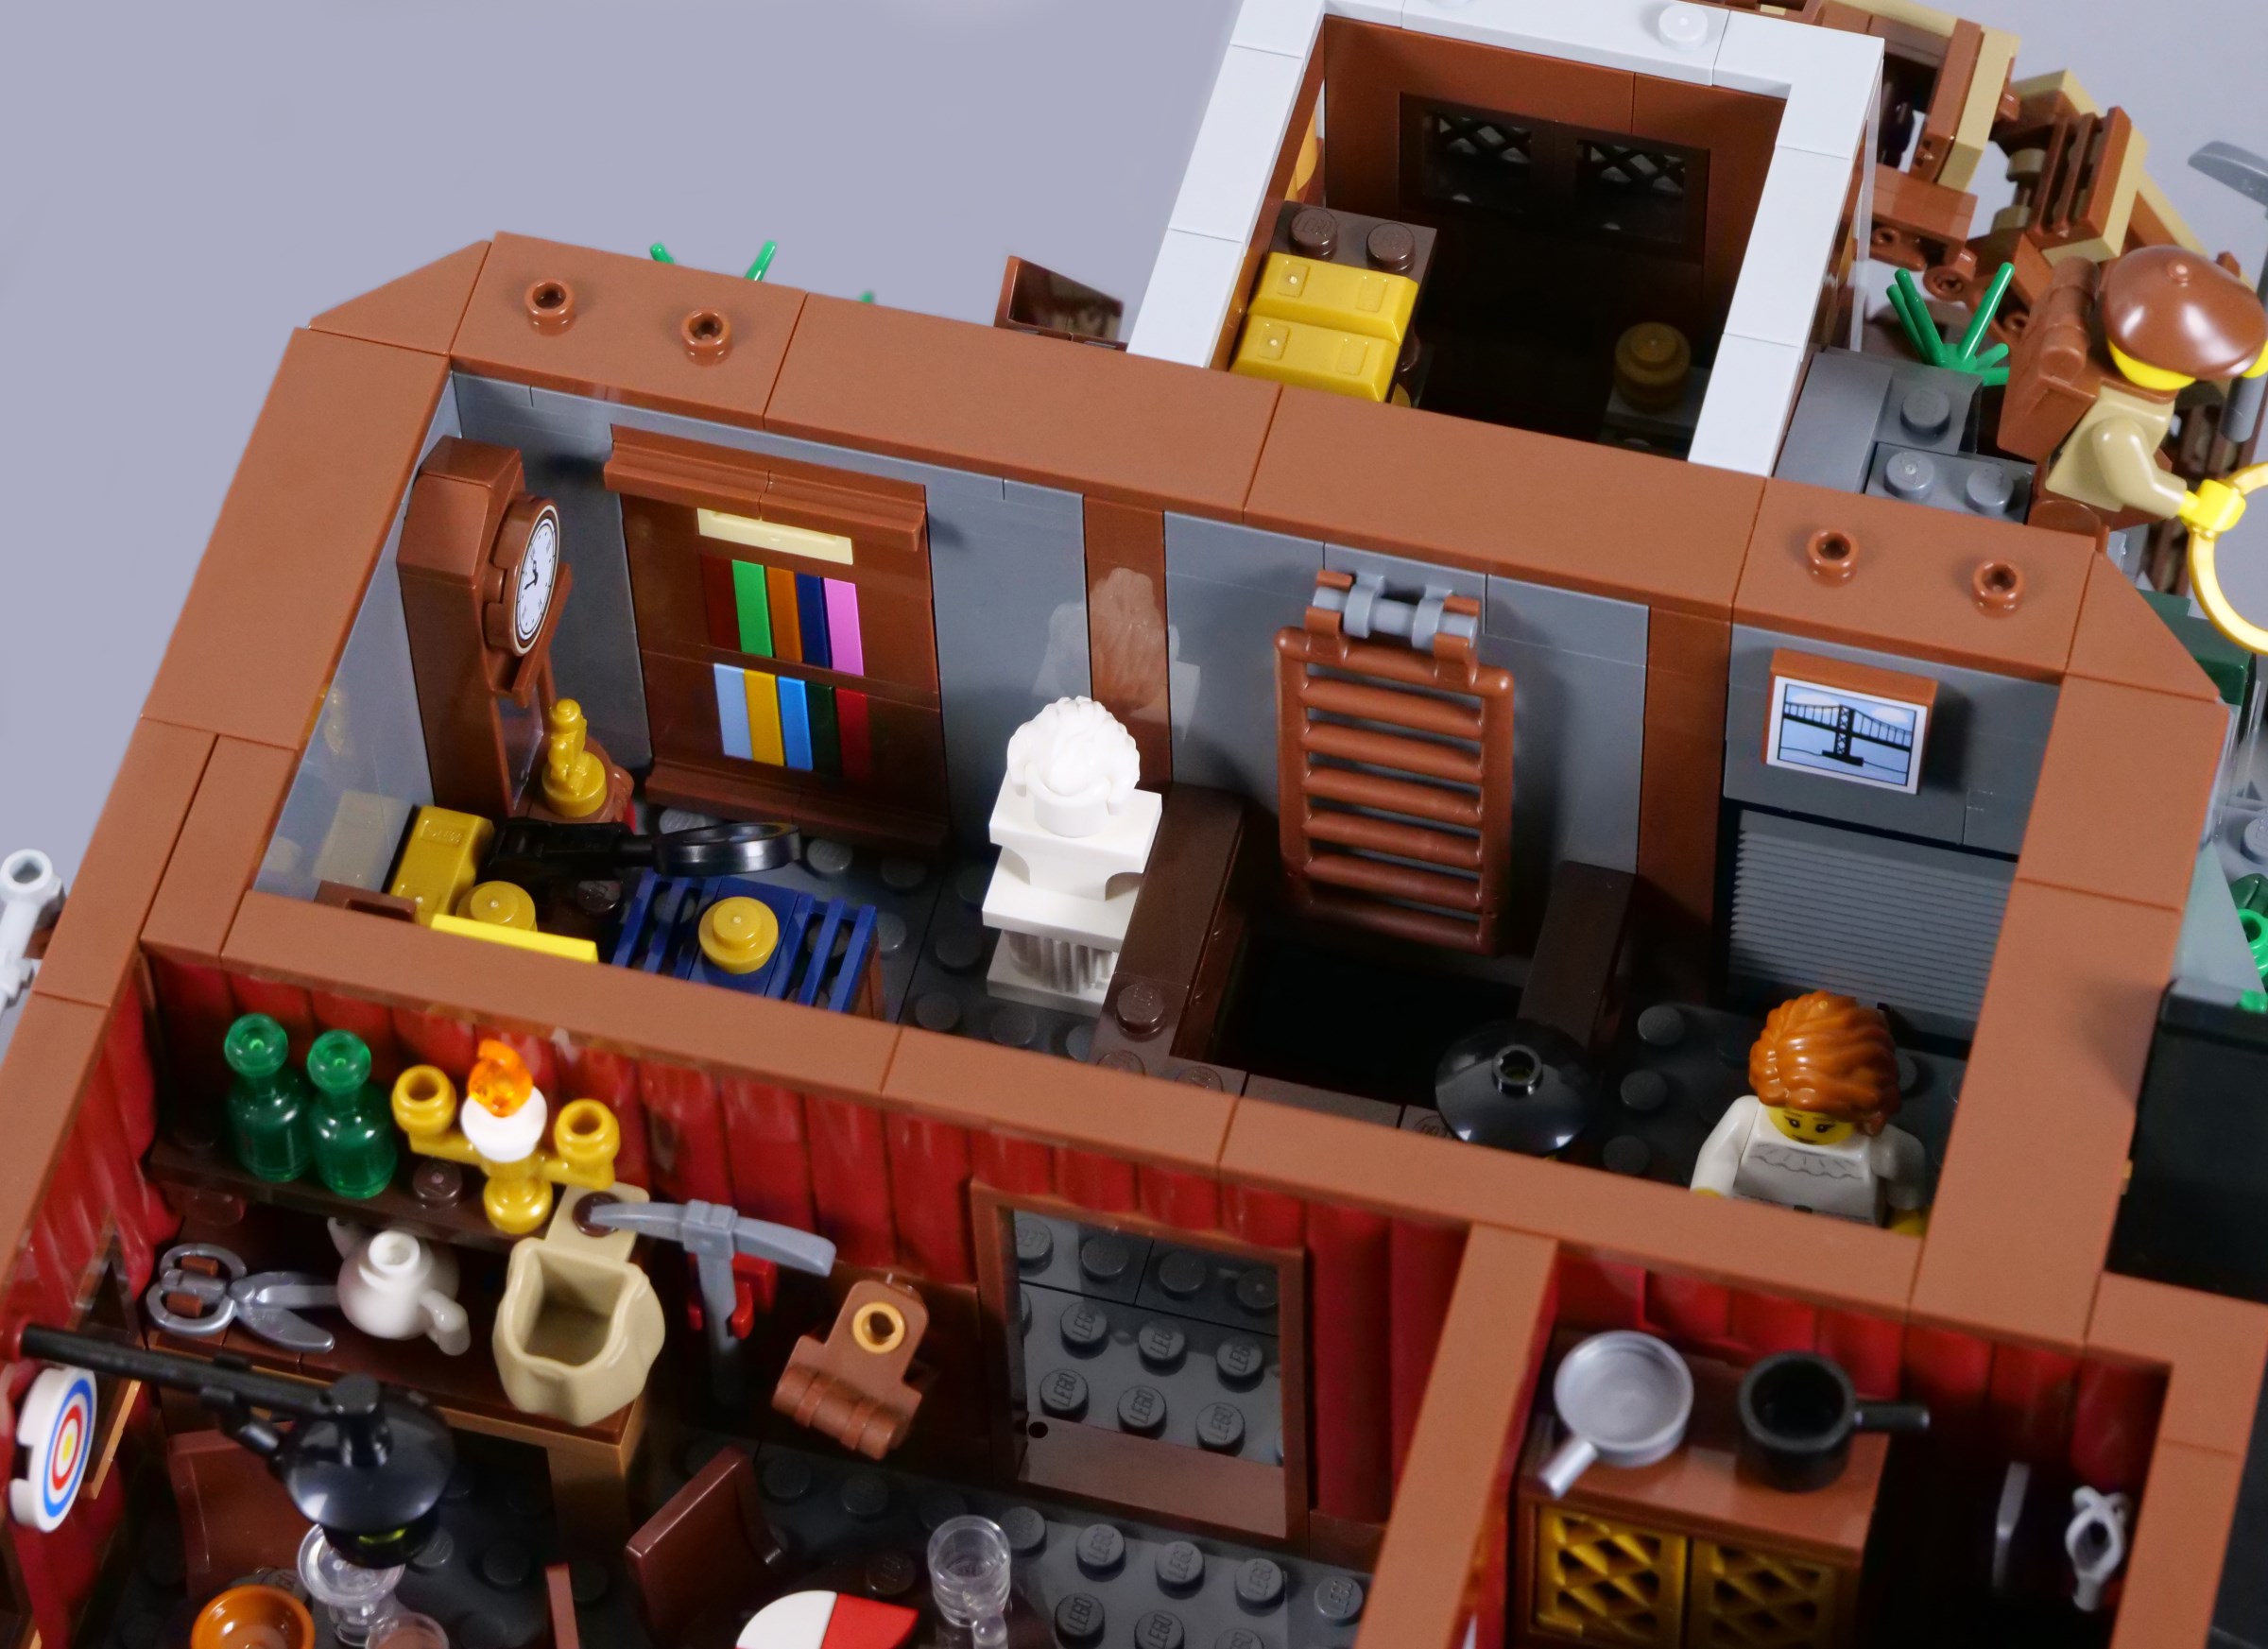
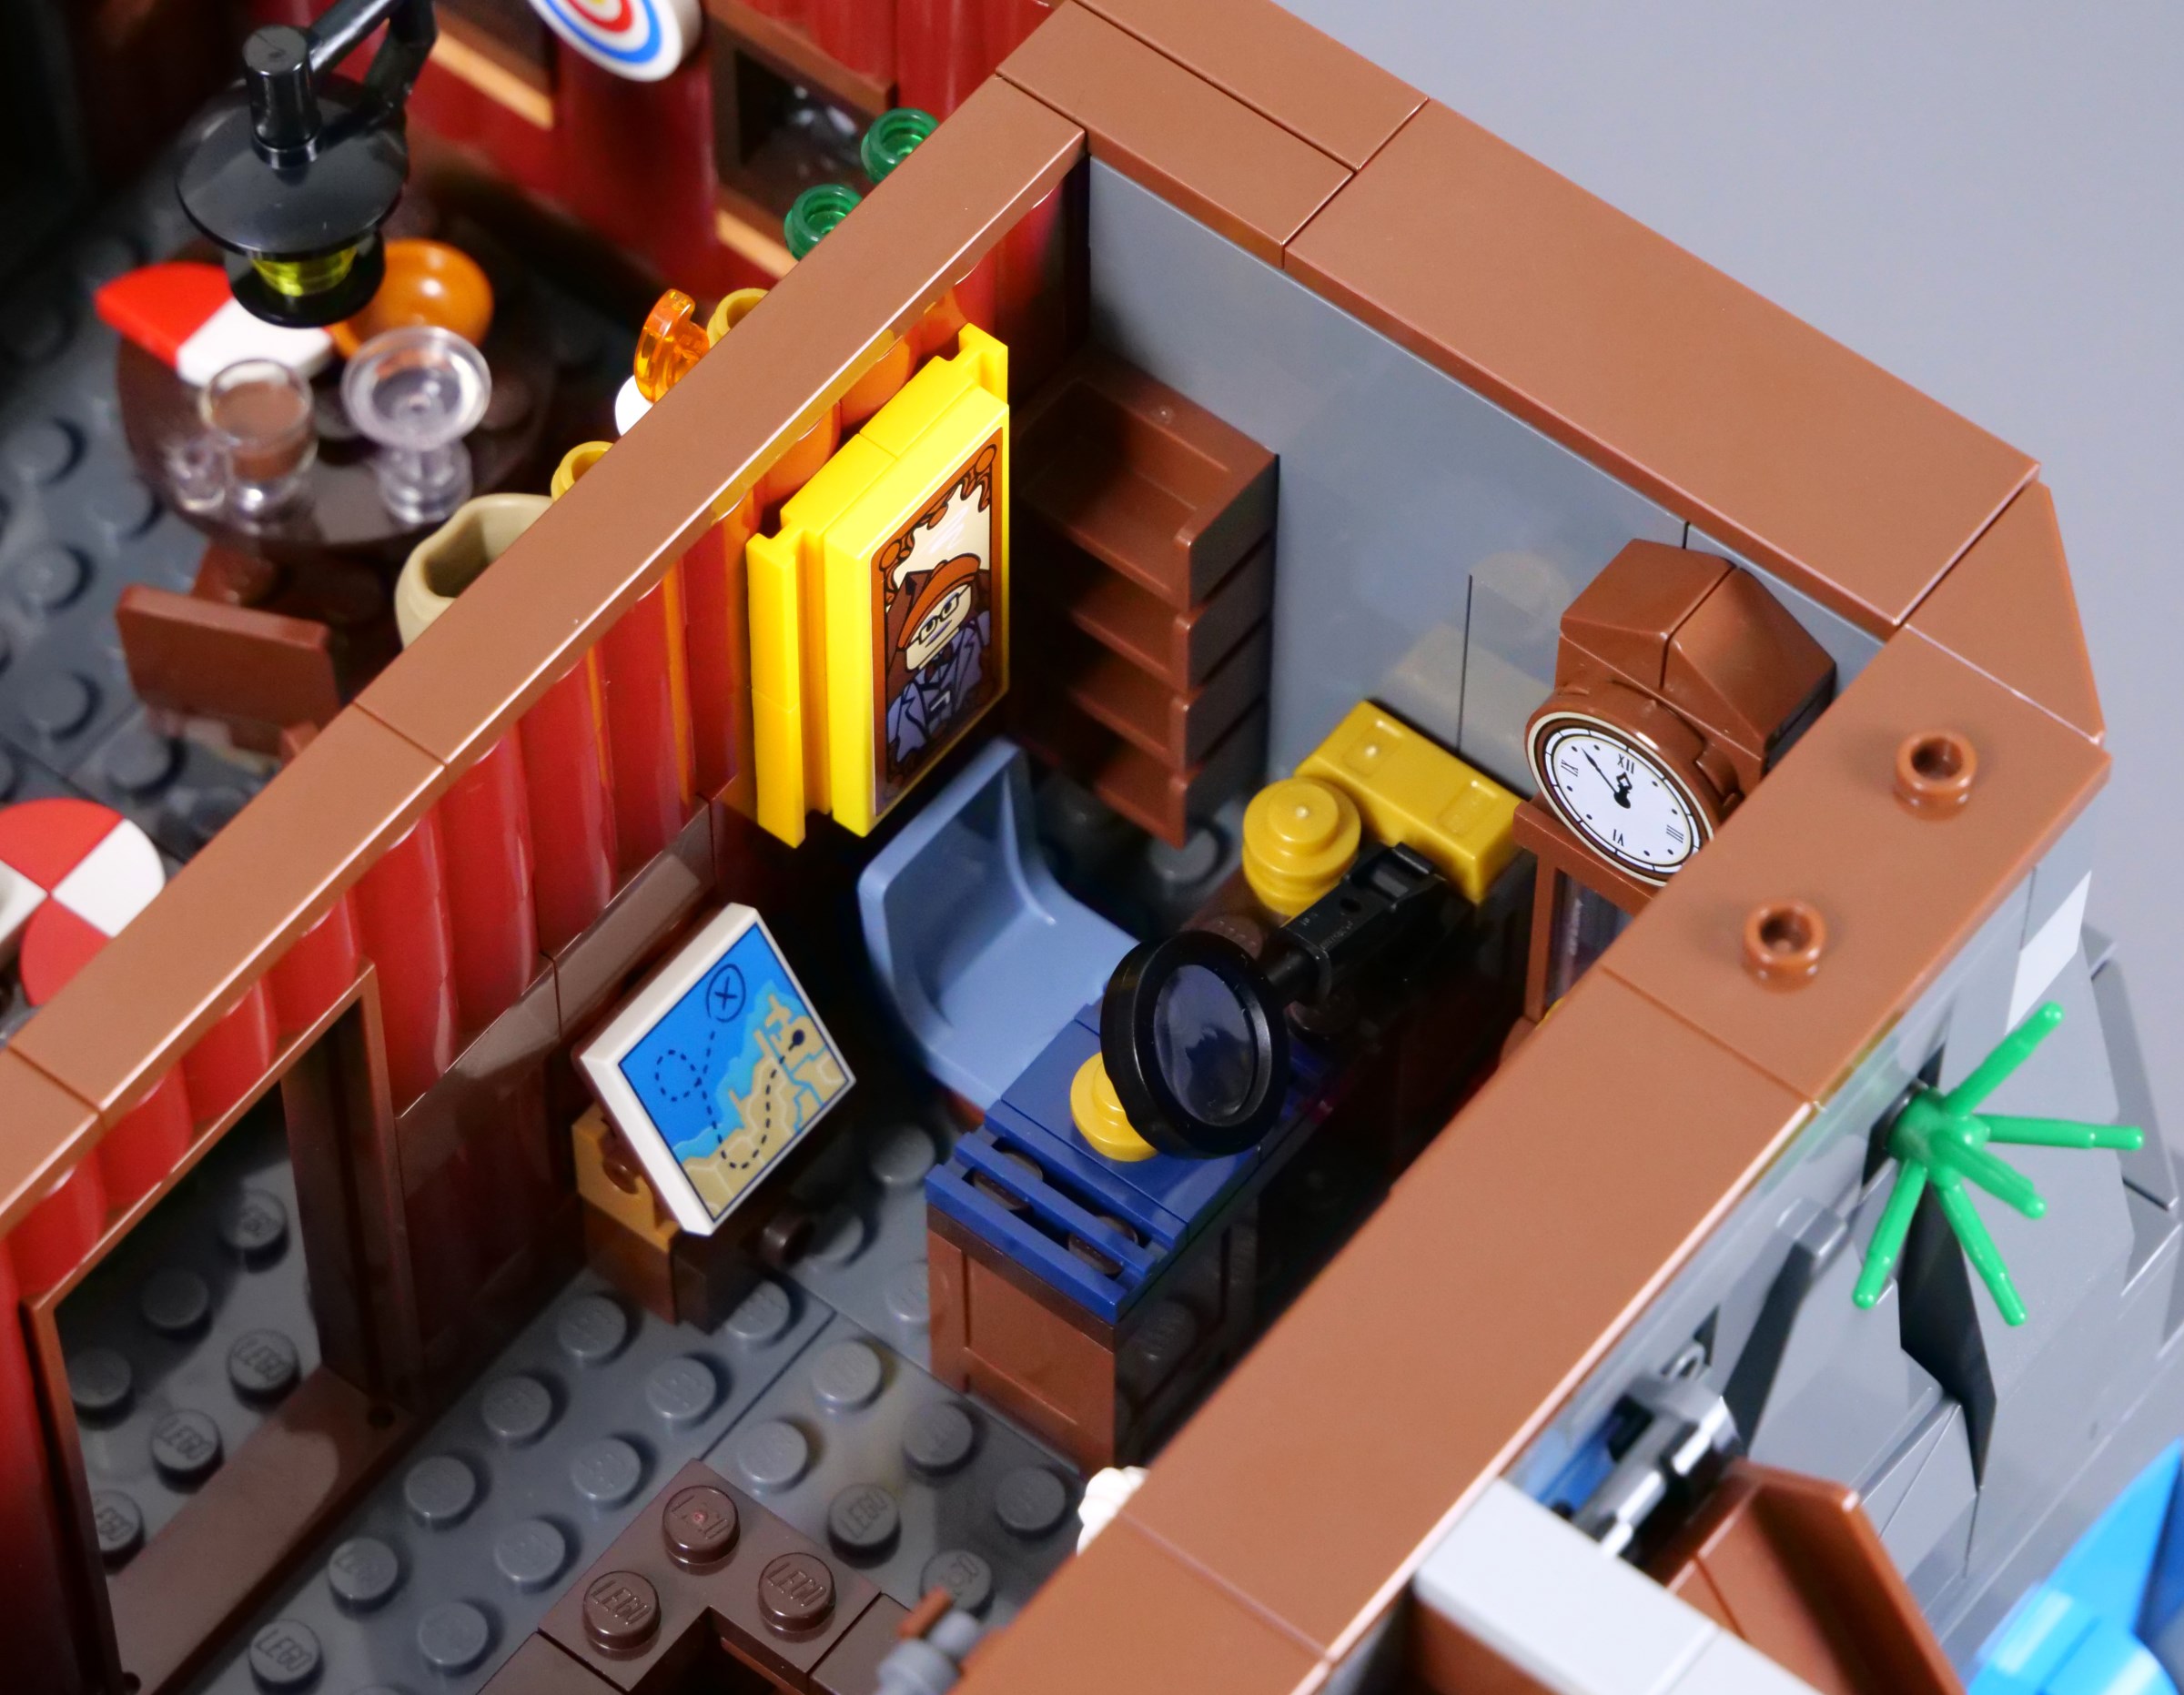
Inside we find an office, perhaps belonging to the mine's owner or a geologist examining rocks as they are excavated. Either way, I like the bookshelves and grandfather clock placed against the wall, with a stickered portrait opposite. The hole down to the cavern underneath seems odd though, albeit needed for a later function.
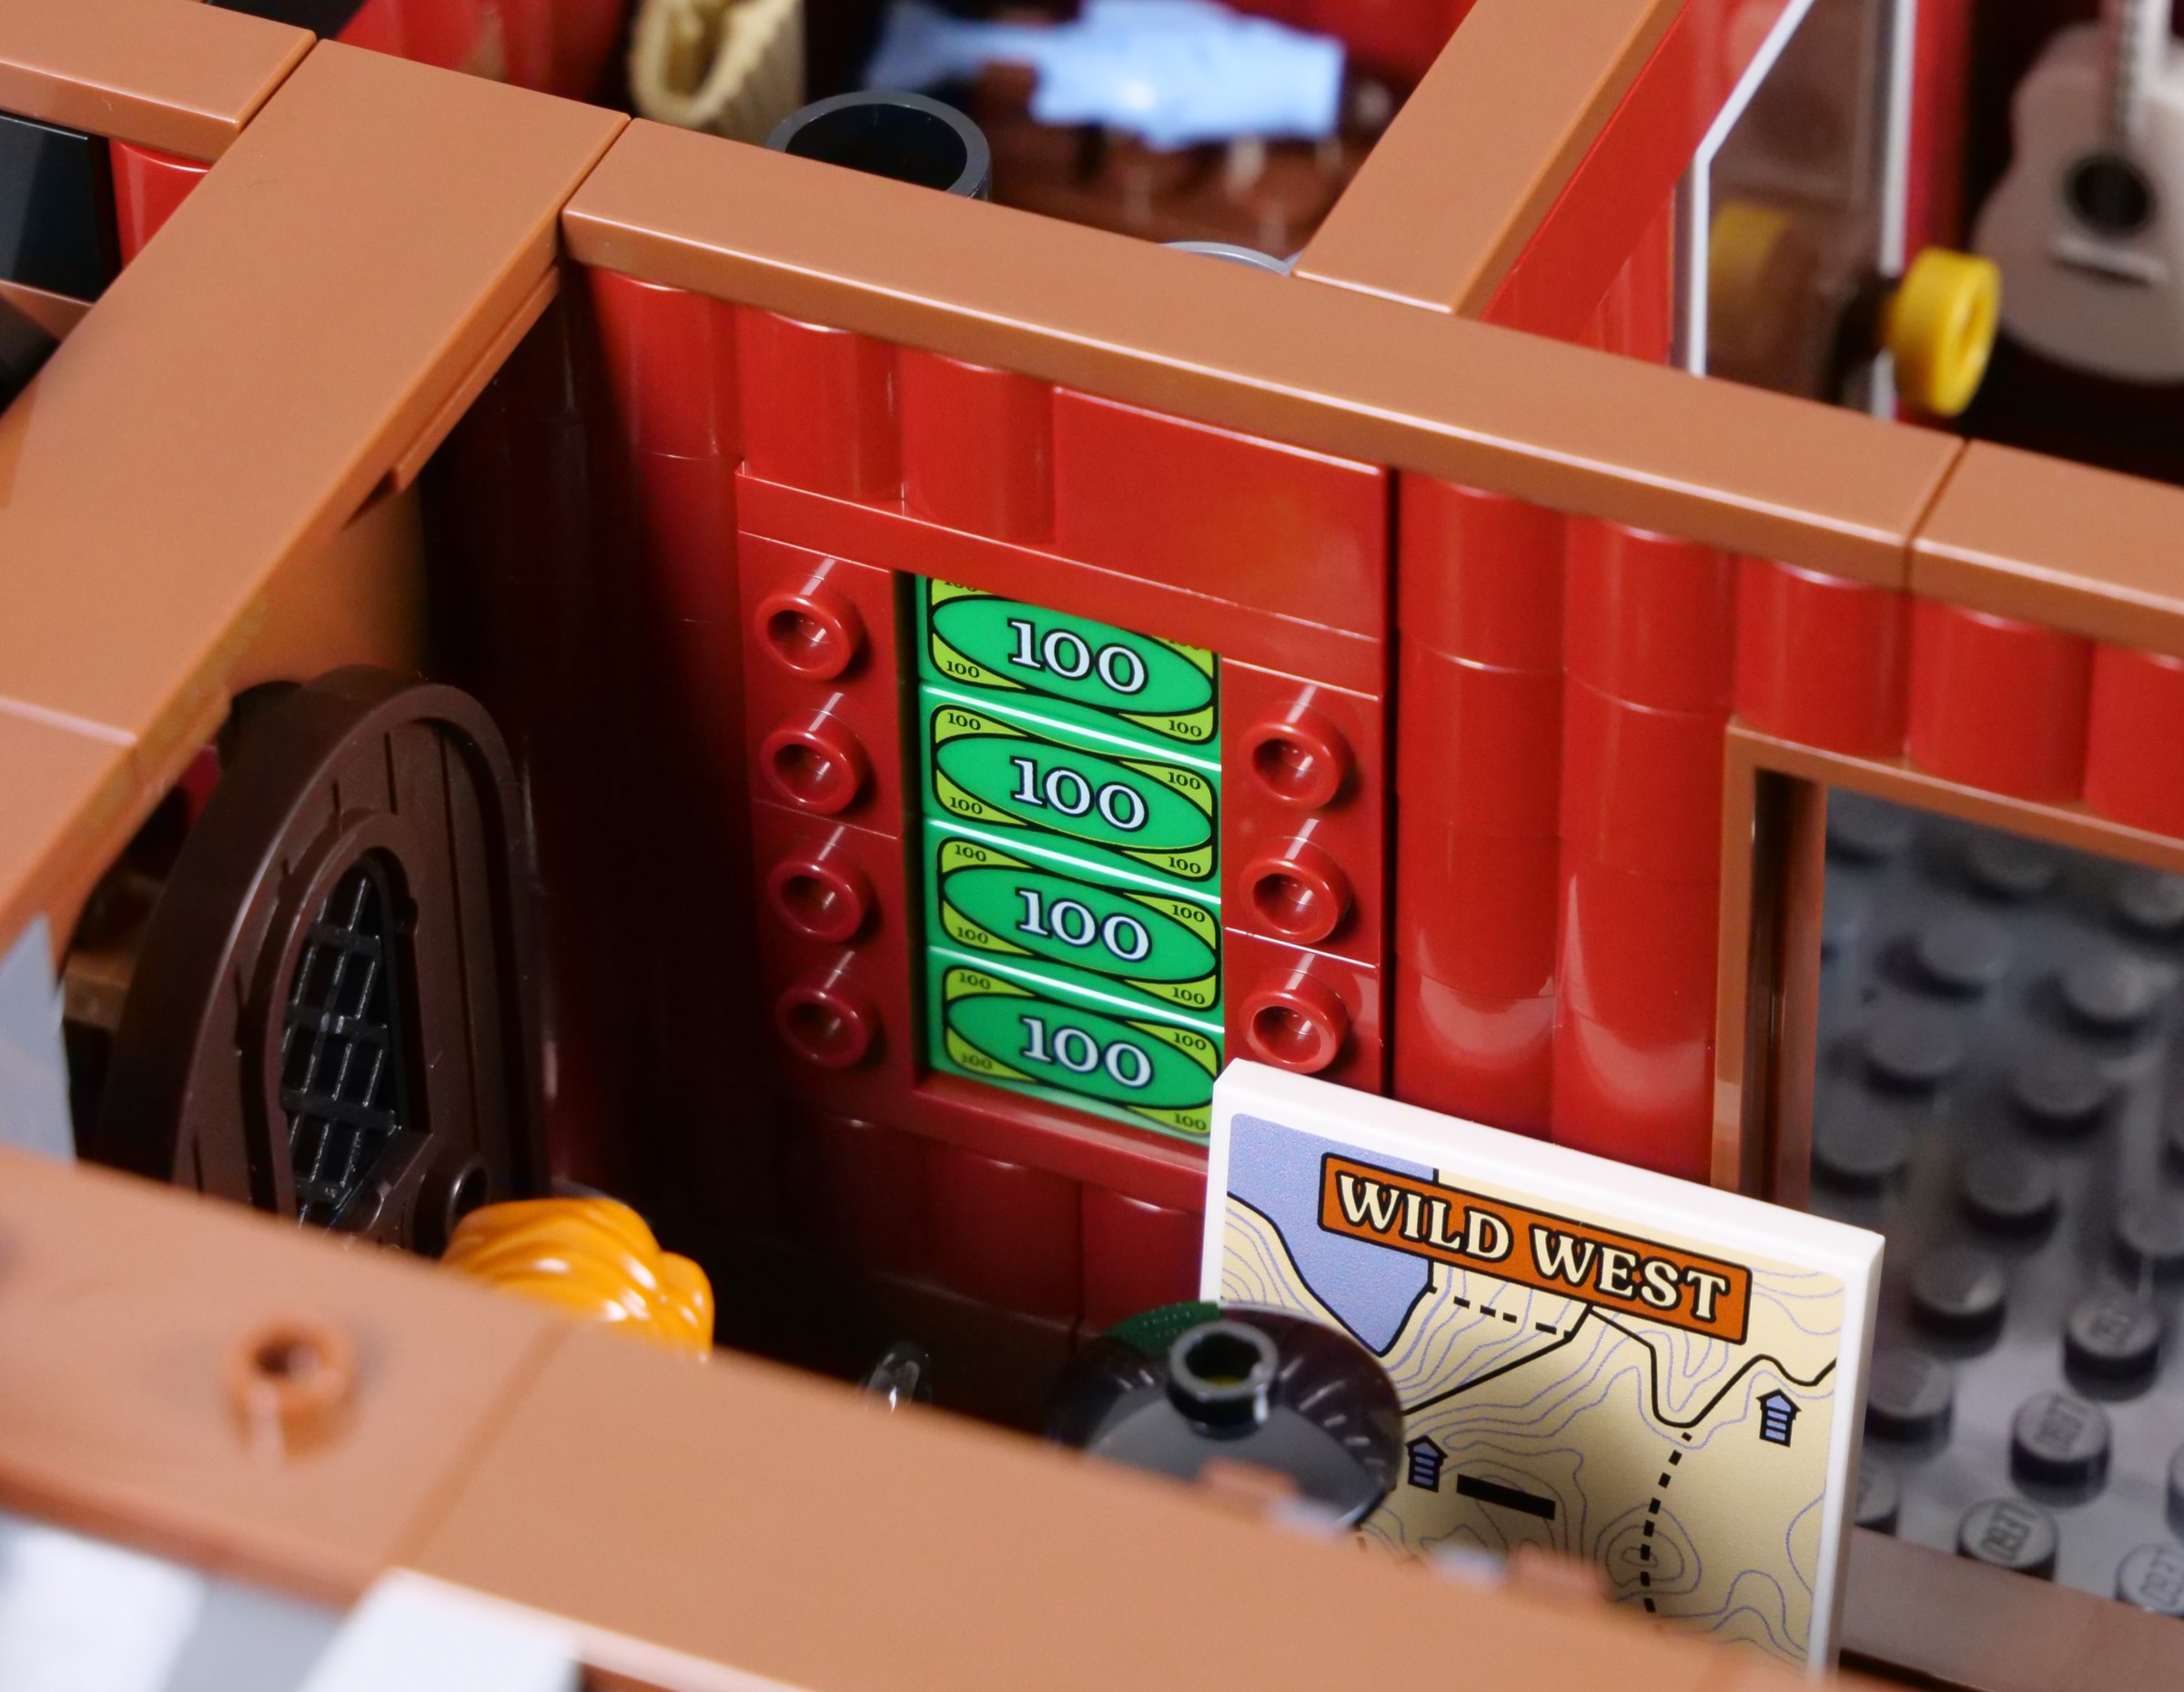
There are a few secrets to be discovered, including stacks of cash hidden behind a map on the wall! Notably, I think there is a mistake on the map sticker, as 'horse trial' should presumably be 'horse trail'. The design looks good though and the banknotes behind are fun.
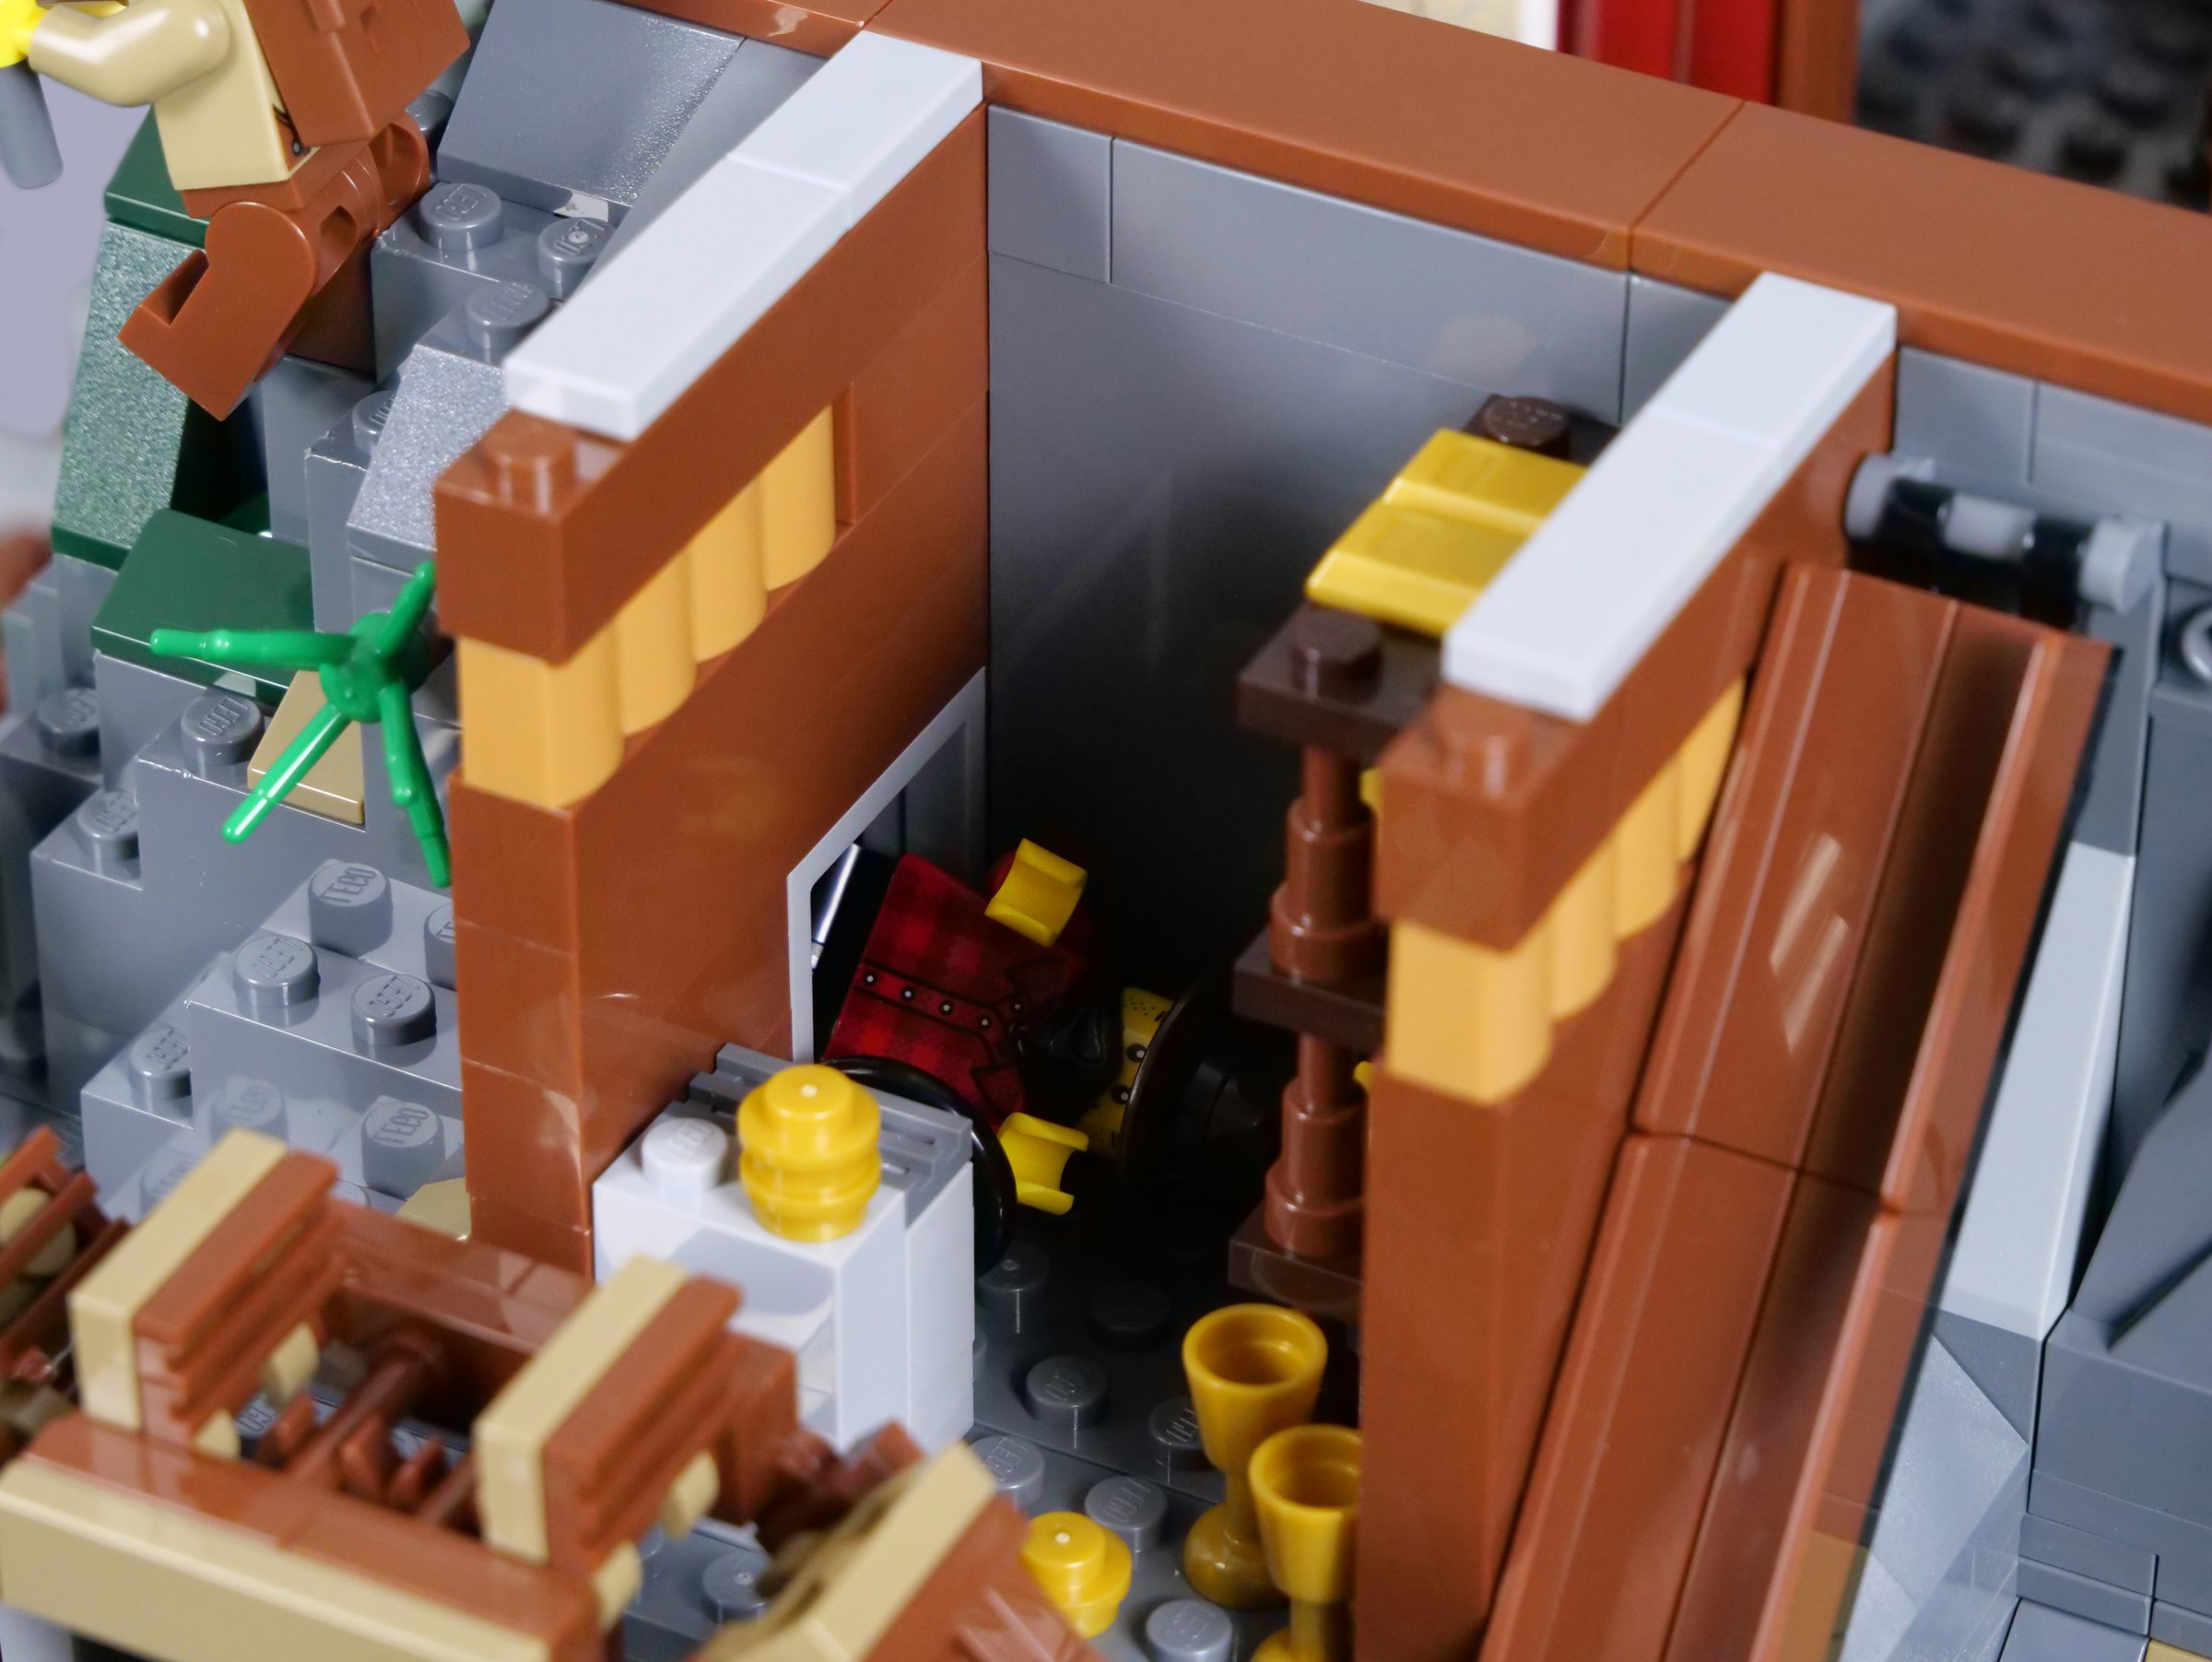
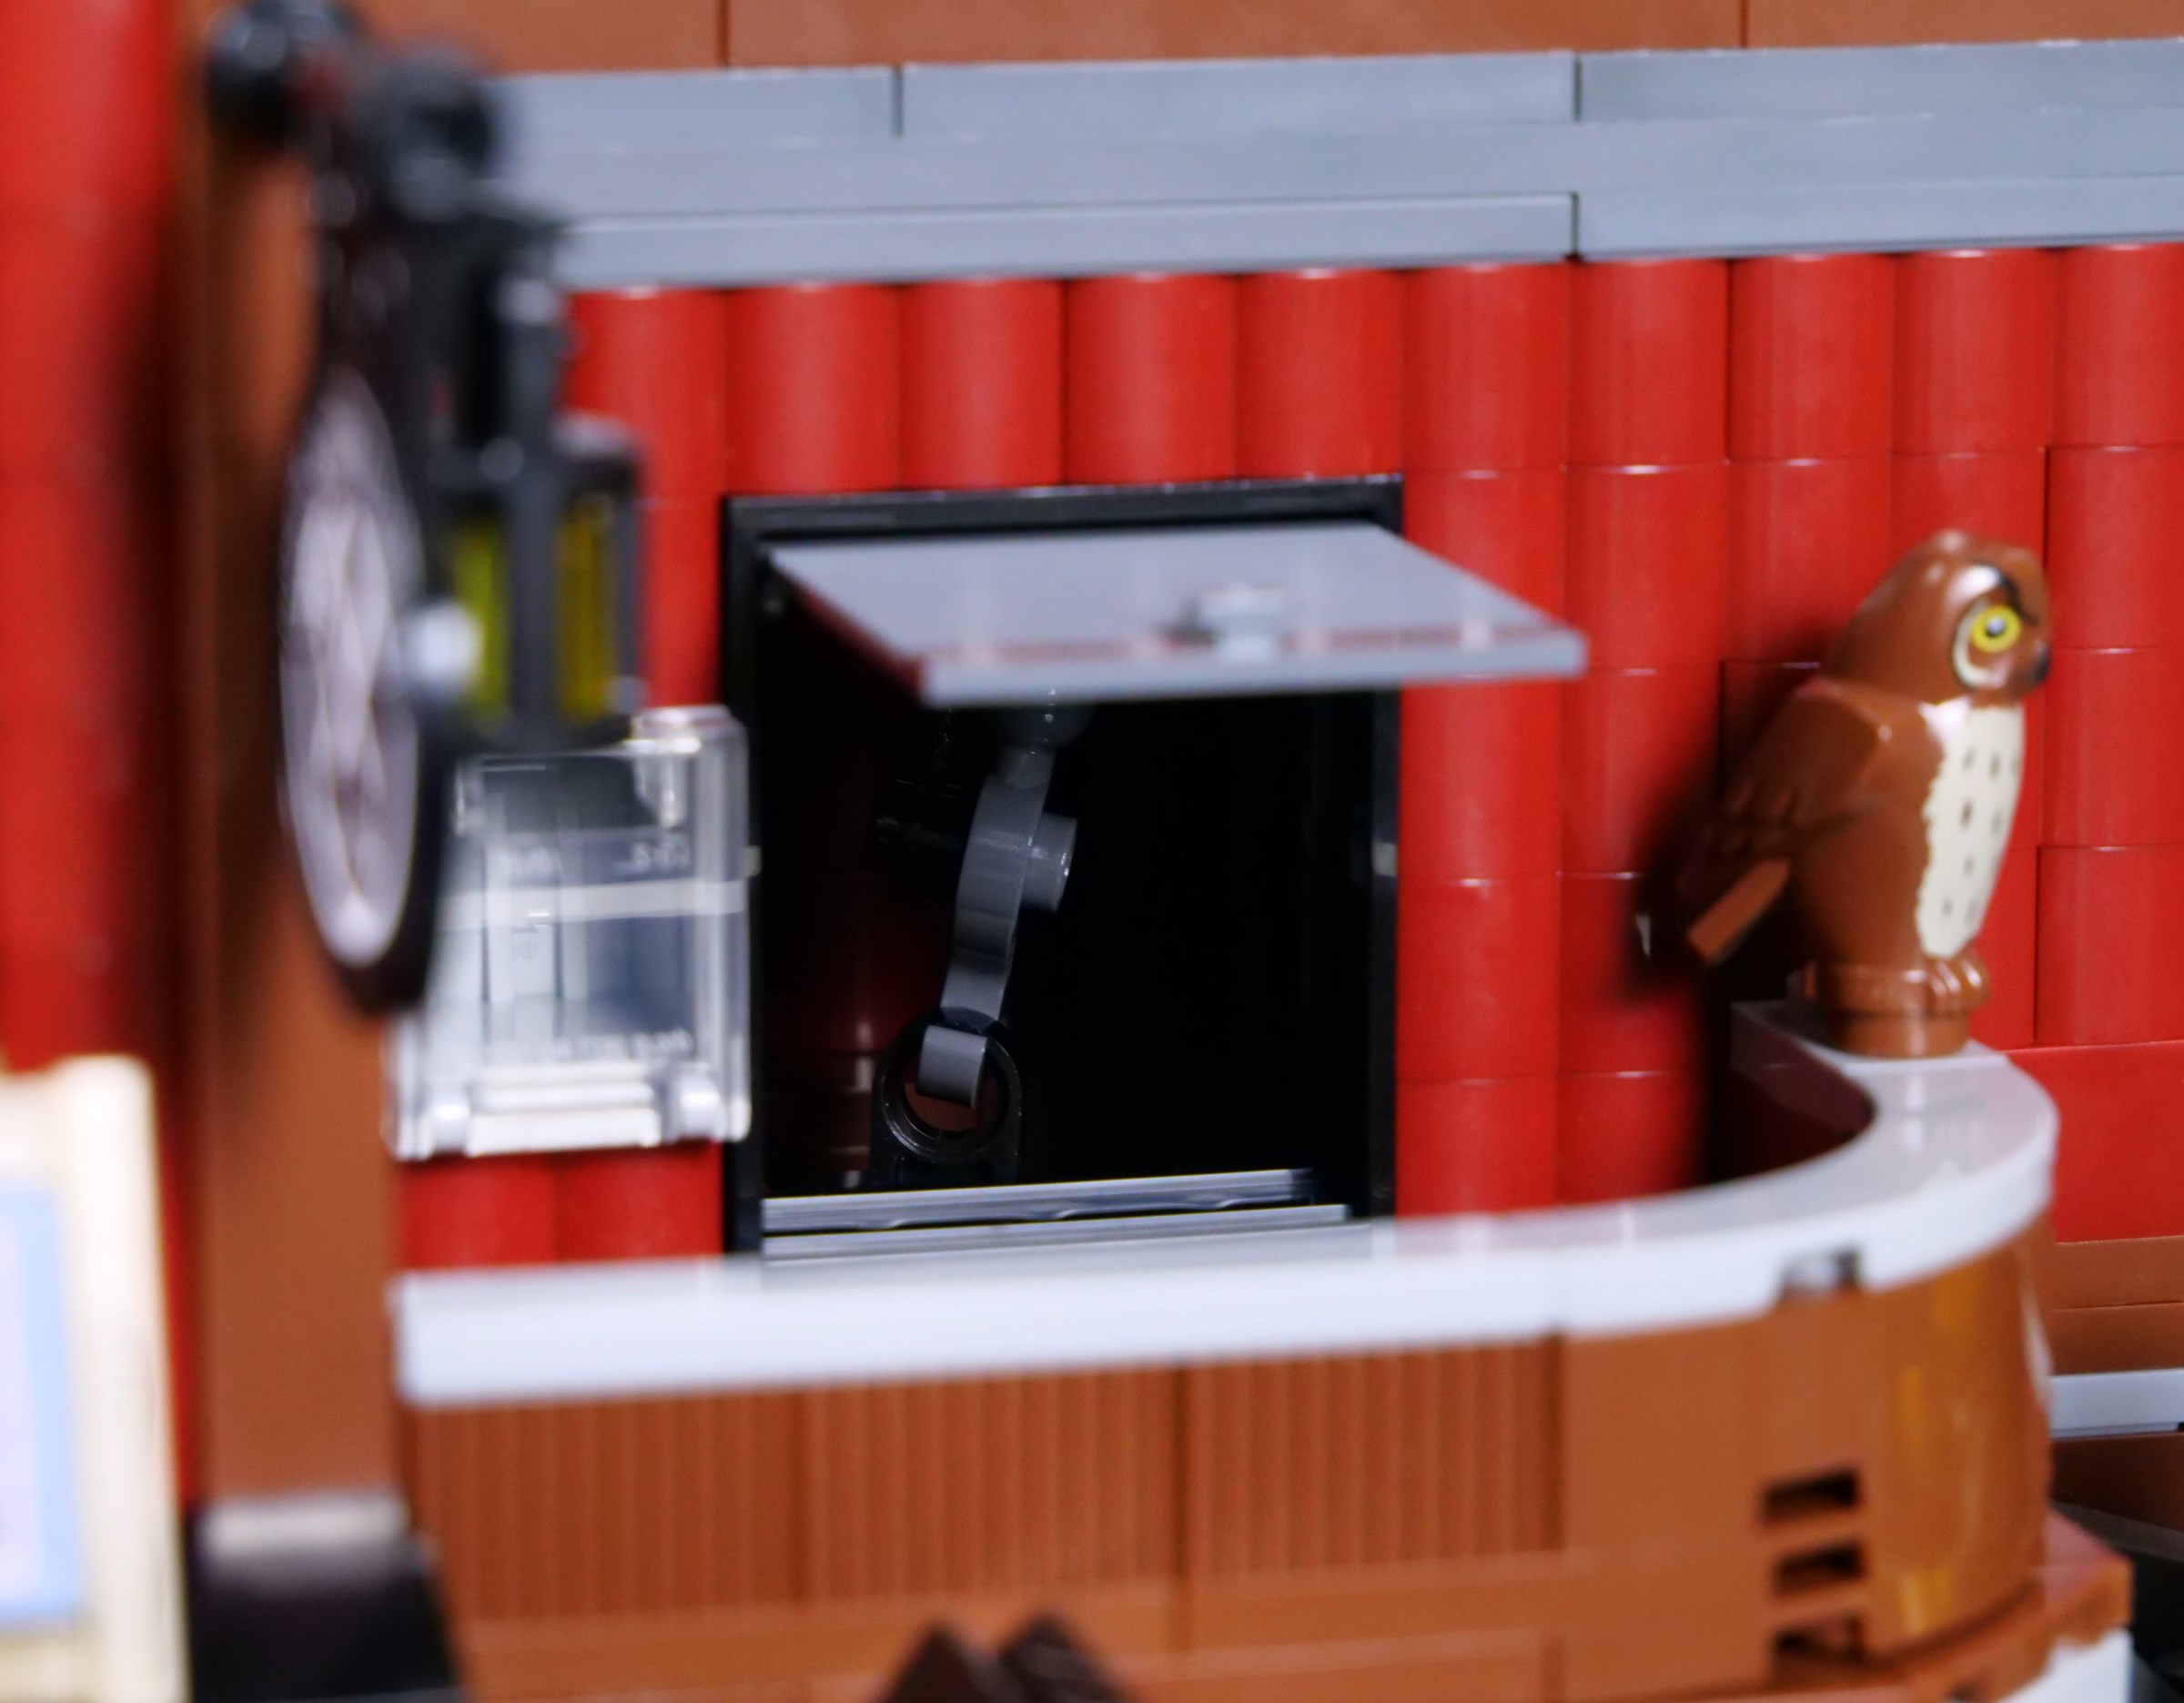
Opposite the map is a printed painting with a hatch underneath, leading to a storage space for mined gold. I appreciate that this room is concealed, but I think a secret door would have been more fun than a small passageway, which you cannot easily push a minifigure though. I like the removable side wall though, improving access, as shown below.
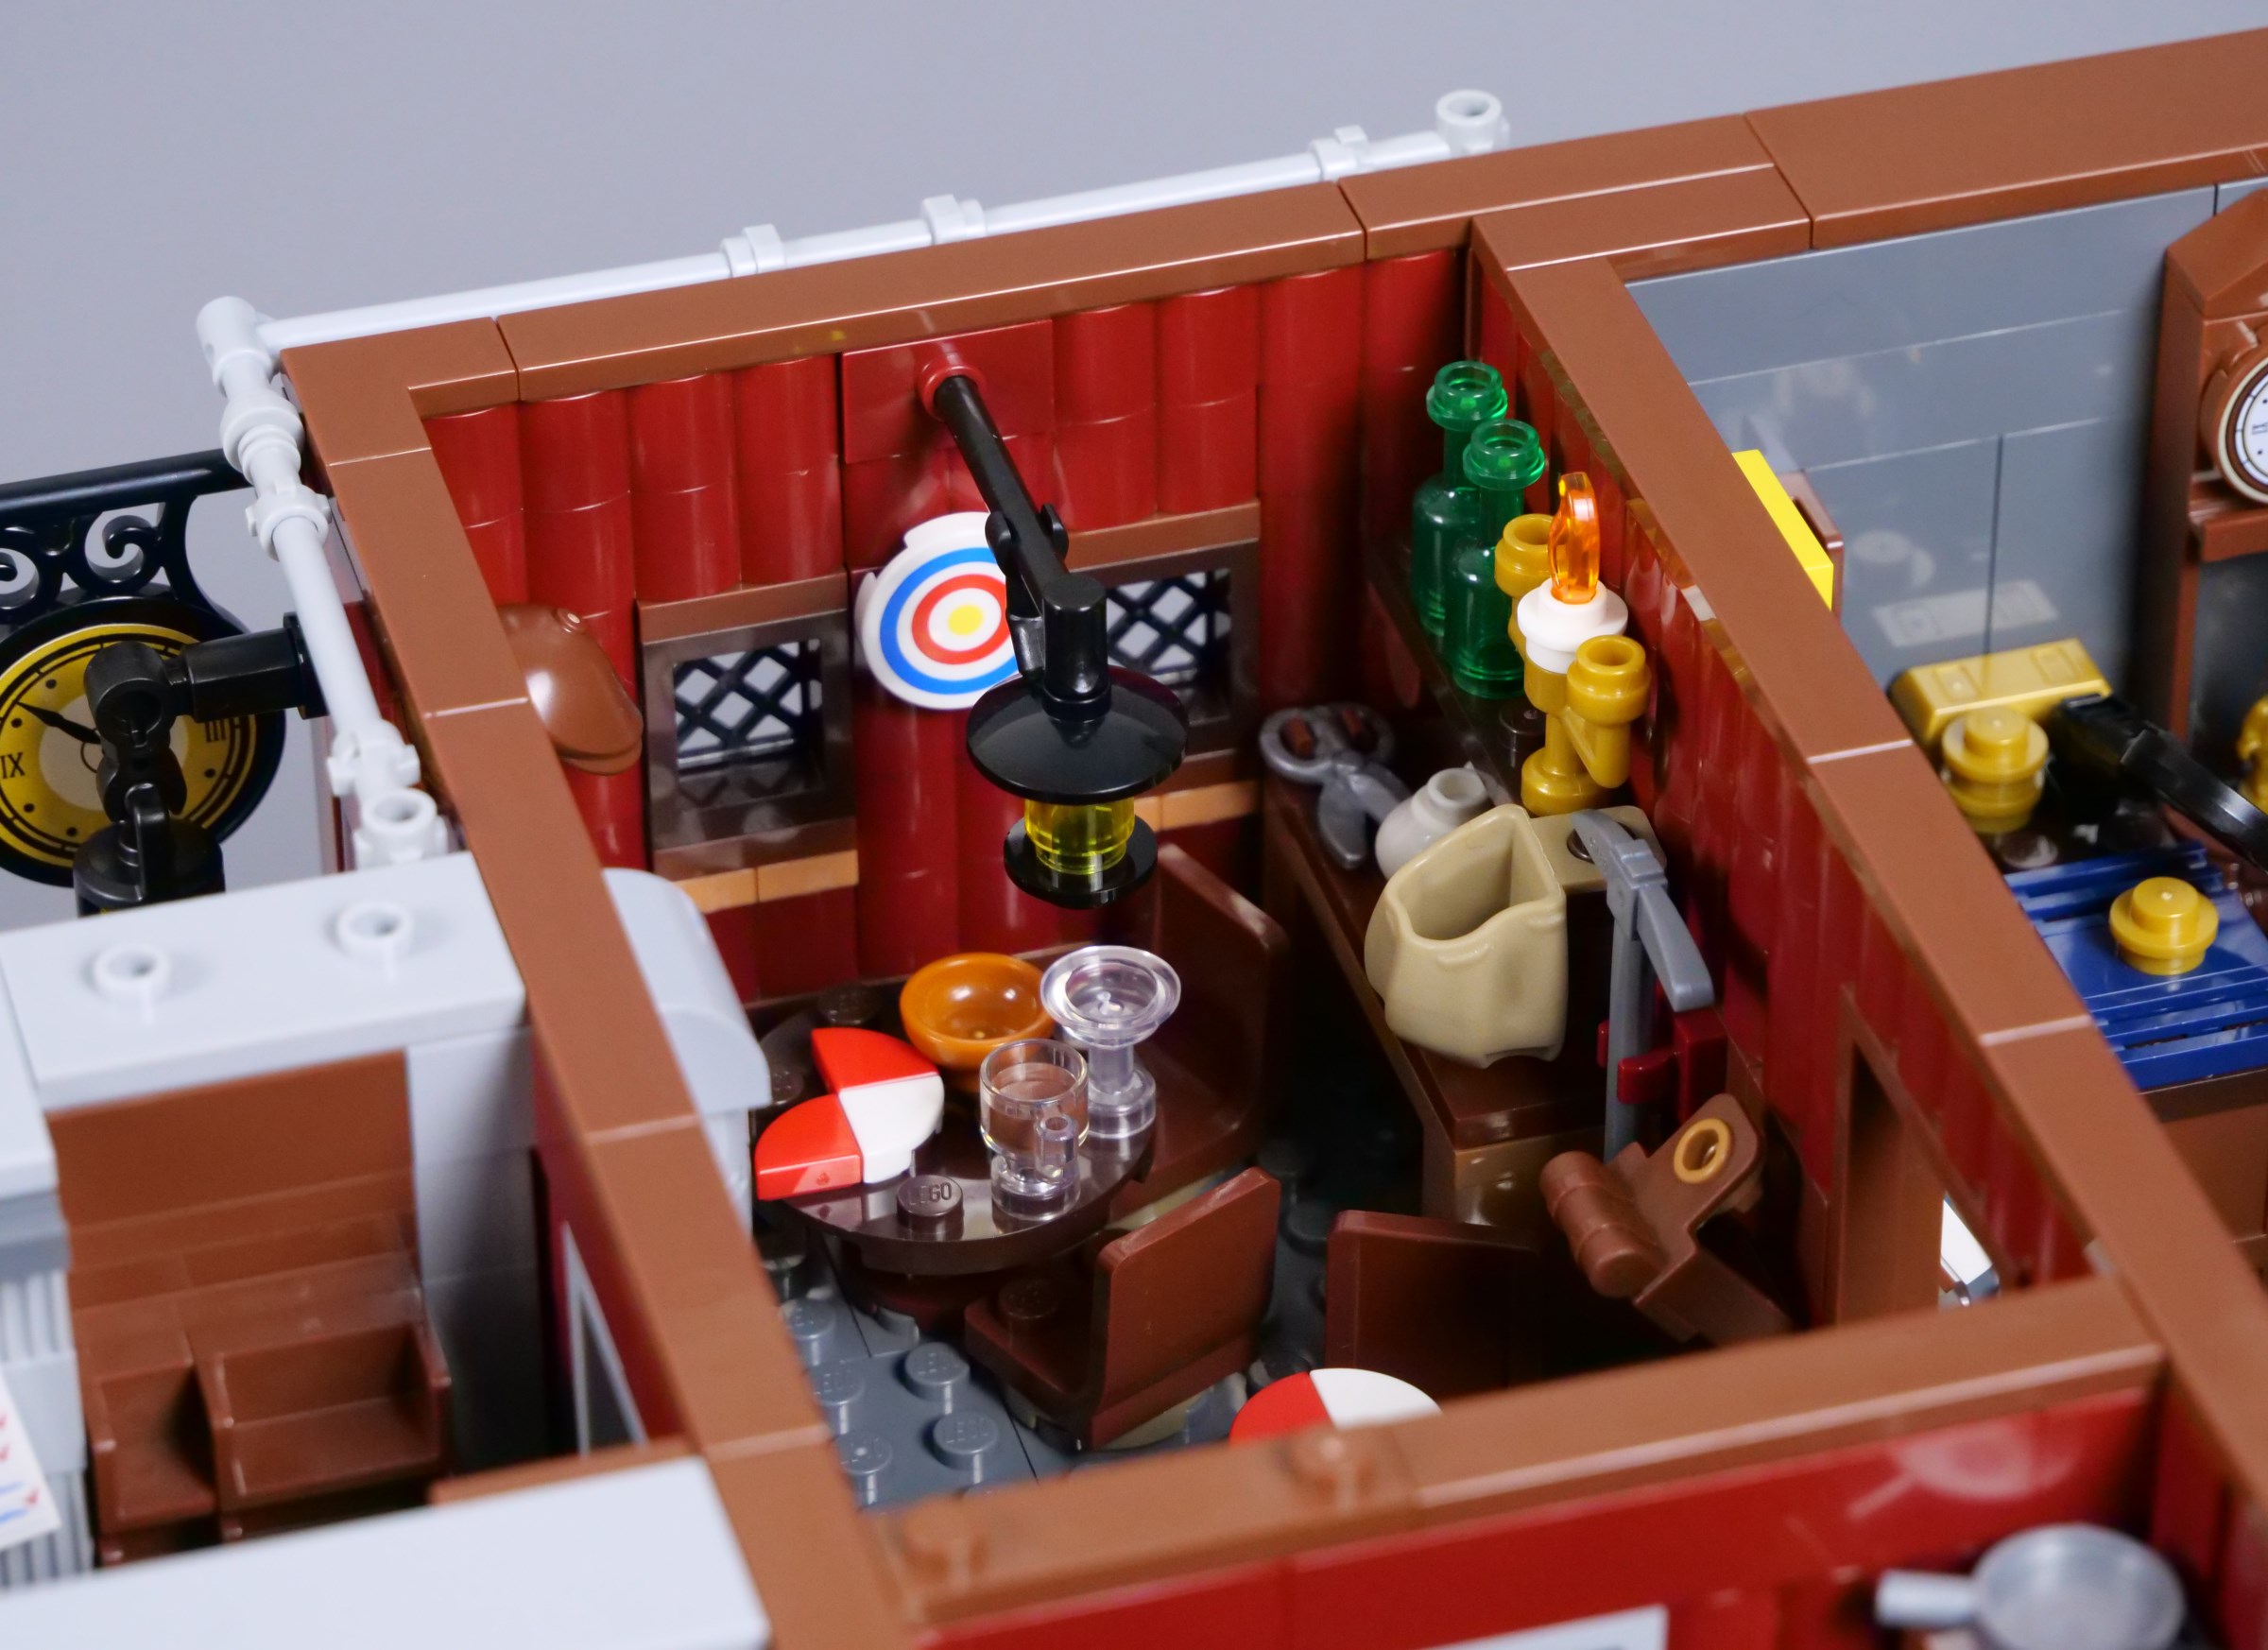
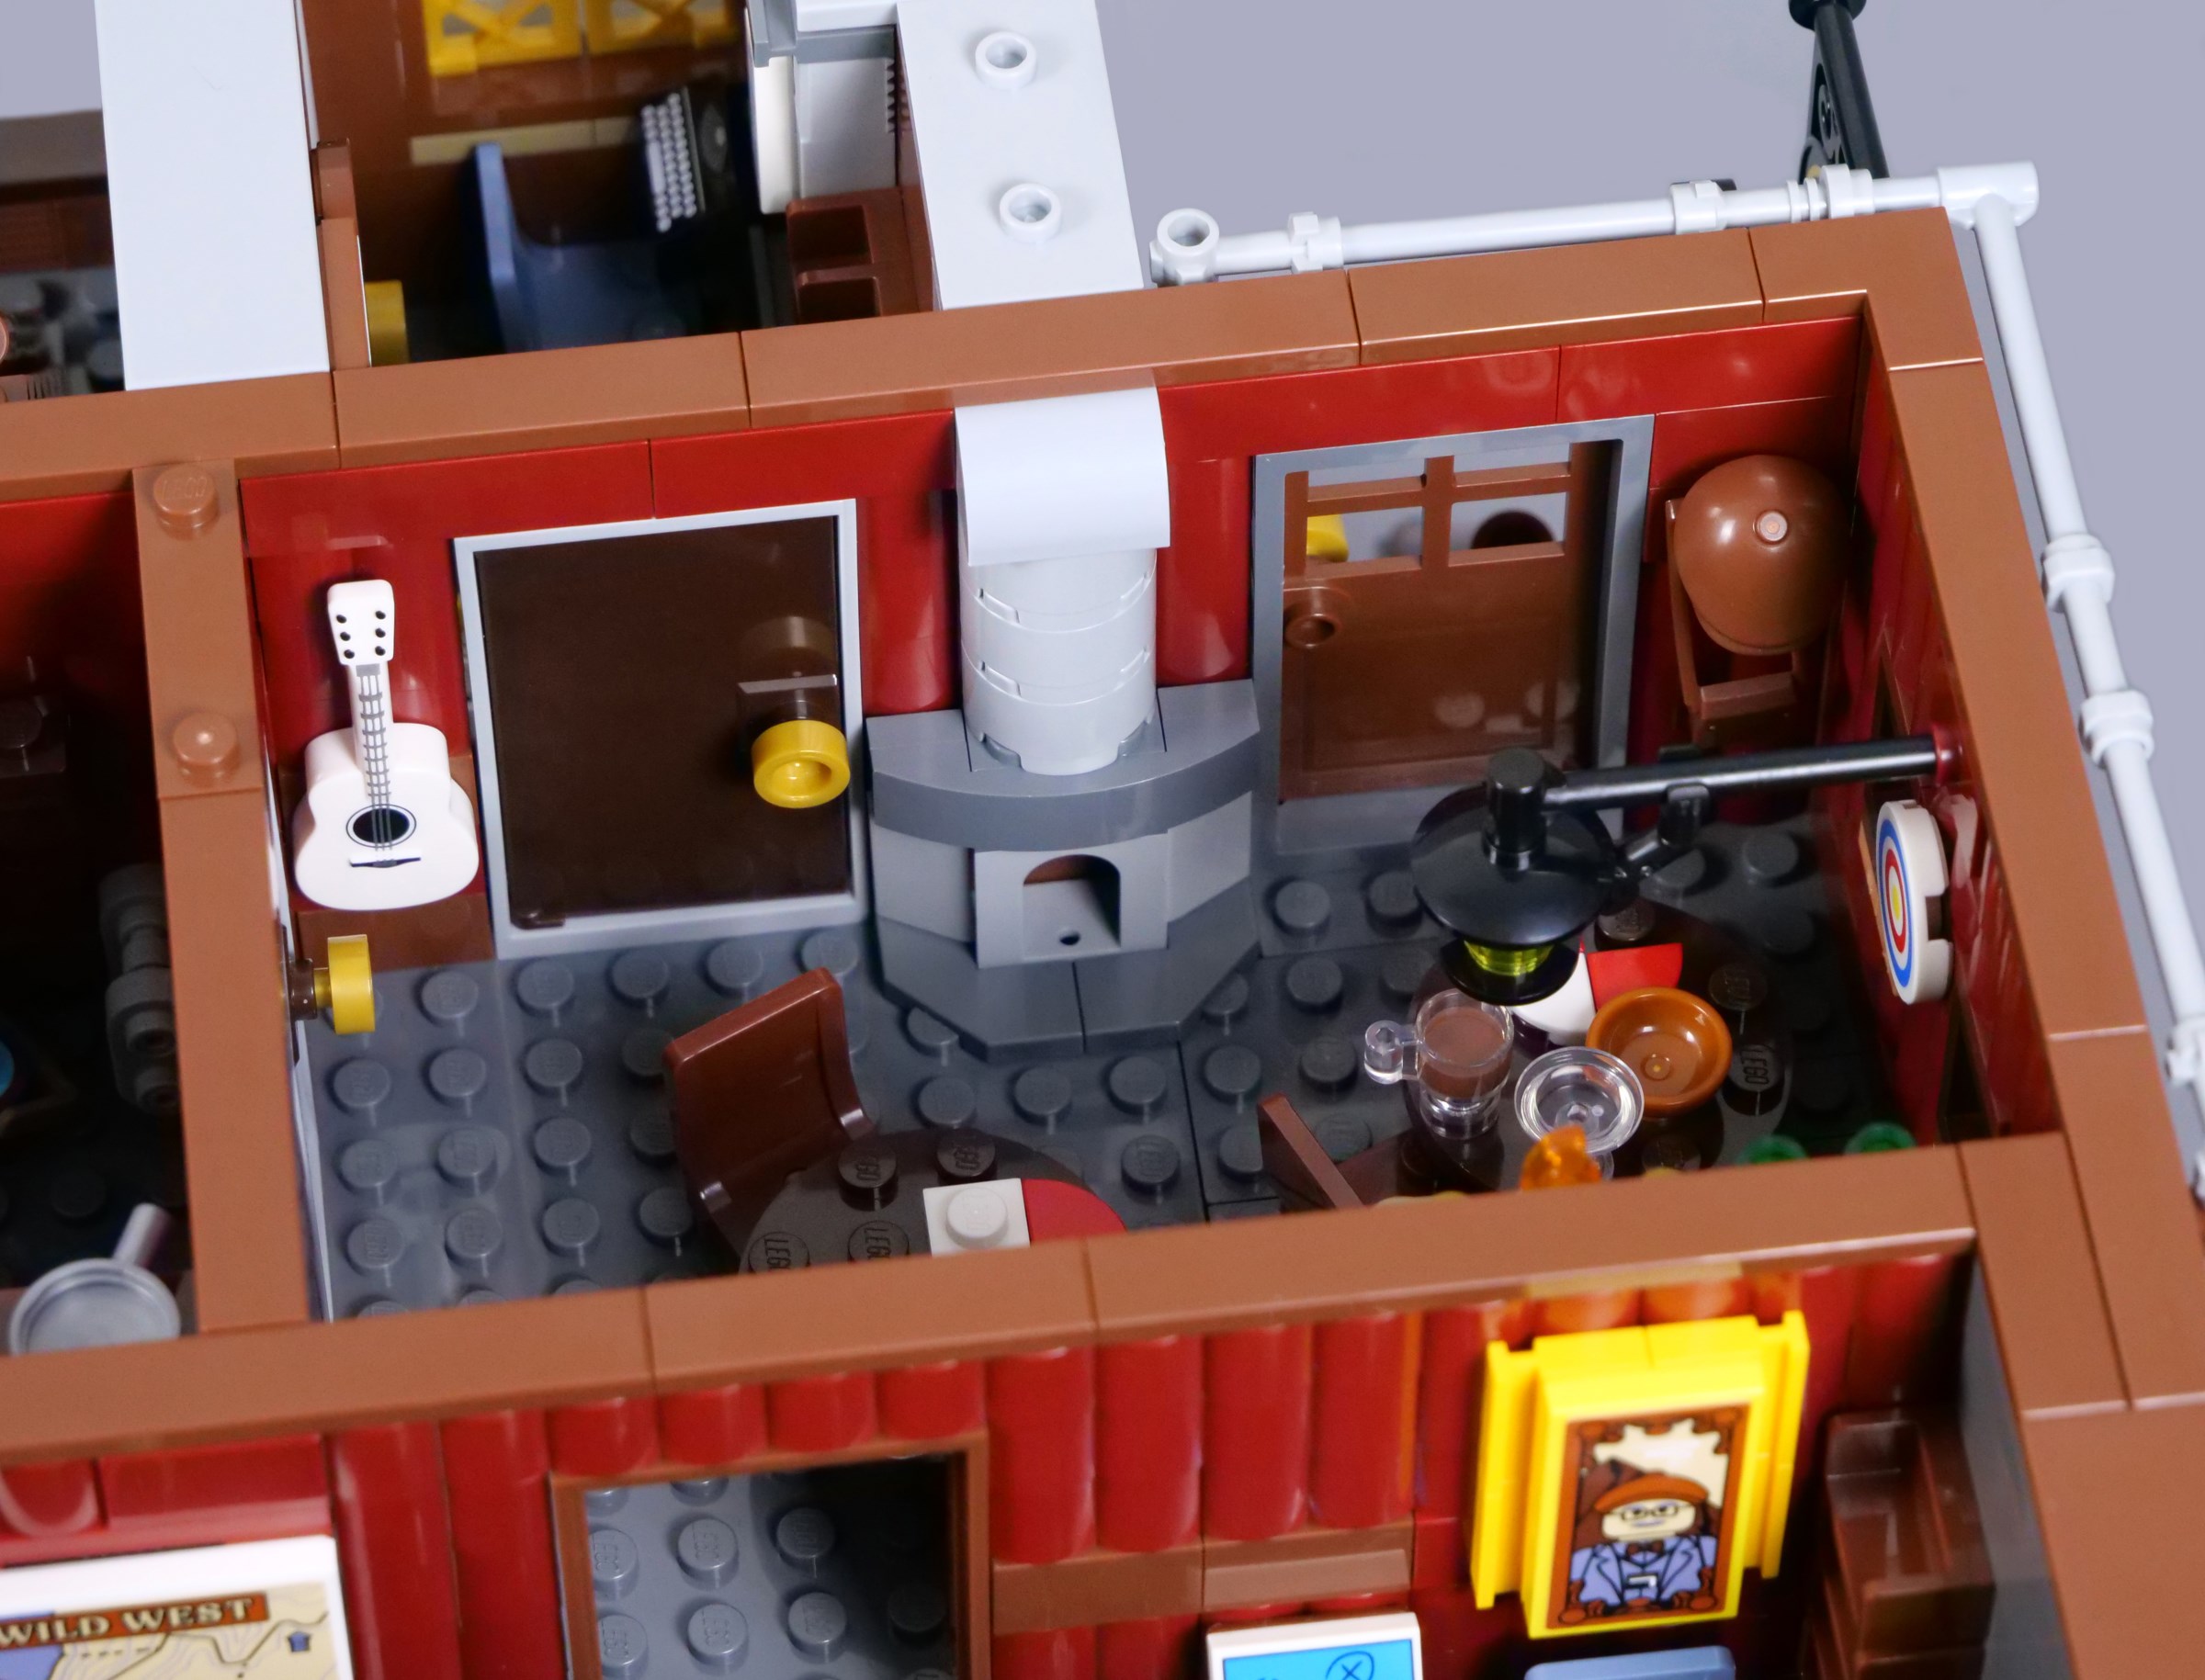
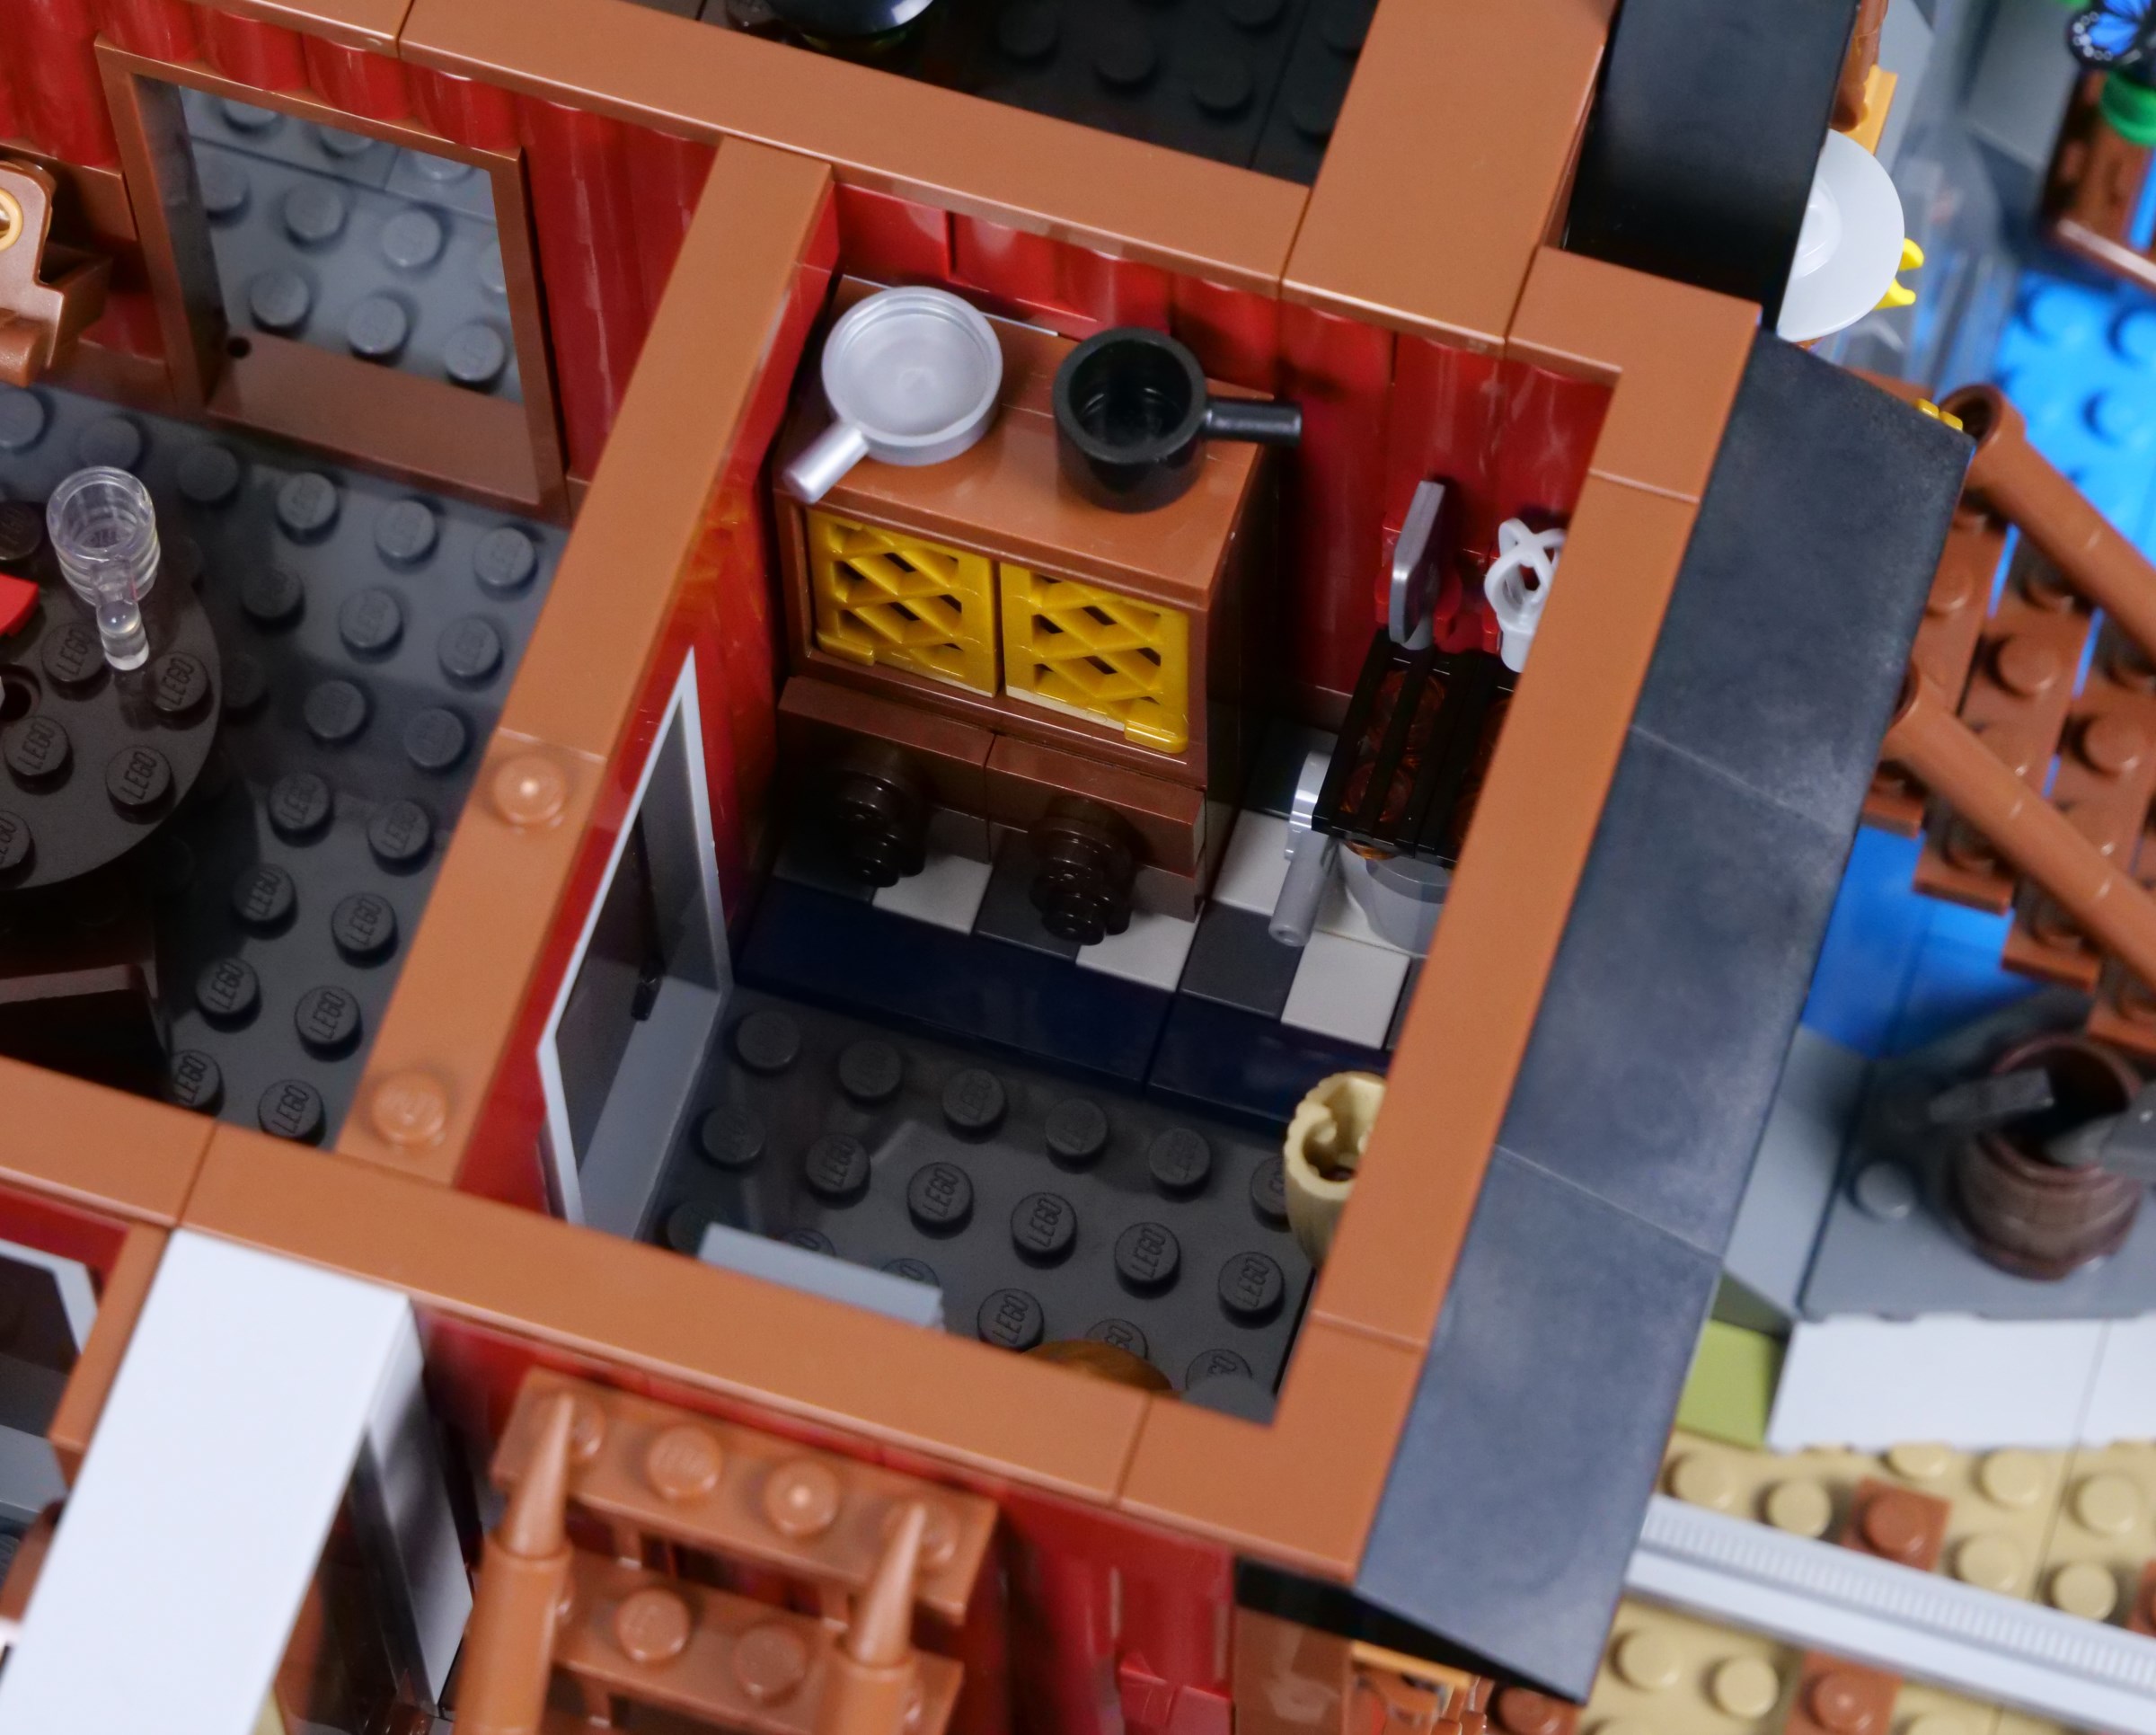
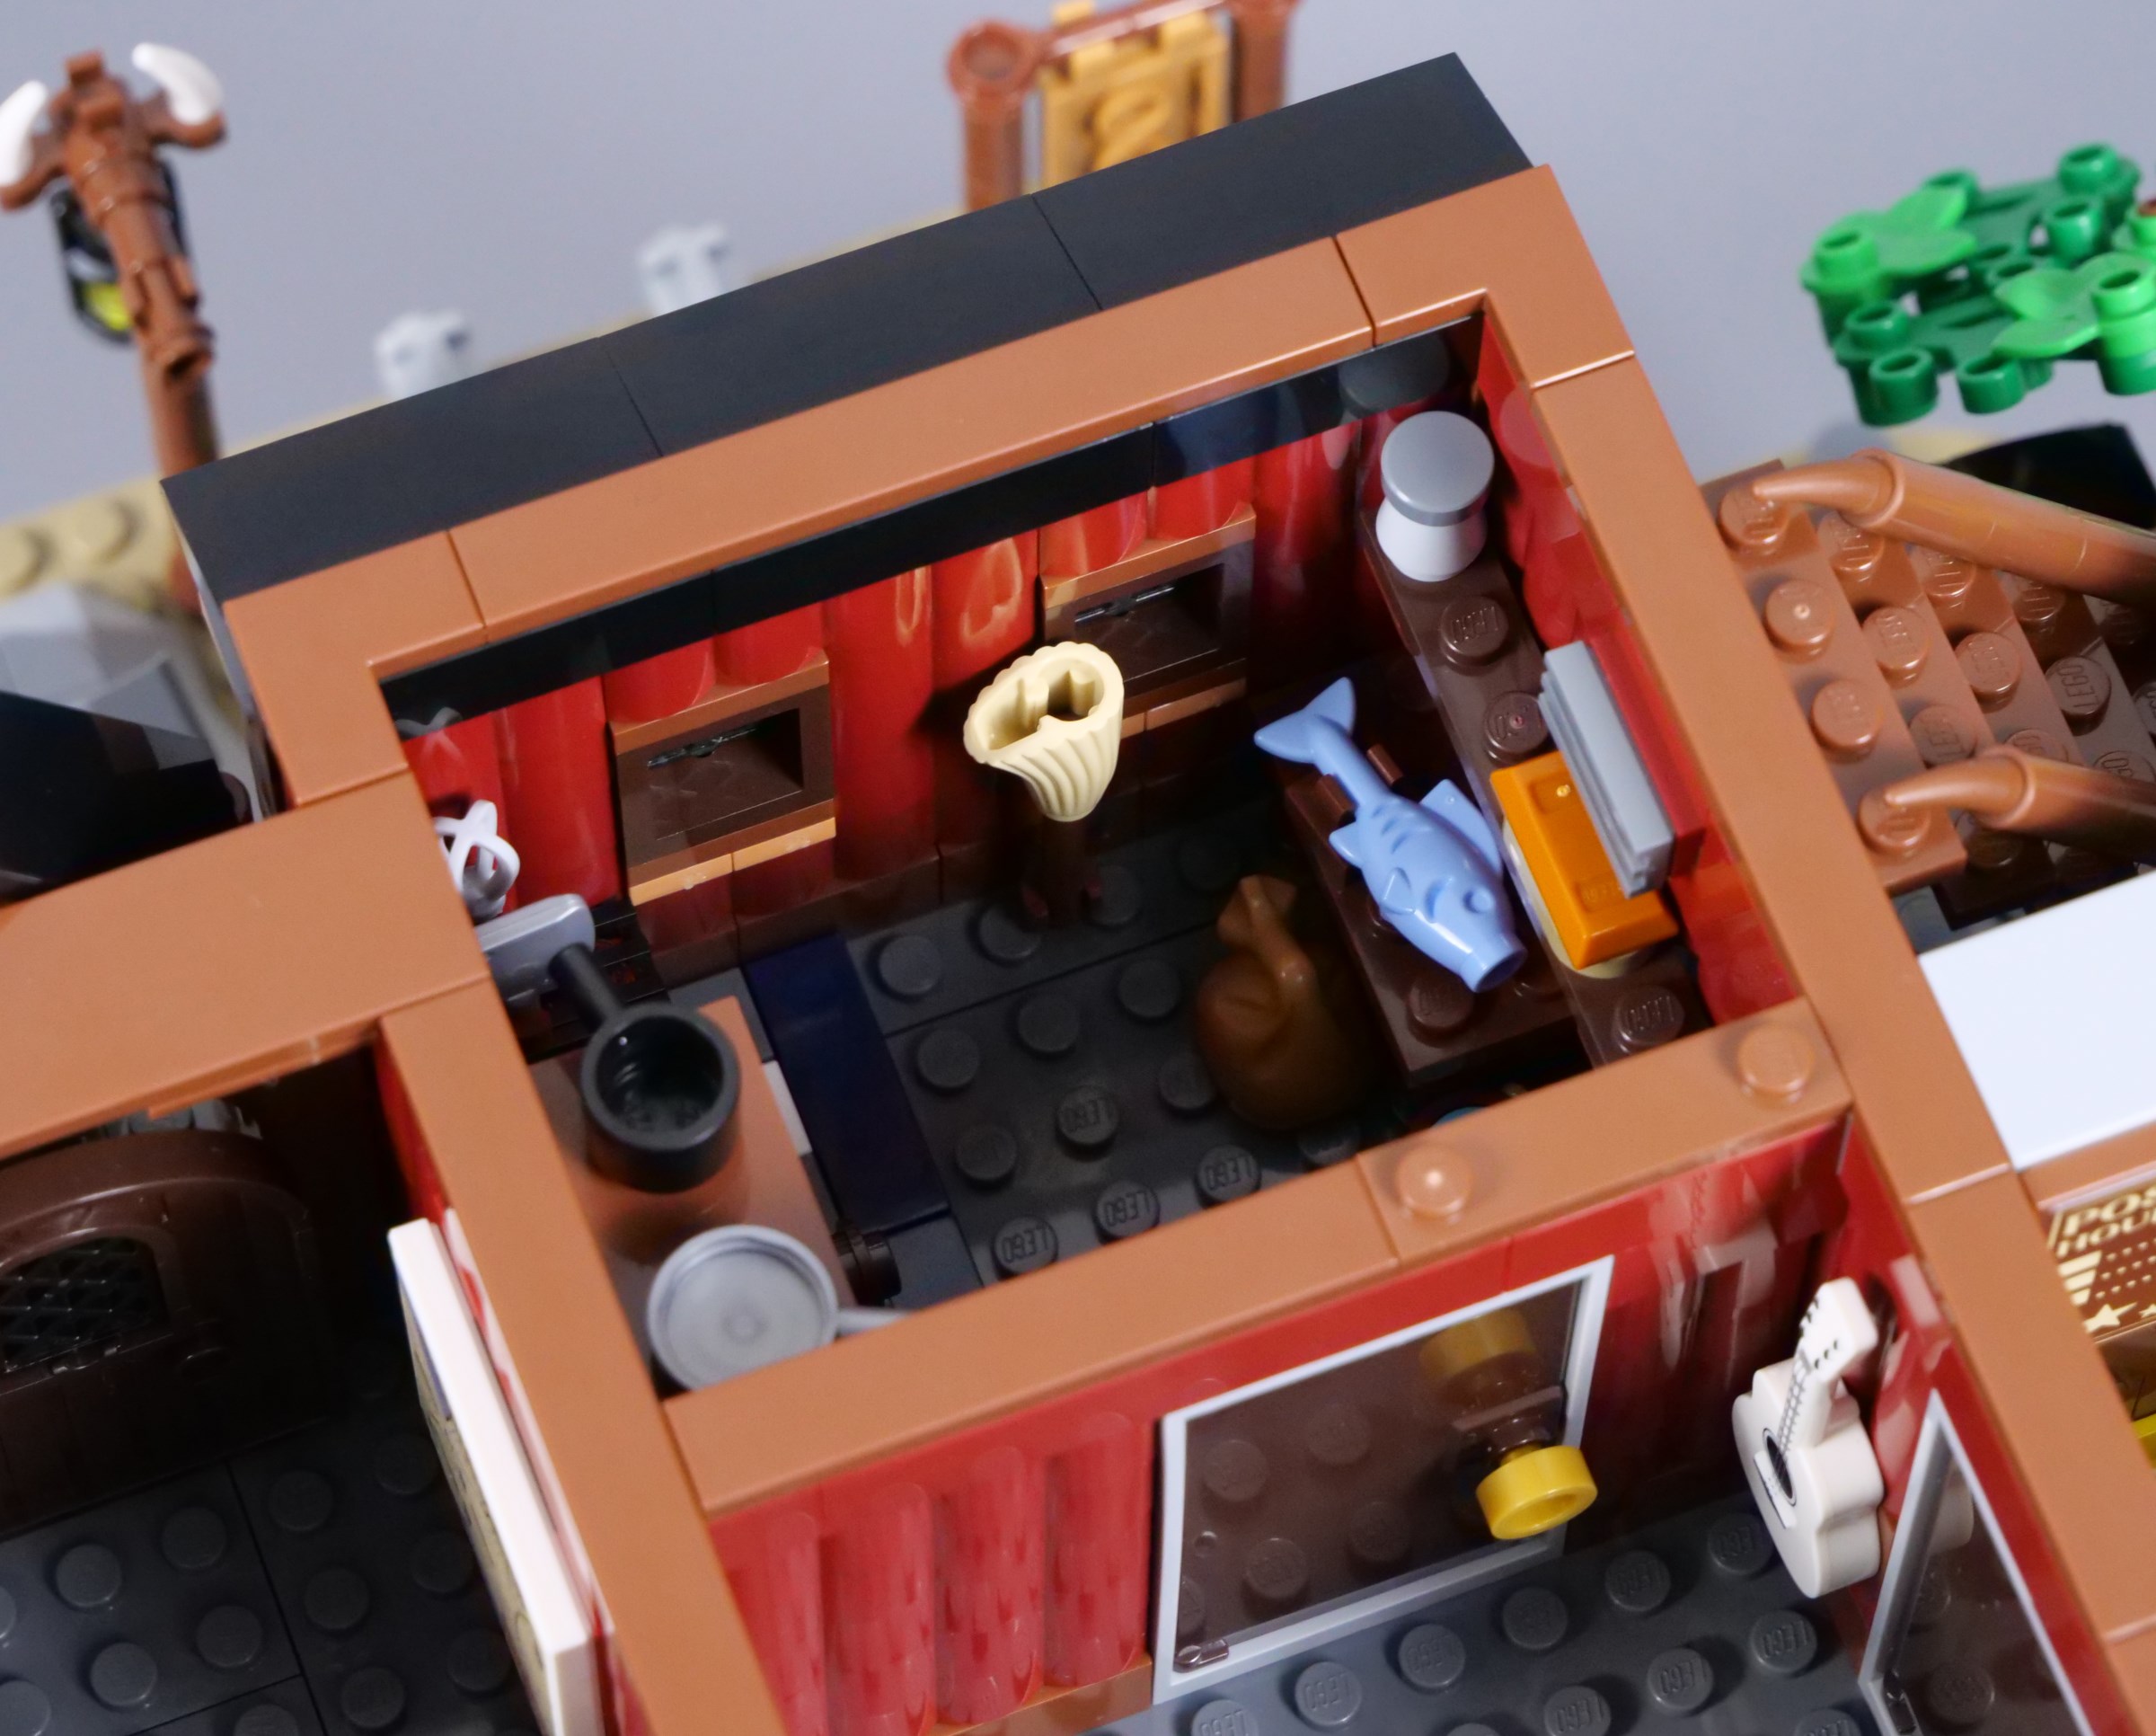
Miners can get refreshments in the canteen, which includes a couple of tables and chairs, with lots of accessories displayed on the wall. These and the dartboard make the room feel suitably chaotic and the adjoining kitchen is very detailed as well, though difficult to reach for play, given its small size. Also, I wish its floor was fully tiled.
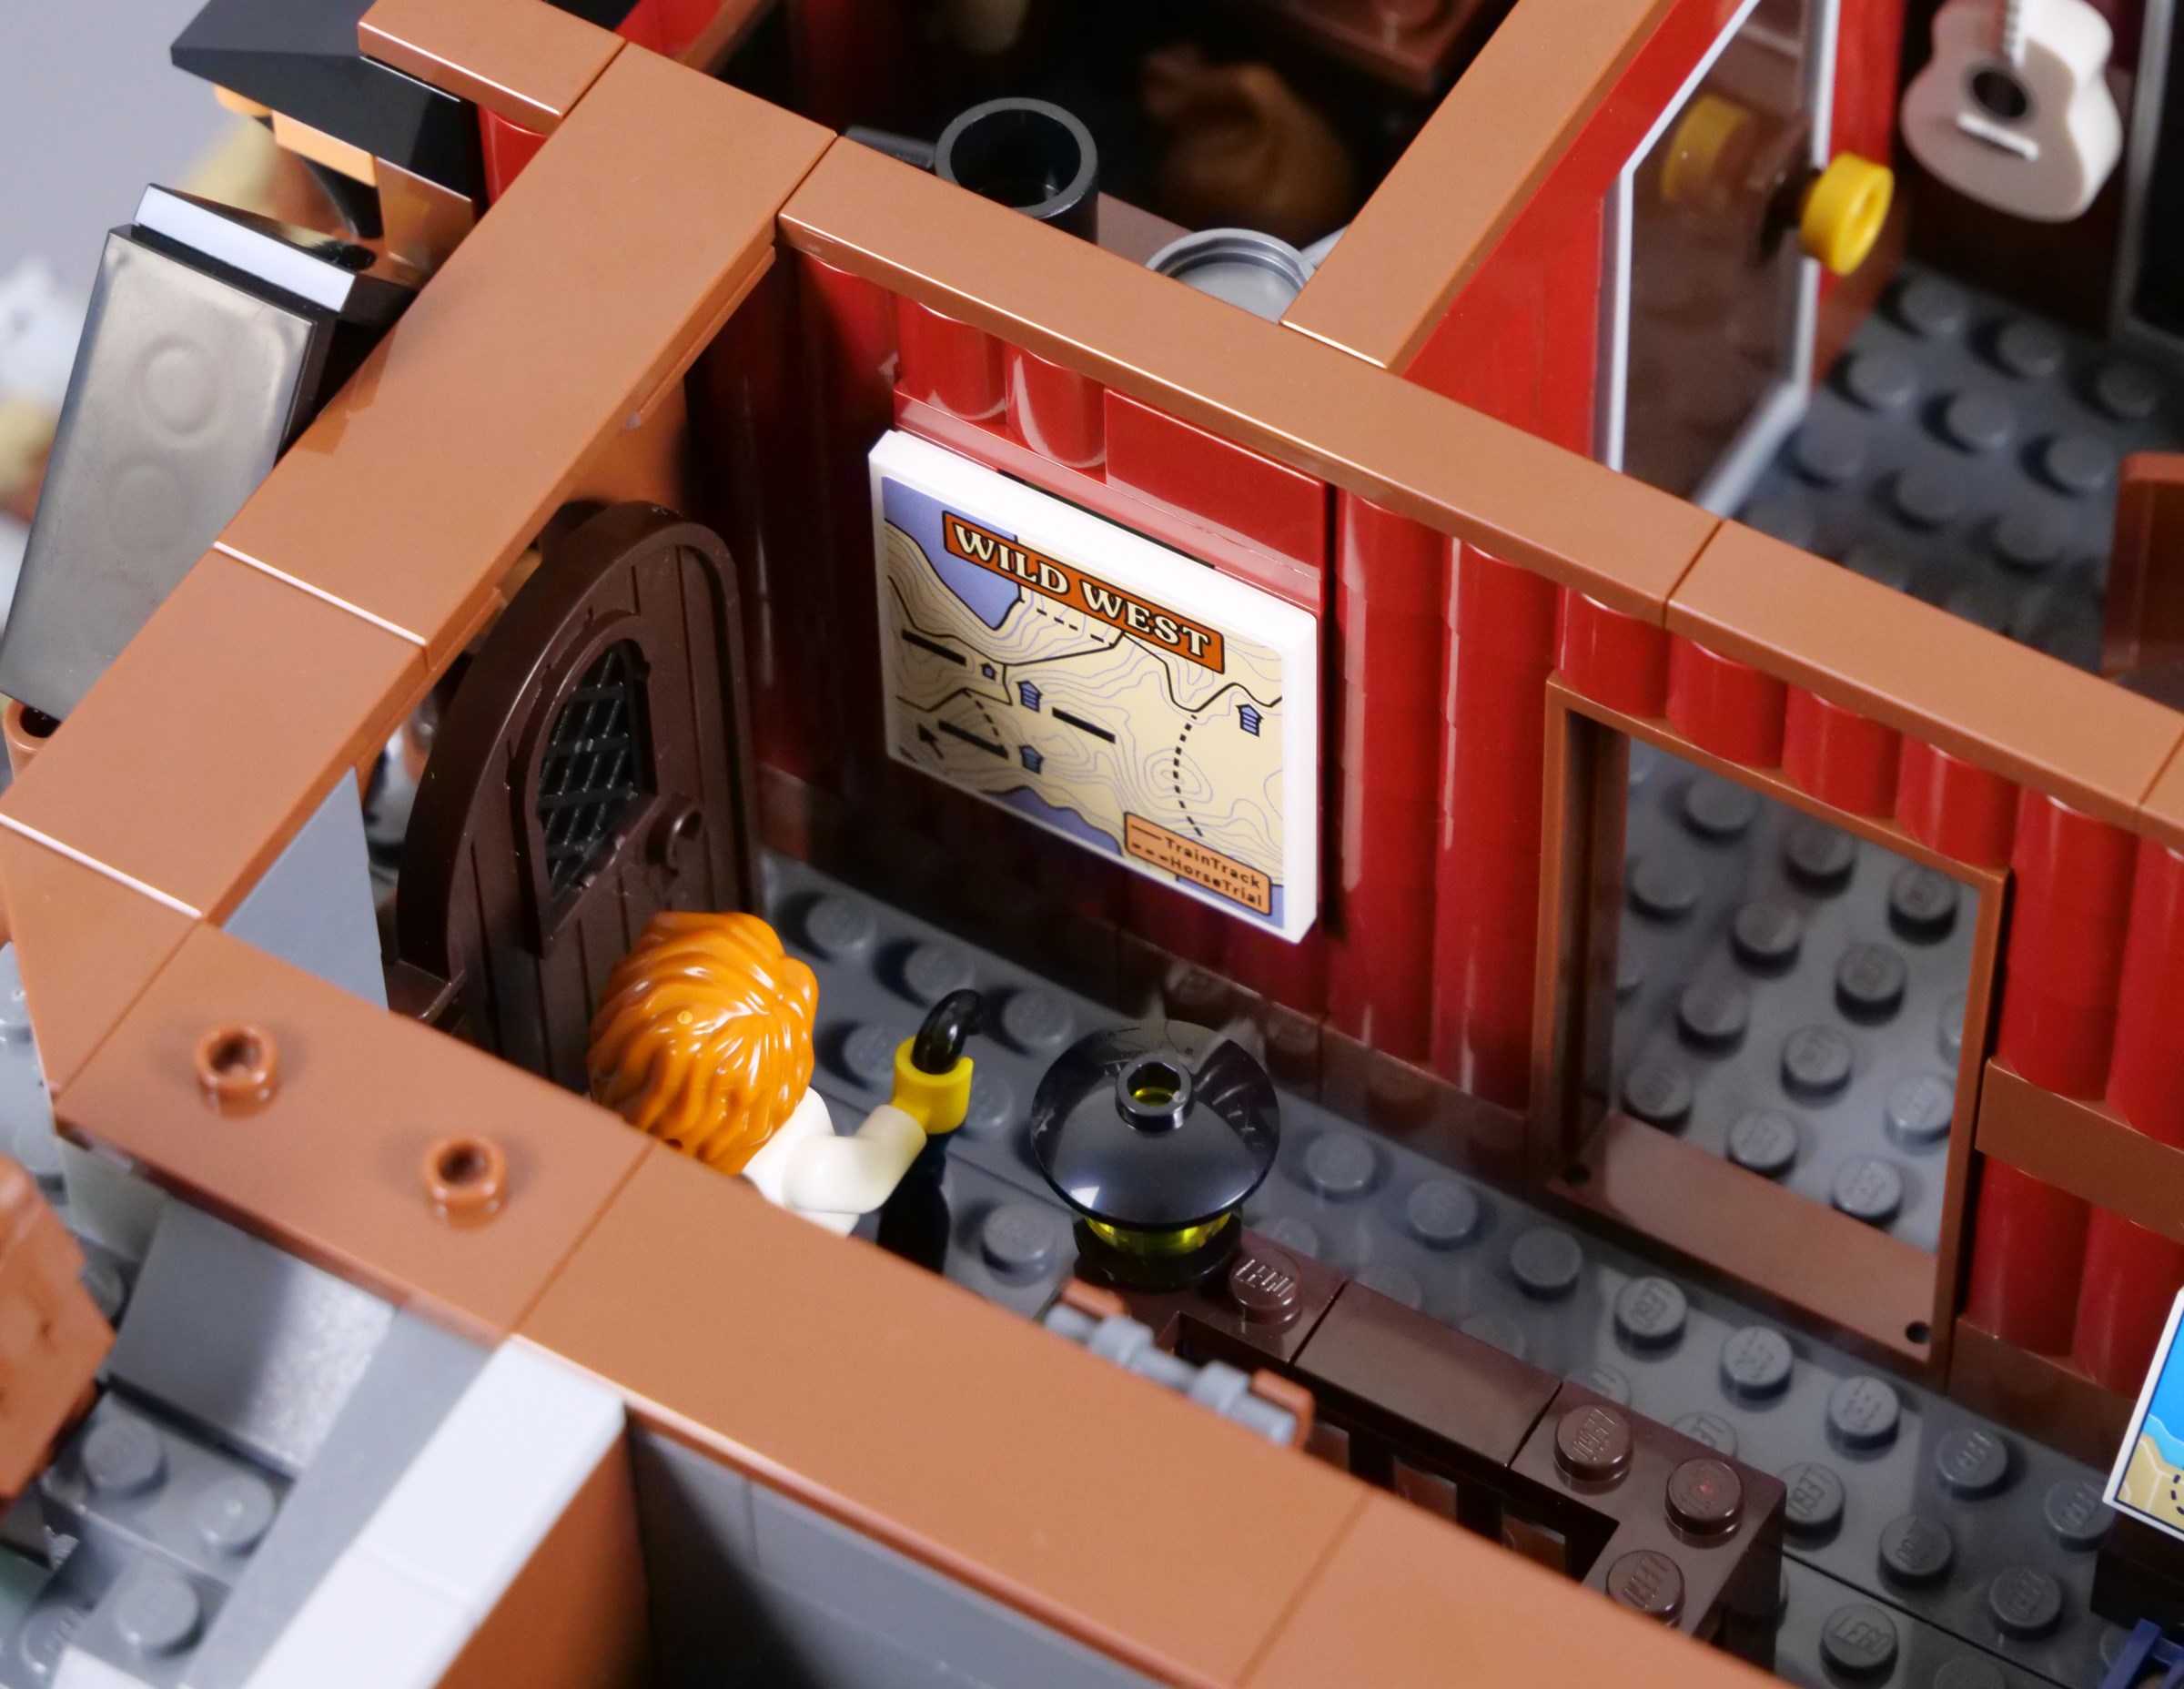
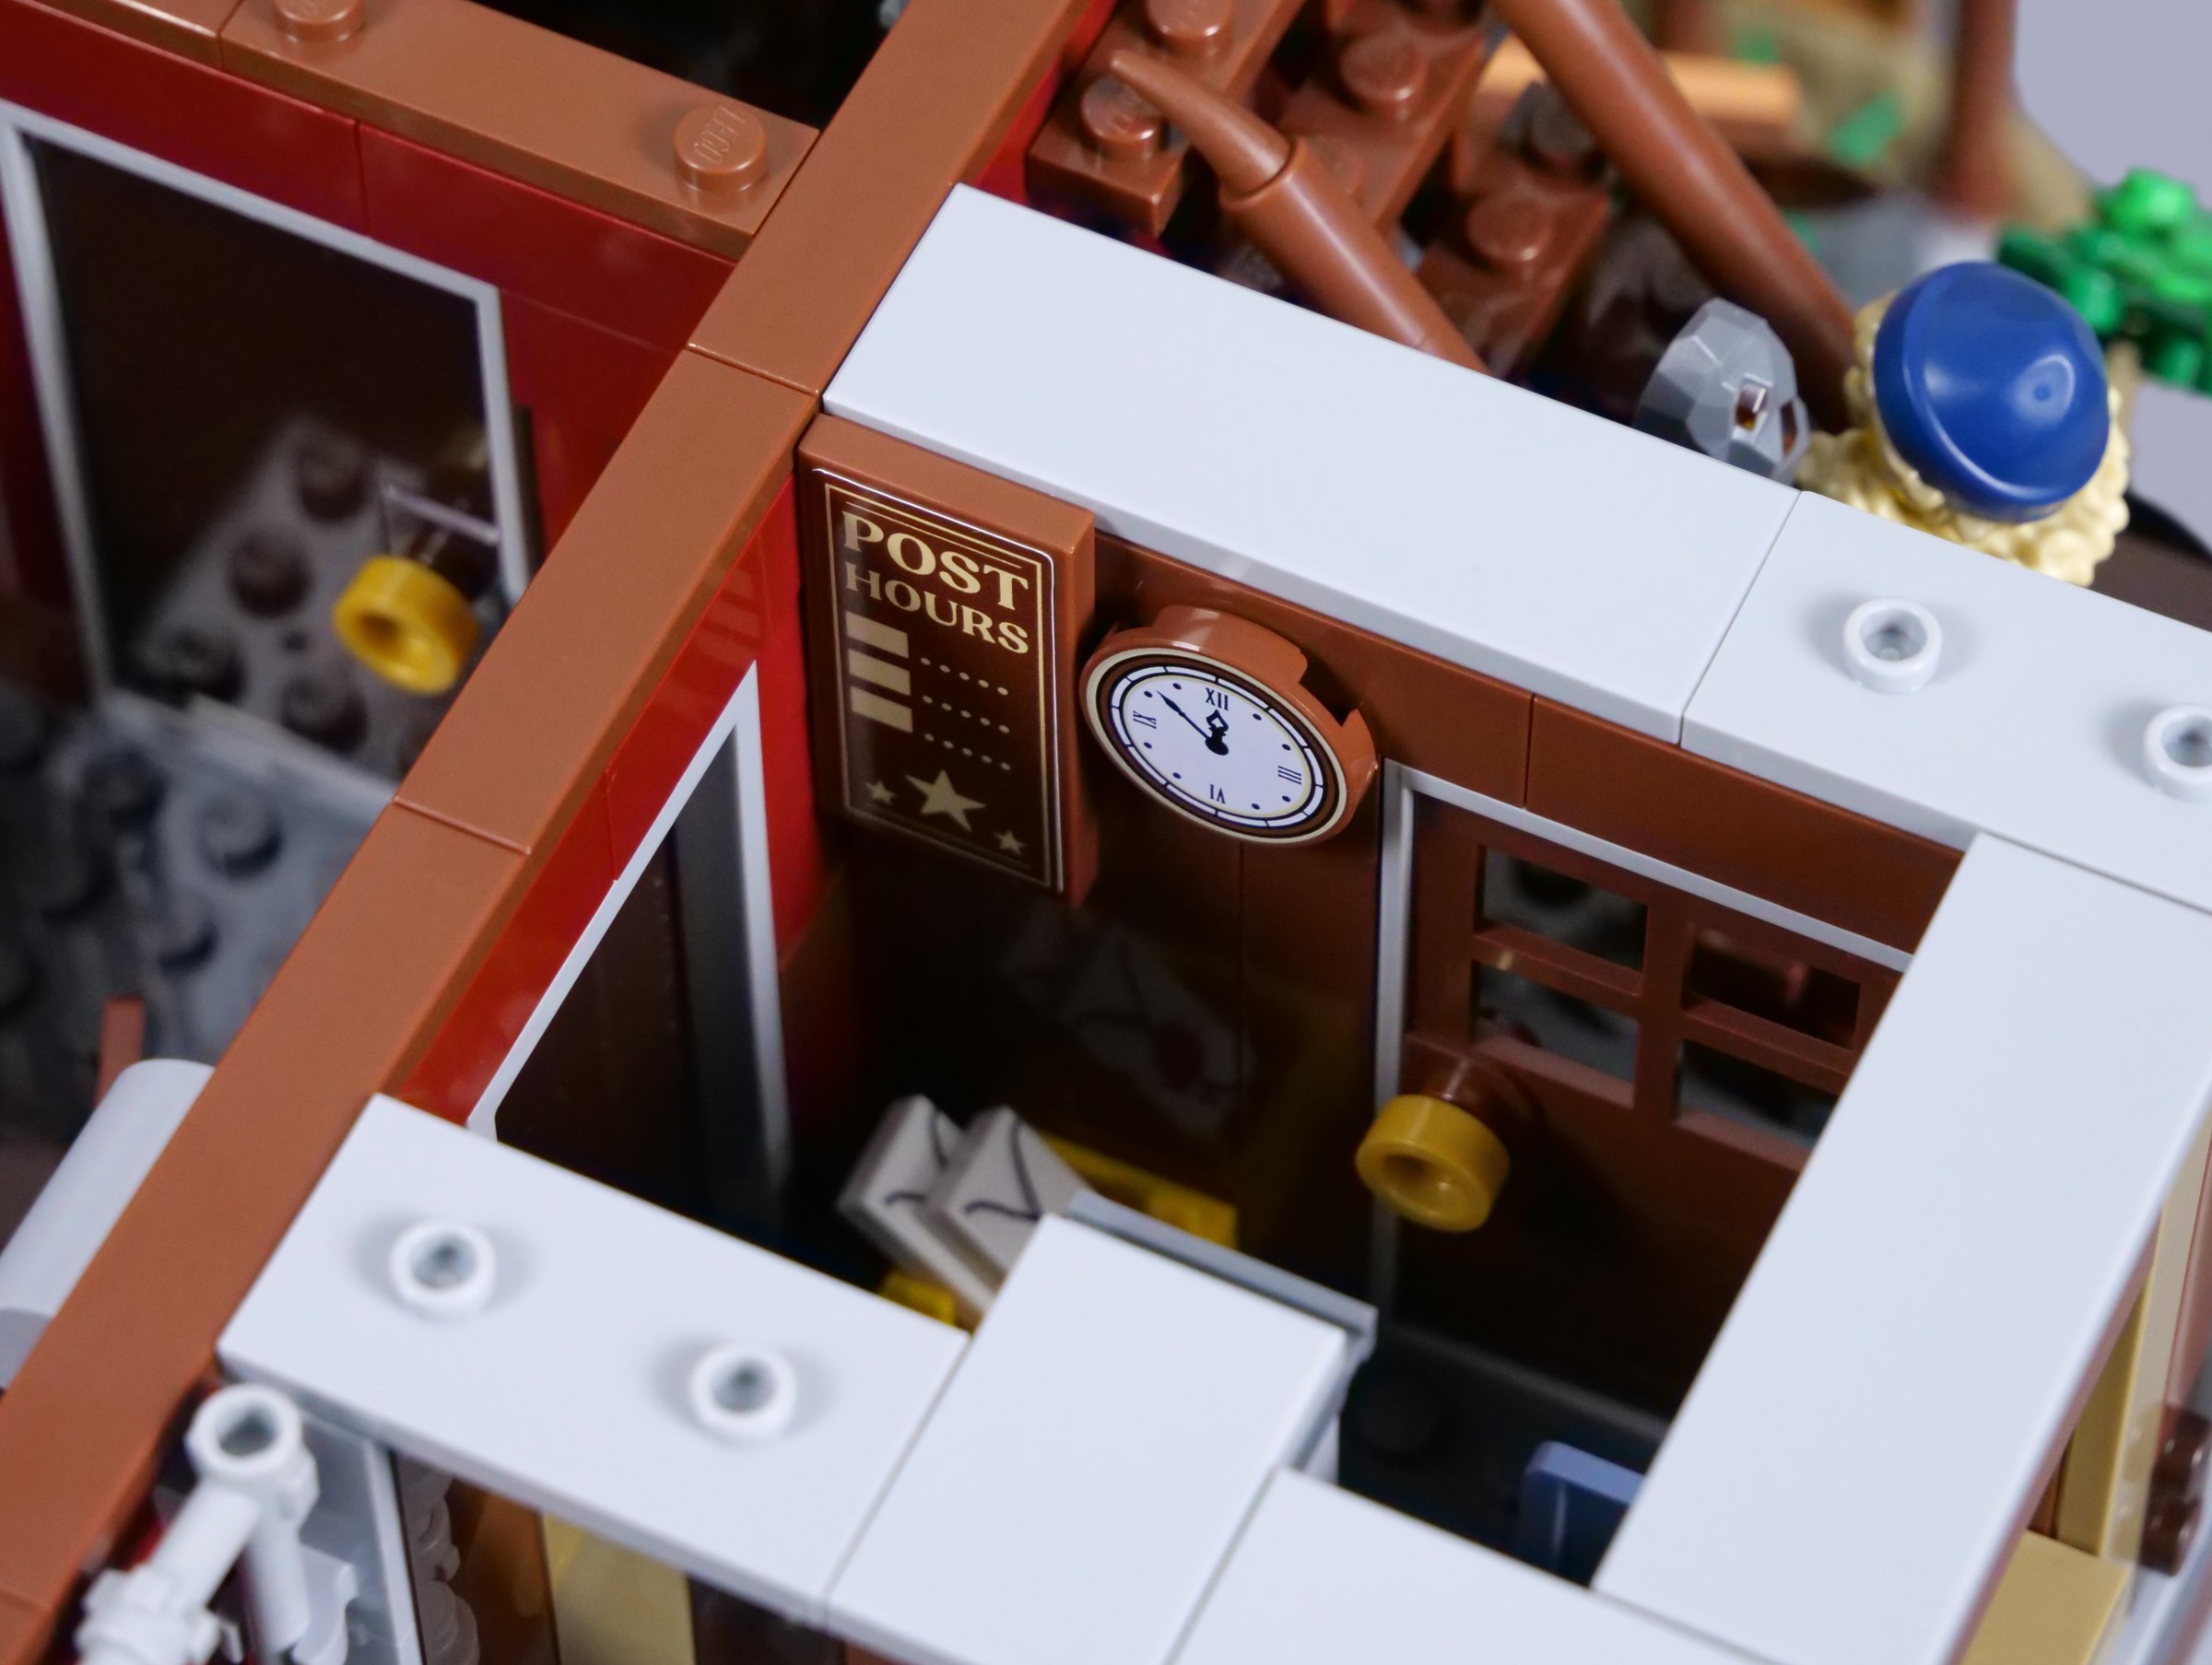
The post room is awkward to access as well, although the compact space makes sense and is brilliantly detailed, once again. The typewriter and fireplace both look great and I like the notice on the opposite wall, showing the post office hours. A telegraph would have been a fun addition too, but I assume the events of this set take place before its invention or installation.
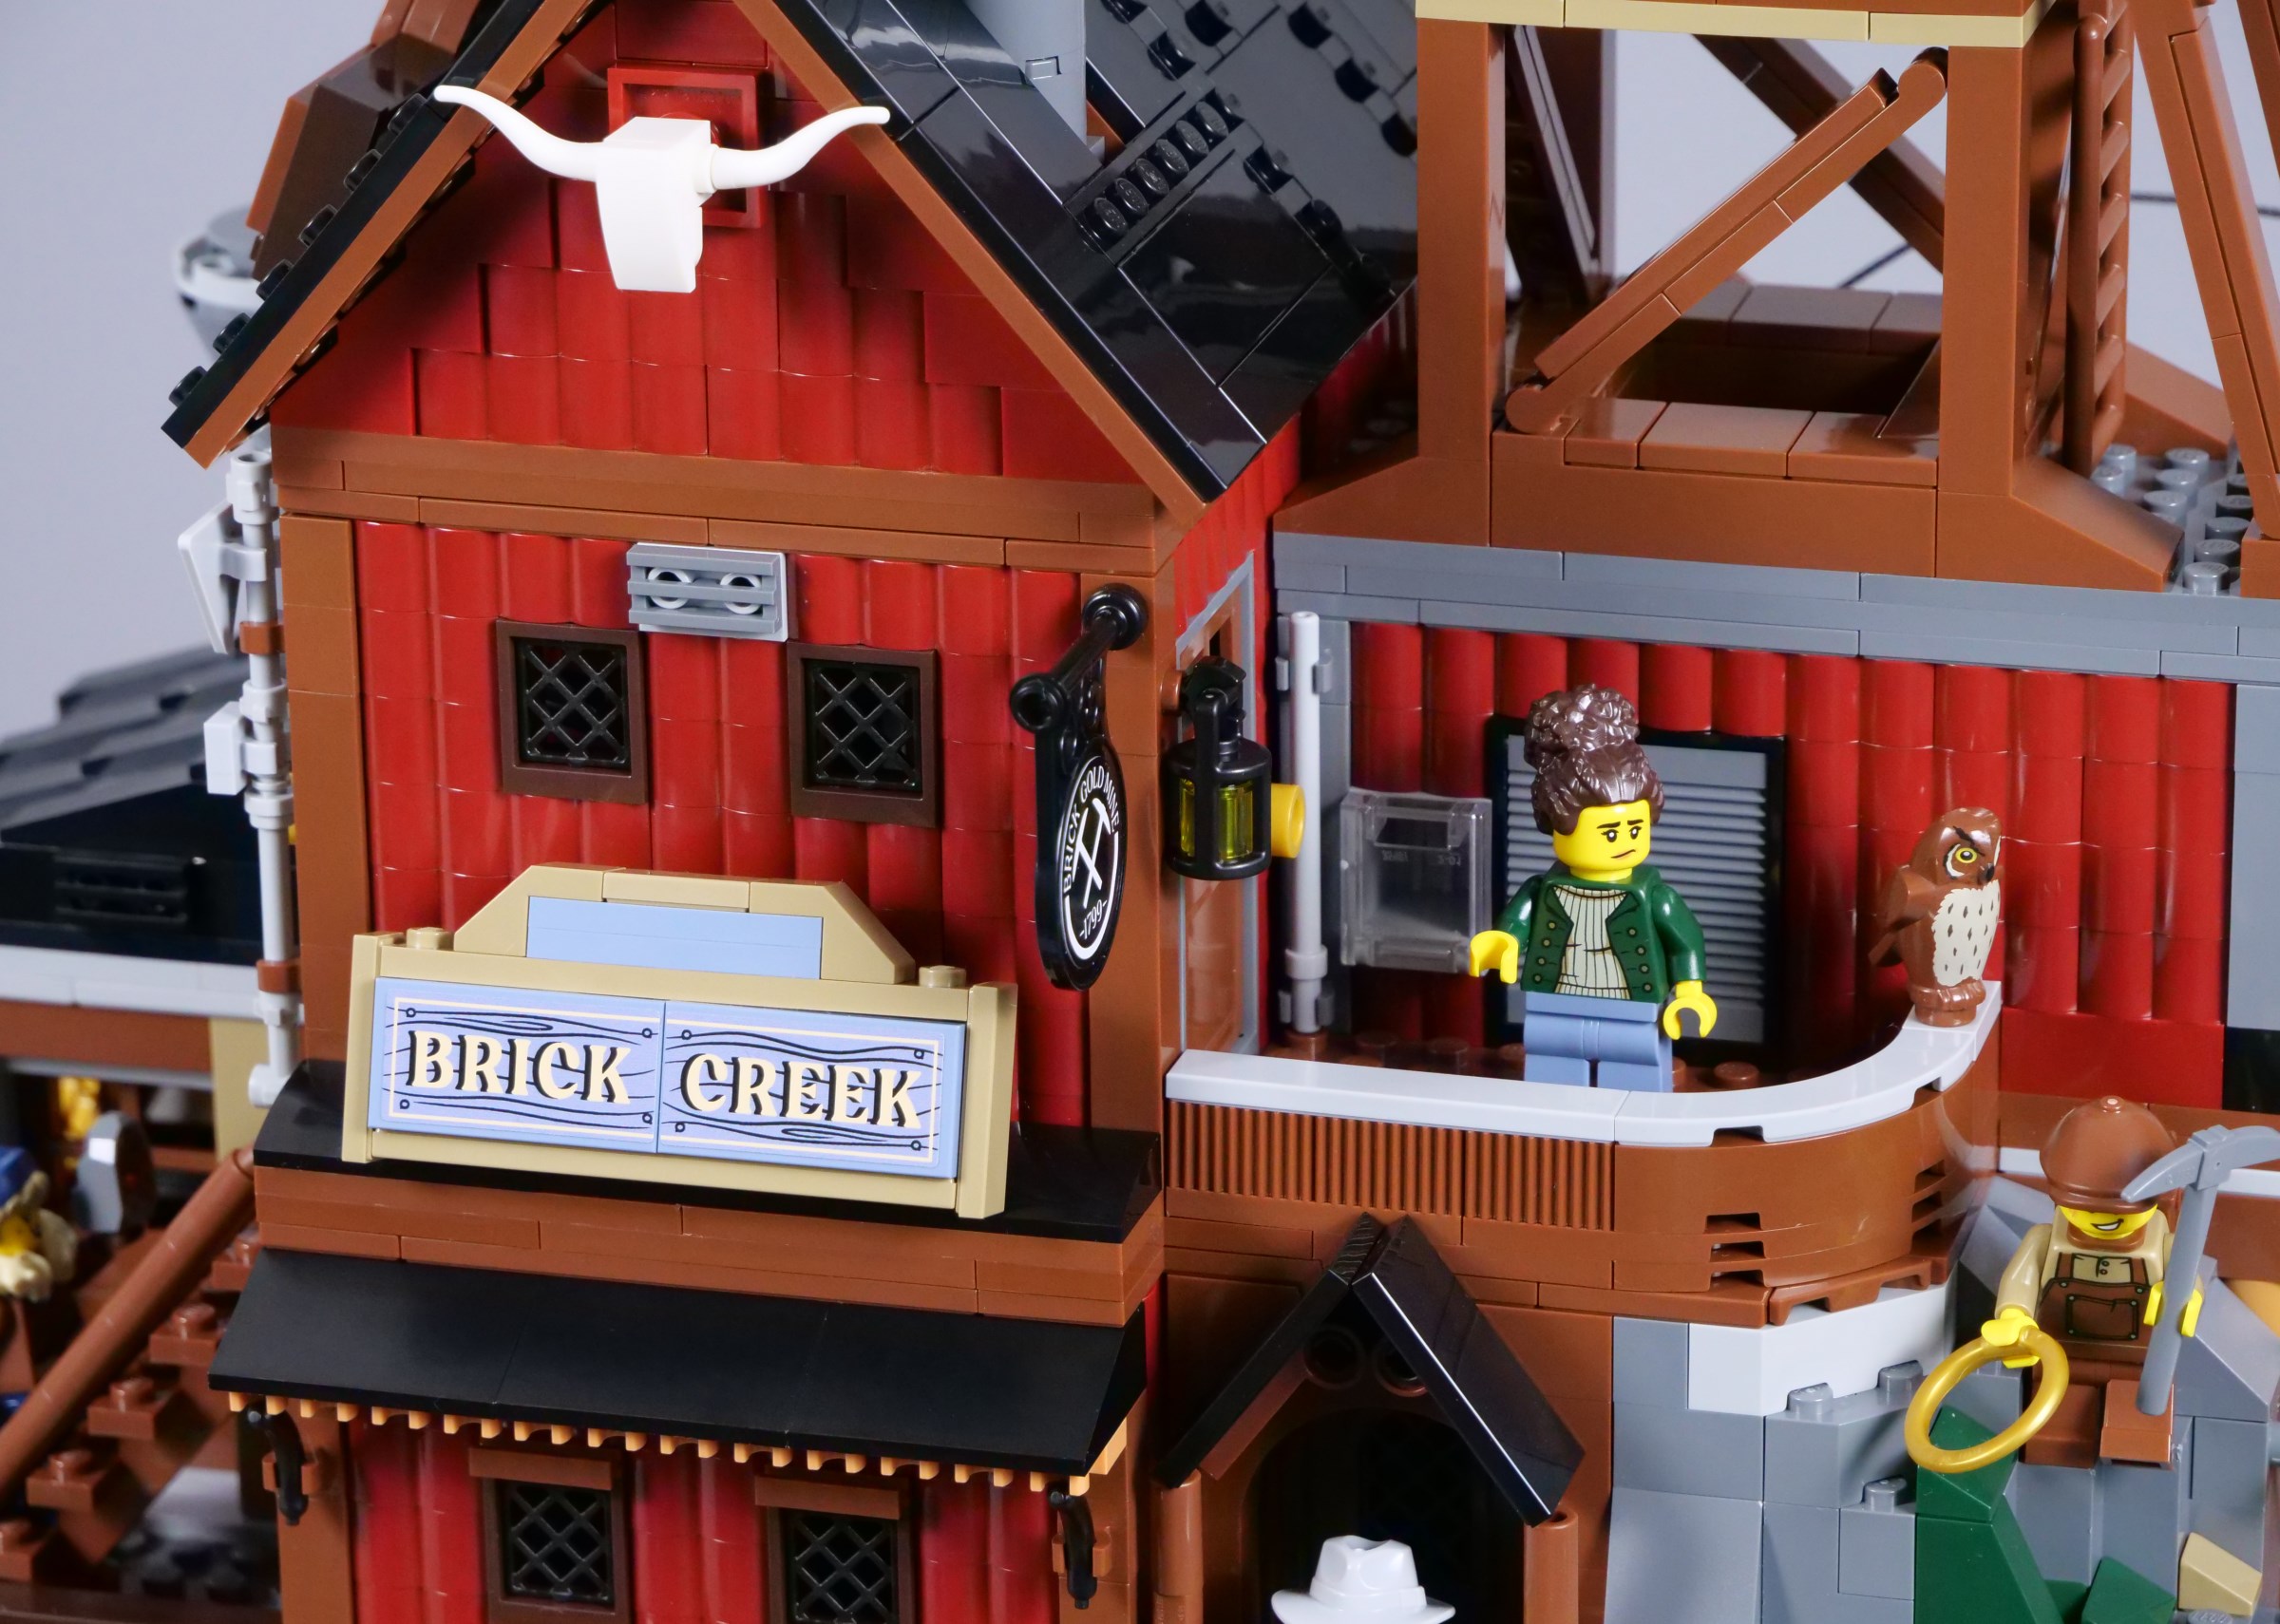
The external door in the post room leads to another staircase, heading for the next floor. I like when chimneys are accurately positioned for fireplaces, as in this case, plus the various pipes on the walls. Furthermore, the Brick Creek sign looks splendid. The sand blue elements clearly stand out, but their colour still seems realistic.
Space comes at a premium in the foyer on this level, particularly with multiple doors occupying much of its wall space. Even so, the room is still properly furnished with a chest of drawers and a hat stand.
The adjoining dormitory is quite detailed, including a writing desk, a gramophone and colourful bunk beds. The patterns on these beds look superb, though they are not actually large enough for minifigures to lie down and the gramophone is a bit underwhelming relative to those in other sets, probably because of the limited parts available for BrickLink Designer Program sets.
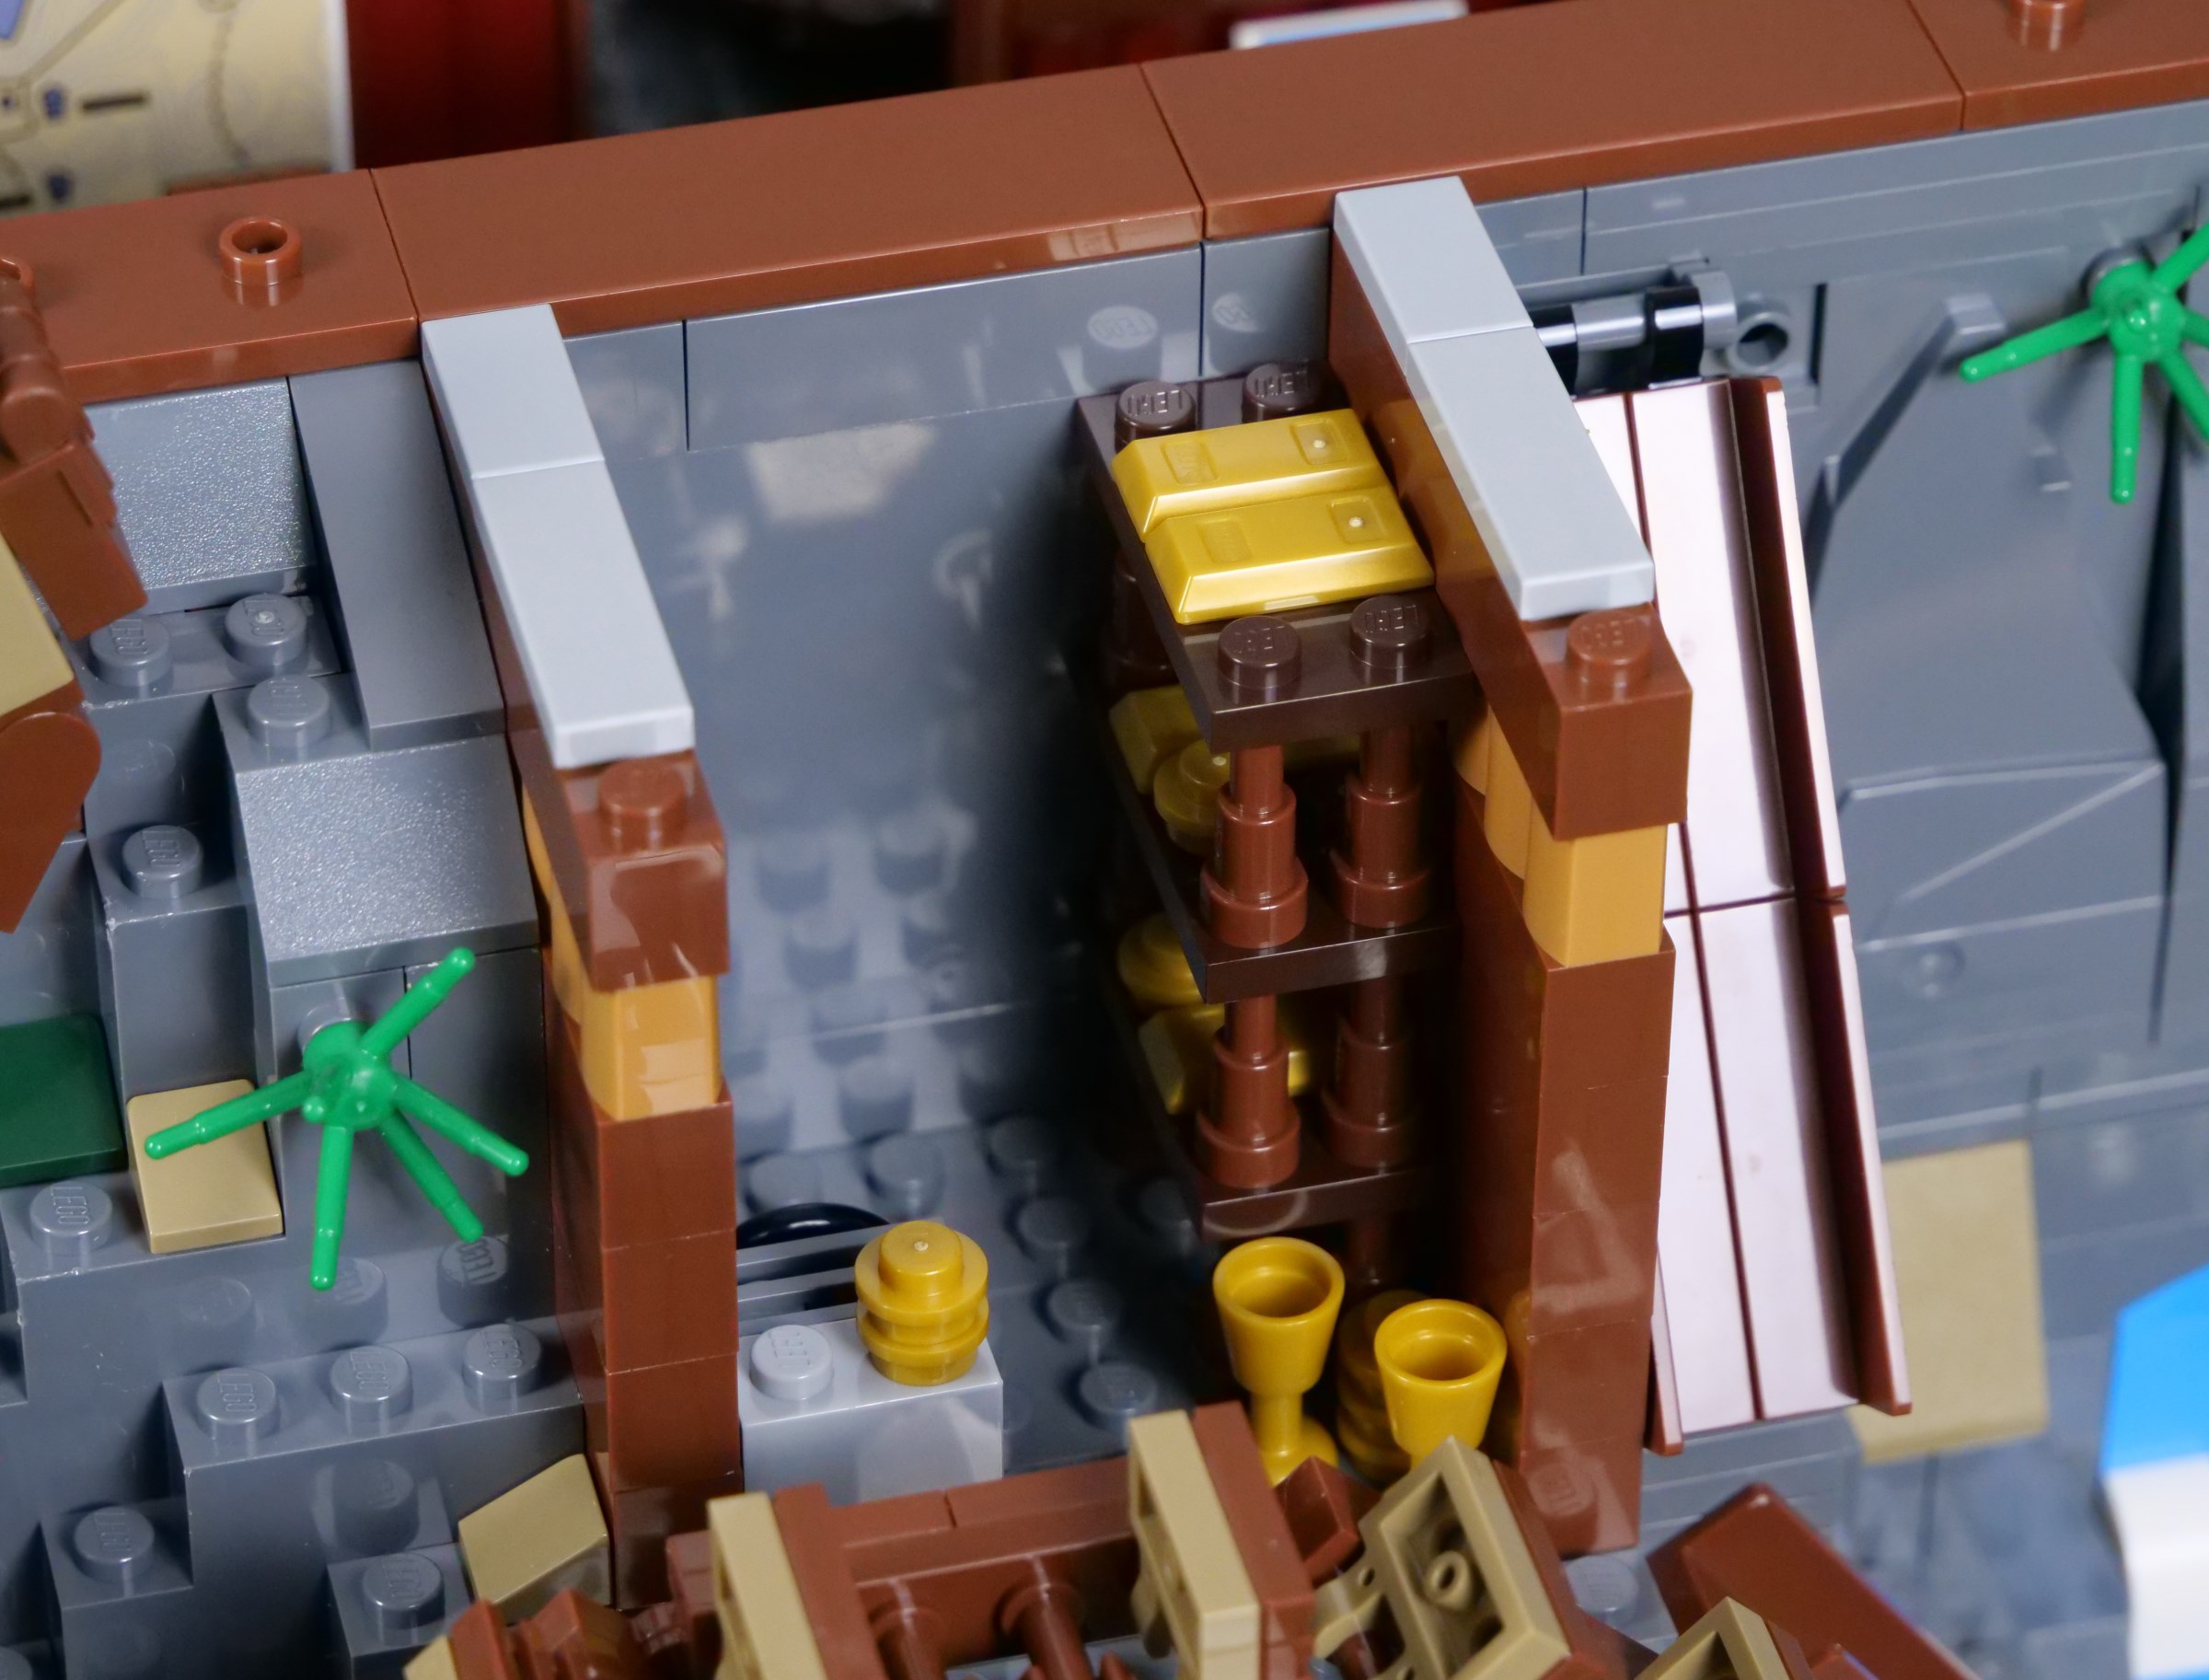
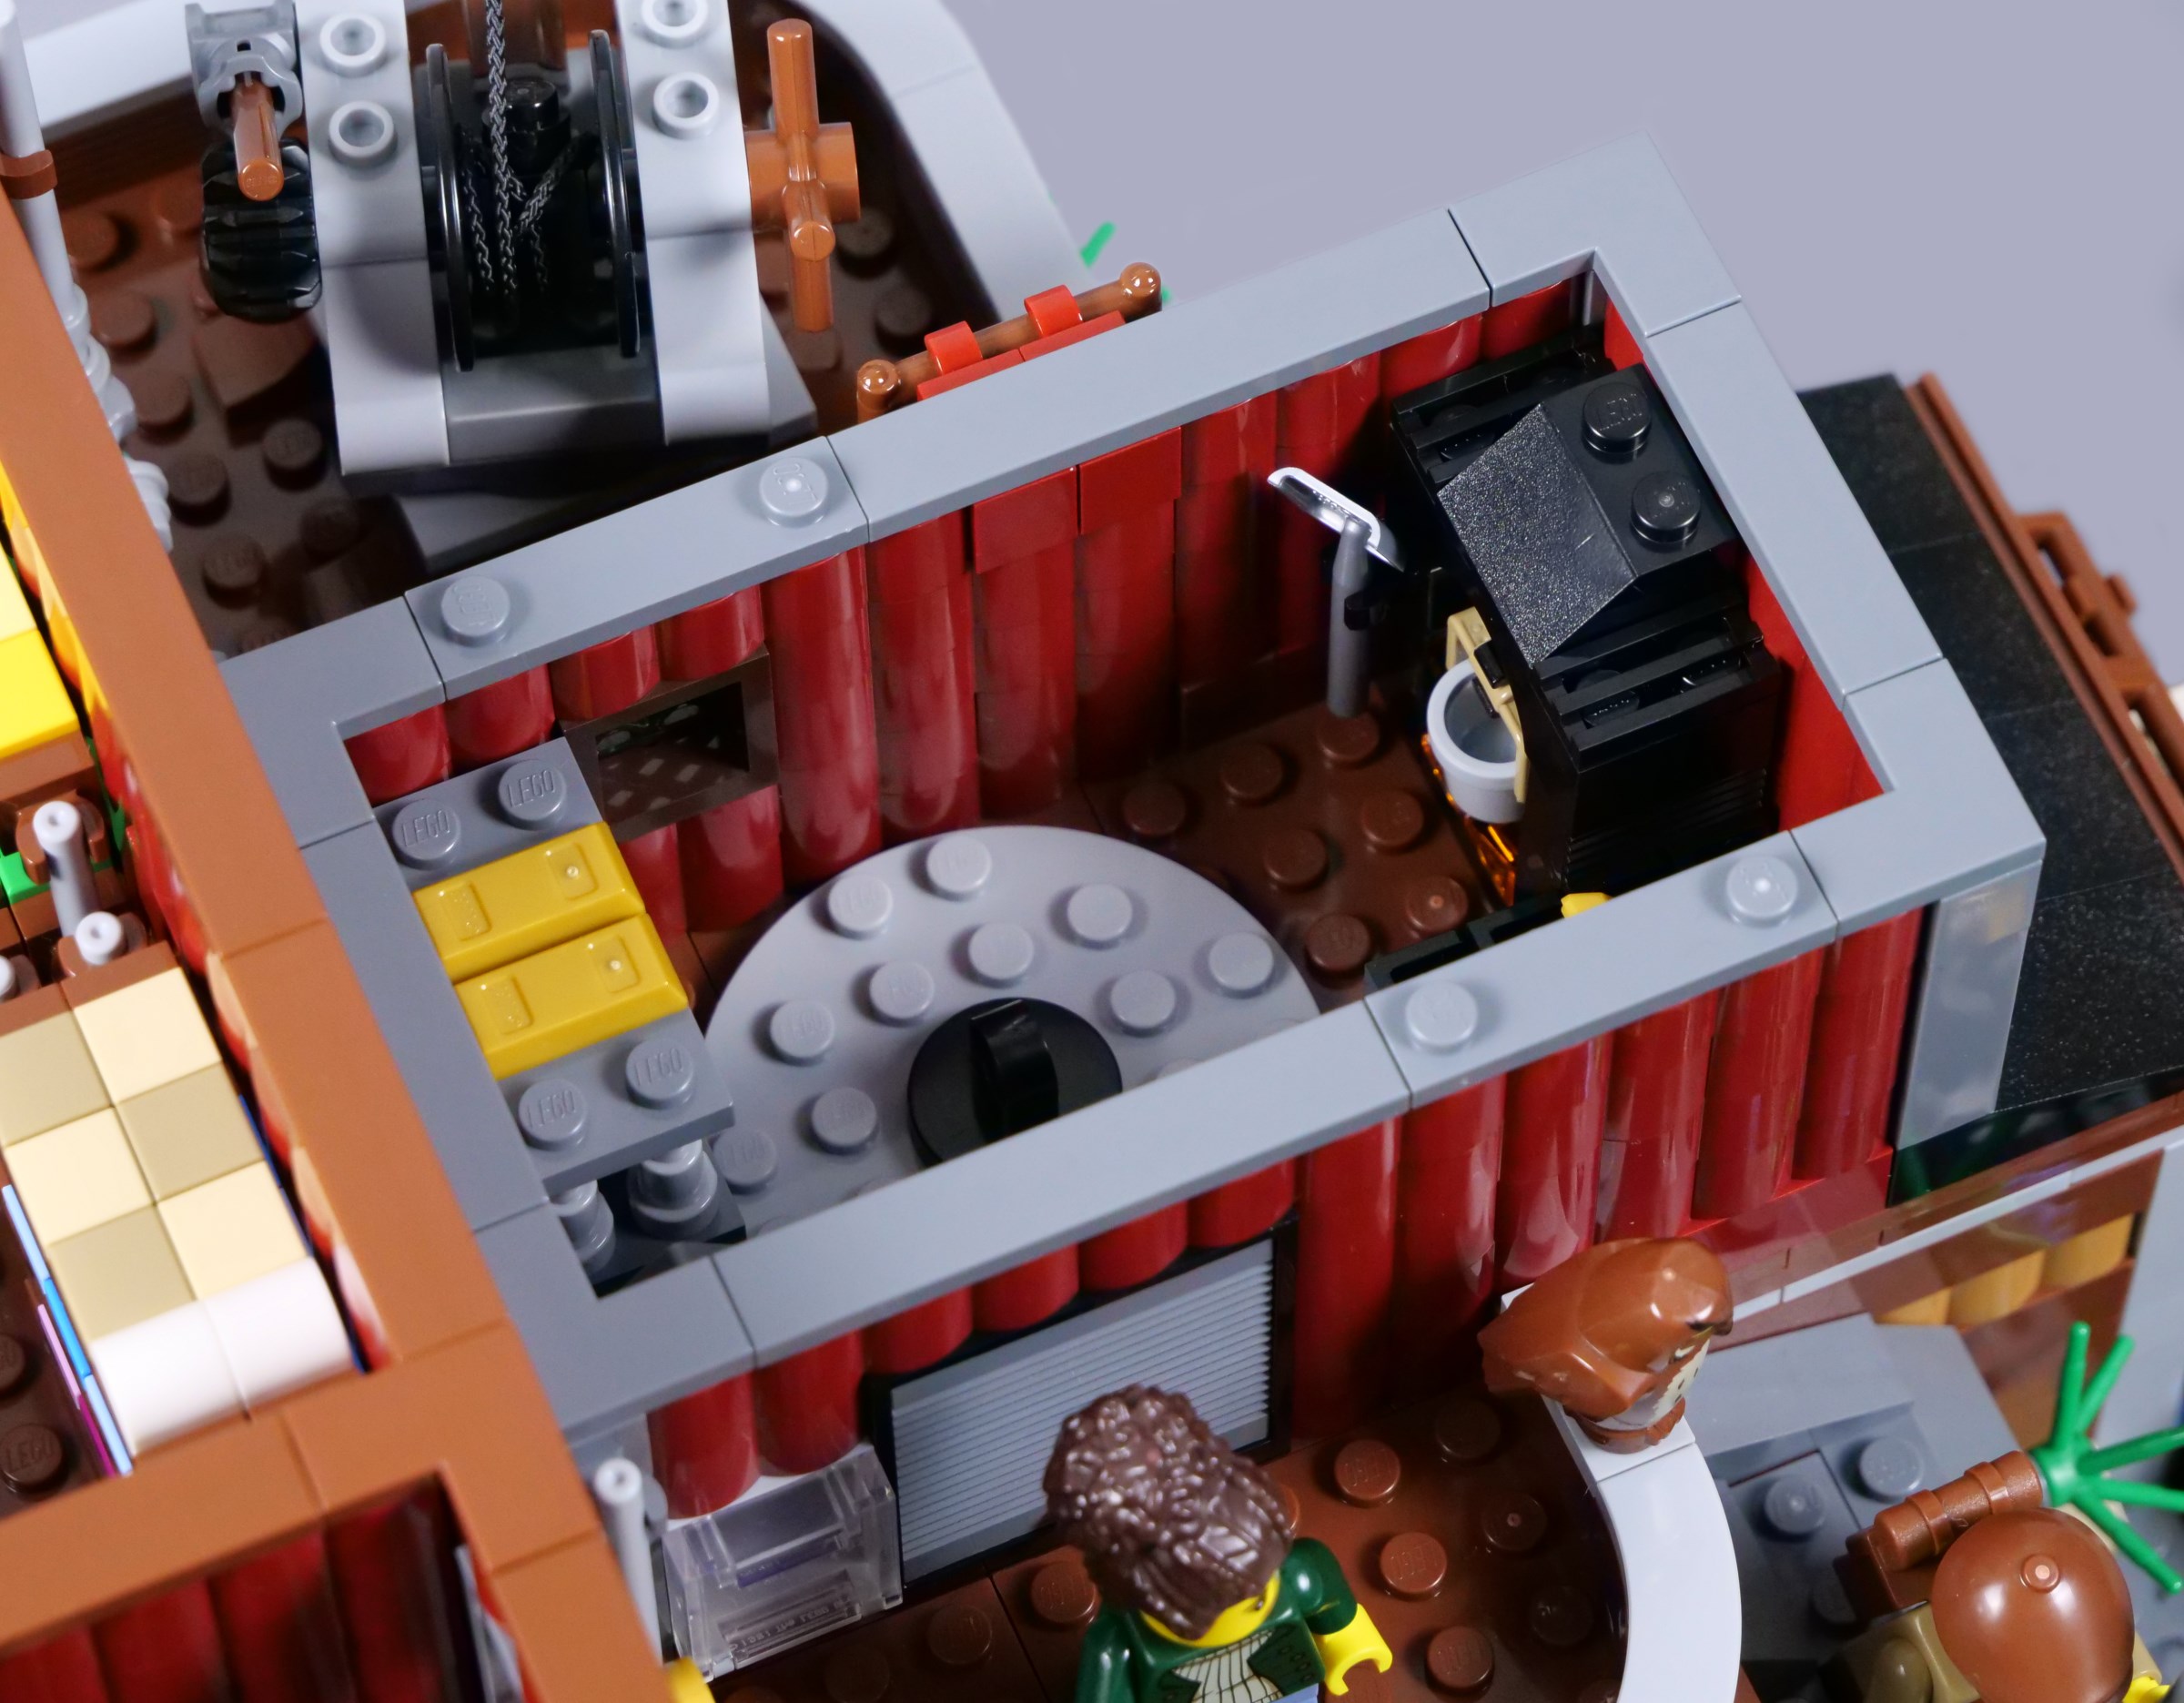
Gold is melted in the furnace and then moulded into ingots in the next room. It is a shame this structure is smaller than others and therefore lacks a proper door, but the interior looks superb, notably including a circular hatch covering a hole in the floor. Two floors below is the mine.
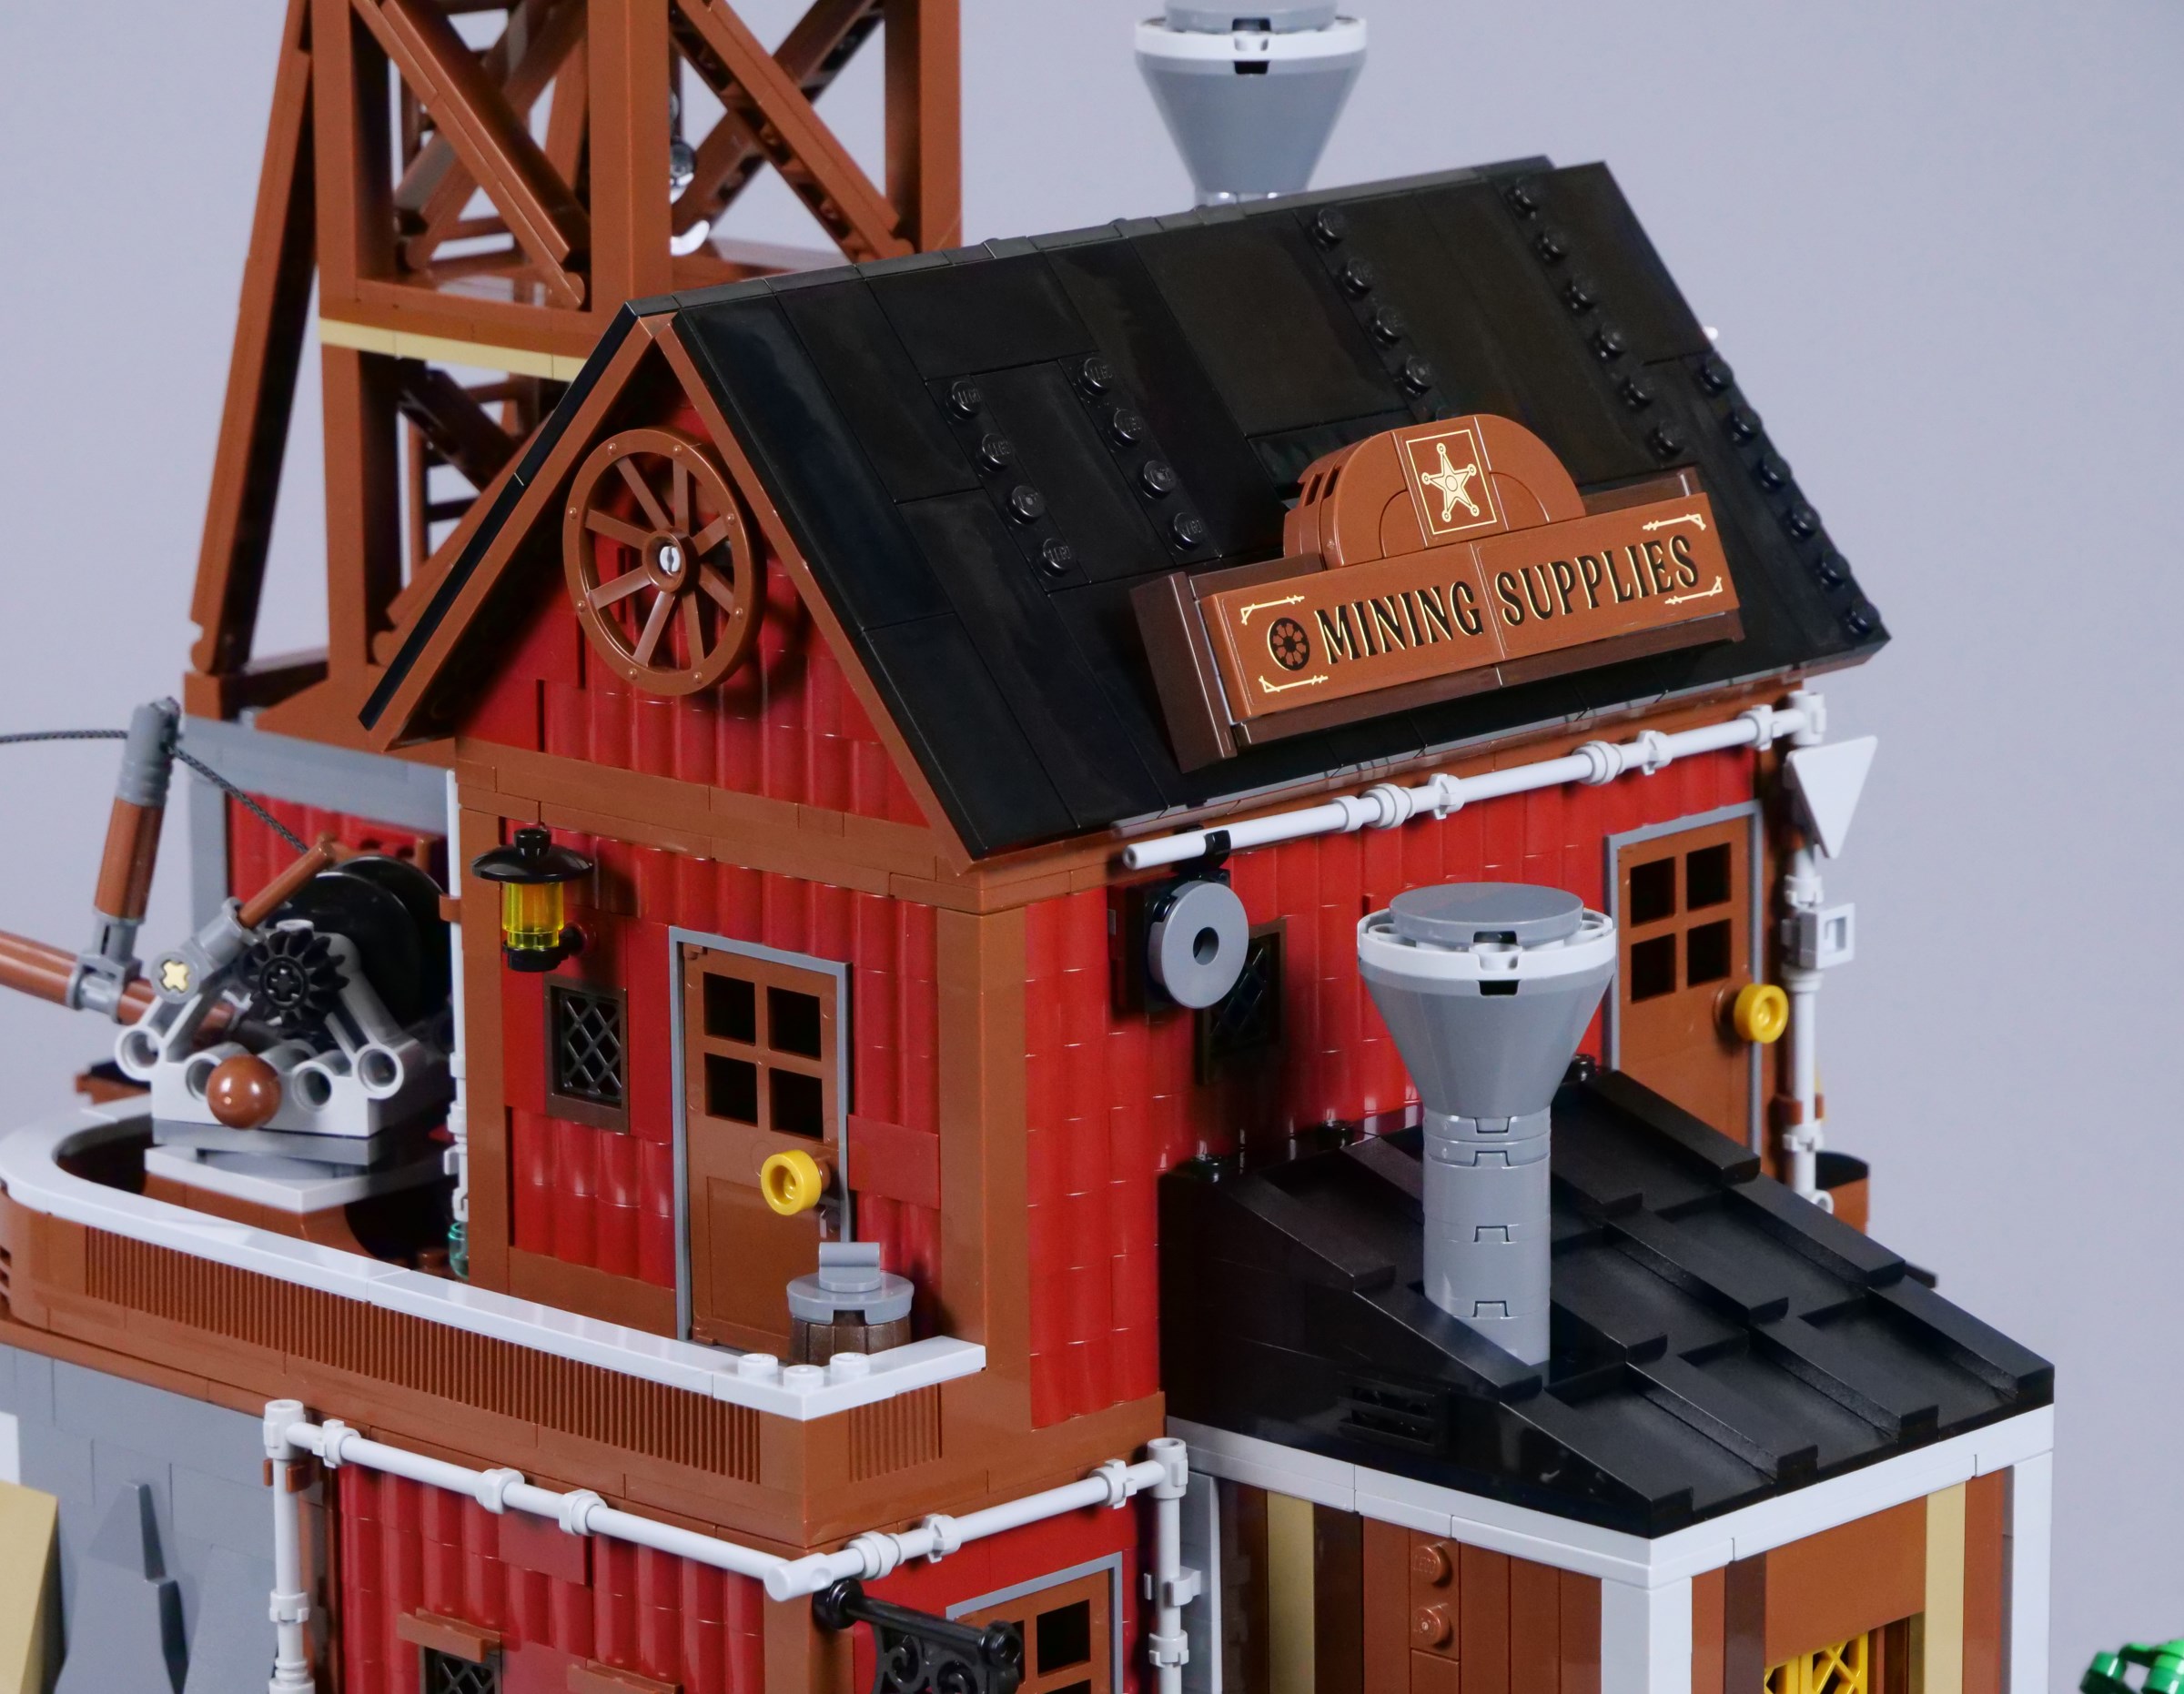
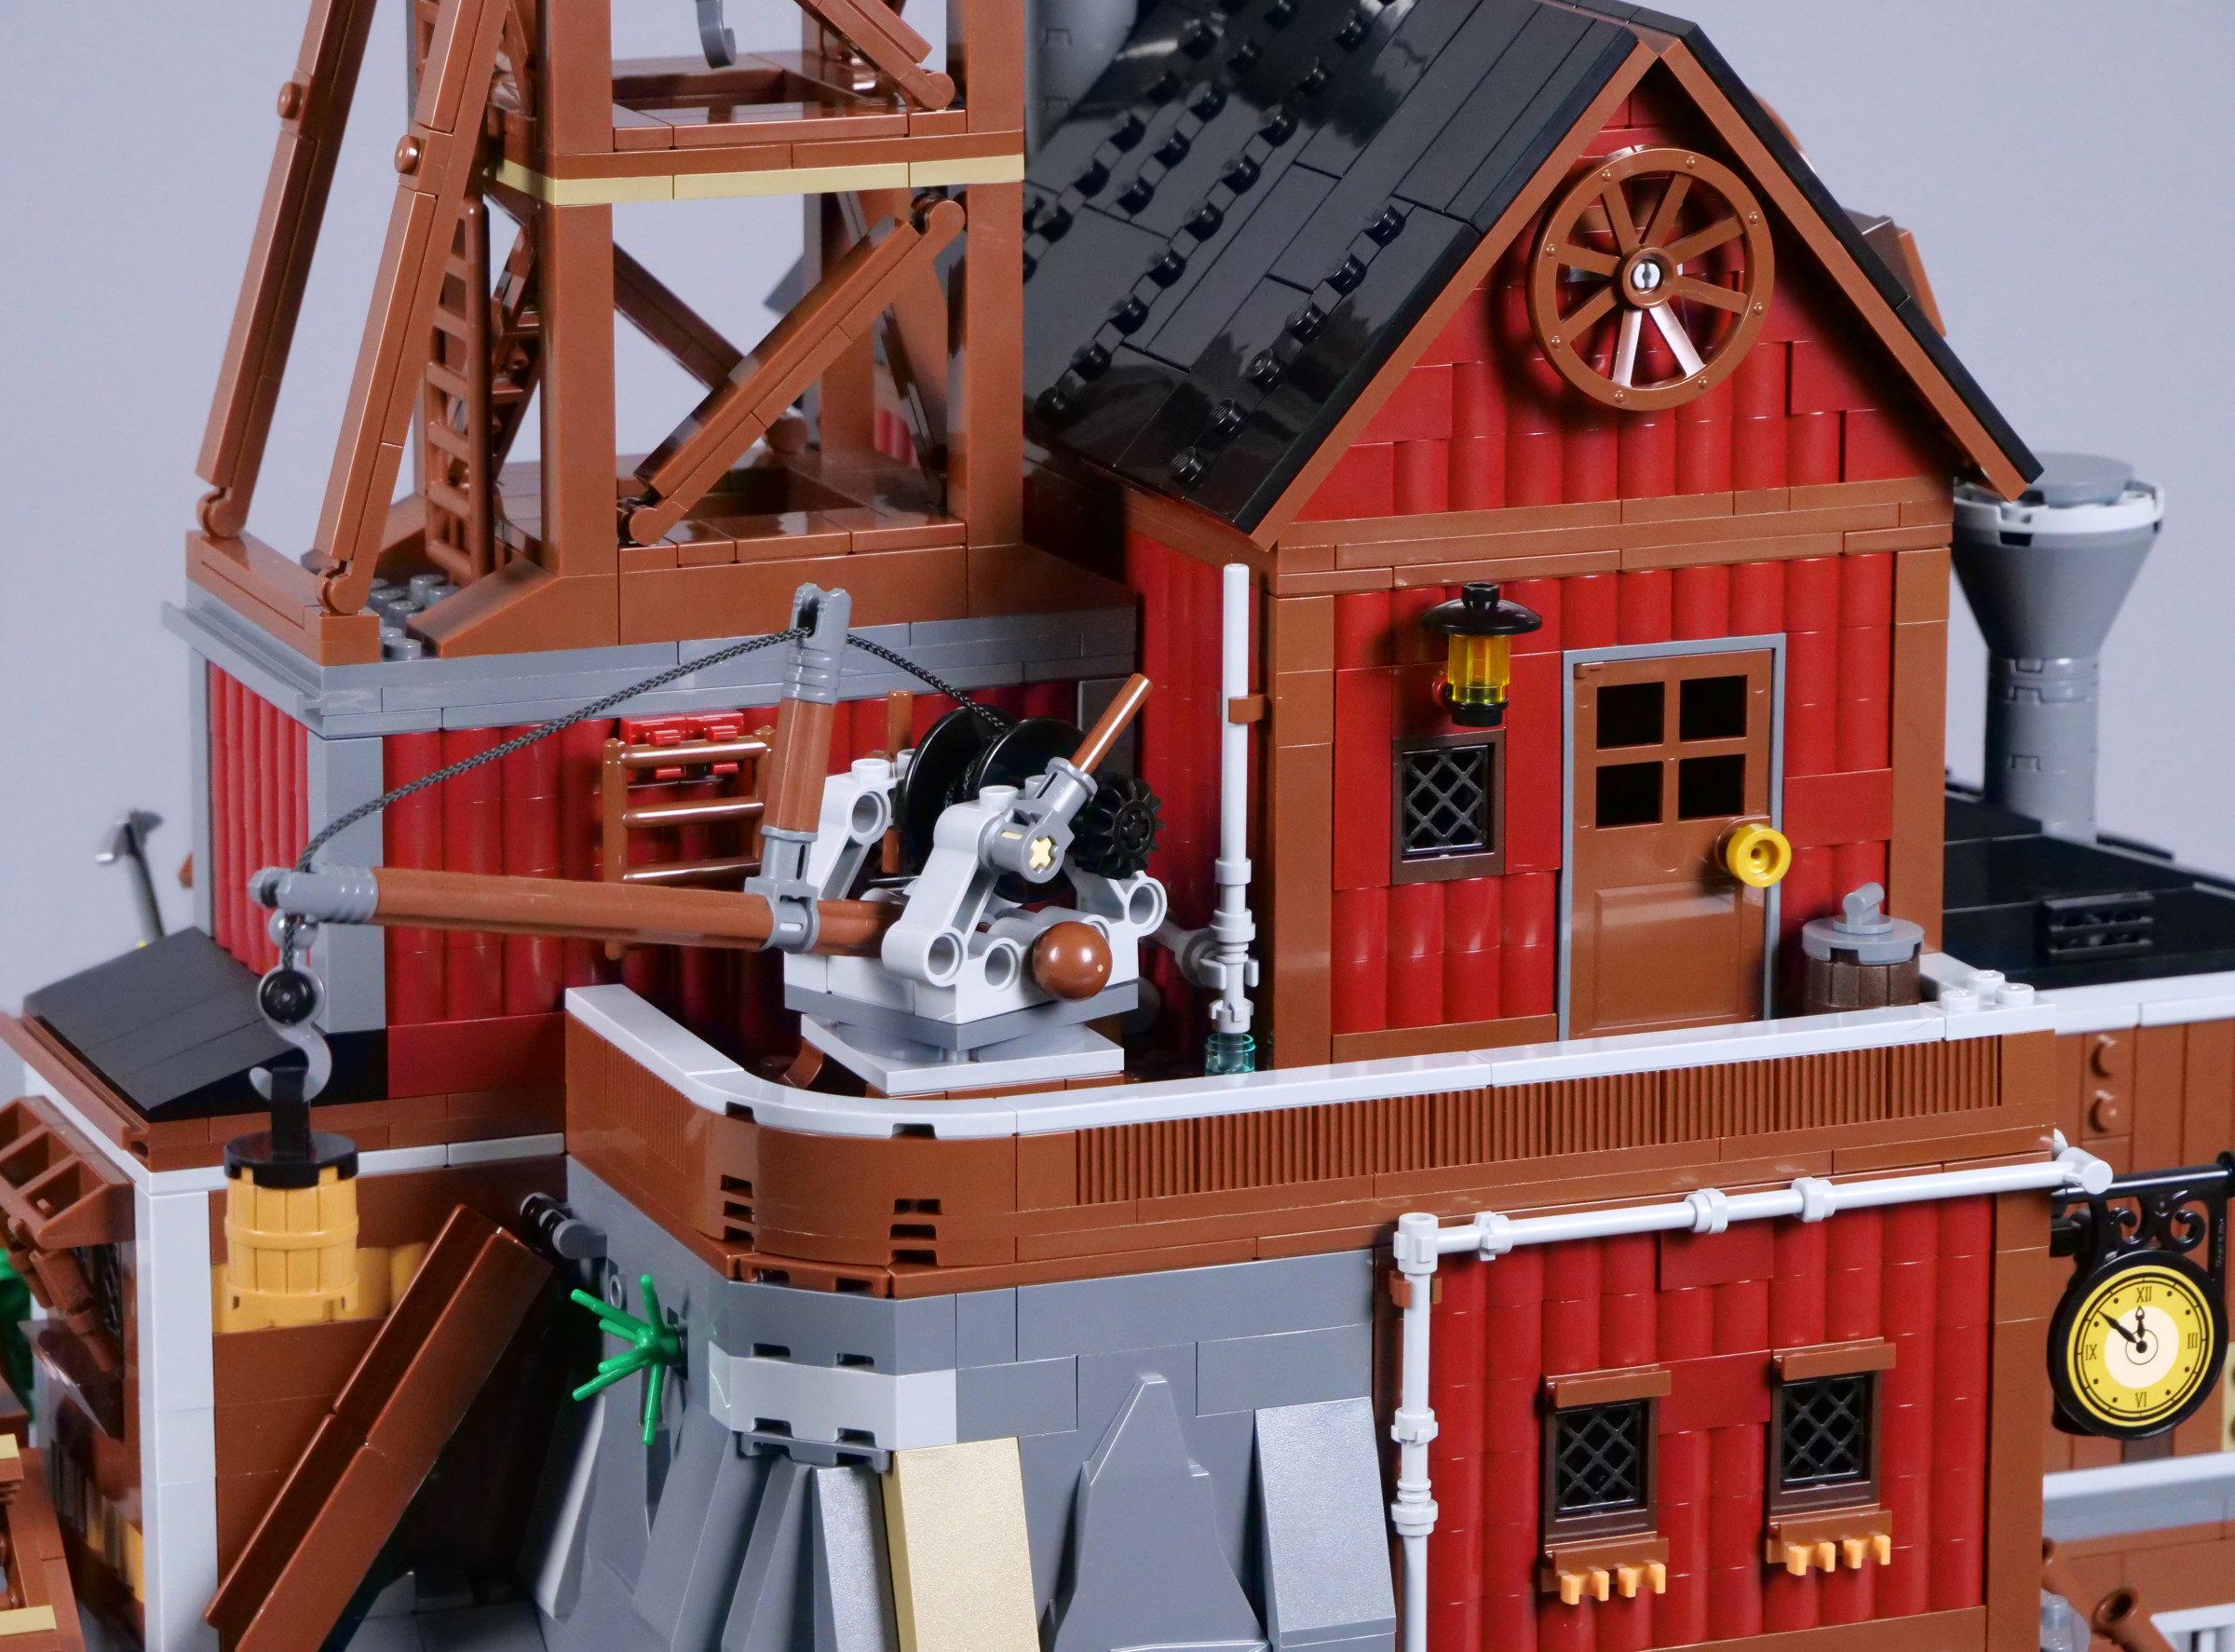
A crane on the rear balcony brings goods to this level, which is much easier than lugging things up multiple flights of steps. The crane mechanism is very basic and works well, extending down to the ground. Moreover, I am pleased with the details on the outside of the uppermost structure, including a classic Old West sign.
The traditional wooden headframe looks excellent, accessible via ladders and reaching all the way down to the mine, through the moulding room and the office. Sadly, you cannot really see the winch passing through each level without removing entire floors, which obviously results in detaching the crane as well.
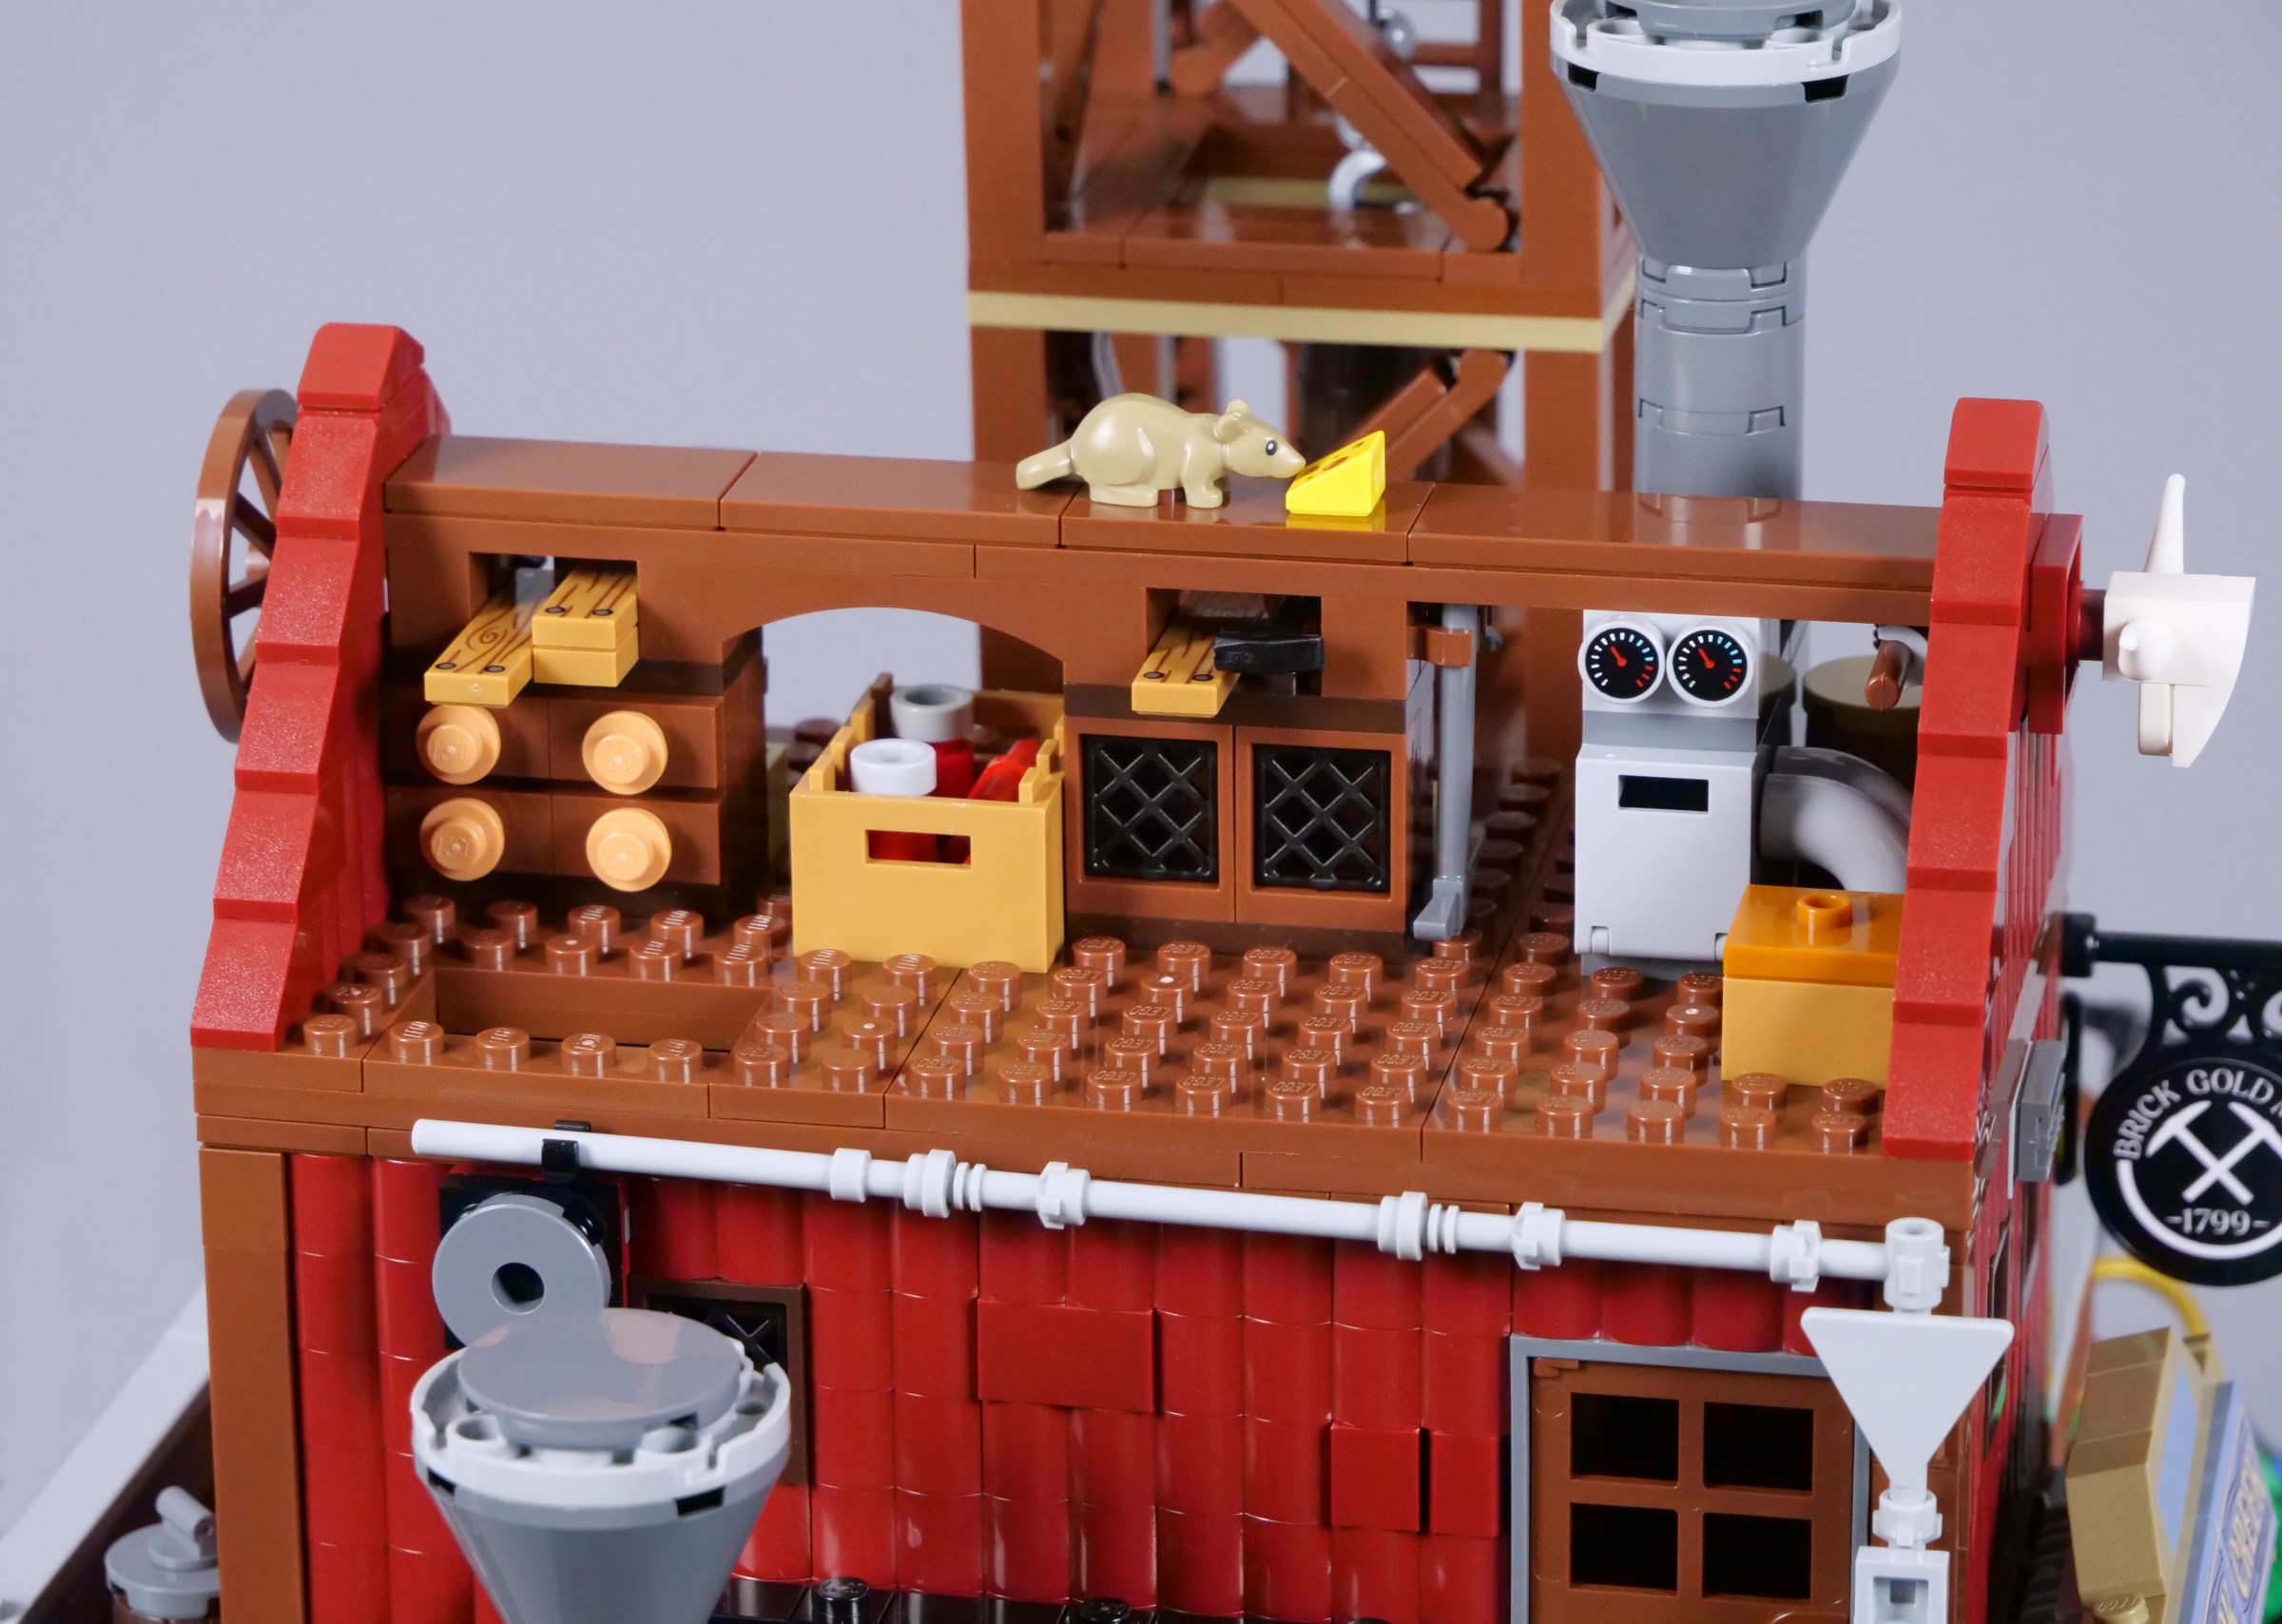
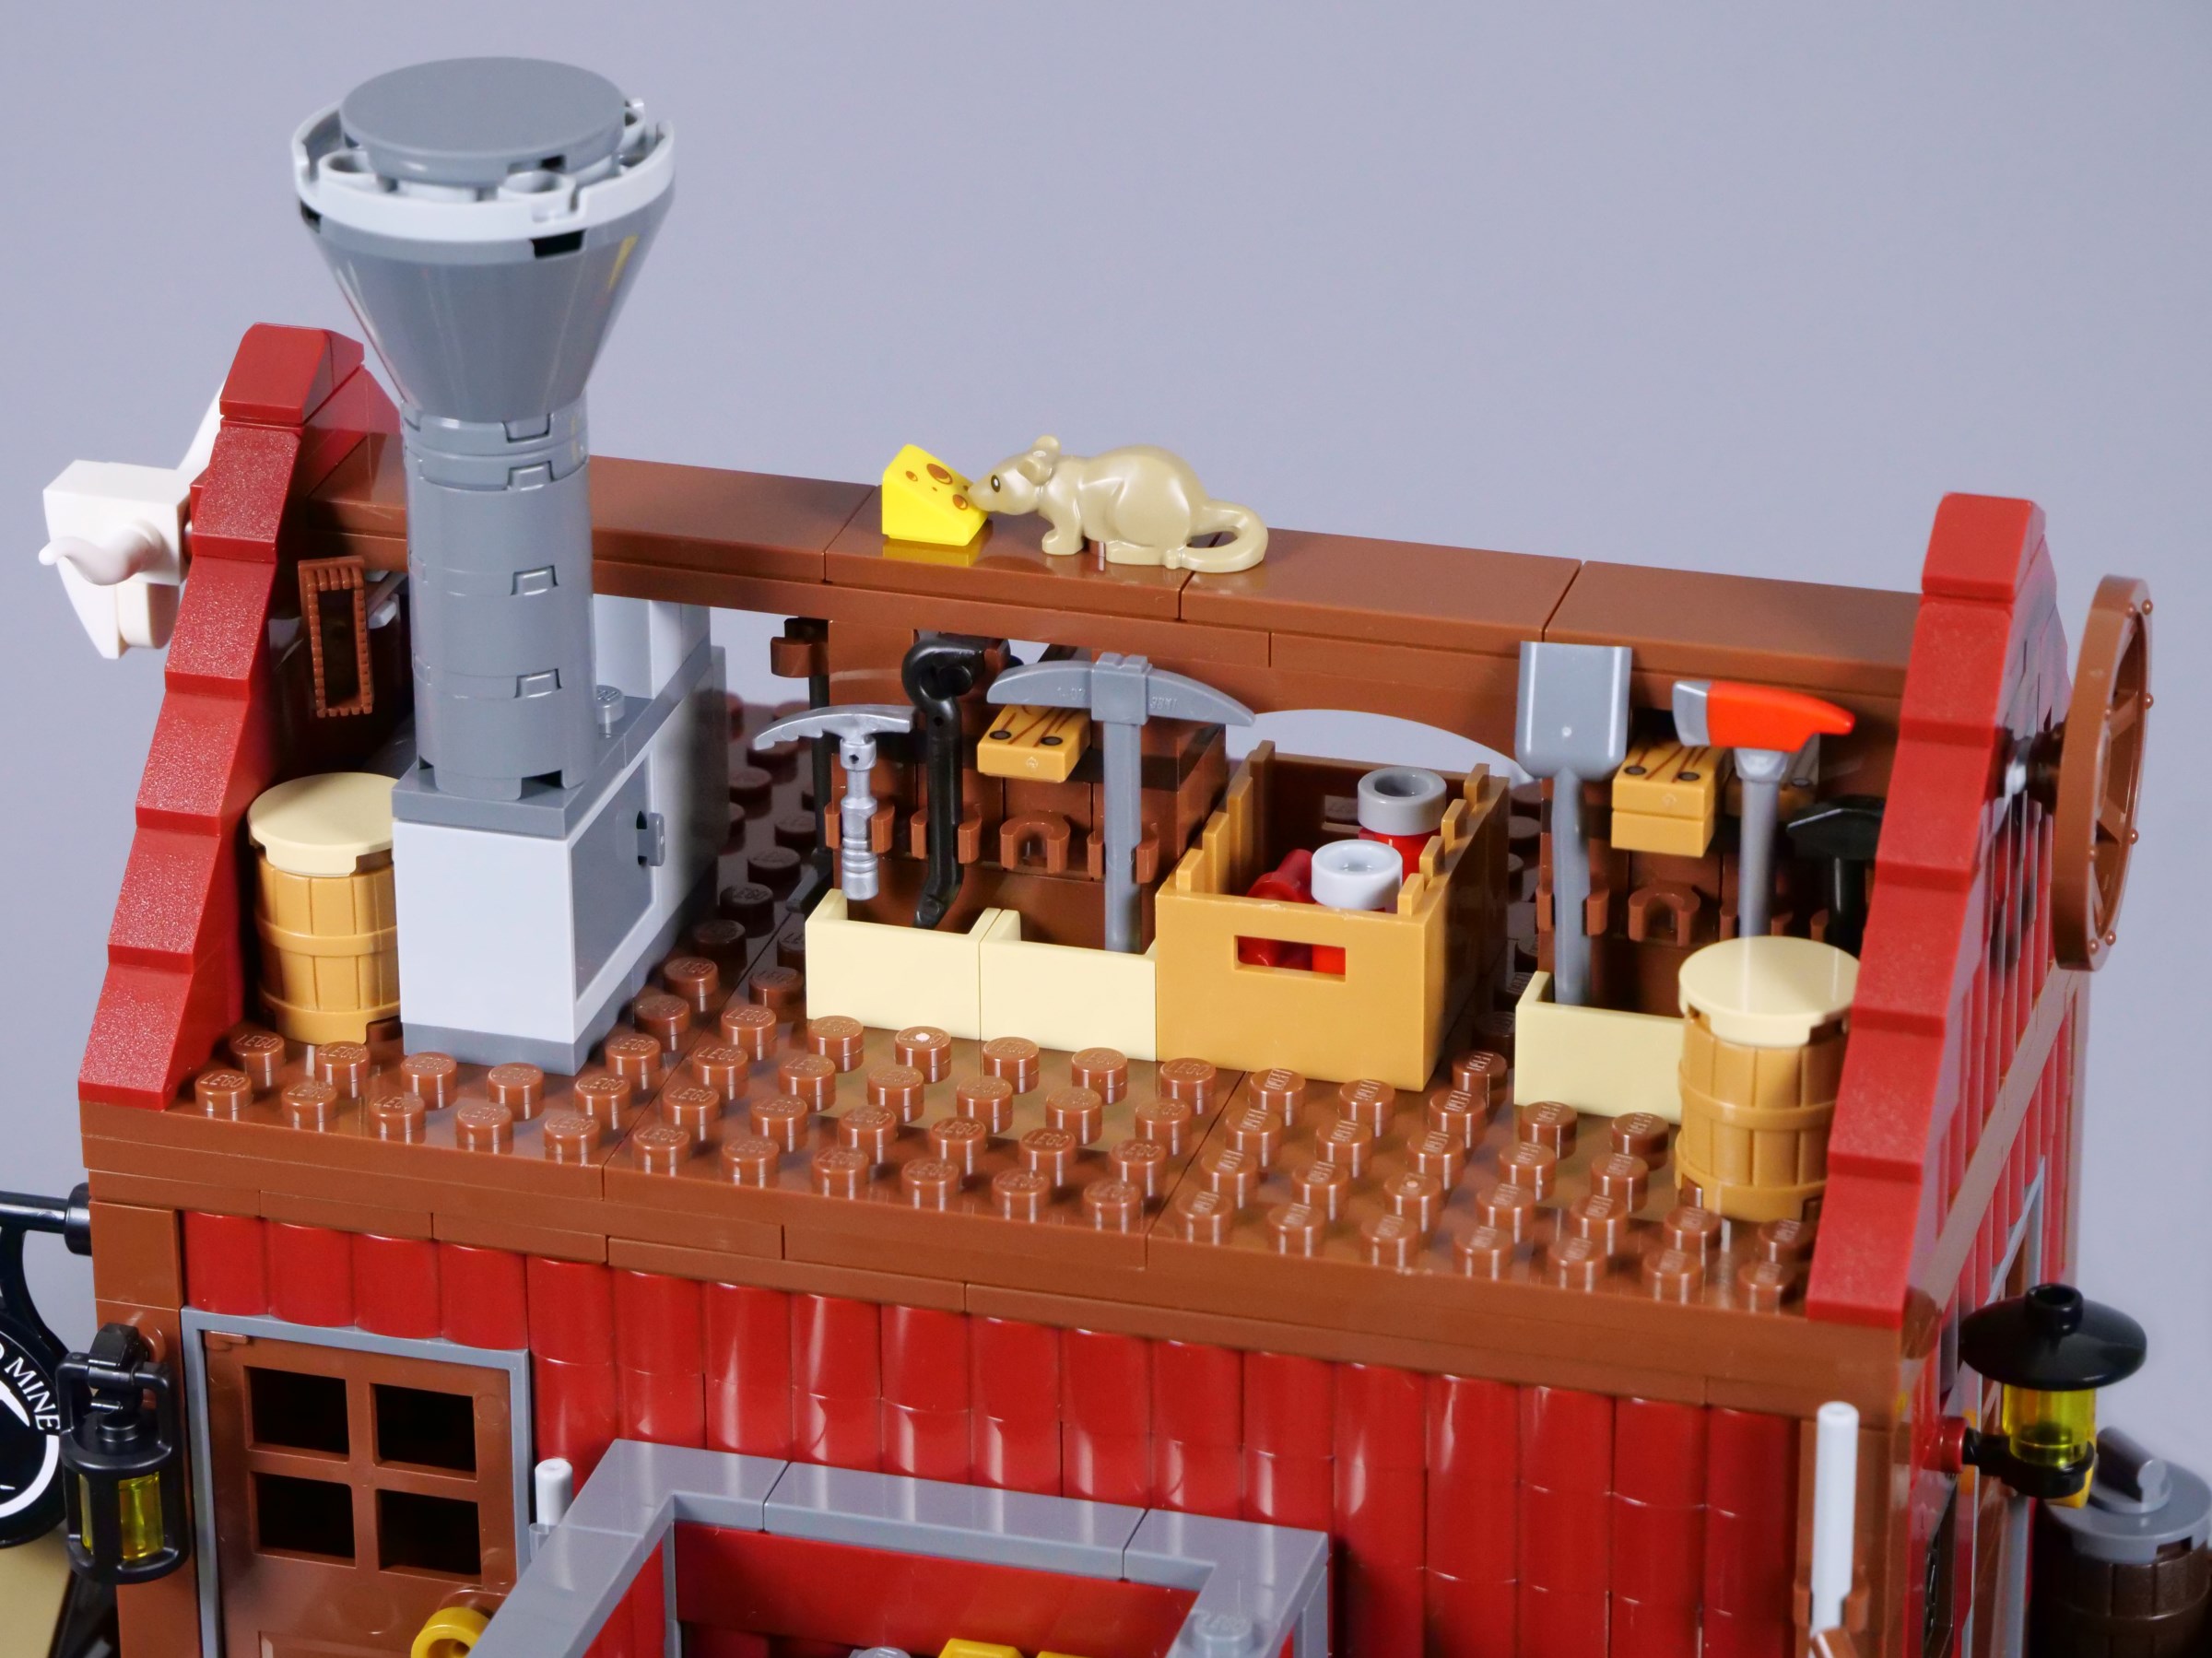
However, there are no issues with the attic above the dormitory. Again, minifigures can climb a ladder to reach the attic, where plenty of supplies are kept. The many details look splendid and the mouse nibbling on a piece of cheese is a fun inclusion too, making full use of the space!
Overall
For the first time among BrickLink Designer Program sets I have built, I find 910055 Gold Mine Expedition a little underwhelming. This is certainly a nice model, packed with all the details you would expect from a 3382-piece set and looking wonderful on display, given the effective use of colour to create a bright scene. The interiors should not be overlooked either.
My slight disappointment stems from the functions, which are a lot simpler than I envisaged for such a large mine. Perhaps this relates more to my own expectations than the set's true quality, but I think more could have been achieved with the space. That being said, £269.99, $299.99 or €299.99 seems a fair price and I think this would be a welcome addition to any Western scene, though not a perfect one.
This set and four others will be available to pre-order later today, from 17:00 CEST, 16:00 BST, 11:00 ET or 8:00 PT.