It looks like you're new around here, so we thought we'd let you know a bit about the site and what it has to offer.
Brickset is primarily a database of LEGO sets. We've been online since 2000 and are now a cornerstone of the online LEGO community: a resource used and trusted by LEGO fans around the world.
As well as virtually every LEGO set ever made, our database also contains information about minifigs, parts, colours, set inventories and much more. We also maintain comprehensive lists of discounts and new products at online LEGO retailers, making it easy to grab a bargain or bag the latest set.
Additionally, we publish news and comprehensive reviews of new products on our home page, making us a one-stop-shop for everything LEGO-related.
Over 300,000 people use the site to keep track of their LEGO collection, review and rate sets, post comments, maintain lists, and much more. So, sign up today to join us and start enjoying everything the site has to offer!
Today's random set is 70708 Hive Crawler, released during 2013. It's one of 12 Space sets produced that year. It contains 560 pieces and 3 minifigs, and its retail price was US$69.99/£49.99.
It's owned by 2,976 Brickset members. If you want to add it to your collection you should find it for sale at BrickLink, where new ones sell for around $116.60, or eBay.
Today's random minifigure is cas480Kingdoms - Jester, Female, a Castle figure that came in one set, 9349 Fairytale and Historic Minifigure Set, released during 2011.
Our members collectively own a total of 1,179 of them. If you'd like to buy one you should find it for sale at BrickLink, where new ones sell for around $9.40.
LEGO Star Wars sets have regularly pushed the boundaries of set design and size, breaking the record for the biggest set by piece count several times, among other accolades. The spectacular 75419 Death Star attains records of its own, as the largest Star Wars set ever released and the most expensive.
The latter is maybe a questionable honour and certainly raises expectations for the Death Star, which has proven quite contentious, thanks primarily to its unexpected design. Although I can understand those concerns, the cutaway format appeals to me and the model is richly detailed, so there is plenty to explore!
Summary
75419 Death Star, 9,023 pieces. £899.99 / $999.99 / €999.99 | 10.0p/11.1c/11.1c per piece. Buy at LEGO.com »
75419 Death Star is an exceptional set, but one with frustratingly conspicuous flaws
Incredible presence on display
High standard of detail
Enjoyable functions
Outstanding character selection
Lots of fun Easter eggs
Emperor's Throne Room is disappointing
Certain rooms are cramped
Minifigures could be better
The set was provided for review by LEGO. All opinions expressed are those of the author.
This article focuses on the model, with more coverage of the minifigures coming soon.
Box and Contents
75192 Millennium Falcon introduced a new box size in 2017, which has remained in use for the biggest sets ever since. I wish the Death Star was positioned centrally on the front, though the superlaser makes that difficult and I like the red glow around the battle station. There are three further boxes inside, containing six instruction manuals and 81 numbered bags in total, which is the most I am aware of in any set!
Also included is a substantial sticker sheet, featuring 67 stickers. Seeing this many stickers in such an expensive set is a concern and I do think certain pieces could have been printed, like the repeated arrow stickers applied on the hangar floor. However, most stickers form small consoles or add Easter eggs and those do not really bother me.
The Completed Model
As normal for an Ultimate Collector Series model, the Death Star comes with a printed plaque, displaying a nice graphic of the superlaser dish. Although there are no mistakes on the plaque, thankfully, I hoped to see some acknowledgement of the Geonosians and the Stalgasin Hive in particular, as one of the station's manufacturers, alongside Kuat Drive Yards.
There are studs to display two figures beside the plaque, intended for Galen Erso and Director Orson Krennic, both of whom were instrumental in the Death Star's creation. These minifigures are exceptional and I am delighted to see Galen in particular, complete with a decorated 1x2 tile representing the Death Star plans on a data tape. Between the duo is a console identifying the thermal exhaust port as a fundamental and intended flaw.
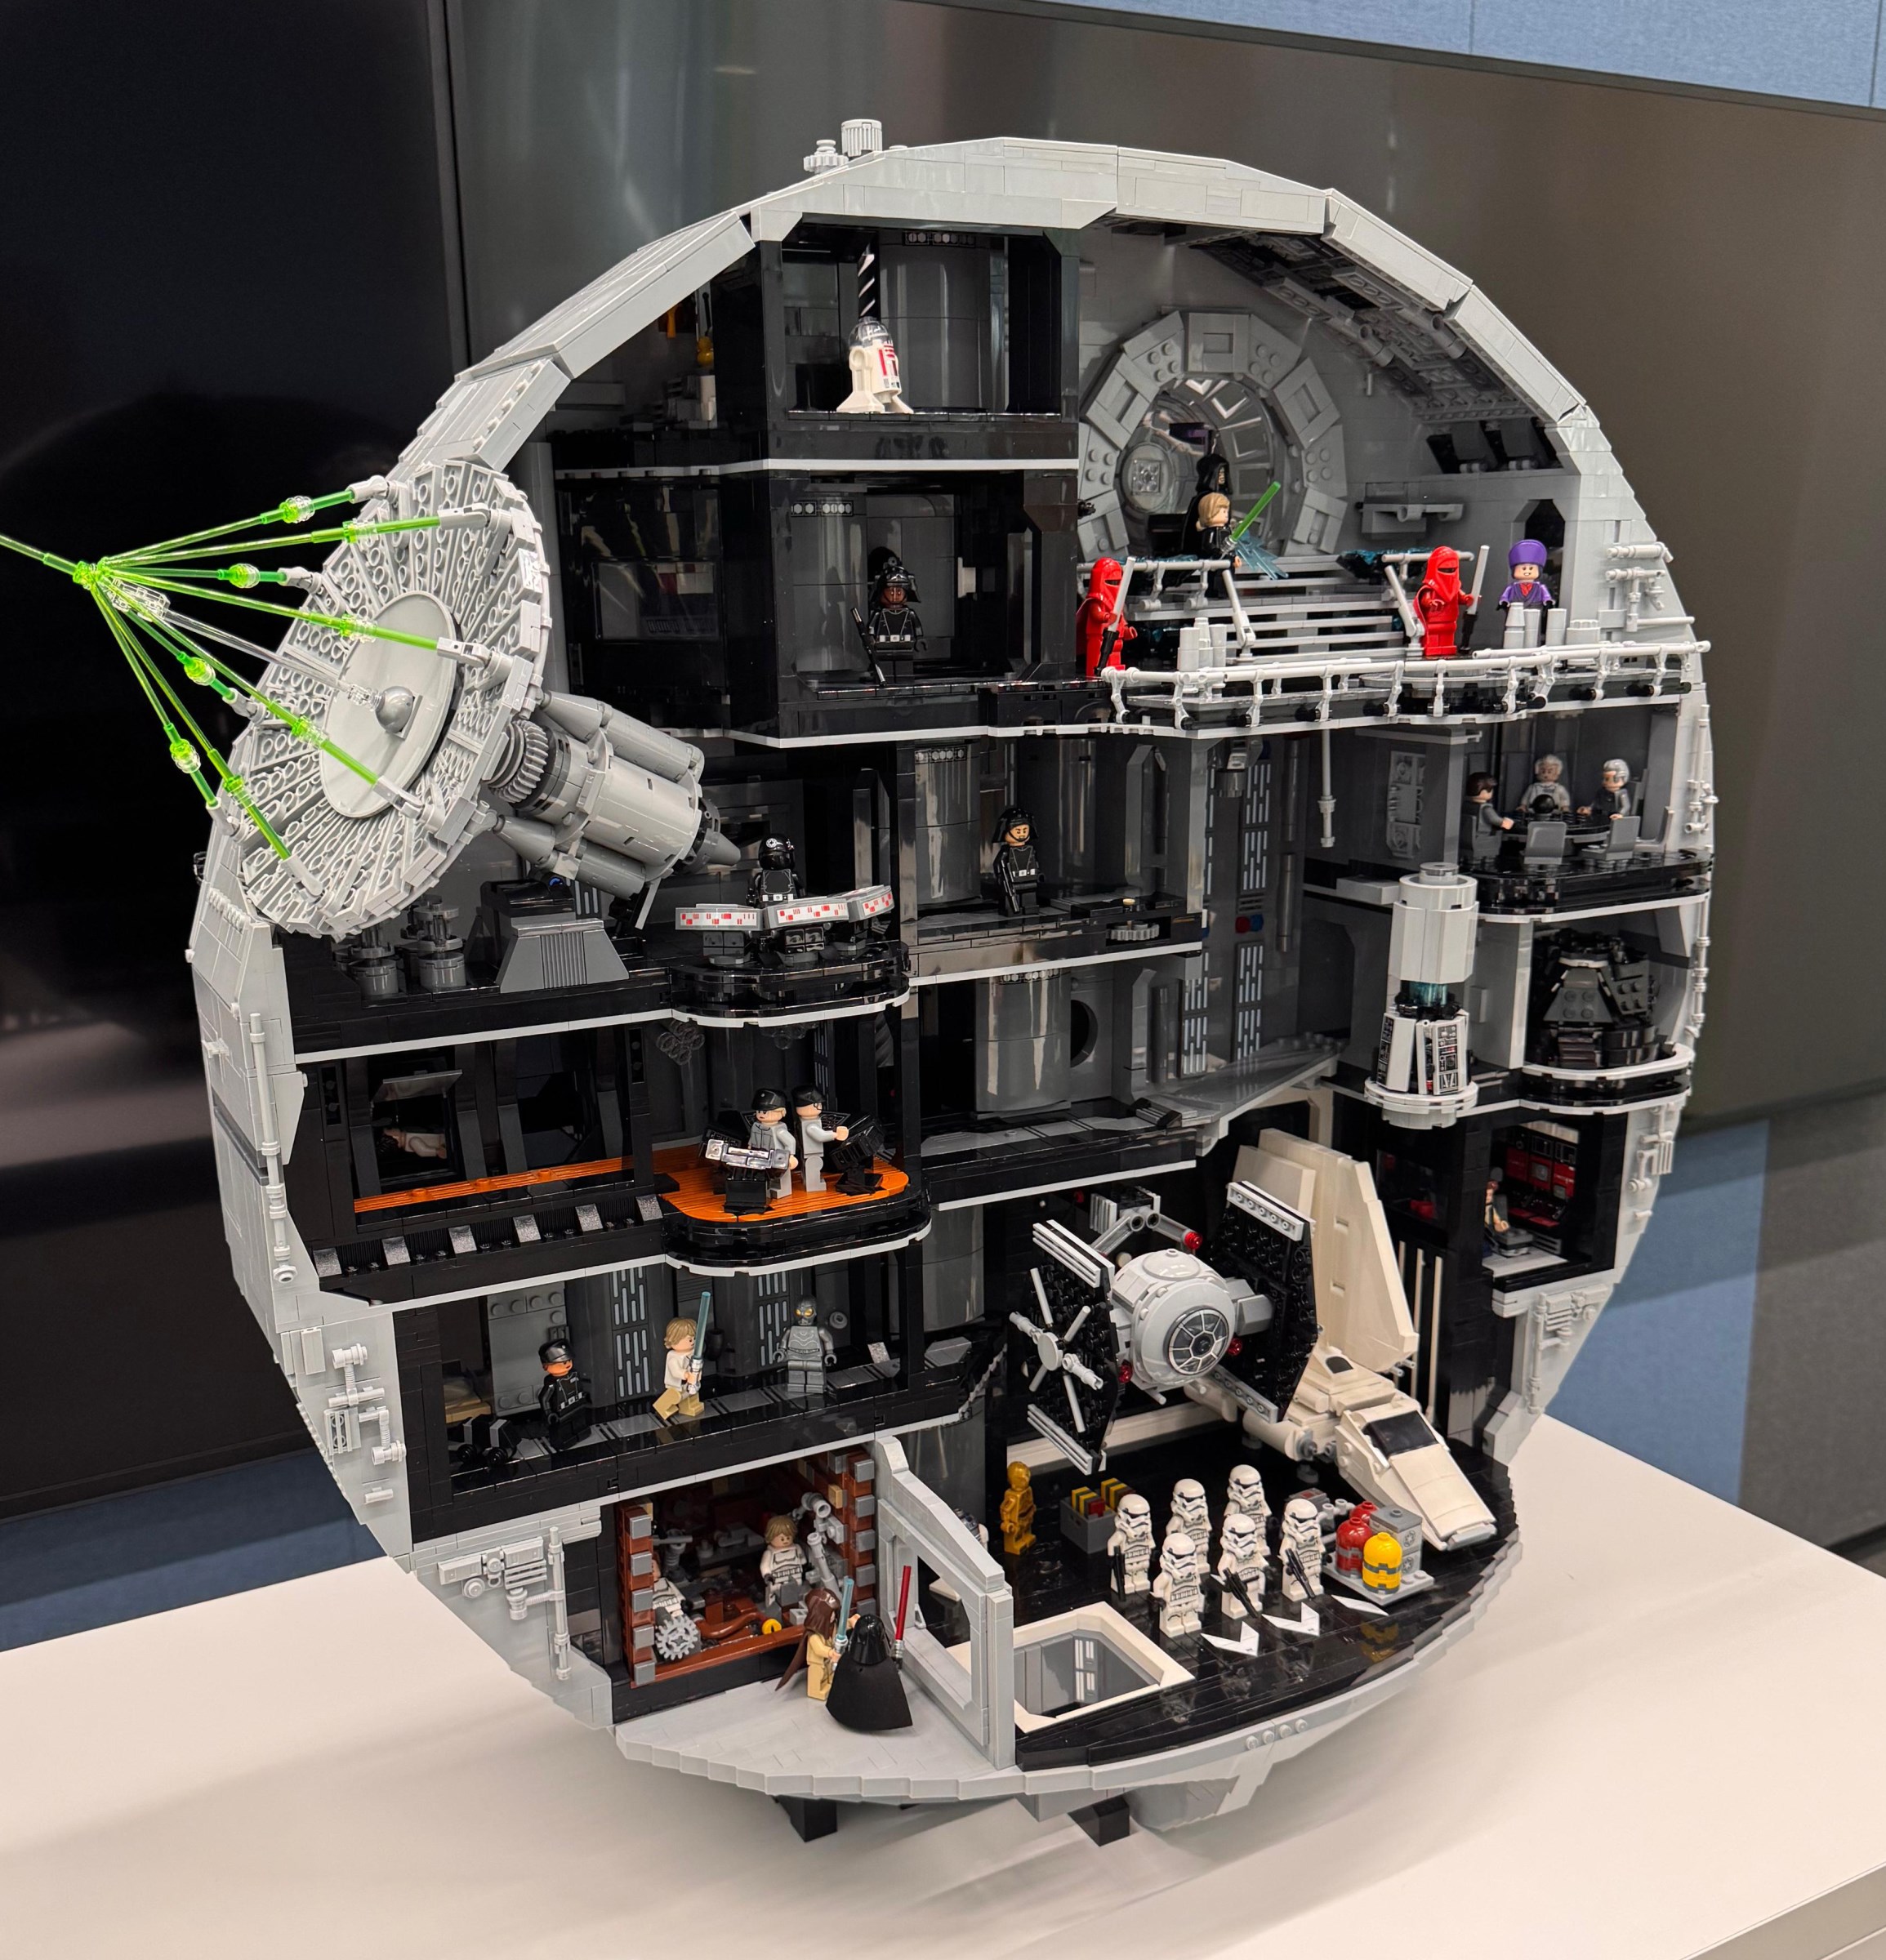
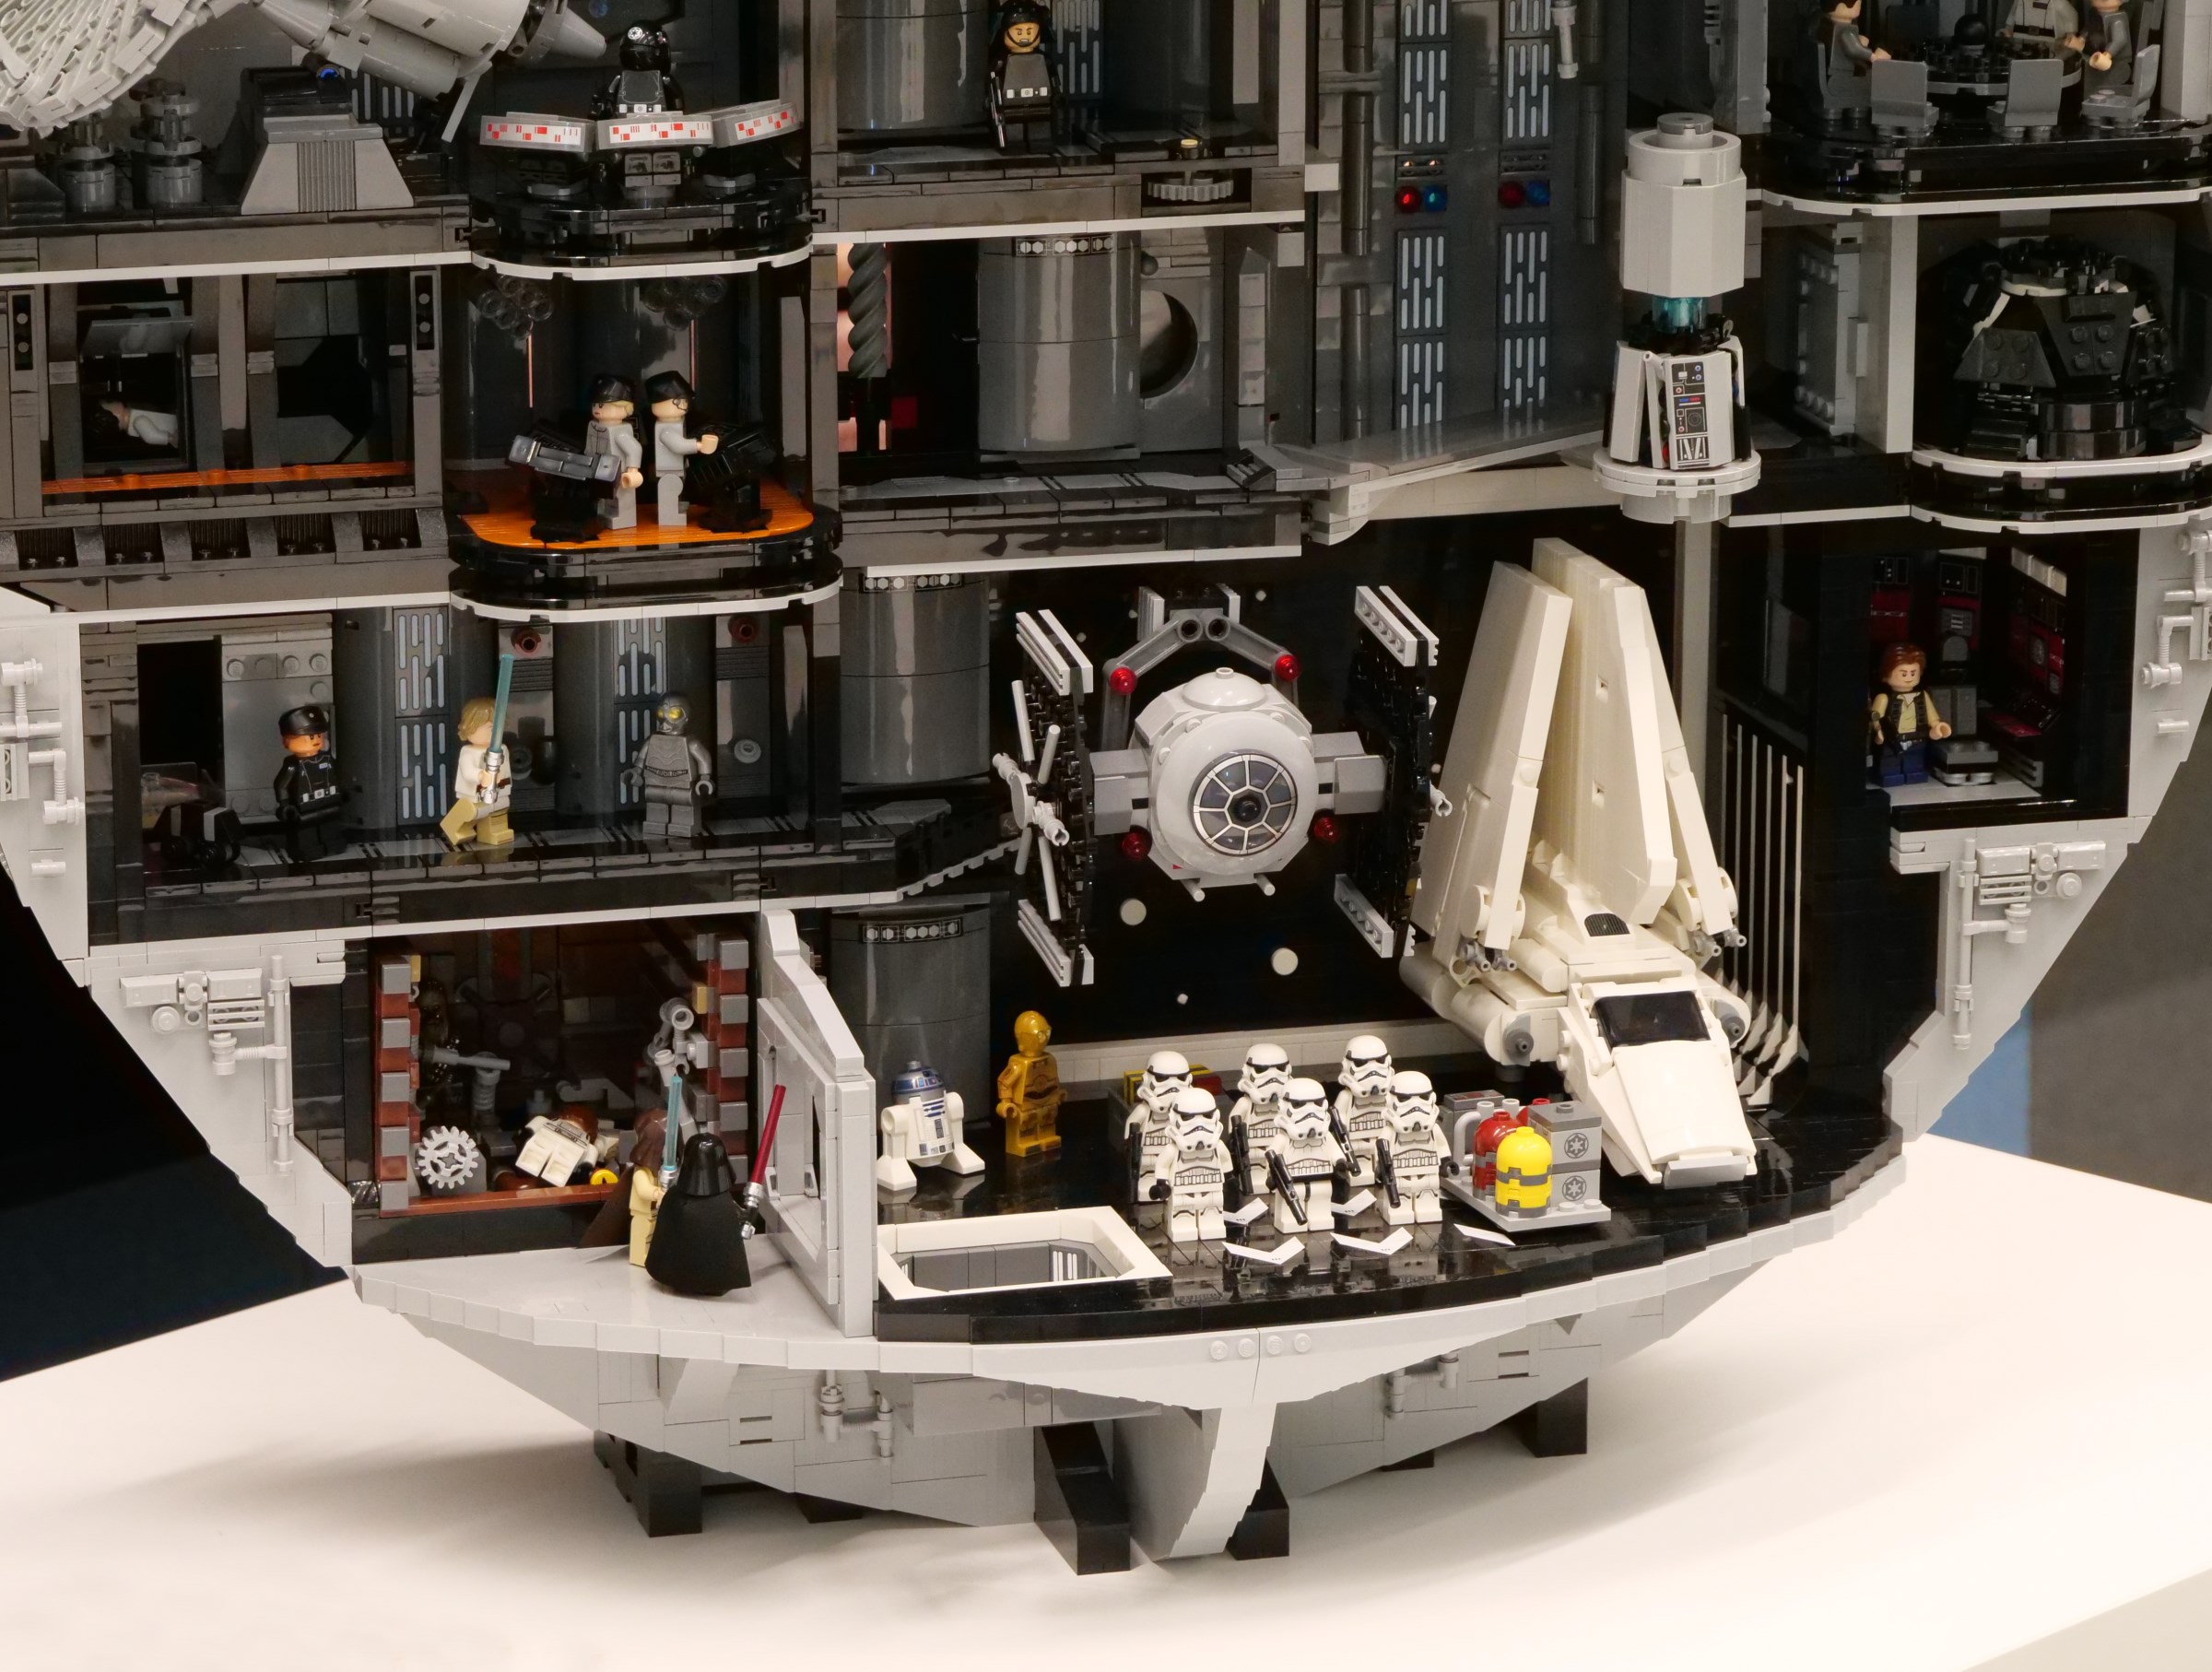
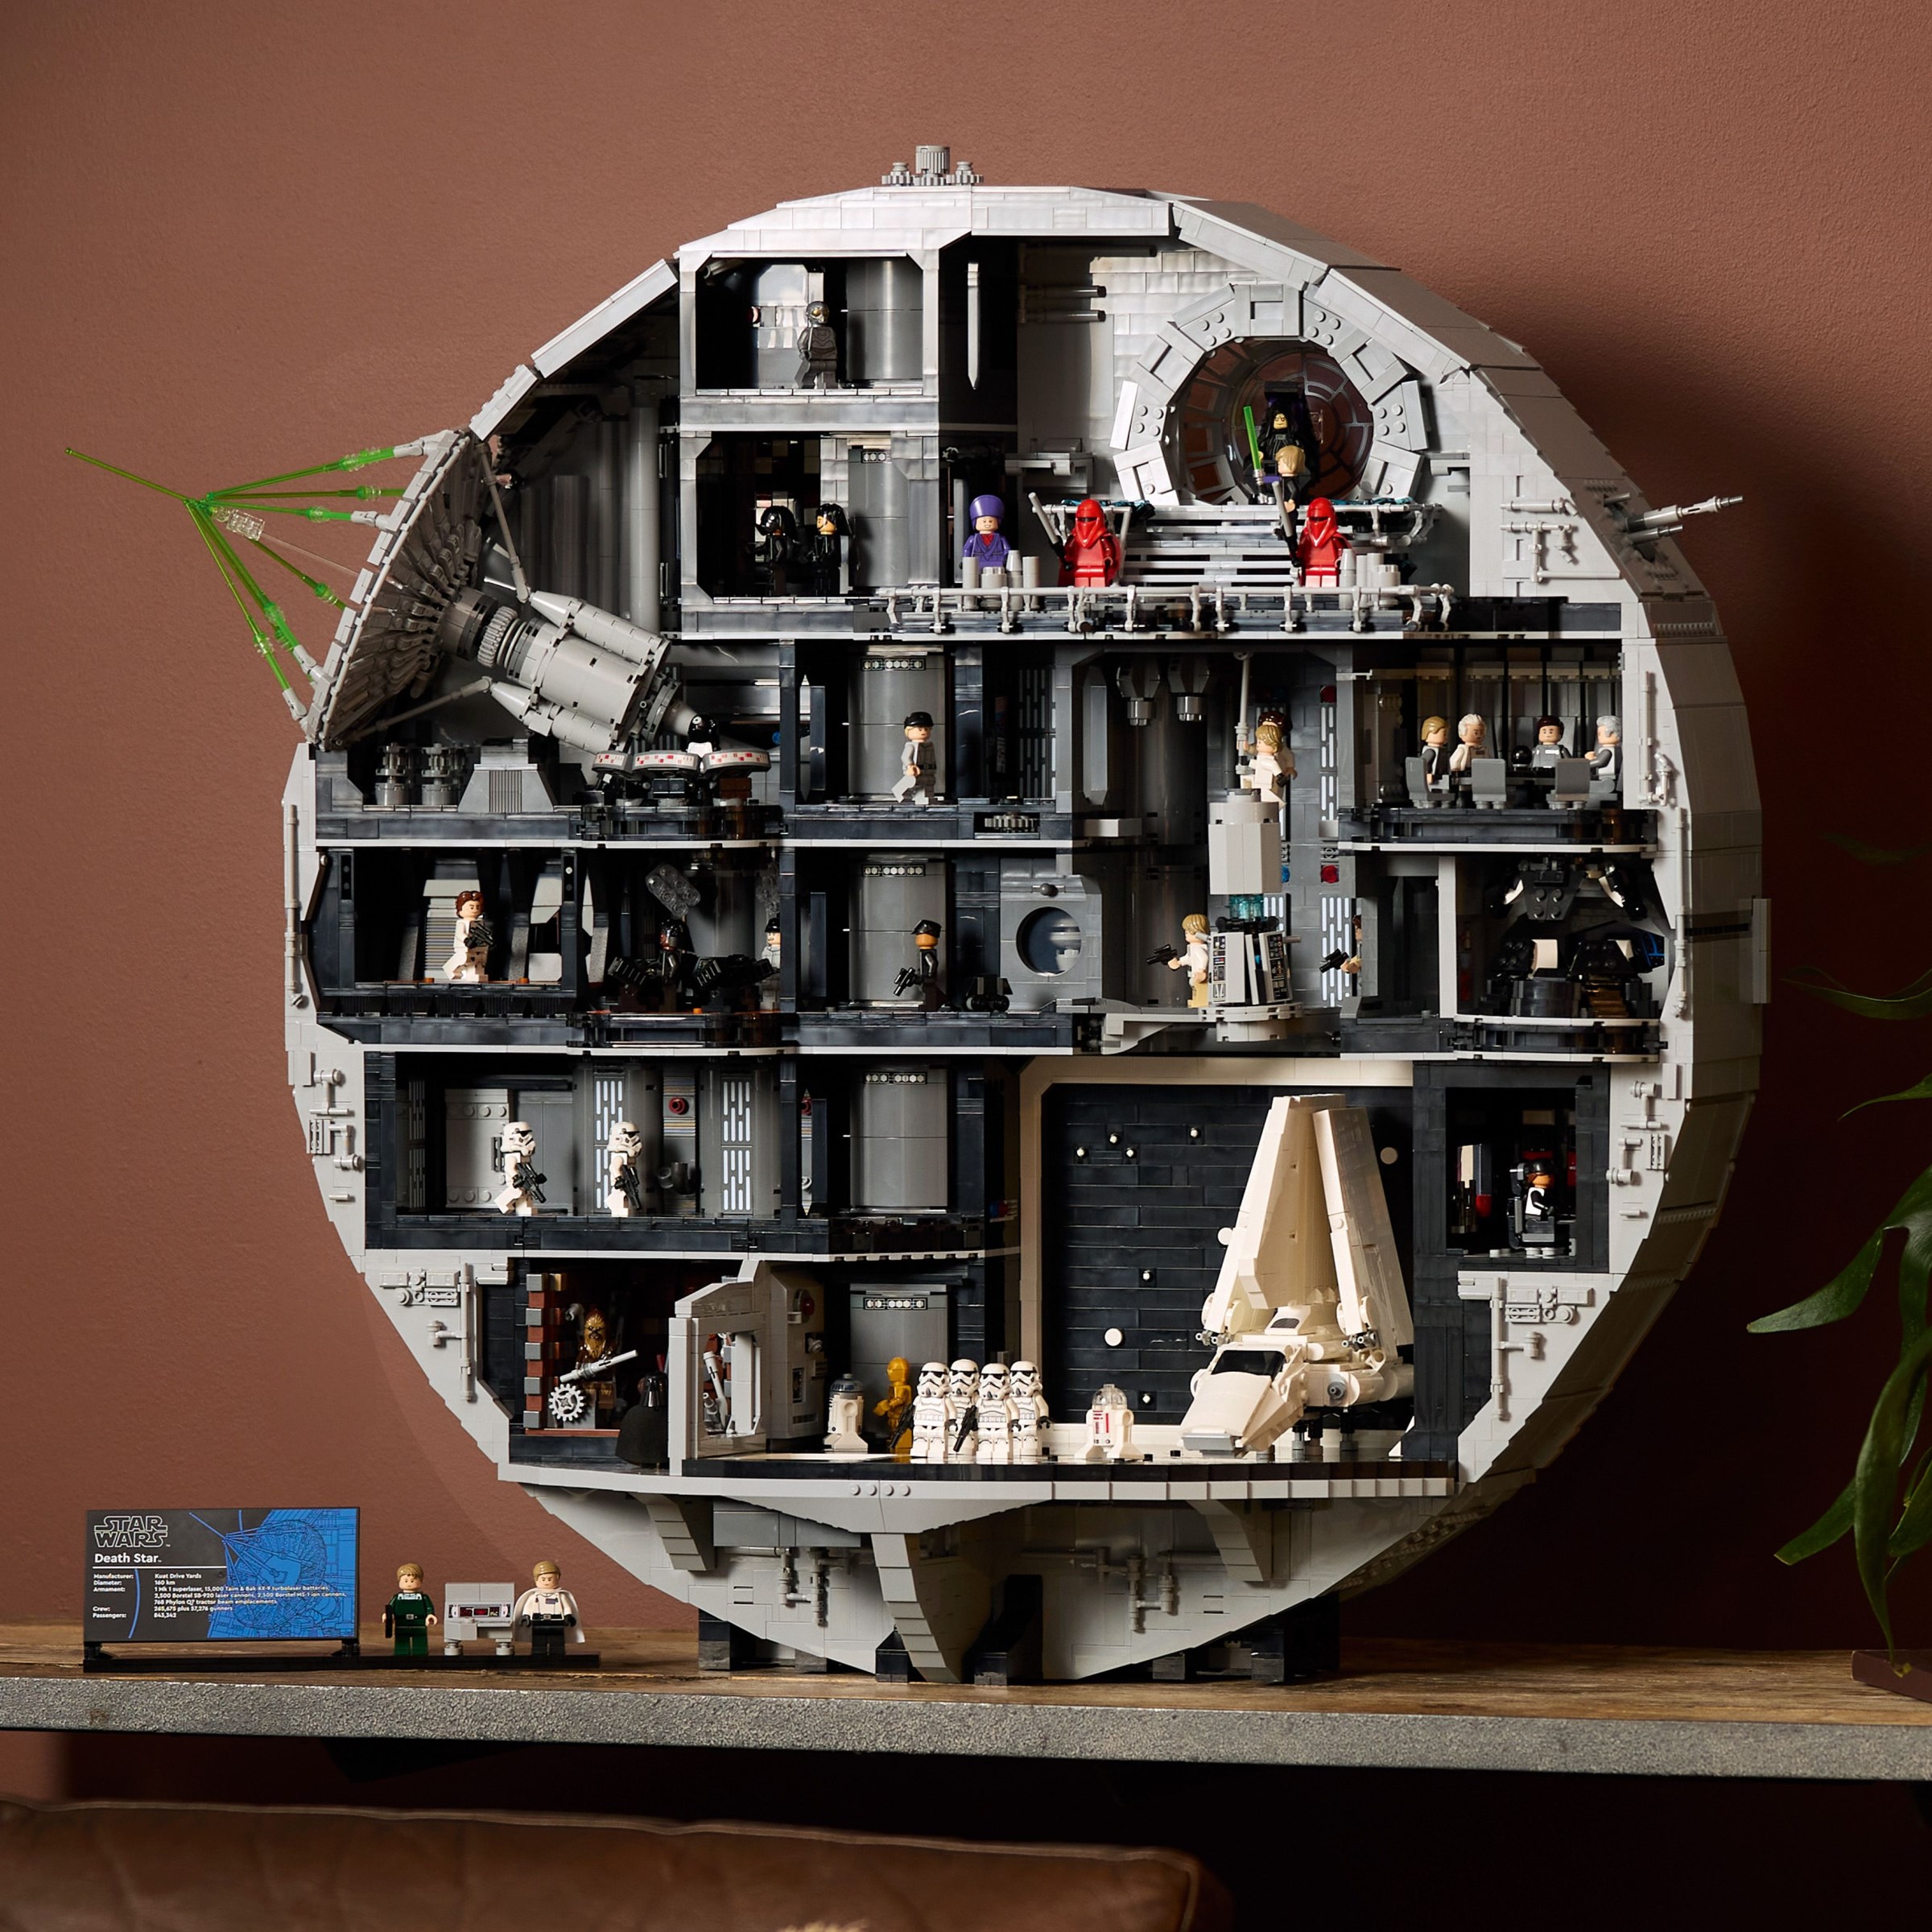
Translating the Death Star to LEGO form is not an easy prospect, with many potential formats. Some kind of spherical model feels natural for the space station and was successful for 10188 Death Star and 75159 Death Star, although I think this design achieves far greater presence on display and its size is remarkable, looking even more massive than 75192 Millennium Falcon.
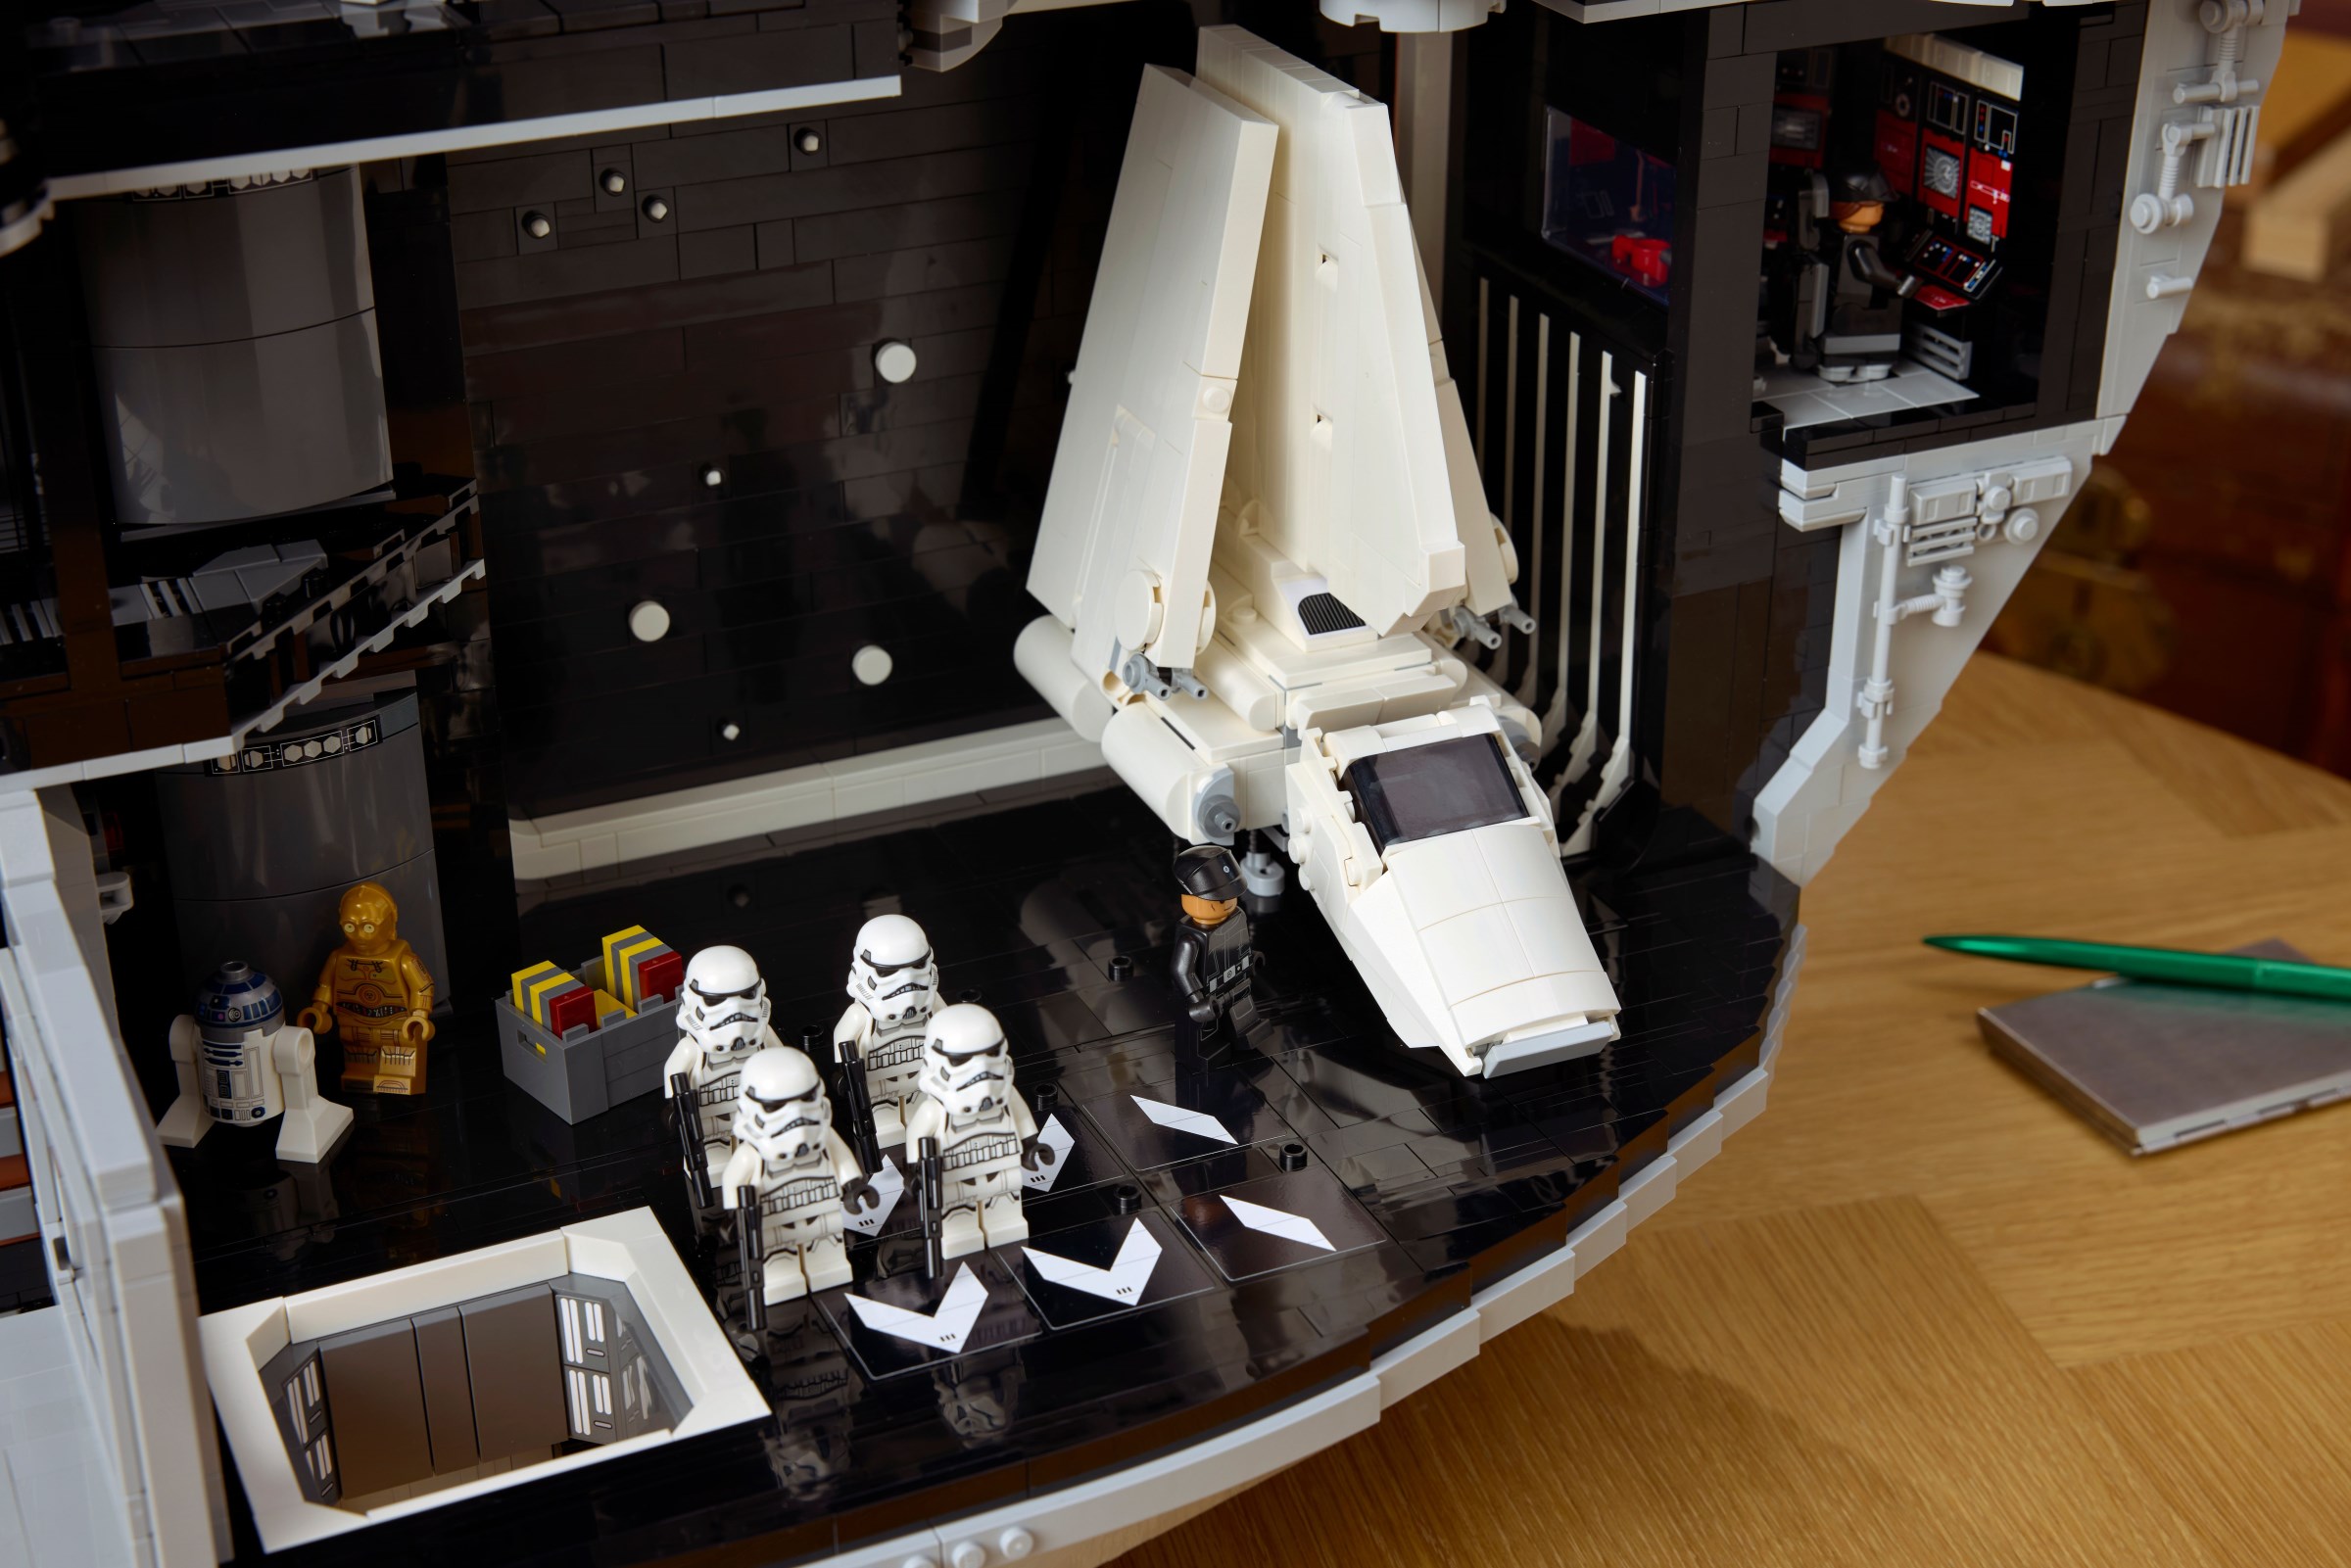
I think the designer, César Soares, has managed to cover all the areas expected aboard the Death Star, beginning with a substantial hangar bay. Though much of the model is only twelve studs deep, this section bulges outwards with a nice curve along the edge, creating plenty of floor space for minifigures and an Imperial Shuttle inside the hangar.
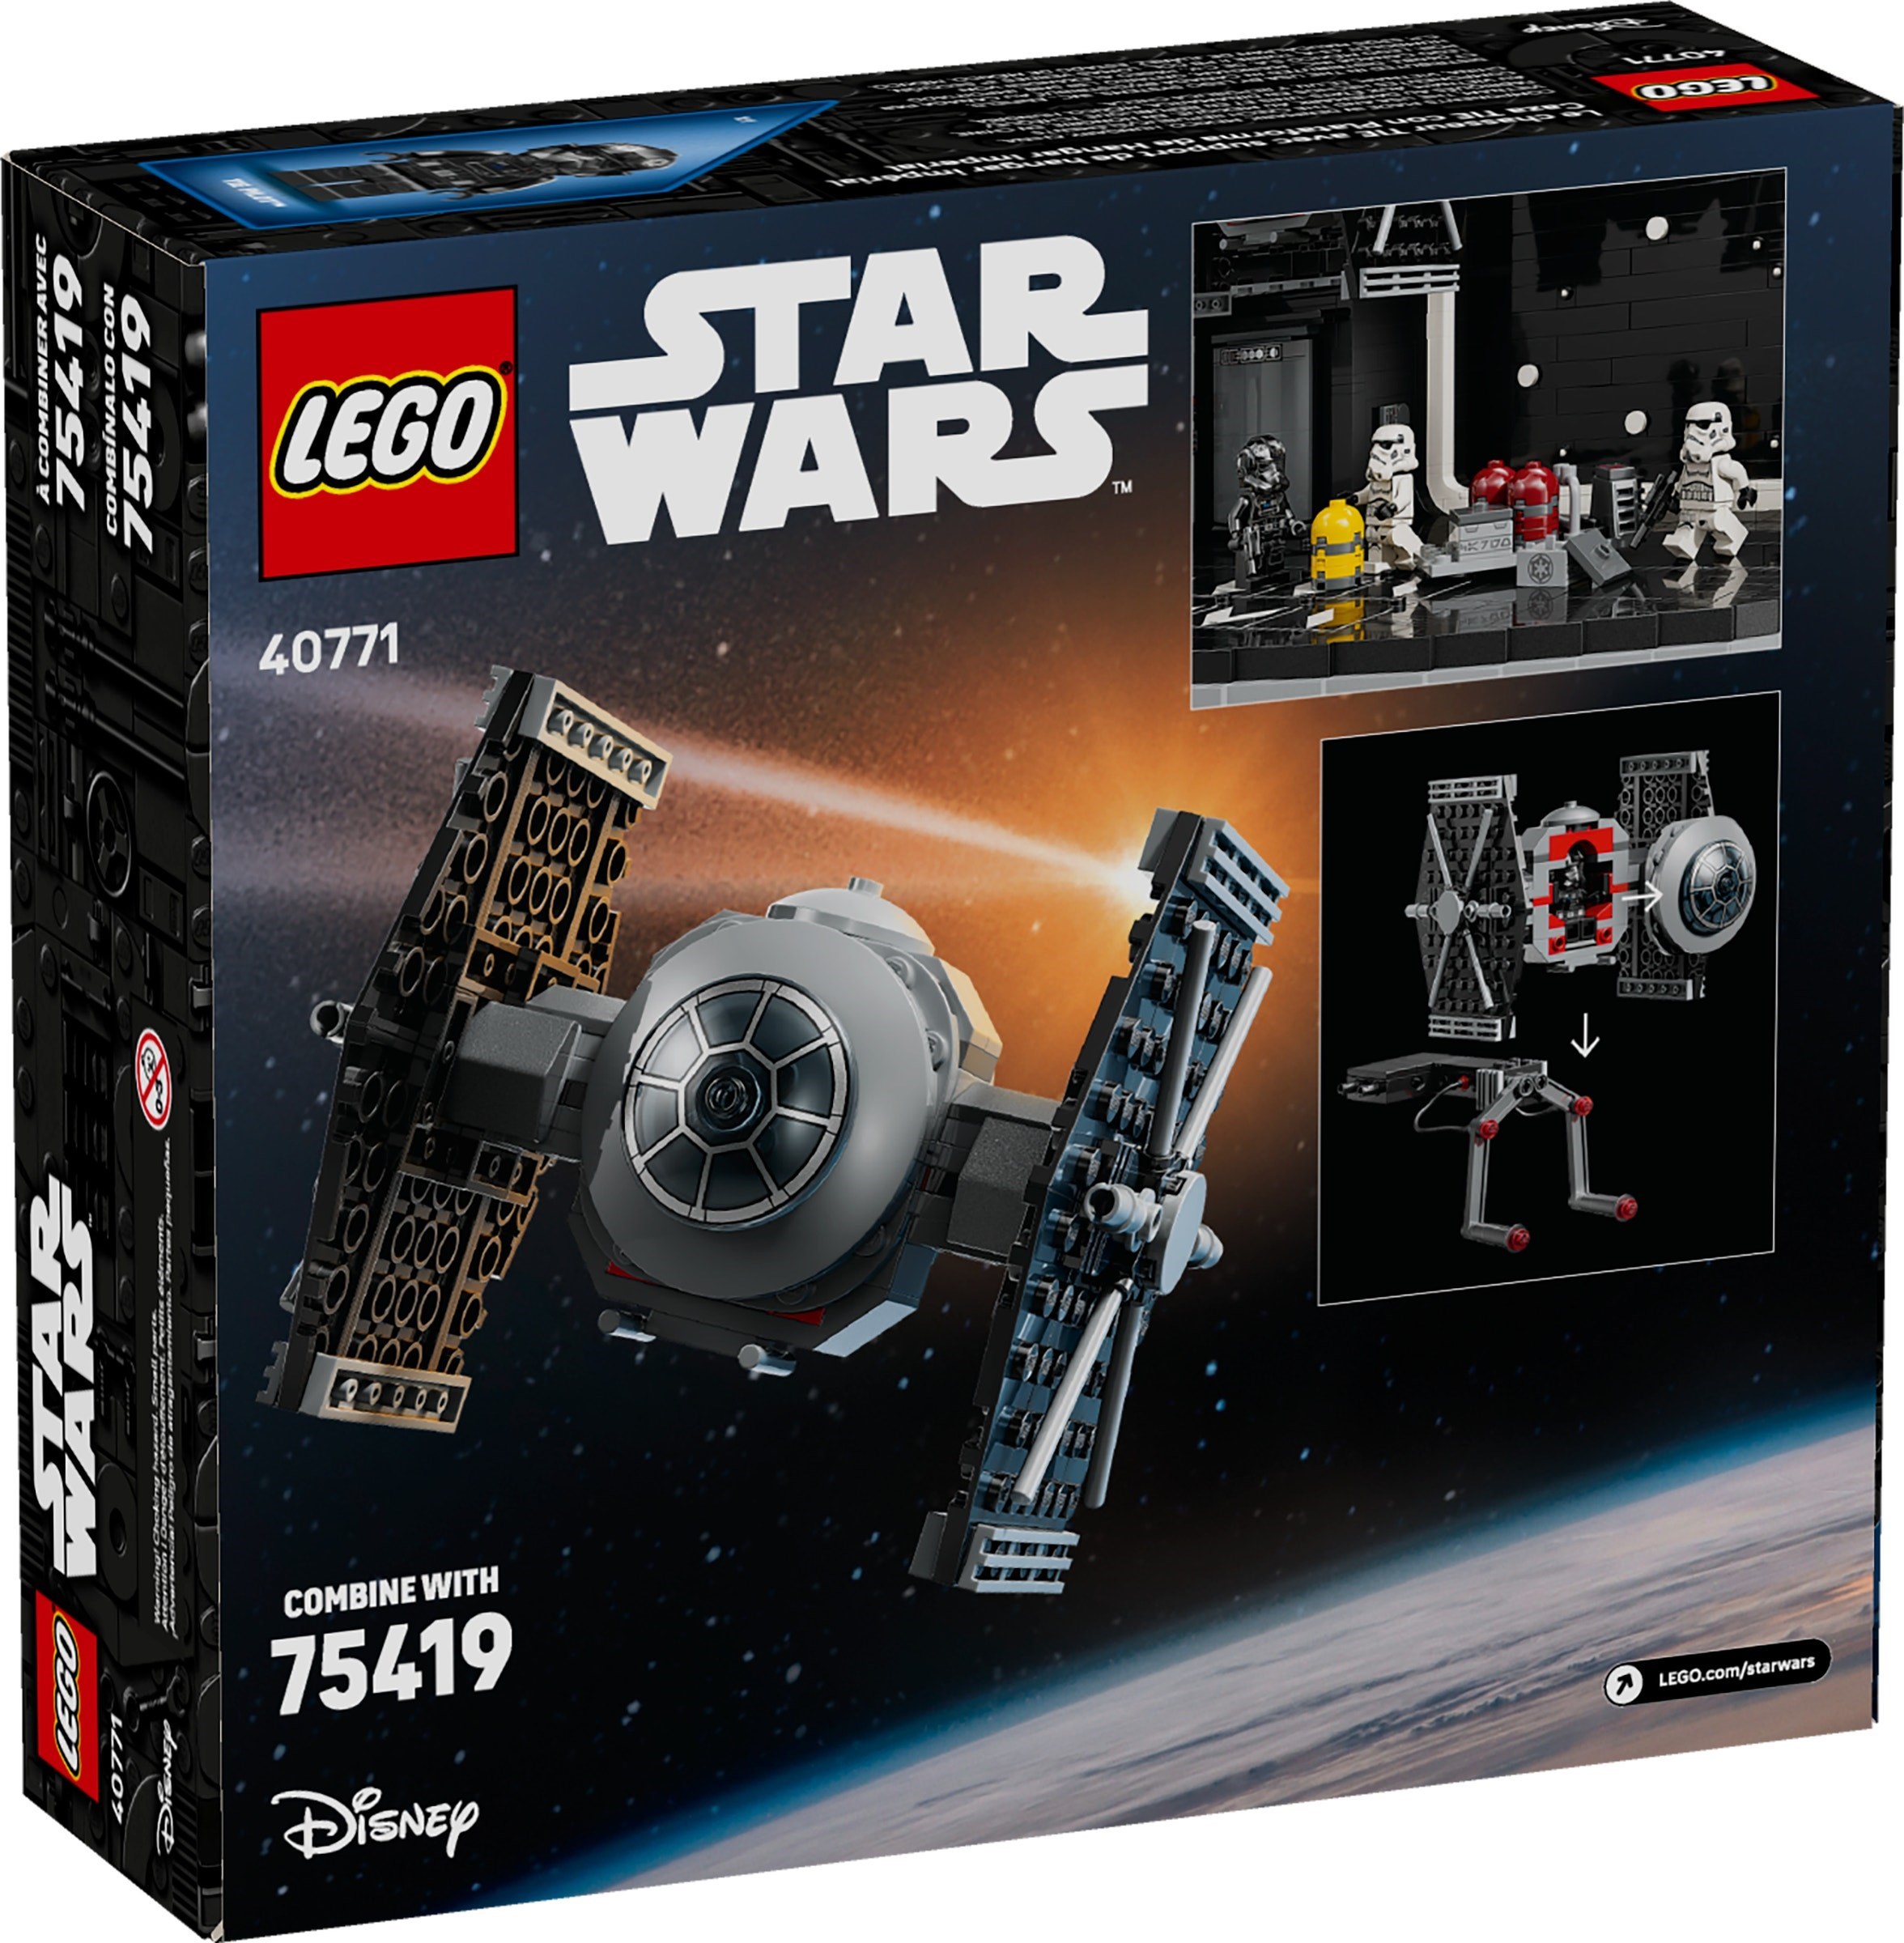
Furthermore, there is room to attach 40771 TIE Fighter with Imperial Hangar Rack beside the shuttle. This set will be available with the Death Star when it is released and I can understand why some fans find that frustrating, although I quite like the idea of a gift-with-purchase directly complementing its associated set and the hangar looks superb with or without a TIE Fighter.
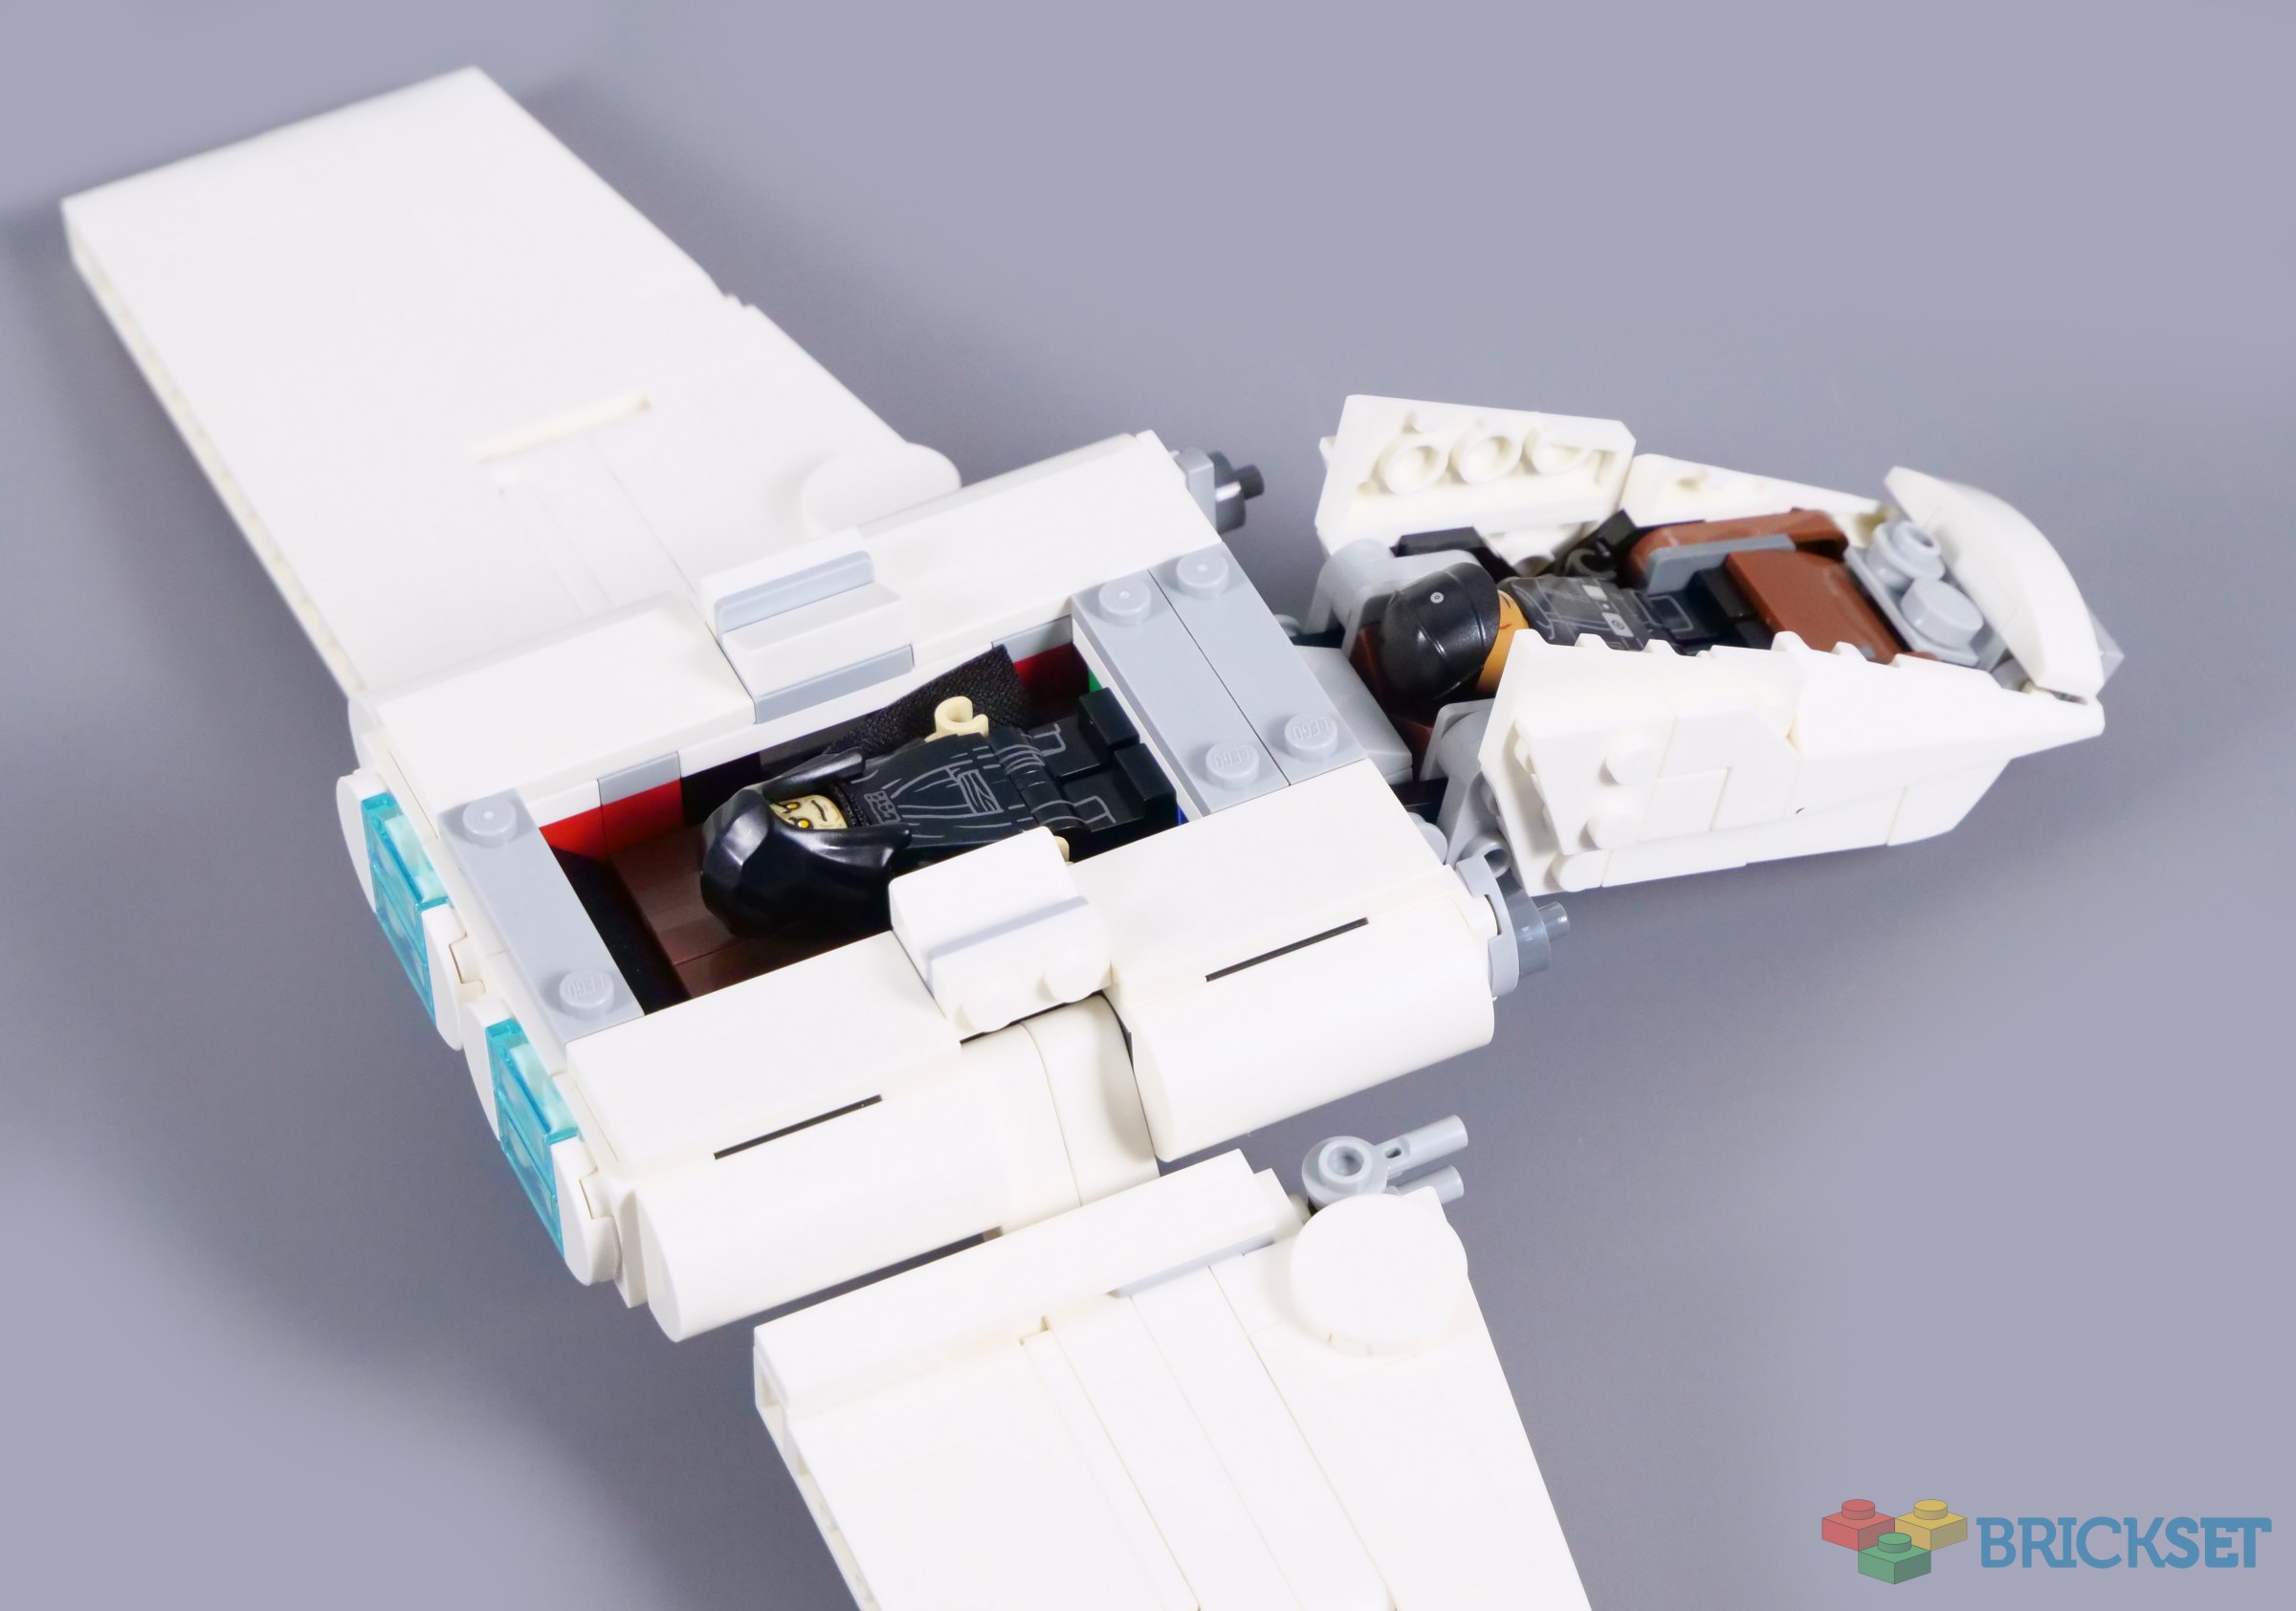
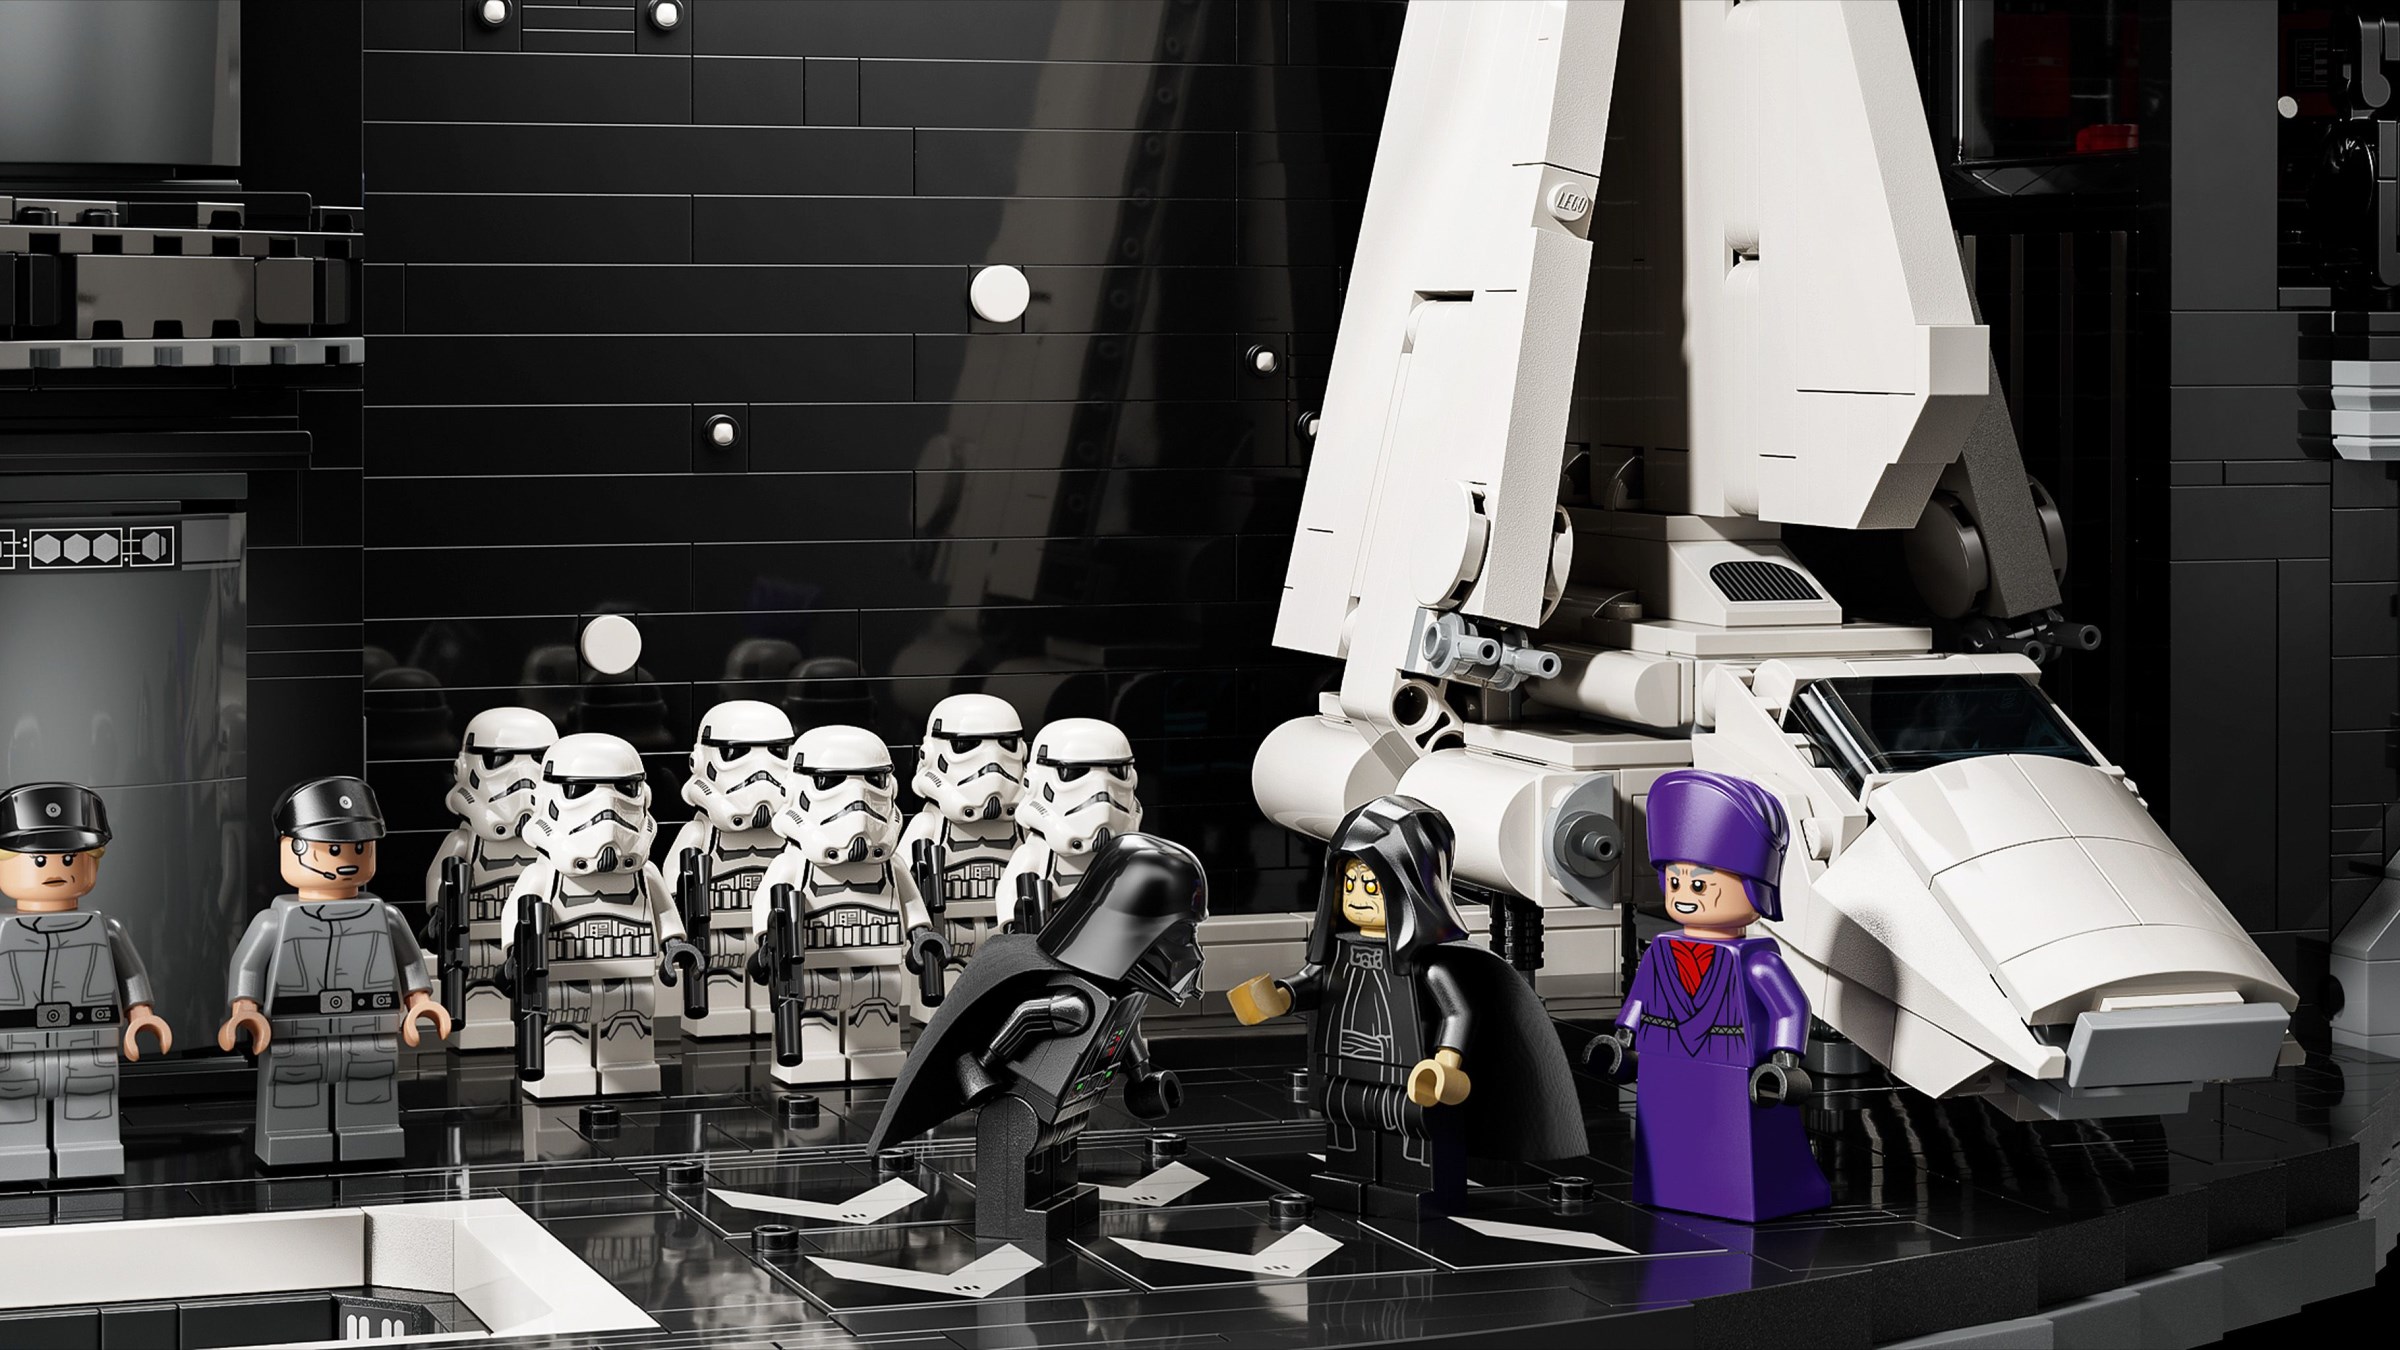
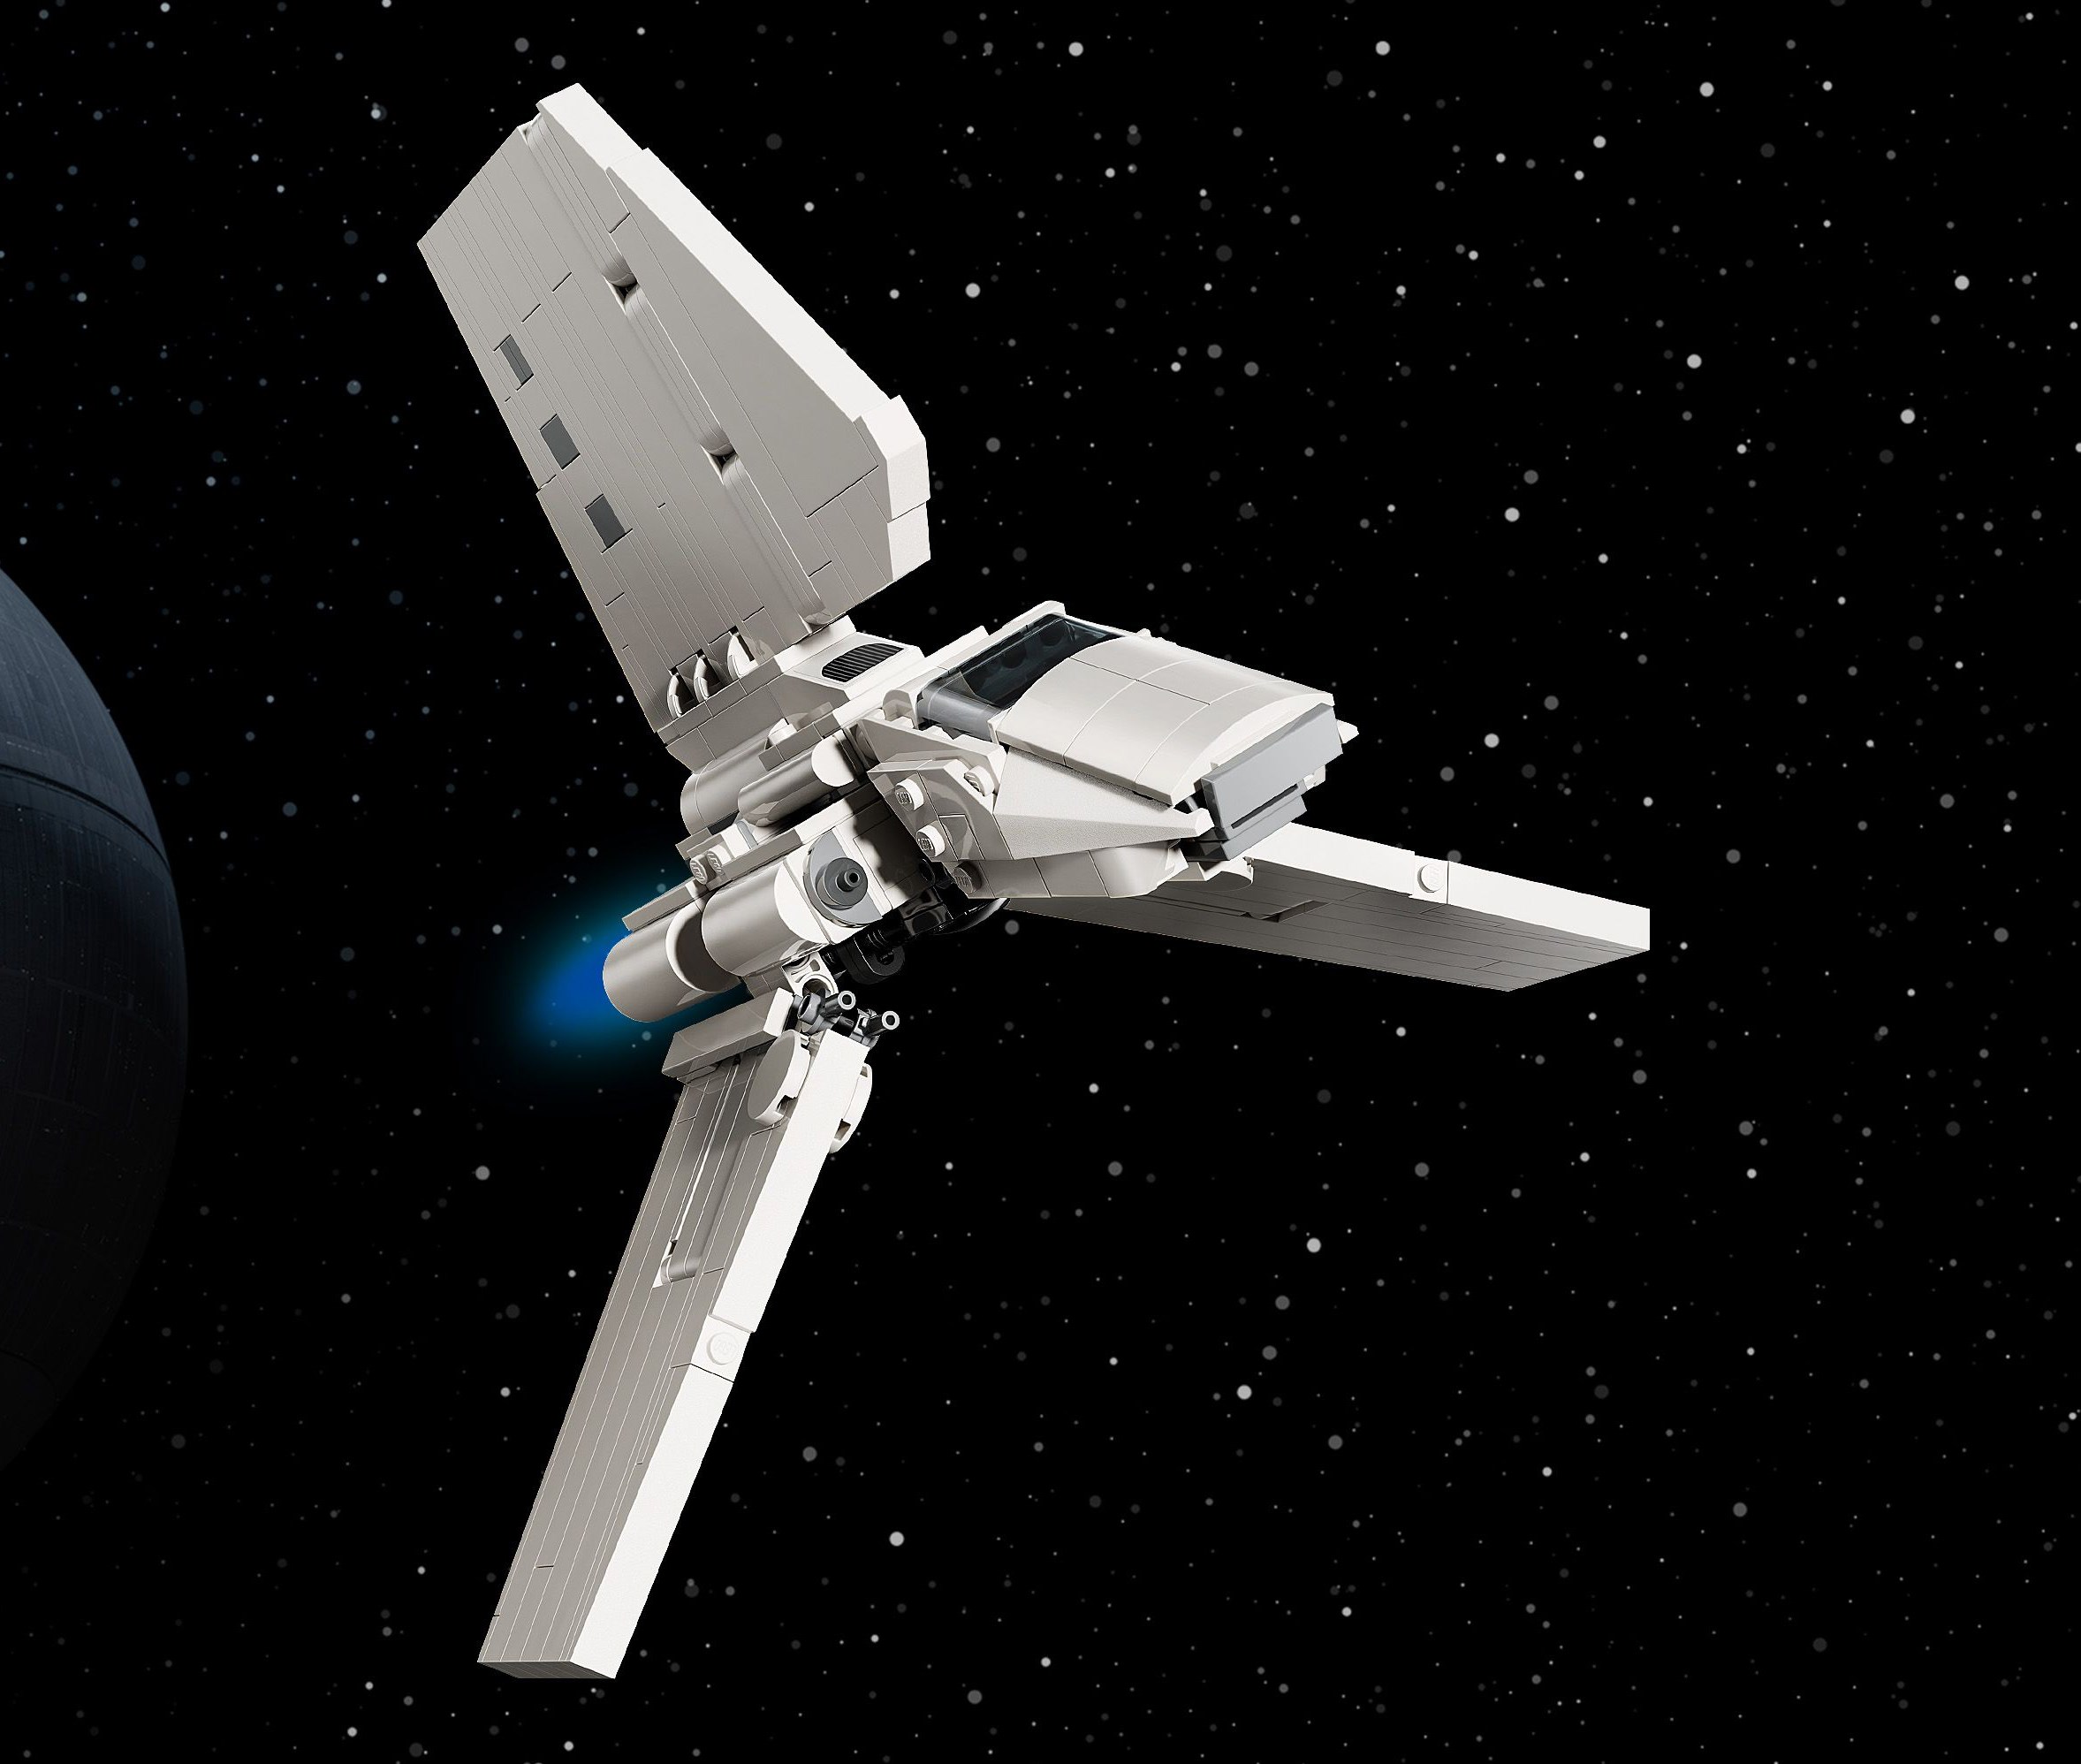
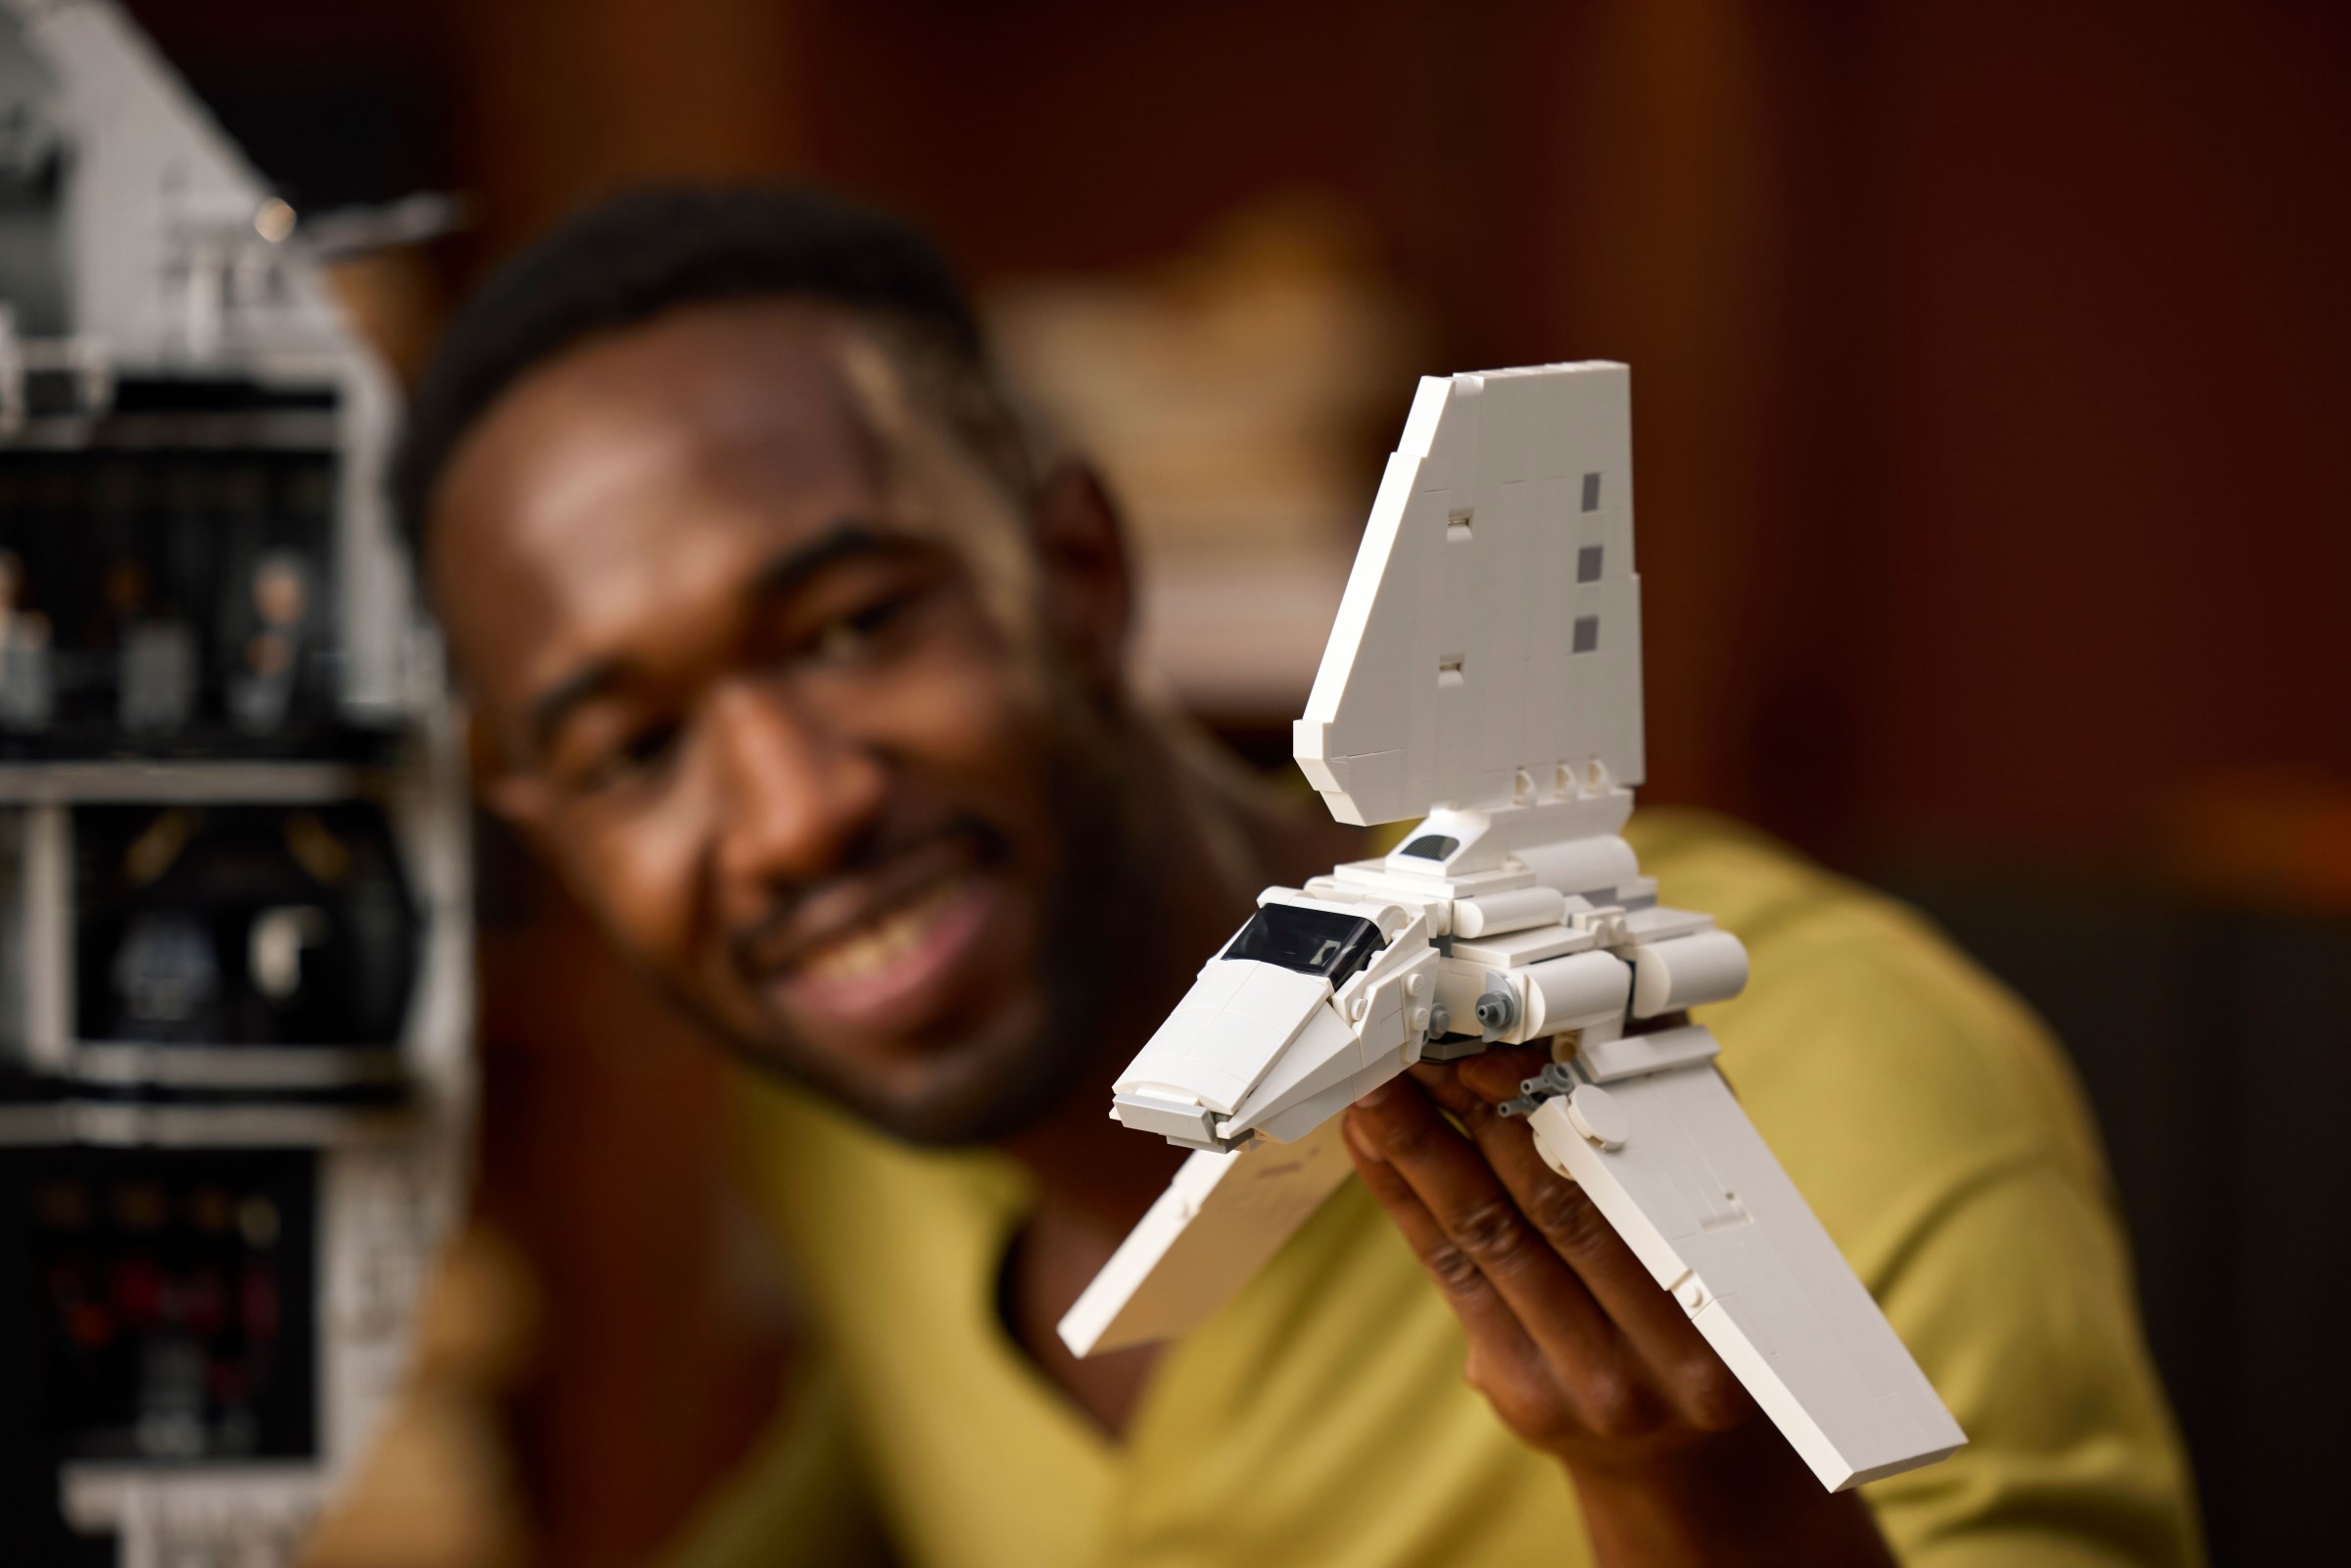
Similarly, I am pleasantly surprised by the Lambda-class Shuttle. The vehicle is obviously quite small and its proportions are distorted because the cockpit module is oversized, compared with the main fuselage. Nonetheless, the overall shape is captured effectively and its most appealing angle is probably the front, which is the side you will normally see in the hangar.
The cockpit is necessarily large to accommodate a minifigure inside, so my greater concern is actually the S-foils, especially when they are folded. The hinges should be a little further out to the sides of the fuselage, which would improve their retracted profile. However, that issue is far less visible with the wings extended and once again, the shuttle's elegant shape looks lovely.
You can remove the top of the fuselage and the cockpit to place the Imperial Shuttle Pilot and a passenger inside. Both minifigures need to lie down, which is never ideal, but I am impressed there is room for them at all, with reddish brown pieces suggesting an interior. LEGO shuttles should always accommodate at least one passenger and this example delivers!
Alternatively, you can display 75375 Millennium Falcon here, as the Starship Collection vessel looks excellent inside the hangar bay. The entrance on the back wall is an ideal size to look as though the Millennium Falcon has just passed through.
Though I wish they were printed, the markings on the hangar floor are accurate and I love its shiny finish, with only occasional studs to attach characters. Additionally, the hole where a lift would rise from below looks splendid, even though it lacks a working lift platform. This is a fair compromise, with nowhere to go underneath.
In fact, under the hangar floor is a familiar stack of 2x2 round elements, featuring the red and green stripes of Octan. 75313 AT-AT also included several of these colourful drums, so Octan evidently supplies fuel to the Galactic Empire!
Gathering lots of the included minifigures to greet Darth Vader or the Emperor creates a good display, but this highlights the omission of Moff Jerjerrod, which is disappointing. However, the hangar does include a crate with some dark red and yellow parts inside, based on boxes found around the hangars aboard the Death Star II, which is a nice touch.
Similarly, the vertical lights on the side wall look fantastic, as does the starry backdrop beyond the hangar entrance. White wands work brilliantly as distant stars, with several 1x1 round tiles scattered among them. I wish the top corners of the border around the entrance were rounded though, to match the bottom corners.
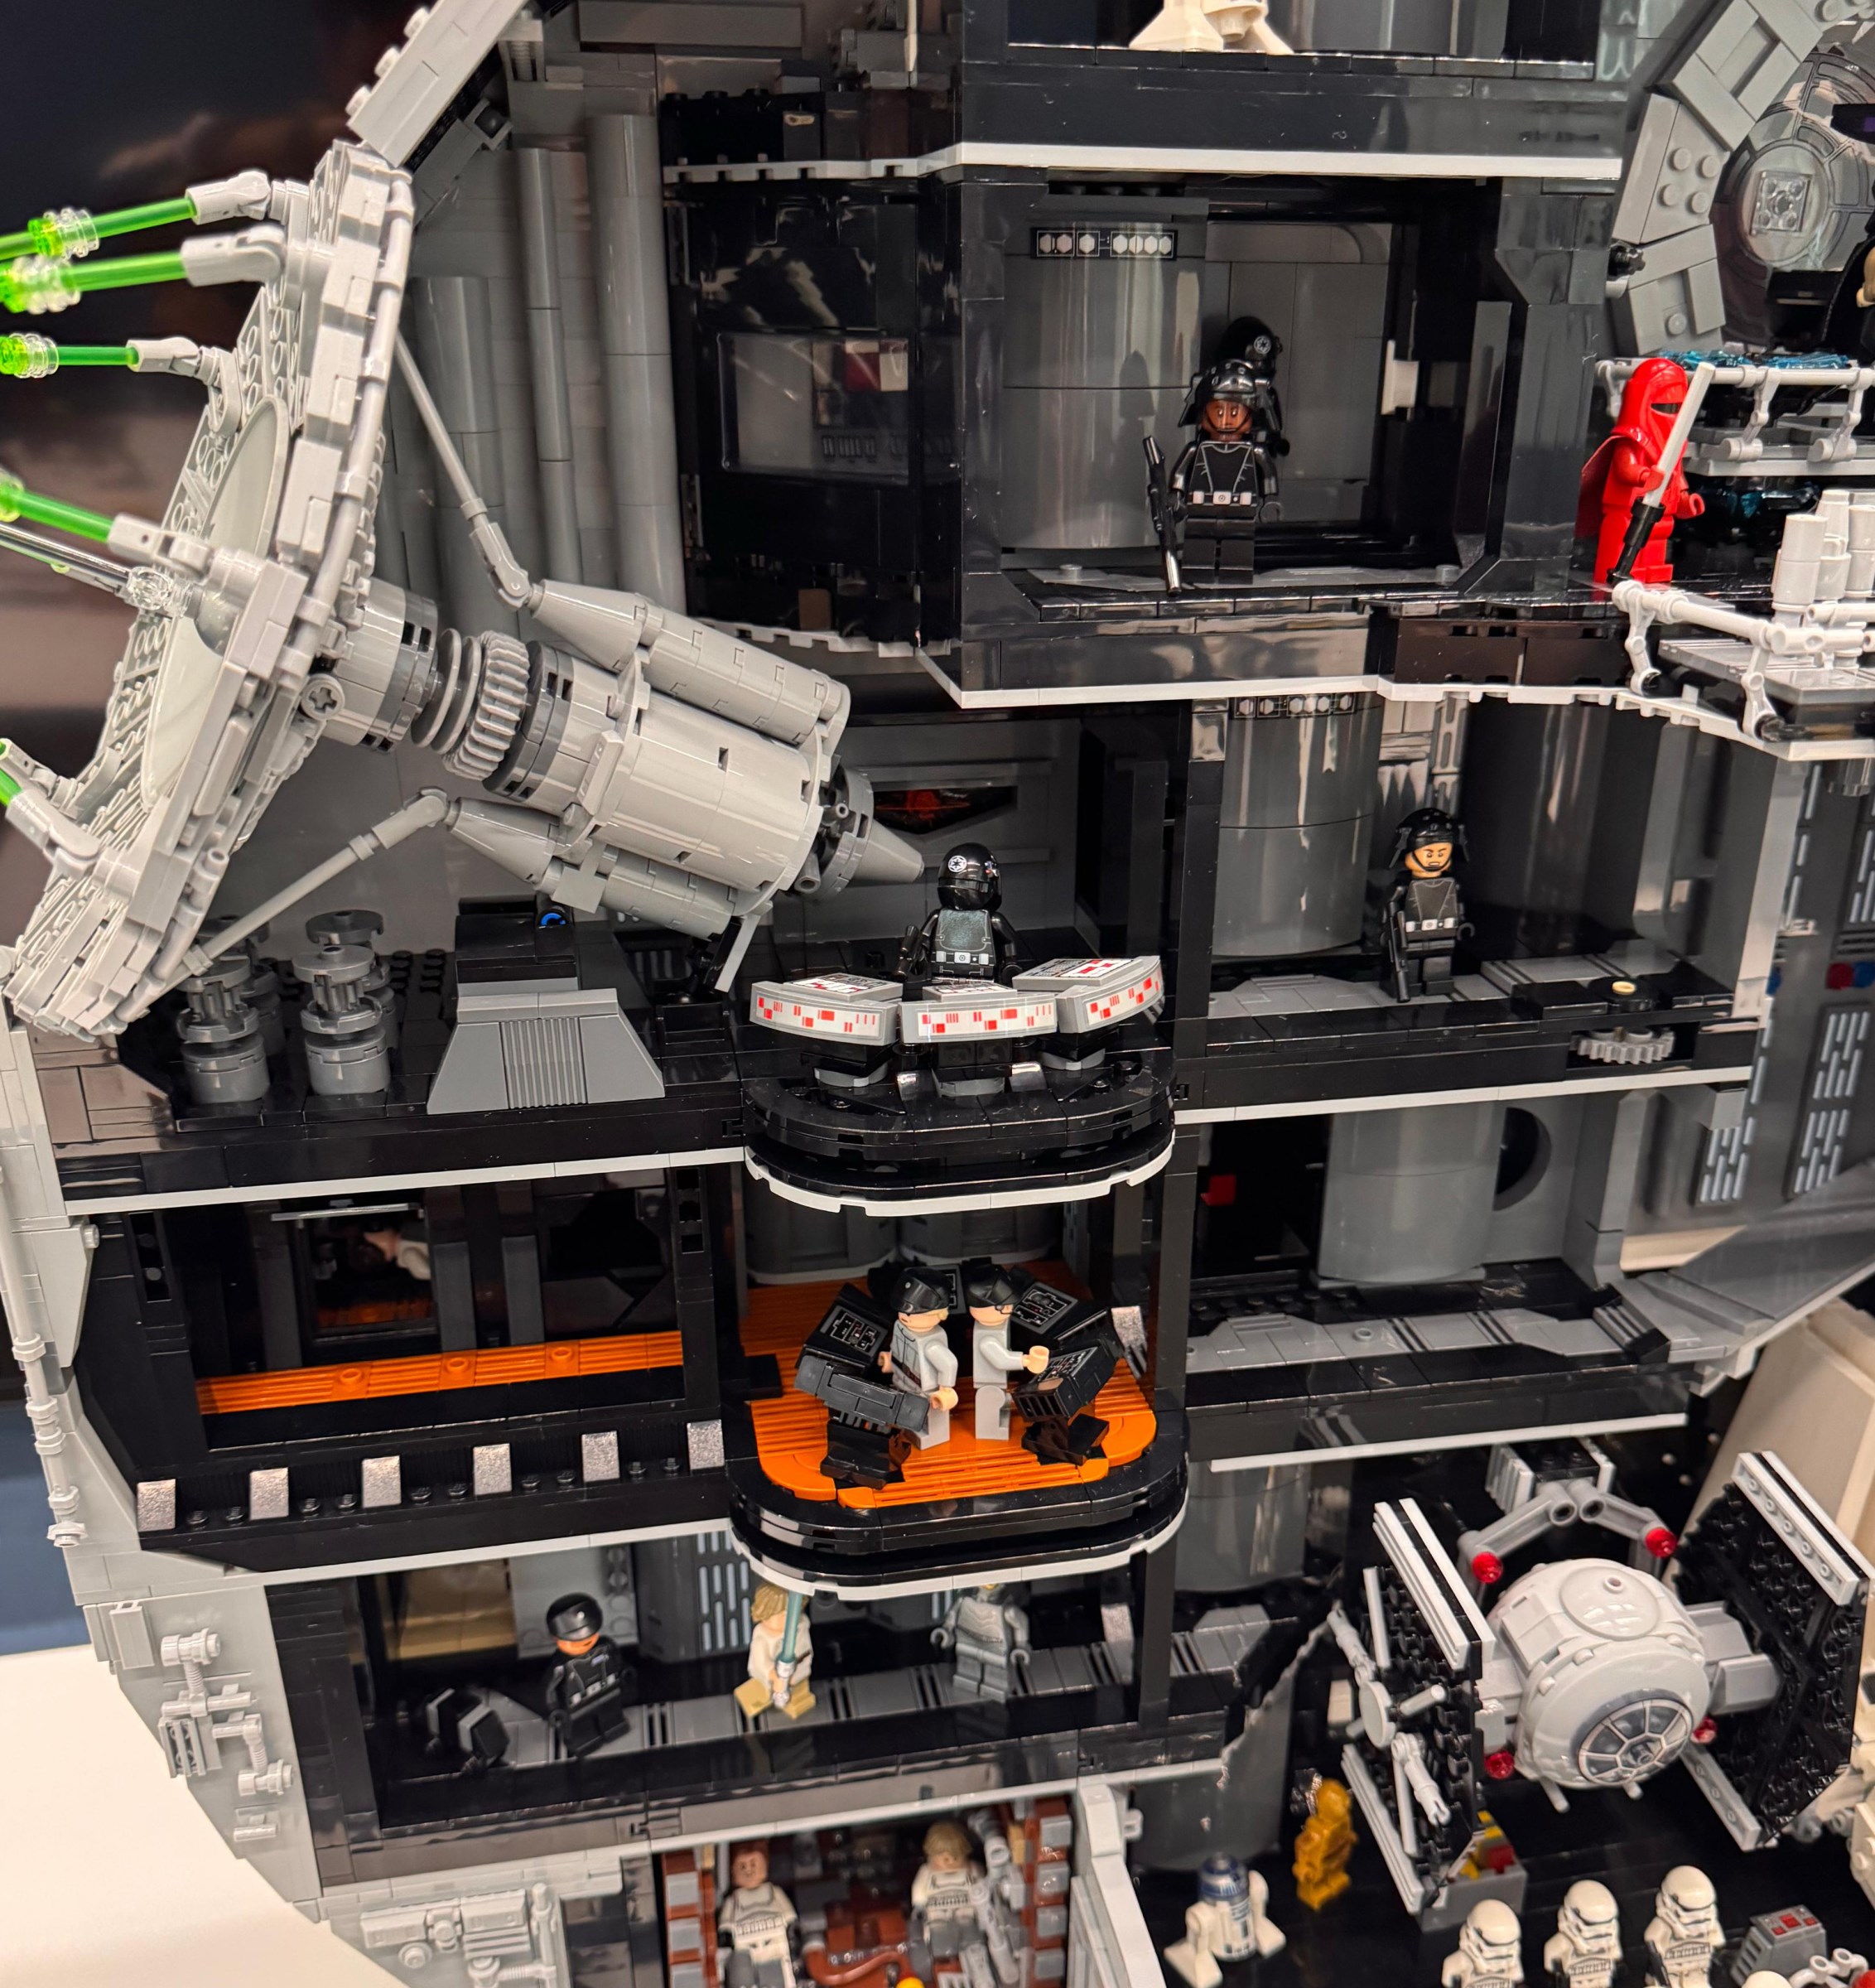
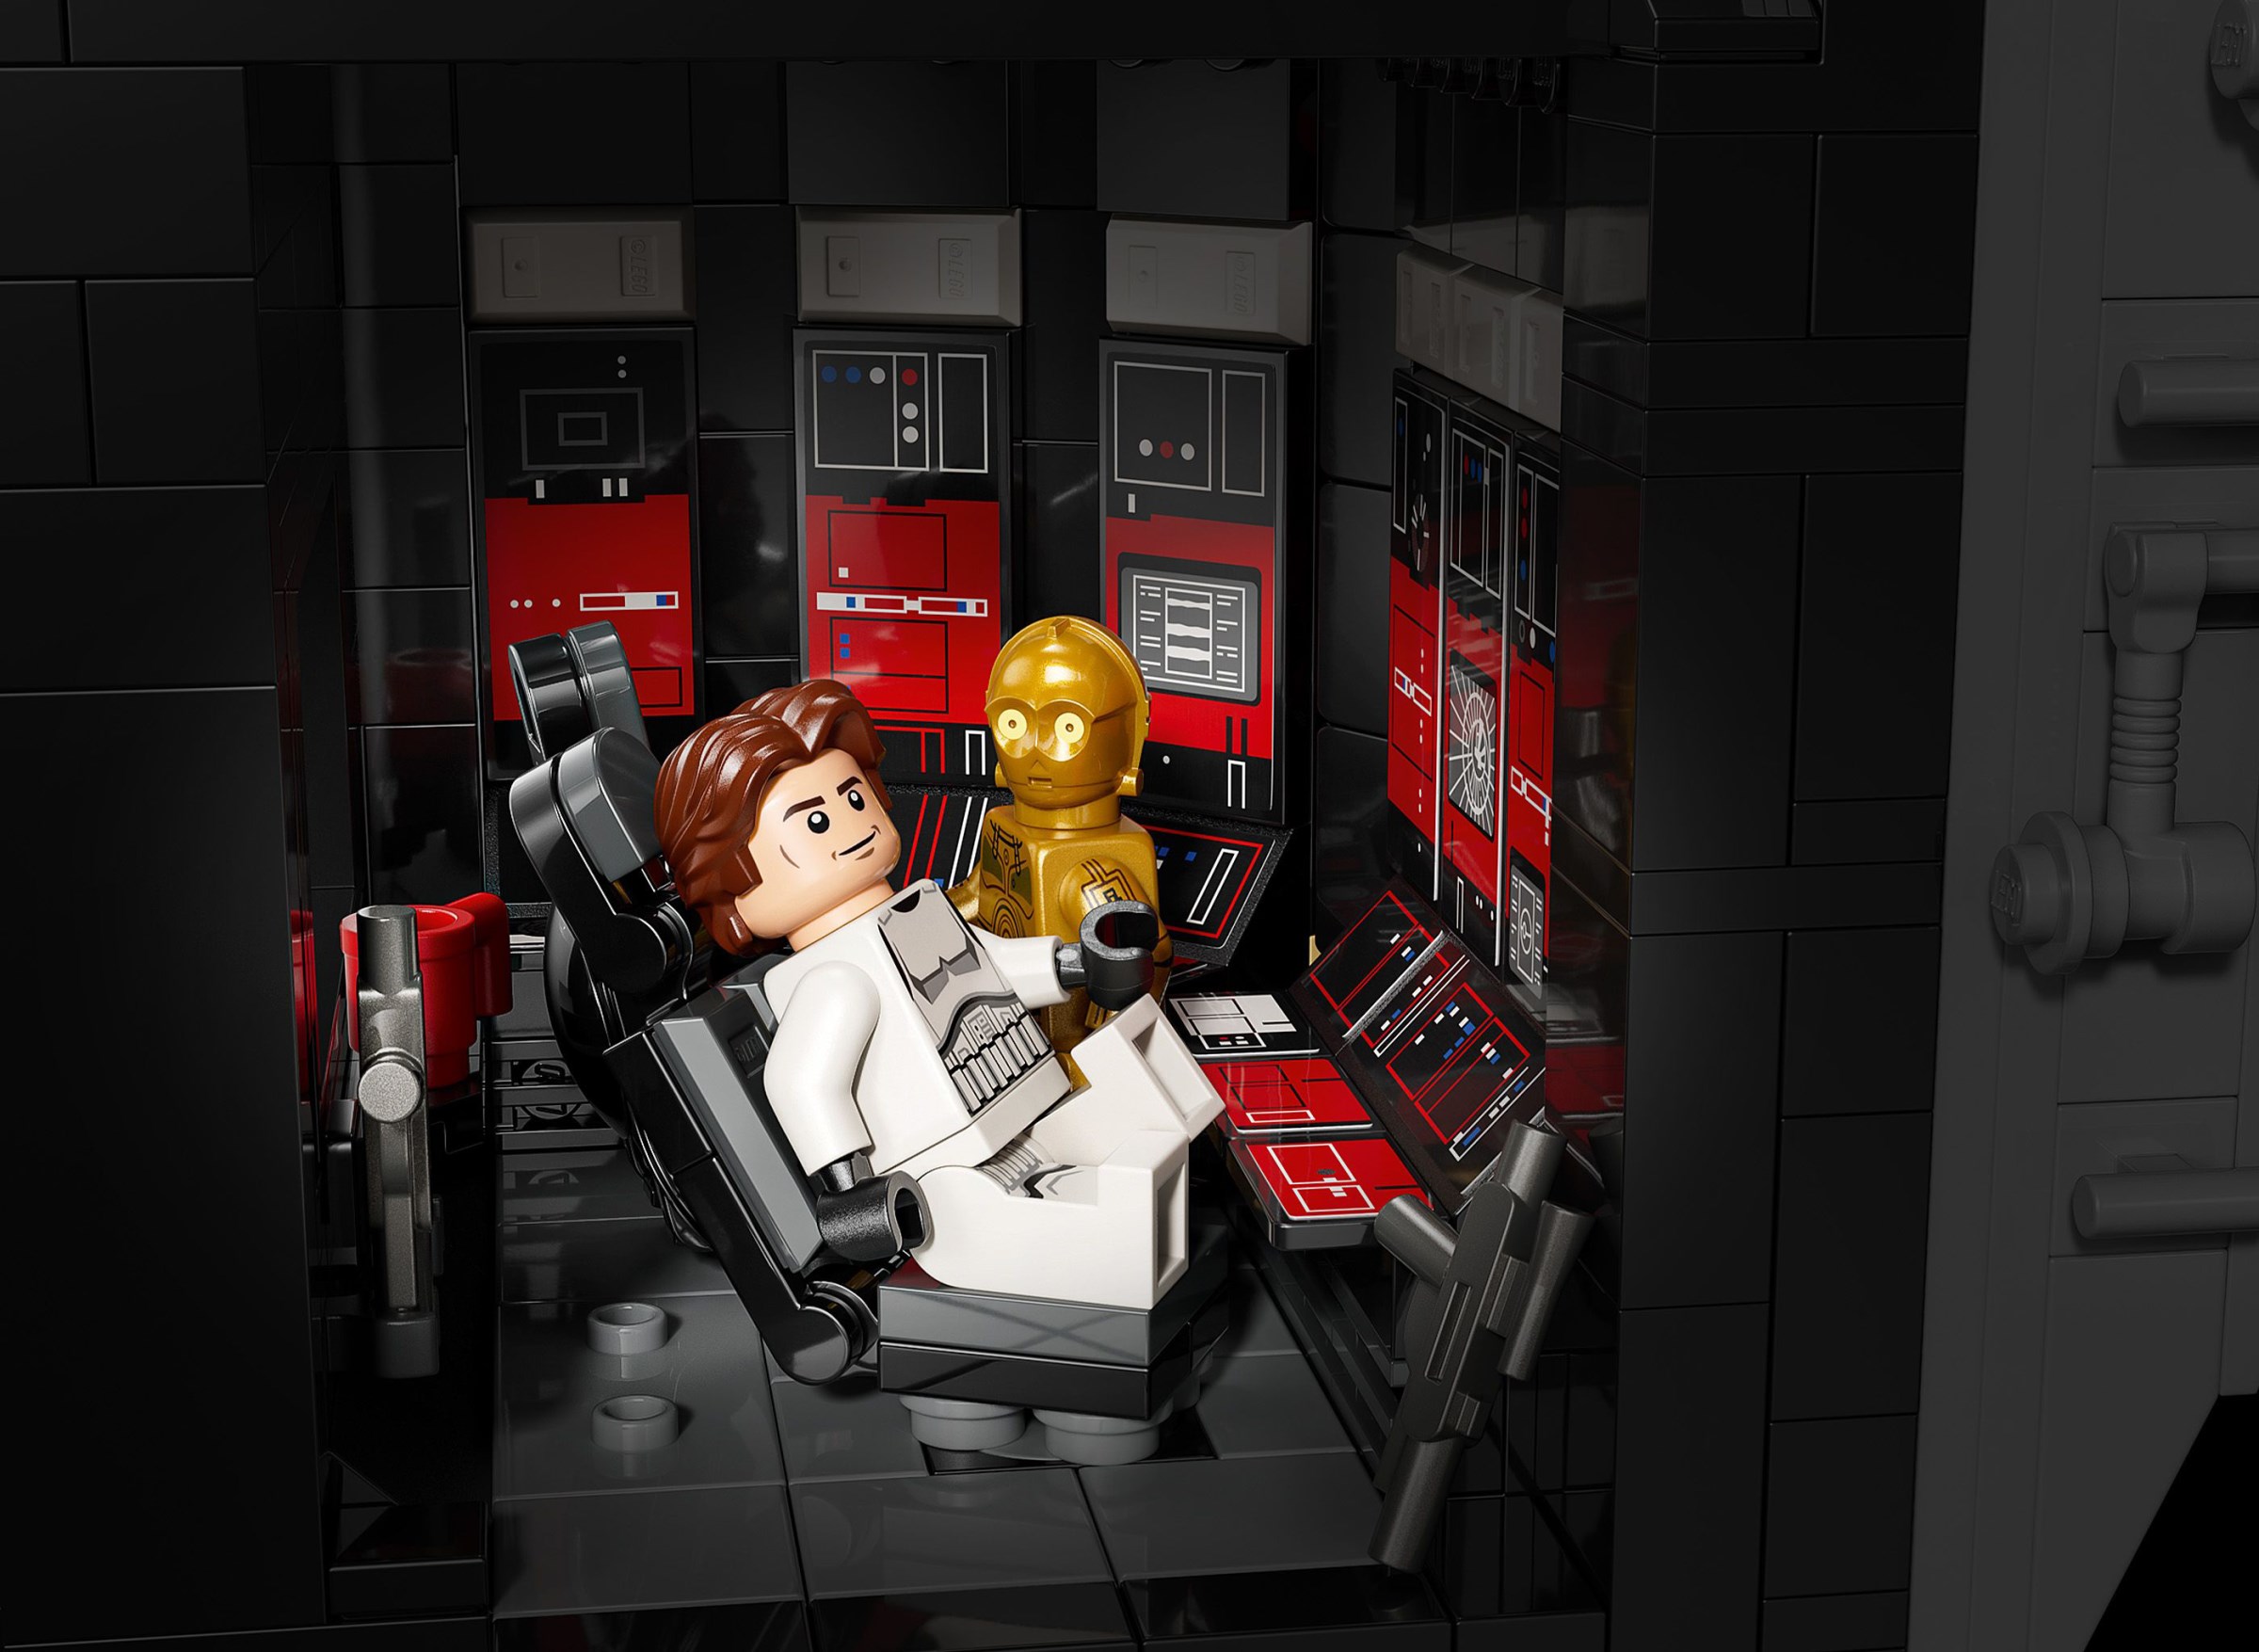
Once the Millennium Falcon is captured aboard the Death Star, the heroes quickly make their way to a control room overlooking the hangar. Vague representations of the room appeared in 10188 Death Star and 75159 Death Star, but this is its first proper appearance, featuring nicely constructed chairs and the distinctive red consoles shown onscreen.
Seventeen stickers are applied in this room alone, ensuring the computers are as detailed and faithful to the movie as possible. They look fantastic, but are not always easy to see and I think the control room should have been able to slide out, like others around the Death Star. You can remove the meditation chamber above, giving slightly better access, but it could be improved.
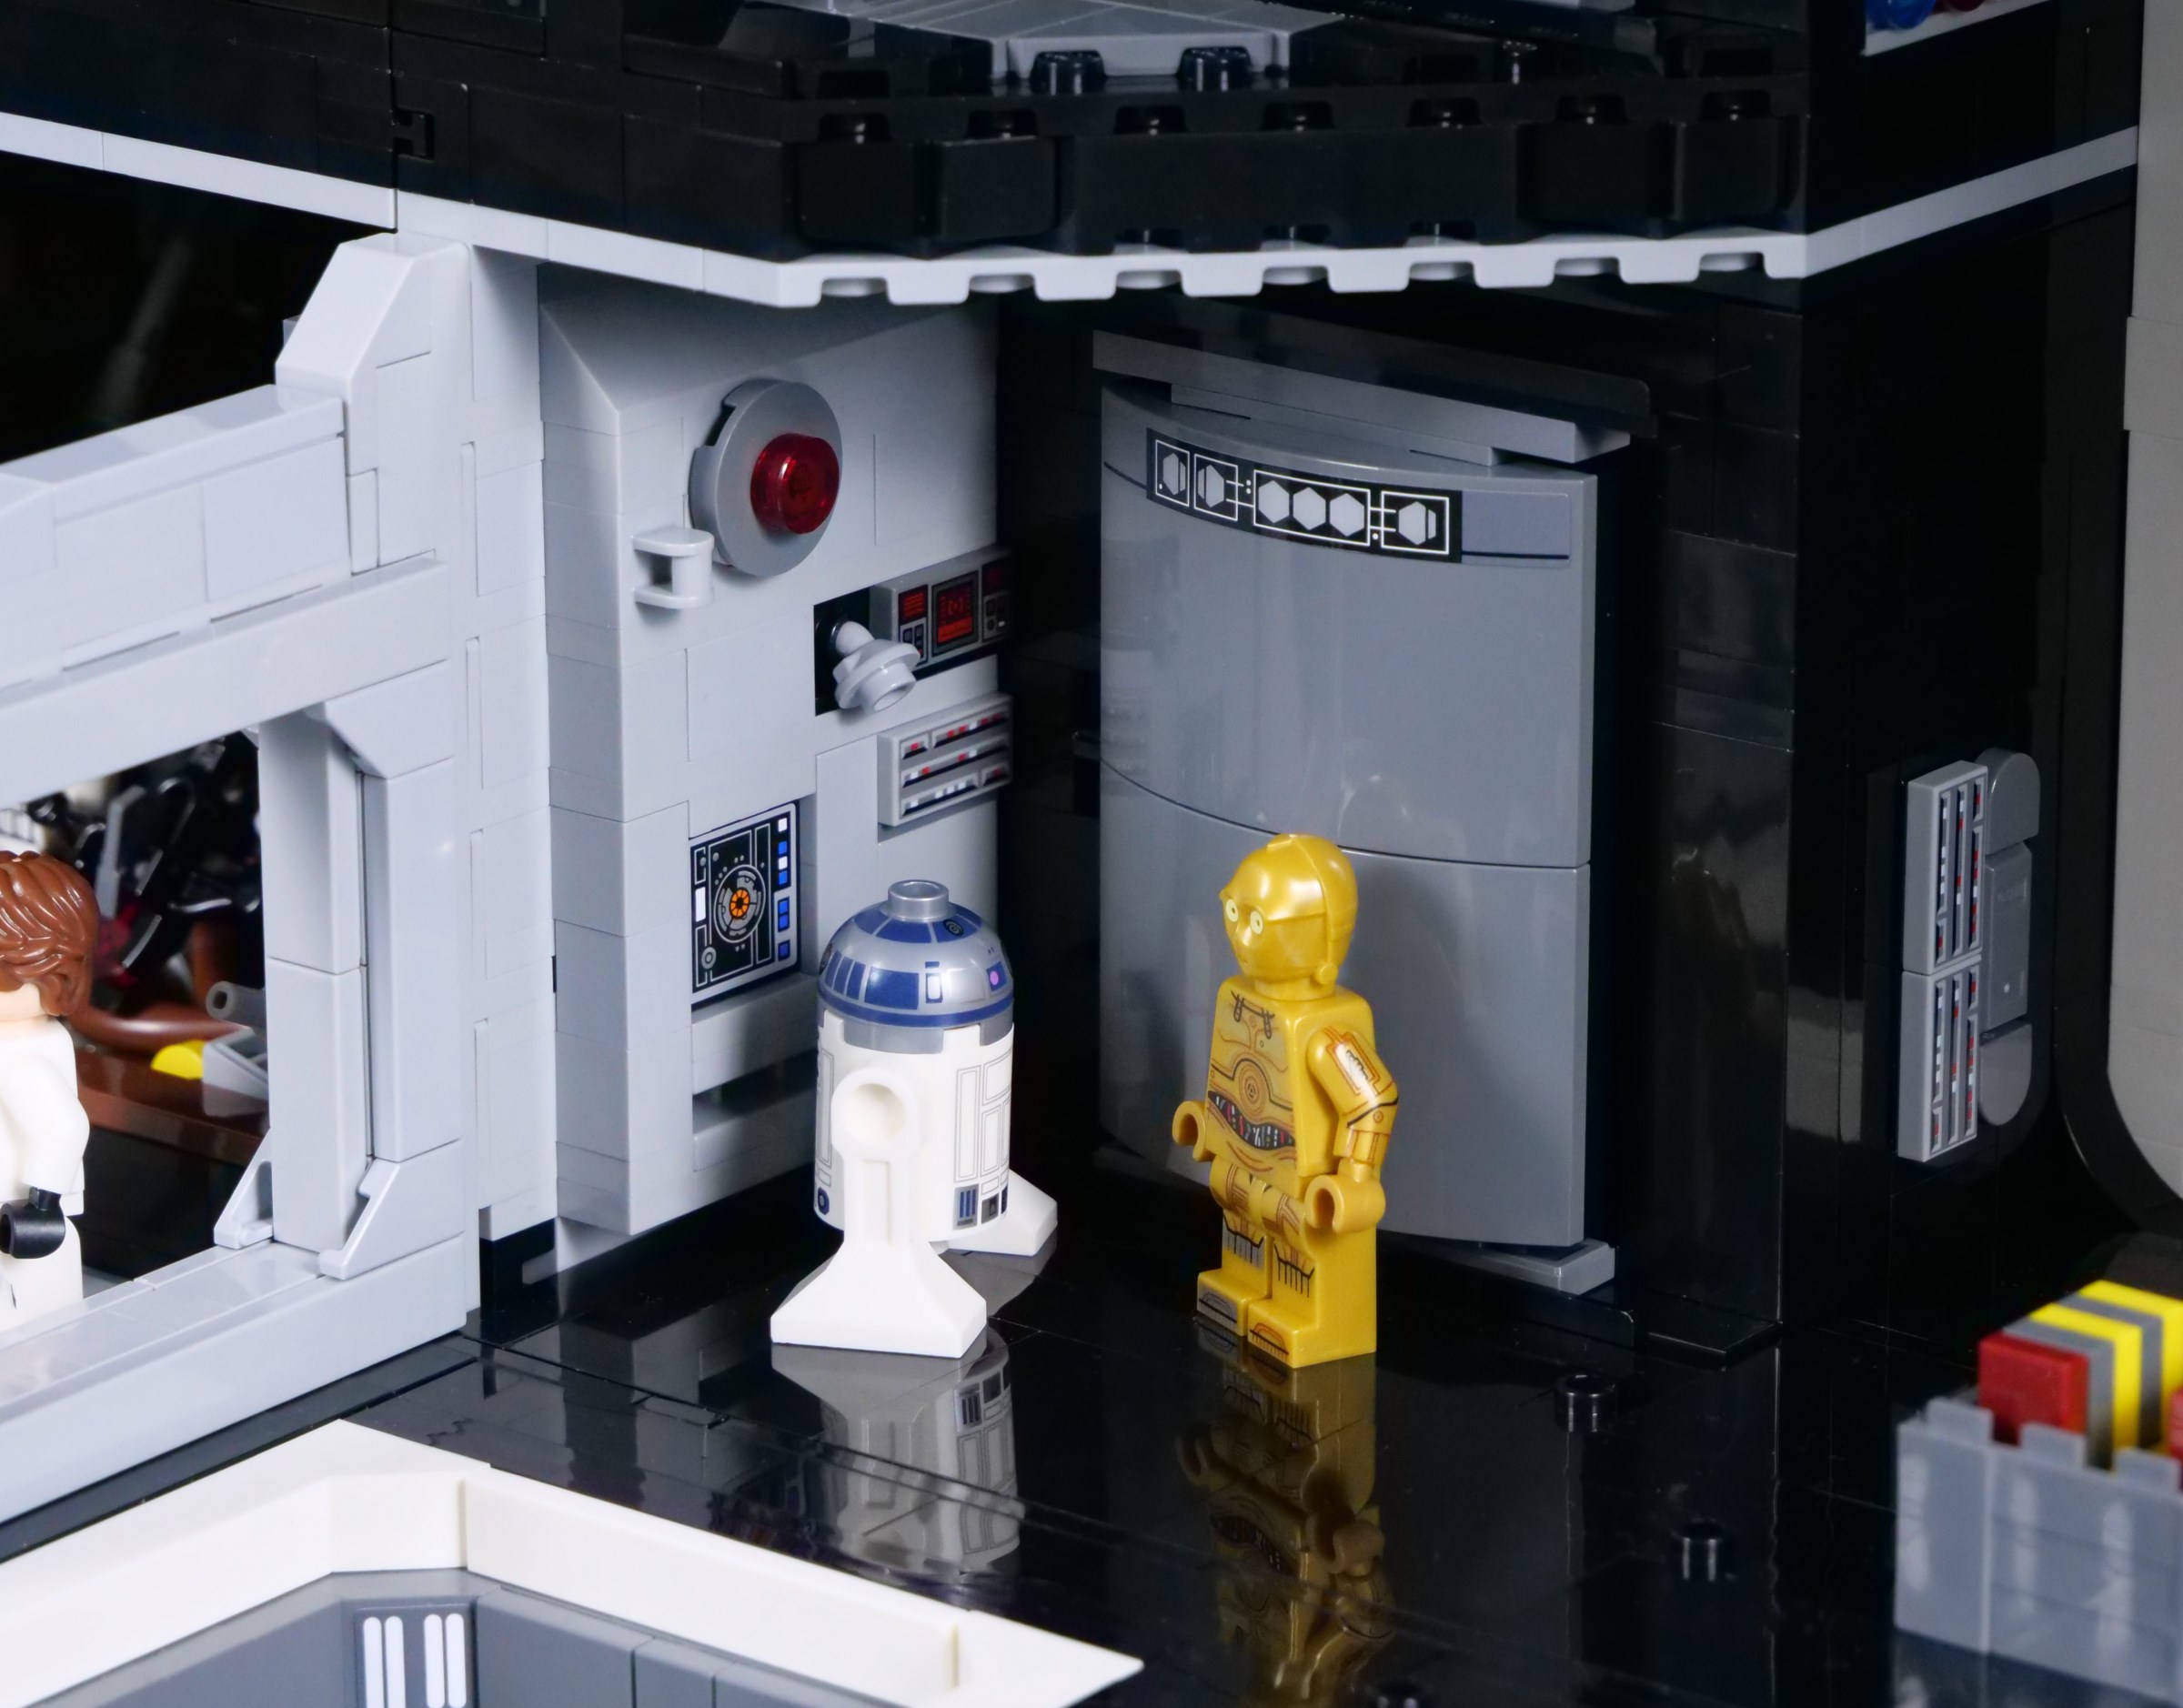
On the other side of the hangar we find R2-D2 and C-3PO, ready to interface with a computer terminal and shut down the trash compactor. I love the brick-built details on the wall, matching the droids' environment in the movie exactly. Additionally, you can see controls for the hangar's external shield on the side of the lift.
Turbolifts enable rapid transit around the Death Star onscreen and this LEGO model includes one too, connecting its six levels. The curved doors slide open on each floor and are adorned with stickers to replicate the indicators seen in A New Hope. There is only enough room for two minifigures inside though, with their feet tucked into a slot to hold them in place.
I was hoping for a more spacious lift, able to accommodate Luke, Han and Chewbacca for their journey to the detention block, at least. However, this design works incredibly smoothly and you can see when the lift reaches each level, thanks to white 1x2 ingots visible on the sides.
The generic corridor on this floor is one of my favourite additions to this Death Star, compared with previous models. The area is easily adaptable to various scenes and the printed lights on the wall look splendid. 28 of these tiles appear throughout the model and I hope they are used elsewhere in the future.
A sliding door is found at the end of the corridor, opening to reveal the interrogation droid. Two roller skate pieces are connected to the door to stop it closing completely, as it could otherwise become stuck against the wall.
There is more to discover past the droid, including a cache of collectable studs from the LEGO Star Wars video games and even further into this hidden room: a minikit! The corridor needs to be shallower than other sections of the Death Star to facilitate a feature discussed later, so I am glad this space was used.
Continuing to the next floor, we reach the detention block where Princess Leia is held captive. This area stands out to a surprising degree, thanks to its dark orange flooring, which matches the detention area shown onscreen. Also, I will take this opportunity to mention the mechanical detail around the edge of the Death Star, as it looks particularly effective here.
The ring of consoles in the control room is included, each featuring accurate stickers and with studs to stand two minifigures in the middle. That being said, I wish the angled consoles were attached to 2x2 jumper plates rather than 2x2 turntables, so they remained fixed at the proper angles.
You can remove a segment of the floor above the detention block control area, giving a better view of the cameras and twin turbolifts. Superb though these look, I wonder whether the main turbolift could have been constructed with a door to one side on this floor, thus leading directly into detention block AA-23 and avoiding the need for lift façades.
Behind the turbolifts is another enjoyable Easter egg. This stickered chart shows the appropriate height of a Stormtrooper, in reference to Leia's comment when Luke Skywalker arrives to rescue her!
The cell corridor is raised in relation to the control area and features angular walls, exactly as seen in the movie. The corridor is easily accessible to place minifigures inside and a sticker is applied at the end, showing the corridor vanishing into the distance, which looks quite effective.
Leia's cell includes an opening hatch from the corridor, but access it much easier through the side. The whole interior slides out, including more dark orange flooring, a rudimentary bed for the princess and a trans-clear pole to attach the interrogation droid. The details included seem reasonable, but I think the cell could have been expanded.
On the other hand, space is reserved for another important feature of the detention area, as the corridor includes a hole blasted through its wall. You can therefore drop figures through the hole and into the Death Star trash compactor two floors below, passing between the minikit and studs en route!
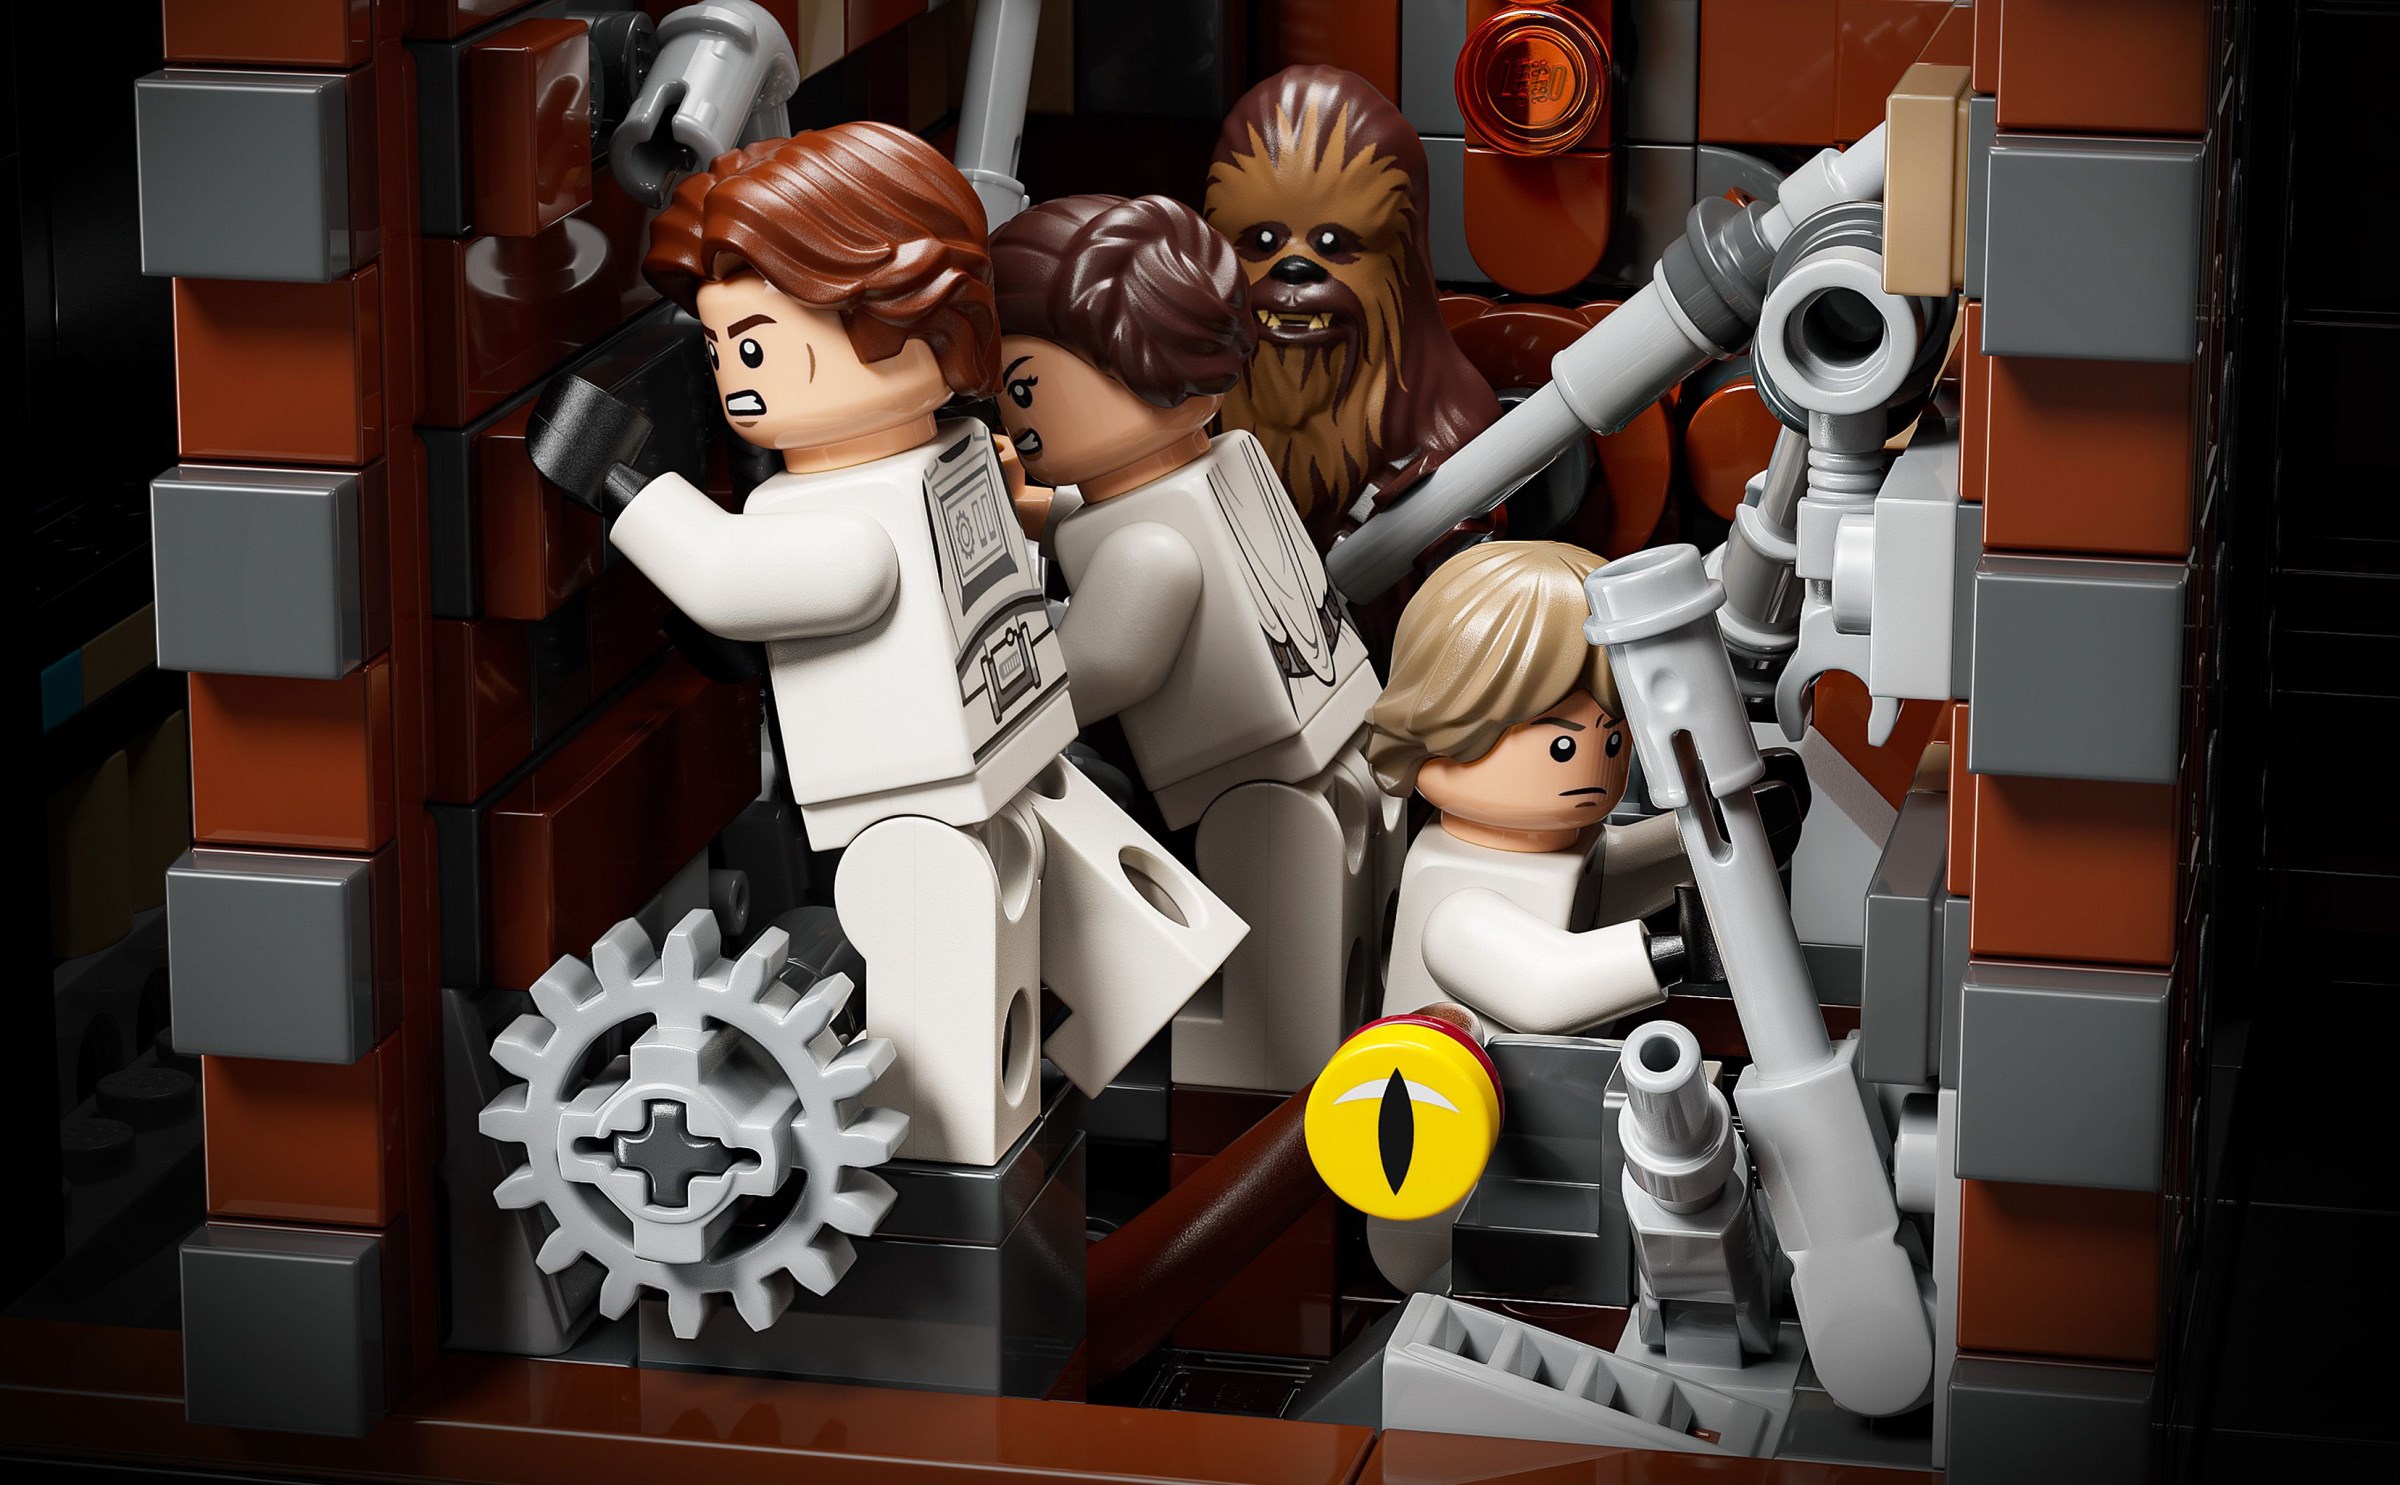
The trash compactor is quite similar 75339 Death Star Trash Compactor Diorama launched a couple of years ago, albeit smaller. The texture on the walls looks great and I love the rubbish inside, which appears to be scattered around randomly, but is actually attached to the walls, so everything stays together when those walls begin to close.
Fortunately, part of the corridor level slides out to access the trash compactor, also revealing trans-orange lights on the door at the back, which correspond with the film. There is plenty of space for a few minifigures and Chewbacca even comes with an accessory to brace the walls, as well as his standard bowcaster.
The walls are controlled using a geared mechanism on the back, moving them back and forth with the turn of a gear and raising the dianoga's eyestalk as the walls slide inwards! I am fairly satisfied with this function, but there is a little more play in the mechanism than I hoped.
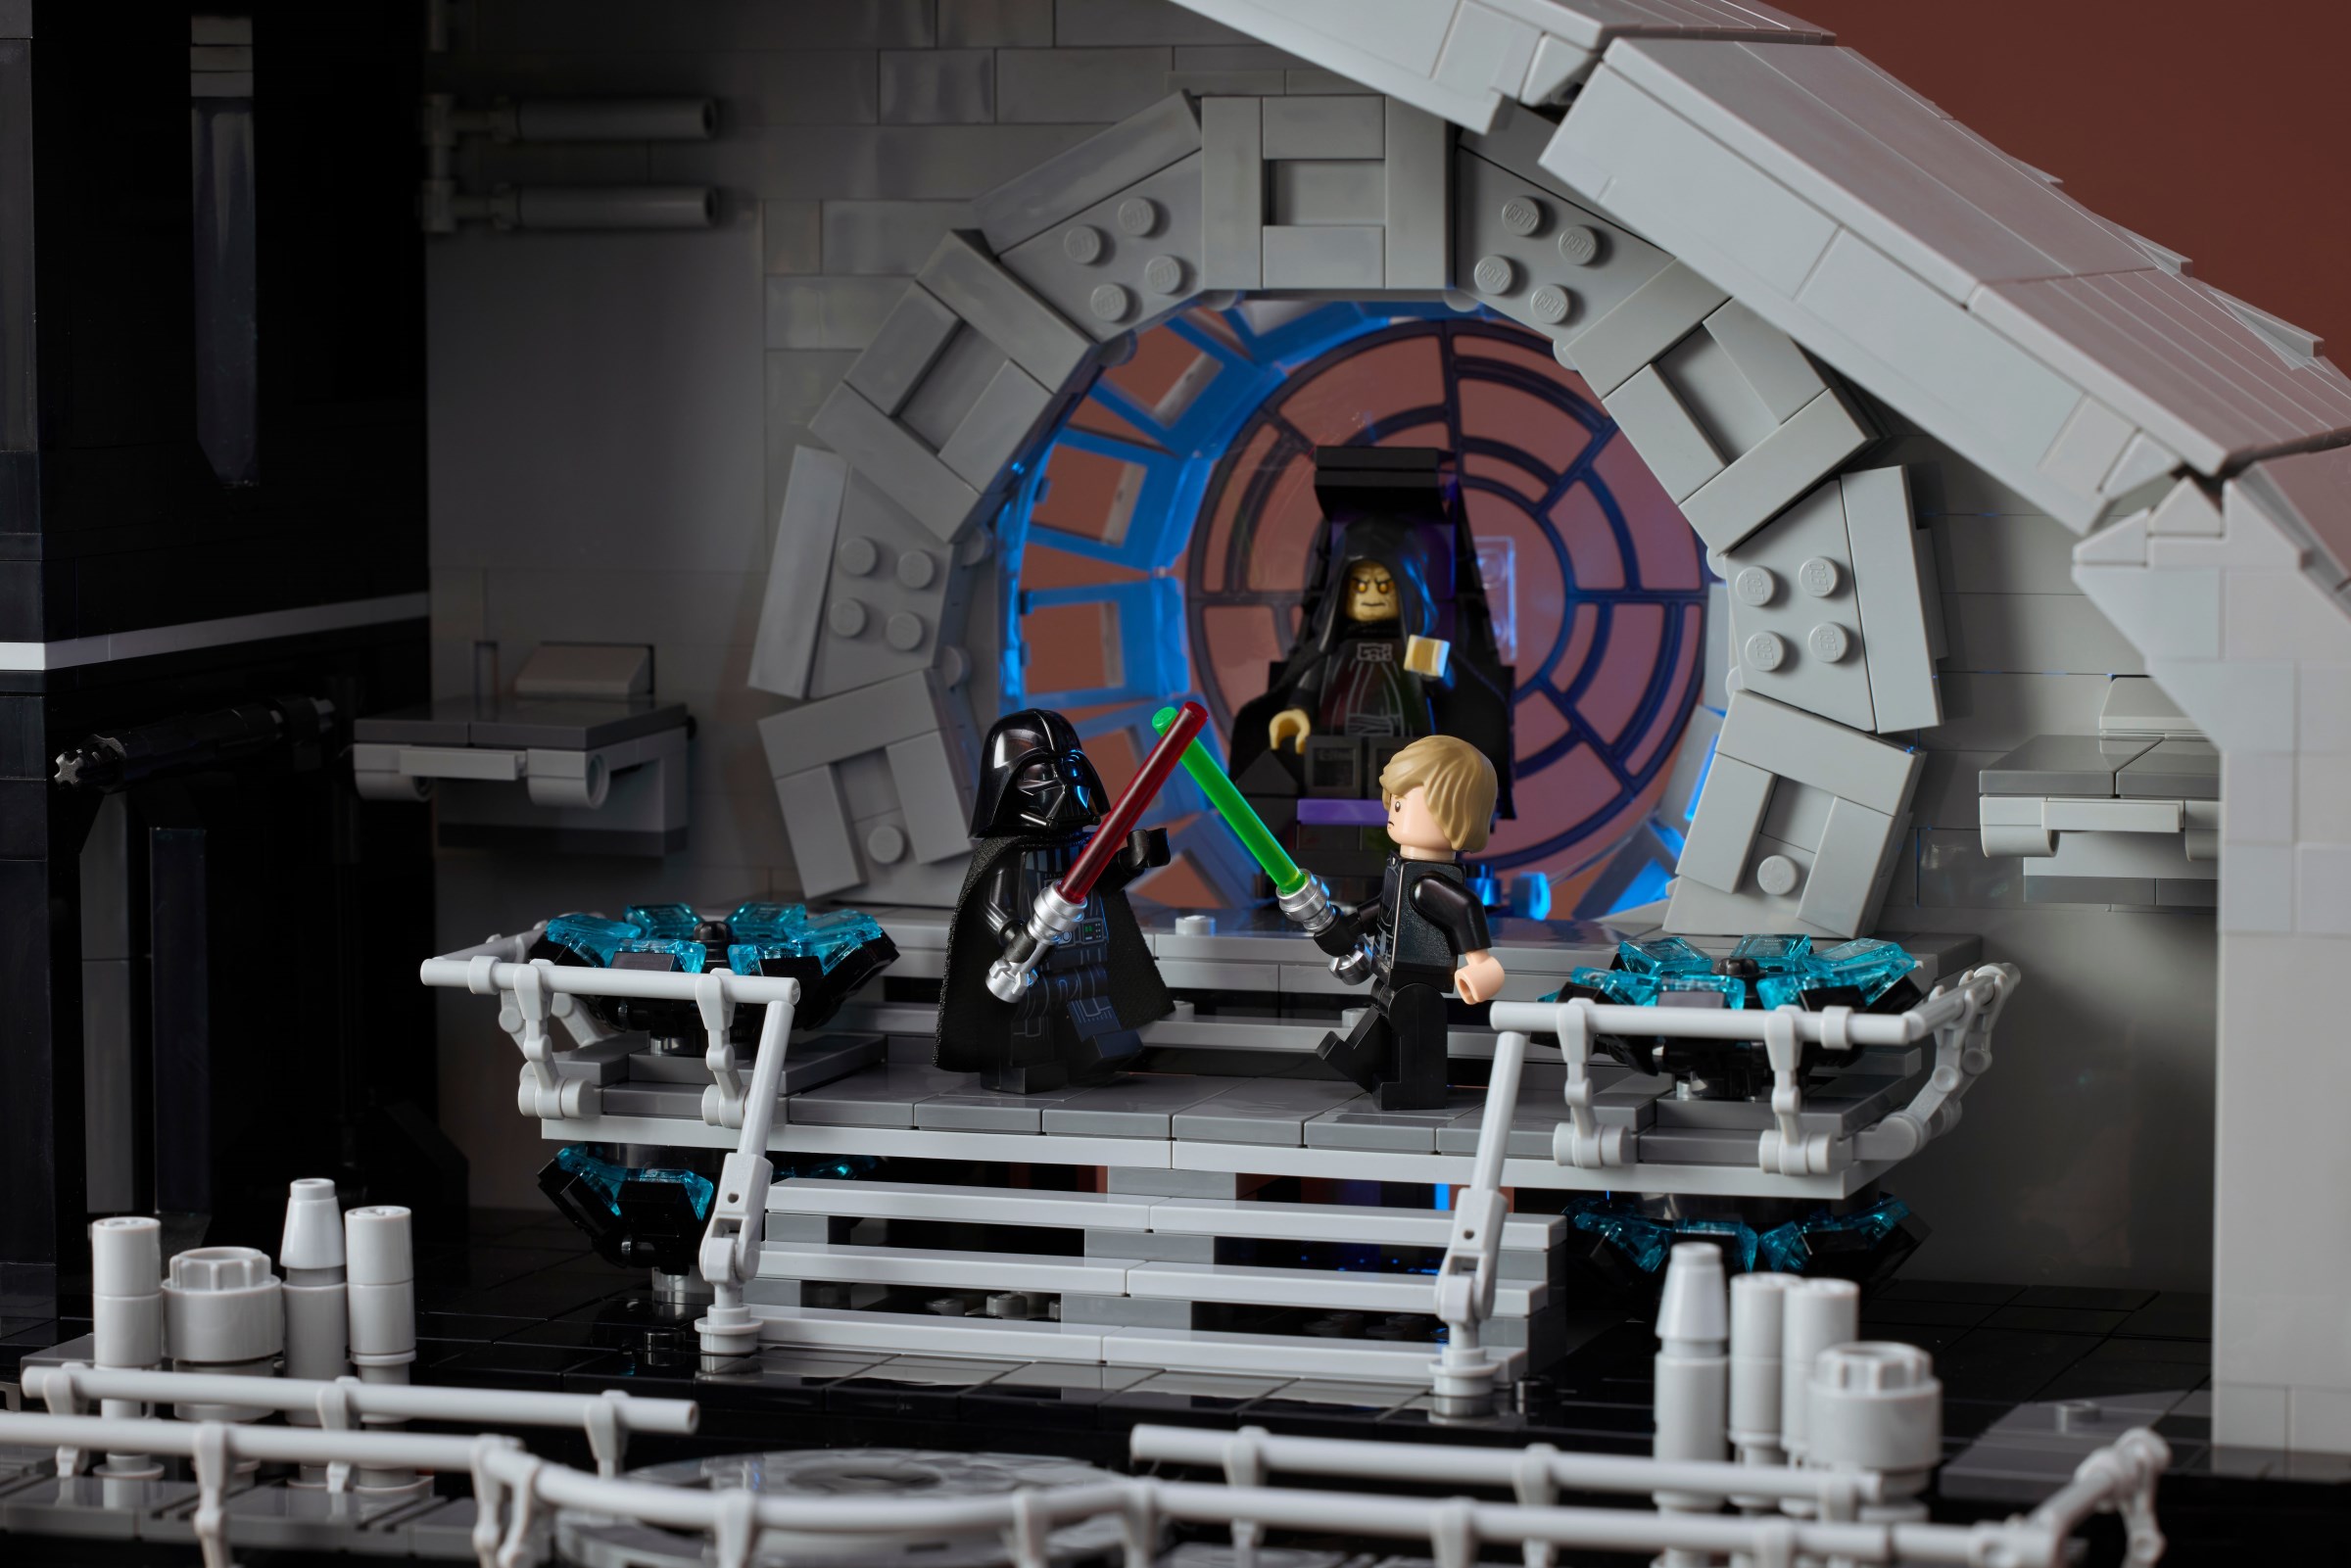
You can place Obi-Wan Kenobi and Darth Vader on studs outside the trash compactor, where their duel can be seen through the door to the hangar bay. This is an impressive use of space and works beautifully with the hangar, but I wish there was a panel included to cover the trash compactor when you want to focus on the lightsaber duel.
On the other side of the turbolift is a circular window to view a microscale version of the Death Star's main reactor, recreating its appearance in Return of the Jedi. This is positioned centrally within the space station, though not quite at the precise centre, which bothers me slightly. Even so, this is a clever use of a small space on board and the window panel is removable.
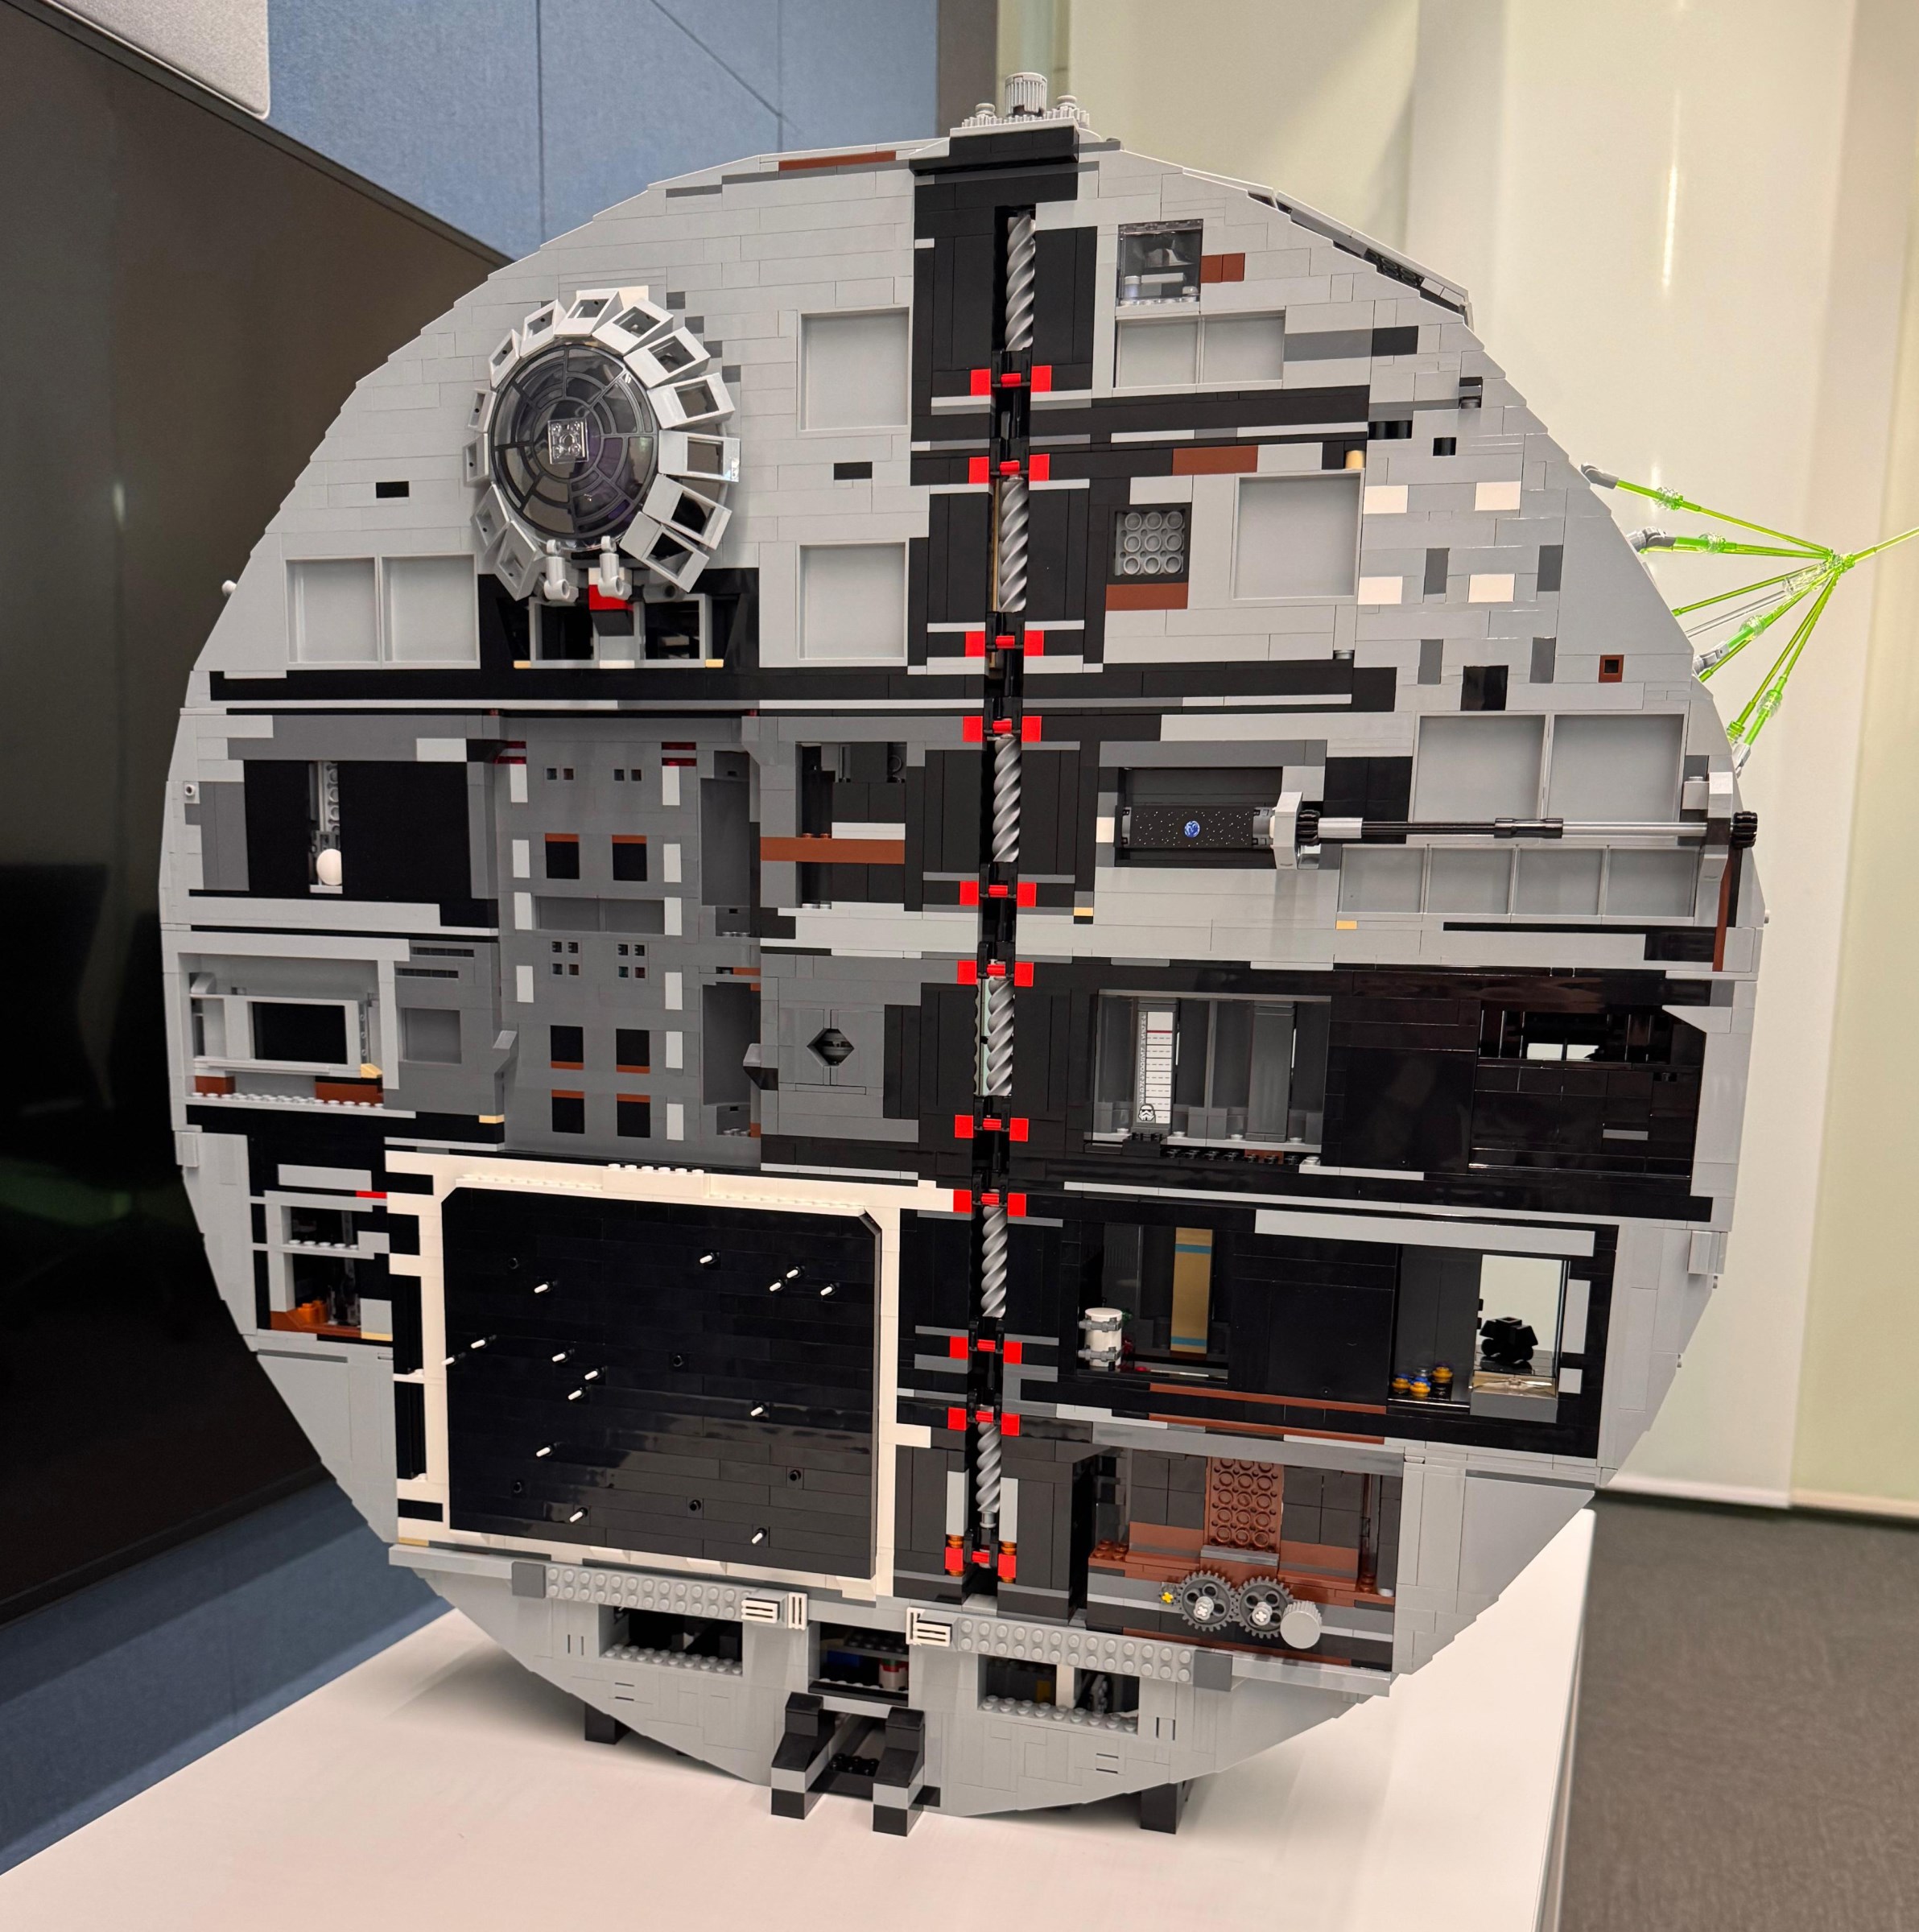
In addition, the back of the model incorporates a simple depiction of the thermal exhaust port found on the original Death Star, leading directly to the main reactor! This is another welcome inclusion, although the photo below also shows some poor colour matching between elements.
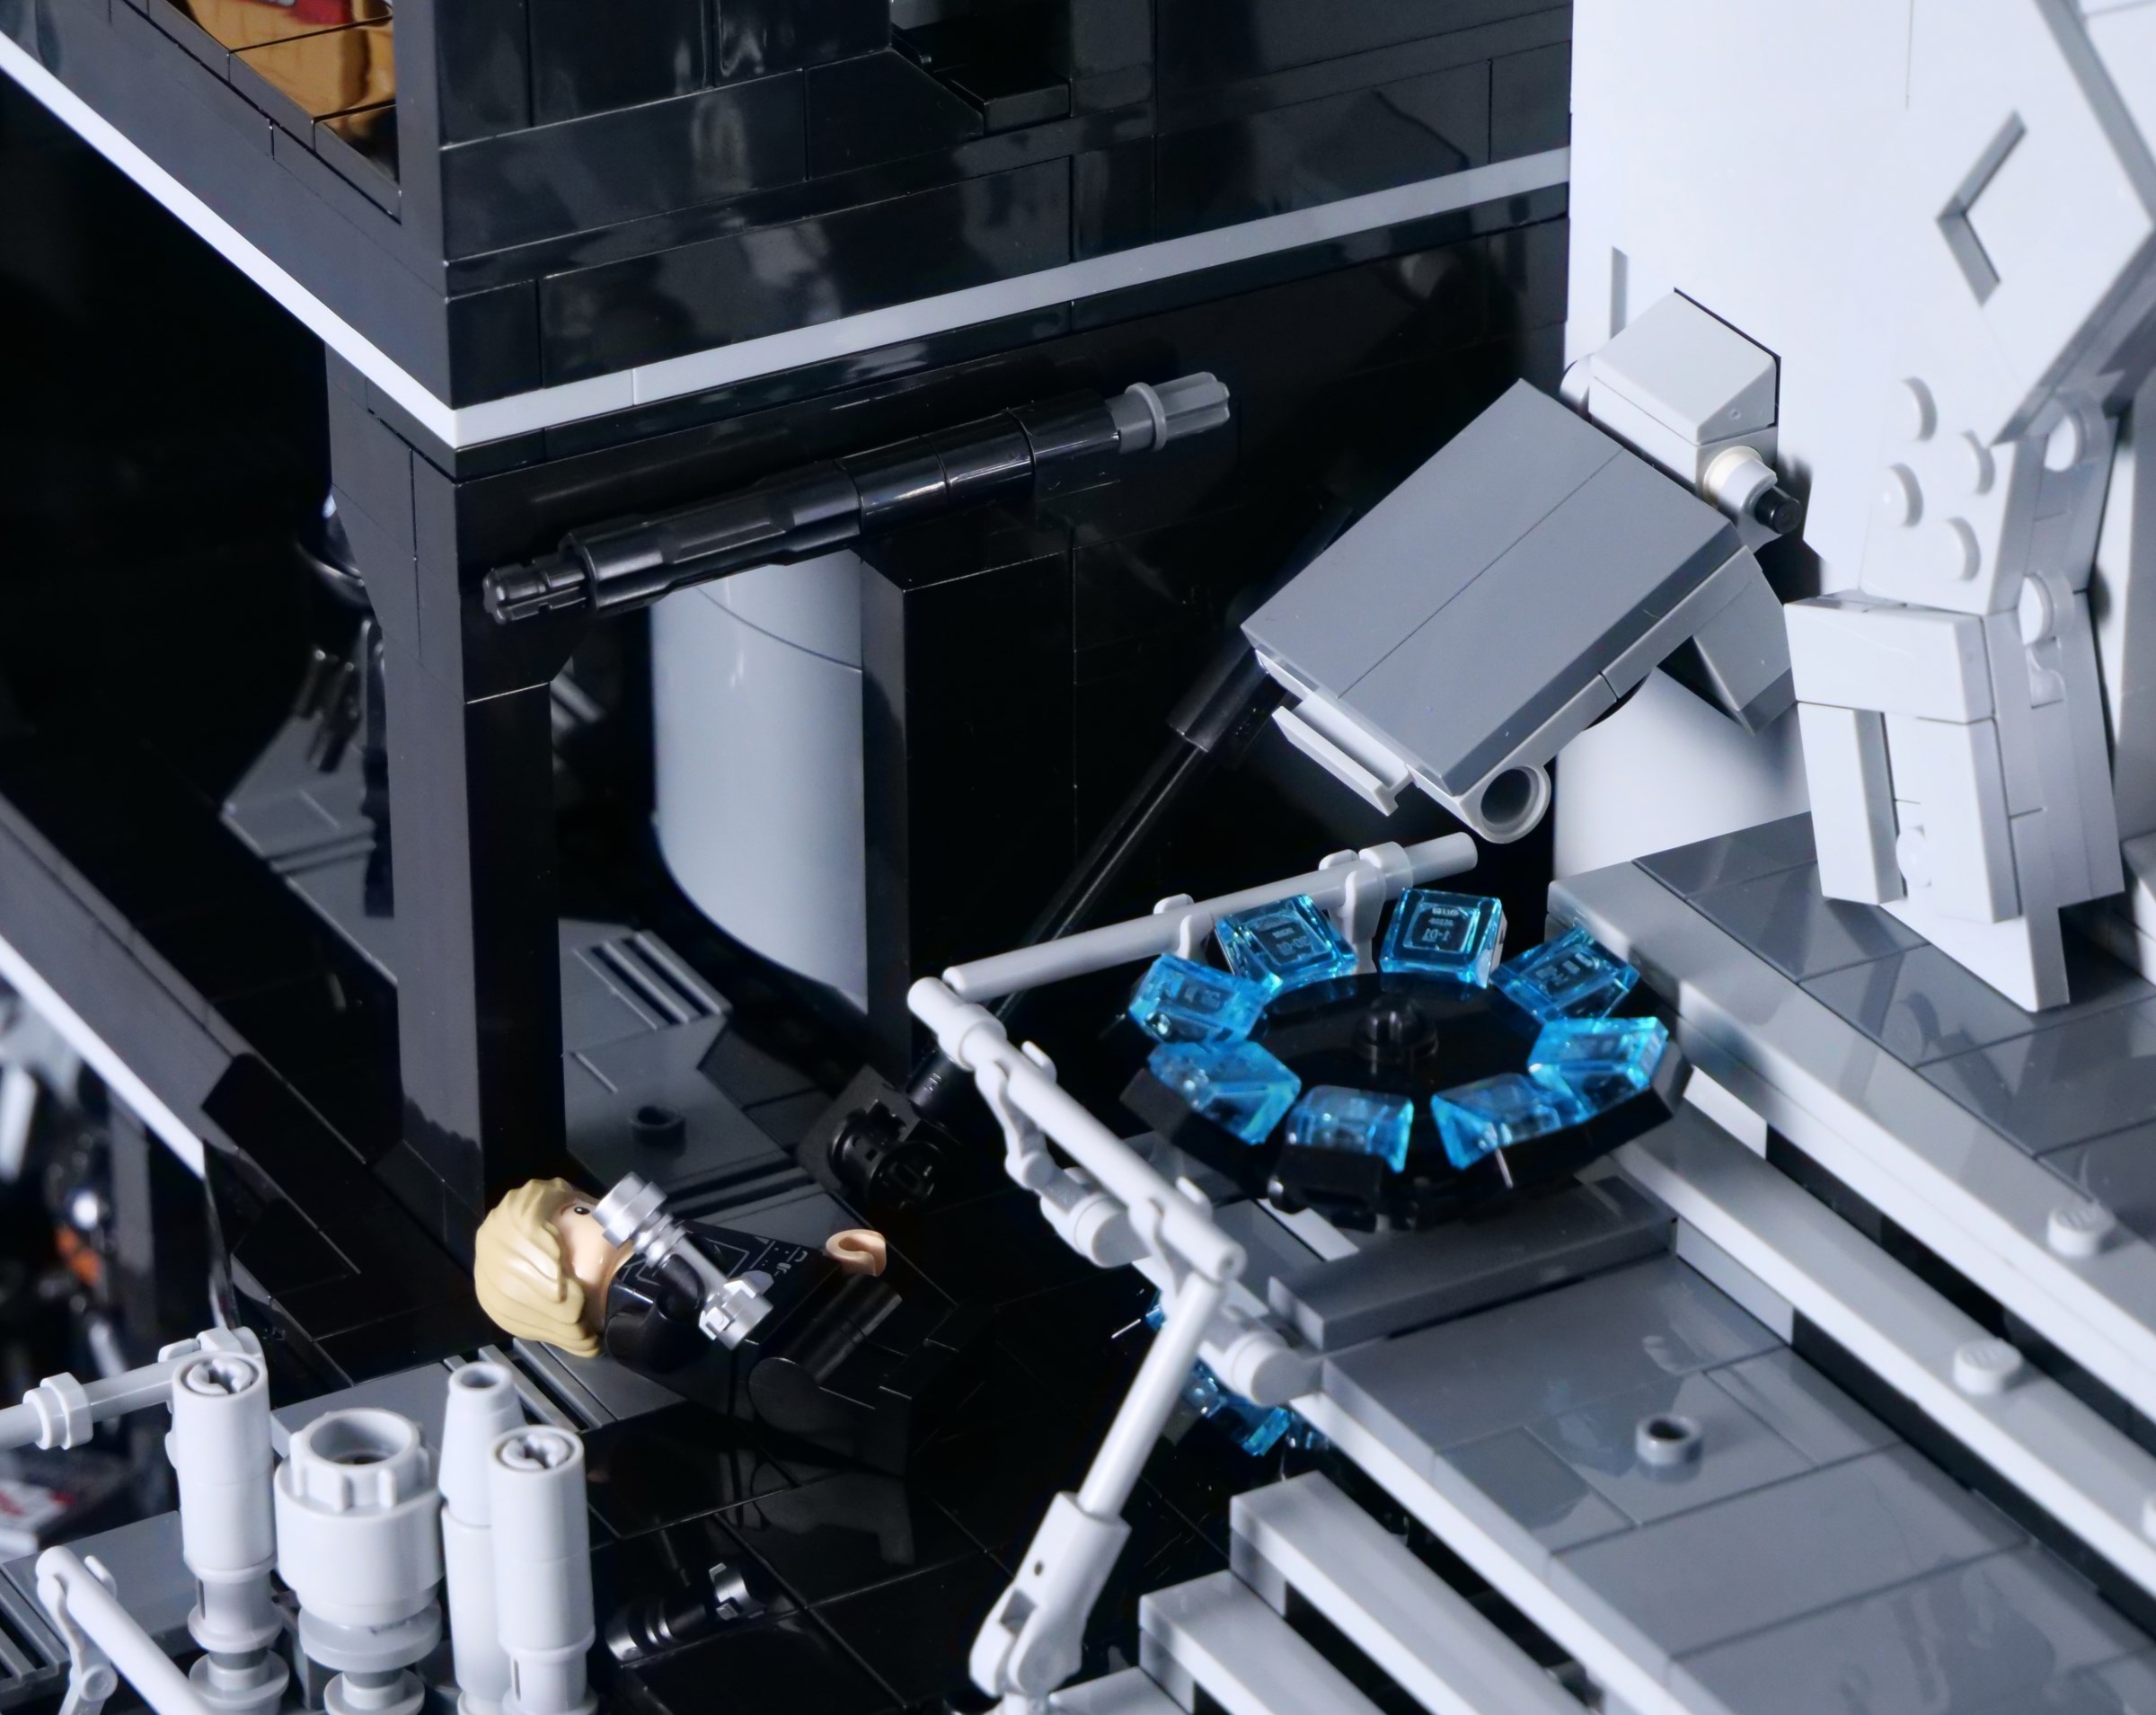
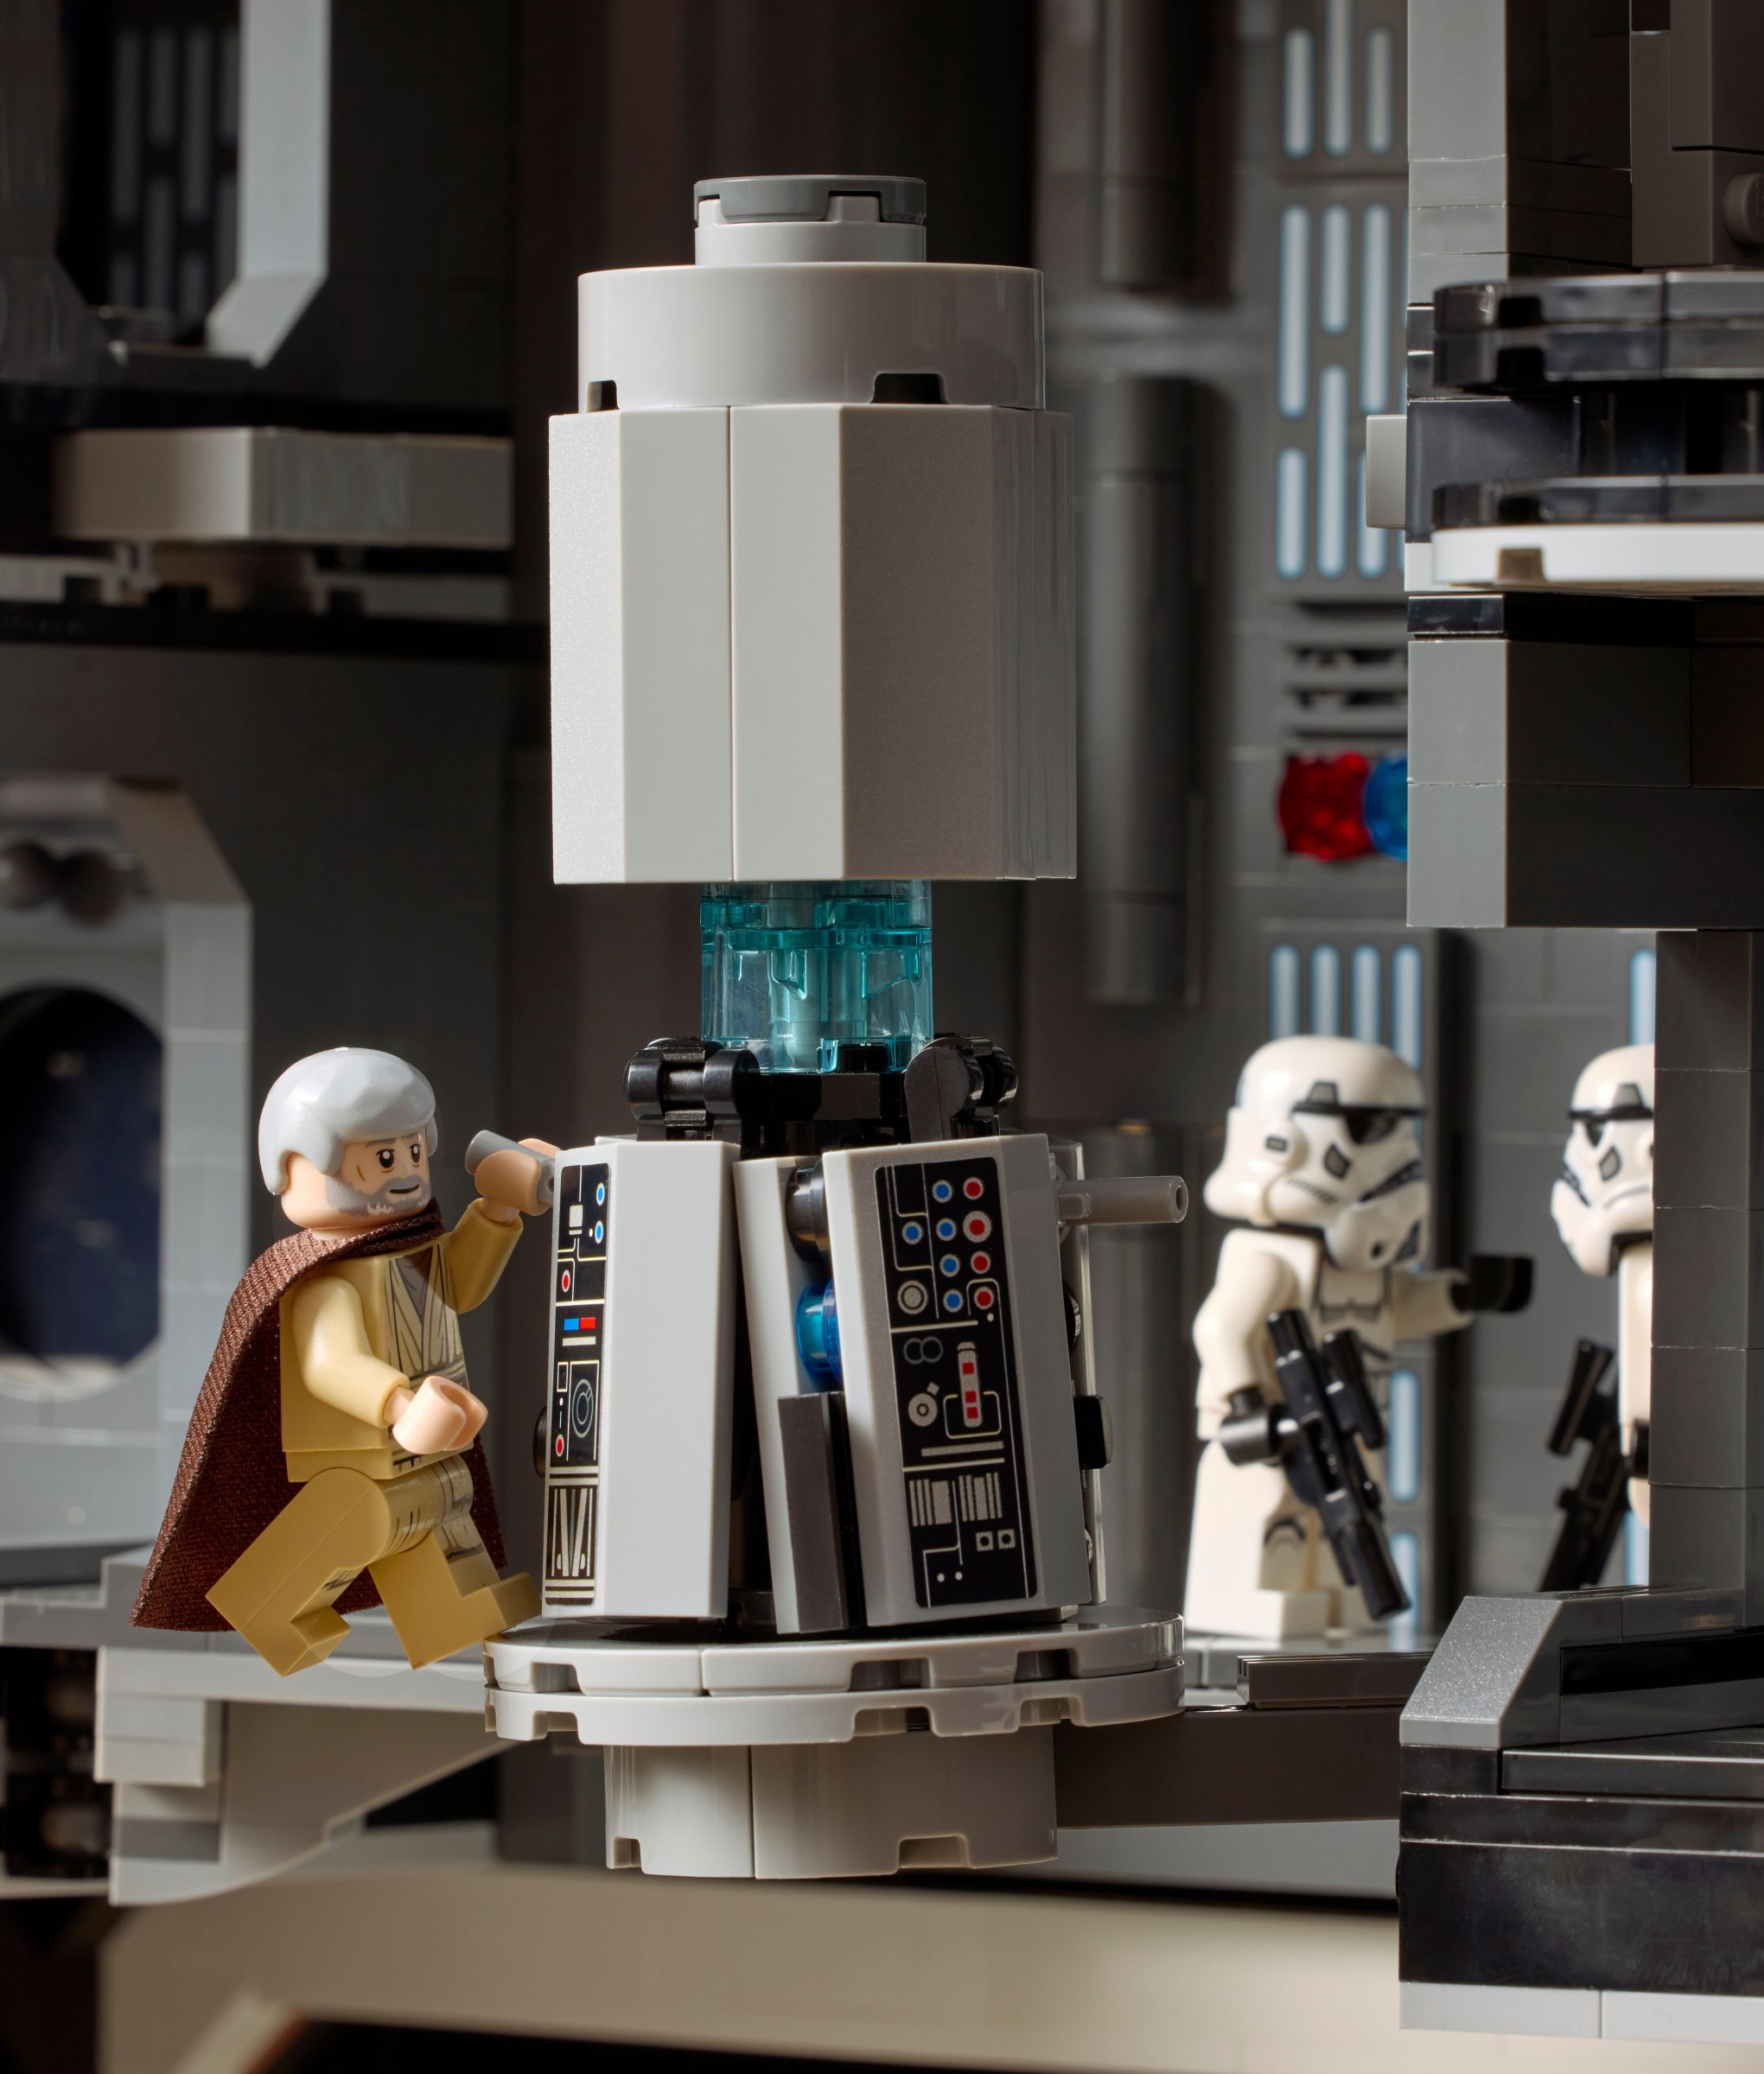
A chasm passes through the Death Star beside the main reactor, inspired by the air shafts and their various narrow bridges presented in the film. I like the angled bridge included on this floor, leading to Darth Vader's meditation chamber and still leaving enough room for the tractor beam power terminal.
This structure is connected to the Death Star using a single Technic beam, so it tends to droop slightly. However, you can move the tractor beam terminal against the bridge, which provides a little extra support and looks better as well. Obi-Wan can grip either of the levers on the terminal and stickers are applied on each side to complete its design.
One section of the model I find strange is the corridor outside the meditation chamber. You can pose minifigures here, but access is awkward and I am not convinced this was needed. On the other hand, the meditation chamber is probably large enough already, so the little hallway does no harm.
Darth Vader is known to have several meditation chambers, although the most recognisable is that aboard the Executor shown in The Empire Strikes Back, of course. I am sure Darth Vader had one aboard each Death Star though, so I have no problem with its presence in this model. Maybe I would feel otherwise if something vital from the films was missing, but nothing is.
Despite its modest size, the shape of the meditation chamber is pretty accurate and its halves lock together neatly, with Darth Vader encircled by consoles inside. There is no mechanism to raise and lower the top of the capsule, unfortunately, though attaching the upper portion of the meditation pod to a frame inside the room suffices to keep it open or closed.
The chamber slides out to access space for figures behind the pod, which also gives a clearer view of a sticker inside, featuring some of Darth Vader's favourite keepsakes! These include a poster promoting the Boonta Eve Classic podrace, a Naboo Starfighter and a photo of Padmé Amidala from the days of Anakin Skywalker, beside an Imperial recruitment poster and a photo taken with the Emperor, inspired by LEGO Star Wars: Summer Vacation.
Darth Sidious also appears on a viewscreen at the back of the meditation chamber. I love how you can see the Emperor's throne room window behind him, presumably calling his apprentice from just a couple of floors above! The screen is removable from the side of the Death Star and can be reversed to show a blank screen, if you prefer.
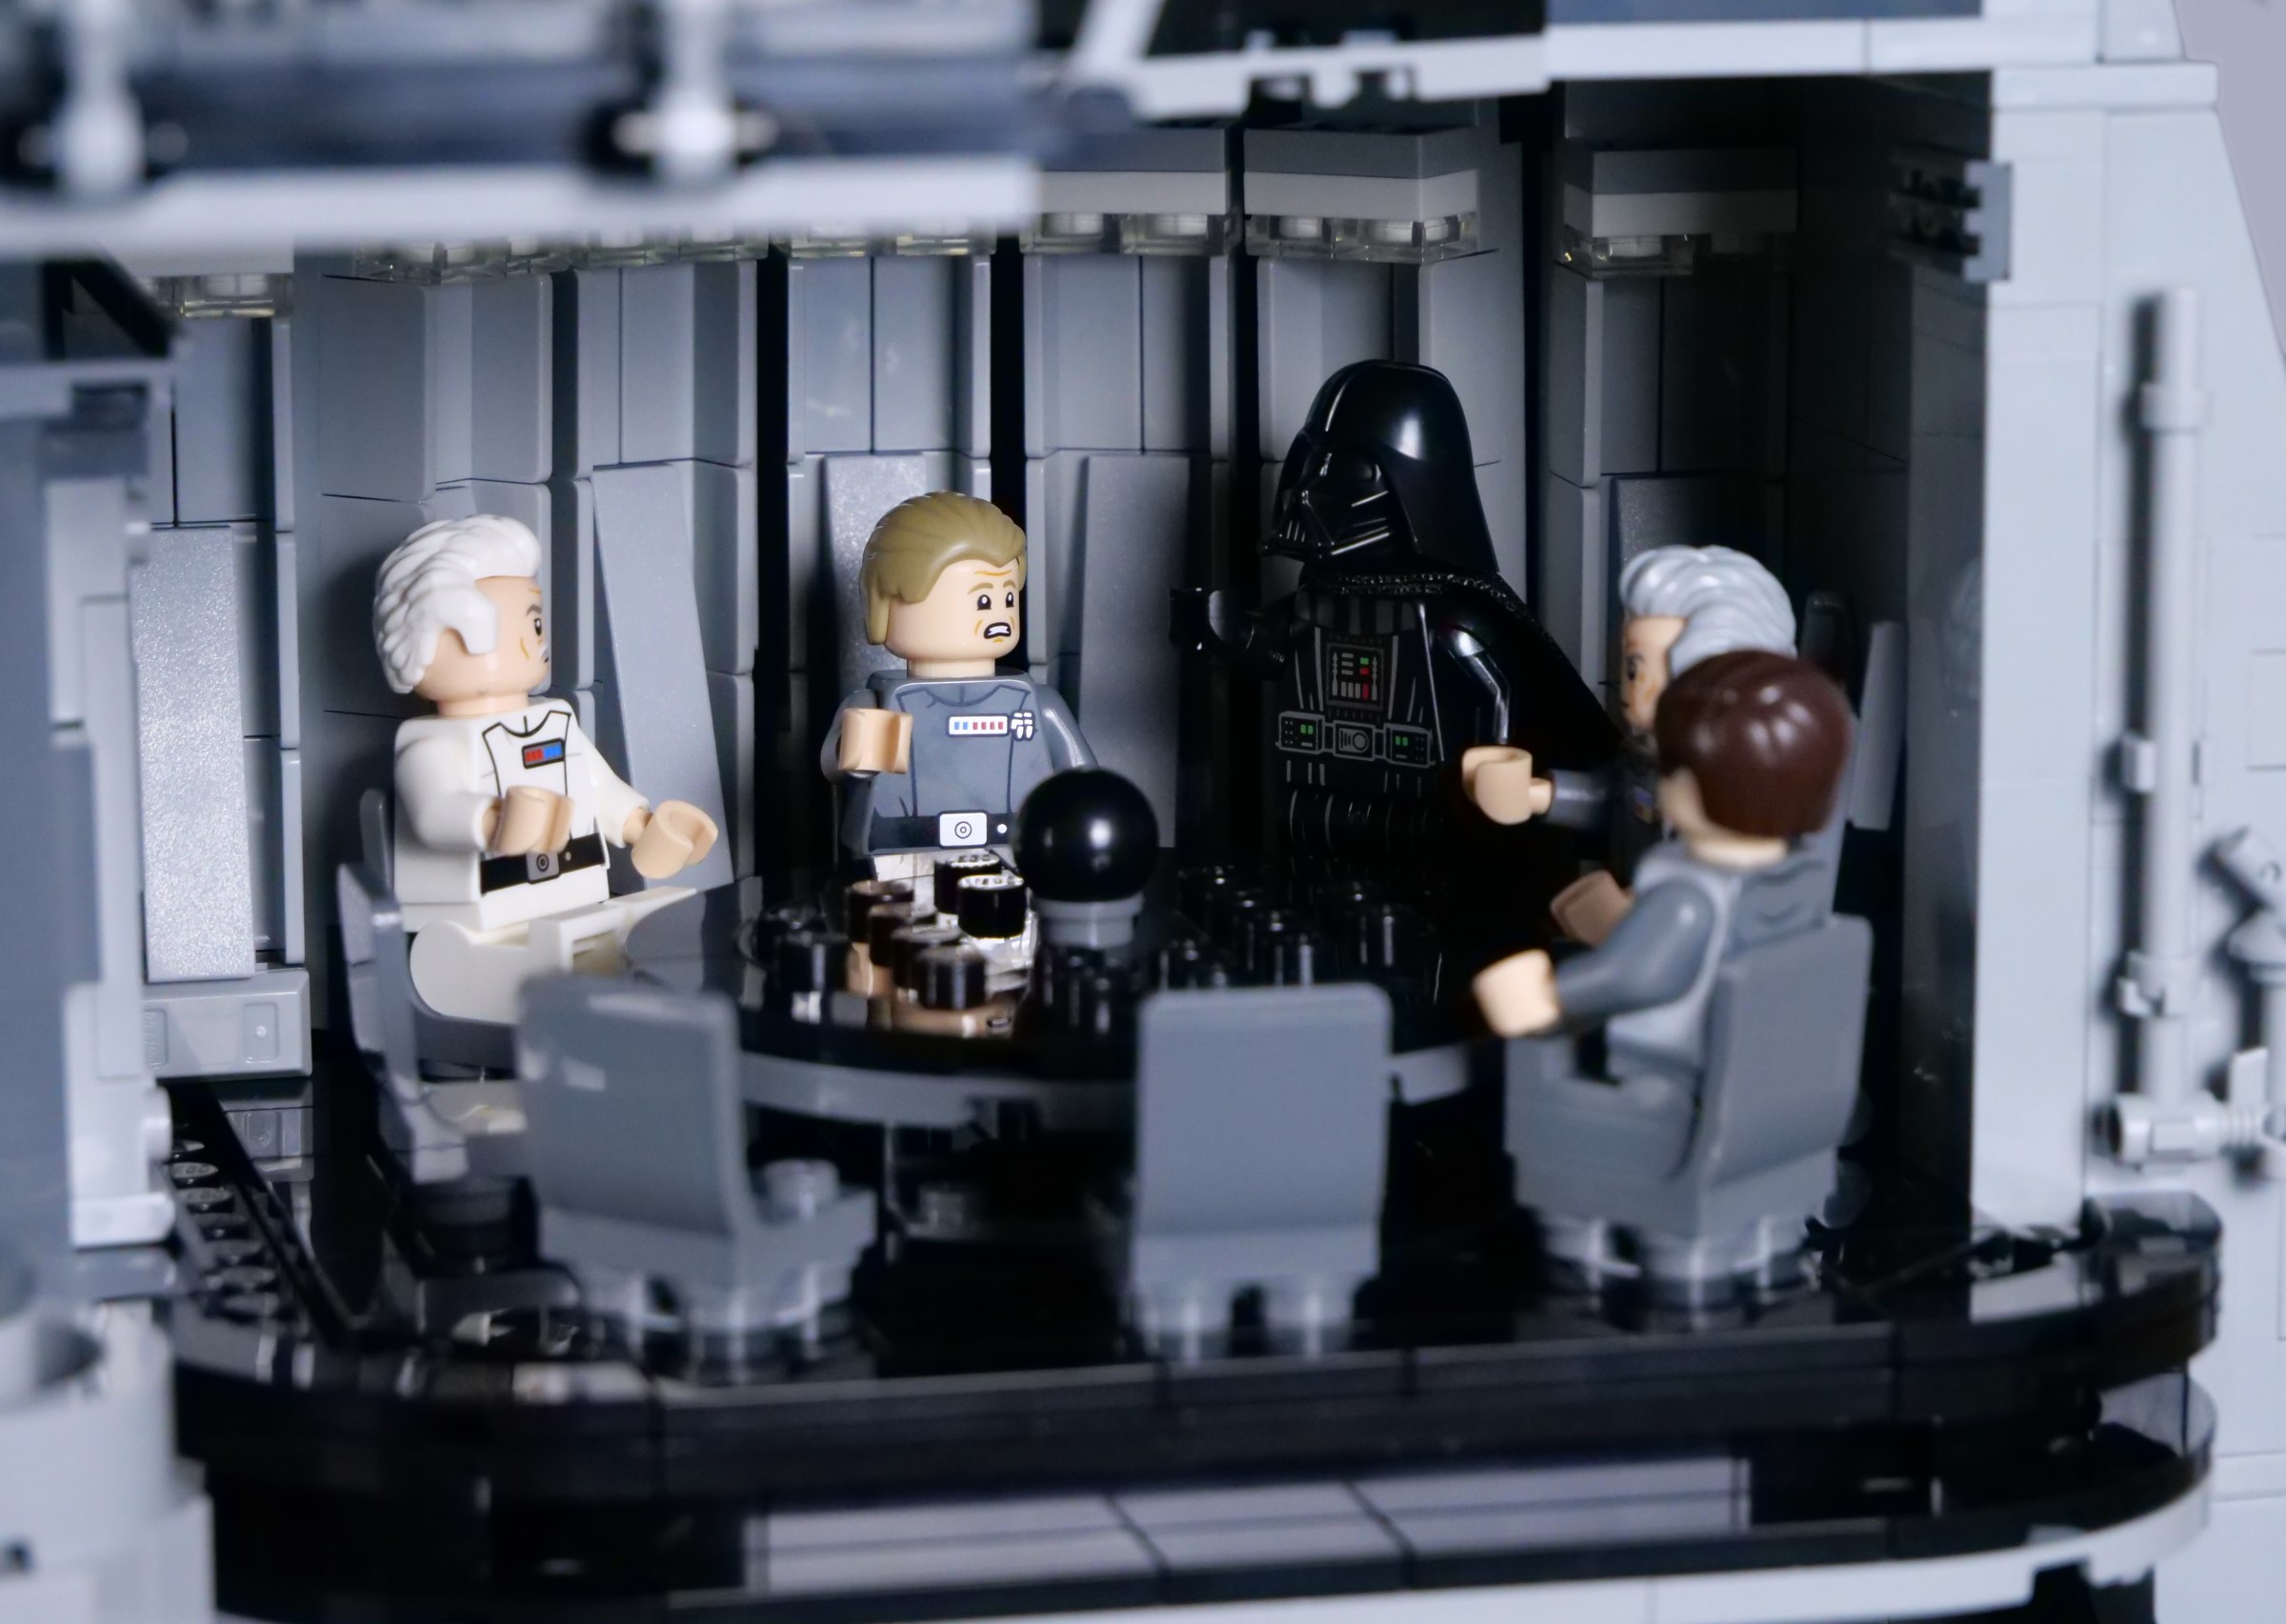
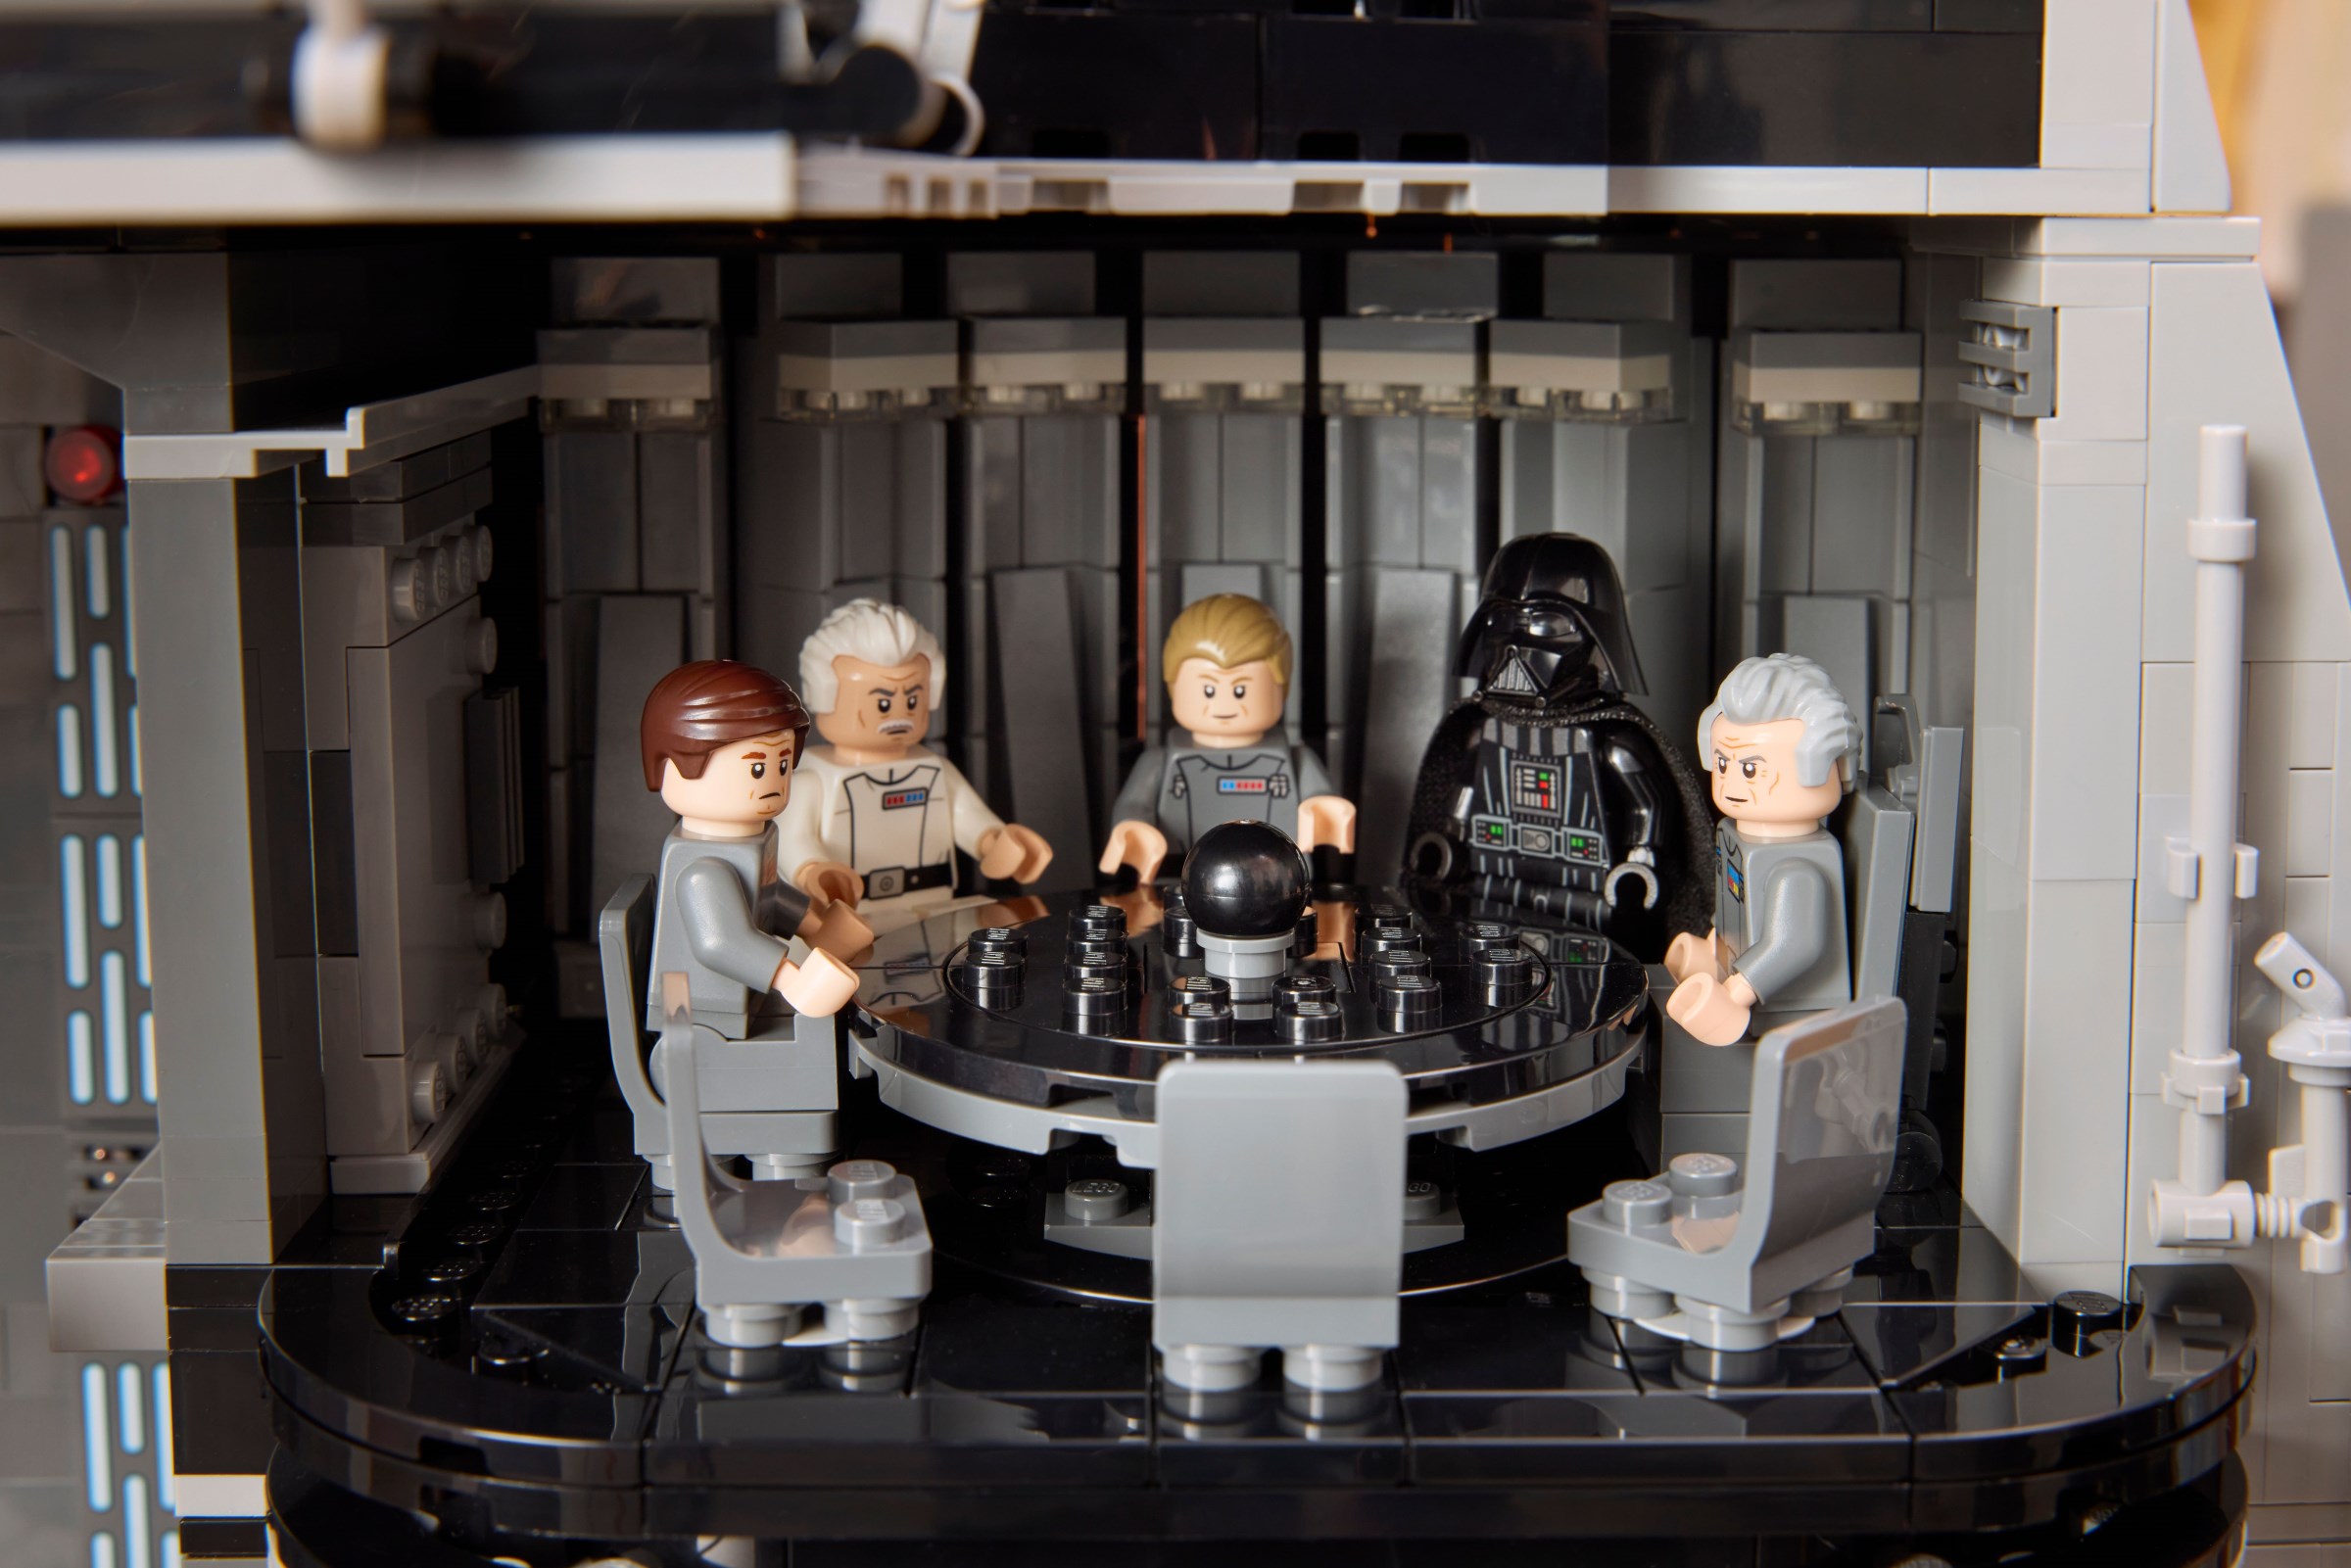
The conference room above looks a bit smaller than I would like. Nonetheless, there is enough room for eight chairs around the table, accommodating all the important characters. In addition, Grand Moff Tarkin's seat is larger and more elaborate than the others, which shows impressive attention to a relatively subtle detail from the movie.
Similarly, the curved walls are surprisingly detailed and I like the spherical holoprojector in the middle of the table. While the table is intended to be removed to reach the seats at the back, I would prefer another completely removable room instead. However, access is sufficient to pose the characters as you wish.
A sliding door from the conference room leads to the chasm, memorably crossed by Luke and Leia using a grappling hook. However, this model features a bar rather than a rope, so the two minifigures can grip the bar together. Turning a Technic gear on the level above swings the pair back and forth, passing by several more of those printed lights.
Fortunately, the Imperial officers need not swing over the chasm to reach the conference room, instead taking the extendable bridge. This mechanism is one of my favourites in the set, as the bridge extends smoothly and lines up precisely with the platform on the other side. As expected for Imperial infrastructure, there are no handrails around the bridge!
The gear controlling the bridge is pretty conspicuous and requires a minor change in the floor height. Perhaps this gear could have been moved to the back of the model instead, like many other function controls around the Death Star. Otherwise, the foyer area looks unusually bland, although it actually contains another fun sticker, hidden on the side of the turbolift.
Unfortunately, the sticker is hard to see, but it includes several more references. The wanted posters for Leia and Han look superb and I love the notice for Stormtrooper shooting lessons, with little response. Also displayed is an advertisement for the Hard Heart Cantina, located on the Death Star, with a poster featuring the 'new T-16', based on the Stormtroopers overheard discussing the 'new BT-16' when Obi-Wan shuts down the tractor beam.
Grand Moff Tarkin and his fellow officers command the Death Star from the Overbridge, found directly above the superlaser dish onscreen. Locating the bridge near the superlaser therefore makes sense on this model, but restricts floor space for characters on the bridge, which can be problematic. You cannot gather lots of officers together as seen in Rogue One, for instance.
Even so, the control station looks marvellous, decorated with accurate stickers and recreating the 'tulip' style work stations found aboard the Death Star. Once again, this section of the floor slides out for access, which is helpful, but minifigures placed behind the work station are pretty tucked away. That seems a shame for something as important as the main bridge.
I find the viewscreen underwhelming too. This should be a massive screen that spans much of the wall, but is relegated to a much smaller version thanks to the superlaser. Moreover, I would have appreciated more alternative screens. Neat though the function to illustrate the destruction of Alderaan is, turning via a gear on the side, screens showing Jedha City and Yavin were also needed.
Even though the superlaser firing mechanism causes issues on the bridge, it is nevertheless impressive. This design is based on the various Death Star schematics created for reference books and matches them closely, but lacks the tributary beam channels around the edge. Still, the textured detail is impressive, especially on the back of the dish.
A six-pointed device forms part of the superlaser mechanism, inspired by the EP-N5 fasteners constructed on Narkina 5 in the Andor series! The final scene of season one revealed what the Narkina 5 prisoners had actually been assembling, joints forming part of the superlaser dish, so this is a brilliant addition to the model. Cassian Andor is not included.
The superlaser dish also looks excellent from the outside. The triangular panels comprising the dish are connected to flexible hoses around the edge and the ring element developed for Harry Potter's glasses in the centre, so the whole dish feels rigid when complete. Furthermore, it slots almost seamlessly into the gap in the external hull panels.
I like the trans-bright green laser beams as well, even though they are relatively fiddly and can be dislodged from meeting exactly in the middle. When positioned properly, they look fantastic and the trans-clear support for the main beam is remarkably rigid, so the place for the tributary lasers to join remains solid and the surrounding lasers are easy to adjust if knocked.
A team of gunners monitors the superlaser system from a control room near the bridge and this area is located on the next floor. Again, it is accessible via the turbolift and a whole wall of white and trans-red 1x1 tiles can be found inside, mirroring the complex fire control computers seen in A New Hope and Return of the Jedi.
Additionally, the gunners can observe the superlaser directly through a window on the side of the control room, which is a welcome feature. However, this is another space that is relatively awkward to access, second only to the hangar control station in that regard.
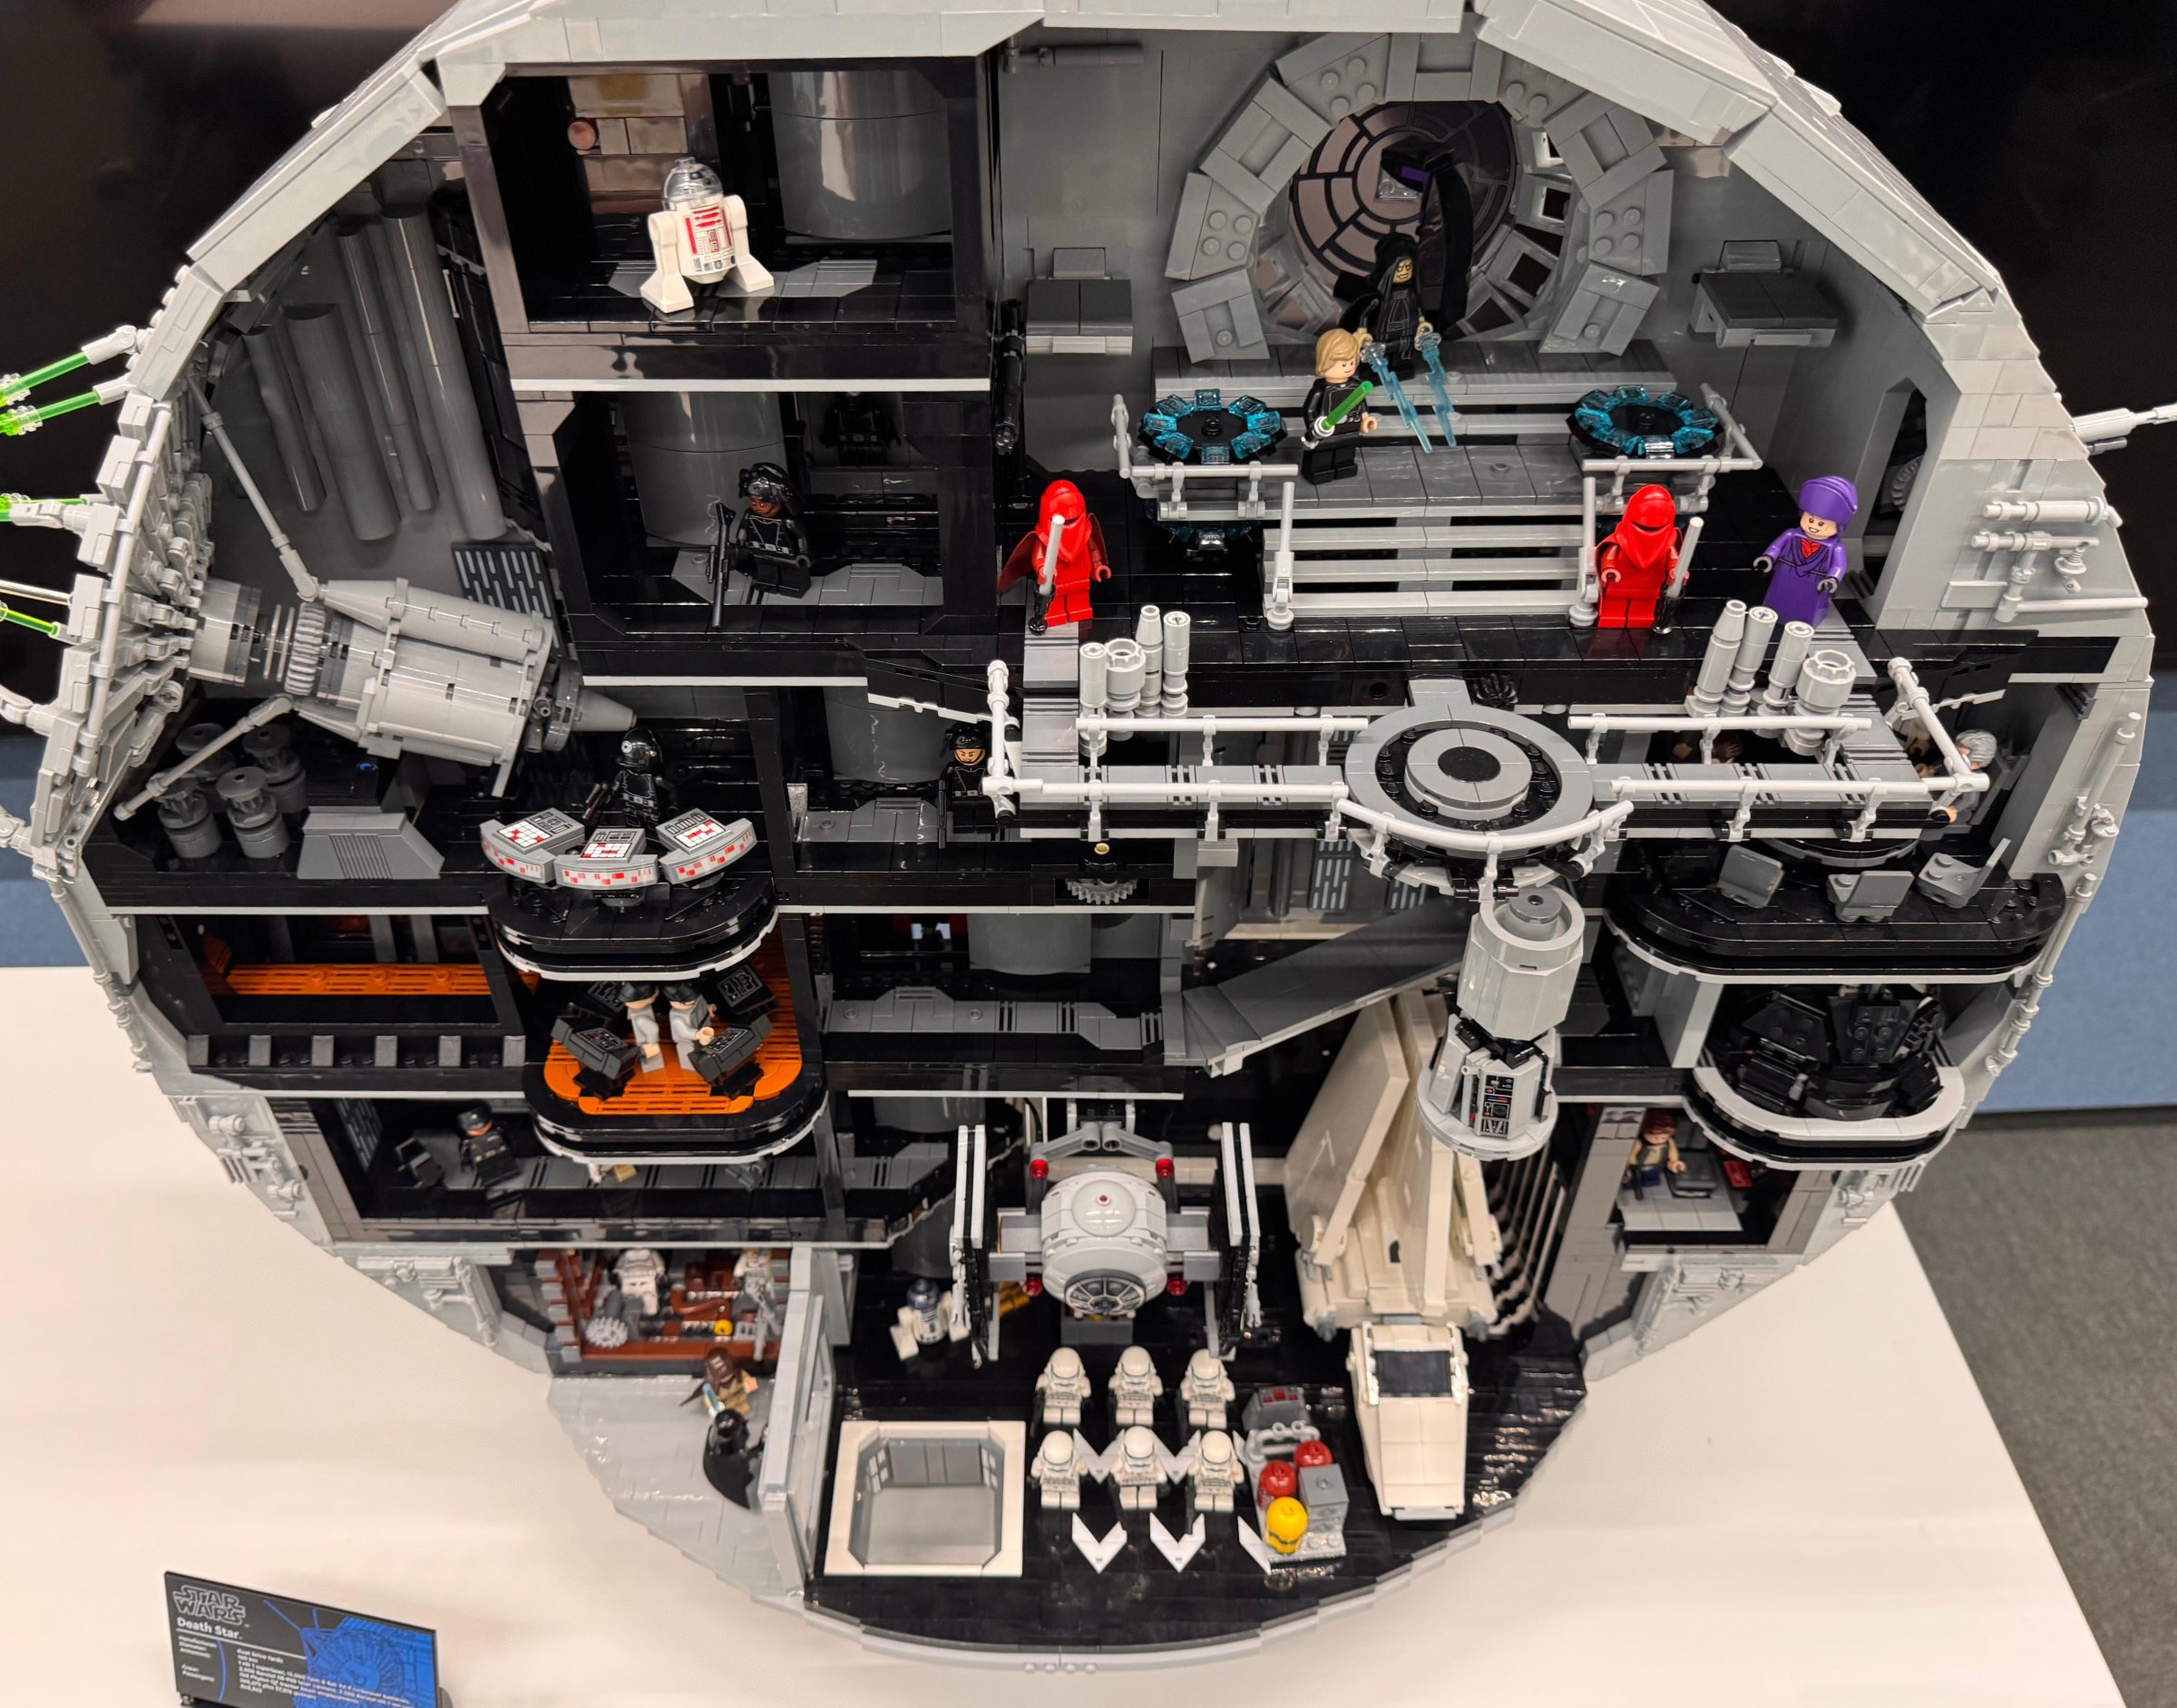
Emperor Palpatine's throne room occupies a huge section of the Death Star and shares some similarities with 75352 Emperor's Throne Room Diorama, which is no bad thing. However, this model expands the scene to incorporate the full staircase and the walkway where Darth Vader and Luke's battle ends and the Emperor perishes.
The roof panel can be removed to reach the Emperor's throne, which rotates and includes the proper purple upholstery. Studs are provided to stand Luke Skywalker and Darth Vader before the Emperor, flanked by the normal control stations, which are finished with trans-light blue 1x1 slopes. Also, the textured frame around the window looks lovely, again reflecting the diorama.
The window bears a particular resemblance to 75352 Emperor's Throne Room Diorama, albeit with smaller windows arranged around the dish in the centre on this occasion. This structure is not quite as sturdy as the diorama rendition, although it looks much the same and incorporates an identical decorated window piece.
Luke jumps onto a catwalk to avoid the battle with his father in Return of the Jedi, represented here by a small platform. This is perhaps my least favourite part of the model, feeling more like something you would encounter in a play set than a display piece. A simple mechanism causes the platform to collapse and works well, but these parts are totally exposed above the door.
While focusing on this area, it is a shame there is no reference to the Sith wayfinder from The Rise of Skywalker on this side of the throne room. Space is limited by the turbolift on the other side of the wall, but an opening panel with a 1x1 pyramid hidden inside would have sufficed.
Fortunately, the walkways in front of the throne are much more successful, complete with the mechanical details and railings we see onscreen. A pair of lightning accessories are provided, ready for the Emperor to torture Luke Skywalker, but there is nowhere to store these elements around the throne room when not in use.
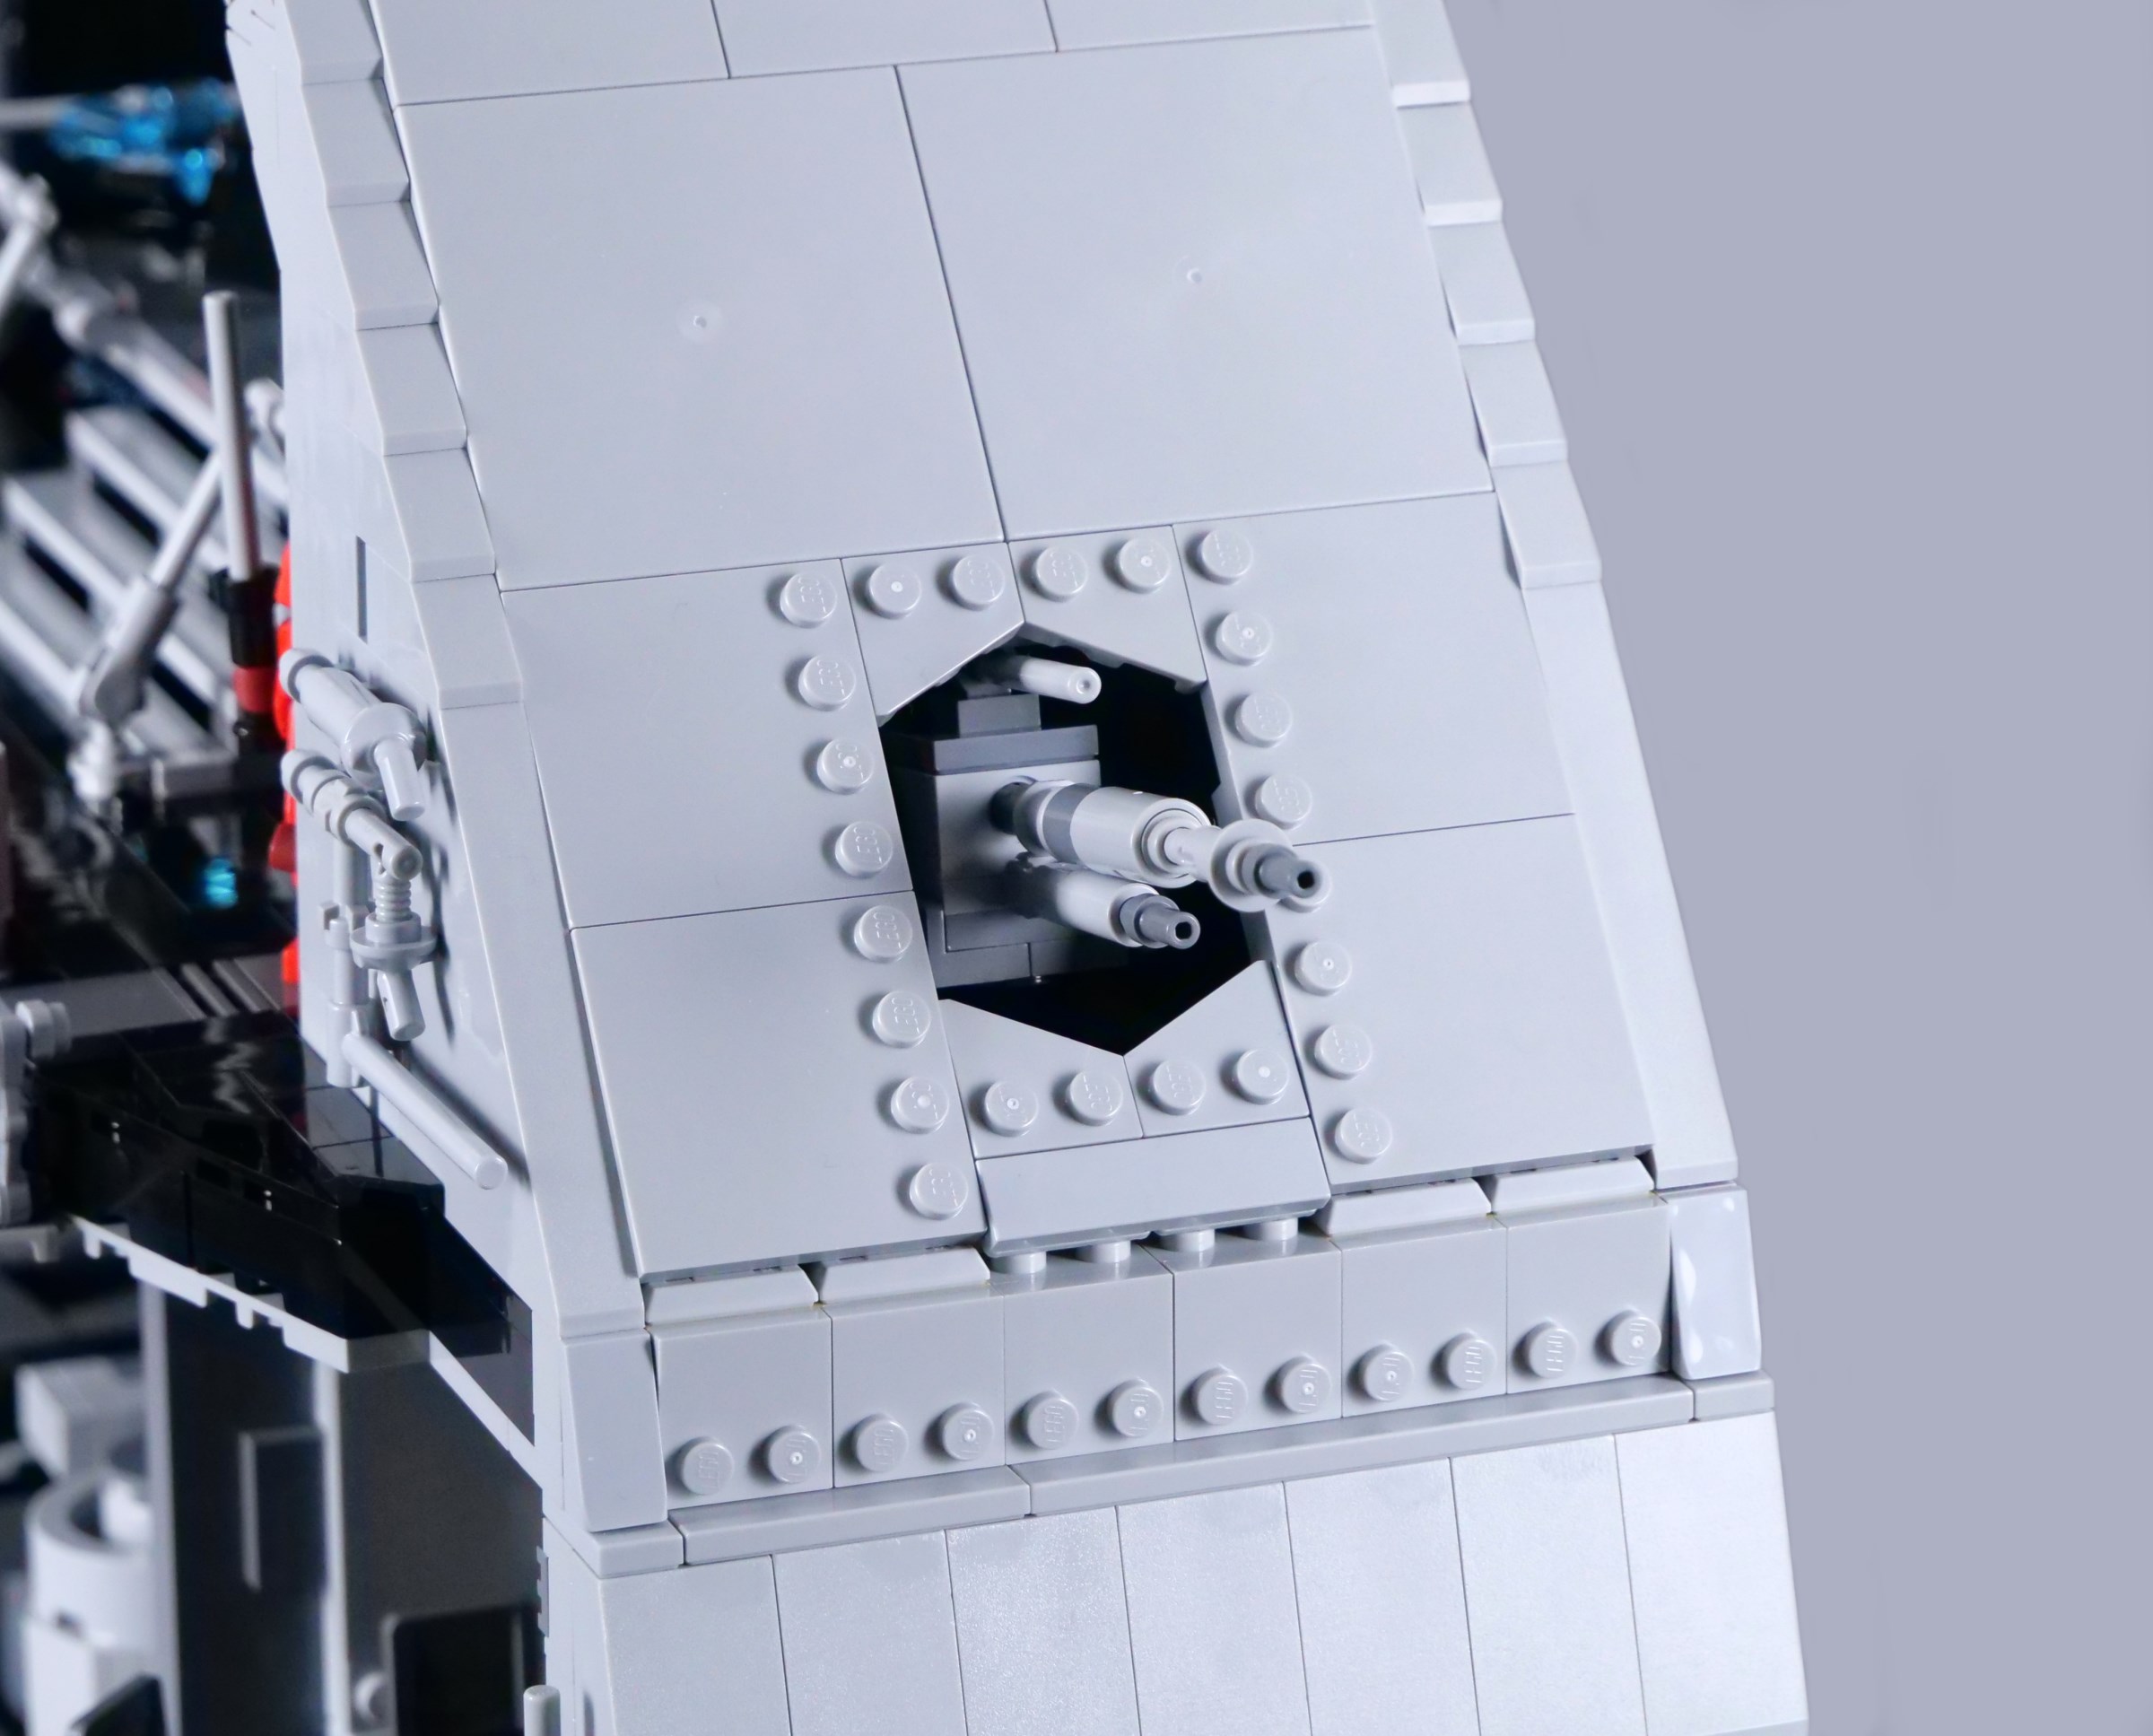
Alongside the Emperor's throne room is an SB-290 laser cannon. These weapons are used en masse against rebel starfighters at the Battle of Yavin, shooting through gun ports on the battle station's surface. This port is a nice example and you can change the angle of the laser cannon, though not by much.
Lifting the hull panel reveals the full weapon inside, with a seat for an Imperial gunner on one side. The laser cannon is quite detailed, capturing the distinctive main barrel with a collimator underneath, but the version from 75159 Death Star remains my favourite, accurately including seats for two gunners, among other features visible onscreen.
Notably, this design lacks the cables around the laser cannon's base and it cannot rotate at all. There would not be much room for rotation with the external panel closed, but I still think some sideways movement was needed.
Above even the Emperor's throne room, at the very top of the turbolift shaft, is a compact area that would be hard to use for any locations seen in the films. The space is instead reserved for an iconic feature of the Death Star in the LEGO Star Wars video games, as removing the black wall panel next to the turbolift reveals somewhere for the Hot Tub Stormtrooper to relax!
You can see the hot tub from the front, but it is better viewed by raising the top panel. Within is the all-important hot tub, filled with bubbling water, plus a radio and a microphone on a nearby shelf! The rubber duck is also a neat touch and I particularly appreciate the designer's effort to ensure this hot tub looks as though it belongs in Star Wars, given the style of the steps and the printed control panel.
The radio and presumably a bottle of bubble bath can be seen through a window on the back too, pictured below. This photo also shows the mechanism for the turbolift, which is controlled using the central dial on top. The function works extremely smoothly and it can take as little as eleven or twelve seconds to move the lift from top to bottom, which is fairly quick.
It goes without saying that the Death Star is not designed to be viewed from the back, as this side looks decidedly untidy. Personally, I was hoping for some degree of curvature at the rear, but a flat design has the advantage of occupying less space on display, without detracting from the model's visual presence, so I can understand choosing this format.
I earlier mentioned the lack of reference to Geonosian involvement in the Death Star's creation on the information plaque and there are no references to the Geonosians at all. However, you will encounter some dark orange 1x1 round plates throughout the model and I like to imagine these as bits of Geonosian sand, though they are actually dark orange because that is one of César's favourite LEGO colours!
Overall
75419 Death Star is undoubtedly my favourite LEGO model of the Death Star to date, despite my nostalgia for 10188 Death Star. This edition achieves far superior presence on display and its sheer scale is impressive, particularly given the density of detail in many rooms. The hangar bay, trash compactor, detention block and superlaser dish are particular standouts for me.
However, there are many imperfections. I think the model gets weaker towards the top, as the control room is too small and the Emperor's throne room seems unexpectedly lacking in detail, compared with other areas of the Death Star. Issues with the minifigures are also frustrating, as even though the overall selection is broadly comprehensive, better versions of C-3PO and the Imperial officers have appeared elsewhere.
That brings me to the topic of value. £899.99, $999.99 or €999.99 is a huge amount of money and many will reasonably think no LEGO set is worth so much. However, when I compare this model with 75192 Millennium Falcon or 75313 AT-AT, which cost £734.99, $849.99 or €849.99 each, the Death Star's price feels relatively reasonable to me.
Even so, whereas 75192 Millennium Falcon is a set I would recommend to any Star Wars fan able to afford and accommodate it, the Death Star is different and does not possess the same broad appeal, despite its numerous qualities.
This week's vintage set is 995 Lighting Bricks with Color Filters, released during 1969. It's one of 31 System sets produced that year. It contains 23 pieces.
It's owned by 263 Brickset members. If you want to add it to your collection you might find it for sale at BrickLink or eBay.
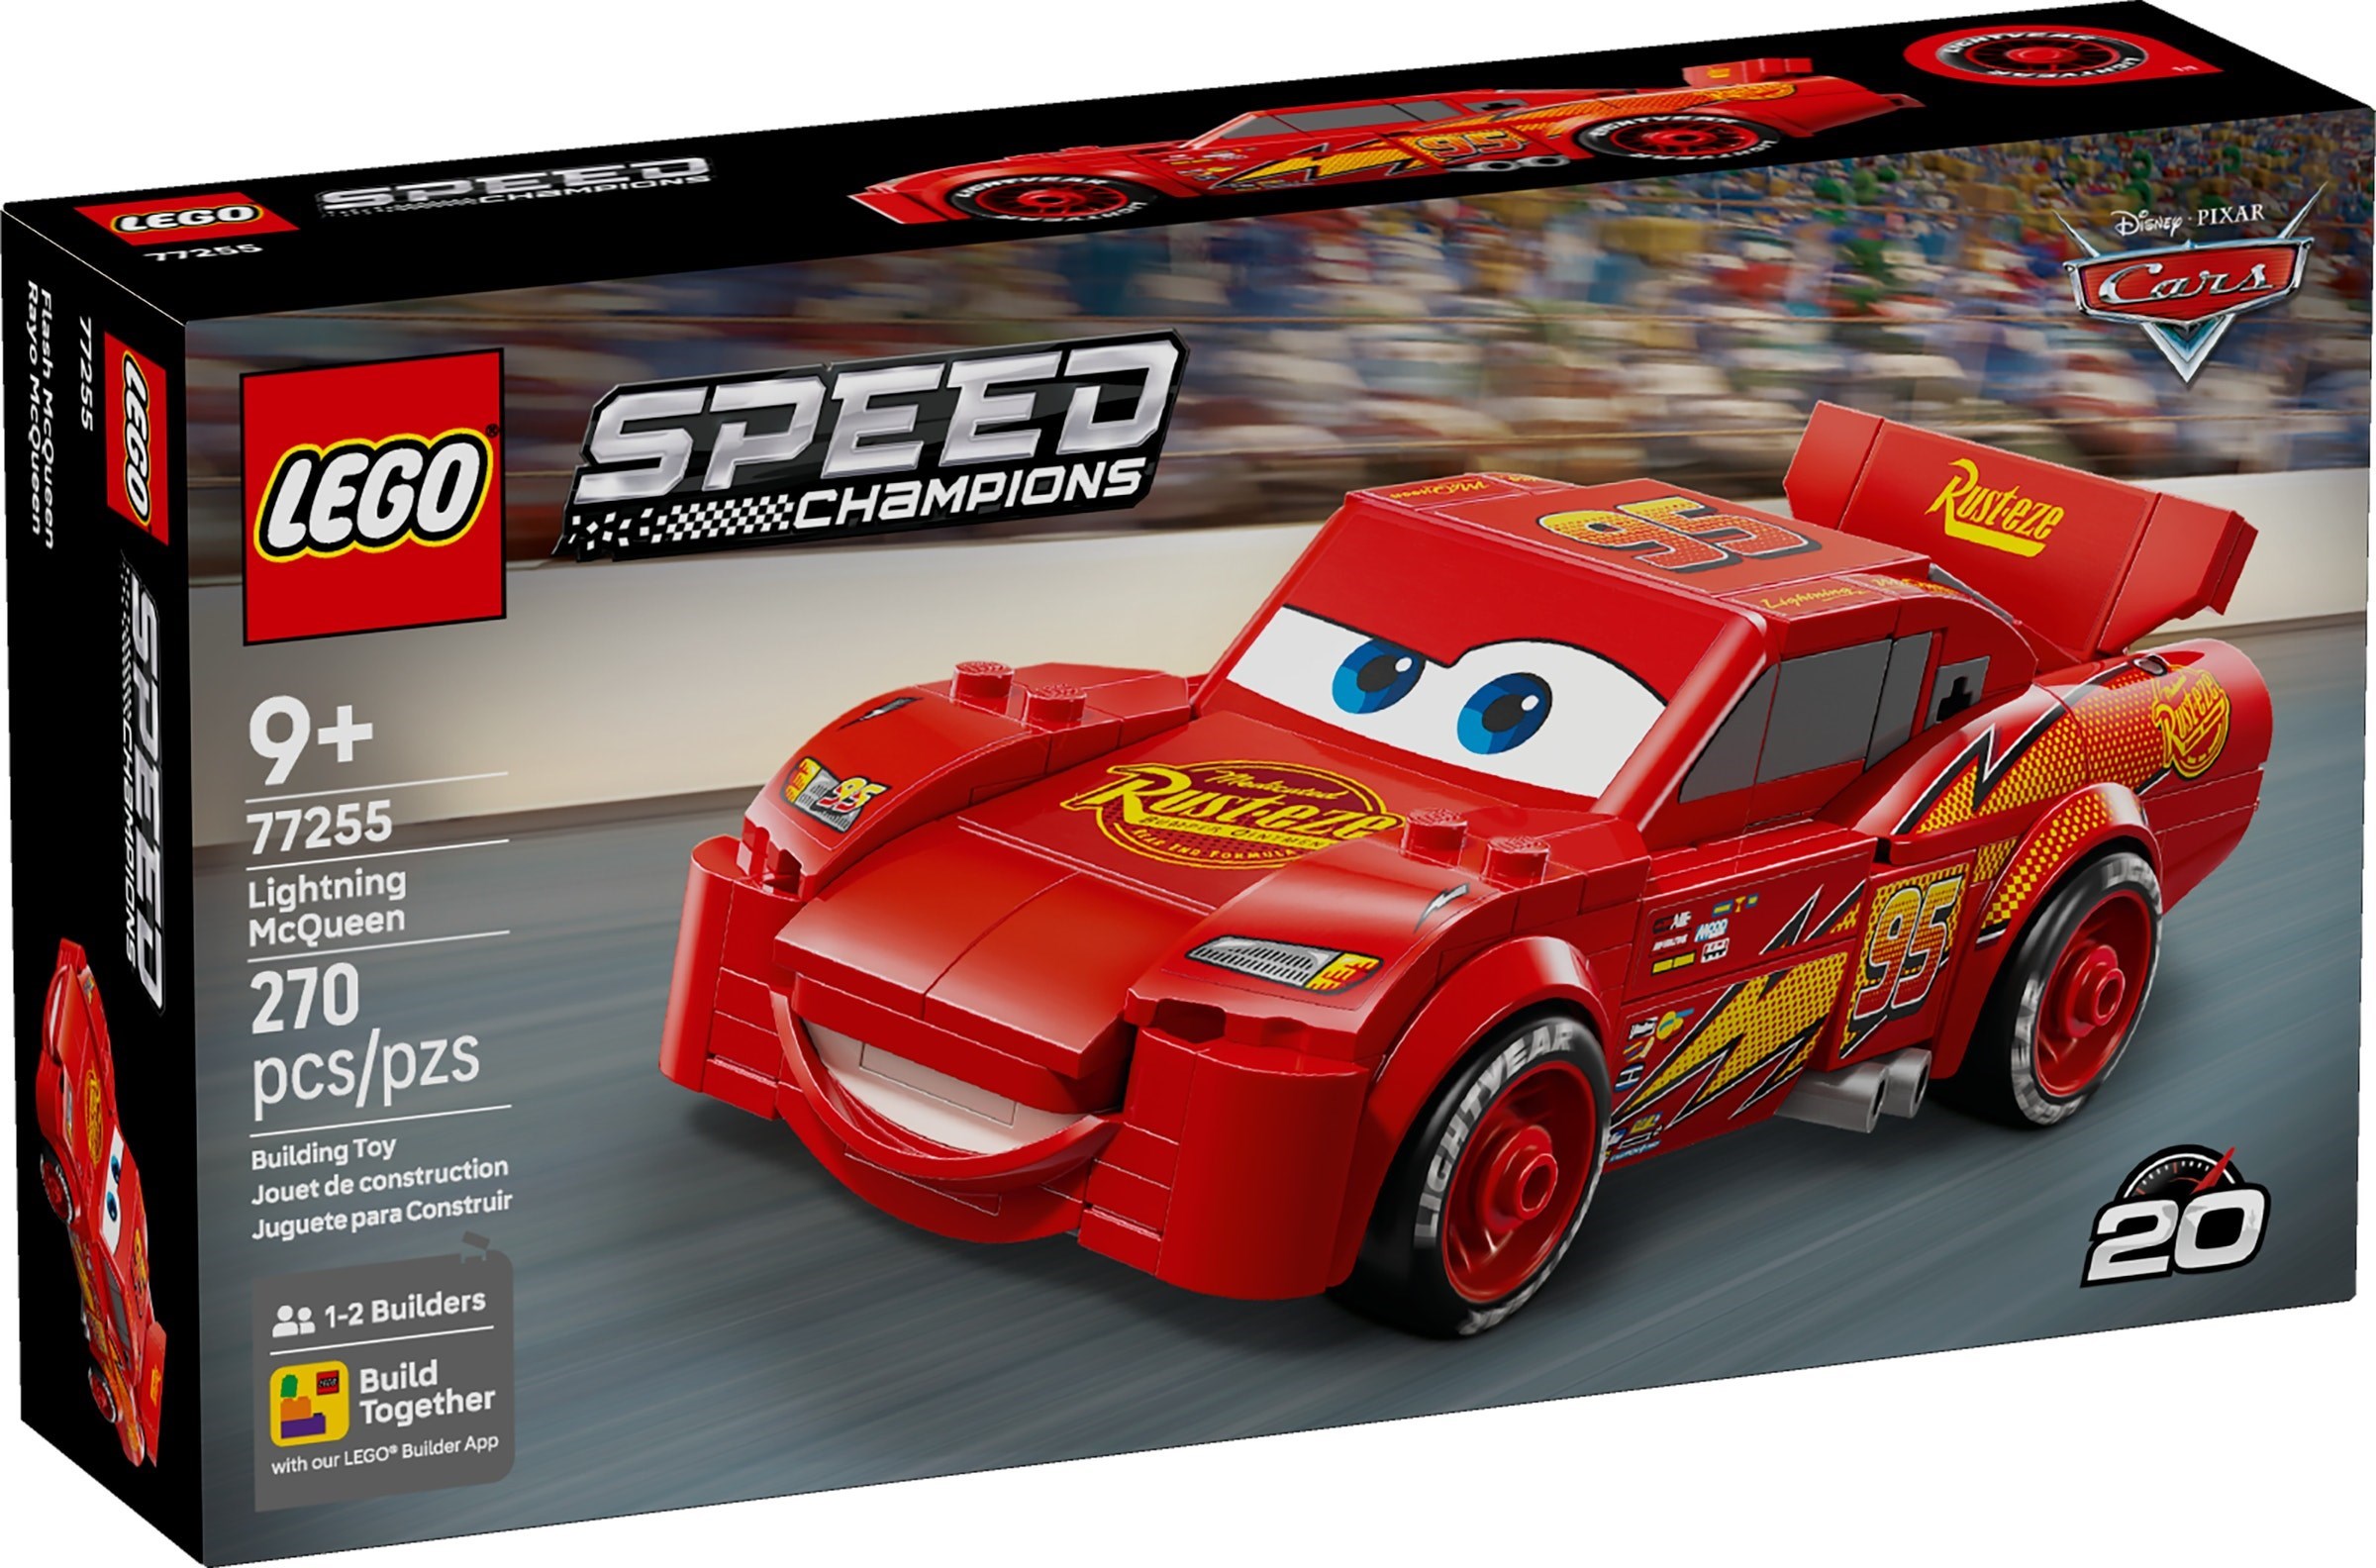
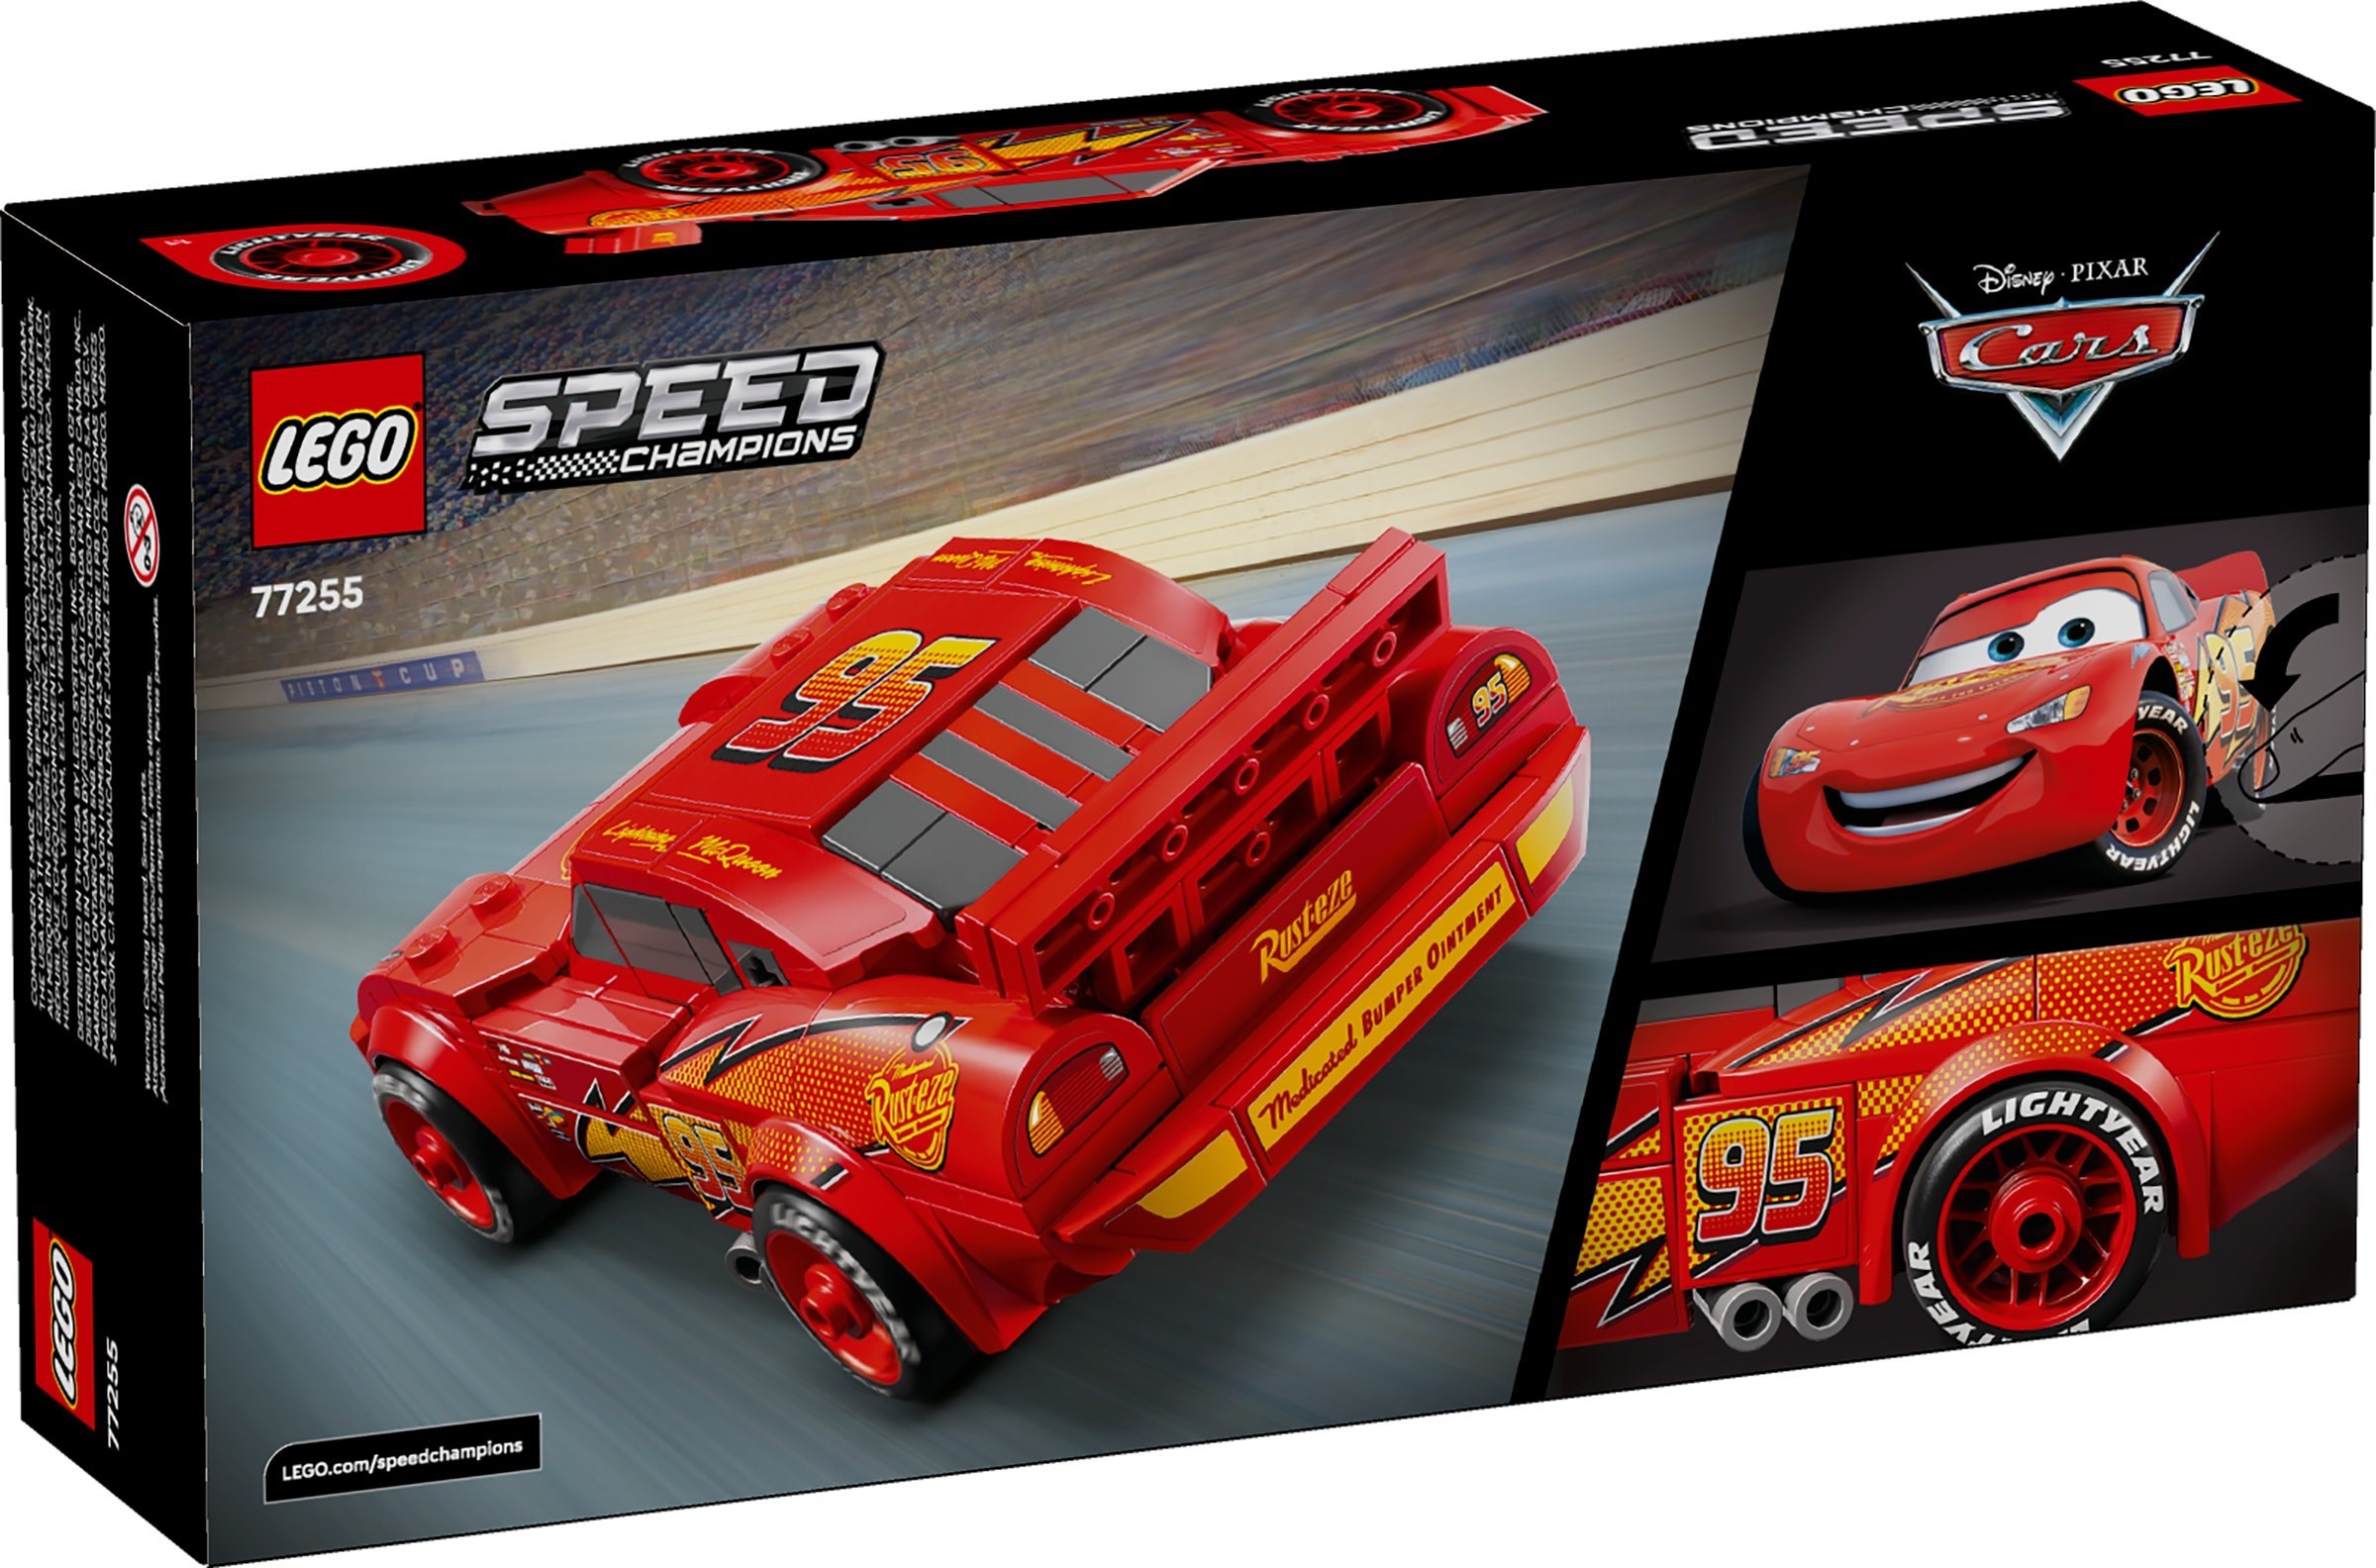
An unusual 2026 Speed Champions set has just been unveiled by LEGO!
Celebrating the twentieth anniversary of Pixar's Cars, 77255 Lightning McQueen will be released on January 1st, costing £22.99, $27.99 or €27.99. The set is available for pre-order now.
This 270-piece rendition of the Radiator Springs racer certainly looks good to me, but what do you think? Let us know in the comments, and view more images after the break...
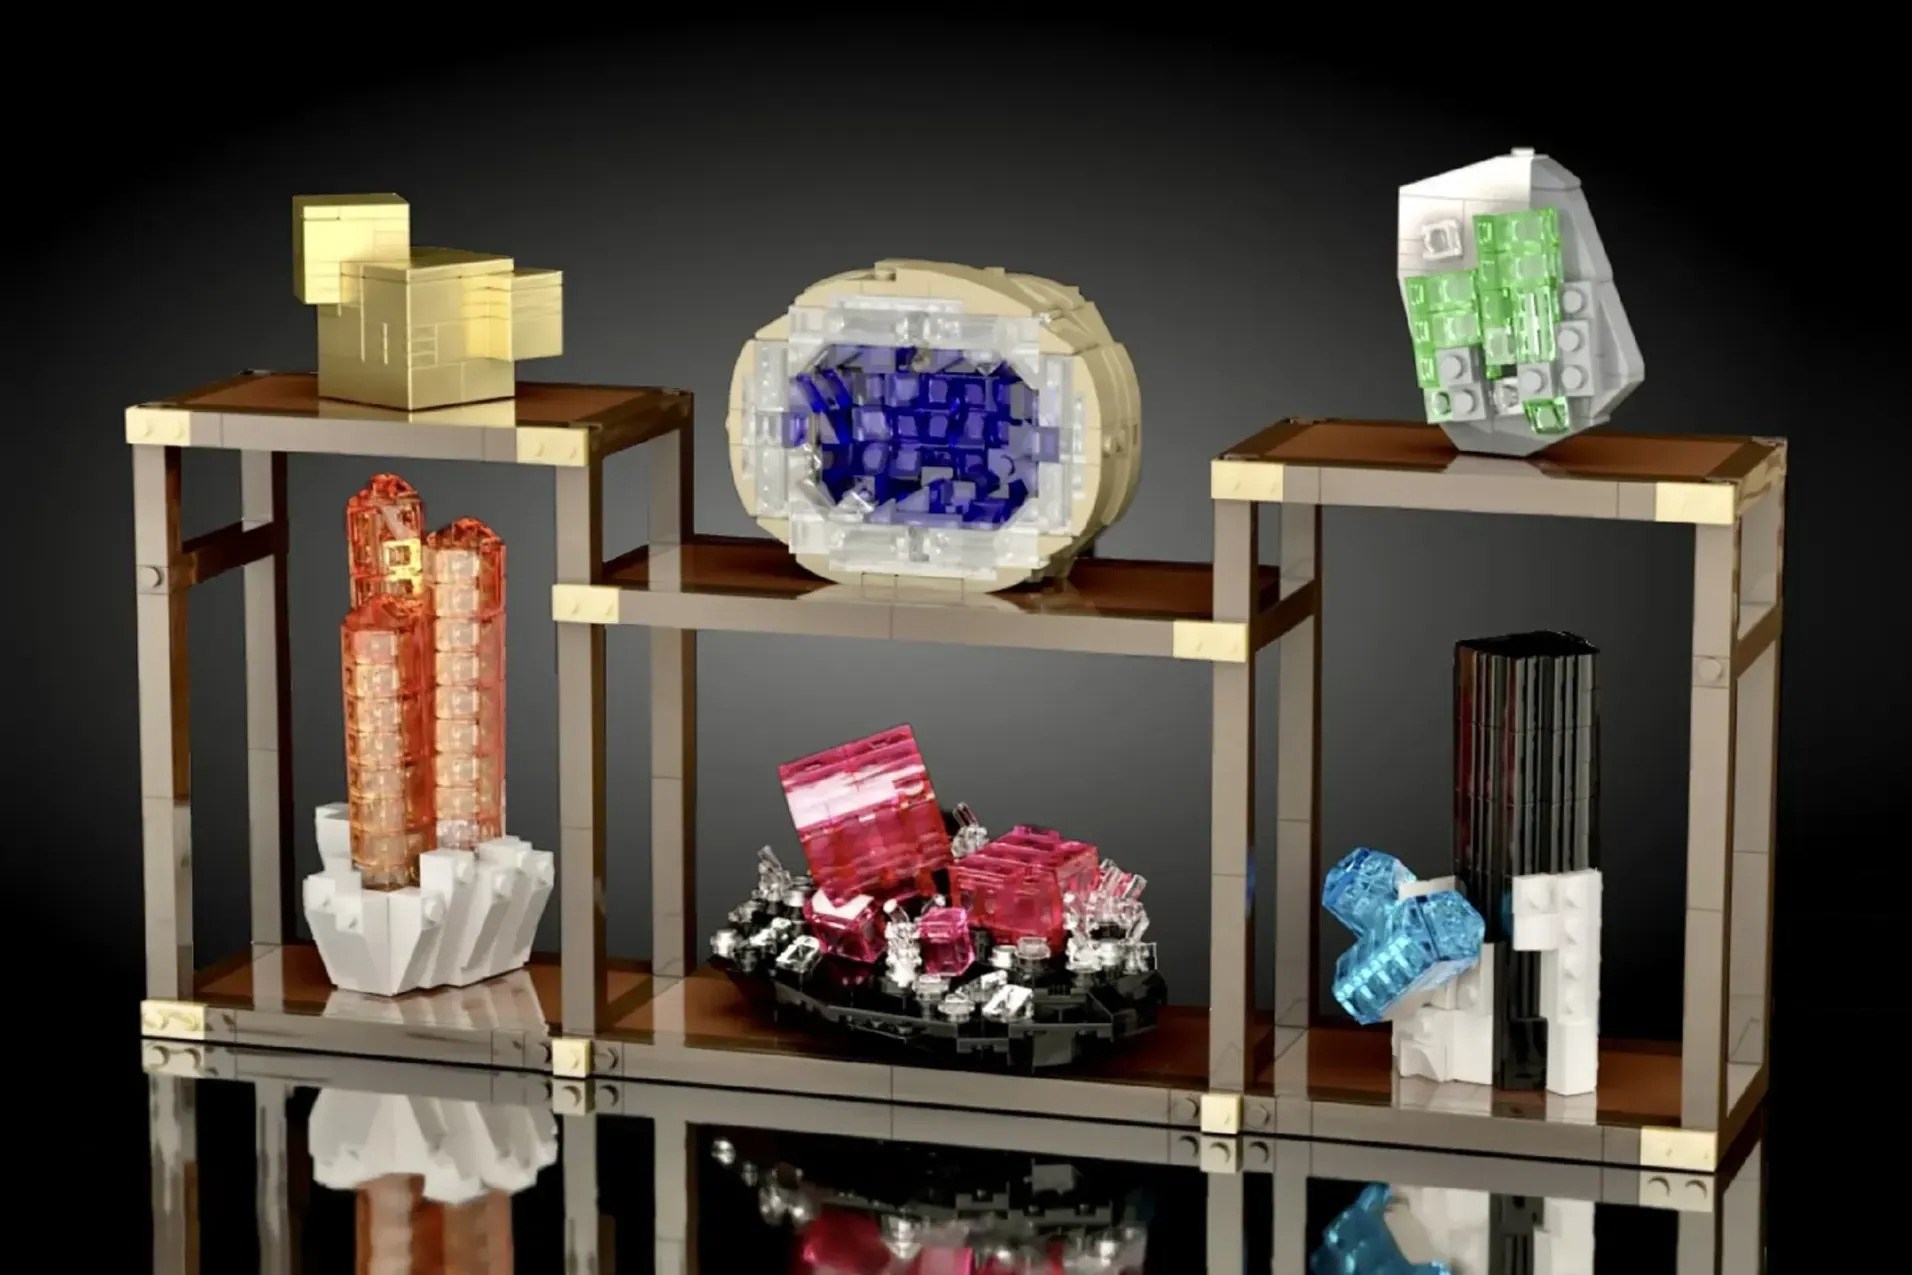
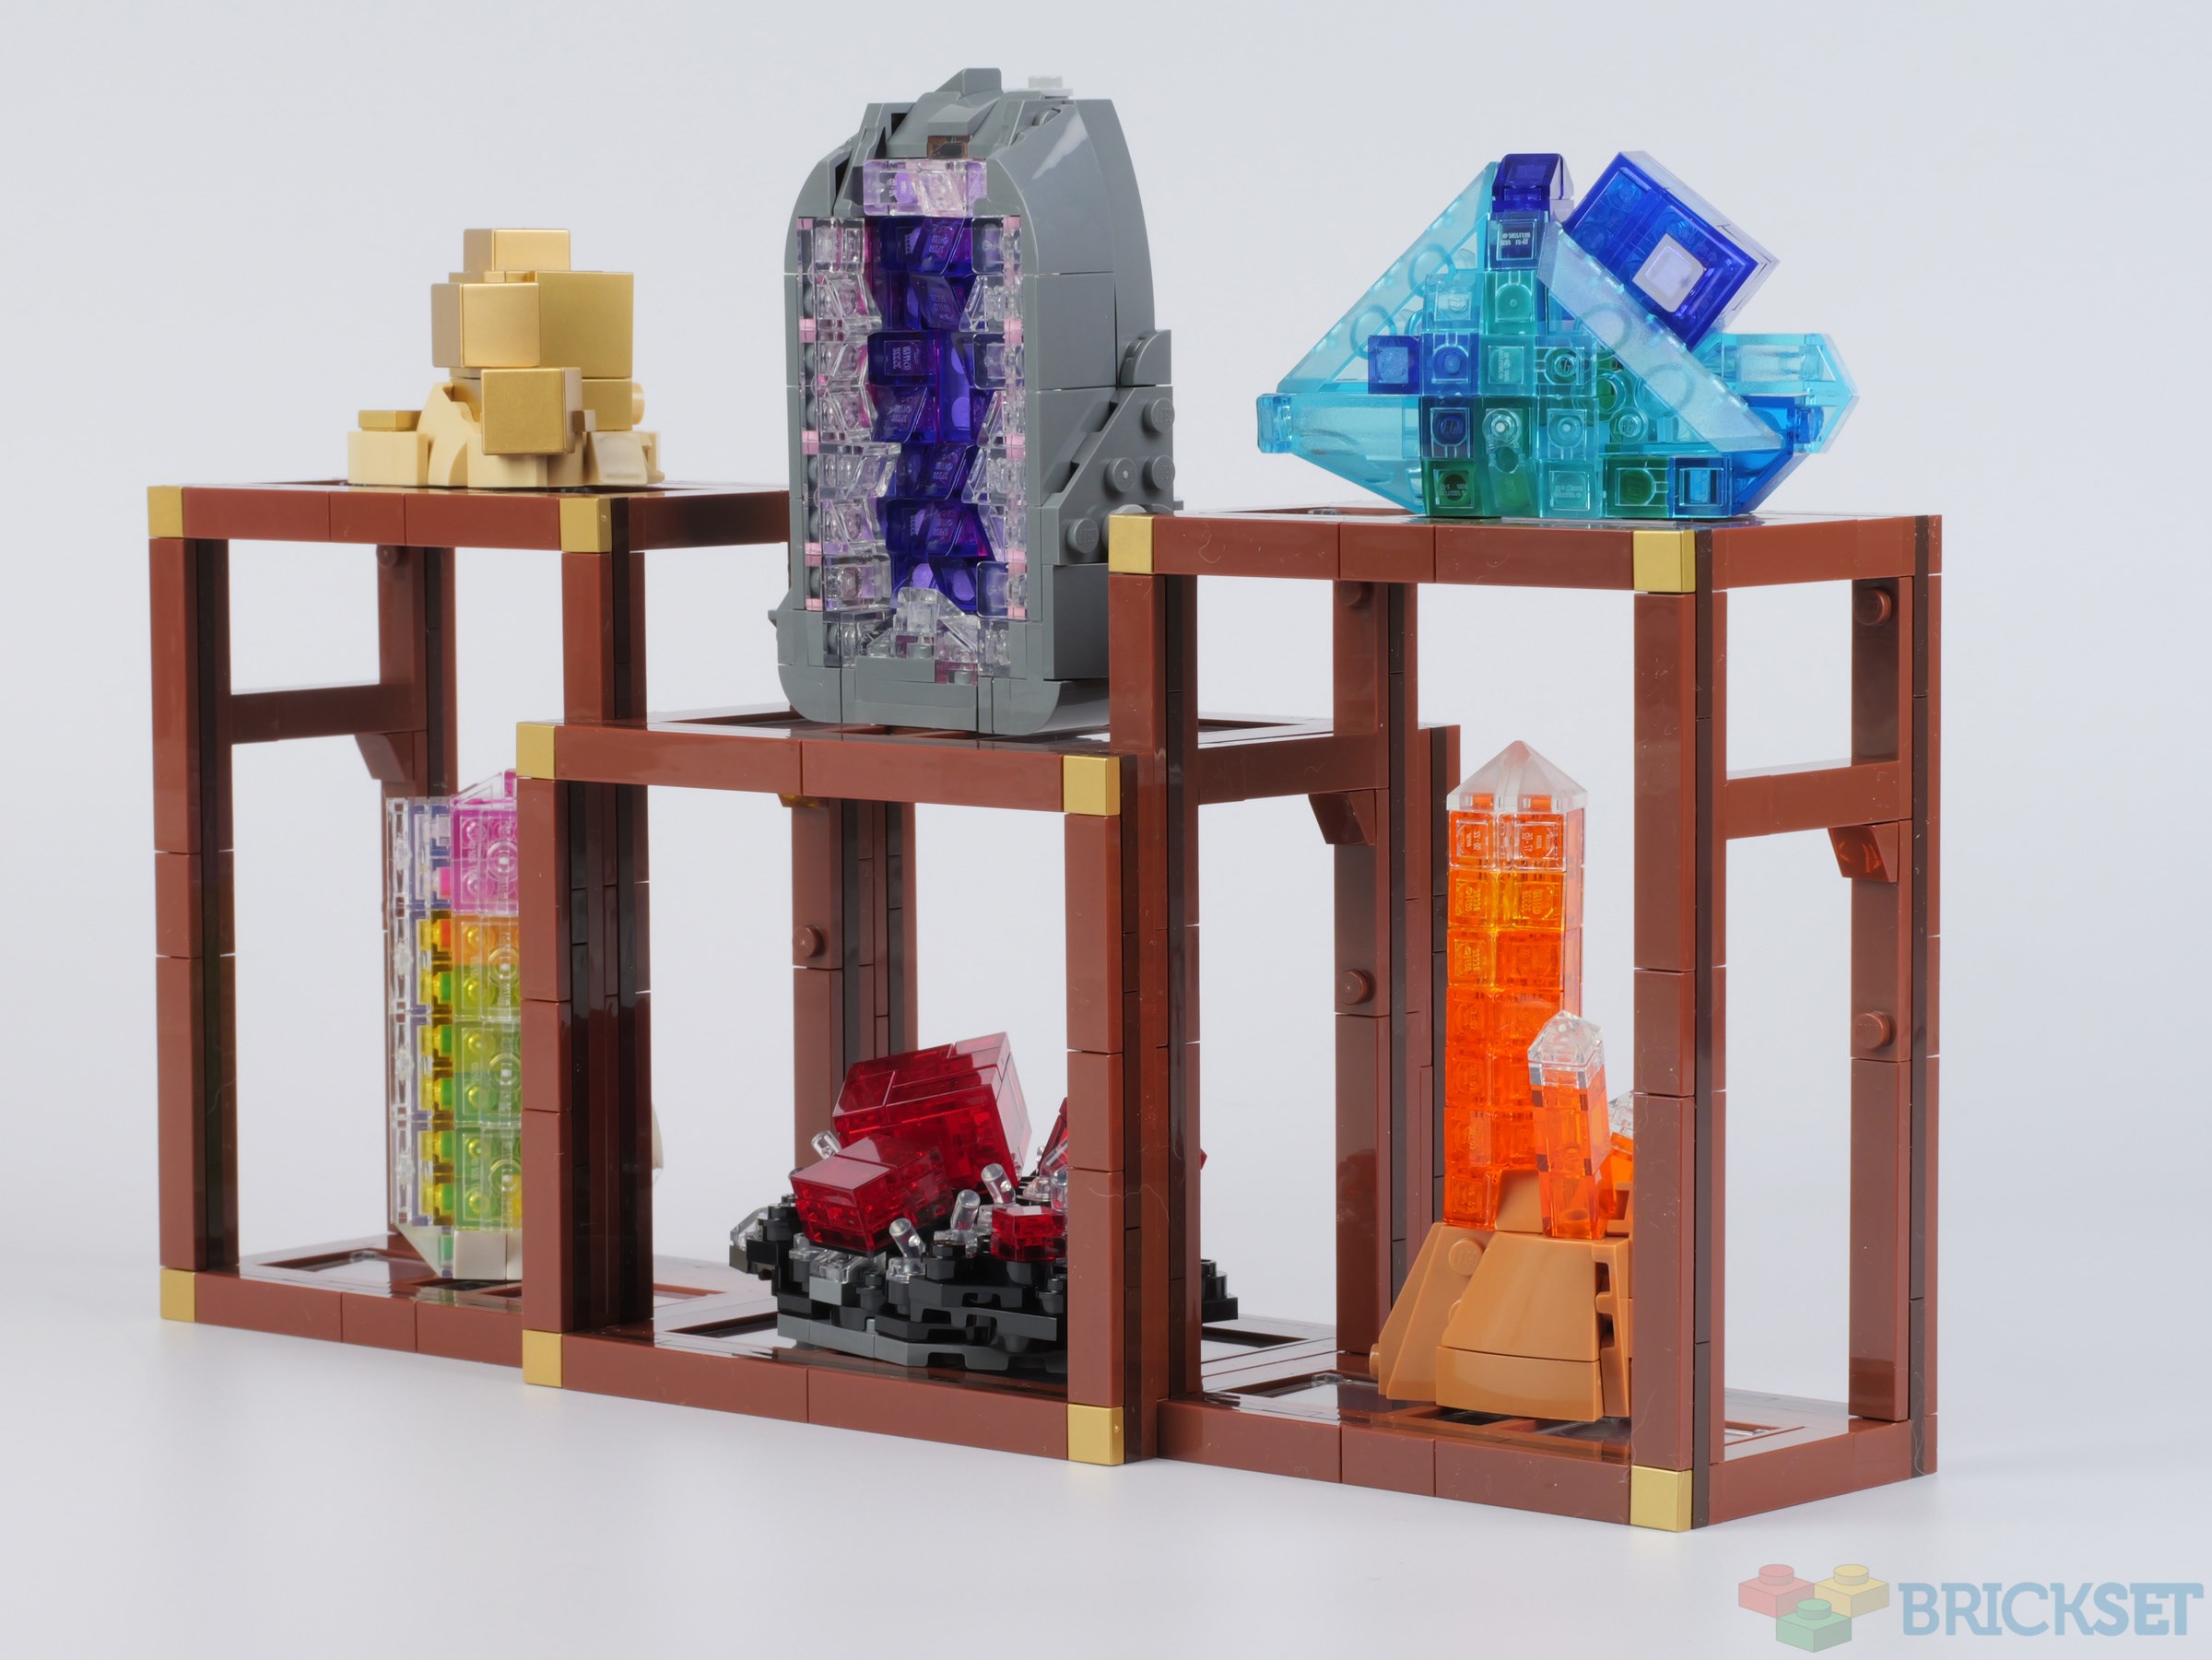
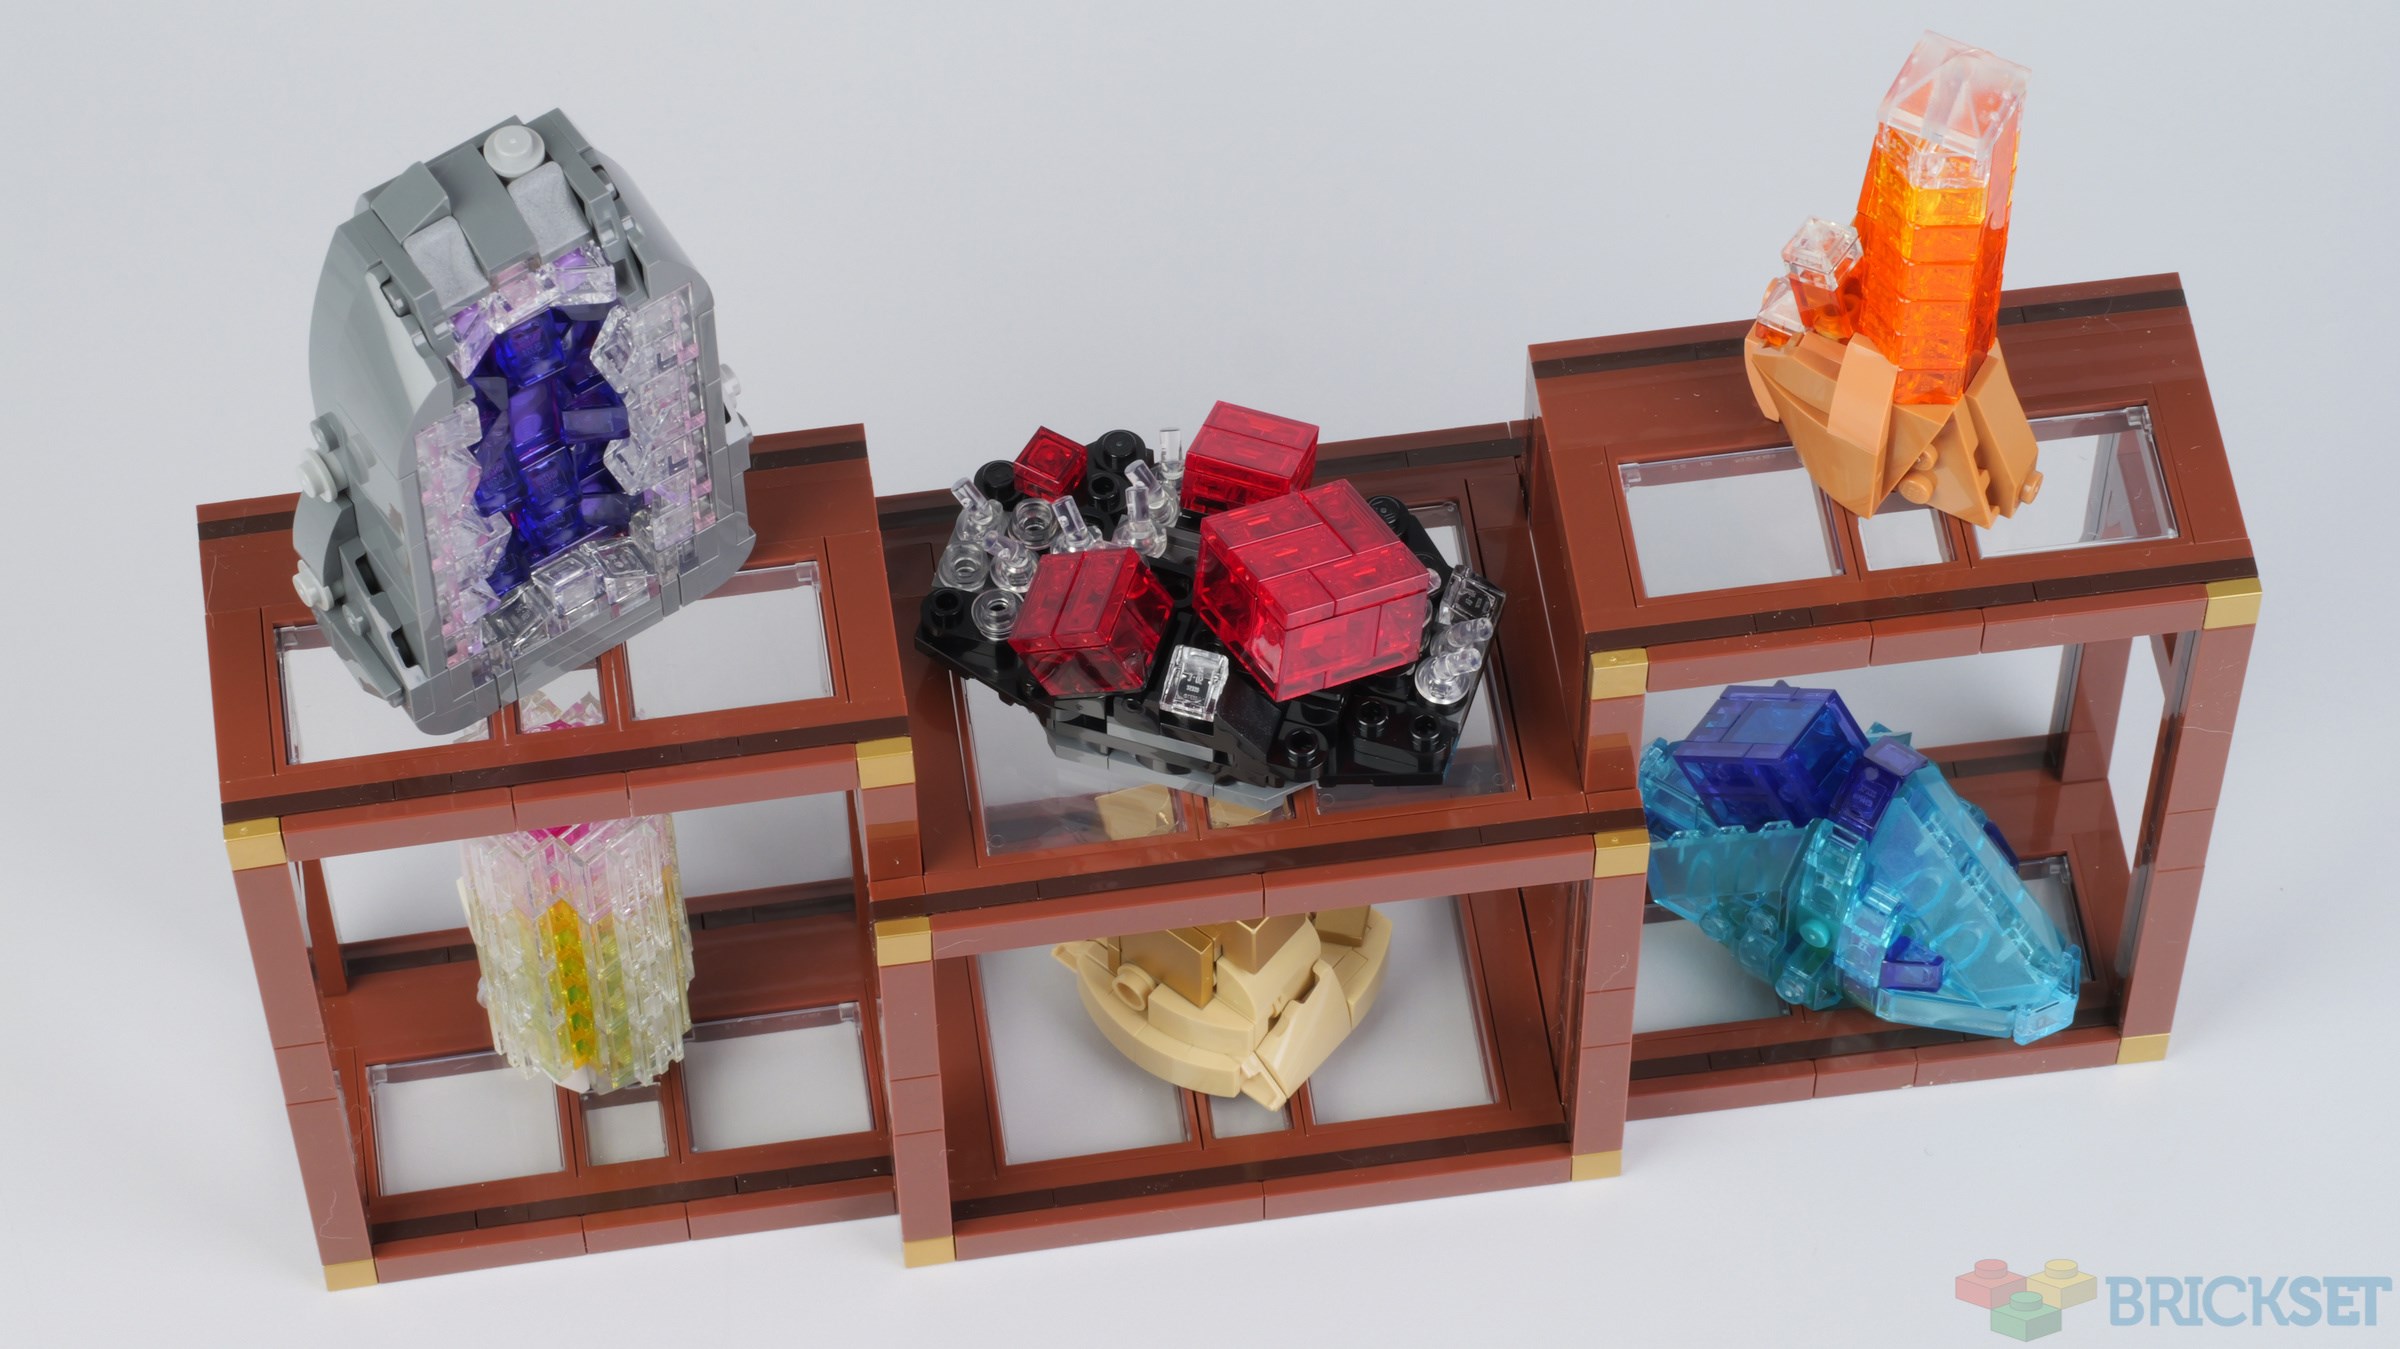
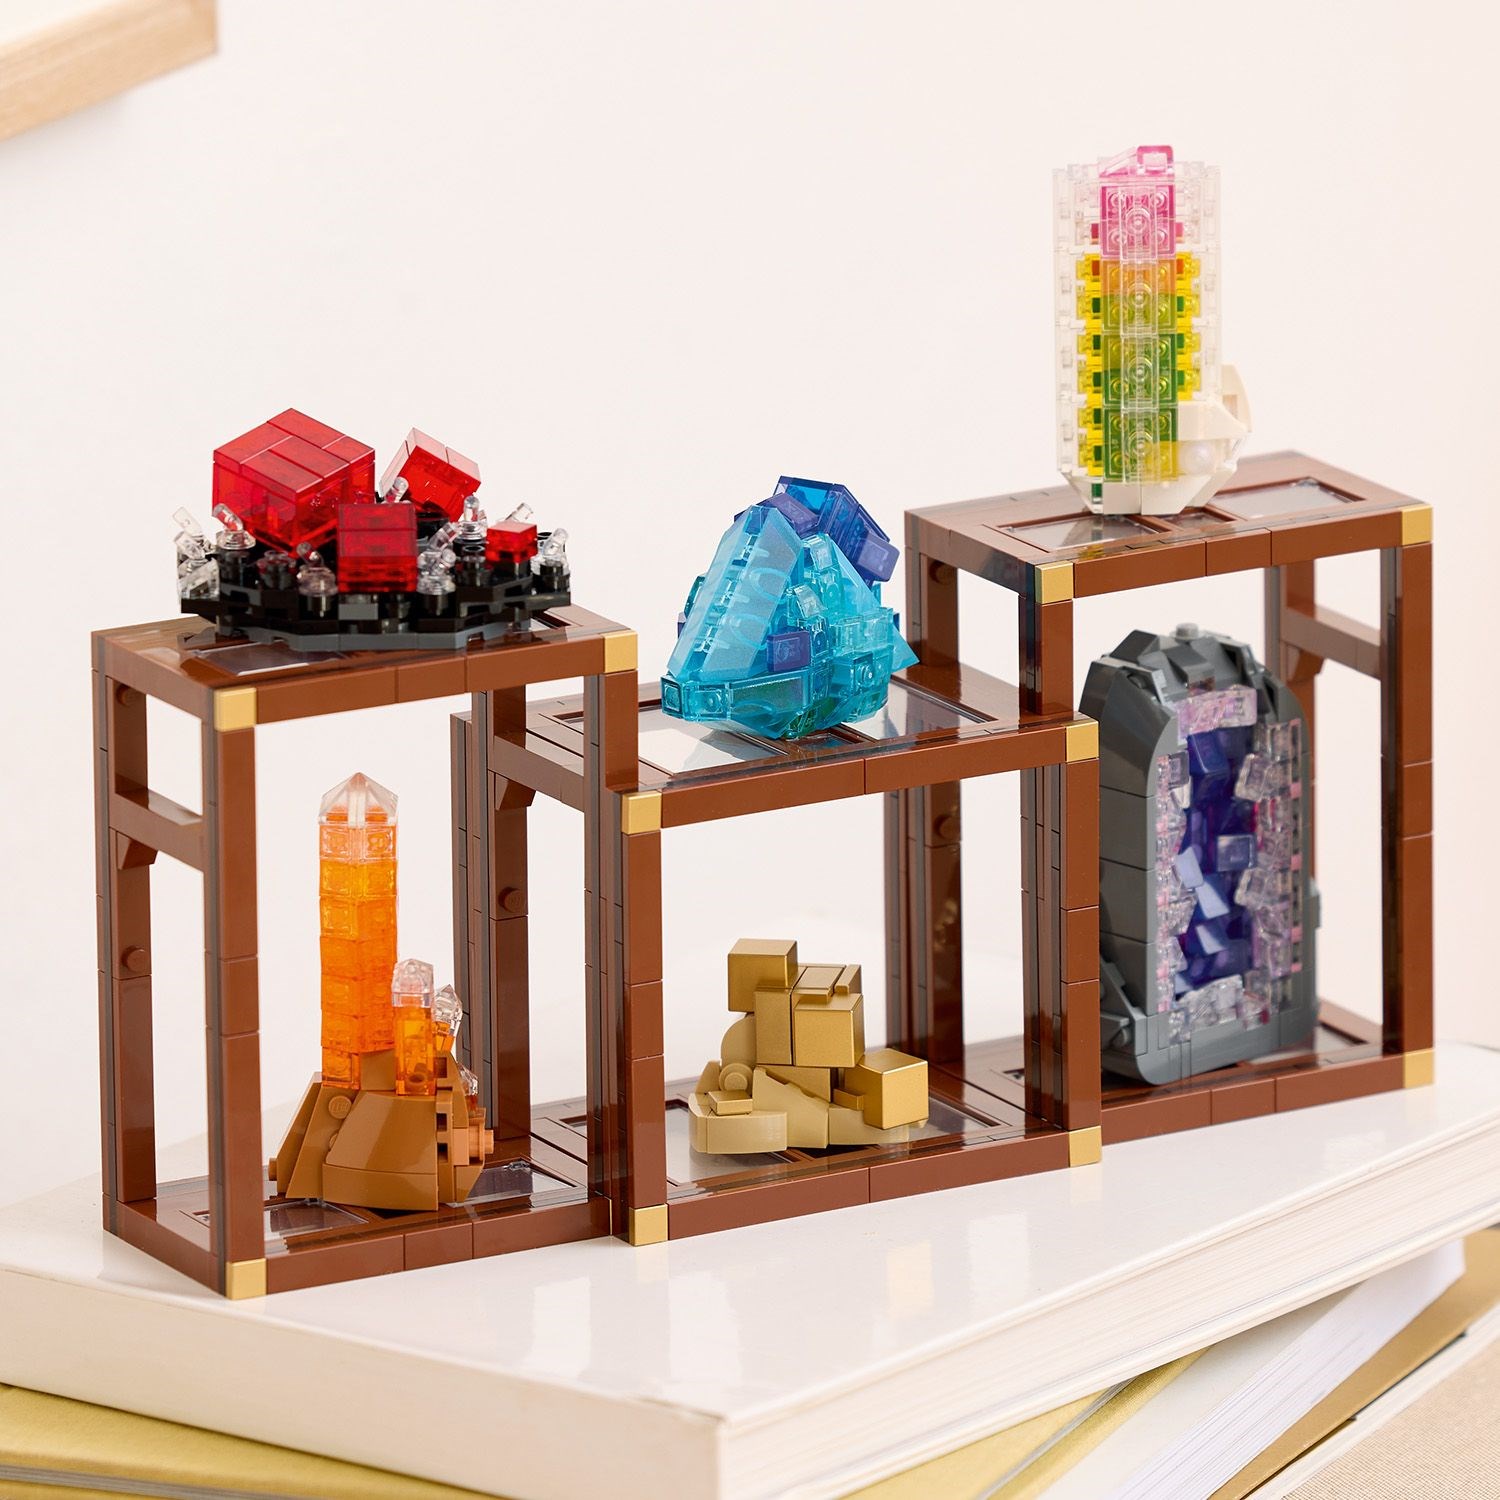
Dario Del Frate's LEGO Ideas project Minerals Display, which passed review in November 2024, proposed six mineral samples displayed on shelves and that's exactly what the finished model, 21362 Mineral Collection, has delivered, less than a year later.
However, there have been changes which, hopefully, have improved rather than impaired it.
Summary
21362 Mineral Collection, 880 pieces. £54.99 / $59.99 / €59.99 | 6.2p/6.8c/6.8c per piece. Buy at LEGO.com »
Interesting, colourful, attractive, and unlike anything LEGO has made before
Intricate and detailed specimens
Faithful to the original Ideas submission
Separate shelf sections necessitate care when handling
The set was provided for review by LEGO. All opinions expressed are those of the author.
This is Dario's winning submission, which is actually his second minerals-themed one to achieve the requisite number of supporters on the Ideas platform.
The main difference between it and the set is the selection of minerals included, and their finesse.
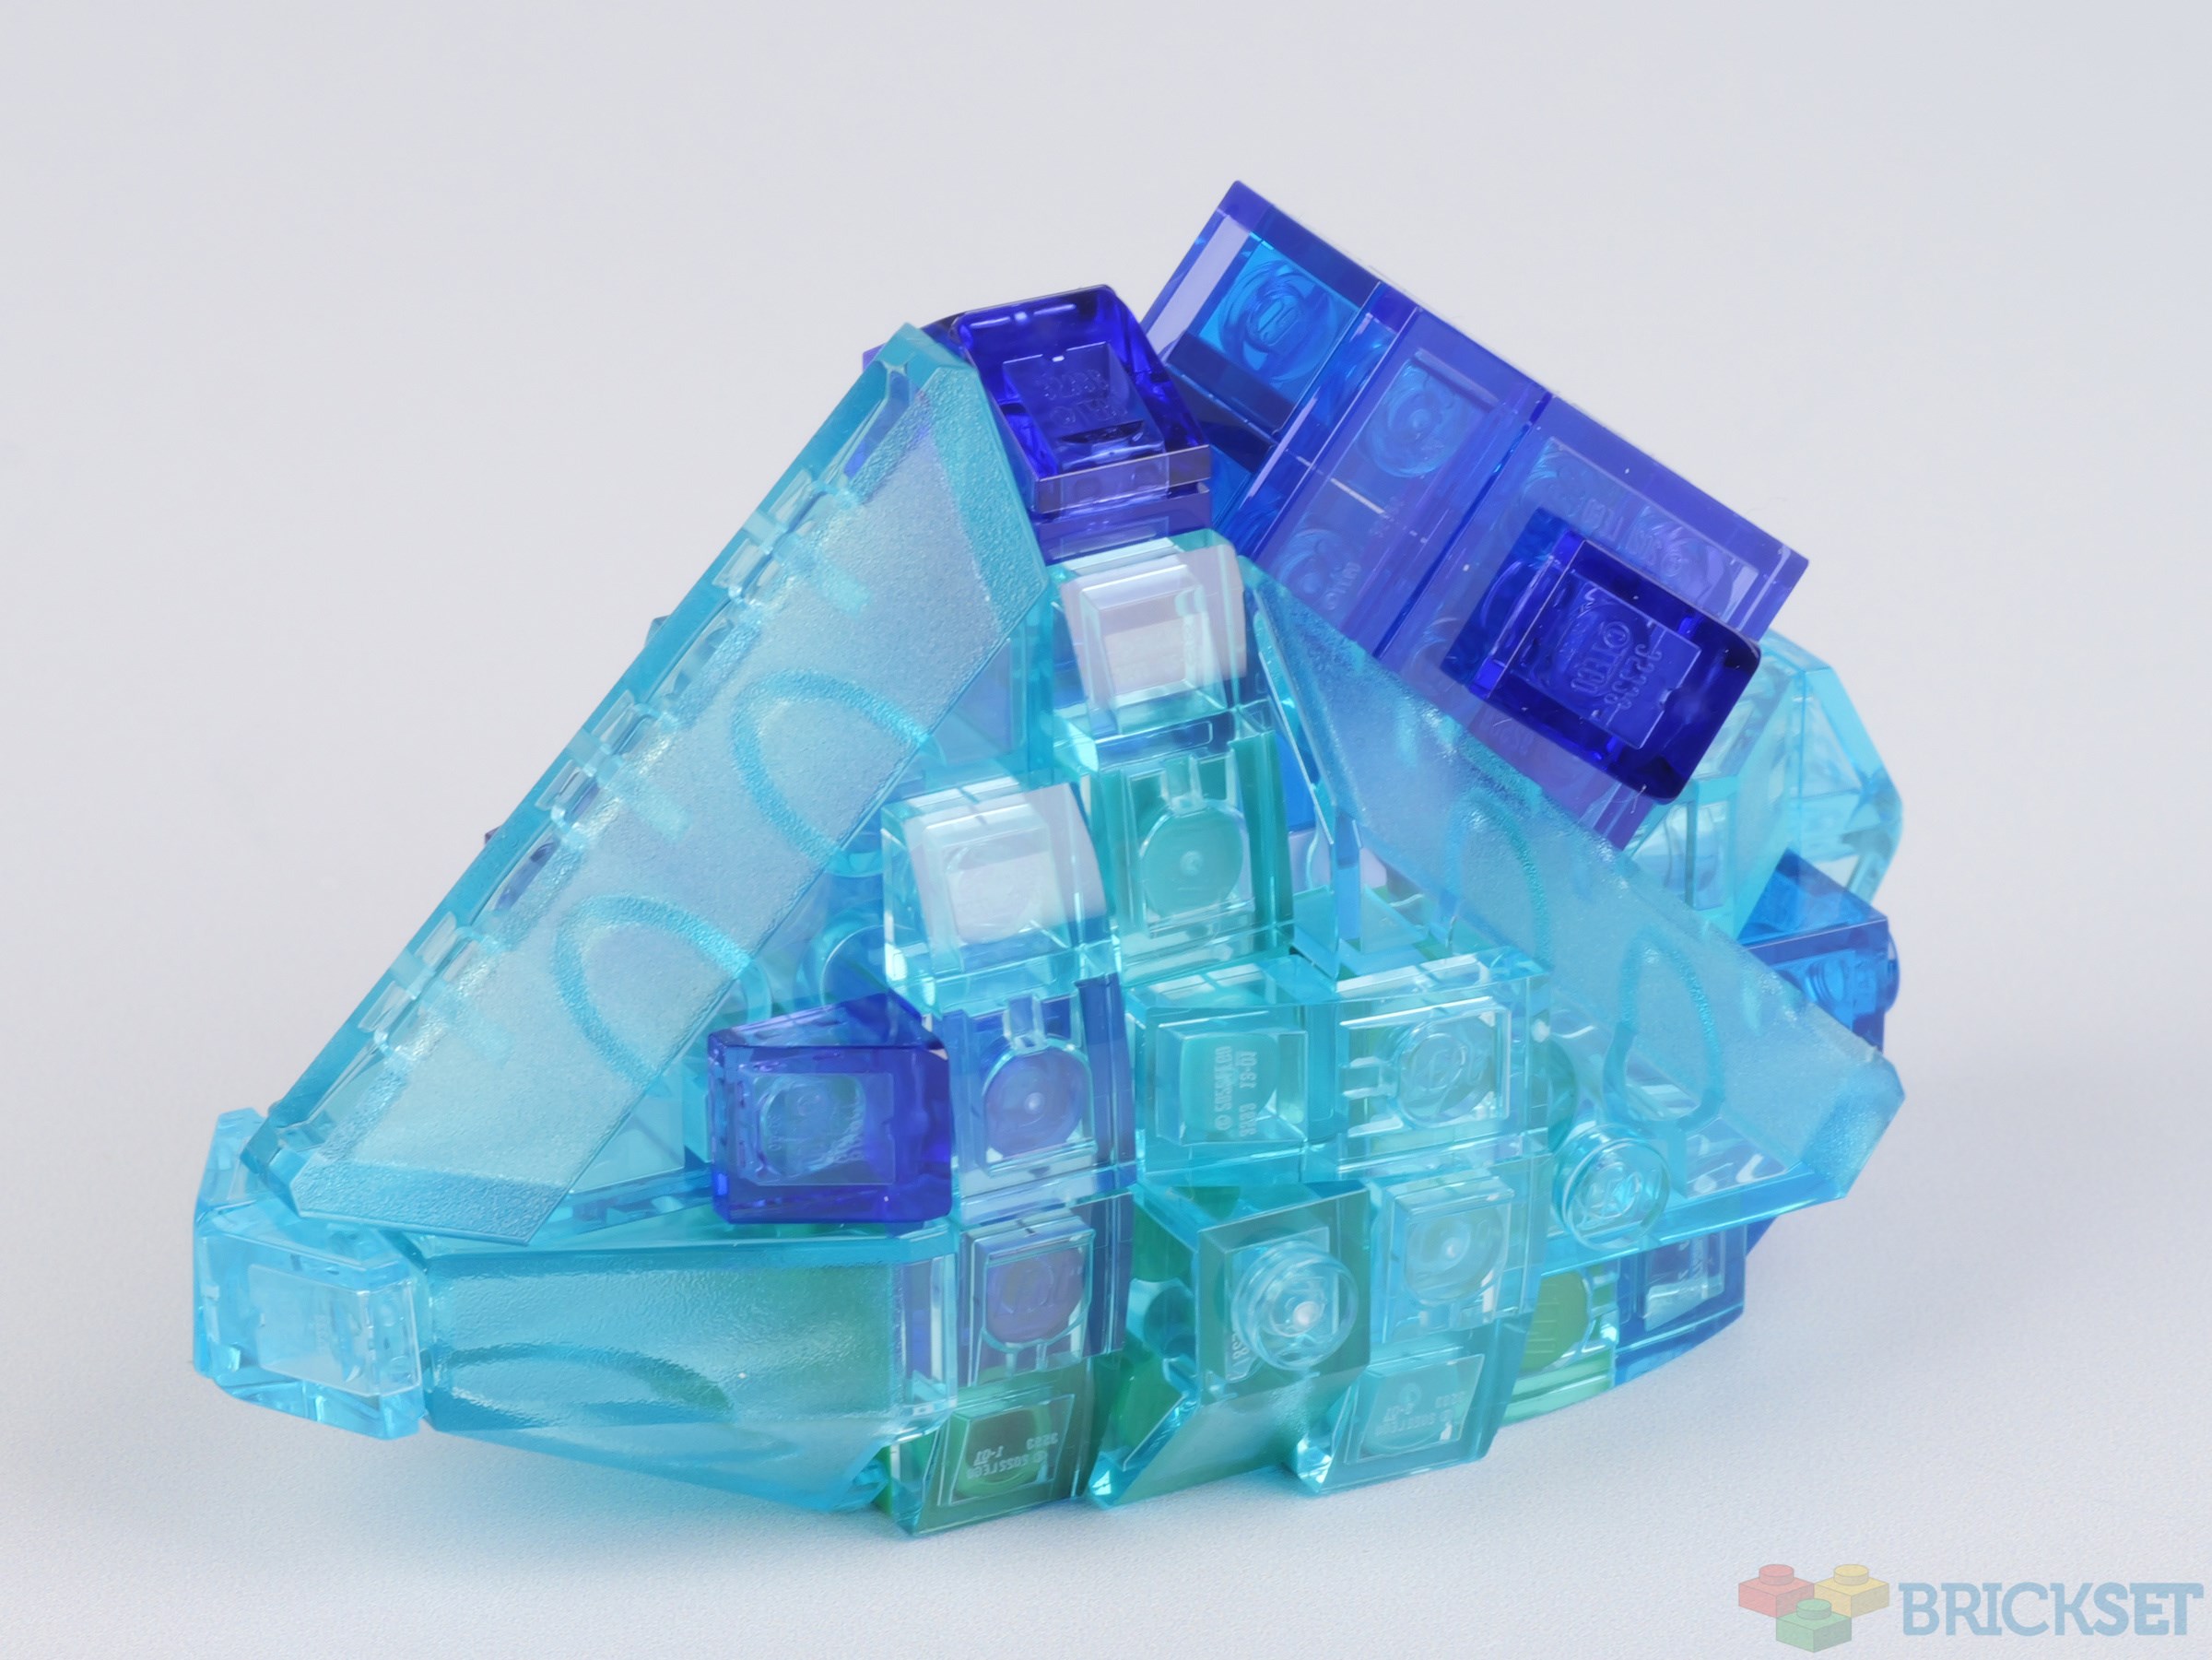
The project proposed samples of rhodochrosite, amethyst, black tourmaline, orange quartz, emerald, and pyrite. Some have been carried over (rhodochrosite, amethyst, pyrite, quartz), one has been changed (tourmaline is now watermelon rather than black), and the emerald has been replaced with fluorite.
It's still an excellent and varied selection in terms of shape, form, and colour.
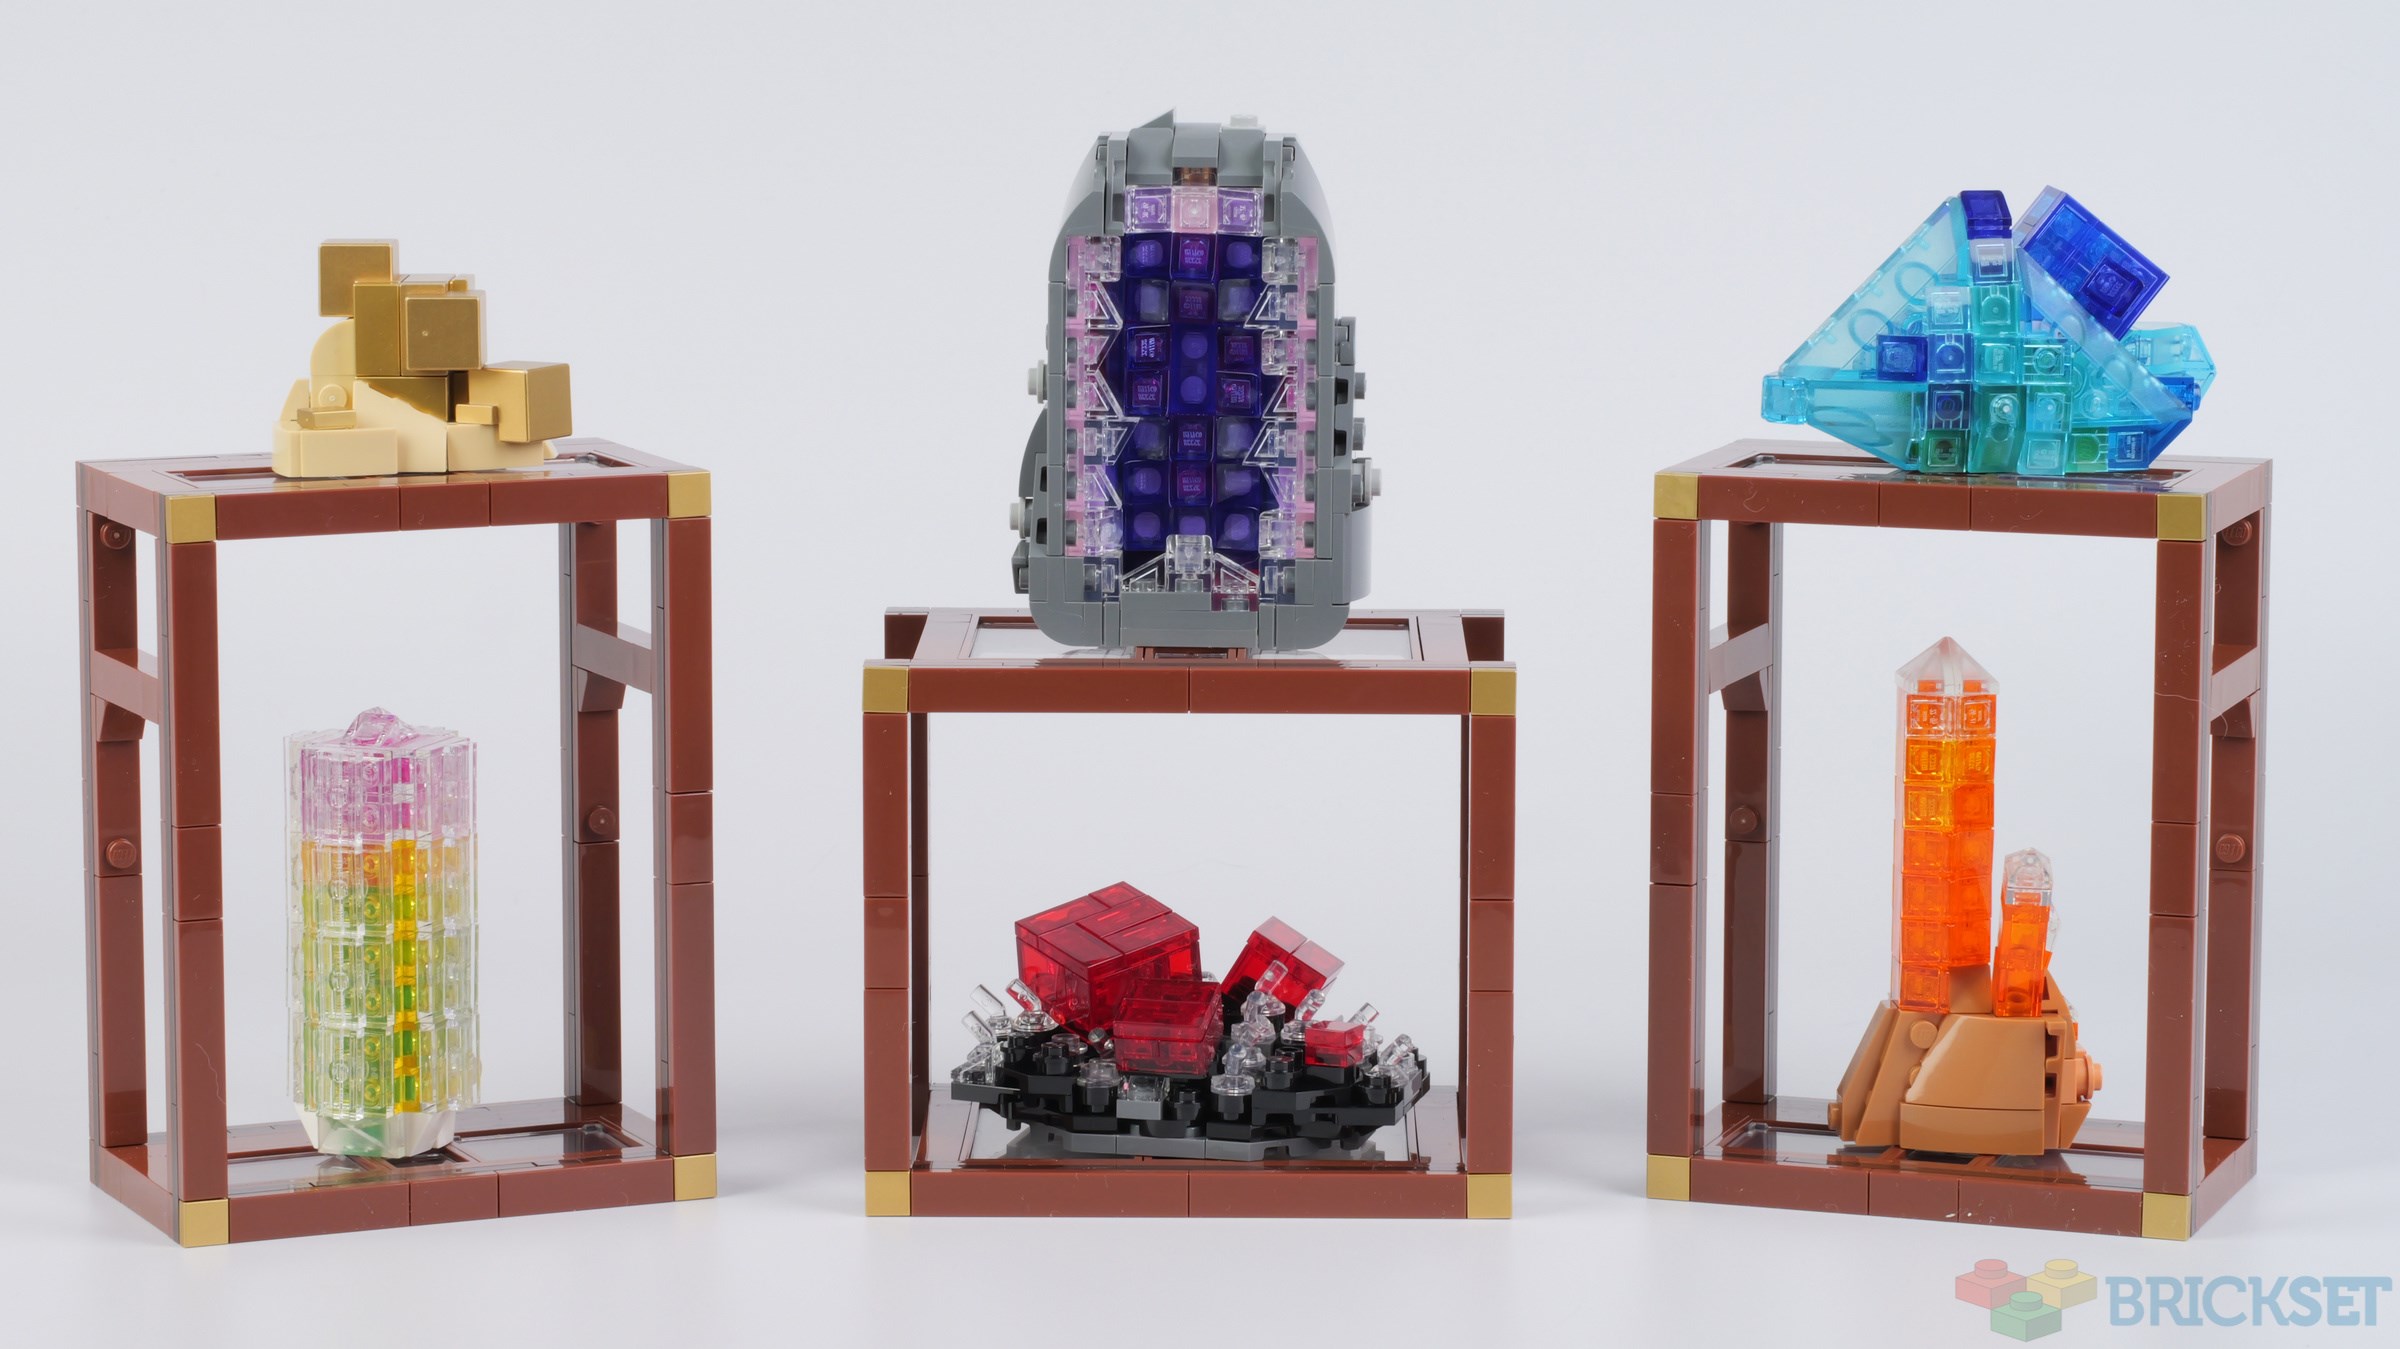
The overall design of the tiered shelving unit remains the same but, rather than being one piece, it comprises three separate unconnected sections designed to be butted against each other.
In his project, Dario states that "the case can be hung directly to a wall or simply put on a shelf" but, as it is, it would not be possible to hang this one without some modification, and you need to bear in mind that it's in sections when picking it up.
The shelves are 'glass', but due to the need to include a stud on them upon which to attach the stones, they have a 'wood' strip down the centre which spoils the look of them a bit.
This beautiful crystal has a pink core surrounded by green which gives it its name.
The colour transition in the model has been created with pink and green pieces in the centre, a layer of trans-yellow plates around them, then transparent elements on the sides. It's quite effective although arguably the two layers of transparent pieces have subdued the effect somewhat.
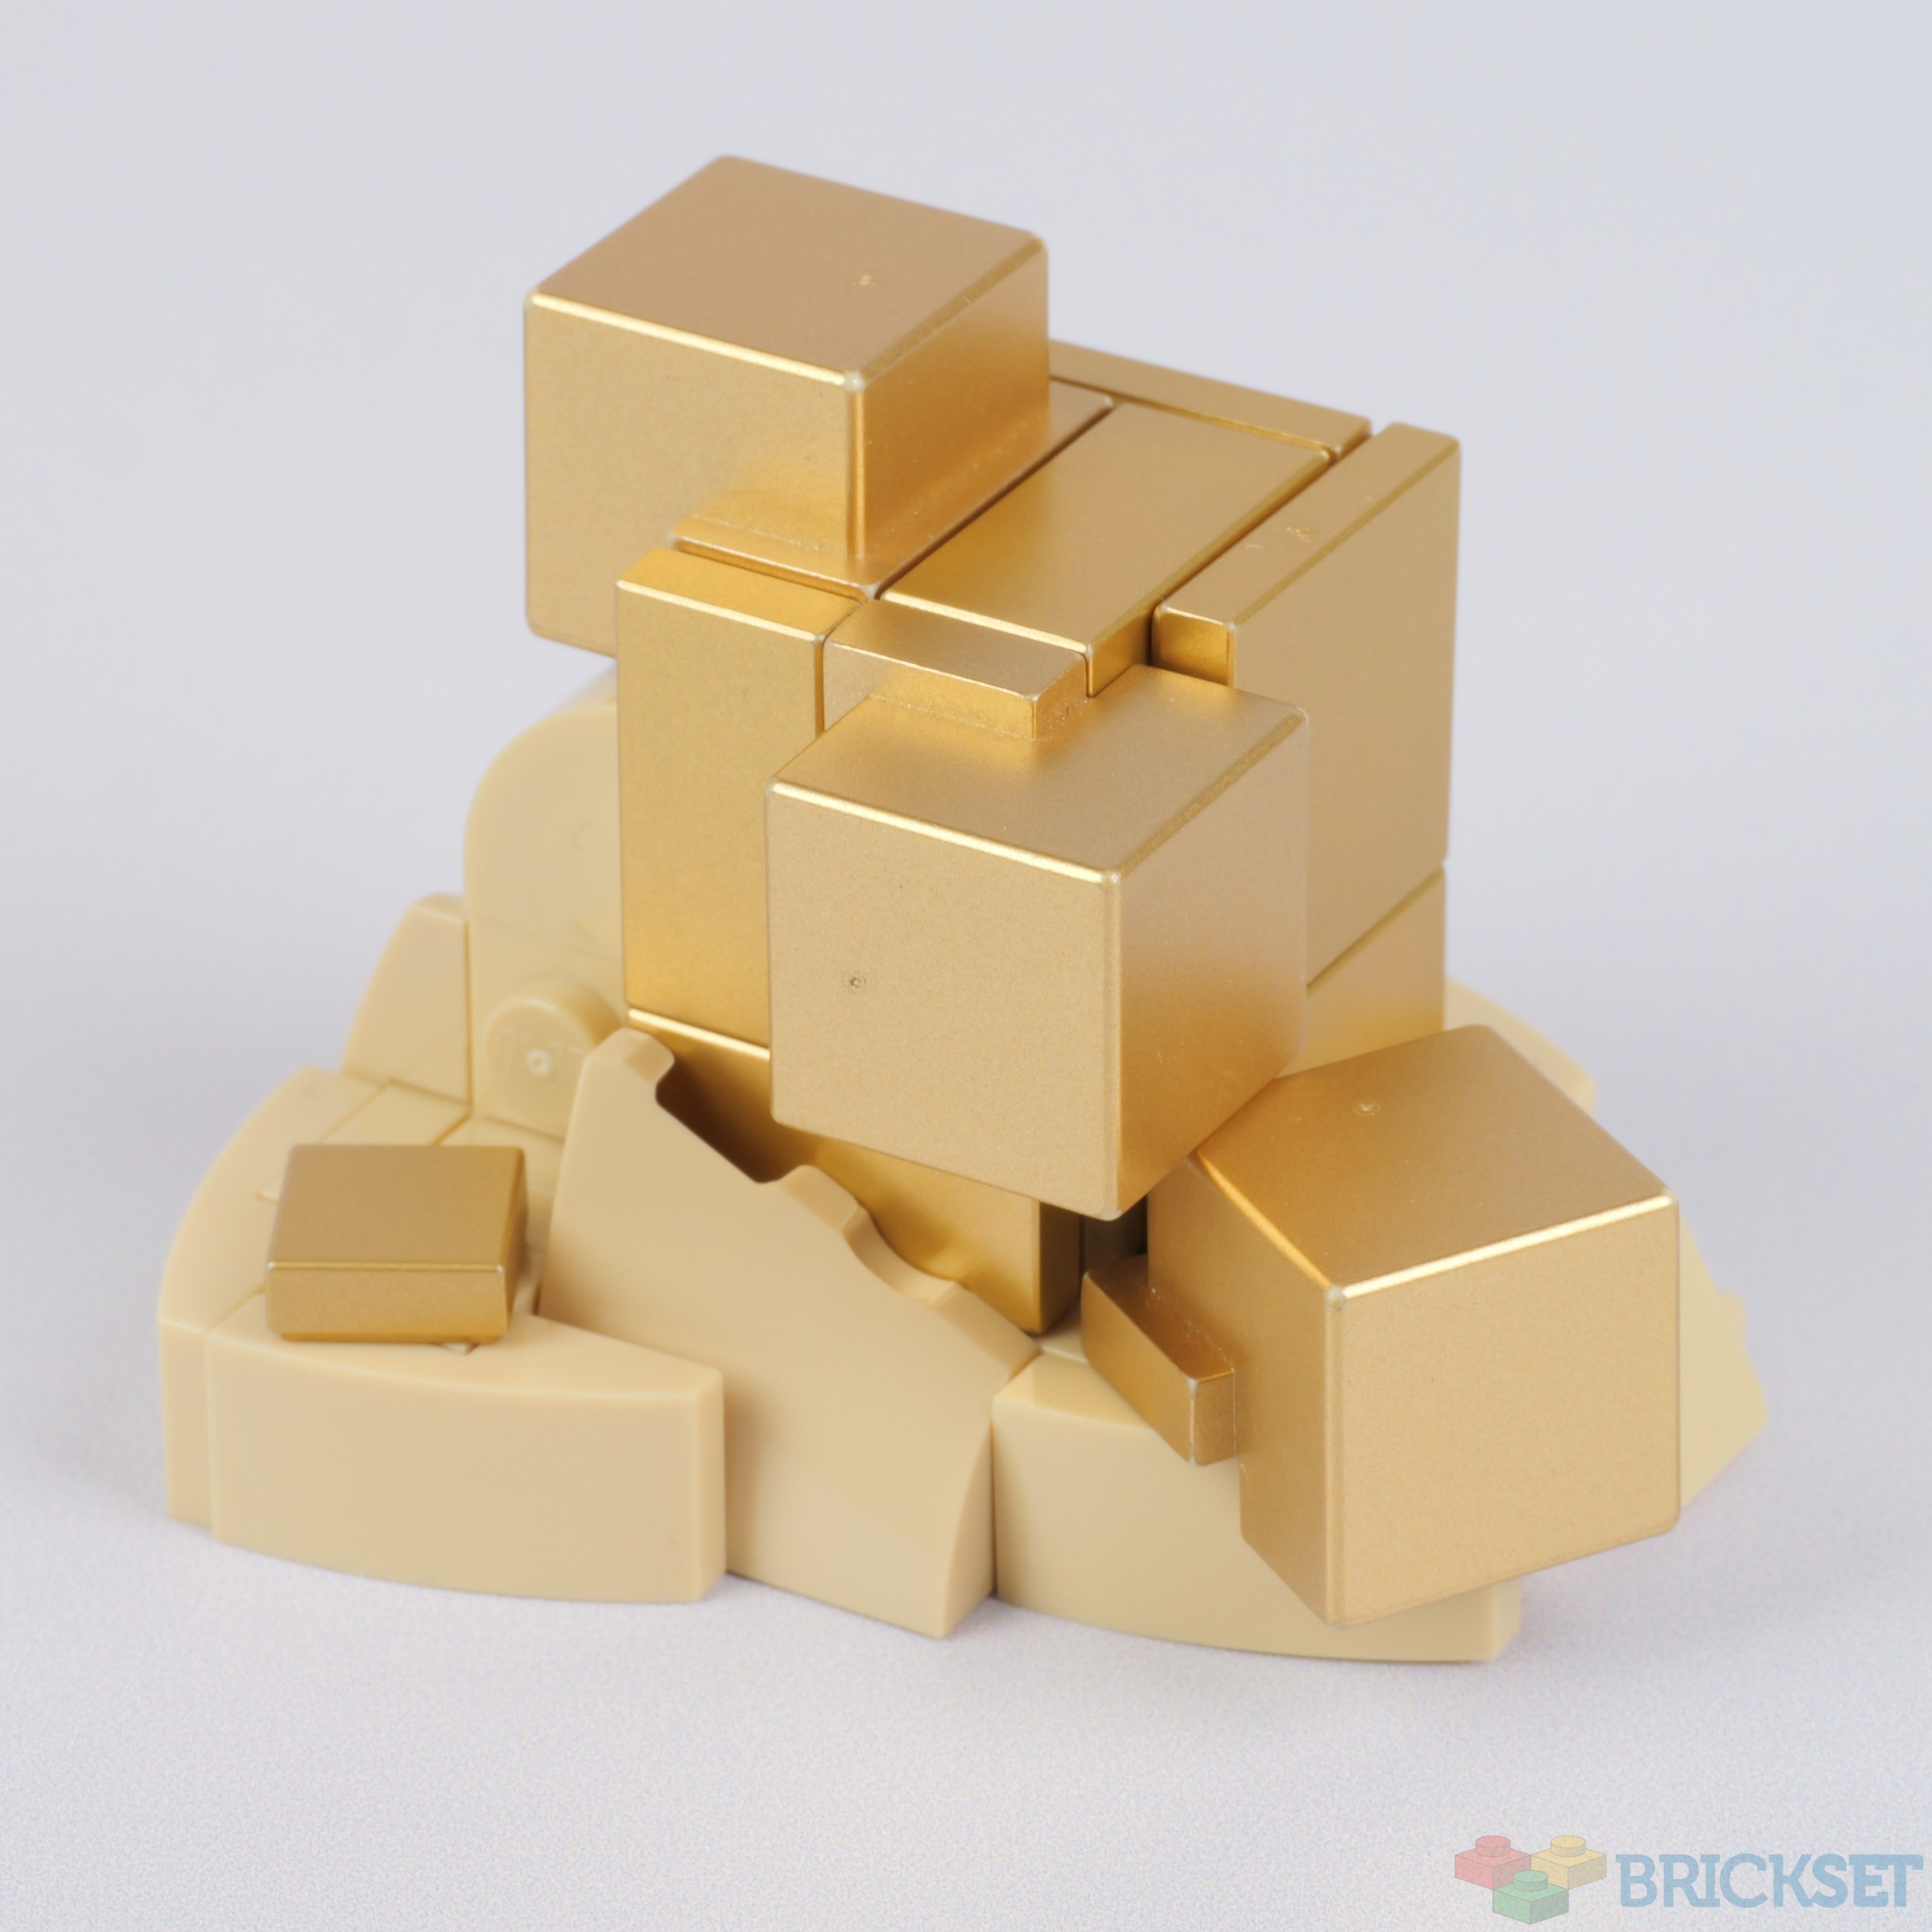
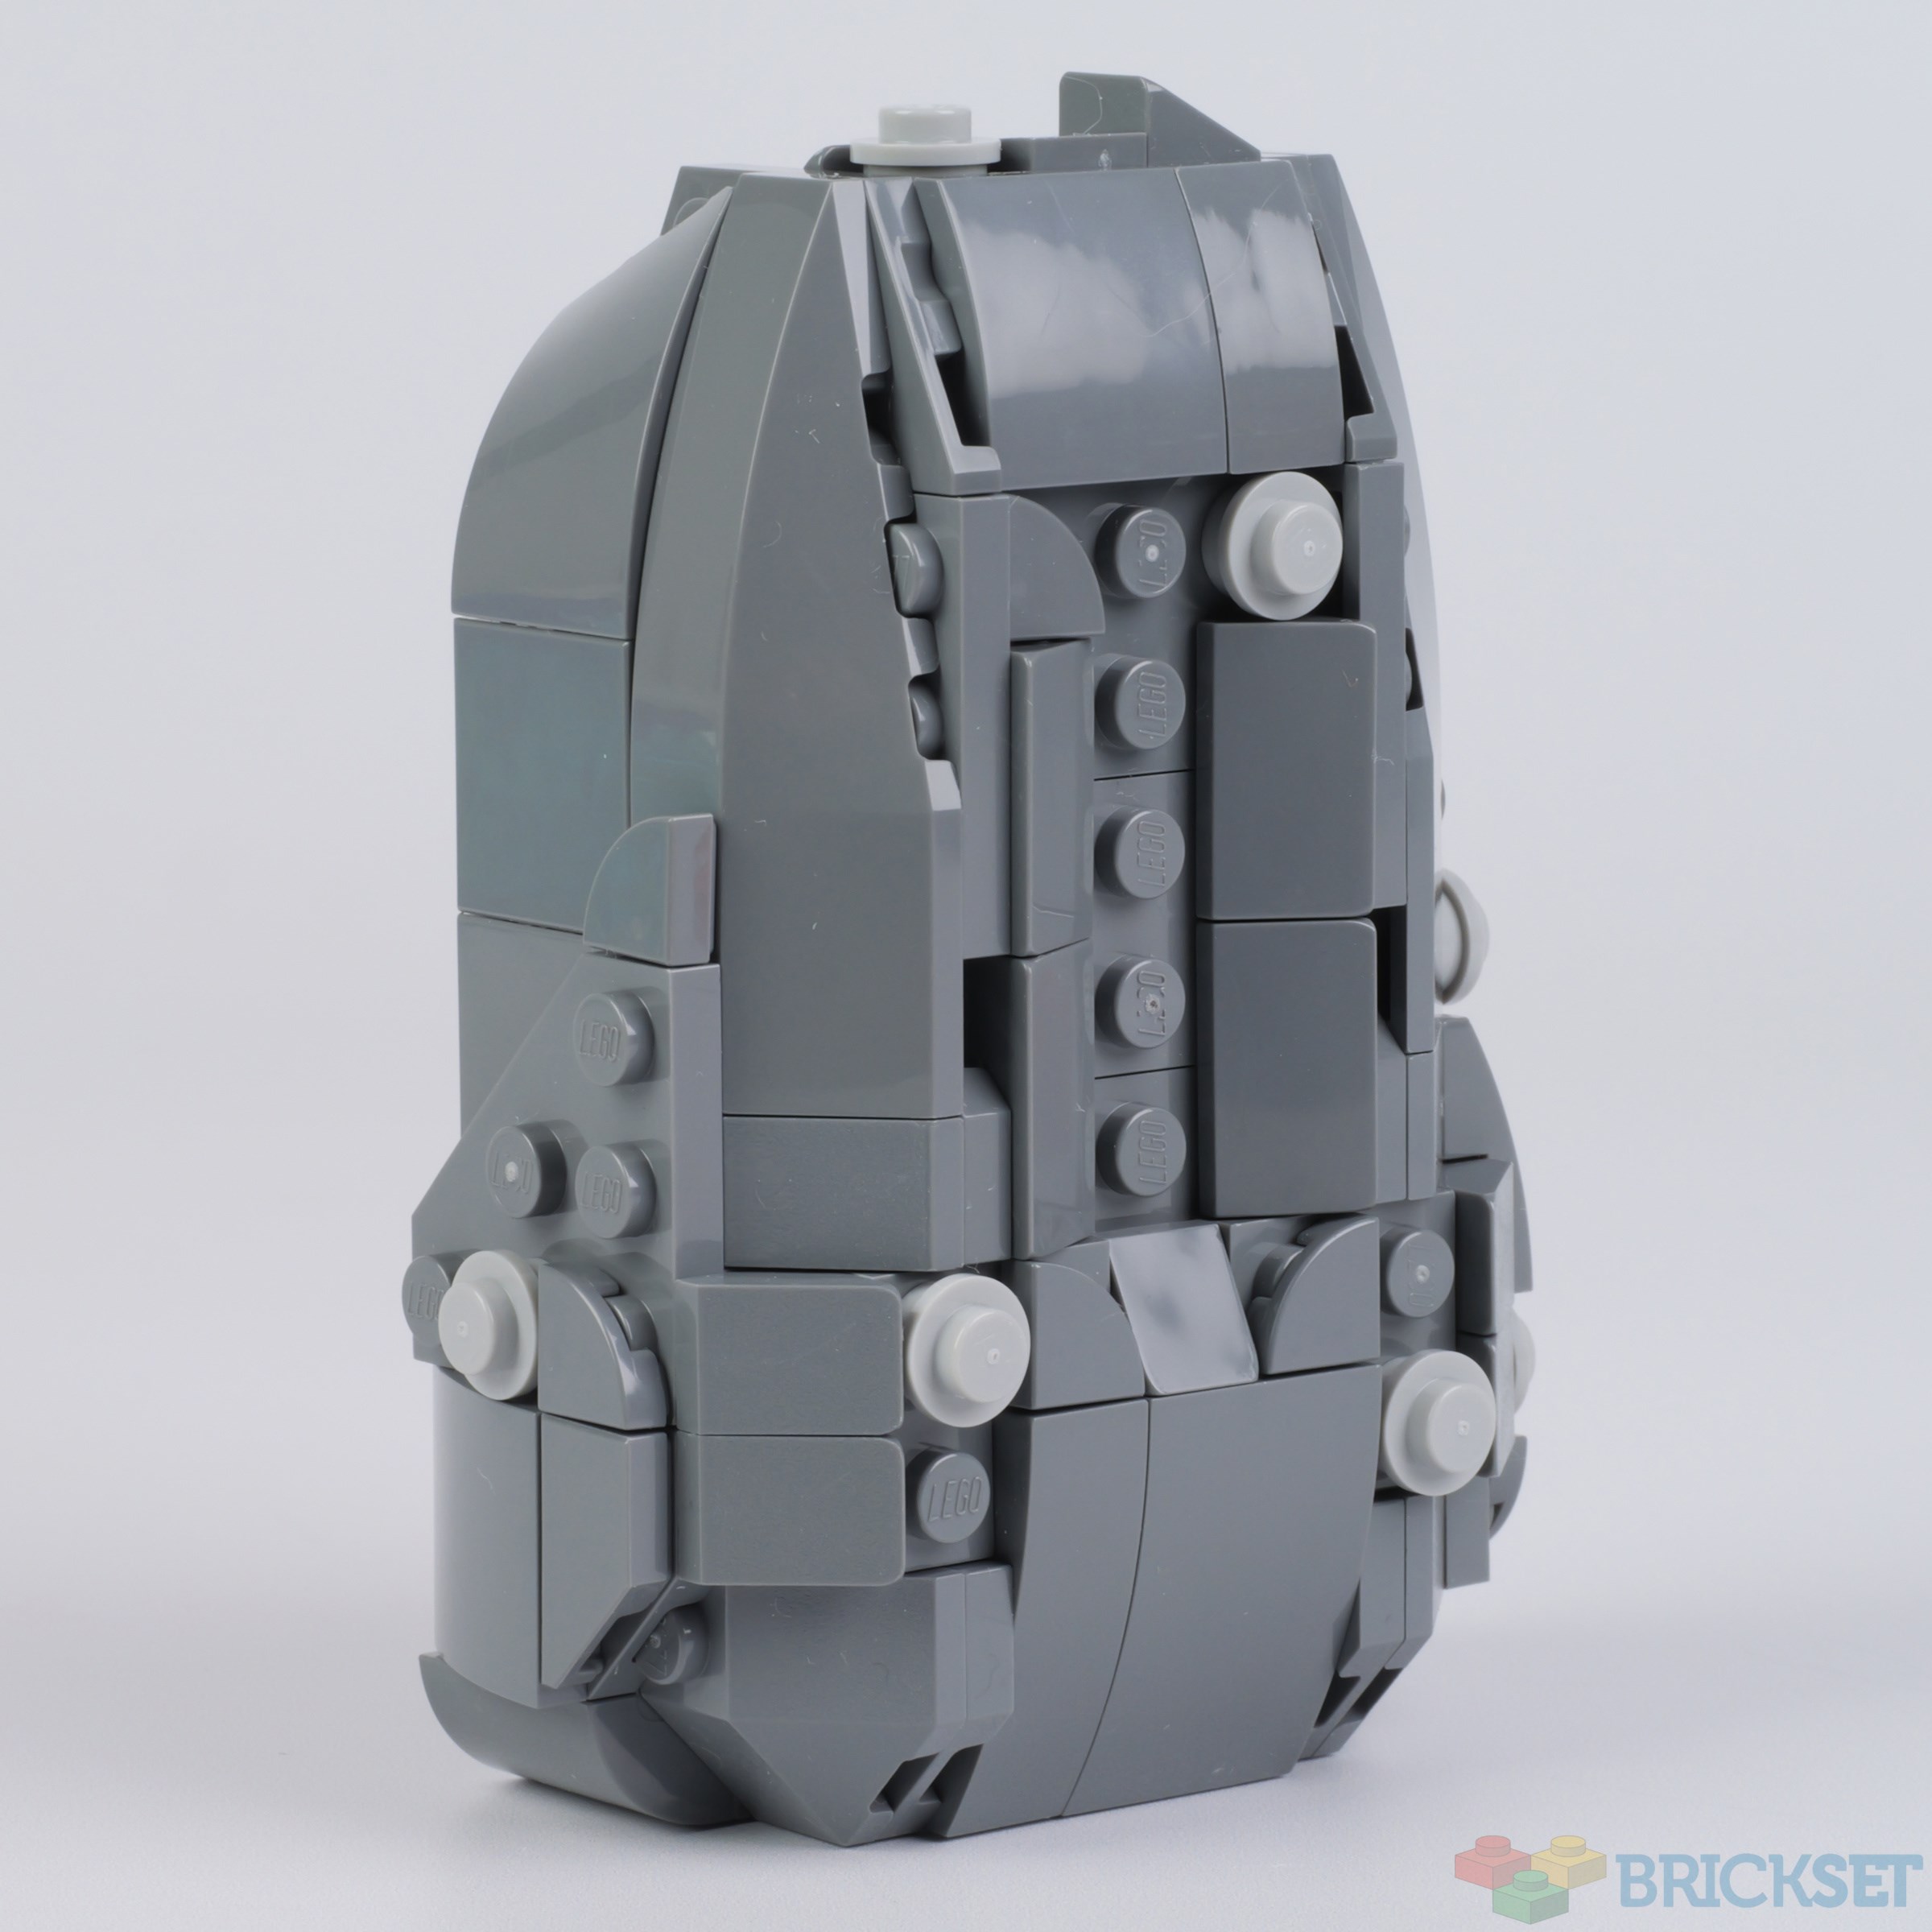
This fools gold sample utilises drum-lacquered gold pieces, including what I believe are Minecraft heads. They have certainly helped create a realistic shape and texture.
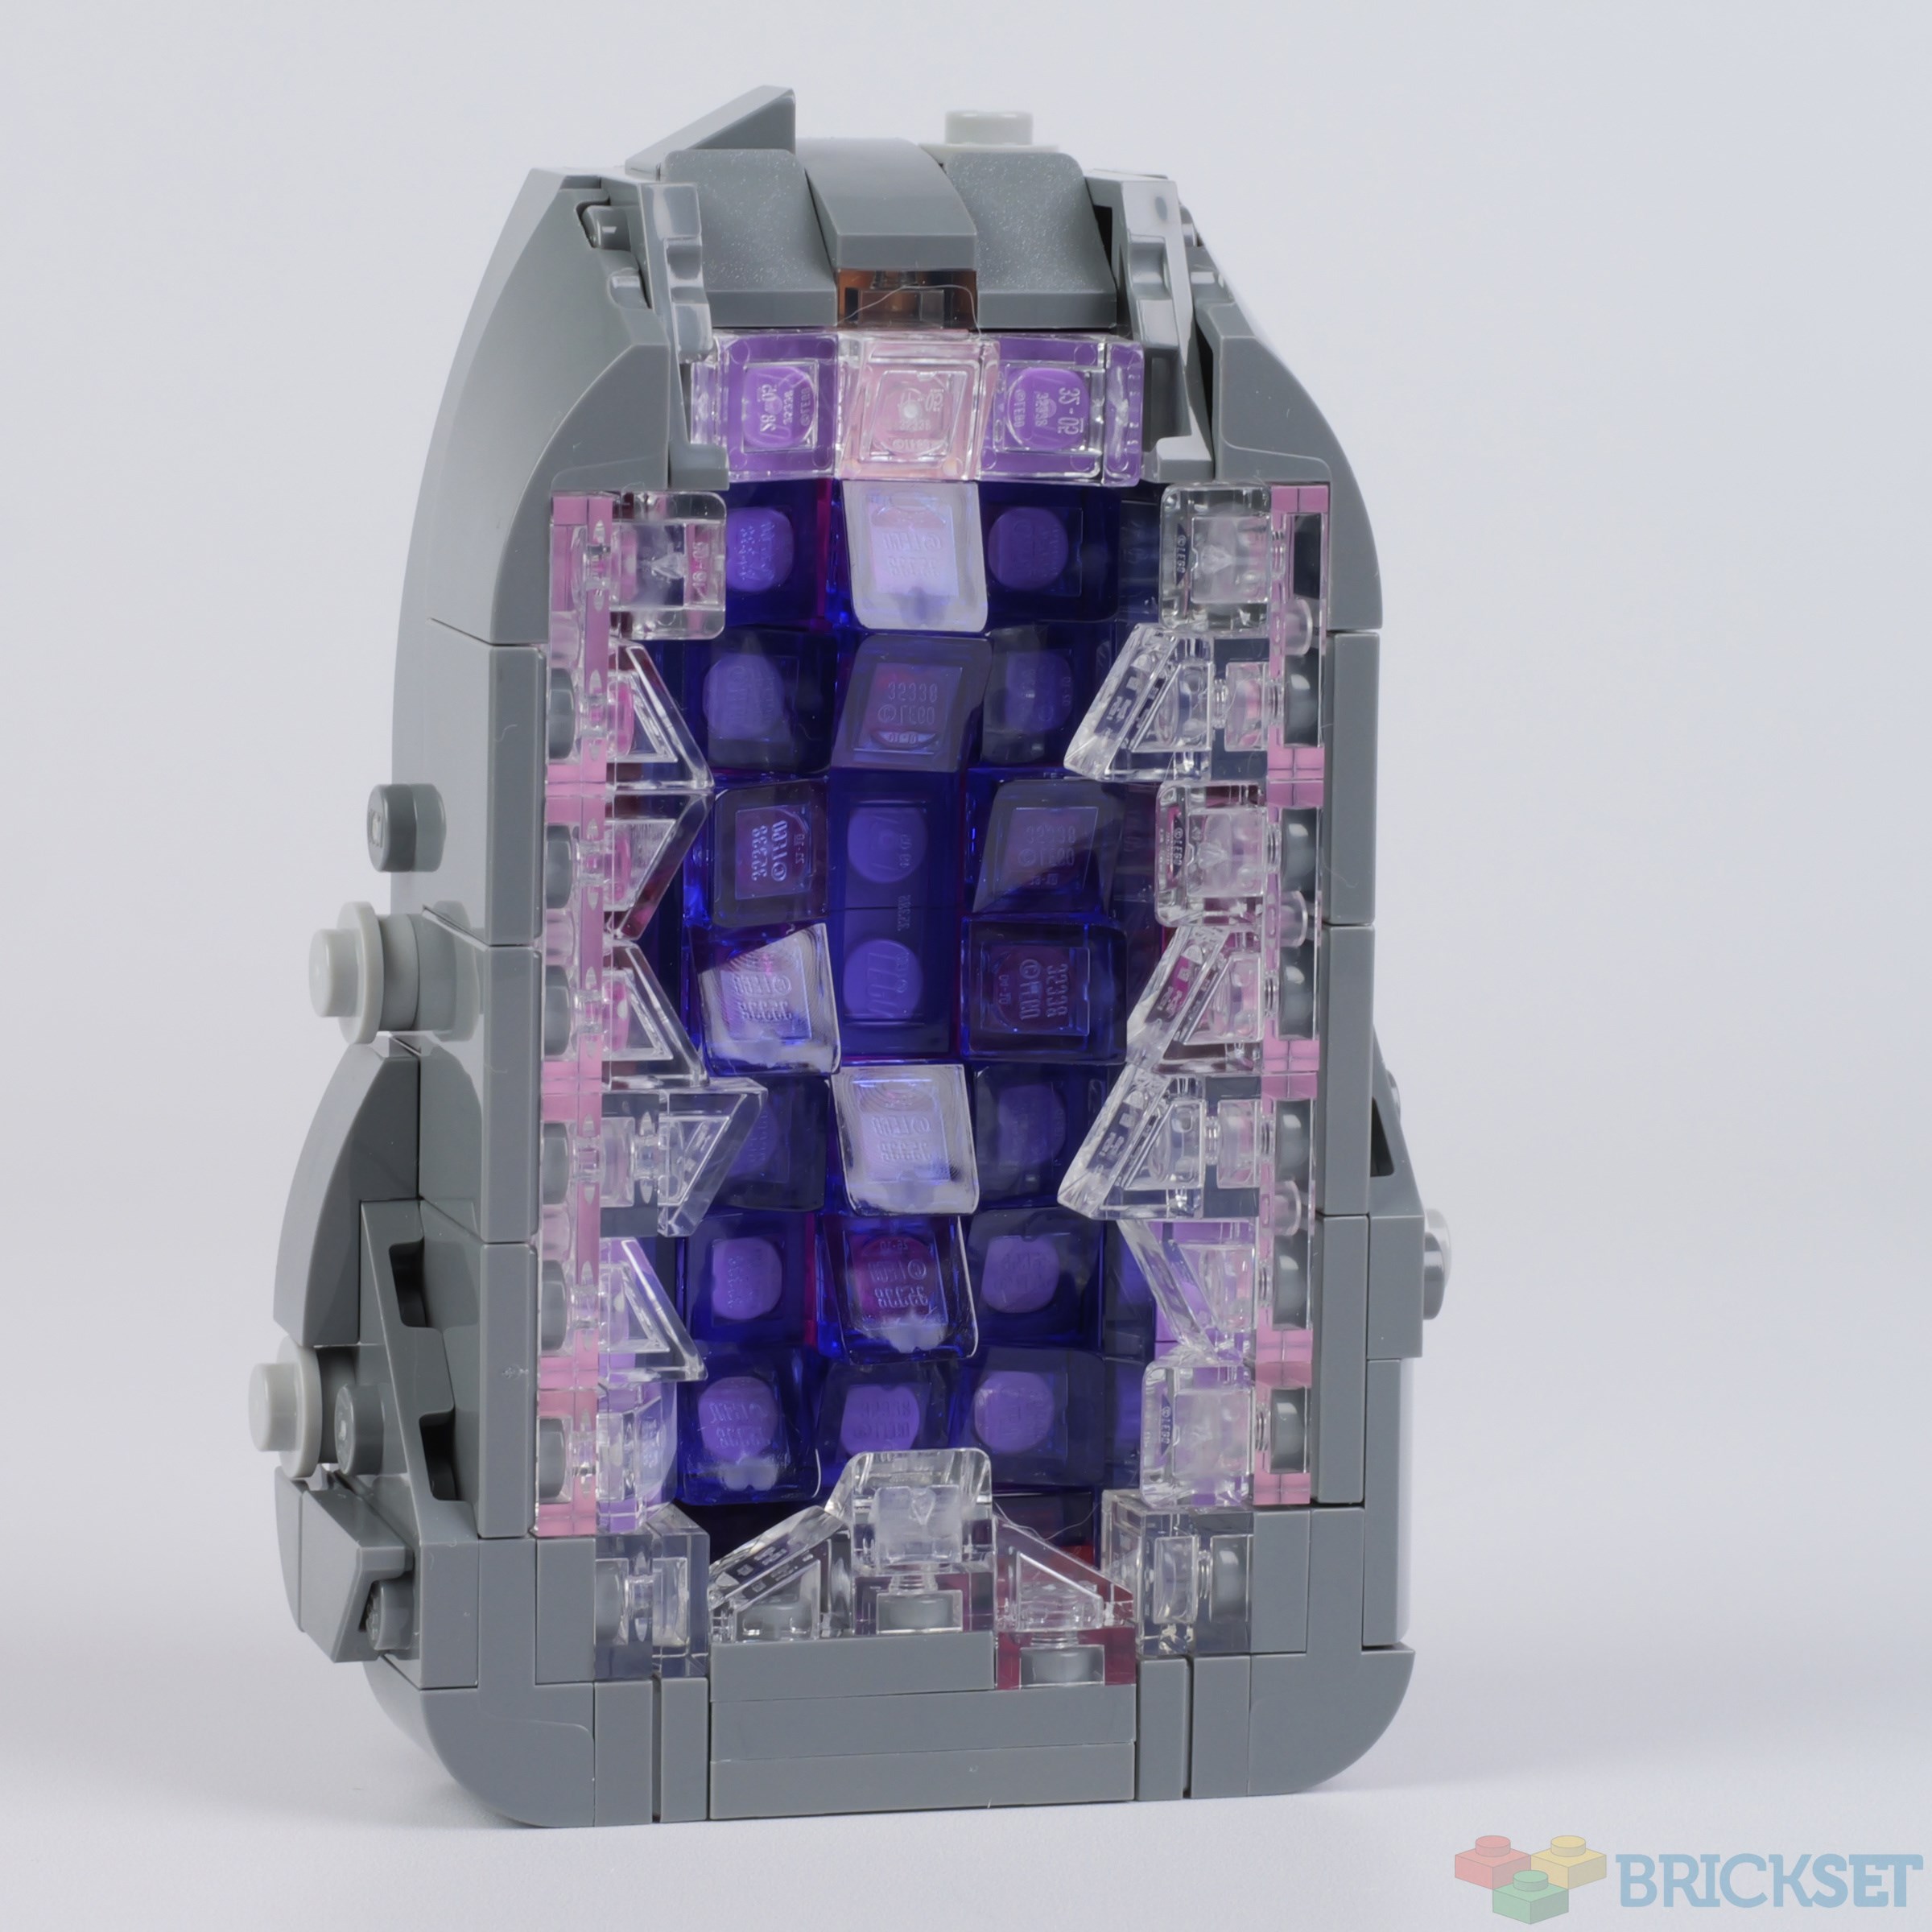
The amethyst geode is much bigger than that in the Ideas submission, and I think it looks very life-like. I particularly like the colour transition effect that the pink tiles behind the transparent pieces around the edges have created.
Just like real ones, the back just looks like a rock.
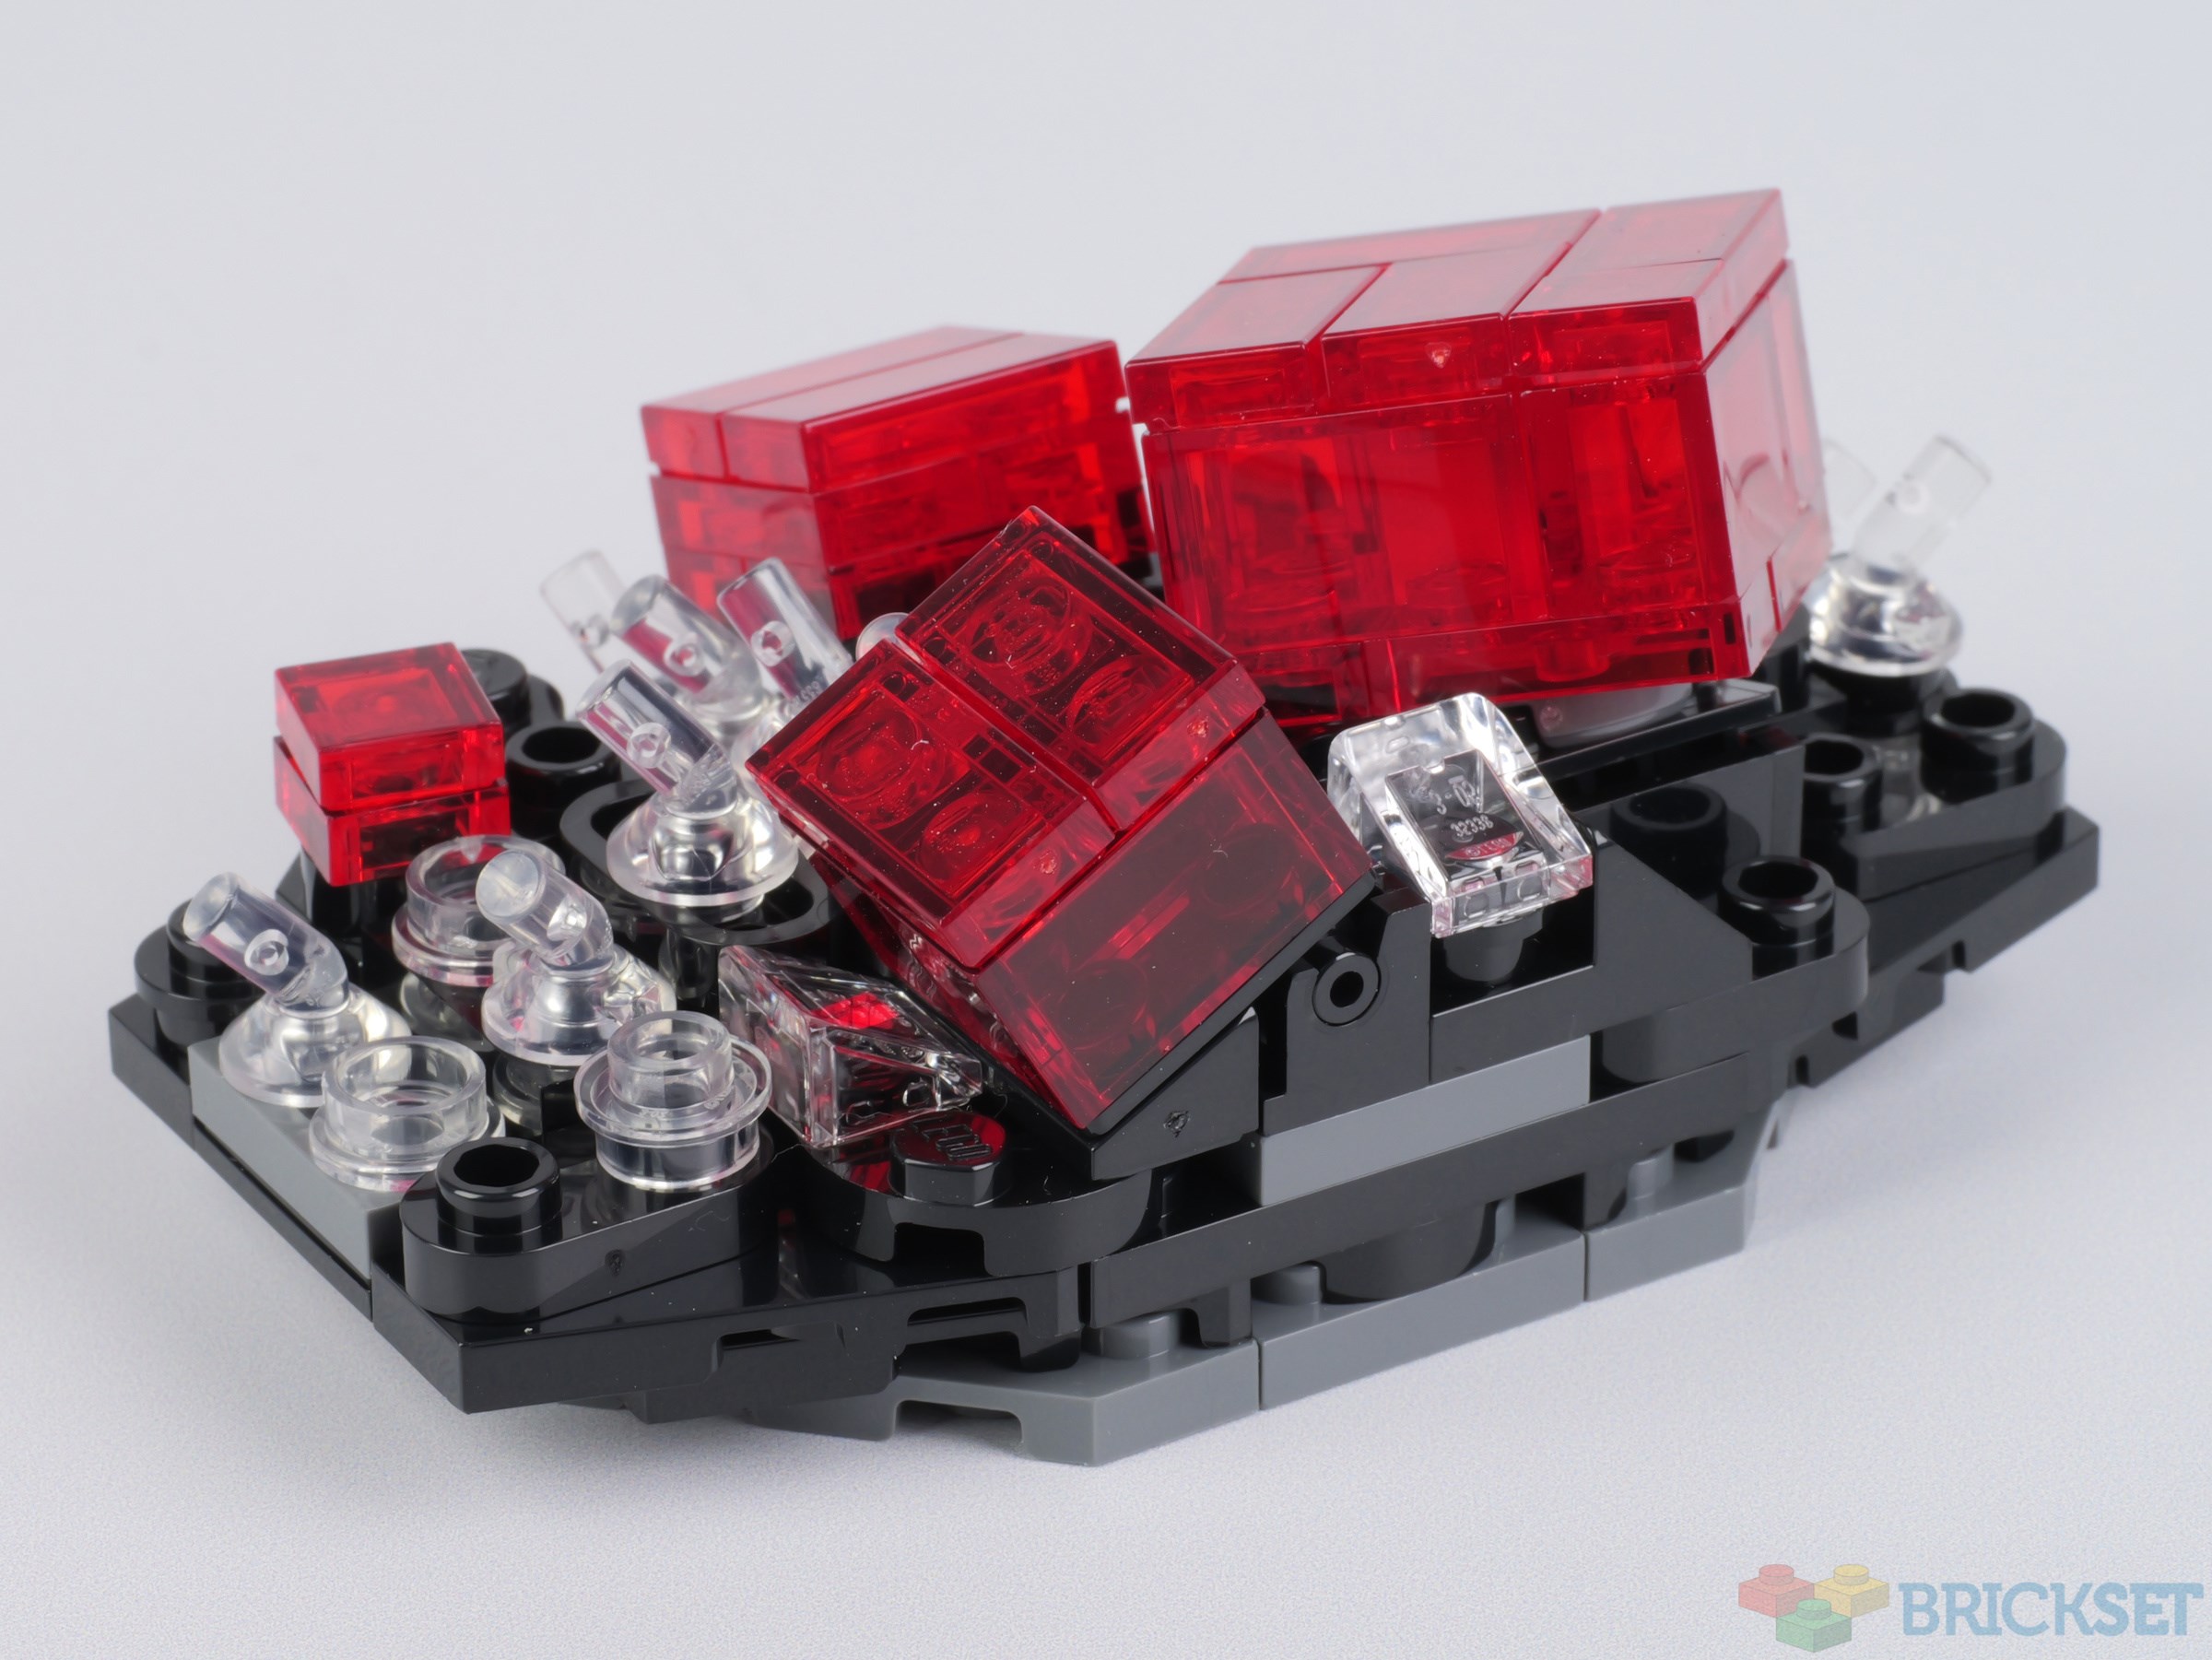
This sample is the most complex in terms of design, with stud-reversal techniques incorporated into the base to allow the transparent handles to stick out upwards, and hinges angling the red crystals to create an organic and realistic appearance.
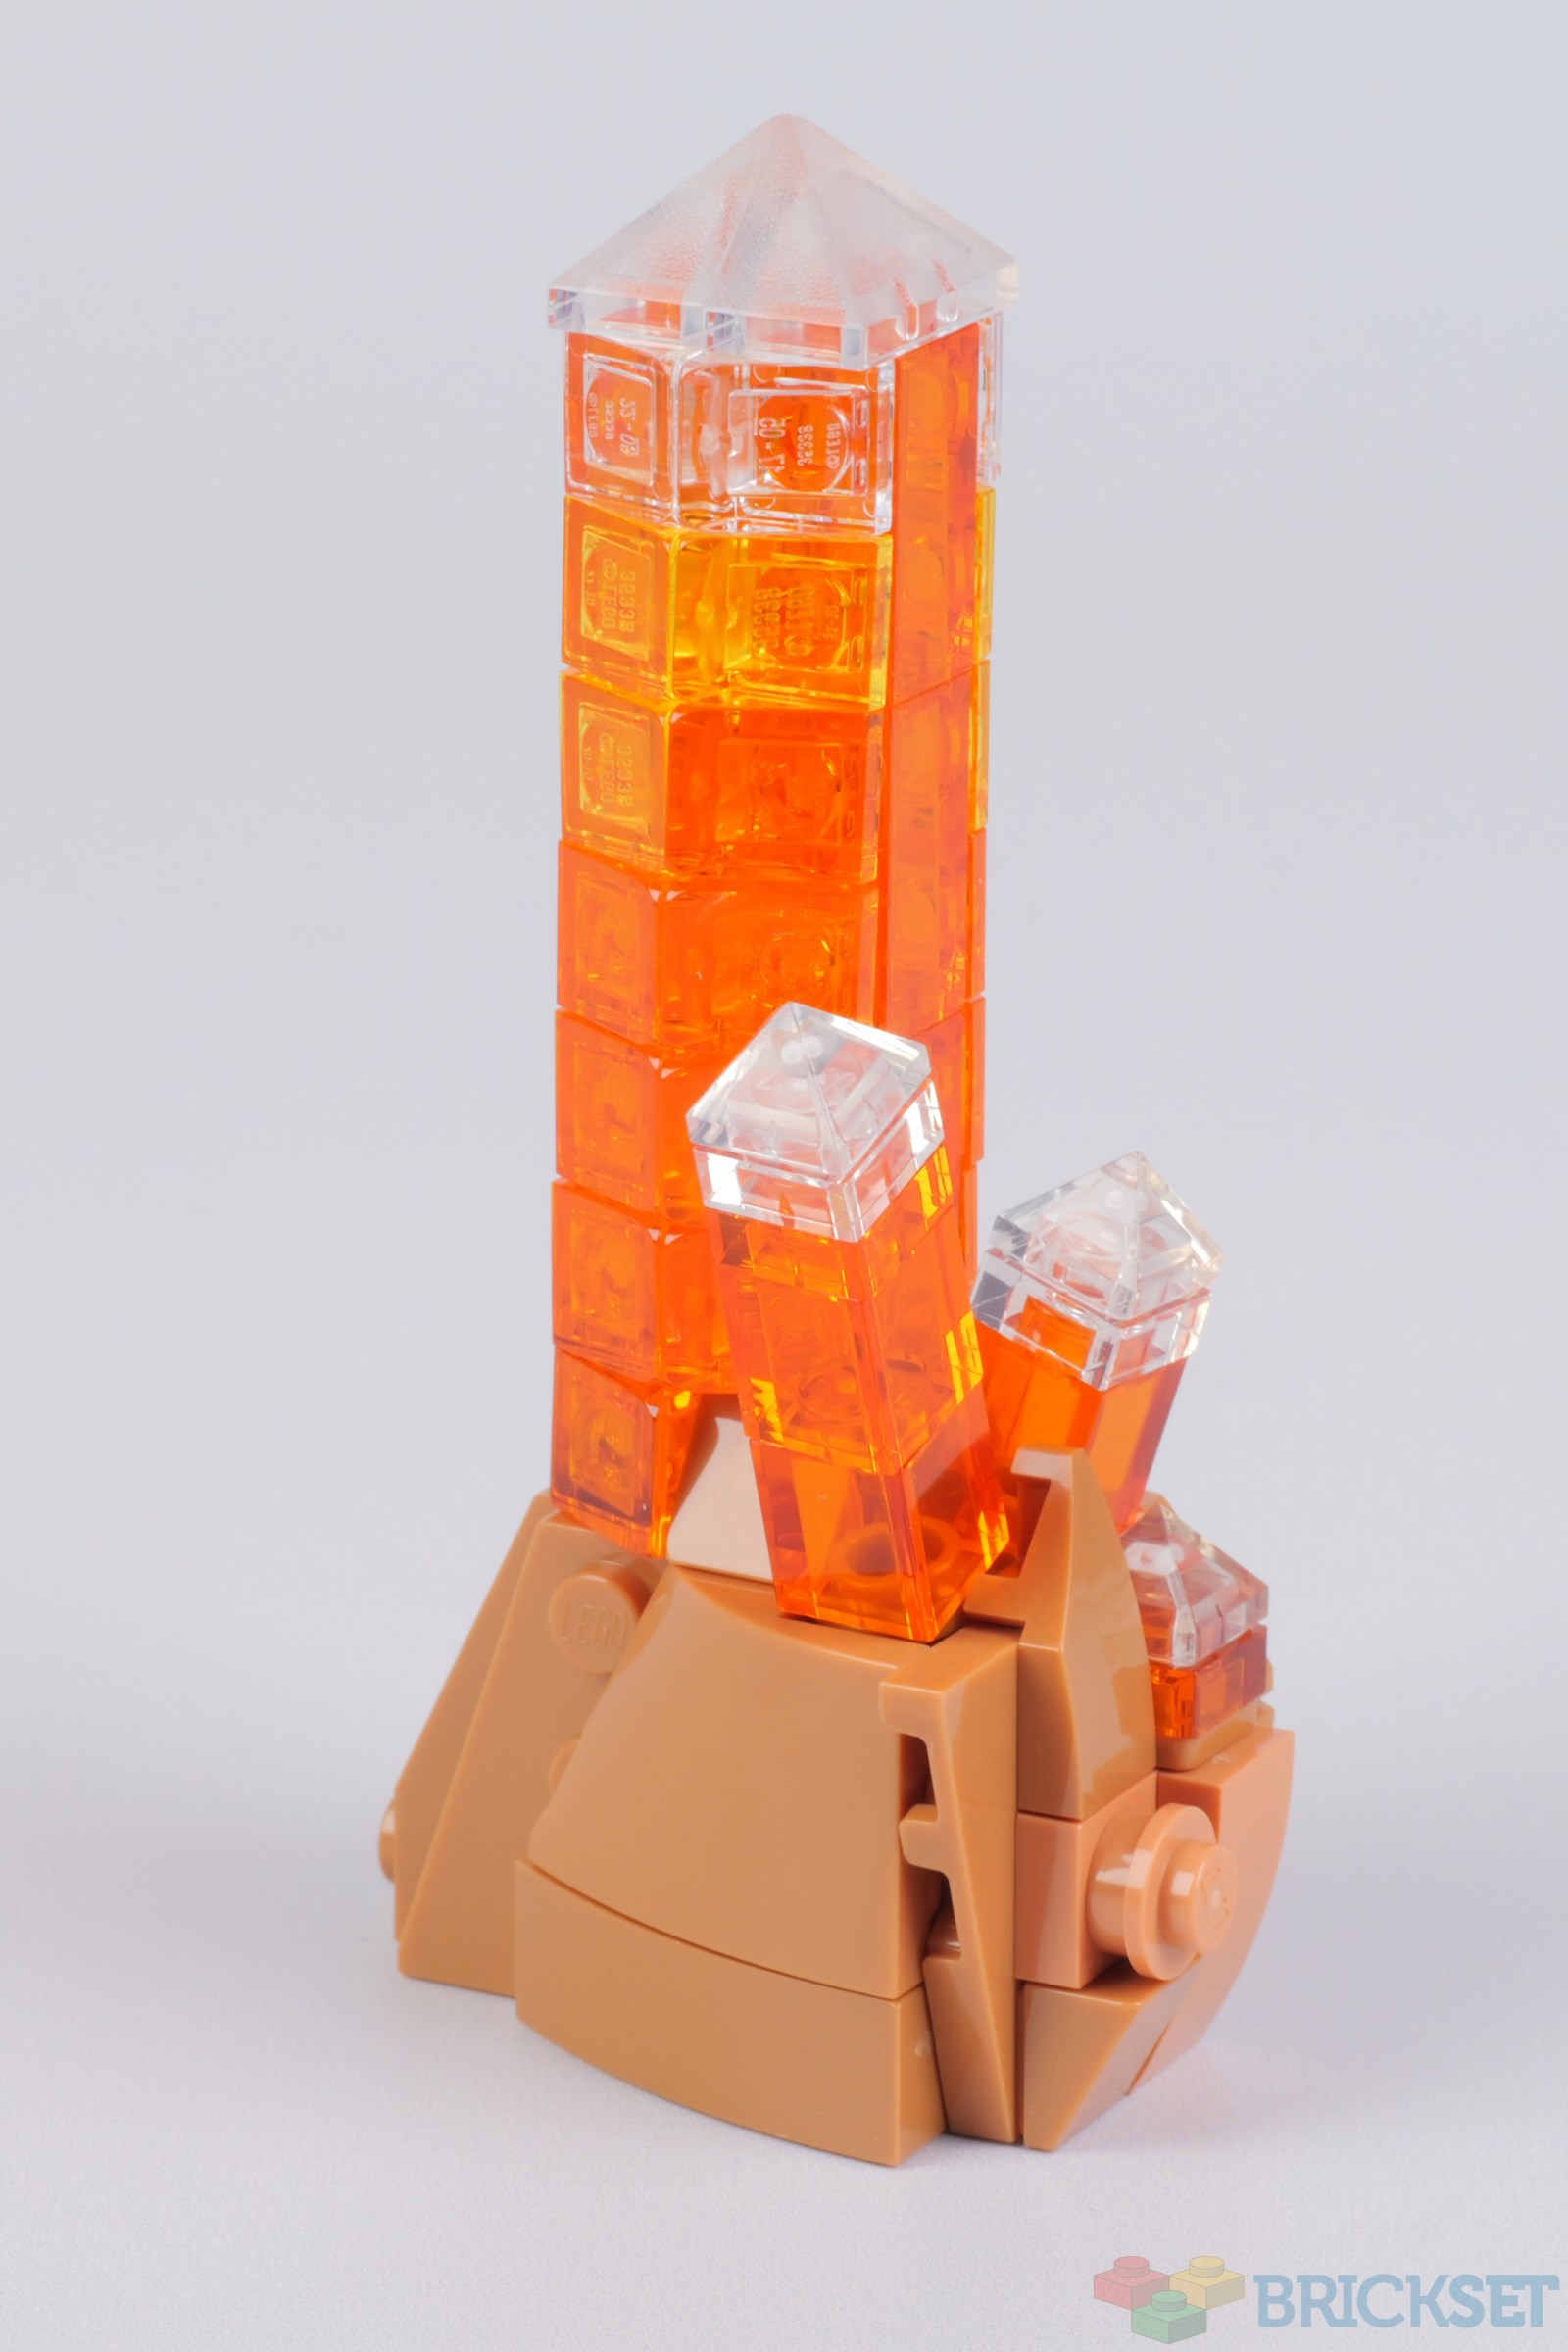
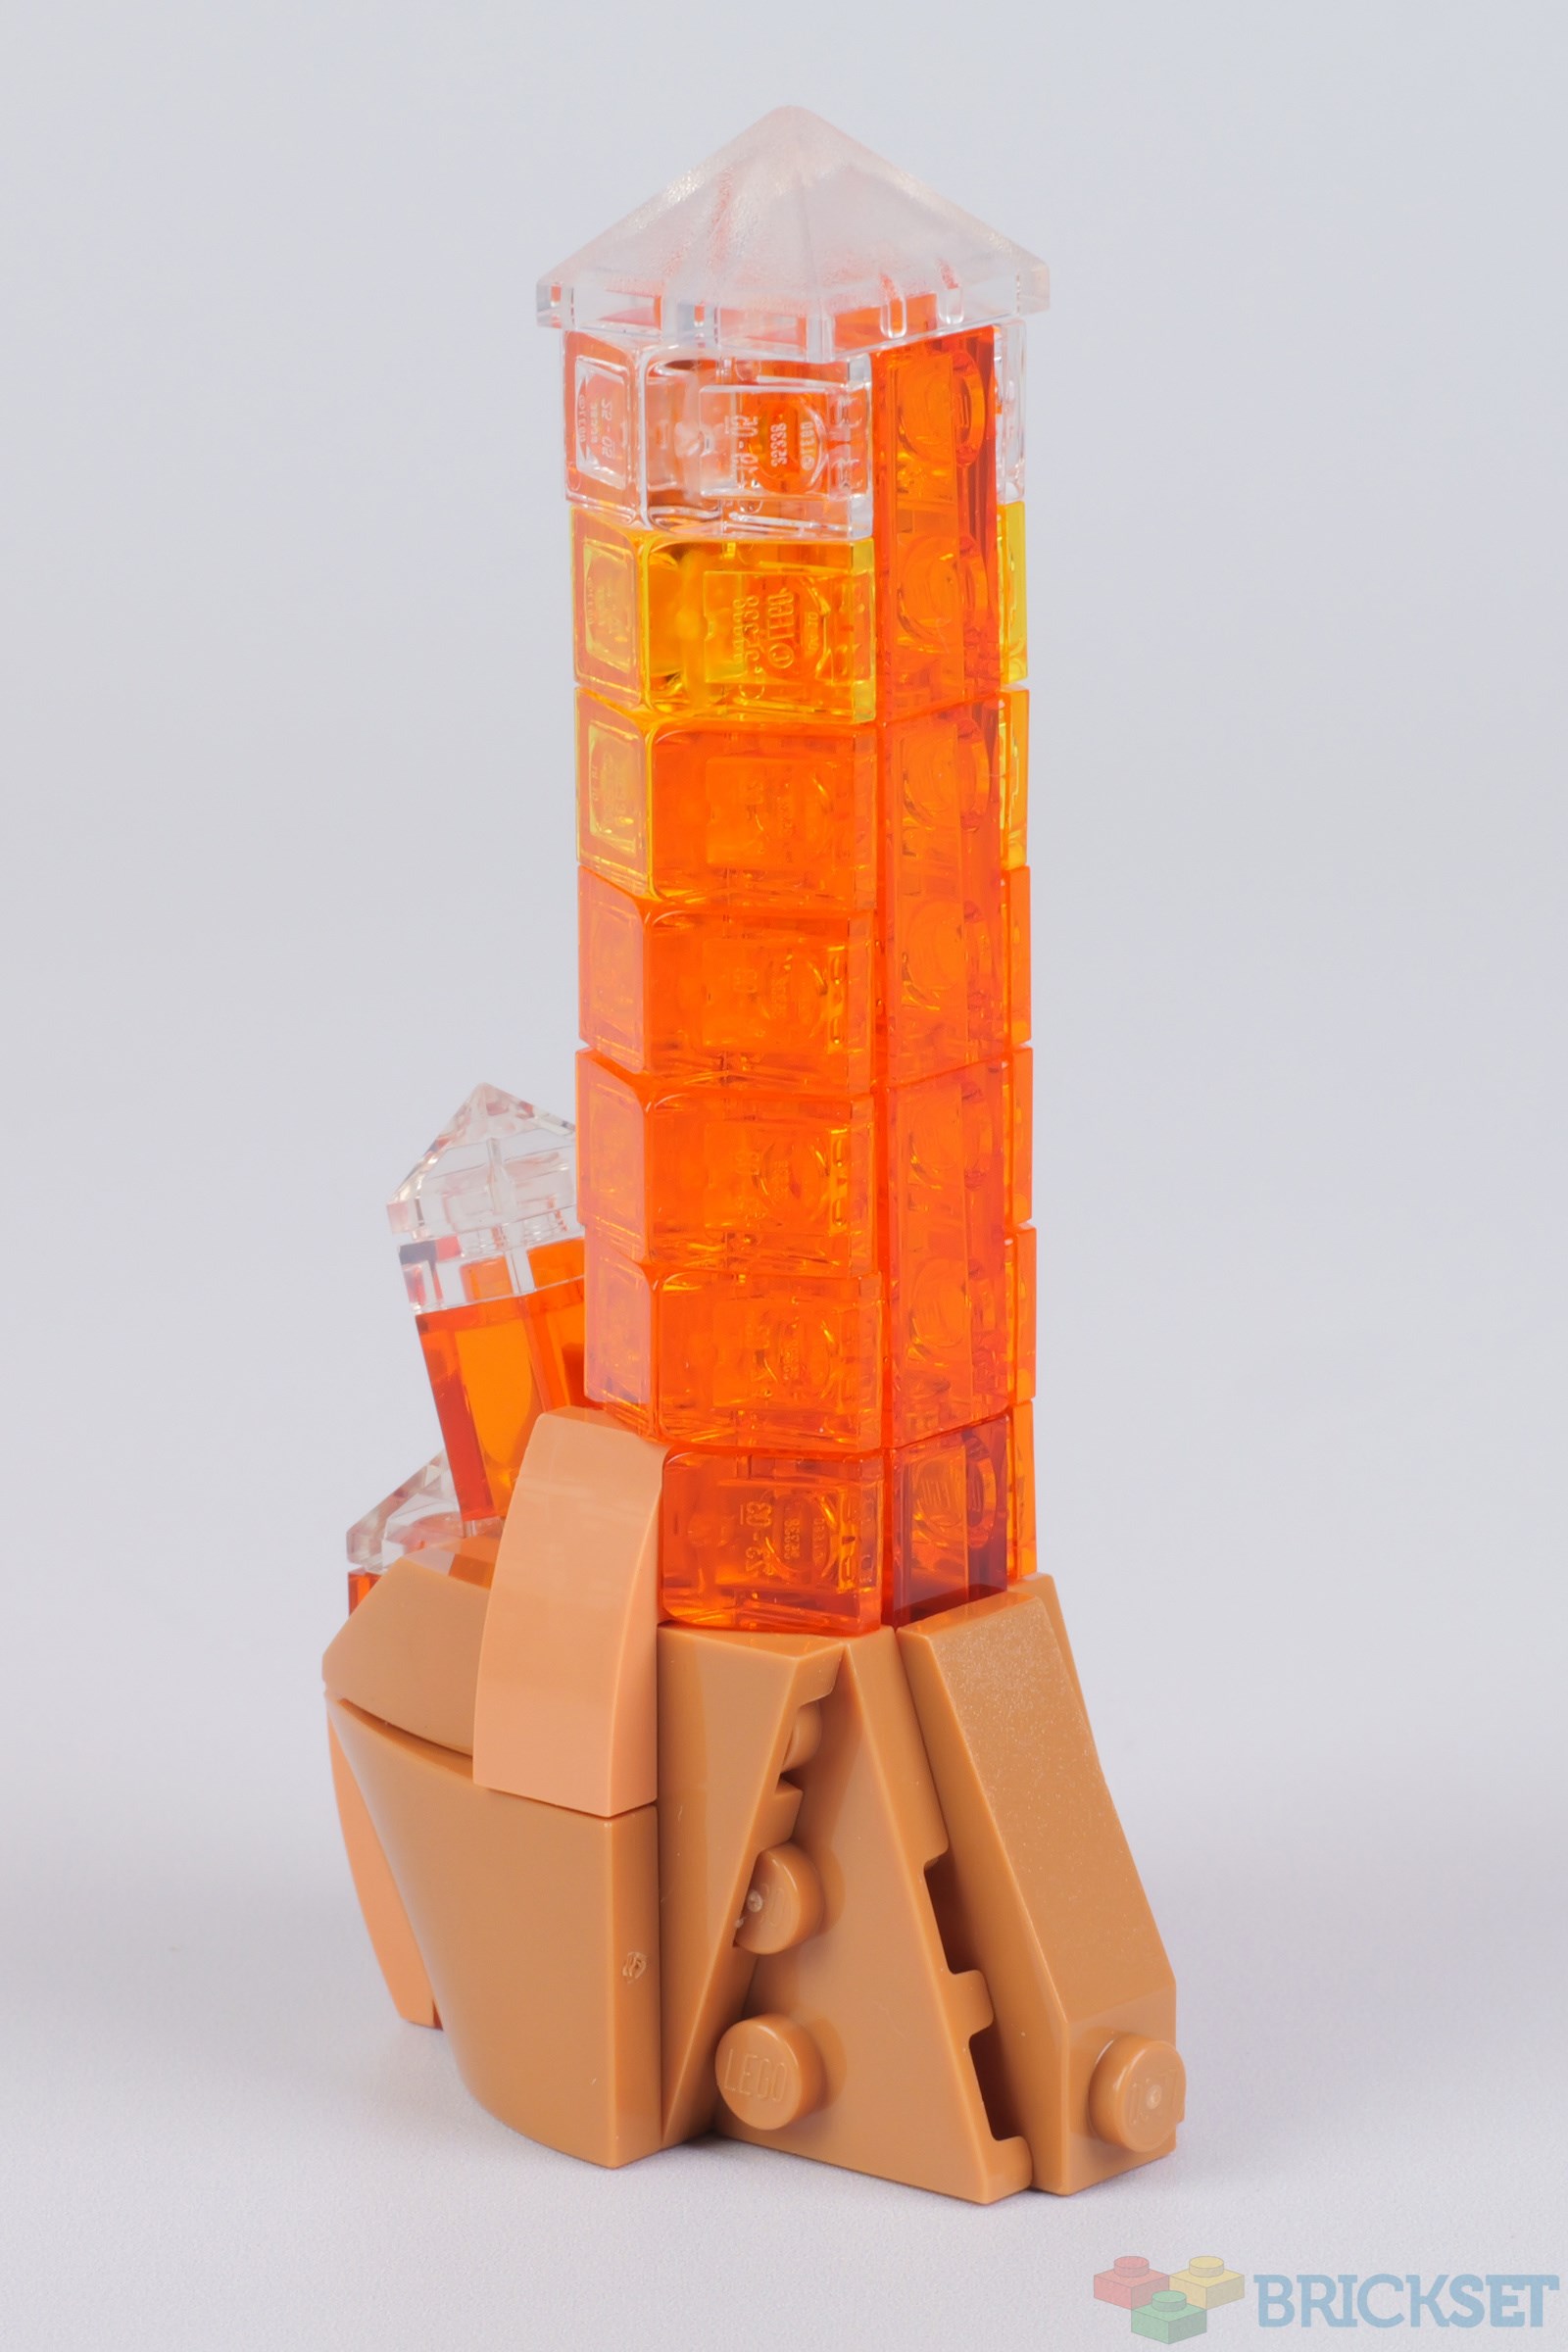
A coating of iron oxide gives this mineral its colour, and in this sample, trans-orange, yellow and clear cheese slopes attached to a core of trans-orange SNOT bricks create a pleasing colour transition from the base to the tip of the large hexagonal crystal.
A couple of smaller square ones jut out at angles from the rocky base, once again creating a very realistic appearance.
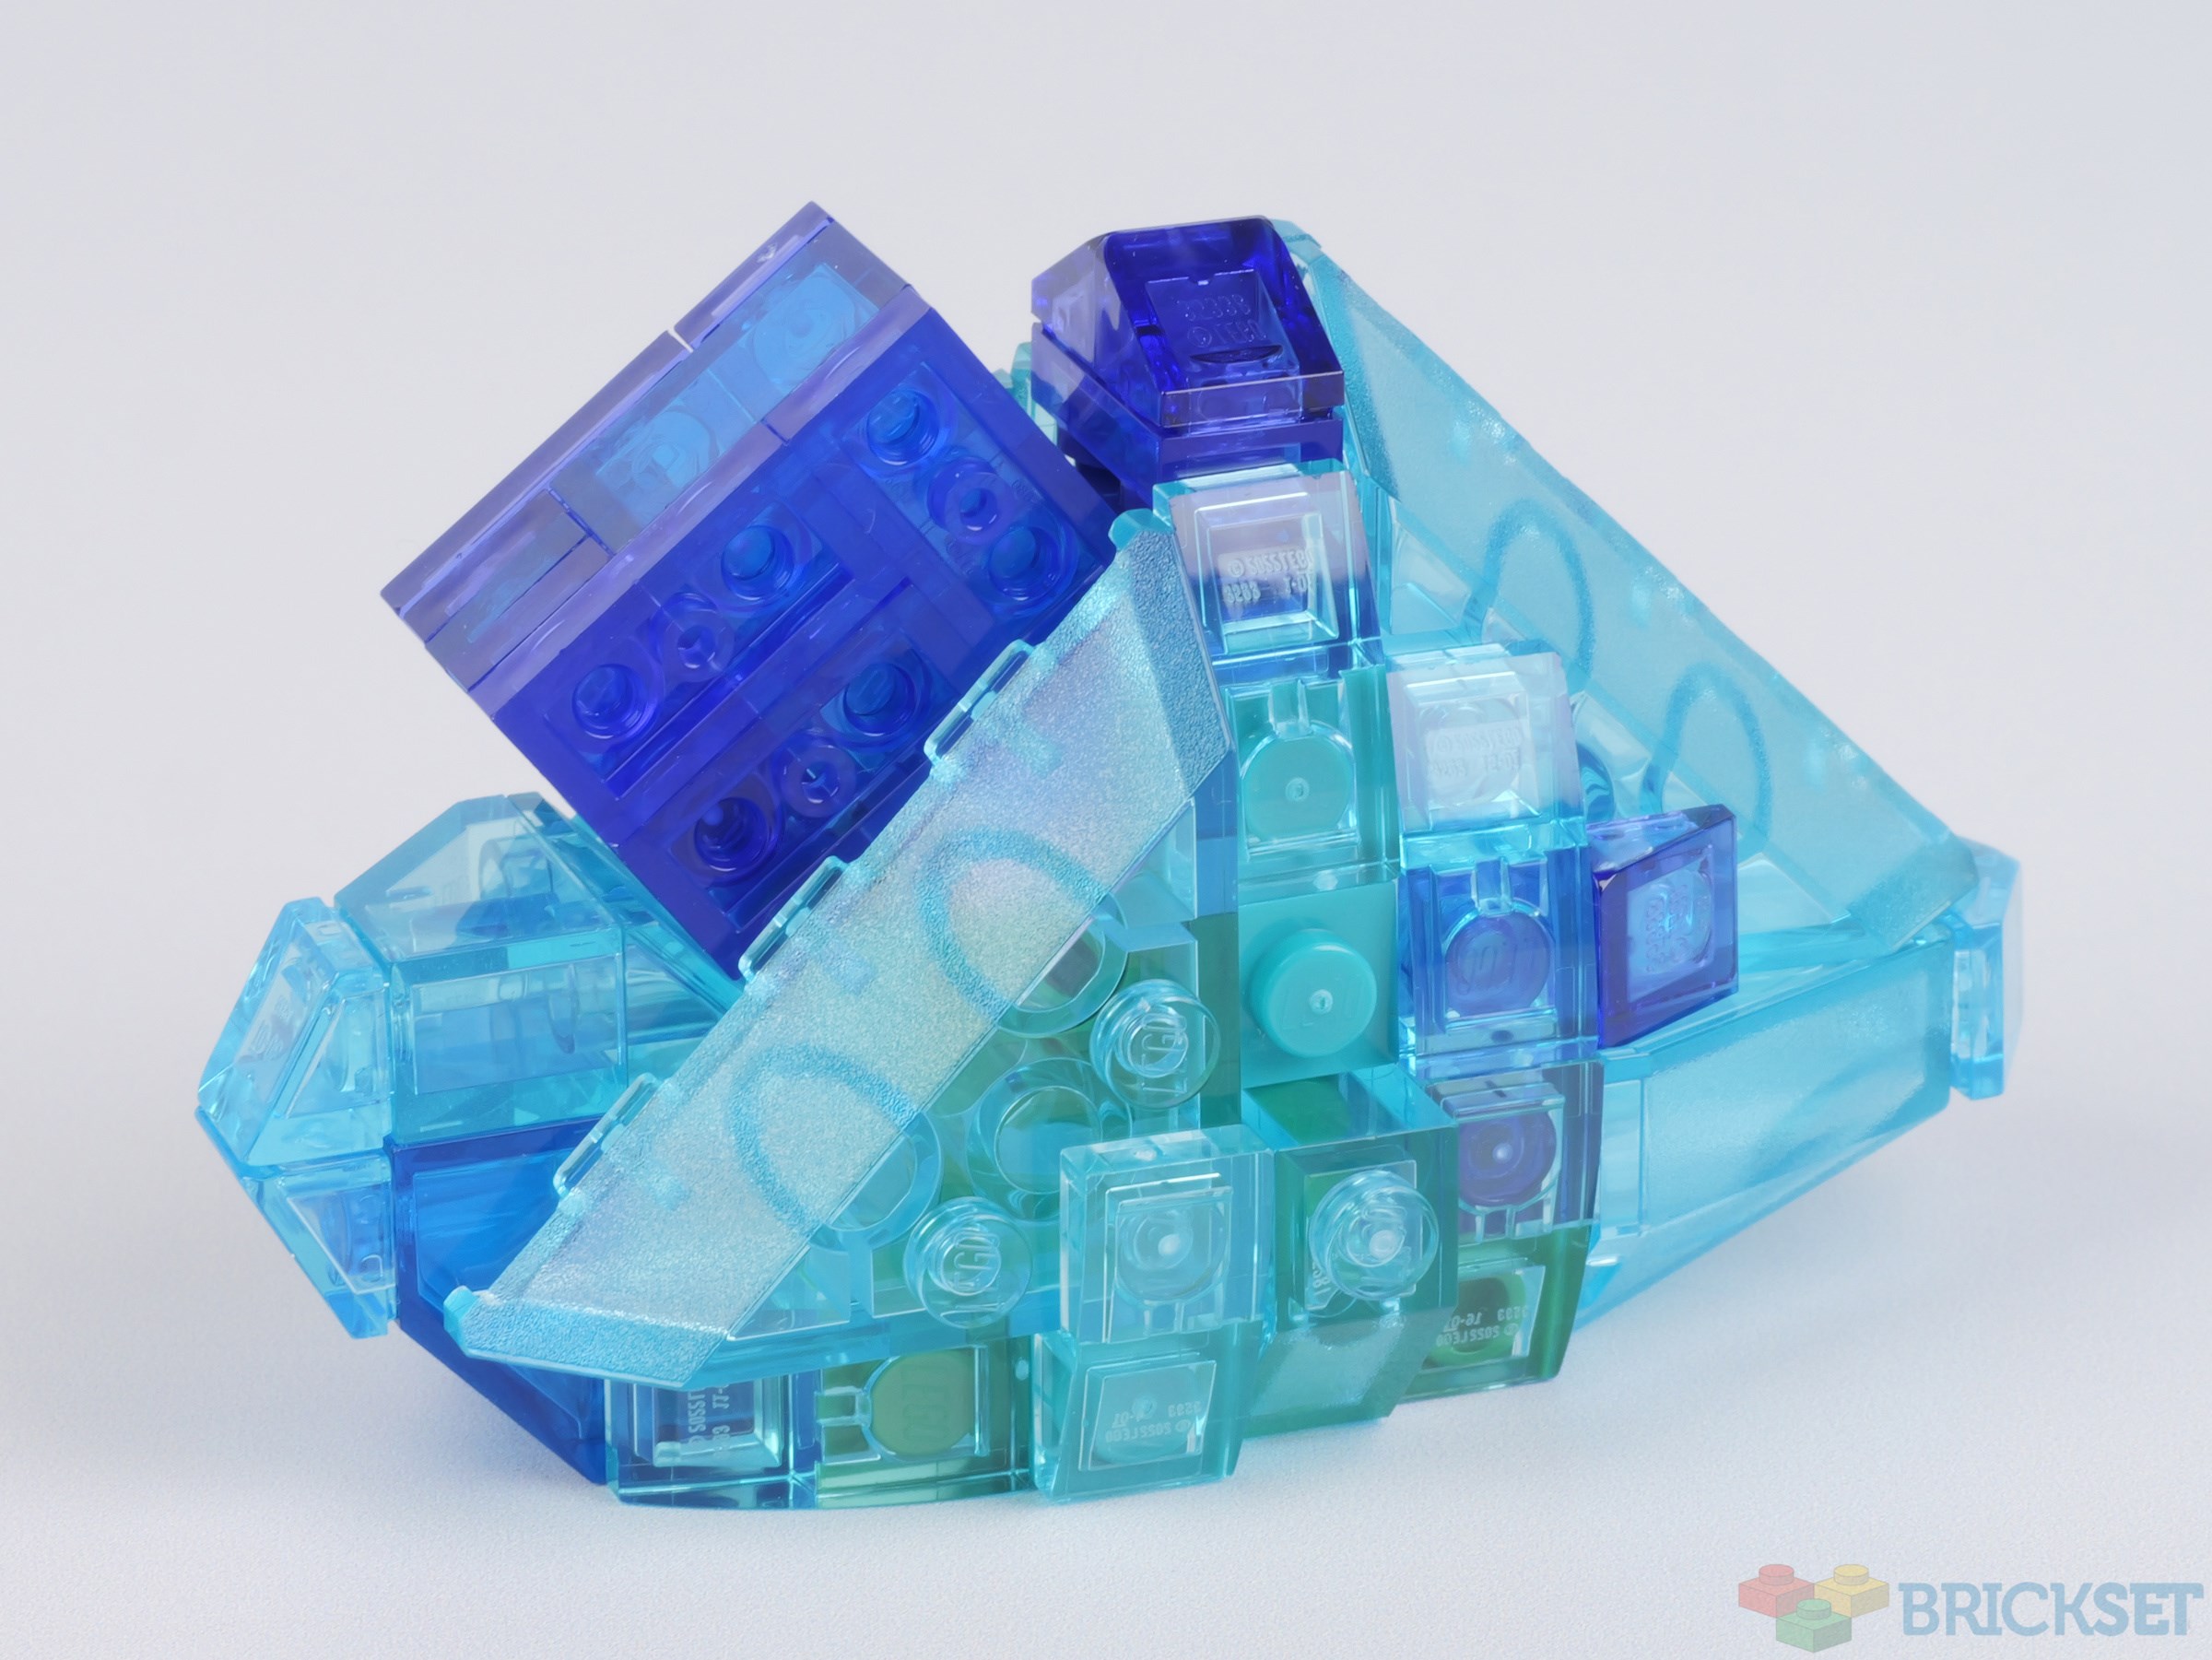
This colourful specimen uses four of this new 4x4 corner slope piece that can also be found in the Black Pearl, in black of course.
Once again, the use of transparent parts around a contrasting colour core, in this case green, has produced an interesting colour transition.
Verdict
The mineral samples are realistic and life-sized which, like the best models of real-life objects, could be mistaken for the real thing from a distance. They are intricate and slightly fiddly to build, involving many small pieces and studs in all directions, but the effort is worth it.
It could be said that the set is more shelf than minerals, and that is certainly true in terms of volume of plastic, but without the shelves the set would just be a disparate collection of small models rather than a cohesive whole.
Changes between the Ideas submission and the set are minimal, which is testament to the quality of Dario's original model. That which has been altered -- the mineral selection and the finesse of the samples -- has only improved it.
This is exactly the sort of set that would not exist without the Ideas platform. It's like nothing LEGO has produced before, and I like it.
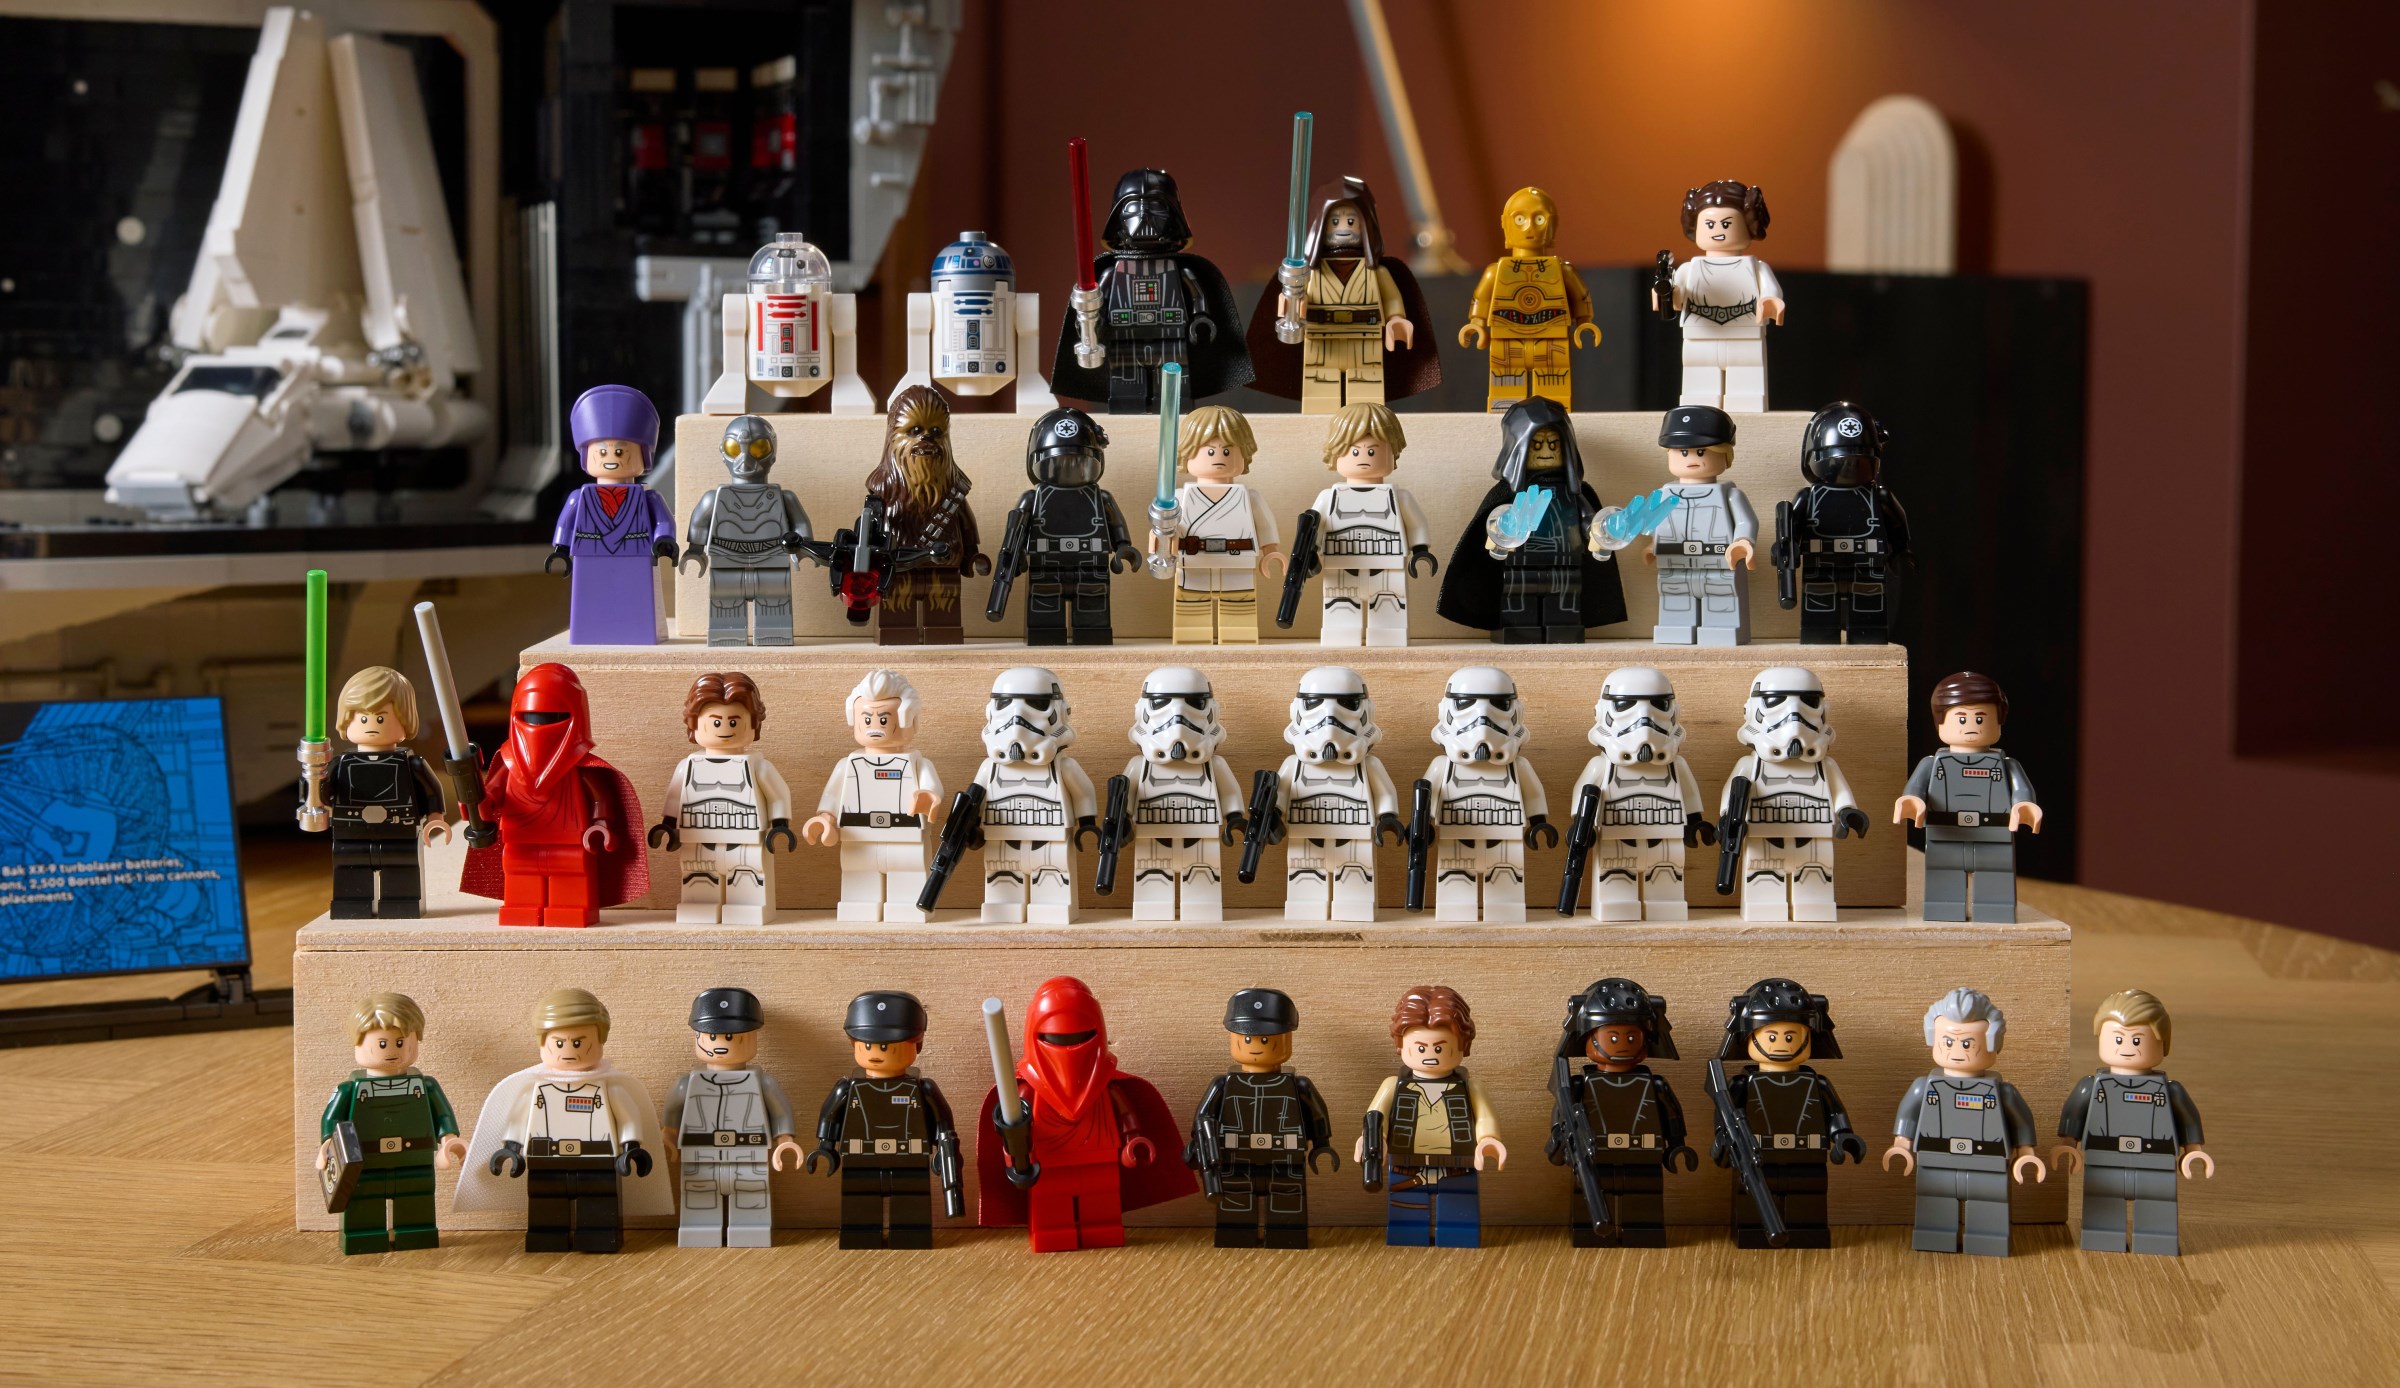
75419 Death Star contains 38 minifigures, more than any other LEGO set! The graphic designer for the set, Maddy O'Neil, therefore had much to do and I had a chance to ask him some questions about the minifigures selection recently.
These include questions about C-3PO lacking a dual-moulded leg and some of the unexpected new minifigures, so read on for more...
Brickset: How did you choose which characters to include in this set?
Maddy: Of course, there are certain characters that were essential and quite a few of them in a set like this. We also wanted to include as many characters as possible from the previous two Death Star sets and then build on those, adding some new ones we have not had a chance to produce before.
There were a few different iterations of the character line-up, but I am really happy with the selection we landed on, which feels like a good amount to populate the space and represent all the iconic scenes aboard the Death Star.
Is it at all challenging to make the minifigure selection exciting for a set like this, where most of the included characters will inevitably have appeared many times before?
Revisiting a location or vehicle we have produced before comes with its own set of challenges, as we are bound to be revisiting characters in those sets. On the other hand, this provides an opportunity to refresh some iconic heroes and villains who have not appeared for a while and there were several new characters we could include; ones that could only appear in the Death Star, like Galen Erso and the Imperial Dignitary.
I am really glad to see those figures included, especially Galen Erso, but one character conspicuous by his absence is Moff Jerjerrod. Why is he not included?
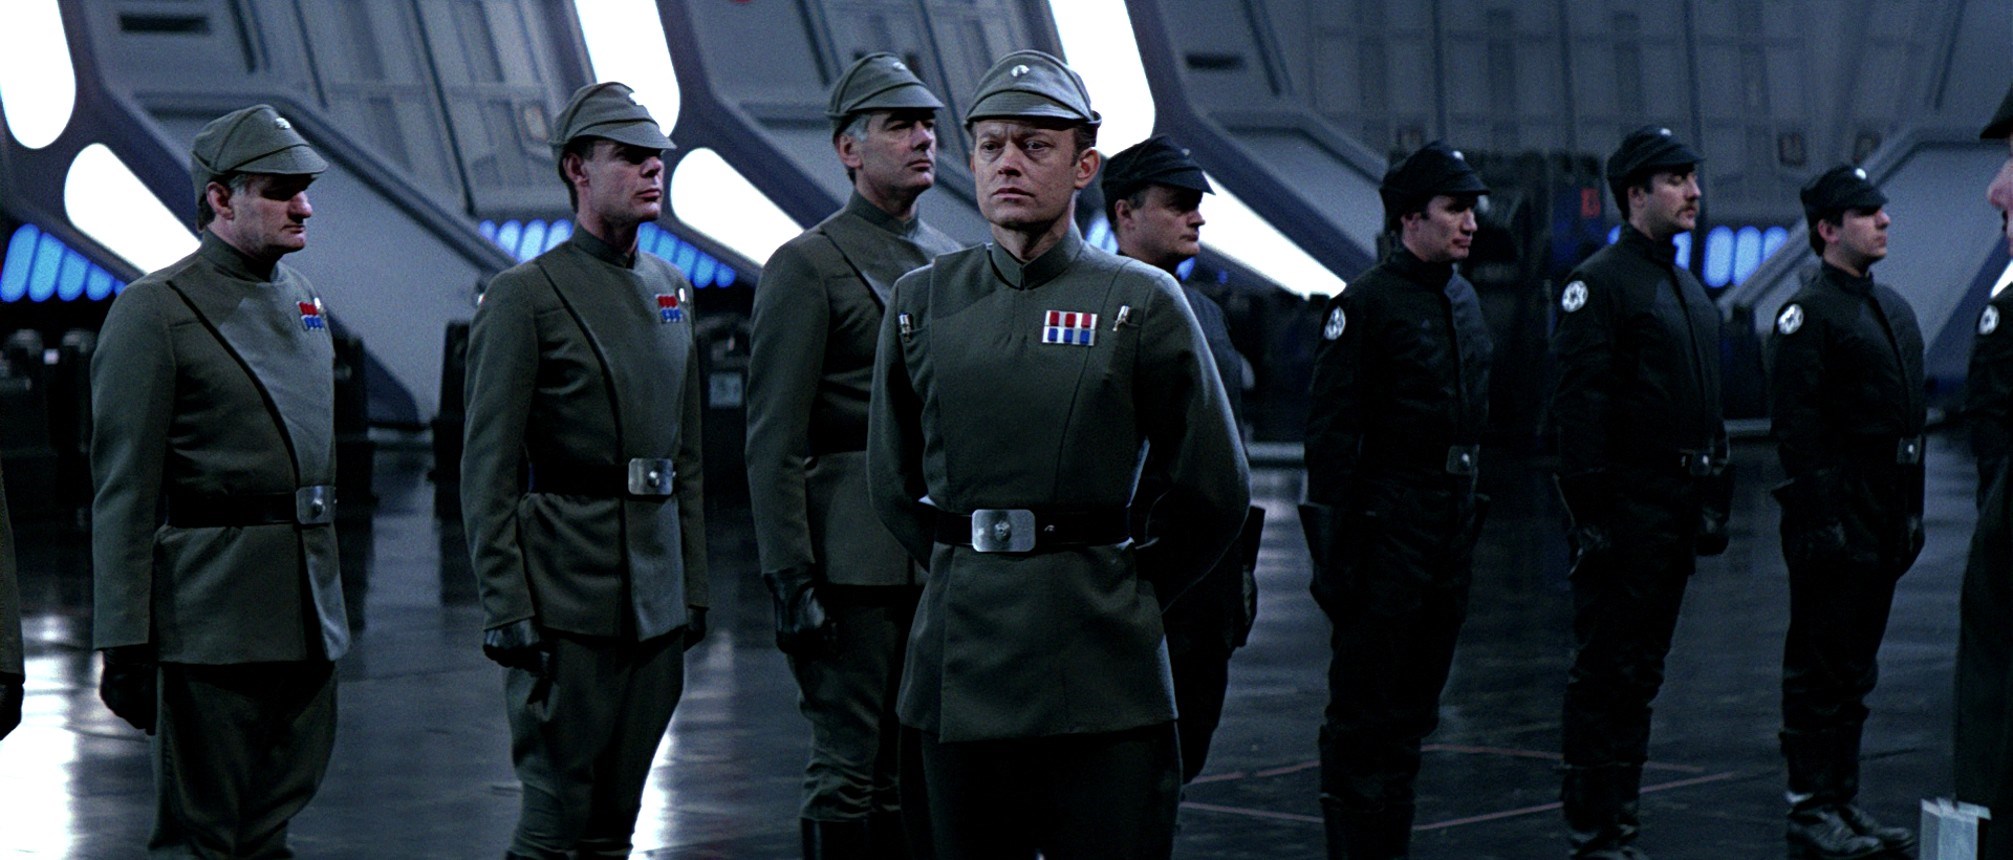
In his case, we already have three Imperial officers wearing dark grey uniforms, one in a black uniform and Yularen, so adding another with a very similar uniform felt a bit repetitive. Also, we have included lots of minifigures to populate the hangar for the Emperor's arrival and where Imperial officers are concerned, we skewed towards characters from the conference room scene.
While on the subject of Yularen, he appeared in the first season of Andor wearing black trousers, but I know his uniform is sometimes depicted as all white. Why did you choose the all-white version?
There have been several incarnations of this character and we wished to maintain consistency with his prior minifigure appearance in 5002947 Admiral Yularen, so we went for the white legs.
Also, the Imperial Officers do not include dual-moulded legs to represent boots, as they sometimes have in the past. Why is that, especially in such an expensive set?
The situation with any set we make, not just this one, is that we receive a certain allotment of frames to do different things with the elements, which can include new moulds, colour changes and new decorations. We try to prioritise creating new characters over features like dual-moulded legs because making a new head, for instance, counts for more or less the same as changing the colour of legs.
We have to look at the whole set and decide on our priorities, so something like giving Galen Erso the printed symbol on his arm, as an example, was ultimately considered more important and the moulded boots did not make it in.
I assume the same applies to C-3PO, but one of the problems I struggle with is that you already manufacture the minifigure with a dual-moulded leg, so why not drop the simpler version and just make that one? This happened with Darth Vader receiving arm printing a few years ago, which then became standard.
There are different factors with every set, but the same actually happened with C-3PO and R2-D2 after 75339 Death Star Trash Compactor Diorama. We added printed arms to C-3PO and decoration on Artoo's back for the diorama, which became the norm going forward and still is today.
Dual-moulding is a bit different though. Adding that cost to a figure that might need to appear in a much smaller and cheaper set, like C-3PO, is not necessarily an option, so in his case, we could not commit to the dual-moulded leg becoming the standard design.
Having said that, we are aware it is something fans are passionate about and we try to include that minifigure whenever we can, but we have to prioritise.
Another thing I notice is that Princess Leia does not include her printed dress element.
No; we decided on the legs because it would allow her to lie down in the cell and look more natural when swinging across the chasm. The dress piece is great, but not necessarily for a character who needs to participate in lots of action. It could also create problems in the trash compactor, where floor space is quite limited.
For the Imperial Dignitary, action scenes were evidently not a concern because he really just stands there!
Speaking of characters just standing there, have you ever considered using the dress piece for the Royal Guards?
Actually, no, we have never really thrown around that idea. I suppose it would work, but having the legs just makes them a little more fun to play with and the cape conveys their flowing robes pretty well.
I also wonder, did you think about using a printed minifigure head or anything like that for the Interrogation Droid?
We did consider a version featuring a printed dome at one point, but a purely brick-built figure works for that droid, especially with the all-important syringe.
Returning to the minifigure selection as a whole, an interesting feature of the Death Star is that it can and does have a lot of figures, but many characters have appeared before, so does that make the minifigure development harder than a set like 75290 Mos Eisley Cantina, which has so many new characters?
It is a different challenge, but an interesting one and it gave us a chance to update several of the classic characters, like Luke, Han and Obi-Wan. It feels like they appear very frequently, but they were not in production when approaching this set, so there was a chance for fresh designs.
I suppose that is a strange disadvantage of including these iconic characters, as I did not realise they had been updated for the Death Star and others might think the same.
True; there are a lot more new elements than are perhaps immediately apparent. Just running through all the new minifigures fans may not expect: Luke Skywalker, Obi-Wan Kenobi, Grand Moff Tarkin, General Tagge, Admiral Motti, Colonel Yularen and the female Imperial Navy Officer all have multiple new elements, in addition to the RA-7 droid, the Imperial Dignitary and others fans will immediately recognise as new.
Then the Imperial Royal Guards, the Imperial Shuttle Pilot and Princess Leia feature new torso pieces. We also created several new heads for Stormtroopers and all the other generic Imperial personnel, to add to the selection we already use.
The mention of Obi-Wan Kenobi reminds me that he is now the only Star Wars minifigure to use that classic male hair piece. Do you feel any pressure at all to update it, or do you prefer keeping the older element in production?
I think we want to keep it for now because of our history using that piece for Ben Kenobi since 1999, but it could make sense at some point for another theme to make a new hairstyle similar to that, with modern texture.
It is probably not something we would produce ourselves because we generally prioritise new helmets and that kind of thing instead, but I could imagine a hair element suitable for Obi-Wan appearing in another theme.
Finally, I think this set includes all the characters from the previous two Death Star play sets, or very similar ones, other than the white Imperial Assassin Droid. Was that figure considered for a return?
I do not think we discussed including the assassin droid, to be honest. He can remain happily in the earlier sets!
Thank you for speaking with us!
You can read our interview with César Soares, the model designer for 75419 Death Star, here.
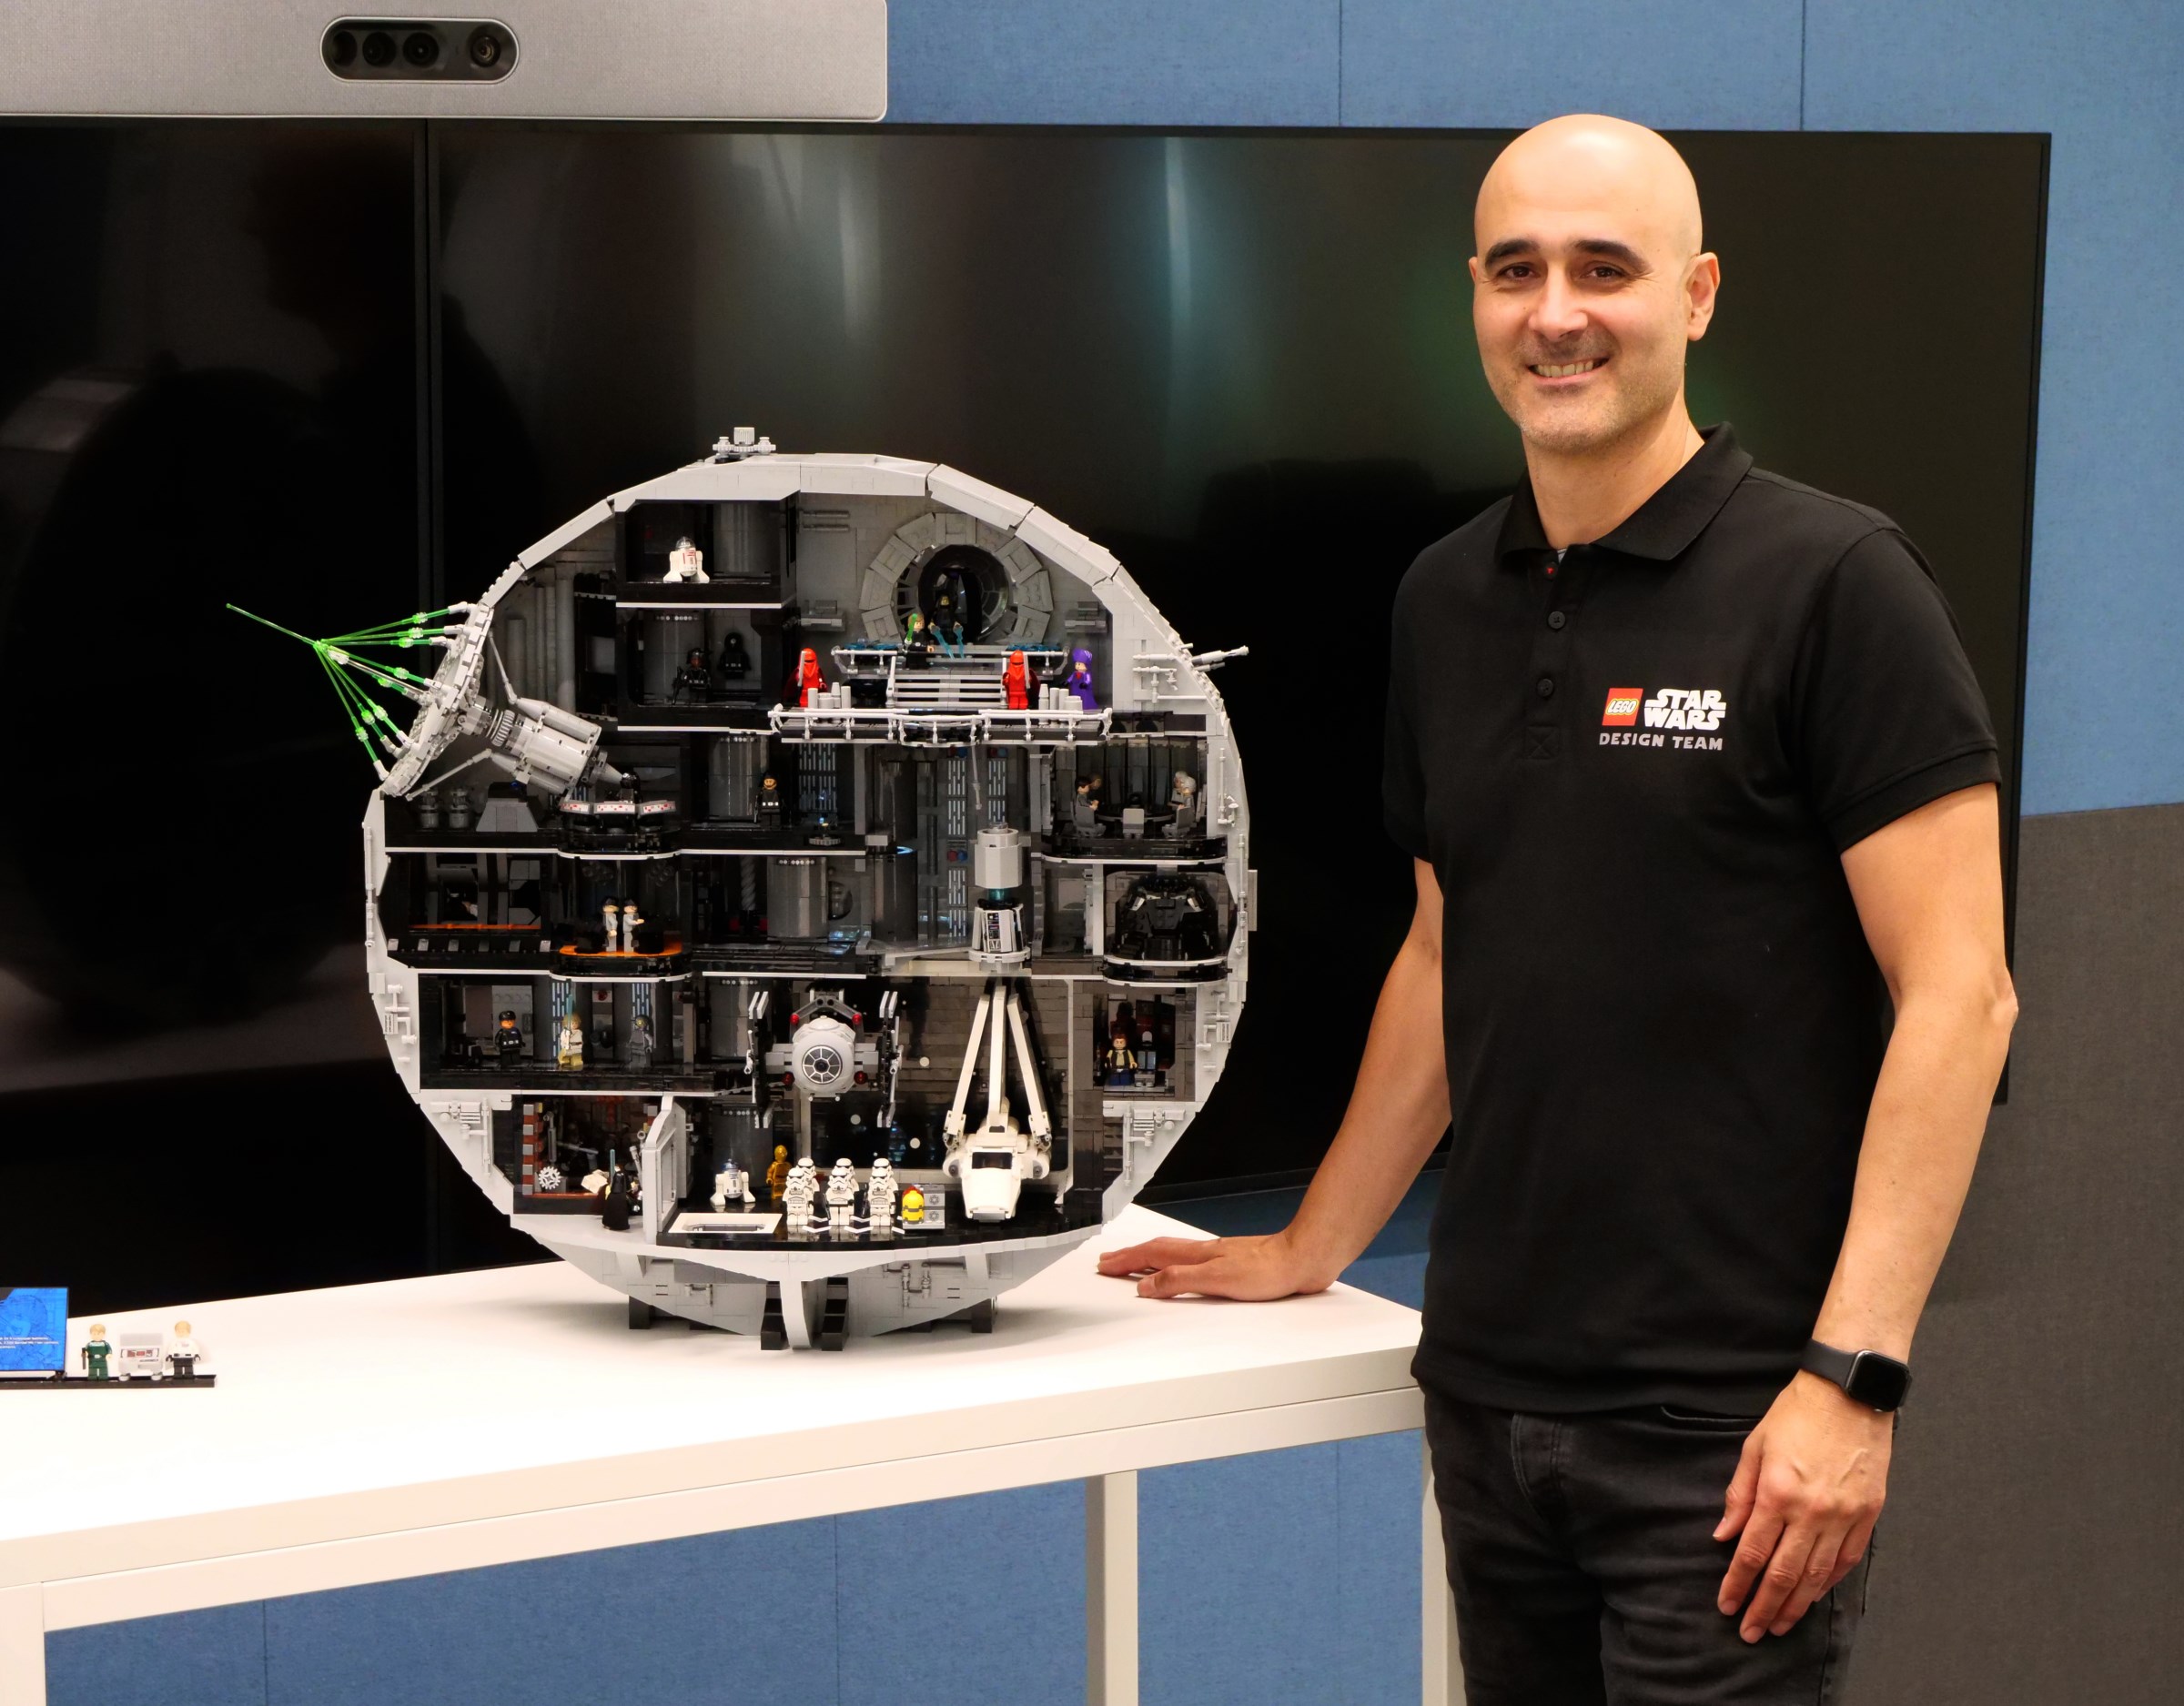
75419 Death Star is the biggest LEGO Star Wars set to date, containing over 9000 pieces and 38 minifigures. Its designer, César Soares, has worked on a number of prior Ultimate Collector Series models, so I was excited to speak with him about the Death Star recently.
Among the topics discussed were the model's format and whether a spherical version was explored, how the internal layout was developed and more!
Brickset: How did you decide on this cutaway format for the Death Star, as opposed to a sphere with panels or perhaps a half sphere?
César: It is a combination of several things. First of all, we wanted to make something different. As you know, we have made a few versions of the Death Star before and the last two were basically the same, so we wanted to develop something new. Also, this shape is easier to display and more effective on display, as you can see all the rooms at the same time across the front, which definitely appealed to us.
On top of that, we had a concept designer build a sketch model during one of our creative boost sessions and its format was very similar to the final set. Pretty much everyone agreed that the idea was very cool and totally different to what we have produced before, so we went in this direction.
Could the model potentially have had a rounded back, so it could be displayed from either side, or would that require too many pieces?
I do think the piece count could have been a problem in that situation. A half sphere or any significant curved shaping at the back would greatly inflate the number of elements, especially with the surface texture, so one of two things would need to happen. Either the model would have to be much smaller, or the level of detail inside would be lower, or maybe a combination of both.
Can you also address the concept of a sphere with removable or folding panels?
If we tried to do that, it would again require a lot more pieces, so the size would be reduced or the price increased. However, the bigger challenge would be making the panels easily removable on such a model, especially because they could not play any structural role, which would be a major problem on a large sphere.
The other issue is how people would display a panelled Death Star. You would have to choose between the enclosed or open formats and would never have the best of both, either concealing a lot of the details inside, or having to put the panels to the side somewhere to show off the interior, making those a bit of a waste. We want people to appreciate what is happening inside the Death Star and be able to see everything at all times.
On the subject of what is happening inside, how did you decide on the internal layout?
As you would expect, we started by thinking about all the rooms we wanted to include. From there, the positioning of the rooms was quite intuitive and came about naturally. You immediately know the trash compactor belongs on the lower levels and the Emperor's throne room towards the top, with the conference room and the bridge. The cell block then needs to be directly above the trash compactor, so minifigures can drop from one to the other.
Other than that, we took some creative liberties to situate different spaces as coherently as we could, so we brought together features like the tractor beam controls and chasm where Luke and Leia swing across.
I notice that the rooms are fully navigable for the minifigures too, connected via the lift, bridges and doorways, except for the hangar control room. Did you try to integrate that too?
I knew you were going to say that! That is the one area a bit isolated from the others and I did look into adding something there, but there is just not space for a lift or anything on that side of the hangar.
10188 Death Star and 75159 Death Star both had ladders to reach that room.
Yes, but I wanted to avoid anything like that because it would not be authentic to the Death Star in the movie and preserving that authenticity was a real priority with this model.
Moving into the hangar itself, I find it interesting that you have included the brick-built backdrop outside the entrance.
That actually started as an open hangar door, but I later realised that many people will display the model against the wall and it could look strange if they had colourful wallpaper or anything like that showing through. At that point, I decided to add the wall.
We discussed a few possibilities for things outside the hangar, like a foil sheet with a couple of different planets from the Star Wars universe. In the end, though, we decided on the brick-built scene with stars because it just seems more natural and we always favour anything constructed with proper bricks.
Next we have the trash compactor. Did you consider adding a removable panel to cover that room at all?
I did, once we added the blast door between the hangar and that area, creating space for the duel between Darth Vader and Obi-Wan. I created a wall panel to separate them at one point, but those parts were ultimately needed elsewhere.
Several rooms slide out of the model for access. Did you think about making them all the same size, so they could be rearranged, or even releasing a separate play set that could be added to the Death Star?
Yes to the first; no to the second. We very briefly considered the option of swapping rooms around, but quickly decided to prioritise making sure the rooms were properly proportioned, rather than the same size just for modularity. The reason some sections slide out is purely for better access to pose minifigures, although we also raised the ceiling heights to accommodate that.
For the possibility of add-on sets, we just wanted to make a complete Death Star in one go.
The bridge is perhaps a bit smaller than I would expect, given its size in the movie. Did any iteration of the Death Star have a larger space for the bridge?
Not as such, although the internal section of the superlaser was much smaller on my original model of the Death Star, which left more room for features like a larger screen. Ultimately, we decided to increase the size of the superlaser's internal mechanism because it looked a bit too small.
The bridge is quite compact, but we knew from the beginning that the hangar and throne room would need to occupy the biggest sections of the model and this area beside the superlaser is sufficient to capture the essential details on the bridge.
Were there any other rooms you wanted to include?
I cannot think of anything else, to be honest. I wanted to expand the conference room at one point, but there was not enough space. Can you think of anything else we could have added?
Not really. One advantage of including the generic corridor is that it works for multiple scenes.
Absolutely, it covers lots of different moments, especially aboard the first Death Star when the heroes are sneaking around.
The back is clearly not intended for display, but it does include a little thermal exhaust port. Was adding a microscale trench run or anything else on the exterior considered?
It was, but like the panel covering the trash compactor, it was ultimately necessary to prioritise other things. However, there was one external feature that Lucasfilm specifically asked for: the trench around the Death Star's equator. As ever, we have an ongoing discussion with Lucasfilm and they sometimes make little suggestions.
Thank you for speaking with us!
A separate interview with the graphic designer, Maddy O'Neil, will be published later today and we have lots more coverage of the Death Star to come!
Thanks to Solid Brix Studios for some of the photos in this article. David's video interview with the designers is available here. Jedi News also had an opportunity to interview the designers and that interview can be found here.
Finally, one of the most discussed and the most expensive LEGO set ever developed has been unveiled, the Ultimate Collector Series Death Star!
75419 Death Star
9.023 pieces, rated 18+
$999.99 / £899.99 / €999.99 Available at LEGO.com from 1st October
Channel the dark side of the Force for a monumental creative challenge with this LEGO Star Wars building kit.
This Ultimate Collector Series version of the Death Star from the classic Star Wars saga is the biggest LEGO Star Wars set of all (at launch) and is very displayable on a small surface due to its compact foundation.
It is packed with details and Easter eggs to delight every fan. There’s the crushing trash compactor where the Rebel heroes were trapped; Princess Leia’s holding cell; the hangar control room that Luke Skywalker and Han Solo infiltrated disguised as Stormtroopers; the tractor beam control unit that Obi-Wan Kenobi deactivated; Emperor Palpatine’s throne room; the hangar bay with the Imperial Shuttle; the Death Star’s Superlaser; and much more.
A spectacular LEGO Star Wars gift for creative adults, this collectable building set includes 38 (yes, 38!) LEGO minifigures/figures with iconic accessories to recreate memorable scenes.
There will also be a gift-with-purchase available with 75419 Death Star: 40771 TIE Fighter with Imperial Hangar Rack. The set contains a TIE Fighter roughly to scale with the Imperial Shuttle, its rack to attach inside the hangar, a transport sled and three minifigures.
What do you think of 75419 Death Star? Let us know in the comments.
We will be publishing interviews with the model and graphic designer later today, so look out for those articles, with much more information about this set.
Following the reveal of two new LEGO Ideas sets this past week, another has now been announced for production!
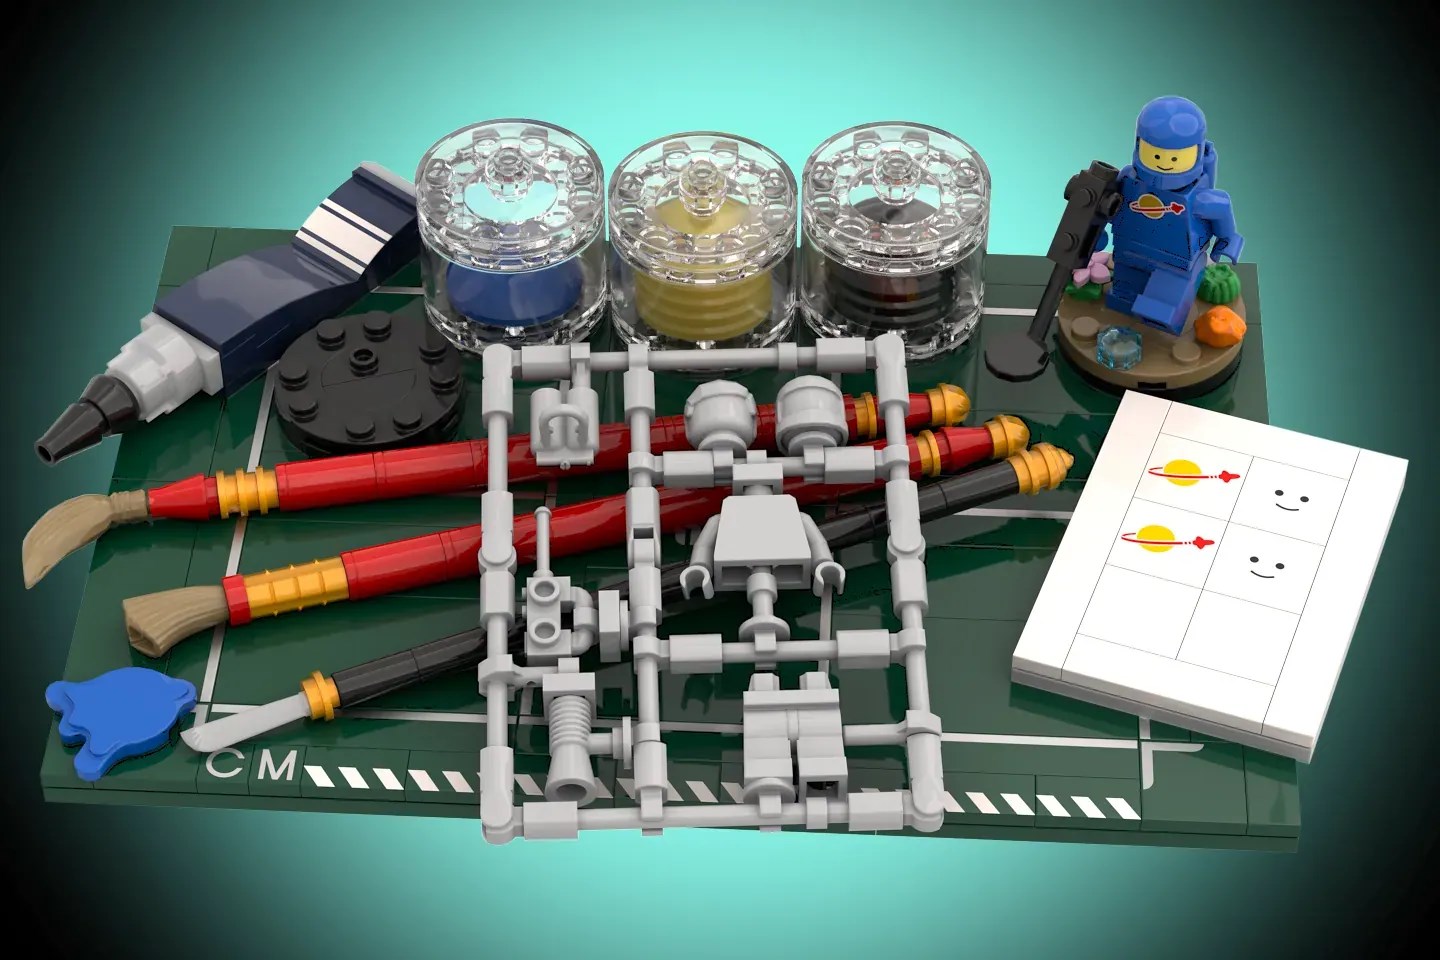
Build, Paint and Play! by Doomslizer is the grand prize winner of the Build Your Hobby challenge. Their submission will be turned into a gift-with-purchase set, presumably available sometime next year.
You can read more on the LEGO Ideas blog, and view images after the break.
What's better for a sleepover than watching a movie? That's one of the activities that was featured in 41740 Aliya's Room, when Aliya had Paisley over for a sleepover. It looks like those two are true cinephiles, as they're also the focus of 42642 Friendship Movie Night. This time the focus is just watching the movie, as there's a grander screen, more popcorn, and a light brick!
Summary
42642 Friendship Movie Night, 154 pieces. £12.99 / $14.99 / €14.99 | 8.4p/9.7c/9.7c per piece. Buy at LEGO.com »
A fun pocket money set
Unique printed tiles for the movies
Cute garden gnome
Light brick
None
The set was provided for review by LEGO. All opinions expressed are those of the author.
Inside the box there are four numbered bags, two 4x8 plates, two instruction books, and an insert explaining the light brick (which happens to be larger than the instruction books! I'm rather pleased to see a light brick in such a small set. There's also a small sticker sheet with only four stickers.
Minidolls
The two Friends in this set are Paisley and Aliya. While they're watching a movie, they're decidedly not in pajamas. They're both dressed casually in outfits we've seen several times before. There are two inserts provided for the movie projector, so it looks like the Friends will have a double feature.
The completed model
The Friends are equipped with all the accoutrements to have a fun movie day/night! Aliya has a book that covers one of the movies, and there's an enormous box of popcorn for the two to share. Most importantly, there are two very comfortable armchairs available.
So comfortable, in fact, others might want to use them too.
(Note: movie-watching sloths not included in this set.)
Just in case the Friends run out of popcorn, never fear! There's another enormous box on stand-by, as well as a popcorn machine! Because movie watching is thirsty work, there's a couple of drinks handy as well.
There's a nice little moving function in the back. Press the level, and the popcorn in the machine will "pop"!
It looks like the movie-watching is happening outside! The screen is mounted on a fence, under some wisteria branches and some neon lights. I love the touches of the watering can and especially the little garden gnome.
There are two clear panes (printed pieces) that show a frame from two movies. The first one looks to be from the same movie (or perhaps a sequel?) of the movie that the pair were watching in 41740. I rather like the continuity here, as we've seen this character featured on stickers in several sets.
Pressing the light button has the desired effect - this is showing the other tile, which looks like it pairs with the book that Aliya is holding.
Overall thoughts
This is a good pocket money or impulse set. The movie set up is fun. I love that the Friends have a popcorn machine, especially one that pops! The garden gnome is very cute, and I'm really impressed that a small set this size has a light brick!
This is a good set to add to your cart if you're looking to bump over a GWP threshold, or for a stocking stuffer.
LEGO Ideas sets are being announced at an unprecedented rate, as mere days after 21361 Gremlins: Gizmo was revealed, here is the press release for 21362 Mineral Collection!
Showcase the vibrant colours of minerals with the LEGO Ideas Mineral Collection (21362) building set for adults. A wonderful gift for rock collectors and nature lovers, this collectable set features brick-built models of 6 minerals and buildable display shelf units to create eye-catching living room decor.
Use clever building techniques and transparent LEGO bricks to create models of golden pyrite, purple amethyst, blue fluorite, watermelon tourmaline, reddish-pink rhodochrosite and tangerine quartz.
Assemble the 3 freestanding shelving units and attach your creations to the shelves. Arrange the units as you wish and swap the minerals to different shelves to change up your display.